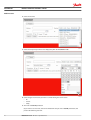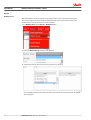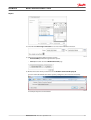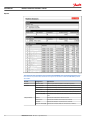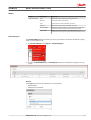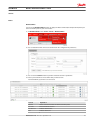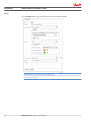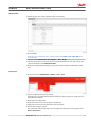
1
MAKING MODERN LIVING POSSIBLE
User Manual
Danfoss Telematics Solutions
Portal
powersolutions.danfoss.com
User Manual
Danfoss Telematics Solutions - Portal
Revision history
Table of revisions
2
Date
Changed
Rev
September 2015
Danfoss layout
0000
May 2015
Review
AC
May 2015
Review
AB
May 2015
First version
AA
BC00000344 en-US • Rev 0000 • September 2015
User Manual
Danfoss Telematics Solutions - Portal
Contents
About this manual
General
Machine status
Reports
Service
Information.........................................................................................................................................................................................5
Web portal login............................................................................................................................................................................... 6
Stated times........................................................................................................................................................................................6
Create a new user account............................................................................................................................................................6
Activate new user account............................................................................................................................................................8
User name / password.................................................................................................................................................................... 8
Forgot password...............................................................................................................................................................................8
Language selection..........................................................................................................................................................................9
Logout.................................................................................................................................................................................................. 9
Preferences.......................................................................................................................................................................................10
Machine overview..........................................................................................................................................................................12
Switch machine connection mode.................................................................................................................................... 13
Search........................................................................................................................................................................................... 13
Advanced search.......................................................................................................................................................................13
Details........................................................................................................................................................................................... 14
Machine tracking............................................................................................................................................................................14
Machine group.......................................................................................................................................................................... 16
Machine position...................................................................................................................................................................... 16
Display machine tracks...........................................................................................................................................................16
Session history................................................................................................................................................................................ 19
GSM info............................................................................................................................................................................................ 21
Vehicle data report........................................................................................................................................................................ 25
Machine group.......................................................................................................................................................................... 25
Vehicles........................................................................................................................................................................................ 25
Available vehicle data............................................................................................................................................................. 26
Selected vehicle data.............................................................................................................................................................. 26
Time period.................................................................................................................................................................................26
Machine data report – Zoom................................................................................................................................................27
Generate reports.......................................................................................................................................................................29
Realtime access...............................................................................................................................................................................30
Scheduled reports..........................................................................................................................................................................33
General......................................................................................................................................................................................... 33
Vehicles........................................................................................................................................................................................ 34
Settings.........................................................................................................................................................................................34
Cycle.............................................................................................................................................................................................. 35
Receiver........................................................................................................................................................................................36
Machine data (CSV format)................................................................................................................................................... 38
Position report................................................................................................................................................................................ 38
Data overview................................................................................................................................................................................. 39
Save and recall profile.............................................................................................................................................................41
Device.................................................................................................................................................................................................43
Download Files.......................................................................................................................................................................... 43
Upload file................................................................................................................................................................................... 44
Name of the files....................................................................................................................................................................... 45
Search, Delete............................................................................................................................................................................ 45
Special files..................................................................................................................................................................................47
Write object dictionary entry special file [.obw]............................................................................................................47
Example of [.obw]................................................................................................................................................................47
Read object dictionary entry through special file [.obr].............................................................................................48
Example of [.obr]..................................................................................................................................................................48
Response on triggered object dictionary read [.obc]..................................................................................................49
Setup the transmission data.................................................................................................................................................50
BC00000344 en-US • Rev 0000 • September 2015
3
User Manual
Danfoss Telematics Solutions - Portal
Contents
Transfer the data.......................................................................................................................................................................50
Activation form............................................................................................................................................................................... 51
Billing address............................................................................................................................................................................51
Activation data.......................................................................................................................................................................... 51
Payment data............................................................................................................................................................................. 53
Confirmation e-mail.................................................................................................................................................................54
Events
Administration
System requirements
Service and support
4
Geofence........................................................................................................................................................................................... 55
Create a Geofence.................................................................................................................................................................... 55
Vehicles........................................................................................................................................................................................ 56
Define area.................................................................................................................................................................................. 56
Notification................................................................................................................................................................................. 58
Event trigger...............................................................................................................................................................................58
Interval..........................................................................................................................................................................................59
Save geofence............................................................................................................................................................................59
Event history.................................................................................................................................................................................... 60
Signal.................................................................................................................................................................................................. 62
Create signal...............................................................................................................................................................................62
Manage signal............................................................................................................................................................................63
Event...................................................................................................................................................................................................64
Create event............................................................................................................................................................................... 64
Manage event............................................................................................................................................................................ 65
Entities................................................................................................................................................................................................67
Creating Danfoss Telematics Solutions Sub-Accounts.................................................................................................... 67
Create User Group......................................................................................................................................................................... 68
Create Machine Group................................................................................................................................................................. 69
Create Device Group.....................................................................................................................................................................69
Create Organization Unit............................................................................................................................................................ 70
Manage Machine............................................................................................................................................................................71
Create and Manage Roles........................................................................................................................................................... 72
Create the end-customers user role.................................................................................................................................. 73
Manage your runtime role..........................................................................................................................................................73
Create the end-customers admin role................................................................................................................................... 74
Create User(s)...................................................................................................................................................................................75
Test new account........................................................................................................................................................................... 76
Design................................................................................................................................................................................................ 76
Custom logo............................................................................................................................................................................... 76
Machine configuration.................................................................................................................................................................77
Operation systems.........................................................................................................................................................................79
Computer desktop.........................................................................................................................................................................79
Mobile platform .............................................................................................................................................................................79
Telematics service and support................................................................................................................................................ 80
BC00000344 en-US • Rev 0000 • September 2015
User Manual
Danfoss Telematics Solutions - Portal
About this manual
Information
This document provides important information on the intended use of Danfoss Telematics Solutions
(DTS) portal. The manual is intended for qualified technicians with advanced knowledge in programming
and software engineering. DTS supplies wide-ranging telematics systems for global access to control
system data as well as extensive web based machines and fleet management. From remote maintenance
and troubleshooting to location tracking reports through to theft protection with Geofencing, DTS offer
numerous functions for comfortable management of machines and vehicle fleets, offers extensive web
hosting and ensures smooth operation and top availability of its systems.
DTS provide a global overview of relevant machines, vehicle and driver data as well as their analysis,
supplying the ideal basis for optimization of various processes and allow to increasing the efficiency and
the productivity of different systems.
The manual frequently refers to device or module, these are synonyms for WS products.
The terms machine or vehicle are used similarly and denote a (mobile) object on which a WS product is
mounted (assigned).
BC00000344 en-US • Rev 0000 • September 2015
5
User Manual
Danfoss Telematics Solutions - Portal
General
Web portal login
Users access the Danfoss Telematics Solutions via the login area on the DPS website telematics section or
the DTS portal login site (URL: https://danfoss.proemion.com/).
After the login the user information are showed in the lower part of the display.
Stated times
All times on the portal are stated according to the time zone configured by the user.
Create a new user account
If you are a new DTS user, in order to set you up for using the automatic activation of WS devices, we
need to create an account, create a customized web portal and link it to the DTS system.
If the DPS portal is not available for service/update/ technical reasons, the same registration form is
available in DPS website, telematics section: Request telematics web portal account
1. Click on Create a new user account link located in the login page.
The following pop up window appear:
6
BC00000344 en-US • Rev 0000 • September 2015
User Manual
Danfoss Telematics Solutions - Portal
General
2. Fill in the form:
Username:
user name for the login of the Administrator of the portal
Password:
password for the login of the Administrator of the portal
First name*:
first name of the Administrator of the portal
Last name*:
last name of the Administrator of the portal
E-mail*:
email of the Administrator of the portal
Company*:
company name
Street*:
street where is addressed the company
ZIP Code*:
company ZIP code
City*:
City where is located the company
Country*:
Country where is located the company
TAX ID*:
Tax Identification Numbers assigned by the government
• VAT: Value Added Tax (EU)
• FEIN: Federal Employer Identification Number (US)
• BN: Business Number (Canada)
* This data will be used to invoice the hosting cost of data plan assigned to WS devices during the
activation on the DTS portal.
3. Push the button Register to send the request.
A confirmation message on top of the portal login page appear:
BC00000344 en-US • Rev 0000 • September 2015
7
User Manual
Danfoss Telematics Solutions - Portal
General
After maximum 48h you will receive and e-mail that include administrator login credentials and all
the basic resources created in your customized portal.
Activate new user account
A confirmation e-mail will be sent to confirm the identity of the user that requested the new account:
1. Click in the link included in the email to confirm the identity
2. If the link work correctly the login page is shown next
3. There is a special hint that the confirmation was accepted
4. Use username and password as typed in the signup form to login
5. After the first login we strongly recommend to change your password (section Extras > Preferences)
To activate a new WS unit see Activation form on page 51.
User name / password
Enter your user name and password to log in to the DTS portal.
The administrator login credentials will be sent by email after the registration process.
Forgot password
If you have forgotten your password, click on Forgot password? link
8
BC00000344 en-US • Rev 0000 • September 2015
User Manual
Danfoss Telematics Solutions - Portal
General
Enter your user name and click on Request password push button. You will receive an e-mail that
includes an activation code to your DTS user email address.
Language selection
The user can choose between English (default language) and German as specific user language for the
DTS portal.
1. Click on the button shown (arrow) to modify the display language.
The available languages will be shown in the drop-down menu.
2. Select the language, that will be used and displayed.
Logout
The logout symbol is shown on the right side of the web page. Always use this logout button to quit the
portal.
This function protects the security of your account.
BC00000344 en-US • Rev 0000 • September 2015
9
User Manual
Danfoss Telematics Solutions - Portal
General
To protect the security of your account, your session expires and you are automatically logged out if you
are inactive for 30 minutes the following message will be shown in a pop up window when the user
request a general functionality from the portal (it’s necessary to login again):
Preferences
The user can configure the preferred setting for his account. This makes it possible to configure the
display to your local conditions.
1. To access Preferences, Click on: Extras > Preferences
10
BC00000344 en-US • Rev 0000 • September 2015
User Manual
Danfoss Telematics Solutions - Portal
General
Designation
Explanation
Language
Select your preferred language
Time zone
Select your time zone
Conversion
Select the units you need for your vehicle data
Number Format
Select the setting for the number formats you need. Find out on your PC settings as
follows: System control > Region and language > Further Setting
Hide control devices
without data
Hide devices without data. For the standard DTS this application has no function
Hide unknown or
invalid data
Hide unknown or invalid data. For the standard DTS this application has no function
Summarize Files
The machine data report shows the summary of the data
Change Password
You can change the password for your account
Tracking
This option allows you to configure the position tracking attributes
2. Click on
• Save to adopt the changes
•
Cancel to reject the changes
BC00000344 en-US • Rev 0000 • September 2015
11
User Manual
Danfoss Telematics Solutions - Portal
Machine status
Machine overview
After the login, the user will see a table with an overview of the devices allocated to him in the DTS portal.
For Machines, click on:
• Status > Machine Overview
The Machine overview section gives you an overview of the status and general information of your
machines/vehicles.
Designation
Explanation
Status
Status indicates the current DTS connection status of the machine:
Offline
Online logging/file transfer mode
Online realtime mode
Online realtime diagnostic session active
12
Model
The model field can displays for instance details of the vehicle model. The administrator can
customize these details (see Manage Machine on page 71)
Serial
The serial field can contain details of the device. The administrator can customize these details
(see Manage Machine on page 71)
Example: SN / IMEI à 1451005 / 352648067099200
Name
The name field can displays for instance details of the company name. The administrator can
customize these details (see Manage Machine on page 71)
Owner
The Owner field can displays for instance details of the vehicle name. The administrator can
customize these details (see Manage Machine on page 71)
Login/Logout
This field indicates the last time the device connected to the DTS server or disconnected from it
Details
This field, when it is active, indicates that a DTS portal configuration is assigned to the machine in
order to show details about logged data
BC00000344 en-US • Rev 0000 • September 2015
User Manual
Danfoss Telematics Solutions - Portal
Machine status
Switch machine connection mode
In the machine overview, you have the option of switching the device mode on your machine between
real time and data logging mode.
Click on the status squares of the relevant machine, a sub-window appear and opens:
If the module is in Real Time Mode (blue squares), you have the option of changing to File Transfer
(Data Logging mode), vice versa if the module is in File Transfer mode (green squares), you have the
option of changing to Realtime Diagnosis (Real Time Mode).
In both case you have to confirm to change the mode and the following message confirm that the
request was successfully processed.
Search
To find the desired machine quickly you can use the Search box and type on the details of the machine
you are looking at, click on refresh box to update the information showed on display:
Advanced search
To find the machine more flexibly you can use the Advanced Search, just click on the arrow symbol
next to the search field that opens another bar which enables an individual search for the required
machine: the entries are automatically executed.
BC00000344 en-US • Rev 0000 • September 2015
13
User Manual
Danfoss Telematics Solutions - Portal
Machine status
Details
Use the spreadsheet symbol located in the details field of the desired machine to open an overview
which lists the data logged by the device.
The symbol could be active or not active depending if the machine is assigned to a specific Machine
Configuration available on DTS portal.
The time field shows the time at which the device logged the data set.
The machine information must be available on the vehicle CAN bus Network. The device can be
configured in order to logs your desired machine's CAN messages in files called with extension ‘.clf’.
After a certain length of time or a logged data volume of 1 kB, the clf file is closed, then sent to DTS
portal. There, the file is interpreted according to a rule determined by the Machine Configuration
assigned to the vehicle on the DTS portal.
The derived values are then made available on the DTS portal. For more information on how to set up the
machine configuration data on your DTS portal, please contact DTS Team, your reference EC SDM or
download the document ‘Data logging’ from DPS website.
To display the data of a different machine, click on Machines on the corresponding spreadsheet active
icon.
The header of the right table indicate the name of the machine you are looking at. A various tabs could
be available to show the various values of selected machine.
To return to the Machine overview visualization just click on the Maximize machine overview symbol.
Machine tracking
Through DTS portal you can know where the machines in your fleet are.
Machine tracking gives you an overview of the last positions sent by machine on DTS portal.
14
BC00000344 en-US • Rev 0000 • September 2015
User Manual
Danfoss Telematics Solutions - Portal
Machine status
To Machine Tracking select:Status > Machine Tracking
Your machines are then showed on an interactive map. The map is based on GoogleMaps®.
To the left of the maps there is
A zoom toolbar (you can also use the mouse): the closer you zoom into the map, the more
detailed you can see the position of your machines.
• The GoogleStreetView® tools.
• The pan tool to move (up, down, left and right) around the map.
•
The map visualization could be customized based on the following selection:
Map: Map visualization and to enable/disable the terrain details with the street map.
•
•
Satellite: Satellite visualization and to enable/disable the streets with names.
BC00000344 en-US • Rev 0000 • September 2015
15
User Manual
Danfoss Telematics Solutions - Portal
Machine status
Machine group
Depending by the zoom level set by the user, the machines located in the same geographical area are
automatically showed in group of machines.
The group of machine icon it’s:
•
The number inside the machine group icon shows you how many machines are there.
Machine position
You can also see the position of an individual vehicle.
1. To do this; go to search and filter the machine you want to find or
2. click to a machine group or
3. zoom in and select the individual machine on the map.
The individual machine/device icon on the map is the following:
If the icon is green, the machine/device is online
If the icon is gray, the machine/device is offline.
Display machine tracks
The machine tracking system can also display the route a vehicle as taken. Apart from the GPS data, the
entire machine shown in the machine overview can also be showed along the route travelled.
In the following example, the machine speed has been selected.
16
BC00000344 en-US • Rev 0000 • September 2015
User Manual
Danfoss Telematics Solutions - Portal
Machine status
1. Select the machine on the map to open a new overview window.
General: Provide for the selected machine the general information also available in the Machine
Overview and in addition the last place information stored by the machine on DTS portal
and the current status of the machine (is offline or is online).
Track:
You can enter the time period (range between 1 and 7 days) you wish to see by selecting
the corresponding dates:
2. Use the Machine Data drop-down menu to select the required data.
In this example, the speed is shown.
BC00000344 en-US • Rev 0000 • September 2015
17
User Manual
Danfoss Telematics Solutions - Portal
Machine status
In the color field, you can set a limit value (70 km/h in the example). For instance, if the vehicle has the
speed exceeded the limit value on part of the route shown, this section is marked in red on the map,
otherwise is green.
3. Click the Apply push button.
The route travelled is shown on the interactive map with point that indicate also the direction of the
machine:
18
BC00000344 en-US • Rev 0000 • September 2015
User Manual
Danfoss Telematics Solutions - Portal
Machine status
If you hold the cursor over a point on the route, a Waypoints box displays
Location detail
Date and time
Diagnosis Data (Speed data)
Altitude
•
•
•
•
for each GPS dataset, depending on the machine configuration. Use the same procedure to see all the
other machine data logged by the device on the route display. The historical data stored on DTS
portal will be available for 3 month durations starting from the date when it has been stored on it.
Session history
Session History show you the login and logout times of the individual machines.
1. To see Session History select: Status > Session History
BC00000344 en-US • Rev 0000 • September 2015
19
User Manual
Danfoss Telematics Solutions - Portal
Machine status
2. Select the machine:
3. Select the time period you want to be displayed by fill in the fields from and to:
4. Select the type of connection you want to consider during the search session.
• All
•
•
Correct
Faulty
5. Then click on Search push button
(if you want to see all records, leave all the fields blank and just click on Search push button, this
produce the following overview:
20
BC00000344 en-US • Rev 0000 • September 2015
User Manual
Danfoss Telematics Solutions - Portal
Machine status
This shows you when and how long the device was online.
This can help determine the cause of the fault: frequent connection failures indicate poor reception
conditions (e.g. defective or badly positioned antennas, poor connectivity).
No fault found
Fault found
6. Click on Cancel if you want to back to Machine Overview.
GSM info
GSM Info gives you a detailed overview of signal quality, position, SIM card used, and network operator of
your device at the time of connection to the mobile network.
When the machine is off-line this section continue to show the latest information available when the
machine was online. For GSM information select:
• Status > GSM info
Select the machine from the list of machines available:
BC00000344 en-US • Rev 0000 • September 2015
21
User Manual
Danfoss Telematics Solutions - Portal
Machine status
You will see this overview of the status of your device:
22
BC00000344 en-US • Rev 0000 • September 2015
User Manual
Danfoss Telematics Solutions - Portal
Machine status
This data was logged at the time of connection to the GSM/UMTS mobile network.
General
Explanation
Name
Displays the name of the machine whose GSM information you are accessing.
Version
Shows the name of the GSM device.
Hardware Version
Shows the hardware version of the device.
Software Version
Shows the firmware version currently installed in the device.
BC00000344 en-US • Rev 0000 • September 2015
23
User Manual
Danfoss Telematics Solutions - Portal
Machine status
24
General
Explanation
DOD version
Shows the DOD version currently installed in the device.
DOD Accept time
Shows the data and time when the current DOD was downloaded in the device.
Telephone Number
Telephone number of the SIM card used (if available).
GSM Information
Explanation
Operator
Indicates the operator used for the connection to GSM/UMTS network
SIM Card Number
Number of the SIM card used. You can also find this on the SIM card.
Status
Connection status information (currently not available).
Signal Quality
Shows the GSM/UMTS signal quality at the time of login to the DTS portal.
Mapping Information
Explanation
Mapping Information
Shows the last known position with date.
…
…
BC00000344 en-US • Rev 0000 • September 2015
User Manual
Danfoss Telematics Solutions - Portal
Reports
Under Reports you can access or generate various reports and convert them in various forms to other
formats. This means you can flexibly monitor the status of your machine at any time and also log this
information permanently.
Vehicle data report
DTS offers the option of having data logged from vehicles/machines to the DTS portal displayed in
graphic form and subsequently formatted in different formats.
This gives you the means to compare machine data and increase efficiency and productivity.
This simplifies the delay report activity that normally is executed manually by the user of the machine
every time the machine it’s used.
For Machine Data report select: Reports > Vehicle Data Report
Machine group
Optional: Select the vehicle group you wish to see:
Vehicles
The Vehicles field lists all the vehicles you manage in your account or that are part of the selected
Machine Group. You can use the filter box to speed up the search of it.
BC00000344 en-US • Rev 0000 • September 2015
25
User Manual
Danfoss Telematics Solutions - Portal
Reports
Double-click on the corresponding vehicle in the list, to create a report for a particular vehicle.
Available vehicle data
After you have selected a vehicle, this field shows all the data logged on this vehicle available on the DTS
portal. Now you can select which data you want to evaluate, you can use the filter box to speed up the
search of specific signal, to do this, either double-click on the corresponding signal, or single-click
followed by arrow to the right (by using the mouse you can also drag and drop the signal from available
to selected) :
Selected vehicle data
The vehicle data you have selected is displayed in the Selected vehicle data list. You can select up to 5
datasets simultaneously. If required, you can also delete data from the list by using the arrow to the left
(by using the mouse you can also drag n drop the signal from selected to available).
Subsequently, all the vehicle data in this list is shown in the report.
Time period
You can select a time period of up to one month, giving you the flexibility to choose the period the report
relates to.
26
BC00000344 en-US • Rev 0000 • September 2015
User Manual
Danfoss Telematics Solutions - Portal
Reports
1. Enter the date and time you require:
2. Click on Create report push button to display the vehicle data selected graphically in an overview:
3. Check or uncheck the boxes above the diagram to see individual values.
As default, all the data you selected are enabled.
Machine data report – Zoom
1. Click on the graphic to see an area in more detail.
Hold the left mouse button down and drag over the required display area.
You can use this function several times.
BC00000344 en-US • Rev 0000 • September 2015
27
User Manual
Danfoss Telematics Solutions - Portal
Reports
2. Click on Show all inside the graphical area to return to the normal view.
28
BC00000344 en-US • Rev 0000 • September 2015
User Manual
Danfoss Telematics Solutions - Portal
Reports
3. Click on Create Report to return to the report settings area.
Generate reports
You can now generate the report you have created in a PDF, XLS, or CSV file and save it locally.
1. To generate a report, check the boxes to select the data you want to be included in the report.
2. Click on the relevant symbol to select the format of the generated report.
The report is provided as a PDF file. To open the file, you need a PDF reader. The report
include the data in graphical and tabular form.
The report is provided as an XLS file. To open the file, you need either Microsoft Excel or Open
Office Calc.
The report is provided as a CSV file.
Use the menu Extras > Preferences > Number Format settings to determine what list separators are
shown in the CSV report:
BC00000344 en-US • Rev 0000 • September 2015
29
User Manual
Danfoss Telematics Solutions - Portal
Reports
Realtime access
With the Realtime connection mode you can gain direct online access to the machine by using the
Service Tool program. The major advantage of Realtime mode is that you do not have to be at the
machine location and you do not need a cable connection.
1. For Realtime Access select: Reports > Realtime Access
2. Select the Machine Group you wish to see (optional):
3. Select the machine or machines you want to generate an overview of.
You can flexibly set the period of time to be shown. If you do not select any time period, all available
data is displayed.
30
BC00000344 en-US • Rev 0000 • September 2015
User Manual
Danfoss Telematics Solutions - Portal
Reports
4. Check the box Show single connections to see a list of each individual connection.
5. After you have made the settings you want, click on
• Generate PDF push button to generate the report or
•
Cancel push button to back to Machine Overview page.
6. Browse the location where you desire to save the Realtime-Connection-Report.pdf
(you can rename the default name of the report by adding date, time and name of machine).
An example of report it’s showed below:
BC00000344 en-US • Rev 0000 • September 2015
31
User Manual
Danfoss Telematics Solutions - Portal
Reports
The amount of data can help the user to monitor the GSM/UMTS data consumption during the real
time connection, but the values showed in the report not match the volume of GSM/UMTS provider
data traffic.
Header
Designation
Explanation
General
Period of Time
The time period of the realtime connections reported.
Overview
Device Amount
Indicates how many devices are shown in the connection record.
User Amount
Indicates how many users have created a connection to the device.
Connections
Indicates the number of connections in the defined period of time.
Duration (hh:mm)
Indicates the total duration of connections in this period of time.
Data transfer (MB)
Indicates the total data amount of the connections in this period of
time.
Vehicle
Indicates the name of the vehicle accessed.
Connections
Indicates the number of connections to a vehicle.
Duration
Indicates the duration of connections to a vehicle.
Sum per Device
Amount of Data (KB) Indicates the amount of data of connections to a vehicle.
32
BC00000344 en-US • Rev 0000 • September 2015
User Manual
Danfoss Telematics Solutions - Portal
Reports
Header
Designation
Explanation
Single connections
User
Indicates the name of the user accessing the device.
Machine
Indicates the name of the vehicle.
Start
Indicates the time of the individual connection.
Duration
Indicates the duration of the individual connection.
Download (KB)
Indicates the amount of data sent to the device. This can deviate
from the value given by the telecommunications provider!
Upload (KB)
Indicates the amount of data received by the device. This can
deviate from the value given by the telecommunications provider!
Scheduled reports
The Scheduled Reports function enables you to have your machine's current data transferred to you by
email at a certain point in time.
1. For Scheduled Reports select: Reports > Scheduled Reports
2. To create a Scheduled Reports, press New Report push button and follow the setting process step
by step:
General
In the Type field, use the drop-down menu to choose between:
Position Report
Machine data (CSV format).
•
•
BC00000344 en-US • Rev 0000 • September 2015
33
User Manual
Danfoss Telematics Solutions - Portal
Reports
The Name* field is a mandatory field. It is quoted in the subject line of the email in which you receive the
information about your machine.
The Active box, if checked, indicate that the Scheduled report will be active at the end of the creation
process.
Continue click on Next push button; click on Cancel push button to exit the Scheduled Report wizard
process.
Vehicles
Under Vehicles, you will find a list of the available machines.
Select the Machine Groups you wish to see (optional):
Double-click on a vehicle to transfer it to the Selected list. You can select several vehicles. You can use
the filter box to speed up the machine selection:
Continue click on Next push button; click on Cancel push button to exit the Scheduled Report wizard
process; click on Back push button to back to General section settings.
Settings
The Settings tab is not shown in the Position Report type. Select Machine Data (CSV Format) to see
the settings.
34
BC00000344 en-US • Rev 0000 • September 2015
User Manual
Danfoss Telematics Solutions - Portal
Reports
Select the repetition period in between the following settings:
•
•
•
•
•
•
Last 24 hours (Selects the data from the last 24 hours from the time of generation of the report).
Last 7 days (Selects the data from the last 7 days from the time of generation of the report).
Last 30 days (Selects the data from the last 30 days from the time of generation of the report).
Previous day (Selects the data from the previous day (00:00 hrs. – 23:59 hrs.)).
Previous week (Selects the data from the previous week (for instance Monday - Sunday)).
Previous month (Selects the data from the previous month (for instance 01 January – 31 January)).
Continue click on Next push button; click on Cancel push button to exit the Scheduled Report wizard
process; click on Back push button to back to Vehicle section settings.
Cycle
The Cycle function gives you the option of setting the time for sending the email. You have a choice
between:
• Daily (you can decide on which days you want to be informed by checking the relevant days).
• Weekly (you receive a report weekly. You can freely decide on which day you want to receive the
report).
• Monthly (you receive a scheduled report by email on the first of each month).
BC00000344 en-US • Rev 0000 • September 2015
35
User Manual
Danfoss Telematics Solutions - Portal
Reports
You can decide on which days you want to be informed by checking the relevant day:
You can select the initial date of execution of the Scheduled Report. Continue click on Next push button;
click on Cancel push button to exit the Scheduled Report wizard process; click on Back push button to
back to Vehicles section settings.
Receiver
The Receiver function gives you the option of having the report automatically sent to one or several
receivers. You can create several receivers.
Write the name of the receiver and his e-mail address, then click on Add push button to add the receiver
information in the list.
36
BC00000344 en-US • Rev 0000 • September 2015
User Manual
Danfoss Telematics Solutions - Portal
Reports
If you press Add with empty field you will see the warning message:
If the e-mail introduced it is not a valid e-mail address the following warning message will appear:
Click on Save to adopt the data; click on Cancel push button to exit the Scheduled Report wizard
process; click on Back push button to back to Cycle section settings.
If the save action is successfully a fdbk message will be showed.
Next you will receive an overview of the already generated reports.
If Active box is checked this indicated that the associated Scheduled report is active.
Click on the Execute symbol and the report will immediately be received by the specified email
address.
Click on the Edit symbol to make changes to your report.
Click on the Delete symbol to delete the report in the corresponding line.
BC00000344 en-US • Rev 0000 • September 2015
37
User Manual
Danfoss Telematics Solutions - Portal
Reports
If you desire to delete a specific Scheduled report the following pop up window appear in order to
confirm the action:
Machine data (CSV format)
The procedure for generating a machine data report in CSV format is exactly the same as that for a
position report. The only difference is that the Settings tab is now additionally visible. There you can set
the report period for which you want to receive the machine data depiction.
After you have saved the machine data report, you will receive an email with a zip file at the specified
times.
It contains the CSV file. This lists all the machine data for the specified period with their physical values.
Position report
Using the Position Report, you can generate a report that list the last-known GPS positions of your
machine. That means you are always up to date and can find out the location of your vehicles always and
at any time.
1. For Position Reports select: Reports > Position Reports
2. Select the Machine Groups you wish to see (optional):
3. Select the vehicle whose position you want to know.
38
BC00000344 en-US • Rev 0000 • September 2015
User Manual
Danfoss Telematics Solutions - Portal
Reports
4. Then click on Generate Report push button to generate a report in PDF format.
5. Browse the location where you desire to save the PositionReport.pdf
(you can rename the default name of the report by adding date, time and name of machine).
An example of report it’s showed below:
Data overview
The ‘Data Overview’ gives you the option of displaying several vehicles or machines in a table, so you can
see and compare them at a glance. You can freely decide which data you want to display in a table.
You can also export this overview in a different format (XLS, CSV).
BC00000344 en-US • Rev 0000 • September 2015
39
User Manual
Danfoss Telematics Solutions - Portal
Reports
1. For Data Overview select: Reports > Data Overview
2. To create a new table, click on Create Data Overview without profile push button, this opens the
following overview:
3. Create a data overview using the following steps.
a) Check the box adjacent to the required machine
b) Continue click on Next push button; click on Cancel push button to exit the Data Overview
wizard process.
40
BC00000344 en-US • Rev 0000 • September 2015
User Manual
Danfoss Telematics Solutions - Portal
Reports
c) Select the vehicle data you want to be displayed and compared.
d) Continue click on Next push button; click on Cancel push button to exit the Data Overview
wizard process.
You will then see the overview in tabular form containing the selected vehicle data.
Move your cursor over a dataset to see a timestamp showing the time of the recording.
Save and recall profile
To save the profile,
1. Enter a profile name (for example H1AC_Test)
2. Click on Save profile.
Next time you use the Data Overview function, you will see this profile and can access the logged
vehicle/machine data directly by clicking on Execute.
It’s possible to transfer the data overview in a different format:
BC00000344 en-US • Rev 0000 • September 2015
41
User Manual
Danfoss Telematics Solutions - Portal
Reports
Generates the data overview as an XLS file
Generates the data overview as a CSV file
42
BC00000344 en-US • Rev 0000 • September 2015
User Manual
Danfoss Telematics Solutions - Portal
Service
Device
Download Files
You can use the Download Files function to display the files transferred (for example CLF file) from your
device to the DTS portal on your user interface.
1. For Download Files select: Service > Device > Download Files
2. You can determine when a file is to be transferred in the configuration of your device.
3. You can use the Search function to perform a detailed search for a specific file.
4. Select a period of time to choose which data you want to view.
Leave fields blank, if you want to see all records.
General
Explanation
Machine
Name of the machine which sent the files to the DTS portal.
File name
File name without extension.
File extension
Indicates the file format.
Size
Indicates the file size.
BC00000344 en-US • Rev 0000 • September 2015
43
User Manual
Danfoss Telematics Solutions - Portal
Service
General
Explanation
Status
Indicates whether the file was successfully transferred or the transfer was aborted.
Transferred
Indicates the time of the transfer.
Changed
Indicates when the file was last changed.
File Successful transferred
File transfer aborted
Use the diskette symbol ‘Download’ to download the corresponding file and save it locally to
your PC. Subsequently, the file is locally available.
Use the recycle bin symbol ‘Delete’ to delete the corresponding file. The file is then deleted
from the server and is no longer available.
Use the document symbol ‘Display’ to see the file contents. This symbol opens a new window
in your browser with the contents. However, the symbol only appears when the file extension
is "clf".
Use the diskette symbol ‘Download all’ to download all files found (max. 1,200 files) at once.
The files are collected in a zip file and saved locally to your PC.
Use the CSV symbol ‘Convert CLF to CSV’ to download all your data (max. 400 files) in your
overview, convert it to csv format and save it locally to your PC. This function is only available
when machine data is displayed on the portal. Delete all
Use the recycle bin symbol ‘Delete all’ to delete all the data in the overview from the server.
This data is then no longer available.
Upload file
Using the Upload File function, you can send any file on your PC to a certain machine at any time. This
file will then be made available by the machine device via CANopen.
1. For Upload File select: Service > Device > Upload Files > Upload File
44
BC00000344 en-US • Rev 0000 • September 2015
User Manual
Danfoss Telematics Solutions - Portal
Service
2. In the machine's drop-down menu, you can choose which vehicle will receive the file you want to
send.
3. Then, select the file by clicking on Search.
4. After you have selected the file, you can upload it to the DTS server using Upload.
The file is then sent to the device. If the device is currently unable to receive files, the file is stored
temporarily until the device collects it.
5. Click on Cancel to back to Machine Overview.
Name of the files
To be capable of uploading, the file name must meet the following criteria:
• The file names have to be 8 characters long.
• The extension has to consist of 3 characters.
• Valid characters: 'A' ... 'Z', 'a' ... 'z', '0' ... '9'
Files with invalid names will be rejected by the device. The files must be deleted from the DTS portal,
otherwise the file transfer is blocked for both directions (upload and download).
W
Warning
If a file is rejected by the devices, there is no indication on the device side. Hence invalid: file names have
to be avoided!
Solution if the file transfer is stuck: Delete the file(s) with the erroneous file name(s) in the DTS portal!
Search, Delete
The Search, Delete function provides an overview of the files that have been sent to the device. You can
use this function to see when a file was transmitted.
1. For Search, Delete select: Service > Device > Upload Files > Search, Delete
BC00000344 en-US • Rev 0000 • September 2015
45
User Manual
Danfoss Telematics Solutions - Portal
Service
2. In the Search menu, you can select either a particular file or a particular time period.
3. Click on Search push button to display the result based on the criteria you selected;
4. Click on Cancel push button to back to machine Overview.
You then have the option of deleting individual or all files from the DTS portal.
File was Successful transferred to the device
Use the diskette symbol ‘Download’ to download the corresponding file and save it locally to
your PC. Subsequently, the file is locally available.
Use the recycle bin symbol ‘Delete’ to delete the corresponding file. The file is then deleted
from the server and is no longer available.
File has not yet been transfer
Use the diskette symbol ‘Download all’ to download all files found (max. 1,200 files) at once.
The files are collected in a zip file and saved locally to your PC.
Use the recycle bin symbol ‘Delete all’ to delete all the data in the overview from the server.
This data is then no longer available.
46
BC00000344 en-US • Rev 0000 • September 2015
User Manual
Danfoss Telematics Solutions - Portal
Service
Special files
It is possible to interact with the WS403 via special files sent through the DTS portal to the telematics
units. Below a description of the currently supported function special files.
Write object dictionary entry special file [.obw]
File contents:
• Line starts with colon ':'
• Object dictionary index (e.g. 0x5353)
• Comma ','
• Object dictionary sub-index (e.g. 0x00)
• Comma ','
• Value to be written.
• All numeric values (signed-/unsigned-integer 8...32 bit, float 32 bit) can be written using this
technique. Format for floating point numbers: "123.45". One can use hexadecimal or decimal
notation.
• Semicolon ';'
• Comment
• Line end <CR><LF>
• Several lines can be combined in one file. Lines can be commented using a semicolon ';' at the
beginning.
Example of [.obw]
1. To upload the file on the selected device go to: Service > Device > Upload Files > Upload Files
2. Select the Machine.
3. Browse and select the .obw files.
4. Upload the files on the selected machine.
5. To verify if the files is correctly Uploaded on the selected device go to: Service > Device > Upload
Files > Search, Delete
BC00000344 en-US • Rev 0000 • September 2015
47
User Manual
Danfoss Telematics Solutions - Portal
Service
6. Check in the list if the files selected have a Status with the green icon.
Read object dictionary entry through special file [.obr]
File contents:
• Line starts with colon ':'
• Object dictionary index (e.g. 0x3333)
• Comma ','
• Object dictionary sub-index (e.g. 0x38)
• Semicolon ';'
• Comment
• Line end <CR><LF>
• Several lines can be combined in one file. Lines can be commented using a semicolon ';' at the
beginning.
Example of [.obr]
1. To upload the file on the selected device go to: Service > Device > Upload Files > Upload Files
2. Select the Machine.
3. Browse and select the .obr files.
4. Upload the files on the selected machine.
48
BC00000344 en-US • Rev 0000 • September 2015
User Manual
Danfoss Telematics Solutions - Portal
Service
5. To verify if the files is correctly Uploaded on the selected device go to: Service > Device > Upload
Files > Search, Delete
6. Check in the list if the files selected have a Status with the green icon.
Response on triggered object dictionary read [.obc]
File contents [Read-only]:
• Line starts with colon ':'
• Object dictionary index (e.g. 0x3333)
• Comma ','
• Object dictionary sub-index (e.g. 0x38)
• Comma ','
• Read value in decimal notation.
• Comma ','
• Unix time stamp of time of reading (UTC)
• Semicolon ';'
• Line end <CR><LF>
• If the file is not deleted from the server. A subsequent read command adds a new line to the file. The
time stamp can be used to differentiate between the various read actions.
The files are located in:
Service > Device > Download File
•
Select the ‘obc’ file, click on the save icon, save the file and open it with an editor (i.e. Notepad++):
BC00000344 en-US • Rev 0000 • September 2015
49
User Manual
Danfoss Telematics Solutions - Portal
Service
Setup the transmission data
This configuration must be stored inside the Unit.
On the portal it is only necessary to download a text file to the unit. This file must have the
extension .obw; the name of the file should be 8 digit without spaces or special characters.
The structure of the file must be aligned to the variable we created inside the unit configuration.
The obw structure is: colon-→ variable type → variable no. → value → comment
Transfer the data
This file can be transferred via the portal to the remote unit.
1. Select the Upload file Tab.
2. Then select the unit (1), the file (2) and start upload (3).
50
BC00000344 en-US • Rev 0000 • September 2015
User Manual
Danfoss Telematics Solutions - Portal
Service
Now the data described inside the .obw file will transmitted to the selected remote unit and provided
on the CAN bus.
Activation form
All WS unit must be activated on DTS portal in order to be used. The activation of the unit is made by the
portal administrator accessing the Activation form.
To Activation form select: Service > Activation form
Billing address
The Billing Address information module is already prefilled with the information you provided during the
registration of the portal administrator.
Activation data
Fill in the Activation Data section:
Purchase number: Enter your own reference number which is printed on the contract confirmation
and the invoice later.
Hosting:
Choose the data plan you want to assign to the machine
Data Plan Low include only Real-time mode.
Data Plan High include Real-time and Data Logging/File Transfer modes.
For more information about Operating modes see TI document L1426375.
Click on ? to see more details about the selected data plan.
BC00000344 en-US • Rev 0000 • September 2015
51
User Manual
Danfoss Telematics Solutions - Portal
Service
Please read all the Data Plan details before to continue.
Serial No:
WS serial number
IMEI:
WS IMEI number
Both Serial No and IMEI are indicated in the device label as showed below:
Click the Add push button to confirm the SN and IMEI, it is possible to activate more than a single device
at the same time by adding more device, a list of device is created:
Invalid IMEI, wrong IMEI or unit already activated generate a warning message, i.e.:
52
BC00000344 en-US • Rev 0000 • September 2015
User Manual
Danfoss Telematics Solutions - Portal
Service
Payment data
Choose the payment method between:
Invoice
Credit Card
•
•
The invoice will be sent via email.
Click Clear push button if you want to remove all Activation Data. Click on Next push button to go in the
‘confirmation’ phase.
A contract overview will be showed with details about data plan selected and unit/units that will be
activated.
Click Back push button if the information displayed are not correct or you want to activate more devices.
Click Send push button to confirm the activation.
BC00000344 en-US • Rev 0000 • September 2015
53
User Manual
Danfoss Telematics Solutions - Portal
Service
The Create Machine function is not required because newly activated devices are automatically assigned
to your portal with the device and machine after activation with the Activation form. You can then
configure them to your requirements with the ‘Manage Machine’ function (see Administrator section).
Confirmation e-mail
After the confirmation, in few minutes, you will receive an email that indicate that the activation process
was successfully completed and an attachment include the Data Plan, device activated, payment method
details.
An example is showed below:
54
BC00000344 en-US • Rev 0000 • September 2015
User Manual
Danfoss Telematics Solutions - Portal
Events
Geofence
Geofence enables you to create a kind of fence. If your vehicle leaves an area defined by you, you
automatically receive a notification (email or text message). The Geofence functions using GPS. You can
use this feature e.g. for construction machinery so that you know immediately if machines are stolen or
for agriculture machinery if the machine is working in a selected geographical area or his moved to the
next.
For ‘Geofence’ select:
Events > Events > Geofence
•
Create a Geofence
1. To create a new Geofence, click on Create push button at the bottom right of the window.
This opens the following window:
BC00000344 en-US • Rev 0000 • September 2015
55
User Manual
Danfoss Telematics Solutions - Portal
Events
2. Select a location directly using Find Place box.
3. Check the Active box if you want to activate the Geofence when it is created.
Vehicles
Select the vehicle/machine you want to add and check it (double-click on the vehicle selected to see the
last valid position directly on the map).
Define area
1. You can create manually the Geofence by using the polygon (no limit in the number of vertex), circle
or rectangle tool, everywhere outside the geographical area indicated in blue is outside the
Geofence; you can use the cursor tool to move, mark or edit the geofence.
56
BC00000344 en-US • Rev 0000 • September 2015
User Manual
Danfoss Telematics Solutions - Portal
Events
You can add more Geofences as you desire.
2. Click the Geofence on the map to select it, now you can move or edit it:
3. When the Geofence is selected the delete icons became active, you can delete the selected Geofence
by pressing the x or all Geofence by pressing Remove all geofences command:
BC00000344 en-US • Rev 0000 • September 2015
57
User Manual
Danfoss Telematics Solutions - Portal
Events
Symbol
Term
Explanation
Cursor tool
With the cursor tool, you can move the individual marking points on
the map.
Polygon tool
You can use the polygon tool to flexibly distribute your points over
the map.
Circle tool
With the circle tool, you can create a circular
Geofence.
Rectangle tool With the rectangle tool, you can create a rectangular
Geofence.
Delete selection
With the ‘Delete selection’ function, you can delete either a whole
Geofence or individually marked points.
Notification
You can use the Notification fields to choose how you want to be informed about an event.
General
Explanation
Mail
Notifications are sent to your email address
Text message
The notification is sent to your cellphone number (for this you need an "Email to SMS Gateway“.
For more information on this, contact your mobile network provider.
After selecting the type of notification, click on + and enter your first name, surname and email address.
Confirm with +.
If some field are missing a warning message appear with details:
Event trigger
In the drop-down menu, you can choose between several options when an automated message should
be sent to you:
58
BC00000344 en-US • Rev 0000 • September 2015
User Manual
Danfoss Telematics Solutions - Portal
Events
The ? symbol provides more information about the event trigger:
Interval
Use the Interval function to choose between inside or outside the area under Event Trigger.
Term
Explanation
None (process every event)
Sends you every event which occurs.
Hourly (report event every hour)
Sends you the current event at most every hour.
Once a Day (report event every 24 hours)
Sends you the current event at most every day.
Once a Week (report event every 7 days)
Sends you the current event at most every week.
Once a Month (report event every 30 days)
Sends you the current event at most every month.
Save geofence
1. After you have defined the Geofence area you want and selected the type and interval of notification,
• Click on the Save push button.
•
Click on Cancel push button to back to Geofence overview list.
BC00000344 en-US • Rev 0000 • September 2015
59
User Manual
Danfoss Telematics Solutions - Portal
Events
This opens a new window in which you can enter a name and a description of the Geofence.
2. Then click on
• Save push button
•
Cancel push button to back to Geofence overview list.
Now, in the Geofence overview, you can see all available Geofence profiles.
In the Active column, you can switch between Active (green led) and Inactive (gray led).
Event history
The Event History gives you a detailed overview of the events that have occurred with your machine.
1. For Event history select: Events > Event > History
You can display Event History differentiate between Trigger and Process by selecting the specific tab.
60
BC00000344 en-US • Rev 0000 • September 2015
User Manual
Danfoss Telematics Solutions - Portal
Events
2. Search for a particular event by limiting the selection criteria, so for example select the machine and
the specific type of event:
and/or event service:
and other criteria in a specific period of time.
If you leave all windows blank, all events will be listed.
Event
Explanation
Event trigger
Indicates what vehicle data triggered the event.
Machine
Indicates the machine on which the event occurred.
Machine time
Indicates the time at which the CAN message was received.
Data received
Indicates when Proemion received the data.
Details
Details opens a new window underneath the event table.
BC00000344 en-US • Rev 0000 • September 2015
61
User Manual
Danfoss Telematics Solutions - Portal
Events
3. Click on Details push button opens a new window underneath the event table:
4. If the criteria set on Search section not produce result a feedback message is shown:
Signal
The Signal function enables you to record specific vehicle behaviors. For instance, a signal is triggered if
the oil temperature reaches a particular value. This signal can then trigger notification by email as an
event.
Create signal
Use this function to create a new signals function on DTS portal.
1. For Create select: Events > Signal > Create
This opens a new window in which you can enter the corresponding signal parameters.
62
BC00000344 en-US • Rev 0000 • September 2015
User Manual
Danfoss Telematics Solutions - Portal
Events
Designation
Explanation
Name
Enter a name you have chosen for the signal.
Controller
Select Machine Data.
Filter
Select SPN Value.
Add
Data ID:
Choose which machine value you want to create a signal for.
Operator:
Choose when the signal should be triggered.
<: smaller than "value"
>: greater than "value"
=: equal to "value"
Value:
Choose a limit value.
Name
Enter a name you have chosen for the signal.
Comment
You can create a comment for the signal here.
2. Click on Add to choose the machine value.
Several data IDs in one signal are linked by a logical OR. This means that if at least one comparison is
true, the signal is enabled.
3. Click on Save push button to adopt the signal created;
4. click‘Cancel push button to back to Machine Overview.
Manage signal
Use this function to view and edit the signals you have created.
For Manage select: Events > Signal > Manage
Use the Search function to search for a particular signal. If you leave the fields blank and select Search, all
the signal profiles are listed.
Using Details after the corresponding line, you can edit or delete the profile.
BC00000344 en-US • Rev 0000 • September 2015
63
User Manual
Danfoss Telematics Solutions - Portal
Events
Event
The Event function accesses a signal you have created. This makes it possible to edit the signal and send
it to you e.g. by email.
Create event
1. For Create select: Events > Events > Create
Designation
Explanation
Active
Check this box to enable or disable the event.
Name
Enter a name for the event.
Machine group
Select one of your machine groups. Then select the signal you want to be informed
about.
Signal
If several signals are combined in one event, they are linked with a logical AND. Therefore,
all the signals must be enabled to trigger an event.
Service
Choose what you want to happen when a particular signal is triggered (for instance
notification by email or text message).
Configuration
Receiver user group
Choose the user group to be informed. To ensure the user group is
shown here, define it as a ‘Configurative group’ (see Chapter Error!
Reference source not found. ‘Error! Reference source not found.’).
Color for enabled
signal
Choose the font color for the triggered signal (enabled) which will
be used in the email. This option is only available under the ‘Status
change’ setting.
Color for disabled
signal
Choose the font color for the triggered signal (disabled) which will
be used in the email. This option is only available under the ‘Status
change' setting.
Status change:
Sends a message when the limit value of the signal is enabled or
disabled again.
Enabled signal:
Sends messages as long as the signal is enabled.
Send message if
64
BC00000344 en-US • Rev 0000 • September 2015
User Manual
Danfoss Telematics Solutions - Portal
Events
Designation
Explanation
Interval
Only available with ‘Enabled signal’. This determines the minimum intervals at which you
want to receive the message.
Comment
Enter a comment for the event.
2. Click on Save to adopt the event.
Manage event
Use this function to view and edit the signals you have created.
1. For Manage select: Events > Signal > Manage
2. Use the Search function to search for a particular event. If you leave the fields blank and select
Search, all the configured event profiles are listed.
BC00000344 en-US • Rev 0000 • September 2015
65
User Manual
Danfoss Telematics Solutions - Portal
Events
3. Using Details after the corresponding line, you can edit or delete the profile.
The Receiver User group must be set as configurative.
Add this Receiver User group in the Administrator Role or in general for the role that have assigned
this service functionality.
66
BC00000344 en-US • Rev 0000 • September 2015
User Manual
Danfoss Telematics Solutions - Portal
Administration
Entities
The following diagram gives a clear description of the hierarchy of the links to your devices.
Part
“access right”
UserGroup 1
MachineGroup 1
DeviceGroup 1
ServiceGroup 1
User 1
Machine 1
Device 1
Service 1
User 2
Machine 2
Device 2
Service 2
P301 830
Creating Danfoss Telematics Solutions Sub-Accounts
As a Danfoss Telematics Solutions customer using the WS403, on your DTS portal account you have the
possibility to create new sub-accounts for your organization or end-customers. These sub-accounts will
only see the machines assigned to them. This may be a subset of all machines on your account.
Together with the registration of your company portal a set of resource are created and available for
further administration.
Username
Your admin username
Password
Your admin password
Admin User group
Your company Admin Users Group
User group
Your company Users Group
Machine group
Your company Machines Group
Device group
Your company Devices Group
Organization unit
Your company
Access rights (both plan)
Your company User Role
Access rights (high plan)
Your company Data Plan High User Role
Access rights (low plan)
Your company Data Plan Low User Role
Admin Role
Your company Admin User Role
The services of our system are based on a low and high data plan.
The low data plan includes the PLUS+1® Service Tool support and the real-time web services including
Geofencing. Additional to this services the high data plan give the opportunity to log CAN bus
information of the connected local system.
Belongs to this two option we have access rights for low and high data plan user. It is possible to allocate
this rights separate or in combination.
BC00000344 en-US • Rev 0000 • September 2015
67
User Manual
Danfoss Telematics Solutions - Portal
Administration
User Group Role
Access Rights
Low Data Plan
High Data Plan
Admin User Role
X
X
User Role
X
X
High Data Plan user Role
Low Data Plan user Role
X
X
Create User Group
1. Go to the menu item: Administration > Entities > User Group > Create
2. Type in the name for the new user group. (e.g. the company name of your customer plus "Users").
You do not need to add a user to this group now.
Configuration Group:
If this box is not checked this group is used only as
login group. If this box is checked this group can also
be used as receiver for event messages
Pool Group:
If this box is checked the administrator can see and
manage member of this group, but don’t see this
group in his overview.
3. Click on Save push button.
68
BC00000344 en-US • Rev 0000 • September 2015
User Manual
Danfoss Telematics Solutions - Portal
Administration
Create Machine Group
1. Go to the menu item: Administration > Entities > Machine Group > Create
2. Type in the name for the new machine group.
You should re-use the name you assigned to the user group and add ‘Machines’.
3. Add the machine(s) you would like the new user(s) to see.
You do not need to add machines here, especially if the user should activate the WS403 devices by
himself using the Activation form.
Pool Group:
If this box is checked the administrator can see and
manage member of this group, but don’t see this
group in his overview.
4. Click on Save push button.
With the machine group you can separate different departments or groups of vehicles in an
organization.
Create Device Group
1. Go to the menu item: Administration > Entities > Device Group > Create
BC00000344 en-US • Rev 0000 • September 2015
69
User Manual
Danfoss Telematics Solutions - Portal
Administration
2. Type in the name for the new device group.
You should re-use the name you assigned to the user group and add ‘Devices’.
3. Add the device(s) you would like the new user(s) to see.
You do not need to add machines here, especially if the user should activate the WS403 devices by
himself using the activation form.
4. You have to add the devices which are assigned to the machines added to the machine group above,
otherwise no Real-Time Diagnosis is possible!
Pool Group:
If this box is checked the administrator can see and
manage member of this group, but don’t see this
group in his overview.
5. Click on Save push button.
Create Organization Unit
1. Go to the menu item: Administration > Entities > Organization Unit > Create
2. Select your organization unit as Parent.
3. Type in the name for the new organization unit (e.g. the company name of your customer).
70
BC00000344 en-US • Rev 0000 • September 2015
User Manual
Danfoss Telematics Solutions - Portal
Administration
4. Select the new created machine and device groups as default machine and device groups.
5. Click on Save push button.
• When the customer activates a WS403 device by sending the activation form, the devices and
machines are automatically assigned to the default machine and device groups by the Danfoss
Telematics Solution system.
• If you have assigned devices and machines to the new groups, you should use the Manage Device
and manage Machine function and assign the devices and machines to the new organization unit
if needed.
Manage Machine
1. To Create/Manage a machine, go to the menu item: Administration > Entities > Machine > Create /
Manage
Use the Search function to search for a particular machine. If you leave the search fields blank and
click on Search, all machines are shown in an overview.
BC00000344 en-US • Rev 0000 • September 2015
71
User Manual
Danfoss Telematics Solutions - Portal
Administration
2. Click the push button Details to visualize/modify the individual machines details.
Field
Explanation
Name:
Enter the name of your machine.
Serial number:
Enter for instance the serial number on the machine.
Owner:
Enter the owner of the machine.
Model:
Enter the machine model.
Photo:
Upload for instance a photo of your machine.
Machine group:
Select the machine group to which you want to add your machine (each machine
has to be assigned to at least one group).
Devices:
Select the device mounted on this machine (usually correctly preconfigured).
Controller:
No setting necessary.
Organization unit:
Select the organization unit under which the machine will operate. Description
Enter a description of your machine.
3. Then click on
• Save to create the new machine or
•
Cancel to cancel the entries.
Normally, the Create Machine function is not required because newly activated devices are
automatically assigned to your portal with the device and machine after activation with the
Activation form. You can then configure them to your requirements with the Manage Machine
function.
Create and Manage Roles
72
BC00000344 en-US • Rev 0000 • September 2015
User Manual
Danfoss Telematics Solutions - Portal
Administration
Create the end-customers user role
1. Go to the menu item: Administration > Access Rights > Role > Create
2. Type in the name for the new role.
You should re-use the name you assigned to the organization unit.
3. Add the new generated groups in the tabs User Groups, Machine Groups and Device Groups.
4. Add the required service group(s) for example ‘High Data Plan user Role’ to the tab Service Group.
5. Add the language group ‘Standard Languages’ to the tab Languages Group
All other tabs should be empty.
6. Click on Save push button.
Manage your runtime role
In order to be able to see the customer’s machines in your account, you have to add his machine and
device groups to your runtime role.
BC00000344 en-US • Rev 0000 • September 2015
73
User Manual
Danfoss Telematics Solutions - Portal
Administration
1. Go to the menu item: Administration > Access Rights > Role > Manage
2. Search for the roles and select your administration role (normally: Company name Administration)
3. Add the new generated groups in the tabs Machine Groups and Device Groups to the existing entries.
All other tabs should not be changed.
4. Click on Save push button.
Create the end-customers admin role
If the customer shall organize his web portal by himself it is necessary to create also a customer
administration role.
1. Go to the menu item: Administration > Administrator Role > Create
74
BC00000344 en-US • Rev 0000 • September 2015
User Manual
Danfoss Telematics Solutions - Portal
Administration
2. Add the groups, roles, and the organization units to administrate.
3. Press the Save.
Every time a new administrator role is created a parallel empty Admin access rights Role will be
created as well.
4. Enter the menu: Administration > Access Rights > Role > Manage
5. Select the group with the same name like the created Administration role and control all tabs in the
same way like before for the Administrator Role.
6. Open the created Administrator Rigth role, select the role tabs and add the Administrator runtime
role.
Create User(s)
1. Go to the menu item Administration > Entities > User > Create
2. Type in the desired username and password.
Username has to be unique within the Danfoss Telematics Solutions system. You could choose an eMail address for example.
3. Enter Name and e-Mail address.
4. Assign the new user to the new user group created above.
5. Assign the new user to the new organization unit created above.
6. Set the other settings as required.
The user specific environmental setup can be changed every time by the user entering the section:
Extras > Preferences.
BC00000344 en-US • Rev 0000 • September 2015
75
User Manual
Danfoss Telematics Solutions - Portal
Administration
7. Click on Save push button.
Repeat this for every new user.
Test new account
1. Log out your user.
2. Log in with the new user name and password.
3. Check the correct machine(s) are displayed in the machine list.
4. Check that the device/machine is online.
5. Test the new account with the PLUS+1® Service Tool software (the machine selected must be in real
time connection mode).
Design
Custom logo
76
BC00000344 en-US • Rev 0000 • September 2015
User Manual
Danfoss Telematics Solutions - Portal
Administration
1. Enter the menu (administrator) Administration > Appearance > Custom Logo
2. Select under which role you want to use your custom logo.
3. Select an image which is stored locally on your PC and upload it using the Upload push button.
Optimal height is between 50px and 200px. Images which are wider than 960px are automatically
cut.
Machine configuration
Enter the menu (administrator)
Administration > Machine Configuration
•
The Machine Configuration interprets the data the machine logs in the form of CAN messages. The
messages are sent in the form of CLF files and the physical values are shown in the DTS portal.
The configuration determines where in the message for instance the oil temperature is shown. This
message is then converted into a physical value. You have the option of having the files presented as
physical values in an Excel spreadsheet. You can also upload the data to the DTS portal. Then they are
interpreted by the portal.
BC00000344 en-US • Rev 0000 • September 2015
77
User Manual
Danfoss Telematics Solutions - Portal
Administration
If you want to set up this DTS configuration, please download the data logging documentation available
on DPS website and in case of problem contact the support.
The Machine Configuration file is called PDC and the idea behind is a configuration with history.
After the initial preparation of the PDC, (if necessary) newer versions of the same PDC should be created.
Any change leaves an entry along a "timeline". There is the concept of a beginning, a progress with
various changes and an end. The whole growing construct always exist and will not be deleted.
The PDC "grow" into the system and with a deletion many relationships must be released.
Only Danfoss can delete the Machine Configuration uploaded on the portal, please contact Danfoss PAE
for more information.
78
BC00000344 en-US • Rev 0000 • September 2015
User Manual
Danfoss Telematics Solutions - Portal
System requirements
Operation systems
•
•
•
Windows 7 or higher
•
•
•
•
Internet Explorer 10 or higher
Linux (is not official supported)
Apple Mac OS (is not official supported)
Computer desktop
Mozilla Firefox 30 or higher
Google Chrome 34 or higher
Apple Safari 7 or higher (browser is not official supported)
Mobile platform
(Tablet / smartphone)*
• Apple iOS (Go to Desktop View)
• Google Android (Go to Desktop View)
*
Not all the DTS portal functionalities are compliant with mobile smartphone, tablet.
BC00000344 en-US • Rev 0000 • September 2015
79
User Manual
Danfoss Telematics Solutions - Portal
Service and support
Telematics service and support
For further information see our DPS website: http://www.powersolutions.danfoss.com or contact our
support team [email protected]
The most recent WS driver, WS System tools and documentation are available for download from the DPS
website Telematics section http://powersolutions.danfoss.com/solutions/telematics/.
80
BC00000344 en-US • Rev 0000 • September 2015
User Manual
Danfoss Telematics Solutions - Portal
BC00000344 en-US • Rev 0000 • September 2015
81
User Manual
Danfoss Telematics Solutions - Portal
82
BC00000344 en-US • Rev 0000 • September 2015
User Manual
Danfoss Telematics Solutions - Portal
BC00000344 en-US • Rev 0000 • September 2015
83
Products we offer:
•
•
•
•
•
•
•
•
•
•
•
•
•
•
•
•
Bent Axis Motors
Closed Circuit Axial Piston
Pumps and Motors
Displays
Electrohydraulic Power
Steering
Electrohydraulics
Danfoss Power Solutions is a global manufacturer and supplier of high-quality hydraulic and
electronic components. We specialize in providing state-of-the-art technology and solutions
that excel in the harsh operating conditions of the mobile off-highway market. Building on
our extensive applications expertise, we work closely with our customers to ensure
exceptional performance for a broad range of off-highway vehicles.
We help OEMs around the world speed up system development, reduce costs and bring
vehicles to market faster.
Danfoss – Your Strongest Partner in Mobile Hydraulics.
Hydraulic Power Steering
Go to www.powersolutions.danfoss.com for further product information.
Integrated Systems
Wherever off-highway vehicles are at work, so is Danfoss. We offer expert worldwide support
for our customers, ensuring the best possible solutions for outstanding performance. And
with an extensive network of Global Service Partners, we also provide comprehensive global
service for all of our components.
Joysticks and Control
Handles
Microcontrollers and
Software
Open Circuit Axial Piston
Pumps
Orbital Motors
Please contact the Danfoss Power Solution representative nearest you.
PLUS+1® GUIDE
Proportional Valves
Sensors
Steering
Transit Mixer Drives
Comatrol
www.comatrol.com
Schwarzmüller-Inverter
www.schwarzmuellerinverter.com
Local address:
Turolla
www.turollaocg.com
Hydro-Gear
www.hydro-gear.com
Daikin-Sauer-Danfoss
www.daikin-sauer-danfoss.com
Danfoss
Power Solutions (US) Company
2800 East 13th Street
Ames, IA 50010, USA
Phone: +1 515 239 6000
Danfoss
Power Solutions GmbH & Co. OHG
Krokamp 35
D-24539 Neumünster, Germany
Phone: +49 4321 871 0
Danfoss
Power Solutions ApS
Nordborgvej 81
DK-6430 Nordborg, Denmark
Phone: +45 7488 2222
Danfoss
Power Solutions Trading
(Shanghai) Co., Ltd.
Building #22, No. 1000 Jin Hai Rd
Jin Qiao, Pudong New District
Shanghai, China 201206
Phone: +86 21 3418 5200
Danfoss can accept no responsibility for possible errors in catalogues, brochures and other printed material. Danfoss reserves the right to alter its products without notice. This also applies to
products already on order provided that such alterations can be made without changes being necessary in specifications already agreed.
All trademarks in this material are property of the respective companies. Danfoss and the Danfoss logotype are trademarks of Danfoss A/S. All rights reserved.
BC00000344 en-US • Rev 0000 • September
2015
www.danfoss.com
© Danfoss A/S, 2015