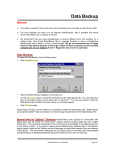
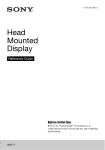
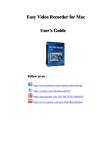
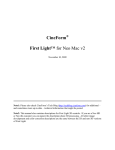
1
Speedy
(Version 4)
© 1999-2004 Broadcast Software International
User Manual
Table of Contents
TABLE OF CONTENTS ..................................................................... 2
INTRODUCTION ................................................................................ 3
OVERVIEW ............................................................................................. 3
SYSTEM REQUIREMENTS ........................................................................ 3
INSTALLING SPEEDY ...................................................................... 4
REGISTERING SPEEDY .................................................................... 5
GETTING STARTED WITH SPEEDY .............................................. 6
OPTIONS ............................................................................................. 7
FILES...................................................................................................... 7
OUTPUT ................................................................................................. 8
NORMALIZE/TRIM ................................................................................ 10
CD INFO .............................................................................................. 11
DEVICES ........................................................................................... 12
RAPID RIP ............................................................................................ 13
APPEARANCE ....................................................................................... 14
TOOLBAR & MENU OPTIONS....................................................... 15
TOOLBARS ........................................................................................... 15
MENUS ................................................................................................. 16
RIPPING TRACKS ............................................................................ 20
THE Q-DESIGN CODEC AND THE CYBERLINK ENCODER. .. 21
INFO EDITOR ................................................................................... 22
LIST OF KEYBOARD SHORTCUTS .............................................. 29
APPENDIX - A .................................................................................. 30
AUDIO FORMATS ................................................................................. 30
APPENDIX - B................................................................................... 33
SPECIAL CONSIDERATIONS .................................................................. 33
TECHNICAL SUPPORT ................................................................... 34
TECHNICAL SUPPORT OR TRAINING? ................................................... 34
CUSTOMER ASSISTANCE CONTACT INFO .............................................. 34
LIMITED WARRANTY.................................................................... 35
CONTACTING BSI ........................................................................... 36
Speedy 4 Manual
2
Introduction
Overview
Speedy is a professional “Audio CD to PC copier”, commonly referred to as a “CDRipper.” Speedy copies audio directly from your CDs at high-speed and converts the file
into a computer readable format. Speedy can also normalize the volume of the file, trim
silence from the front and (or) end, and convert the audio to a variety of different audio
formats such as MPEG Layer 2, MP3 or ADPCM.
Using free online “CD Info” databases, Speedy can also retrieve the Artist and Title
information for most commercially available CDs and uses that information to “tag” your
audio files – this “internal labeling” saves you typing the Artist and Title information in
again.
Speedy’s “Rapid Rip” feature makes copying your entire CD collection fast and easy.
A free copy of BSI’s Info Edit program is supplied with Speedy. This allows you to
mark Intro and Segue times and enter a lot of other useful information into the audio files
that Speedy creates.
System Requirements
•
Genuine Intel Pentium III 500 MHz or better processor
•
Microsoft Windows 98, 2000 Professional, or XP Professional operating system
(XP Pro recommended with Administrator Login)
•
128 Mb of RAM memory (256 recommended)
•
10 Mb of hard drive space to store program (and up to 10Mb per minute for
audio storage)
•
PC Audio Card
•
Copying to some proprietary formats, requires a licensed audio codec for that
format
Speedy 4 Manual
3
Installing Speedy
Before installing Speedy, we strongly advise you to SHUT DOWN ALL RUNNING
APPLICATIONS including anti-virus software, which can interfere with the installation
process. Ensure that you have administrator (or sufficient) privileges to install software
on your computer.
•
DOWNLOAD VERSION: If you have downloaded a copy of Speedy from our
web site, double-click the Speedy_Setup.exe and follow the on-screen
instructions.
•
CD VERSION: Place the BSI Install CD in your CD Rom Drive and wait for the
CD to automatically run. Then, select Speedy from the drop-down box on screen
and click the Install button.
During installation, please ensure that you read the End User License Agreement that is
displayed on screen. At the very end of the install process, you may be asked to restart
your computer.
When Speedy is first installed, it runs in a limited demonstration mode until the program
is registered. This is to allow limited testing of the software. We suggest that you
confirm Speedy is working before registering the software.
WARNING: Speedy will only rip a
single track while in demonstration
mode.
Speedy 4 Manual
4
Registering Speedy
There are two ways to register (license) Speedy.
1. Single Machine License (using a validation code)
2. Hardware Key Version (allowing you to move the software to different
PCs)
The Hardware Key Version allows more flexibility to use the program as you can move
the Hardware Key to any computer on which you wish to run Speedy.
Once you have Speedy running and decided which license you require, select Help >
Register from the main Menu. The first time you do this a window will come up asking
whether or not you want to use a Hardware key.
NOTE: Hardware Keys require that you install a driver on your computer
BEFORE inserting the Hardware Key
•
If you are using the single machine license, note the Serial Number at the top left.
You need to email this serial number to BSI ([email protected]) to obtain your
Validation Code (you can click on the Copy button and then Paste the number
into your email.)
Enter your information and validation code to register Speedy. Information marked with
a “*” must be filled in.
Once you have entered all the information and your validation code, click the Done
button. Speedy will now be registered.
Using a Hardware Key
To use the Hardware Key version, you must have already purchased and received a
Hardware Key from BSI.
Select the Use Hardware Key option when the window comes up. Speedy will then let
you know that it needs to install the Driver for the hardware key.
Speedy 4 Manual
5
TIP: BSI recommends that you follow all of the onscreen prompts and accept the
default suggestions when installing the Sentinel driver. Be sure that the
hardware key is NOT plugged into your system when installing the driver.
Once the driver has finished installing, plug the USB key into your system and open
Speedy back up.
Go to Help>register and enter your information and validation code to register Speedy.
Information marked with a “*” must be filled in.
Once you have entered all the information and your validation code, click the Done
button. Speedy will now be registered.
(Keep a note of your Hardware Key Validation Code, you will need to re-enter this
information if you move the Key to another computer).
Hardware Keys can also license other BSI products, so if you have a Hardware Key in
your computer already, the license for Speedy can also be added to this Hardware Key.
Note: Only one Hardware Key should be used in your computer. You
should not place two Hardware Keys in the machine at the same time.
Getting Started with Speedy
Quick Start:
Ripping a CD is as easy as 1-2-3. By default, Speedy will create the files in c:\bsi32 in
an uncompressed Linear PCM format. These defaults can be changed from the Options
menu which is explained in detail in the following sections.
To demonstrate how easy it is to use Speedy, we’re going to get started right-away with
the default settings.
1. Launch Speedy and insert an audio CD into your CD ROM. After a short pause,
you’ll see a list of tracks come up
2. Check some tracks and click the Rip Checked Tracks button on the main
toolbar
3. Speedy will display a progress box to tell you that it’s working. One this has
completed, you’ll be able to go into your Output folder and play your files. It
doesn’t get much easier than this!
Speedy 4 Manual
6
Options
Speedy’s default settings are setup in the Options menu. Either click the Options button
on the main toolbar, or select Edit > Options from the main menu. You can also use the
CTRL-O shortcut to access the options screen.
Files
The Files tab is where you can setup your default Output Folder where Speedy stores the
files it creates.
Name Format allows you to specify a custom File Name for your audio files using a
combination of different Meta Variables. The values for the Meta Variables are imported
automatically for most commercially available CDs via the Internet.
%1 Artist
%2 Title
%3 Track Name
%4 Track Number
%5 Genre
%6 Track Number with leading zero
%7 CD Info Disc ID
You can also use the backslash character “\” to create folders. For example, to store
audio files in a sub folder for each Artist use:
%1\%7-%6 which translates to c:\bsi32\Artist\CD Info Disc ID-Track Number.wav
Speedy 4 Manual
7
Using the CD Info Disc ID and Track Number to create you file name is by no means
compulsory, but it’s a useful common format which is very suitable for most radio
automation systems such as BSI’s Simian.
Write Title to Title/Description field rather than the Album field
Normally, Title -> Album, Track Name -> Title/Description
When this option is Checked, Speedy writes the Album Title to the Track
Title/Description field of the audio file (normally the Album Title is saved in the Album
field and the Track Name is saved in the Title/Description field).
Save & Restore Output Folder with Local CD Info
Output
The Output tab allows you to select with Native or Encoded audio file format.
By default, Speedy will copy files onto your hard drive in Native Linear PCM
(Uncompressed .wav) format. This is the highest quality available and matches the
original CD. This requires 10Mb of hard drive space, per minute so an average 4 minute
song will take up 40Mb of space.
Check the Encoded option to select a compressed audio file format. The list of
compressed formats available is dependant on the audio codecs installed on your
computer. Speedy will work with any fully ACM compliant codec.
BSI recommends the Cyberlink codec for MP3 files and the Q-Design codec for MP2
files.
Speedy 4 Manual
8
In the example above, we have selected the Cyberlink MPEG Layer 3 (MP3 encoder) at a
constant bit rate of 128 Kbps. Whilst this format does not provide the highest quality,
many people consider that the quality obtained is “near CD quality” and acceptable for
some broadcasting.
Using the MP3 format at 128 Kbps uses only 1Mb per minute, so a typical song only
takes up 4Mb of disk space.
Rather than use a higher MP3 bit rate, it is generally better to use the MPEG Layer 2
format at 160, 192 or 256 Kbps. This provides very good quality indeed and MPEG
Layer 2 at 256 Kbps is a standard adopted by many radio stations around the world.
NOTE: Where disk space is available, we strongly advise you to use Native
Linear PCM format for excellent audio quality, rather than an Encoded
compressed audio format.
Create MPEG (.mp2 .mp3) Output File – check this option to prevent Speedy creating
a compressed MPEG .wav file.
Show All Sample Rates – Speedy will do it’s best to select a list of sensible compressed
bit rates for each codec, however your audio codec may provide other options which you
can view when this option is checked.
Speedy 4 Manual
9
Normalize/Trim
To prevent you having to load the audio files that Speedy creates into an audio editor,
Speedy can optionally “normalize” the levels and delete silence from the Start or End of
the file (or both).
Checking the Normalize option will allow you to specify exactly how you want Speedy
to normalize your files. If you are copying your library from scratch, then Normalizing
songs to 70% as shown here, with allow for some digital headroom (equivalent to about 3
dB of headroom).
Normalizing to 70% will allow voice files (which are usually normalized or recorded to
100% or 0dB) to be heard over the top of the songs (during intros and fades). This is
particularly useful where the songs are quite “hot” or “dynamically processed.”
Trim will delete silence from the beginning and / or end of your audio files. The
Threshold allows you to specify the audio level below which you consider silence. Take
care that this value is not too high; otherwise you may end up trimming a long fade on a
song. We suggest you try different values between about 0.5 and 0.7 in general use,
however a full range of values is supported.
It is generally desirable to Trim silence from the front of the audio file (so that there is no
delay when the file starts) but to allow the file to run all the way to its natural end to
avoid cutting off a long fade.
Speedy 4 Manual
10
CD Info
CD Info is the generic name for a series of CD indexing services, providing artist and
title information for many commercially available CDs. These services provide disc
information only and DO NOT offer any music files for download.
The first thing to do after installing Speedy is to click the Update Servers button. This
will retrieve and list all the currently available servers. (You will need to be connected to
the Internet to retrieve this list and the CD Info data).
Choose a server located near to you and check the box to the left of it. Note the Port
number. You need access to the Internet and (if you are using a firewall) that port too. It
is very unusual not to have access to Port 80 which is the standard HTTP (web page)
port.
Using the Edit Server and New Server buttons, you can customize the way in which you
connect to these servers [these are advanced settings and will not normally require
changing].
Some Internet Service Providers or Corporate Offices use a Proxy Server to access web
pages on the Internet (HTTP). If your connection is affected in this way, check the Use
Proxy for HTTP queries option and ask your System Administrator for the information
to enter the details into the boxes provided.
In case of difficulty, try selecting a server using the CDDB protocol, or a different port.
Speedy 4 Manual
11
Devices
If the computer has more than one CD Drive (more than one ‘Device’), select the fastest
CD Drive from the drop down box provided.
By default, Windows NT, Windows 2000 Professional and Windows XP Professional
will use the SCSI Pass Through Interface (SCSI PTI). This is regardless of whether or
not your CD Rom is a SCSI device.
Older operating systems used a system called ASPI to communicate between PC and CD
Rom drive. This was essentially a proprietary protocol develop by a company called
Adaptec (although Microsoft included ASPI with Windows 95, 98 and ME.) Windows
NT, 2000 and XP are not supplied with ASPI drivers, if you wish to obtain and use ASPI
drivers, uncheck the Use SCSI Pass Through Interface option. Speedy will not work if
you uncheck this option and do not have ASPI drivers installed.
NOTE: By
default, access
to the SCSI
Pass through
Interface is
restricted to
users with
Administrator
Rights only.
Rip Speed - allows users to select the speed at which Speedy copies files from the CD
Rom. Whilst most modern CD-ROMs will run at 48X or 52X, audio extraction may not
be reliable at such high speeds. Experimentation will allow you to choose a suitable ‘Rip
Speed’. We set our default to 32X to be on the safe side.
Correct Jitter Errors – when Speedy cannot read the CD Rom continuously, the CD
Rom may slow down and restart causing skipping of some minute samples of audio data
(often heard as “pops” or “clicks”. Whilst most new CD Rom drives correct for this
automatically, Speedy can correct for Jitter Errors by reading overlapping blocks. Check
this option if you hear audible pops or clicks in the audio files Speedy creates.
Play Device – selects the audio card for Speedy to use to audition the audio files.
Speedy 4 Manual
12
Rapid Rip
When copying a large number of CDs or a complete music library, engaging Rapid Rip
can help save time.
Auto rip all tracks when disc is inserted – will automatically start ripping CDs when
inserted, all tracks on the CD will be selected
Check all tracks for ripping when Speedy starts – will check all available tracks on the
CD for ripping when a new CD is inserted.
Open drive tray when ripping is complete – opens the CD Rom drive when ripping is
complete (just insert the next CD and that will Rapid Rip too)
Access remote CD Info database automatically for new discs – automatically connects
and extracts the artist and title information from the CD Info database each time a new
disc is inserted. This information is saved (tagged) inside the audio file automatically.
Speedy 4 Manual
13
Appearance
You can customize the look of Speedy by selecting some of the options on the
Appearance tab.
Small ToolBar Buttons - removes the caption from each button and reduces their size.
ToolBars Wrap If Necessary – if Speedy is not wide enough to fit all the ToolBar
buttons on one line, they’ll wrap onto another line when this option is checked.
Custom Color Scheme – allows you to select your favorite colors for the foreground and
background (FG and BG) of the main Speedy Window and Controls.
Speedy 4 Manual
14
Toolbar & Menu Options
Toolbars
Speedy’s Toolbars can be re-sized and dragged into different positions to suit individual
users. During this process, it’s possible to accidentally hide the Main Menu (as shown
below) as well as the Toolbars.
To remove a toolbar, click the dotted rectangle
to the left of the Toolbar itself. To re-
size or drag the Toolbar, hover over the embossed vertical line until the cursor changes
to a horizontal, double arrow-headed line and then click and drag.
This will allow you to access the main menu options and the associated short-cut Keys.
To reset all Toolbars, go to the View menu and click Reset Toolbars.
Speedy 4 Manual
15
Menus
File Menu
Exit (CTRL-Q)
Shuts down Speedy
Edit Menu,
Check All Tracks for Ripping (CTRL-A)
Selects all tracks on the current CD for ripping
Uncheck All Tracks for Ripping (CTRL-N)
Clears all the selected tracks
Swap Artist & Track Name (CTRL-P)
Swaps details as required by some compilation CDs
Options (CTRL-O)
Displays the Options dialogue
View Menu,
Active Drive
When Checked, displays the active drive in the main window
Button Bar
When Checked, displays the button bar in the main window
CD Info Fields
When Checked, displays the CD Info Fields in the main window
Viewing the CD Info Fields allows you to see and change the
most commonly used fields. These are then stored within the
audio file (and can be modified later by using the BSI Info Editor
that comes with Speedy).
Much of this information is gathered automatically from the CD
Info database. However, things are sometimes slightly different
when using compilation discs or when no CD Info information is
available. In this case, you can right-click the track and select
Rename…to manually enter / edit the details.
Speedy 4 Manual
16
Compilation Discs
For ‘historical reasons’ compilation discs are normally added to
the CD Info database with the artist listed as ‘various artists’ and
stores the real artist information in the name field, separated by a
hyphen.
When the ‘Compilation Disc’ option is checked, Speedy will
correct this problem by searching compilation discs that are
marked ‘various artists’ and will then add an Artist column to the
Track List instead of on the main CD Info toolbar
Unfortunately, some discs are marked ‘artist – title’ while others
use ‘title – artist’.
Speedy 4 Manual
17
While it is impossible for Speedy to know which way the details
should be listed, Speedy does provide an option to swap artist
and title positions by clicking the two blue arrows to the right of
the words ‘Compilation Disc’
.
Obviously, you need to check carefully yourself that both are in
the correct order before ripping all the tracks.
Occasionally, there is a Hyphen in the Artist or Title name and
Speedy is unable to work out where to split the information. If
this happens, right-click on the Artist or Name data and select
‘Rename Track’.
Play Controls
When Checked, displays the Play Controls in the main window
Reset Toolbars
Resets the toolbars to default settings
Explorer Windows (F10)
Displays the output folder and its contents
Action Menu,
Eject (CTRL-E)
Ejects the selected CD drive
Refresh CD (F5)
Refreshes the track listing for the currently inserted CD
Rip checked Tracks (CTRL-R)
Starts the ripping process for all selected tracks
Get CD Info
Connects to the CD Info database to name tracks, also saves a copy of
the info on the local machine
Save CD Info
Allows you to Saves a copy of the CD Info data locally, this includes
manual edits to the CD Info
Play Selected Tracks (F6)
Plays the selected track
Stop Play (F7)
Stops playback
Pause Play (F8)
Pauses playback
Rapid Rip
Speedy 4 Manual
18
Selects ‘rapid rip’ mode for semi-automated ripping
Help Menu,
Help Contents (F1)
Displays main help file
Register
Activates registration process
About
Provides file information and version of Speedy.
Speedy 4 Manual
19
Ripping Tracks
When you are ready, click the ‘Rip Tracks’ button on the tool bar (or view the menu
option).
The time taken for Speedy to rip the tracks will depend on a number of factors, including
the quality of the CD and CD-ROM drive – however, Speedy will update the progress on
screen for you to see.
Once the tracks are ripped, you can click the ‘Output Folder’ icon to open Windows
Explorer for the folder in which your new files have been saved.
The first time you do this, Speedy will
display a tip to let you know that if you
Right-Click the audio files and select ‘Edit
Info’ you will be able to edit information
about the file using the BSI Info Editor
(see section).
Speedy 4 Manual
20
The Q-Design Codec and the Cyberlink Encoder.
The MP3 codec supplied free with Windows doesn’t allow you to encode MP3 files at bit
rates higher than 56 Kbps.
To obtain a full range of bit rate settings, you must purchase and install a third-party
codec such as the Cyberlink Encoder or the Q-Design Codec.
Please see Appendix – A regarding Audio Formats for a more detailed explanation of
the differences between MPEG Layer 2 and MP3.
Cyberlink Encoder
When using the Cyberlink Encoder, bit rates of 32 Kbps to 320 Kbps are available. 128
Kbps for MP3 files is considered by many to be an acceptable “CD like” quality.
Although a higher bit rate would provide better quality, it is normally advantageous to
move up to the MPEG Layer 2 format for bit rates of 160, 192 and 256 Kbps.
Q-Design Codec
The Q-Design Codec allows you to encode files in MPEG Layer 2. You can obtain the QDesign Codec by either contacting Q-Design directly (www.qdesign.com) or by
contacting the BSI sales department.
.
Speedy 4 Manual
21
Info Editor
BSI’s free Info Editor utility is installed automatically with Speedy and can easily be
used for any audio files on the computer. To access Info Editor, right-click on any audio
file and select the ‘Edit Info’ option.
If you are familiar with ‘tagging’ audio files, then the BSI Info Editor will seem very
familiar but even for those who have never ‘tagged’ audio files before, the utility is very
easy to use.
‘Tagging’ an audio file involves storing additional information about the audio file,
inside the audio file itself. Usually this is just the artist and title information, but BSI
products support many other fields too such as Intro and Sec tones, hook start and end as
well as date information.
This means that audio files can be transferred between stations / production centers
complete with all the information stored inside the audio files themselves. BSI products
read this information – the Info Editor writes the information. A full list of fields is
shown below.
The main tab is Description /
Tones.
This is where the most
important information about
the audio file is entered – some
of it automatically by Speedy.
Title / Description and Artist
/ Advertiser allow you to enter
the relevant information based
on whether the audio file is a
song or commercial spot (or
jingle etc). This information
will appear in the Cart Decks
of other BSI software.
The Location is a reminder
where the audio file is stored
on the computer and cannot be
edited.
Usually, you will want to
select AUDIO as the Category
for songs. It is possible to
setup other BSI product to
recognize different categories
(you may want to have all our
commercial material listed as
SPOTS).
Format gives you an
indication of the audio file
format.
Speedy 4 Manual
22
No Fade At Segue is an option that can be checked so that other BSI products that
support deck fading, does not fade the audio file once the Segue marker is reached (see
below). This is useful on station promos / liners / new in jingles where fading the audio
early is not desirable.
The Play Controls allow you
to listen to the audio file whilst
the track slider allows you to
move quickly to a specific
position within the file. This is
useful in conjunction with the
‘lightning’ buttons below that
allow you to set an ‘Intro’ and
‘Segue’ (or ‘Secondary) tone.
These ‘tones’ are in fact a
‘silent’ marker inside the audio
file which is recognized by
other BSI products.
There is also an additional set
of silent markers called
‘Hooks’. This marks the start
and end of a clip of the song
(for example a line in the
chorus, or a memorable rift).
If you set a start and end hook
and press the play button, Info
Editor will play just the Hook
of the song.
Should you not wish to enter
any other data into the audio
file; you can click Save now,
or Cancel if you have made a
mistake and want to start
again.
Alternatively, select the next tab – Times / Album.
Speedy 4 Manual
23
Start Date & Time and End
Date & Time allows you to
enter a period for which the
audio file is valid. Other BSI
applications read these dates to
ensure that out of date files are
not played in error. (This is
really useful if you have a
holiday weekend and want to
make sure that none of your
holiday weekend promos are
played on come Tuesday
morning).
Click on the Calendar icon to
change the date…
…and the Watch icon to
change the time. (Use the Up /
Down arrows by highlighting
the Hours / Minutes and
remember to use the 24 hour clock).
You must enter a start AND end time – you can either
Set or Clear these settings. (You may be familiar with
this feature as something called ‘kill dates’).
Alternatively you can set a (start and end) ‘Time
Window’ during which the file can play each and every
day.
The Album, Year, Genre and Track # can also be entered or edited in this screen.
Some of the information will be automatically added when using Speedy.
If you’ve made changes you’ll be able to press the Save button, or you can move onto the
next tab Authoring.
Speedy 4 Manual
24
The Authoring tab allows you
to store a lot more useful
information about the audio
file.
It’s a useful reminder of who
produced the audio file if you
ever need to have them remaster it.
How many times have you
forgotten the ‘Talent’ (voices)
used by a particular production
company (and want to re-use
them, or prevent a voiceclash).
Composer, Publisher and
Copyright / Record
Company can be used to store
information to report to the
various copyright collection
agencies.
A larger Comments box
allows a virtually unlimited
amount of further information
to be stored inside the file.
You might use this for the
release date of a song, details
about the advertiser – a phone
number perhaps?
Remember, all this information is being store within the audio file itself, so it’ll never get
lost whether you send it via email, FTP it, or copy it across the computer Network.
Speedy 4 Manual
25
On the Commercial tab, we
can enter an ‘OutCue’ which
is displayed on software using
BSI Play Decks.
Agency and Account
Executive / Sales Person
makes it easy to identify who
produced your commercial and
who to contact!
Copy can be displayed by
products supporting BSI Play
Decks. Typically this would
be a presenter ‘Live Read’ at
the end of a commercial or
spot promo. Some stations use
the Copy field on their traffic
report bed so that the traffic
info is displayed as soon as the
bed is played.
URL is a field that can be used
to link a song to an ecommerce website for
purchase; or to an image link.
It’s utilized by the dynamic
web page generation available
in BSI’s Simian product.
Speedy 4 Manual
26
The Music tab is where such
detailed information as the
Key (scale) the music is
recorded in, together with the
type of End, Energy and
Texture of the music –
together with its Tempo and
Beats per minute.
Whilst primarily used for
music format programming,
this can be a useful source of
information when checking to
see if songs will segue either to
another song, or with a jingle.
Speedy 4 Manual
27
Finally, the About tab. This
shows information about the
file version and program
revision.
Output device for audition
allows you to select the audio
device used for playing back
the audio files. This allows
you to select a device that
doesn’t come out on air so that
you can tag files and enter
Intro / Segue markers etc
without the file interrupting
what’s being played on-air.
If the audio card you are using
doesn’t support compressed
audio formats, you can install a
Windows ACM Codec on your
computer and Force use of
ACM CODEC to play the
compressed file.
TIP: If you receive an error on after clicking Save
ensure that you are using Windows Classic folders
(otherwise Windows locks the audio file for editing
as it tries to play it with Windows Media Player).
If you still encounter problems, right-click the audio
file and check in the Properties that the file isn’t
‘Read Only’ – this can happen if you transfer audio
files from a data CD.
Speedy 4 Manual
28
List of Keyboard Shortcuts
CTRL-Q
........................EXIT SPEEDY
CTRL-A
........................CHECK ALL TRACKS
CTRL-N
........................UNCHECK ALL TRACKS
CRL-O
........................OPEN OPTIONS DIALOG BOX
CTRL-E
........................EJECT CD ROM
SHIFT-CTRL-E .....................CLOSES CD ROM
CTRL-R
........................RIP CHECKED TRACKS
F1
........................HELP CONTENTS
F2
........................RENAME SELECTED TRACK
F6
........................PLAY SELECTED TRACKS
F8
........................PAUSE PLAY
F7
........................STOP PLAY
F5
........................REFRESH TRACK LIST
F10
........................OPEN EXPLORER WINDOW
Speedy 4 Manual
29
Appendix - A
Audio Formats
Here is a basic guide to audio formats which will help when selecting a suitable audio
format for your files. We highly recommend that you select one format and standardize
on that format as mixing files with different audio formats can cause problems – if you
don’t want to read any further, then we suggest that you choose Uncompressed Linear
Audio Files (PCM) at 44.1 KHz for which you need to allow 10 Mb of hard drive
space per minute of audio. For the reasons why, read on!
To simplify a complicated subject, think of there being three parts to each audio format the ‘sample rate’; whether or not the file is compressed and if it is compressed, the ‘bitrate’ used for the compression.
In very general terms, the higher the sample rate and the higher the bit-rate, the higher the
quality and the larger the file size. But it’s also very useful to know that the sample rate
used to generate CDs is 44.1 KHz, so there is little point in recording at anything higher
than this (as there will be no improvement in the ‘sound’ of the audio file).
It’s also useful to know that the top frequency response of FM broadcasts is 15 KHz.
Certain high-end Digital Broadcasting (and CDs) may allow for a frequency response of
22 KHz. However, in European countries, where Digital Broadcasting is already
prevalent, MPEG Layer 2 compression at between 128 and 256 Kbps is chosen.
One other very important consideration is that each time an audio file is passed through a
digital to analogue or analogue to digital conversion, the quality suffers. (This can
happen through a digital audio processor, converting files for live web-casts, digital
mixing desk to analogue transmission chain, STL, ISDN link or converting audio files
between different audio formats). Because each process removes a little bit more
information from the audio file, eventually there is a real danger of audio artifacts (pop,
clicks, glitches or a ‘phase’ sound) in the audio files broadcast.
Linear PCM - (Uncompressed 44.1 KHz) will give you the best quality possible – it’s
the same format used to record the CDs in the first place. Whilst recording at a higher
sample rate is possible on many modern audio cards, there is no advantage in doing so.
Files recording using Linear PCM use 10 Mb per minute.
With 250 GB hard drives (and greater) available at very reasonable cost, Linear PCM
would be the best audio format to select
MPEG Layer 2 (256Kbps) – Long adopted by the ‘broadcast industry’ as an acceptable
standard, Speedy needs Windows to have a software audio codec installed to save files in
this format. If the Audio card you are using doesn’t directly support MPEG Layer 2
playback, you will also need to install a codec on your play back machine. The Q-Design
MPEG 2 codec is suitable for both recording and playback of MPEG Layer 2 files.
Where disk space is at a premium, MPEG Layer 2 files at 256 Kbps are a good balance of
file size versus quality and a 1 minute file will take up 2 Mb of disk space.
As many digital broadcasts (and STL links) also use MPEG Layer 2 compression, if you
are selecting a compressed audio format for your files, MPEG Layer 2 at 256 Kbps is a
good choice.
Speedy 4 Manual
30
MP3 (128 Kbps) – Although made popular by the Internet community and touted as
‘near CD quality’ this is somewhat far from the real truth. While MP3 files sound good
through a set of PC speakers or on personal stereo headphones, the format is not really
good enough for professional FM broadcasting and in side by side tests against a CD it’s
very clear that the quality does not match. The top frequency response can be as high as
15 KHz (the same as FM broadcasting) but a lot of other information has been removed
from the audio file to reduce the size to about a tenth of an uncompressed file.
MP3 files degrade really quickly when going through different analogue to digital or
conversion processes. Likewise, if a file that’s already been compressed (either with
MPEG Layer 2, or something like a Mini-disks which uses something called ATRACS
compression) is converted the MP3, the quality quickly begins to suffer.
To counter this, some people try to opt for MP3 files at bit-rates greater than 128 Kbps,
but MPEG Layer 2 files will sound better at higher bit-rates, rather than MP3 files.
Likewise, MP3 files at rates lower than 128 Kbps usually sound better than MPEG Layer
2 files.
MP3 files at 128 Kbps only take up 1Mb of disk space per minute, and it is for this reason
over and above any other that MP3 files should be selected (i.e. only when disk space is
at a critical premium).
Speedy 4 Manual
31
Appendix - B
Special Considerations
Speedy has been tested under Windows 98, Win2K pro, and Windows XP
professional.
If you are updating from an earlier version of Simian, we strongly advise you to delete all
the files inside your c:\windows\prefetch folder before applying the upgrade.
Under Windows XP, you must be logged on as a system administrator to have access to
the SCSI Passthrough Mode to extract audio files from CD to Hard Disk Drive (this is a
Windows limitation).
If you are using the hardware key version of Speedy to register, please visit our support
site and read the important SENTINEL document in our database as this provide
important information about installing and configuring the hardware key driver.
Speedy 4 Manual
32
Technical Support
Technical Support or Training?
BSI has two sections designed specifically to assist you – ‘Technical Support’ and
‘Training’. While they are both here to help you out, their backgrounds and goals are a bit
different. Let's take a look at each:
Technical Support
Our Technical Support department is made up of hardcore computer people who work
hard to fix problems that relate to BSI software. They're here for you when BSI software
is not functioning correctly to help you get your software (and sometimes hardware) up
and running properly. These people can tweak Speedy and shuffle IRQ's with the best of
them. When BSI software is broken, contact Tech Support.
Training
Our Training department is made up of Radio Engineers who work hard to help you
integrate your BSI software into your radio station. These people know about things like
ferrite beads, grounding and scheduling software. When you need help using Speedy,
Call Training.
Customer Assistance Contact info
Technical Support Phone Number:
(541)342-5250
Technical Support Email:
[email protected]
Technical Support on the Web
www.bsiusa.com/support
Training Section Phone Number :
(541)338-8588
Speedy 4 Manual
33
Limited Warranty
Broadcast Software International warrants that all discs provided are free from defects in
material and workmanship, assuming normal use, for a period of 90 days from the date of
purchase.
Broadcast Software International warrants that the program will perform in substantial
compliance with the documentation supplied with the software product. If a significant
defect in the product is found, the Purchaser may return the product for a refund. In no
event will such a refund exceed the purchase price of the product.
EXCEPT AS PROVIDED ABOVE, BROADCAST SOFTWARE INTERNATIONAL
DISCLAIMS ALL WARRANTIES, EITHER EXPRESS OR IMPLIED, INCLUDING,
BUT NOT LIMITED TO IMPLIED WARRANTIES OF MERCHANTABILITY AND
FITNESS FOR A PARTICULAR PURPOSE, WITH RESPECT TO THE PRODUCT.
SHOULD THE PROGRAM PROVE DEFECTIVE, THE PURCHASER ASSUMES
THE RISK OF PAYING THE ENTIRE COST OF ALL NECESSARY SERVICING,
REPAIR, OR CORRECTION AND ANY INCIDENTAL OR CONSEQUENTIAL
DAMAGES. IN NO EVENT WILL BROADCAST SOFTWARE INTERNATIONAL
BE LIABLE FOR ANY DAMAGES WHATSOEVER (INCLUDING WITHOUT
LIMITATION DAMAGES FOR LOSS OF BUSINESS PROFITS, BUSINESS
INTERRUPTION, LOSS OF BUSINESS INFORMATION AND THE LIKE) ARISING
OUT OF THE USE OR THE INABILITY TO USE THIS PRODUCT EVEN IF
BROADCAST SOFTWARE INTERNATIONAL HAS BEEN ADVISED OF THE
POSSIBILITY OF SUCH DAMAGES.
Use of this product for any period of time constitutes your acceptance of this agreement
and subjects you to its contents.
Speedy 4 Manual
34
Contacting BSI
Broadcast Software International (BSI)
BSI - Broadcast Software International
1925 Bailey Hill Road, Suite A
Eugene, Oregon USA 97405
Headquarters: (541)338-8588
Headquarters Fax: (541)338-8656
Headquarters email: [email protected]
Sales: 888-BSIUSA-1 ((888)274-8421)
Sales Fax: (541)338-8656
Sales email: [email protected]
Technical Support email: [email protected]
Speedy 4 Manual
35