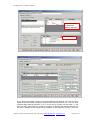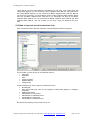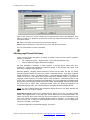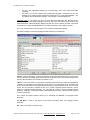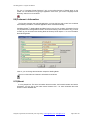
1
PBX BILLING SYSTEM MANUAL Preface: READER SHOULD KNOW ....................................................................................................... 1 Chapter 1: INTRODUCTION TO PBX BILLING SYSTEM ...................................................................... 1 Chapter 2: PBX BILLING SYSTEM’s FILES ......................................................................................... 3 Chapter 3:ONLINE CAPTURE CALL RECORD AND EXPORT/IMPORT UTILITIES .............................. 7 3.1)Online Call Detail Record Capturer: ............................................................................................... 8 3.2)Call Detail Record Importer:..........................................................................................................10 3.3)Call Detail Record Exporter: .........................................................................................................13 3.4)Call Record Modifier: ....................................................................................................................14 Chapter 4: ORGANIZATION DATA ........................................................................................................17 4.1)Departments:................................................................................................................................18 4.2)Users: ..........................................................................................................................................18 4.3)Organization Chart: ......................................................................................................................20 4.4)Extension & Access Code:............................................................................................................21 4.5)Customer Database:.....................................................................................................................24 4.6)Report of Defined Data: ................................................................................................................25 4.7)Undeclared Core Data: .................................................................................................................26 Chapter 5: CALL CHARGE SCHEME ....................................................................................................28 5.1)Currency Exchange System: ........................................................................................................29 5.2)Viet Nam Province Distance Information.......................................................................................30 5.2)Telephone Rate Tables: ...............................................................................................................31 5.2.1)Learning telephone charge via an example company..............................................................31 5.2.2)Introduce to tariff interface and tariff policy..............................................................................33 5.2.3)How to input rate record for each Area Code ..........................................................................41 5.2.3.1)Area Code: ......................................................................................................................42 5.2.3.1.1)Common Area Code:.................................................................................................42 5.2.3.1.2)Service number is a special Area Code: ....................................................................42 5.2.3.1.3)Area Code for Charge Template: ...............................................................................43 5.2.3.1.4)Area Code of distance: ..............................................................................................45 5.2.3.2)The other properties of AreaCode ....................................................................................46 5.2.3.3)The properties of detail rate record...................................................................................49 5.3.3.3.1)Basic properties of record rate...................................................................................49 5.3.3.3.2)Step-based rate by block order..................................................................................50 5.3.4)Be able to set multiple call charges by dial time per Area Code ..............................................52 5.3.5)The rate selection order .........................................................................................................52 5.3.8)Call Charge Formula: .............................................................................................................53 5.3)Service Charge Policies................................................................................................................55 5.4)Synchronizing The Telephone Rate Table ....................................................................................57 5.5)Call Charge Tester: ......................................................................................................................57 5.6)Reprocess Existing Calls: .............................................................................................................59 Chapter 6: ENTERPRISE-STYLE & HOTEL-STYLE TELEPHONE BILLS ..............................................61 6.1)Telephone Bill Master: ..................................................................................................................62 6.1.1)Preview:.................................................................................................................................65 6.1.2)Header/Footer Layout... .........................................................................................................65 6.1.3)Customization...: ....................................................................................................................69 6.1.3.1)Common customization dialog applied to all normal reports: ............................................69 6.1.4.1)Customization dialog of Universal Telephone Bill: ...........................................................70 6.1.4.2)Customization dialog of Cross Tab By Department:..........................................................72 6.1.4.3)Customization dialog of Cross Tab By Department-User: .................................................72 6.2)Hotel Bill Master ...........................................................................................................................73 6.3)Advanced Auto Send Email Service:.............................................................................................75 6.3.1)Detail Bill By User: .................................................................................................................76 6.3.2)Summary Bill By User: ...........................................................................................................76 6.3.3)Detail Bill By Dept: .................................................................................................................77 6.3.4)Summary Bill By Dept: ...........................................................................................................77 6.3.5)Alert: ......................................................................................................................................78 Chapter 7: SECURITY MANAGER.........................................................................................................79 7.1)Change Password: .......................................................................................................................80 7.2)General Security:..........................................................................................................................80 7.3)Account & Permission:..................................................................................................................83 Chapter 8: APPLICATION TOOLS .........................................................................................................85 8.1)Change Customer Logo:...............................................................................................................86 8.2)License Key:.................................................................................................................................86 8.3)Communication Settings: ..............................................................................................................88 8.3.1)Via Serial Port ........................................................................................................................88 8.3.2)Via IP.....................................................................................................................................90 8.4)Application Settings: .....................................................................................................................91 8.4.1)First Page – “CDR Settings”: ..................................................................................................91 8.4.1.1)Incoming CDR .................................................................................................................94 8.4.1.2)Smart Checker.................................................................................................................95 8.4.1.3)Advanced... .....................................................................................................................96 8.4.1.3.1)2nd CDR Definition .....................................................................................................96 8.4.1.3.2)Character Filter .........................................................................................................97 8.4.1.3.3)Pop-Up......................................................................................................................98 8.4.1.3.4)CDR Column Copier..................................................................................................98 8.4.1.3.5)Conditional Set CDR .................................................................................................99 8.4.1.3.6)Other.......................................................................................................................100 8.4.1.3.7)Important note about features of Advance... box: .....................................................102 8.4.1.4)Dial Number Settings.....................................................................................................102 8.4.1.4.1)Page “Trigger Condition & DialNumber Wizard” .......................................................103 8.4.1.4.2)Page “Member Call Wizard”.....................................................................................104 8.4.2)Second Page – “Option 1”: ...................................................................................................105 8.4.3)Third Page – “Option 2”: .......................................................................................................109 8.4.4)Fourth Page –“Sample CDR Creator”: ..................................................................................112 8.4.5)The rule to separate CDR string into columns:......................................................................113 8.4.6)Case Study – Some examples of settings this software to understand your particular CDR format ...........................................................................................................................................113 8.4.6.1)Case Study 1 .................................................................................................................113 8.4.6.2)Case Study 2 .................................................................................................................114 8.4.6.3)Case Study 3 .................................................................................................................115 8.4.6.4)Case Study 4 .................................................................................................................117 8.4.6.5)Case Study 5 – Bill Incoming Call ..................................................................................118 Sample Raw CDRs: ...............................................................................................................118 Discussion .............................................................................................................................119 8.4.7)Explanation the predefined columns .....................................................................................119 8.5)Least Call Warning .....................................................................................................................123 8.6)Archiving/Export Scheduling Settings..........................................................................................124 8.7)Hotkey Assignment.....................................................................................................................125 8.8)Language Phrase Dictionary:......................................................................................................126 8.9)Customer’s Information:..............................................................................................................128 8.10)About:.......................................................................................................................................128 8.11)Security Dialog Box: .................................................................................................................129 Chapter 9: SYNCHRONIZING THE TELEPONE RATE TABLE ............................................................131 9.1)Introduction to synchronizing telephone tariff: .............................................................................132 9.2)Normal Synchronizing:................................................................................................................132 9.3)Adding and Deleting: ..................................................................................................................133 9.4)Confliction and the policy applied to customer-created record: ....................................................134 Chapter 10: THE WORKING MODES ..................................................................................................136 10.1)Simple direct connection billing system .....................................................................................137 10.2)Billing over the computer network: ............................................................................................138 10.3)Billing for two physical PBXs.....................................................................................................140 10.4)Virtual PBX model ....................................................................................................................140 10.5)Remote support ........................................................................................................................144 10.6)Summary of Working Mode:......................................................................................................145 Chapter 11: USER DIGEST .................................................................................................................147 11.1)How to lock the application: ......................................................................................................148 11.2)System Log file:........................................................................................................................148 11.3)Raw data of Pbx: ......................................................................................................................148 11.4)Unknown Call: ..........................................................................................................................148 11.5) System User, System Department: ..........................................................................................148 11.6) How to run the Pbx Billing System whenever Ms Windows start without explicitely type User name and Password: ........................................................................................................................148 11.7)Example of CDR format: ...........................................................................................................149 Alcatel PBX:..................................................................................................................................149 Aristel : .........................................................................................................................................149 Panasonic PBX: ............................................................................................................................149 Siemens PBX:...............................................................................................................................150 Ericson PBX:.................................................................................................................................150 Philips PBX: ..................................................................................................................................151 11.8)The limitation of exporting report...............................................................................................151 11.9)Unicode issue...........................................................................................................................152 APPENDIX: CABLE WIREMAP & OTHER VALUED INFORMATION ...................................................153 A)CABLE WIREMAP ........................................................................................................................154 A.1)Nullmodem 9p-9p ...................................................................................................................154 A.2)Nullmodem 9p-25p .................................................................................................................154 A.3)Nullmodem 25p-25p ...............................................................................................................154 A.4)Modem 9p-25p .......................................................................................................................155 A.5)Modem 25p-25p .....................................................................................................................155 A.6)Printer 9p-25p.........................................................................................................................156 A.7)Printer 25p-25p.......................................................................................................................156 A.8)Definition: DTE & DCE............................................................................................................157 A.9)Wiring.....................................................................................................................................157 B)OTHER VALUED INFORMATION:................................................................................................158 B.1)Microsoft acticles related to Ms Access...................................................................................158 B.1.1)A program is trying to automatically send e-mail on your behalf ........................................158 B.1.2)Solution to solve Microsoft E-mail Security .......................................................................161 Preface: READER SHOULD KNOW By reading this chapter, you will: Know the target of the manual. Know how the manual is organized. This document has been reviewed and updated for version 4.1 (Front End version). I try my best to review and update document as much as possible, but it can be out-of-date compare with the software you may have. You can check the version of software by going to About dialog and check Front End version (don’t care about Back End version, because Back End version related to data store structure and you won’t see it). The English version of the manual is to be used by foreigner. There is Vietnamese version with the same content. I divide the reader into Common Users (or users for short) and Technical Engineers. The Common Users are the persons, who want to use the Pbx Billing SystemTM to make only the telephone bills or hotel bills. They don’t care how the application works or how the application cooperates with the Pbx to get the call data or to control the Pbx. The Receptionist is one of example of Common User. The Technical Engineers are the persons, who have technical background of telecommunication, Pbx operation and also IT knowledge. The Technical Engineer must know how the Pbx communicates with the application. How the telephone company charges them. What is under the control of their Pbx and what is under control of your telephone service provider. They should also know the scope of the application, and what beyond the scope. It seems to require too much. But don’t worry. A Telecommunication Engineer or IT Engineer is normally qualified to administer the application. Chapter 1 Chapter 2 Chapter 3 to Chapter 6: Chapter 7, Chapter 8: Chapter 9 to Chapter 11: The introductions to the application. Common Users or Technical Engineers may read this chapter. Explain the main files and their roles. Only Technical Engineer should read it. The application divides its functions into some groups (function groups). Chapter 4 to Chapter 7 will go though 4 function groups. Common User must read these Chapters deeply, Technical Engineer may read it to have overall idea. Explain you how to secure the application and how to configure the application to correctly communicate with your Pbx. These chapters require technical background. The Technical Engineer should read them carefully. Deeply explain other matters of the application. The Technical Engineer must read. If you have time, despite who are you, you may read all the content of this manual several time to master the application. Hotel Management SystemTM and Pbx Billing System aren’t separate applications. Actually, there is only one application but you can switch the Working Mode to make the application to concentrate on Enterprise’s telephone billing or Hotel business’ telephone billing/room billing (Read Chapter 11 to know how to switch the Working Mode and in which case you need different Working Mode). Pbx Billing System concentrates on the requirement for the billing system of an Enterprise. Hotel Management SystemTM has some more special features needed by Hotel business and the billing feature is only one function of it. If you switch the application to Hotel business model, the menu system and toolbar system will be changed accordingly. You won’t find the functions like Department, User to input the company organization, instead you will find the form to enter the room information, the room rack indicated your hotel rooms... Let me summarize: The application, when set to support billing problem required by Enterprise business will be called Pbx Billing System. The application, when set to support billing problem and guest/room management required by Hotel business will be called Hotel Management System. For easier reading, the User-Manual will be separated into two versions: Pbs-Manual-(Eng or Vit).doc This document concentrates on Telephone Billing only. Just a few lines for Hotel-style Telephone Bill. Hotel-Manual-(Eng or Vit).doc This document has a part to discuss about Hotel business feature and the other part discussing how to integrate Telephone Billing feature to have unique bill for the guest. For user, who already familiar with other Call Accounting System, you can jump to Chapter 8, the sub-topic Application Settings to learn how to configure this software to understand your particular CDR format. Chapter 1: INTRODUCTION TO PBX BILLING SYSTEM INTRODUCTION TO PBX BILLING SYSTEM Pbx Billing System - English User Manual Upon completion of this chapter, you should be able to: Basically know the functions and features of the application. Know the supported OS and the hardware requirement to run the application. - Pbx Billing System is expertise software for recording and calculating telephone bills. It is integrated by latest software technologies and excellent design. - Pbx Billing System is designed for: Microsoft Windows 2000 Professional/Server, Service Pack 4 or later. Microsoft Windows XP, Service Pack 3 or later. Microsoft Windows 2003, Service Pack 2 or later. Microsoft Windows Vista. Microsoft Windows 7. - Pbx Billing System requires Microsoft Office 2002 (another name is Office XP, Office 10) or later to run. You also have to update all Microsoft Office 2002 Service Packs to make the VBA libraries to be more stable. If you don’t update Service Pack, there are some errors caused by the bug of Microsoft Office, which prevents the application to run smoothly. Pbx Billing System can: - Communicate with private exchange via serial port (RS232 standard) or IP. It is compatible with all Pbx of any manufacturer. No need to recompile or change anything to make it able to work with your Pbx. - Online relay the calculated call data to serial printer connected to another serial port of the billing PC to print out the bill as soon as the call finishes. - Supply the billing information for third-party application via the Billing Connector concept. If you have developed your application like Payroll, Hotel Management, Cost Allocation ... you can connect your application to the Billing Connector to retrieve the calculated call data. By retrieving call data via Billing Connector, you can develop by yourselves the telephone bills. - Make telephone bill, which bases not only on Extension but also on Access Code - the password used to access outside - of employee. - Support Context-Sensitivity helps. You can press F1 at any window of Pbx Billing System to get valued instructions and explanations of what you are wondering. - Receive call detail records (CDR) directly from private exchange, then process it immediately. The real time detailed information of each call will be display on your monitor and also be saved to database. - Provide 54 standard cooperate reports (telephone bills). You can custom these 54 reports by changing sort criterion or limit the bill to only department or extension that you want… - Provide 12 professional telephone bills specially designed for Hotel business and Hospitality business. - Output these telephone bills to Microsoft Word or Microsoft Excel. - Configure to automatically make and send standard cooperate reports to an email address at scheduled time. - Create report for core data that you have entered like department information, user information, tariff… - Support multiple currencies. Auto-exchange money base on currency system that customer can define. Designed, Programmed, Documented By Tran Hong Quang, [email protected]; [email protected] Page 1 of 168 Pbx Billing System - English User Manual - Beside online receiving mode, Pbx Billing System also supports offline-receiving mode which inputs call detail records from export files of it or text files copied from private exchange. - High availability. Pbx Billing System saves data twice into two different file formats. Firstly, Pbx Billing System saves raw data to log file under text format. And then Pbx Billing System tries to process that data according to CDR information the customer already defines. Sometime Pbx Billing System receives good call records but could not process further because of undeclared core data. For example the call has undeclared area code. In such case, the call record still is saved to temporary area of the database, and customer will be received warning message about undeclared core data. Whenever core data input such call record will be re-processed further step. - Require minimum resources of PCs. Pbx Billing System can run smoothly on Windows 32/64 bit and PC with low configuration. Suggested configuration for PC is Intel Pentium 800 MHz, 128 MB RAM, 300 MB Free Hard Disk or above that. - Support Master/Slave mode. One Master billing PC is communicating directly with Pbx and many other Slave billing PCs can be used to make reports at the same time and at anywhere on your network. - Auto-find out undeclared extensions, undeclared trunks, and already deleted extensions… - Support multiple telephone service provider with multiple telephone tariffs. Pbx Billing System is able to cooperate with Pbx to implement “Least Cost Routing” model. Auto-find tariff table for each calls record according to trunk number. - Be able to secure your application using Security Manager. The customer can decide which form is public form, which form is protected-form. Furthermore, customer can create Service User and then assign appropriate permission to use protected-form base on each form. - Re-apply tariff whenever you want. Why does customer need re-applying tariff if the tariff already is in database? In fact, your telephone service provider can change the tariff, even they inform customer, but customer might forget to change tariff in database at right time. Customer can change tariff later then let Pbx Billing System re-apply the call in the pass with current tariff. - Define call record formats during runtime. No need to obtain special version to work with your Pbx or re-compile the application. Designed, Programmed, Documented By Tran Hong Quang, [email protected]; [email protected] Page 2 of 168 Chapter 2: PBX BILLING SYSTEM’s FILES PBX BILLING SYSTEM’s FILES Pbx Billing System - English User Manual Upon completion of this chapter, you should be able to: Know the files, which Pbx Billing System is using. Know which files needed to be backup. Pbx Billing System has the following files: File Name 1. Pbxcas.mde 2. DataStore.vit 3. TelephoneRateTable.mst 4. TelephoneRateTable.slv 5. OnlineCDR.mdb 6. ArchivedCDR.mdb 7. …………………… Default Installed Folder ...\PbxCas\ ...\PbxCas\ ...\PbxCas\TelTariffs\ ...\PbxCas\TelTariffs\ ...\PbxCas\ ...\PbxCas\Archiving\ The typical installed folders and sub-folders look like this picture: The folder PbxCas, Archiving, TelTariff have been mentioned above so you know their role. The purpose of remain folders are: ExcelBasedBills Store the Excel-based report, which allow you to make report directly from Ms Excel. You are free to modify or layout the report in the way you like. ExportedReports You may active the feature that the application will automatically make and send the bill via Email. This folder stores temporary exported report (in Rich Text Format), which is created before sending out. Logs Store raw CDR log file. You can open these files in any text editor to see actually what your PBX was sending out. ReservationLetters This folder stores the Reservation Letter Template for Hotel business feature. You can edit this template with some keywords, then the application will automatically replace the keywords with corresponding information of the guest. Thus, it is the quickest way for you to make the confirmation letter. SemiMaster1 In case you configure the application to work as CDR distributor for two independent company, this folder is store data file for the first company. SemiMaster2 In case you configure the application to work as CDR distributor for two independent company, this folder is store data file for the second company. - Pbxcas.mde is the interface where you can input your core data like tariff, extension, access code, and department. Pbxcas.mde also provides you the way to make standard reports and export them to other application of Microsoft Office like Microsoft Excel, Microsoft Word…Pbxcas.mde has module, which communicates with your Pbx to get CDR. - DataStore.vit is the real data store. It stores what you have been entered and Pbx Billing System has received from your private exchange. - TelephoneRateTable.mst is the file containing the telephone tariff. This file will be maintenanced by software provider, not by customer. That means we will monitor the change in telephone tariff and then update it to TelephoneRateTable.mst. We will send it to the customer who has service contract with us. The customer then is able to synchronize their current telephone tariff with TelephoneRateTable.mst to keep their telephone tariff up to date. Designed, Programmed, Documented By Tran Hong Quang, [email protected]; [email protected] Page 4 of 168 Pbx Billing System - English User Manual - TelephoneRateTable.slv is also the file containing the telephone tariff but it belongs to customer and be maintenanced by customer. TelephoneRateTable.slv can be fully or partially synchronized with TelephoneRateTable.mst to get the telephone tariff up to date. - OnlineCDR.mdb can be considered as the connector for external application to access the processed call data. For example, the customer is hotel owner. They have developed their Hotel Management. The Hotel Management can connect to OnlineCDR.mdb to get the telephone cost then include it to the room bill. - ArchivedCDR.mdb is the file to store old call data. The old call data will be exported automatically to acquire a higher level of data safety and also to speed up the processing capacity of Pbx Billing System since Pbx Billing System doesn’t have to manage the old call data. - TotalQuality.vit has the same structure with Datastore.vit. TotalQualtity.vit has been input data of a virtual company – TotalQuality Ltd, to create an example that helps you to understand the billing concept. TotalQuality.vit isn’t included in the Setup Package. It is an optional. You may contact the distributor to get it. - Pbxcas.hlp and Pbxcas.cnt is help file. - ByPass.vbs and ByPassOE.vbs are scripts to automatically click on “Yes” button if you activate the feature sending the report to relevant person at given time. As you may known, Microsoft has secured the Ms Outlook and Ms Outlook Express from automatic sending email to prevent mail virus. If any program tries to send email in silent mode, Ms Outlook Security will pause the process and pop-up a dialog telling about that, you have to wait 5 seconds, then the “Yes” button will be active. The user has to explicitly click on “Yes” button to allow sending mail. If you put the billing PC in the isolated room, then no one there at the right time to click on “Yes” button. ByPass.vbs is the small program written to defeat Ms Outlook Security, it wait for 5 seconds, then send click-event to “Yes” button on Security Dialog. ByPass.vbs will be launched if you select to use Ms Outlook to send telephone bill. ByPassOE.vbs will be used if you select Ms Outlook Express to send bill. I suggest that if you have Windows Domain with Ms Exchange server, you should select CDO as mailing method. You go to Application Settings, turn to second page, on this page you can select one of 3 mailing method. Using CDO, the Hotel Management System will directly communicate with mail server, while using Ms Outlook, or Ms Outlook Express, Hotel Management System will relay the message to mail client – that finish. - Mttty.exe is a tool for offline test. It is optional. Mttty.exe is used on another PC to simulate your private exchange by sending a large file to Pbx Billing System. You can check Pbx Billing System high availability feature by sending the file containing not only CDR data, but also binary data. Pbx Billing System will accept only CDR data and reject unrecognized data. Designed, Programmed, Documented By Tran Hong Quang, [email protected]; [email protected] Page 5 of 168 Pbx Billing System - English User Manual - ReadMe.doc is Setup menual and information of virtual company TotalQuality Ltd. You have to read first part of ReadMe.doc to know how to setup the application. But you have to read the remain of ReadMe.doc conjuntion with Manual-Eng.doc or Manual-Vit.doc to know how to use every features of the Pbx Billing System . - Pbs-Manual-Eng.doc is user manual written in English. Pbs-Manual-Vit.doc is also user manual written in Vietnamese. Both documents has the same content and concentrate on the Pbx billing feature. - Hotel-Manual-Eng.doc and Hotel-Manual-Vit.doc are user manual written in English and Vietnamese, which concentrate on hotel business, the Pbx billing feature is also discussed in that documents. Beside the files created by the setup package, during runtime, Pbx Billing System also create some more files as follows: Pbxlog.txt: This file store all error message happened during runtime. Importlog.txt: This file is created when you import the CDR from file. The content will be over-written the next time you import CDR from file. Pbxlogx.txt: x stands for the increasing number. The x number will increase by 1 every time you restart the application. Pbxlogx.txt is stored under the subfolder named Logs. They store the raw CDR received from PBX via serial cable. You can configure the application to name the log file by month, not by the number of time of restarting. In that configuration, the log file will have the prefix name of Pbxlog, and the suffix is the name of month. - Separating Pbx Billing System into two parts (Pbxcas.mde as a tool and DataStore.vit as a data store) make it more flexible and easier for updating. DataStore.vit stores important data. It needn’t to be changed whereas Pbxcas.mde is just a tool and we can develop it on special requirement of customers. Whenever we have a new version of Pbxcas.mde and distribute it to you. What you need to do is just copy new Pbxcas.mde over the existing Pbxcas.mde and then you have a new Pbx Billing System with stronger and better features. - Separating Pbx Billing System into two parts allows to 1. Realize “0ne side for recording – multiple sides for bill making” architecture. 2. Easily upgrade or fix bug If you install the Pbx Billing System Enterprise, which supports 2 independent companies shares the same physical PBX, there are two more sub-folders named SemiMaster1 and SemiMaster2. Each the sub-folder has all the files of Pbx Billing System package used for each company. The main Pbx Billing System receives the call data from PBX then delivers to each sub-folder according to the Extension parameter or the Trunk parameter of the call. Designed, Programmed, Documented By Tran Hong Quang, [email protected]; [email protected] Page 6 of 168 Chapter 3:ONLINE CAPTURE CALL RECORD AND EXPORT/IMPORT UTILITIES ONLINE CAPTURE CALL RECORD AND EXPORT/IMPORT UTILITIES Pbx Billing System - English User Manual Upon completion of this module, you should be able to: Know how the Online Call Detail Record Capturer work. Know how to offline import CDR from file by using “Import Call Detail Record” form. Know how to backup the call data by using “Export Call Detail Record” form. Know how to view call data currently stored in the database via “Call Detail Record Modifier” form. 3.1)Online Call Detail Record Capturer: Online Call Detail Record Capturer is a window that receives call detail records from Pbx directly. You can select the way to communicate with Pbx: via serial port or via IP. You should check your Pbx to know which interface your Pbx supports. And then, on this software, you can select corresponding communication method on Communication Settings form. As you can see, Online Call Detail Record Capturer has two pages, one for processed call records and one for raw data. The data on the first page will be saved to database while data on the second page will be saved to log file (text format). You can find the log files under “...HomeFolder/Logs”. Writing to log file has highest priority. Right after receiving any byte from serial port, Pbx Billing System writes that byte to the log file without processing it. So that you can use the log files as a reliable source to find out the cause of CDR lost. Pbx Billing System only tries to parse the string of byte received when there is at least one Carry Return, or Line Feed arrive. Even a good call record may has undeclared core data, so Pbx Billing System couldn’t calculate the price for such call. For example, if customer forgot to enter specific area code, all call made to that area wouldn’t be charged correctly. Pbx Billing System will give a warning if undeclared core data has been detected. Customer can input undeclared core data later and then let Pbx Billing System re-process for such call record. On the top of the window, you can see the settings of serial port or IP interface. Each parameter is displayed for two seconds. Whenever CDR sent to serial port or received via IP interface, the string “Data Received” will appear there instead of communication settings. The number of processed CDR buffered on the first page can be set in Application Settings. The order of column is the order of CDR. Also on Application Settings. Customer can decide whether the calculated field will be displayed there as well or not. The calculated fields are Destination, Price, Currency, Has Discount Of. Designed, Programmed, Documented By Tran Hong Quang, [email protected]; [email protected] Page 8 of 168 Pbx Billing System - English User Manual Page 1: Display processed call detail record. Page 2. Display raw data received from Pbx The fields of CDR have been taken out from raw CDR. Display serial port settings. Green means serial is in good status. Price, Destination and Currency are calculated fields of the call. Records on the first tab can be in different color depend on the CallType this call belong to. You can define the color for CallType on Telephone Rate Tables form (going to Call Charge Scheme>>Telephone Rate Tables). The first column on Call Record tab is an icon that show up the general result of call charge calculation. Normal call will have icon of green telephone. A call which has discount will have icon of a money bag. A call which can’t calculate call charge due to missing rate record or rate=0 will have icon of red triangle. Page 2. Display raw data received from Pbx CDR won’t be recorded twice in database. So customer can command your Pbx to re-send CDR in the past if you Pbx is able to do that. See Importer in next topic for principle to recognize double CDR. Depend on version, you may see or not see “Show Message Of Processing” on Log File tab. If this option is checked, the message of processing the raw call log will be written next to raw call log. This information is very useful for customer during configuring CDR format. But showing message of processing will increase the load for the software. Some important messages and their meaning as follows: 1/ You cannot add or change a record because a related record is required in table 'tblExtensions'. Designed, Programmed, Documented By Tran Hong Quang, [email protected]; [email protected] Page 9 of 168 Pbx Billing System - English User Manual This message means the Extension on the call log hasn’t been declared yet. You have to go to Organization Data>>Extension & AccessCode to create this missing Extension 2/ You cannot add or change a record because a related record is required in table 'tblAccessCodes'. This message means you are using AccountCode-based billing. To activate this mode, you have added AccessCode to Used Columns list on Application Settings. The AccessCode (the concept of AccessCode is nearly the same as AccountCode) on this call log hasn’t declared yet. Please go to Organization Data>>Extension & AccessCode>>go to second tab and create this AccessCode 3/Duplicate CDR. These call was already saved into the database. This message means you are trying to add the call log that has been saved to database before. This case is when you are importing again the old raw log file or you command your Pbx to resend call log 4/ Above is good call. It was made.... Congratulation! This is very good call record and it has been saved successfully to the database. However, please pay attention on the date mentioned on this message. Is that right date of the call? If not, you have to adjust dial date format on Application Tools>>Application Settings>> the parameter “PBX Date(time) Format” to match the date format of your Pbx. You should be able to make the bill for this call. Important Note: If you close this form, the Pbx Billing System can’t capture CDR from your PBX any more. Therefore, if you don’t want to stop receiving process temporarily, you should not close Online Call Detail Record Capturer. When needed to close it, remember to re-open it ASAP. The icon on the toolbar of Online Call Record Modifier is as follows: 3.2)Call Detail Record Importer: Summary information of importing process CDR after being imported Beside input call record directly from private exchange, Pbx Billing System also supports inputting CDR from data file that was copied from private exchange or inputting data from export file of it (Pbx Billing System ). Note that you can export your data from database to external files (Pbx Billing Designed, Programmed, Documented By Tran Hong Quang, [email protected]; [email protected] Page 10 of 168 Pbx Billing System - English User Manual System is able to export to 3 file formats, in which Blank Text and Ms Access are importable. Please read the Export session for more information.). Later on, you can import that data back to your database. Clicking on Import button to open Open File Dialog window. You can either input from data file (of private exchange) or export file. How can Pbx Billing System guess which option you are doing? Depending on the extension of your file, Pbx Billing System can guess whether it is export file or data file of private exchange. If the extension of the file is .mdb, Pbx Billing System thinks it as export file, otherwise is data file of private exchange. For input data which is an exported file, Pbx Billing System looks for the table called tblCallData, and then copy all data there into database of Pbx Billing System . For the data file of private exchange, Pbx Billing System reads line by line, then checks whether it is call record or not. A text file named ImportLog.txt will be created in home folder of Pbx Billing System . ImportLog.txt is the log file of the import process. You can review ImportLog.txt to find out invalid data and the reason why Pbx Billing System couldn’t accept it. During importing process, the caption of Import button will change from “Import...” to “Cancel”. That means if the data of CDR file is too big and take a long time to import, you can cancel it. After importing data from external file, you can click on the Close button if you don’t want to add those records to your database. If you want to apply that data, you can click on Update button. A call record will not be duplicated in database. For example, you try to import an external files several times, Pbx Billing System will find out that some call records are existing in database and they will be ignored new-coming-the-same call record without warning. Two call detail record is referred as duplicate if they has the same three following factor: 1. Extension 2. Dial Date 3. Dial Time One Extension couldn’t make more than one call at the same time. Scan Log File(s) For New CDR: Check this check-button to enable PBX Billing System to work in indirect mode, in which PBX Billing System will periodically scan the log files to get newly-come CDR. If you check, a small button named “Setup...” will appear next. Click on “Setup...” button to open the following dialog: Designed, Programmed, Documented By Tran Hong Quang, [email protected]; [email protected] Page 11 of 168 Pbx Billing System - English User Manual Log File Monitor is the tool allowing you to program how the application scan the log files or log file folder to get new coming data. The applicable case in which you need to use Log File Monitor feature to get call data indirectly from PBX is that your customer has already other PBX Billing Application, now they want to run this Pbx Billing System in parallel with the old application for evaluation. The billing PC may has only one serial port connected to PBX to receive call data and that serial port is opened exclusively by the old PBX Billing Application. Thus you have to program this PBX Billing System to get call data directly from the log file of old PBX Billing System. File Name Or Pattern: You enter directly file name with its full path or file name pattern. File name pattern comply with OS file name pattern. For example: - “C:\Billing\log.txt”: This is full path and file name of specific log file. - “C:\Billing\”. This pattern will make PBX Billing System to look call data from all the files under the folder “C:\Billing\”. This pattern equals to “C:\Billing\*.*”. - “C:\Billing\*.txt”: This pattern will make PBX Billing System to look call data from all the text files under the folder “C:\Billing\”. - “C:\Billing\Log*.txt”: This pattern will make PBX Billing System to look call data from all the text files beginning with “Log” under the folder “C:\Billing\”. - “C:\Billing\Log-??-??-????.txt”: This pattern will make PBX Billing System to look call data from all the text files under the folder “C:\Billing\”, which have the name like (for example) “Log-22-042003.txt”, “Log-22-04-03.txt”... List Of File Matches Your Log File Criteria: You click on Check button to make PBX Billing System to find and display here all the files match your pattern. Scan Frequency: The period in milisecond at which PBX Billing System will check for new call data in the file matches your log file pattern. When checking for new call data, PBX Billing System will keep track of the last status of all log files (Modified date, file length). So the next checking process, PBX Billing System will continue at the last position in log files to read only newly-come call data only. Before checking, PBX Billing System will also scan the log file pattern to determine is there any newly-created file which matches your log file pattern. The deleted log files will also flushed out of taken-care log files. File Selector: Click on this button to open Open File Dialog. This dialog allows you to select exact one log file, not a pattern. Designed, Programmed, Documented By Tran Hong Quang, [email protected]; [email protected] Page 12 of 168 Pbx Billing System - English User Manual Check: Click on this button to make Pbx Billing System search for log file matching the log file pattern and write them on the list on the left. Cancel: Click on this button to close this windows without saving any log file pattern or log file list. Reset: Click on this button will delete all tracking of current log file and start from begining all log file that match the log file pattern. If there is a log file, which is being read at position of n, by clicking on Reset button, you make Pbx Billing System to read again this log file at position of 0. OK: Click on this button to save log file pattern and log file list, then close the form. The new log file, which match the log file pattern will be added. The tracking of current log file won’t be changed. Thus, if current log file is being read at position of n, the next time Pbx Billing System will read at position of (n+1) if the log file has new data. Note: The as many the number of call record is being displayed on the form as slow the Pbx Billing SystemTM is. So that there is a Up-down button on the left-bottom coner that allow you to adjust the maximum number of CDR can be buffered on the screen, call this number N. N can range from 500 to 10.000. So that if you import more than N, you can find only the last N records on the screen. But don’t worry about losing the beginning records. Although the beginning records aren’t displayed, they are still kept on temporary table. If you click on Update button, all imported records will be updated to the database. The reason of maximum number of being displayed CDR is 10.000 records is that the List View 6.0 of Microsoft has problem if the number of record is too big (overflow stack). The icon on the toolbar of Export Call Detail Record is as follows: 3.3)Call Detail Record Exporter: As mentioned above, Pbx Billing System can create export file (in the file format of Microsoft Access, Microsoft Excel and Blank Text) containing your call records. Call Detail Record Exporter is a tool that enables you to do that. Your database will be bigger and bigger. As a result, it causes the processing spedd slower and slower. But some data in your database is very old. We give you a way and suggest you do it monthly or quarterly. You can export old data to external file, and then delete them from database. By doing it, you make Pbx Billing System run quicker. However, if you need your old data, you can import it back to your database again whenever you want. From Date, From Time, To Date, To Time: They are text boxes where you can set the period of time in which the call was made. Export All Call Record: If you want to export all data, please check this button. If you do so, Theeffect calls anymore. were made within From Date, From Time, To Date, To Time won’t this period of time will be Delete After Export: Delete all exported dataeffected from database. - Clicking on Preview button, you will see all your call records that will be exported. - Click on Export button, and then give the application the file name, the path to that file, you will has external file containing the call record that you want. Designed, Programmed, Documented By Tran Hong Quang, [email protected]; [email protected] Page 13 of 168 Pbx Billing System - English User Manual There are three formats for export file. You can choose one or all of them by selecting it from “Output Formats” combo box: Secured Database: Your export file is in Ms Access format and that file is password-protected. You can’t view it directly under Ms Access, but you can import your data back whenever you want. Blank Text: Your export file is in text format. The order of column is the same as your CDR format. There are some additional columns for Destination, Price, Currency, HasDiscountOf. You can also re-import data from this file. Excel: Your export file is in Ms Excel format. It is very good for viewing or re-layouing in Ms Excel. But you can not import CDR from this file back to your current database. All Above Formats: If you select this option, you will export to all three formats mentioned above. You have to provide only one file name without extension. Pbx Billing SystemTM will add the extension to file name automatically. For example, you give it name as “export”, then you will have export.mdb, export.txt, export.xls The number of call record can be being displayed on the screen at the same time is limited to 10.000. So that if you export more than 10.000, you can find only the last 10.000 records on the form. Although the beginning records aren’t displayed, they are still kept on temporary table. If you click on Export button, all records will be exported to external file. The reason of limit number of 10.000 records is that the List View 6.0 of Microsoft has problem if the number of record is too big (overflow stack). Tip: You can double click on From Date, To Date text boxes to see electronic calendar and pick the date you want instead of typing. Note: The Microsoft Access increate the size of data file by step, not continuously. Thus, you may find that even you just input some call data, the size of Datastore.vit is unchanged. But, the new call records are coming, when no more free space to store them, the Datastore.vit will be automatically increased a big volume. At that time, there are some free spaces in Datastore.vit, which are reserved for future coming call data. The icon on the toolbar of Export Call Detail Record is as follows: 3.4)Call Record Modifier: Pbx Billing System allows customer to edit/delete call records in the database directly by using Call Record Modifier. Customer have to enter the criterion and then Call Record Modifier will search the whole database for the call record that meet your criterion. Click on View Database to select the database you want to see its call records. There are 3 databases as follows: Current Database: The Datastore.vit file. This file is the main being used database. Online CDR: The OnlineCDR.mdb file. This is connector for other application to retrieve the Call Accounting Information. For example, the third party vendor, who developed a Hotel Management, can connect their application to this file to get telephone cost information. Archived CDR: The old call data can be output automatically to Archived CDR file. This file normally name ArchivedCDR.mdb and stored under home/Archiving sub folder. The meaning of text boxes used for criteria is described on the picture below. Designed, Programmed, Documented By Tran Hong Quang, [email protected]; [email protected] Page 14 of 168 Pbx Billing System - English User Manual The period of time, in which the call was made. CDR in database, which meets the criterion you enter above. This is the prefix of dial number. For ex, you would see only the IDD call you can enter 001 for international access code. The number of digit in dial number will be within this range. Call duration will be within this range. Almost the fields on Call Record Modifier were comment by red color boxes except Orphaned Calls. Show All Calls Being Stored In The Database: If this radio button is checked, the form will display all call records, which are, currently stored in the selected database (you select the database to view via “Viewed Database:” combo box). No filter criterion, so that the other criteria fields will be disabled automatically. Orphaned Calls: That is the call, which its associated rate record in Telephone Rate Table has been deleted. If you delete some rate record from Telephone Rate Table and that rate records have been used to calculate the call charge for some calls, the calls can become Orphaned Calls if you re-calculate the call charge. For example, you can make some calls to become Orphaned Calls by these steps: o Make a normal call. o Determine which rate record has been used to calculate the call charge for the test call and delete that record from Telephone Rate Table. At this time, the test call not yet become orphaned call. o Open Reprocess Existing Call, and try to re-calculate the call charge for the test call. o Now, the test call become orphaned call. You can add back the rate record to Telephone Rate Table, then do again “Reprocess Existing Call” to make the orphaned call to become normal call. For the company, which does not pay for Polarity Pulse from PSTN to count the duration of call exactly, the Pbx have to estimate the duration. Duration in this case is the period between ATelephone was picked up and the time it goes on hook. So there must be a lot call records with very short duration. They aren’t the real calls. Customer can use Call Record Modifier to find and delete such call record. Designed, Programmed, Documented By Tran Hong Quang, [email protected]; [email protected] Page 15 of 168 Pbx Billing System - English User Manual Define Query...: Click on this button to open following form. Although on the Call Detail Record Modifier, you can change many options to filter and display the calls currently are stored in the database, some of my customers prefer a mechanic allowing them to define the criterion. That why the application offers you “User-Defined Query”. You must have knowledge of SQL command to define your own query. The best way is modifying the current query. Then, click on Requery button to see the result. Icon on the toolbar of Call Record Modifier is as follows: Designed, Programmed, Documented By Tran Hong Quang, [email protected]; [email protected] Page 16 of 168 Chapter 4: ORGANIZATION DATA ORGANIZATION DATA Pbx Billing System - English User Manual Upon completion of this chapter, you should be able to: Know what company data you have to provide and how to do that. Know what hotel data you have to provide if you set the application to support hotel business. 4.1)Departments: On Departments window, you can create or edit departments of your company. Department: Where you give the name to your department. This information help Pbx Billing System to make telephone bill grouped by department Department Code: This is optional field. Some customers want to give each department a code and this code may be referrenced on other company document, instead of long department name. The department code, if you enter here, will be appeared on some cost allocation bills. Department Head: This field is viewed only on the form. Whenever you assign a member of given department as department head, he/she will be appeared on this field. You can assign department head only on Users form. Description: Any comment about the department. The icon on the toolbar of Departments is as follows: 4.2)Users: The following window enables you to create users. Don’t forget add it to right departments or companies. There are two main models for Pbx Billing System to make telephone bill: 1. Base on Extension 2. Base on Access Code (ID of employee) The first model, administering by extension, the form for creating users looked likes this Designed, Programmed, Documented By Tran Hong Quang, [email protected]; [email protected] Page 18 of 168 Pbx Billing System - English User Manual The title will change to Access Code automatically in second billing model. Each user will be assigned to one or more Extension/ Access Code. Clicking on “Asign Extension/AccessCode” to see a list of available Extension or Access Code. Check on the Extension or Access Code you want to assign for this person. To revoke an Extension or Access Code from user, click on the row of that Extension or Access Code on the sub-window, after that action the button named “Revoke Extension/AccessCode” will be active. Click on “Revoke Extension/AccessCode” to revoke it. Switching between billing base on Extension and billing base on Access Code will be done automatically. It depends on whether Access Code column is in CDR format or not. You can set Access Code column in CDR format on Application Setting window. See Application Settings window for more information about billing base on Access Code model. Each user may register a list of private number in “Private Number” sub-table on the form. Pbx Billing System can make special report of the call to any one number in the private list of that user himself. The user can pay back to company for his/her private call. Note that the call made by other person to your private list is not in your private call report. Because it can be business call, other person may ring you at home to talk about business. User Name: The full name of user. User Code: Optional field. Some customers want to give each user a unique user code. User code will be referrenced on other company document instead of long user name. If you enter user code here, you will find it on some cost allocation bills. Mobile Phone: Optional, the mobile phone number of the user if he/she has. Designed, Programmed, Documented By Tran Hong Quang, [email protected]; [email protected] Page 19 of 168 Pbx Billing System - English User Manual E-Mail: Optional, e-mail address of the user. If user has e-mail address, all telephone bill can be scheduled to be sent monthly to him/her at given point of time. Department: Browse to select department this user is a member. Department Head: Check this button to promote this user as Department Head. Because the user is in position of department head, he/she couldn’t move to another department if there is no new department head. That is the reason why the text box Department is in inactive status when you check Department Head button. If you want to move the person currently is Department Head to another Department, you have to promote another person to Department Head first. Your action will also de-promote former Department Head to common staff. Therefore you can move him/her. Pbx Billing System equips itself the mail client function. This function allows you to send telephone bill automatically at given time. You have some choices, for example, send user detail telephone bill To that user and CC his/her Department Head. If you want to use this sophisticated feature, you have to enter correctly both e-mail address of every staff and also point out Department Head. Address: The address of the user. Note: Any comment about him/her. View As List...: Click on this button to open datasheet-style form displaying current database of user. Datasheet-style form is easier to have an entire look over the current users, also easier to delete multiple users, but this style is not suitable for creating new user. Some feature, for example the feature of assigning an Extension to a user, won’t work for Datasheet-style form. The icon on the toolbar of Users is as follows: 4.3)Organization Chart: When you create Department and User, you can not have a general view of entire your organization. The Organization Chart is a tool allows you to to view your Organization in the tree format. You can move a User from this department to another department by dragging-and-droping it. Designed, Programmed, Documented By Tran Hong Quang, [email protected]; [email protected] Page 20 of 168 Pbx Billing System - English User Manual Change Icon: Allows you to change icon of any node. Click on any node, then Change Icon will be active. Click on Change Icon to choose the icon you want. There is invisible icon list. Whenever you reach the last icon, you will be put to the beginning icon list again. Change Color: Allows you to change the color of the text of any node. Click on any node to activate Change Color button. And then click on Change Color button to open Color Dialog box. Select the color you want. Default: Restore the Organization Chart to its installation configuration include both color and icon. All nodes of the same function have the same color and icon. That means if you change color or icon for a specific user, your custom setting will apply for all other users. The icon on the toolbar of Organization Chart is as follows: 4.4)Extension & Access Code: You have to declare all Extension and AccesseCode (if it is being used) which have been created in your Pbx to this window. The principle here is that you create a pool of Extension and Access Code, then assign it to users. Designed, Programmed, Documented By Tran Hong Quang, [email protected]; [email protected] Page 21 of 168 Pbx Billing System - English User Manual Extension: You enter all Extensions that already created in you Pbx Assign To User: It is the nickname of user this Extension or Access Code has been assigned to. You can change user by browsing a list of user in this column. It will be empty if the Extension on the left hasn’t been assigned to any staff. Locate In: Enter the room number where the handset with this extension number located. If you are a company, the field is less significant. But if you are a Hotel, this field is exactly the room number. The Hotel Bills will contain this information – the room number – in its header. Class: To classify extension. This is free text, you can enter any string. You won’t find any related between Class and anything on the telephone bill. It seem to be none-sense factor ? No. Some customers develop themselves accounting software to automatically retrieve call charge and they want to have extension classification like this. Apply Service Charge: Normally, the service charge will be assigned to the CallType – that means somehow depend on called party. But, some telephone retailers want to apply service charge by calling party, since they have multiple kind of customer. You can defined Service Charge by using “Service Charge Policies”, then you can browse them from this column to assign it to corresponding Extension. Hot Bill: If this check box is checked, the call made by corresponding Extension will be printed immediately to default printer. You can re-define the layout of hot-bill template by editing C:\Program Files\Pbxcas\ReservationLetters\Hotbill.txt (this is default installation path. If you install in other folder, you should search Hotbill.txt in relevant path). The default settings of template Hotbill.txt is: HELLO! THIS IS HOT BILL (Printed at #NOW()#) ~~~~~~~~~~~~~~~~~~~~~~~~~~~~~~~~~~~ YOUR CALL: #EXTENSION# #TRUNK# #DIALDATE# #DIALTIME# #DIALNUMBER# #DURATION# #DESTINATION# Designed, Programmed, Documented By Tran Hong Quang, [email protected]; [email protected] Page 22 of 168 Pbx Billing System - English User Manual CALL CHARGE: #PRICE# #CURRENCY# THANK YOU FOR USING OUR SERVICE The word inside two # is keyword and will be replaced by corresponding value of the call. The maximum length of Hot Bill after replacing call data must be less than 255 characters. Note: Any comment about the Extension on the left If you have to create a big range of Extension or AccessCode, it takes much time to enter one by one. For example, you have to enter the Extension ranging from 100 to 300. Thus you have to repeat the same actions 201 times. The application provides you a tool to do it quickly. Click on “Auto Create...” button to open following window: From Number: Enter the beginning number of your Extensions or AccessCodes To Number: Enter the end number of your Extensions or AccessCodes. The continuous range of Extension or AccessCode, which between “From Number:” to “To Number:”, will be created. For example, you want to create a range of Extension from 100 to150, then 200 to 250. You have to do it twice. The first time, you type 100 in “From Number:”, type 150 in “To Number:”, then click OK. You will be returned to Room form. Open this form again. This time, enter 200 in “From Number:” and 250 in “To Number:”. Click OK button. What happen if you try to create more Extensions or AccessCodes than the valid license you have or left? The answer is that the maximum Extensions or AccessCodes you are able to create equals the license you left. For example, your license is 20 and you have created 10 Extensions. Now, you want to use “Auto Create Extension and AccessCode” to create a range of Extensions. You enter 200 in “From Number:” and 300 in “To Number:”. Only the first 10 Extensions will be created (200...209) because you have only 10 free licenses. The window title may be change according your license bases on Extension or AccessCode. On the picture above, you find the window title “Auto Create A Range Of Extension Number” since your license currently base on Extension. You will find new title “Auto Create A Range Of AccessCode” if your license bases on AccessCode. For those Extension or Access Code, which haven’t been assigned explicitly, they will be belonging to System User, and System Department. System User and System Department is installation user and installation department. You can’t change its name or delete it. If you find in telephone bill some call belong to System User, that mean such call was made from unassigned Extension or unassigned Access Code Access Code page will inactive in case telephone bill base on Extension. But Extension page is always active. Because even in Telephone-base-on-Access Code mode, Pbx still output the Extension number where the call was made. Designed, Programmed, Documented By Tran Hong Quang, [email protected]; [email protected] Page 23 of 168 Pbx Billing System - English User Manual If telephone bill base on AccessCode, you have to declare AccessCode as a field of CDR by add it to Used Column List on the form named Application Settings. After doing that, the Access Code page will be active and you have the same sub-form there to create Access Codes. In telephone-bill-base-on-Extension mode: 1. Create Extension (and can assign it now or later do that in Users form) in Extension page. 2. Do not pay attention on Access Code 3. License number is the number of Extension you can create. In telephone-bill-base-on-Access Code: 1. Create Access Code (and can assign it now or later do that in Users form) in Access Code page. 2. Still create all extension although it is none sense to billing 3. License number is the number of Access Code you can create. Tip: Even you are using AccessCode-Based telephone bill, you have to still declare Extentions. When you reach the number of license you will get warning message and no more Extension or Access Code can be created. You have to contact vendor to extend your license. The icon on the toolbar of Extension & Access Code as follows: 4.5)Customer Database: Some companies ask staff to pay back the private call charge. As you may still remember, each user can register a list of his/her private number. Every call to this number that made by his/her Extension or Access Code will be on his/her private bill. But it doesn’t cover all cases. Staff can make, once a while, a call to his/her friend. So some companies want to have a way to control only long-distance calls or international calls because they are expensive. Let study the following example: Company A has many oversea partners. Many staff can make international call. Company A want its staff to explain any international call that didn’t go to any partner number. This task can not be Designed, Programmed, Documented By Tran Hong Quang, [email protected]; [email protected] Page 24 of 168 Pbx Billing System - English User Manual done by manual if the number of international call is considerable big. The answer to this problem is Customer Database function of Pbx Billing System The list telephone number of this company Company: The name of your partner City: The city where the partner office is located. State/Province: The state or province where the partner office is located. Country: The country where the partner office is located. Notes: Any comment about this partner There is a check box at the bottom of the form. If this check box is unchecked, Customer Database is only sub-tool for you to record all your partners. Customer Database will work independently with Pbx Billing SystemTM . If this button is checked, the dialed number of each call will be checked again the list of telephone number of partner to find out whether this call go to partner office or not. If this button is checked, the paper orientation of detail telephone bills (the bill has the word “Detail” in its name) will be landscape. It will have more space for one additional column containing the partner name if the call went to the partner number, and will be blank if the call didn’t go to any partner at all. Staff may have to explain only the call with partner column is blank. The icon of Customer Database on the toolbar is as follows: 4.6)Report of Defined Data: Where you can create report of the core data you have entered. Designed, Programmed, Documented By Tran Hong Quang, [email protected]; [email protected] Page 25 of 168 Pbx Billing System - English User Manual There are 7 options you can choose and then make corresponding reports Organization Data: The report contains all department and its members that you have entered on the form of Department and Users Extension List: The report contains a list of created extensions Access Code List: The report contains a list of created Access Code Currency System: The report contains Currency Exchange Rate System. Customer Database: The report contains a list of your partner and their telephone numbers. That are the partner you have entered in the form named Customer Database. Simple Telephone Rate Tables: The simple report of current telephone rate table. On this report, only main fields are showed. In Hotel or Hospital, sometime, your customer (guest or patient) ask to see the telephone rate report. You can give them this report. Full Telephone Rate Tables: The report of current telephone rate table. Almost fields of the telephone rate table will appear on this report. Thus, it is a bit complicated to read. Report Interface Uses Customized Language: Check on this button to have translated report. Preview: Click on this button to display the report on the screen. Print: Click on this button to directly make a print out of selected report without previewing it. The icon on the toolbar of Report Of Defined Data is as follows: 4.7)Undeclared Core Data: Although you try to declare all core data needed for call charge processing, but you may forget something sooner or later. For example, you may forget to create new Extension that just is created on your Pbx. So all the call may be made from this extension won’t be billed to right staff. Another case is that your telephone company created new Area Code and you haven’t created that new Area Code. The call made to that Area Code wouldn’t be calculated call charge because of lacking information. There are 5 pages. If any page has no data it will be inactive. Designed, Programmed, Documented By Tran Hong Quang, [email protected]; [email protected] Page 26 of 168 Pbx Billing System - English User Manual Undeclared Extension: Those calls were made from the extension that isn’t in database. Undeclared AccessCode: The Access Code used in this CDR is not in the database. Undeclared Trunk: The trunk parameter in its CDR is not in the database. Undeclared Area Code: The call in this page made to undeclared area code. Too Short DialNumber: You can define for each CallType, how long the DialNumber should be. It is a range, from n digits to m digits. If the call with DialNumber shorter than n, it is considered as false call and will be appeared on this page. If the call with DialNumber longer than m, the application will automatically truncate the DialNumber to the first m digits. After you enter missing information, for Pbx Billing System re-process such call automatically. The icon on the toolbar of Undeclared Core Data is as follows: If no undeclared core data detected the Undeclared Core Data form won’t be opened. You will get message that no undeclared core data detected so far. Designed, Programmed, Documented By Tran Hong Quang, [email protected]; [email protected] Page 27 of 168 Chapter 5: CALL CHARGE SCHEME CALL CHARGE SCHEME Pbx Billing System - English User Manual Upon completion of this chapter, you should be able to: Know how to manage the currency exchange system. Understand the telephone rate table and be able to update it basing on rate table of the telephone service provider. Know in detail how the application calculates the call charge for a given call. Know how to test the call charge calculation. Know how to recalculate the old call with up-to-date telephone rate table. Know how to synchronize your current telephone rate table with the one managed by us to bring your telephone rate up-to-date. 5.1)Currency Exchange System: Currency form is where you create Exchange System. You choose one currency as base currency and the exchange rate between other currency and the base currency. The Exchange rate of Base Currency and itself must be 1. So when the form displaying base currency, the text box of Exchange Rate will be disable. Usually you choose your country currency as base currency. Currency: The name of Currency. Note: Any comment. Flag: This is Updatable-indicator. You have to read the session talking about Synchronizing Telephone Rate Table of this chapter, and the chapter 10 for detail information about the mechanic, which updates the Master Telephone Rate Table file to the Slave Telephone Rate Table file. The Blue color means that the record (in this case is Currency and Note field) is updatable. The Red color means the record is non-Updatable. Not only the main record has flag, all record of Currency Exchange System has Updatable-indicator (flag). The priority of flag to its direct record is higher than the flag of mother record. For example, as you see on the picture above. Each currency has multiple exchange rates on different date. Each exchange rate record has its own flag. If the exchange rate record has Blue flag, while the mother record – the currency name and note – has Red flag, the exchange rate record is still updatable. Designed, Programmed, Documented By Tran Hong Quang, [email protected]; [email protected] Page 29 of 168 Pbx Billing System - English User Manual Effected Date: The time this exchange rate record effects. The exchange rate is changing often. Then, normally, you have multiple exchange rate records for any currency unit with different effected date. The principle to find and use the exchange rate record is that the effected date is latest but not earlier than the transaction date – here is the dial date of the call. For example, you have Exchange Rate = 1, EffectedDate=01/01/2000, and the other record with Exchange Rate= 1.5, EffectedDate=01/01/2001. Thus, the calls made between 2000 and 2001 with be applied Exchange Rate =1. The calls made later than 2001 will be applied Exchange Rate =1.5. The calls made before 01/01/2000 has no correct Exchange Rate. In such case, the Exchange Rate will be assumed equal 1 and you will get a warning message. See the picture below for more information how the exchange rate applied. Exchange Rate: The exchange rate of this currency and base currency. Each record on this form is marked by a color Flag. The Blue Flag means the records were original created by us – the software vendor, and are synchronize able. The Red Flag means the records were created by customer, and are not synchronize able. You have to take care the one you created. Read the chapter 10 – INSIDE SYNCHRONIZING PROCESS OF TELEPHONE RATE TABLE for more information how the synchronizing process does. The icon on the toolbar of Currency form is as follows: 5.2)Viet Nam Province Distance Information This window will be hidden if you select Country different than Viet Nam on declaration form. This window, by default, has 61 records for 61 provinces in Viet Nam, and its relative distance to the province you selected as your location. Beside that, there is information of Charge Area for each province If you have downloaded this application via Internet and you are in country other than Viet Nam, this form, perhaps, has no value for you. From Oct-2003, VNPT announce new telephone tariff policy, in which, for inter-province call, the call charge will generally analog to the distance between the source province to destination province. In detail, there are 3 distance-based charge level that are: Less than 400 km From 400 km to 1200 km Above 1200 km. The application now supports the call charge basing on distance like that. You just have to select your location, then the distance from your location to other province of VIet Nam will be recalculated automatically. Designed, Programmed, Documented By Tran Hong Quang, [email protected]; [email protected] Page 30 of 168 Pbx Billing System - English User Manual Beside that, for mobile telephone service charge, province near each other will be grouped to form a so-called Administrative Land Area – it is actually Charge Area. There are 3 Charge Area in Viet Nam, that are Charge Area 1: All provinces in the north to Nghe An. Charge Area 2: All provinces in the south from Binh Thuan. Charge Area 3: All remain provinces in the middle of Viet Nam There are only two charge level, Neighbor Charge-Area rate and Inter Charge-Area rate. Charge Area 1 Charge Area 2 Charge Area 3 Charge Area 1 Neighbor Charge-Area Rate Inter Charge-Area rate Neighbor Charge-Area Rate Charge Area 2 Inter Charge-Area Rate Neighbor Charge-Area rate Neighbor Charge-Area Rate Charge Area 3 Neighbor Charge-Area Rate Neighbor Charge-Area Rate Neighbor Charge-Area Rate The icon of this form on the toolbar is as follows: 5.2)Telephone Rate Tables: 5.2.1)Learning telephone charge via an example company This is very important core data and also difficult to understand. Firstly, let me introduce a typical company and some different call charge policies, which are currently applied in the world. Let discuss about the case of TotalQuality Ltd – the sample company. (There is another more detail sample about TotalQuality Ltd in ReadMe.doc) - They have one Pbx and two telephone service providers. They connect to the first telephone service provider by trunk numbered 81983405 and to second telephone service provider by trunk numbered 84719354. - The two telephone service providers have different discount policy (both OffPeak Discount and Holiday Discount). So your exchange has been already programmed to use to Least-Cost-Routing Designed, Programmed, Documented By Tran Hong Quang, [email protected]; [email protected] Page 31 of 168 Pbx Billing System - English User Manual procedure, that means it will try to route the call (by using the trunk numbered 81983405 or 84719354) to telephone service provider who offer the best price at the time the call made. - The two telephone service providers offer different period of time in a day that is considered as OffPeak time. For example, the first telephone service provider give OffPeak discount to any call which is made between 22 PM and 6 AM of tomorrow. The other telephone service provider consider OffPeak time is begin at 23 PM and up to 7 AM of tomorrow. The holiday of week usually has Holiday Discount. But some telephone companies refer both Saturday and Sunday is Holiday of week, while other company only accepts Sunday. 81983405 Telephone Service Provider 1 Tariff 1 TotalQuality’s Pbx 84719354 Telephone Service Provider 2 Tariff 2 - OffPeak period may be two or more period of time in a day. Normally, when telephone traffic goes down, the Telephone Company will offer discount to stimulate customer to make more and longer phone call. As a result, it will increase traffic. So if telephone traffic goes down systematically twice or more than twice a day, the company telephone may offer two Offpeak time per day. OffPeak Period of day - The OffPeak rate may be less than the rate in normal time by fixed ratio (15%, 20%, 30%) or not relating to standard rate (rate in normal time) by fixed ratio. - Two telephone service providers may have different holiday of a week or holiday of the year. Saturday could be holiday of week of this telephone service provider but may be not for the other. Like OffPeak rate, Holiday rate may be less than normal rate by fixed ratio or not relating to normal rate. - Some telephone service providers ask customer to pay monthly a fixed mount of money for renting the trunk line. But they give back customer a free duration for calling. For example, customer has to pay monthly 1 USD for 1 trunk number that is connected to telephone service provider. And then the customer could have 12 hours free local call. But long-distance call is always charged. - If the total connection time exceeds a specific duration, customer may have special discount (volume discount). The billing function of Pbx Billing System meets all requirements above. The steps to calculate call charge as follows: Designed, Programmed, Documented By Tran Hong Quang, [email protected]; [email protected] Page 32 of 168 Pbx Billing System - English User Manual 1. When Pbx Billing System receiving a CDR, it has to find the trunk this call went out to know which tariff should be used to calculate call charge (see the picture below). You can assign a trunk “any” to default telephone rate table. If you do so, any call with not-yet-known trunk will be charged by default telephone rate table and its trunk will be automatically added as well. 2. Check whether the call just is made in OffPeak time or Holiday. If it is, get the discount rate. If it has both OffPeak discount and Holiday discount, calculate the price by using Discount Combination option (User-Settable) 3. If the call is still in free duration, the call charge will be $0 but minus free duration of this month a mount equal the call duration. 5.2.2)Introduce to tariff interface and tariff policy First of all, you should have a general idea about the structure of a telephone rate table. Designed, Programmed, Documented By Tran Hong Quang, [email protected]; [email protected] Page 33 of 168 Pbx Billing System - English User Manual One Telephone Rate Table per one telephone service provider. Almost customer has only one telephone service provider, thus they have only one Telephone Rate Table – this is common simple case. But some customers can have multiple telephone service providers, the call will be automatically routed via whom offers the cheapest rate. In this case, you need one Telephone Rate Table for each telephone service provider. One Telephone Rate Table can have multiple Call Types. You group the calls, which has the same charge scheme to a call type, of course they must belongs to single telephone service provider. One Call Type can have multiple Area Codes. For example, the international Call Type much have the country code for all country in the world. Each Area Code can have multiple rates for each period of time. The call charge rate is looked like the money exchange rate in some point of view. It is not fixed, instead of change time by time. You can keep multiple call charge rate for different period of time. The application can find the date of the call and know which charge rate is right for that call. Let return to Rate Table form and learn how to configure Pbx Billing System to work correctly. If you are using the version older than 3.4, you have only one interface to input telephone tariff, that interface is a window named “Telephone Rate Table”. If you are using version later than 3.4, you may has another interface named “Telephone Tariffs” which is a nicer windows for you to edit telephone tariff. The both interfaces have the same objects but “Telephone Tariff” organizes objects in Tree-style, while the old interface “Telephone Rate Tables” uses the list-style to present the objects. You can switch between old form (listview-based) to new form (treeview-based) by clicking on “Switch To Treeview” button at the bottom of the old form. And vice versa, you can switch from new form (treeview-based) to old form (listview-based) by clicking on “Switch To Listview” button at the bottom of new form. Firstly, study new interface named “Telephone Tariff”: Designed, Programmed, Documented By Tran Hong Quang, [email protected]; [email protected] Page 34 of 168 Pbx Billing System - English User Manual Holiday Of Year The Trunks, which are applied this telephone rate table. The interface has two parts. The left-hand-side is the Tree of tariff objects, which contains: Telephone Rate Table |_______CallType |_________AreaCode Click on the object on the left tree will load its properties on the right pane. The root of the Tree is Telephone Tariff table. You can create multiple Telephone Tariff tables and assign different trunks to each Telephone Tariff table. To calculate the call charge, the billing system will check the Trunk parameter on raw call log again Telephone Tariff table-Trunk assignment that you configure here to find the right Telephone Tariff table for the call. The second-level nodes on the left Tree are the Call Types. As I mentioned above, you can create multiple Call Type per Telephone Tariff table. The third-level nodes are AreaCodes. Each CallType can have multiple AreaCodes. AreaCodes can be normal AreaCode that you can dial as prefix to reach the B-party area. But there are some special AreaCodes which beginning not by numeric digit, these special AreaCodes are Charge Template. Select Action: You can create/delete object on the Tree by select corresponding action on this combo box, then click on Execute button next to it. Depend on selected node level on the Tree, the valid actions you can do is different. For example, you can create new Telephone Tariff table if you are selecting a node on level 1 on the tree (level of Telephone Rate table). If you are selecting a node on level 2 (level of Call Type), you can create new CallType under existing Telephone Tariff table.The possible values of “Select Action” combo box are: "Create new Tel. Rate Table": Create a new Telephone Rate Table with default name is “New Blank Telephone Rate Table”. You have to update its data, and change it name before you can add another one. "Create new Call Type": Create a new Call Type with default name is “New Blank Call Type”. You have to update its data and change it name before you can add another one. If currently selected node is a Telephone Rate Table, the newly-created Call Type will be Designed, Programmed, Documented By Tran Hong Quang, [email protected]; [email protected] Page 35 of 168 Pbx Billing System - English User Manual under that Telephone Rate Table. If currently selected node is a Call Type, the newlycreated Call Type is slibing of selected one. "Create new Area Code": Create a new Area Code with default Name is “[Empty] New Blank AreaCode”. You have to update its data and change the name before you can add another one. If currently selected node is a Call Type, the newly-created Area Code will be added under that Call Type. If currently selected node is Area Code, the newly-created Area Code is slibing of selected one. The value here has two parts separated by the first blank. The first part is AreaCode, the second part is Destination name. "Delete selected node": If you select this action, the selected node will be removed. The first click of mouse on the TreeView will select the node, the second click on selected node will bring you directly to editing mode. You can change the name of Telephone Rate Table, Call Type by enter any string. But pay attention when changing the text here of AreaCode, you have to input the AreaCode, then one blank, all the remaining string is Destination name. Now, you can click on the Telephone Tariff table node to load its properties to the right pane. You will see: Telephone Rate Table: The name of the telephone rate table. Normally, each telephone company has their own telephone tariff. They give this information to you. Then you create a telephone rate table on this form, which store mentioned telephone tariff. Flag: The color of flag let you know that the record is updatable or non-Updatable. Not only Telephone Rate Table name, but also every record under this form has a flag. The flag of subrecord has no effect on the mother record, but has higher priority to its record than the flag of mother record. Please read “Synchronizing Telephone Rate Table” session, which is explained right after this session, and the chapter 10 to get more information. Blue means Updatable record. Red means non-Updatable record – this is the private record of customer. Customer has to keep it up-todate manually because the telephone rate table synchronizer ignores Red Flag record. THIS FEATURE IS AVAILABLE ONLY FOR VIETNAM The Tariff form of Pbx Billing System has two pages. The first page contains: Service Provider: Information of telephone service provider Note: Any thing customer want to note about this tariff. Holidays: These are holiday of the year, Holiday Day Of Week: The day of week in which the call is made wills has holiday discount. Trunks: The trunk, which is used to connect your Pbx to your Telephone Service Provider that offer you this telephone tariff. As mentioned above, you can use service of two or more telephone company. Each company will offer their own telephone tariff. You have to let Pbx Billing SystemTM know which trunk connected to which telephone company. That information will help Pbx Billing SystemTM to find out the right telephone tariff for the call. Technically speaking, Telephone Tariff bases on Trunk connect between customer and Telephone Company. If you create a special trunk named “any”, the application will automatically add a new trunk if it found. This is a simplest way to let the application to learn by itself about your particular trunks, but it has very weakness that if there is some strange character on the position of the trunk, that string will be considered as new trunk and automatically add into database. You may find a column named “Dummy”. Pls stick on this check box if the trunk is not a real one. For example, you should check “Dummy” column of the trunk named “any” or any dummy trunks, which are needed for sole selecting Telephone Rate Table only. Next, click on any Call Type node (second level nodes) to load CallType properties on the right pane. Let me remind you of CallType concept and discount combination possibilities: Designed, Programmed, Documented By Tran Hong Quang, [email protected]; [email protected] Page 36 of 168 Pbx Billing System - English User Manual As you may know, call charge scheme usually is divided into sub-class named CallType (For example: service call, local call, inter-province call, and international call). CallType is group of connections, which have the same rules for calculating price. CallType’s properties presents on two sub-pages. Let go through the boxes on the sub-page named “Call Type’s Properties” one by one: 1. Call Type: The name of call group. 2. Prefix: Let me give an example to explain about prefix. As you may know that Country Code of Germany is 49, of United Kingdom is 44, France is 33, Italy is 39. If you make a call from US to these countries, you have to dial 01149xxxxxx, 01144xxxxxx, 01133xxxxxx, 01139xxxxxxx. There are 2 ways to create AreaCode for these IDD calls, the first way is creating let Prefix empty and create a longer AreaCode like 01149, 01144, 01133, 01139. The second way is set Prefix=011 and create shorter AreaCode like 49, 44, 33, 39. Both ways result to the same call charge calculation. 3. Init. Period: The period of time considered as the first block. 4. Add. Period: The next period of time considered as additional block. 5. Currency: Browse to choose one currency form your currency system for this Call Type. 6. Charge Class: The CallType name itself more or less give you draft idea where the destination is. But one Telephone Rate Table can have more than one CallType lead to the same destination. Thus, you need an mechanism to classify the CallType by destination. You can select one of three possible values that are “LOCAL”, “DOMES” and “INTER” (Local call, Domestic call, International call). Some reports need this classification to group the bill. 7. Free First Blocks: The period of time at beginning of each month you can use telephone service free. Usually you have to pay a fix mount of money to rent the trunk, and telephone service provider give you some free call calculated in connection time. Designed, Programmed, Documented By Tran Hong Quang, [email protected]; [email protected] Page 37 of 168 Pbx Billing System - English User Manual 8. Discount Combination: In case the call has more than discount, the final discount the call has depends on option you choose here (Lowest Price, Holiday Discount Only, Off-Peak Discount Only, Off-Peak Discount + Holiday Discount) 9. OffPeakStartTime: The point of time that is beginning of Off-Peak.period 10. OffPeakEndTime: The point of time that is the end of Off-Peak period. The telephone calls are established between Off-PeakStartTime and Off-PeakEndTime will get Off-Peak discount. There may be more than one period of time per day in which caller can have OffPeak discount. So you can enter more than one row in this sub-table. 11. AdditionalOffPeakDiscount: The additional discount specialy for this period of time. For example, How do we do to give 20% discount for the call made between 22 PM to 23h59’ PM, 25% discount for the call made between 0 AM to 5 AM, and 18% discount for the call made between 5 AM and 7 AM. The answer is that OffPeak Dist=0, and create 3 Off-Peak period of times and give each Add. OffPeakDist, in the order the valued of 20%, 25% and 18% 12. OffPeak Discount On Ratio Basic: If this button is in checked status the call rate of the call made in Off-Peak period will has ratio discount. That mean the Off-Peak call rate is less than the standard rates a given percent, which you can enter in OffPeak Discount Percent text box. 13. OffPeak Discount Percent: The percent value, which is the OffPeak Discount. This text box only is active if OffPeak Discount On Ratio Basic check box has been checked. 14. Holiday Discount On Ratio Basic: This field has the same meaning for Holiday as OffPeak Dist Ratio has for Off-Peak time. Check/Uncheck this buttons to switch Holiday discount policy from Ratio-Based to random value. 15. Holiday Discount Percent: The amount of discount the call made in Off-Peak time will have. It only effect if Holiday Discount On Ratio Basic check box has been checked 16. Vol Discount 1, When Exceed Block No:This is volume discount. You may have “Vol. Discount 1” discount if total connection time of this CallType, in this month, exceeds the value on “When Exceed Block No” text box located on the right of “Vol Discount 1” box. If 0 is entered in “When Exceed Block No” text box, the volume discount policy is disabled. 17. Vol Discount 2, When Exceed Block No: You may have “Vol Discount 2” discount if total connection time of this CallType, in this month, exceeds the value on “When Exceed Block No” text box located on the right of “Vol Discount 2” box. So there are two level of volume discount. If 0 is entered in “When Exceed Block No” text box, the volume discount policy is disabled. 18. On Trunk Basic: The volume discount can be applied for the whole company or on each trunk – that completely depends on your telephone company. If this check box is sticked, the volume discount will bases on each CallType and Trunk. Otherwise, “On Trunk Basic” is unchecked, the volume discount will apply for the company, despite how many trunk you are using. 19. Surcharge: This is service charge. Usually re-sale Telephone Company will put this percent of top of call charge. See the formulas below. 20. Flat Charge: The fixed fee per call that the caller has to pay to use telephone server. See the formulas below. Meaning of the objects on second page named “Additional Features” is as follows: Designed, Programmed, Documented By Tran Hong Quang, [email protected]; [email protected] Page 38 of 168 Pbx Billing System - English User Manual 1. Check The Length Of Dial Number: If this button is checked, the number of digits of DialNumber will be examined. The next two text boxes will be activated allowing you to specify a range for valid DialNumber. If DialNumber’s length is shorter than the value in “Drop The Call If It Is Shorter Than:”, the call will be discarded and moved to “Too Short DialNumber” page of Undeclared Core Data form. If DialNumber’s length is longer than the value in “Truncate If It Is Longer Than:”, the application will automatically truncate the DialNumber to that value. 2. Min. Duration: The call of this CallType will only be calculated its call charge if its duration is longer than Min. Duration. In other word, you won’t charge the call belong to this CallType if it lasts shorter than Min. Duration. 3. CDR Color: You can give each CallType an color to easier to recognize them. Click on this button to open color dialog, then select the color you want. Whenever the application receives a new coming CDR, the application will go to find the best CallType for it, determine the assigned color, and display the received call in corresponding color. You also have an option to configure the bill to display the call record in assigned color. Note that for Off-Peak discount, if user enters the same value in OffPeakStartTime and OffPeakEndTime, and then no call can be made in between them. So no discount here at all. We will over view the listview-based interface of Telephone Rate Table. At first, user may find that Treeview-based interface seem to be easier to use because it guides you step by step. But experienced users may find that Listview-based interface is also easy to use and they can do telephone tariff update quicker. From Treeview-based, you can click on “Switch To Listview”, then you will have below interfaces. Using Listview interface, you can and have to move from this Telephone Rate Table to another by clicking the navigation buttons at the bottom. Each window shows all properties of a Telephone Rate Tables including CallType’s properties and AreaCode’s properties. There are multiple subpages to present all that information. Designed, Programmed, Documented By Tran Hong Quang, [email protected]; [email protected] Page 39 of 168 Pbx Billing System - English User Manual The Trunks, which are applied this telephone rate table. Holiday Of Year In fact, telephone rate table is stored in a file named telephone rate table file. There are two kind of telephone rate table file that are Master Telephone Rate Table file (extension of “.mst”) and Slave Telephone Rate Table file (extension of “.slv”). You can click on “Change Tel. Rate Table...” to call Open File dialog, which allows you browse and change your telephone rate table file. After that, you are able to calculate the call charge basing completely on new telephone rate table. The form’s Designed, Programmed, Documented By Tran Hong Quang, [email protected]; [email protected] Page 40 of 168 Pbx Billing System - English User Manual caption will let you know which telephone rate table file you are using. If the caption ends with “(Using Slave Replica)”, you are connecting to Slave Telephone Rate Table file. If the caption ends with “(Using Master Replica)”, you are connecting to Master Telephone Rate Table file. With the role of end user (customer), you should always connect to Slave Telephone Rate Table file. We will take care the Master Telephone Rate Table file for you. Periodically, we send you the Master Telephone Rate Table file, you can synchronize the Master Telephone Rate Table file with Slave Telephone Rate Table file – the one, normally, you are using – to get your telephone rate up-todate. 5.2.3)How to input rate record for each Area Code Click on third-level nodes, which are AreaCode, to load AreaCode properties to right pane. The information you have to input for an AreaCode record is: Area Code Destination Note Charge Template Relative-Distance Charge Group And the information you have to input for a detail rate record is: Effected Date Initial Period Rate (this name can be changed to Normal Rate depend on CallType’s properties) Addition Period Rate OffPeak Rate For First Period OffPeak Rate For Additional Period Holiday Rate For First Period Holiday Rate For Additional Period We will learn the meaning of each column one by one. Designed, Programmed, Documented By Tran Hong Quang, [email protected]; [email protected] Page 41 of 168 Pbx Billing System - English User Manual 5.2.3.1)Area Code: The Area Code is the prefix of the digit series that you have to dial to reach B-telephone. 5.2.3.1.1)Common Area Code: For example: 04 is Area Code of HaNoi or other word - you have to dial 04 first, then the telephone number of B party to reach it in Ha Noi. Another example: 001 is Area Code for US. Note: You can use Prefix property of CallType to reduce the number of digit you have to input for AreaCode. For example, to make an IDD call from Viet Nam, you have to dial 00, then the destination Country Code. If you leave Prefix empty for IDD CallType, then you have enter 001 for AreaCode of US. But you can set Prefix=00 as the digits you have to dial to use IDD service, then you can enter 1 as AreaCode for US. People normally think about Area Code as Common Area Code like above example. This application supports further special Area Code to simplify or reduce the number of Area Code you have to input or manage. Please see next paragraphs. If this is the first time you have worked with this Telephone Rate Table, you may play around with common AreaCode only. It is quite simple and easy to understand. And the best thing that you can almost input your Telephone Tariff by using common AreaCode. Later on, once you have familiar with this telephone tariff, and you may have more complicated calculation, you can learn other kind of AreaCode. You can post your question to forum.bicsoft.net, I will answer you case by case. The best matching principle: The call will be determined belong to which Area Code by the best matching rule. According to this rule, if more than one Area Codes match the beginning digits of the dial number, the longer Area Code will be choose. For example, you have both AreaCode1 = “8” and AreaCode2=“82”. If you dial “825327”, Pbx Billing System will decide that the call made to AreaCode2, even the AreaCode1 also match the beginning digits of dial number. The reason of choosing AreaCode2 because AreaCode2 matches by two digits, while AreaCode1 matches only one digit. If you dial “833523”, the Pbx Billing System decides the call made to AreaCode1. Because only AreaCode1 matches by 1 digit, AreaCode2 doesn’t match any beginning digits. 5.2.3.1.2)Service number is a special Area Code: There are some service numbers, which give you different rate for given areas. For example, in Viet Nam, some service numbers are 171, 177, 178. This isn’t an area code. It is just the service code, by dialing it, you will get another call rate for given destination. The service code together with each area code creates a Full Combined Area Code (FCA). So that, you can enter 17104 for Ha Noi, 171056 for Binh Dinh to the Telephone Rate Table. But if the service code gives you the same rate for all the destinations under the same CallType, it isn’t good idea to re-enter every combined area code. For example, 171, 177 and 178 charges the same rate for every international call. It doesn’t depend on which country you dial in. Thus, if you enter 171, 177 and 178, then all country codes, you have to enter about 3x190= 570 Full Combined Area Codes more. This will slow down the application and take you more time to enter, more time to manage. The better way is entering the service number ending with * or ?. The meaning of * and ? here different from the common meaning of it you may familiar. “?” will let Pbx Billing System tries to find Area Code for all the digits from the position of “?” forward. For example, you have service number of 171?, you dial 171825327. Pbx Billing Designed, Programmed, Documented By Tran Hong Quang, [email protected]; [email protected] Page 42 of 168 Pbx Billing System - English User Manual System find out “?” at position of 4, so it cuts out 825327 from dial number and continue to search the Area Code of 825327. The result is Local call. n character of “*” will let Pbx Billing System looks back n digits from the first “*” and try to find the Area Code for all digits from there forward. For example, you have service number of 17100**, and you dial 1710044825327. Pbx Billing System find out “**” at position of 6, it looks back at position of 6-2=4 (2 is the number of “*” found) and cut out 0044825327. Pbx Billing System continues to find the Area Code for 0044825327. This is a call to England. I try to give you an complex example, in which show you how Pbx Billing System finds out the normal Area Code and combined service number and normal Area Code for a call: - - Assume that the “Inter-Province” area codes and “International” area codes have been created. The “Inter-Province” area codes begin by “0” and the second digit must be other than “0”. The “International” area codes begin by “00”. Assume there is an Area Code=”8” named “Local” for local call. Create a new CallType, then create 3 Area Codes as follows: o Test Area Code 1=”171?” o Test Area Code 2=”1710*” o Test Area Code 3=”17100**” Thus: 1. if you dial 171825327, the Pbx Billing System will output the call charge information with Destination = “Test Area Code 1 – Local”. Because “Test Area Code 2” and “Test Area Code 3” can’t match the beginning digit of the dial number. For the “Test Area Code 1”, the first 3 digits – 171, match 3 first digits of dial number. The character of “?” let Pbx Billing System cuts the dialed number from the position of 4 and continue to look for the best matched Area Code. The dial number after cutting is 825327, this dial number made to the local Area Code=”8”. The destination will be created by joining “Test Area Code 1” and “Local”. 2. If you dial 171056825327, the Pbx Billing System will output the call charge information with Destination = “Test Area Code 2 – Binh Dinh”. Pbx Billing System find out that “171?” also the Area Code for this call, but the matched digits is only 3, while “1710*” matches 4 digits. The “Test Area Code 3” doesn’t match the first digits of dial number. Thus, the best matching Area Code is “Test Area Code 2”. Pbx Billing System find out * at position of 5, it looks back at position of 5-1=4, cut the dial number from this position. The after-cutting dial number is 056825327. Pbx Billing System continues to look the Area Code for 056825327. It will find out 056825327 is the call made to Binh Dinh province. 3. If you dial 1710044825327, the Pbx Billing System will output the call charge information with Destination = “Test Area Code 3 – England”. The “Test Area Code 1” matches 3 digits, “Test Area Code 2” matches 4 digits, “Test Area Code 3” matches 5 digits. “Test Area Code 3” is selected. Pbx Billing System find out “**” at position of 6, it looks back at position of 6-2=4 (2 is the number of “*” found) and cut out 0044825327. Pbx Billing System continues to find the Area Code for 0044825327 and found this is the call to England. In case, the second Area Code search doesn’t return any Area Code, the combined Area Code has one member, that is the first Area Code detected. The call rate is the rate of the first Area Code detected. The purpose of second Area Code search is only giving you more information about the call. 5.2.3.1.3)Area Code for Charge Template: Each Area Code can be defined a its own rate. So that you can have a lot of call charge rate. In fact, many Area Codes have the same call charge, that mean the same price for the call to those Designed, Programmed, Documented By Tran Hong Quang, [email protected]; [email protected] Page 43 of 168 Pbx Billing System - English User Manual Area Codes. The Area Code number in this case is only used for routing purpose of the exchange. Thus, if you have to input a gain the same value for multiple Area Codes, it is not the best way. Later on, if the call charge change, you have to do gain that boring job for multiple Area Codes. Hotel Management System introduces a concept of Charge Template. Charge Template defined by special Area Code, which isn’t real Area Code. The Area Code of Charge Template begins by character @, then follow by a name (string), not a digit series. Below is screenshot of Charge Template @Local in case you are using Treeview-based interface And this is screenshot of Charge Template @Local in case you are using Listview-based interface The remain columns of Charge Template have the same meaning with common Area Code, except column Destination and Charge Template. You can enter any string to column Destination, but I suggest you should consider column Destination as a name of the Charge Template. For column named Charge Template (of a Charge Template record. A bit confused due to the same name, hopefully you can distinguish), it should always has value of “Not Assigned” After definition of Charge Template record, any real Area Codes, which have the same charge rate as the Charge Template you just defined, will point to that Charge Template. How to do that? You just have to click on column Charge Template to browse a list of selectable value. The list has “Not Assign” line by default, plus the name of all Charge Template you define on this Call Type. Again, look at the screen shot above, other real Area Codes like 4, 5, 6, 7, 8, 9 have Charge Template = Local Charge Group. How about the call charge calculation? For example, you make a call to 8633467, the application determines this call is a local call, the Area Code should be 8. Next, there is no detail call charge define for this Area Code, instead the application can find column Charge Template of this Area Code pointing to “Local Charge Group”. The application will take the rate of “Local Charge Group” charge template to apply for this call. Below is the picture showing you the steps used to calculate the call charge via Charge Template. I take the Listview-based interface because it is easier to see the calculation flow on this interface than Treeview-based interface: Designed, Programmed, Documented By Tran Hong Quang, [email protected]; [email protected] Page 44 of 168 Pbx Billing System - English User Manual 1. 2. 3. 4. 5. The application found the Dial Number has Area Code of 09053. The Area Code 09053 has no detail rate, instead it use Charge Template = Inter Area. Look for Charge Template = Inter Area Take the rate defined for Charge Template=Inter Area Apply the rate to the call. 5.2.3.1.4)Area Code of distance: This feature is only applied for Viet Nam. The inter-province call in Viet Nam will have 3 price levels depend on distance between the source and the destination of the call. Designed, Programmed, Documented By Tran Hong Quang, [email protected]; [email protected] Page 45 of 168 Pbx Billing System - English User Manual There are special Area Codes to define the distance. This distance Area Code has special character: <value The call with distance shorter the value will be applied the rate defined by this distance Area Code. >value The call with distance longer the value will be applied the rate defined by this distance Area Code. [value1-value2] The call with distance between value1 and value2 will be applied the rate define by this distance Area Code. The remain other column of distance Area Code have the same meaning as the common Area Code, except the column Relative-Distance has no meaning, and Charge Template should always be “Not Assigned”. As mentioned above, the relative-distance between your province and remain other provinces is automatically calculated. So that, the application is able to know which distance Area Code should be used to calculate the call charge. 5.2.3.2)The other properties of AreaCode Destination: The name (usually the name of place for fix telephone number) of the destination of connection. Note: Any note about this AreaCode Relative-Distance: This field is only applicable to Inter-province call within Viet Nam. You don’t have to input any value, instead when you select your province during installation, the relative distance from your location to the remain 60 provinces in Viet Nam has been recalculated and appear here. Note that by selection your province, the application will be able to determine on each administrative area you are, then re-calculate call charge for mobile phone service as well. For example: - If you select Ha Noi as your province, then any mobile phone Area Codes, which lead to the province in the north will get Neighbor Charge-Area rate, the Area Codes lead to the provinces in middle of Viet Nam are also be given Neighbor Charge-Area rate, and the Area Codes lead to the provinces in the south will have Inter Charge-Area rate. - If you select Ho Chi Minh City as your province, then any mobile phone Area Codes, which lead to the province in the north will get Inter Charge-Area rate, the Area Codes lead to the provinces in middle of Viet Nam are also be given Neighbor Charge-Area rate, and the Area Codes lead to the provinces in the south will have Neighbor Charge-Area rate. Designed, Programmed, Documented By Tran Hong Quang, [email protected]; [email protected] Page 46 of 168 Pbx Billing System - English User Manual For the country out of Viet Nam, you can define manually the distance from your location to other place in your country (destination of the call). Many Telephone Companies have charging scheme basing on the distance from calling party to called party. If so, you can define a Charge Template like [x-y], then all the call to destination which far from x to y from your location will be charged by rate of this Charge Template. Charge Template: You can define a special Area Code, with prefixed by @. This is not real area code, it is a template of call charge. Then, on the same call type, you can click on the column named Charge Template to select the template of call charge you just define. When there is a call record sent from Pbx with the Area Code charged by template, the application will search for the template, then apply the rate defined in the template to the call. The advantages of Charge Template is that you can point multiple Area Code to the same Charge Template. Yes, in fact, there are a lot different Area Codes have the same rate. Whenever you want to change the rate for such big amount of Area Code, you have only do one – change the rate of the Charege Template. Charge Group: Charge Group is derivative of Charge Template. The principle is that assigning a tag to any AreaCode. Then define some special Charge Templates, which have the format of: #Tag1:Tag2 or #Tag1: * Go to Application Tools>>User Information and enter your location Zip Code. Your Zip Code will be re-used as Tag1. You enter a value to Charge Group box of all AreaCode and this value will be considered as Tag2. The billing software will analyze the dialed number to find out the right AreaCode, the take the Tag2. When both Tag1 and Tag2 are known, the billing software will search for Charge Template of #Tag1:Tag2. If this Charge Template found, it will be used to calculate the call charge. If no #Tag1:Tag2 found, the billing software will search for #Tag1:* #Tag1:* will match all the call made from location of Tag1 to anywhere which the AreaCode is in the same CallType. Let me explain more about Charge Group by example. For long-distance domestic call, almost US telephone company charge by 2 rates: 1. Within state 2. Inter-state Charge Group method allows re-building the telephone tariff automatically so that wherever you are in US, you will have right rate for domestic call. When you selecting your location on User Information dialog, the billing software knows Tag1. It will automatically add 2 special charge templates to telephone rate table which are #Tag1:Tag1 for within-state call rate, and #Tag1:* for inter-state call rate. You can make a test by reinstall the billing software, the first time you logon, you will be asked to declare some information about you. To load US telephone tariff, please select “US” for Country combo box, then on Province combo box are all major cities/places of US. I selected Phoenix as my location. Phoenix belong to Arizona, therefore AZ will be loaded automatically to Zip Code box. AZ will be used as Tag1. Designed, Programmed, Documented By Tran Hong Quang, [email protected]; [email protected] Page 47 of 168 Pbx Billing System - English User Manual Click OK to save your declaration. Go to Call Charge Scheme>>Telephone Rate Table, you will have below screenshot: As you can see from screenshot, there are 2 Charge Templates: #AZ:* is the rate of all the call made from Phoenix to anywhere in US. #AZ:AZ is the rate of all the call made from Phoenix to place within in Arizona. If you select other location on User Information dialog, the software is able to create another 2 Charge Templates for you. By using this method, I can support all US cities even I have only one Telephone Tariff file of AT&T. Designed, Programmed, Documented By Tran Hong Quang, [email protected]; [email protected] Page 48 of 168 Pbx Billing System - English User Manual Note: If you have old version, that old setup package may not have the telephone rate table of ATYT. If so, you can download AT&T telephone tariff table from my website www.bicsoft.net, unzip it, copy it to C:\Program Files\Pbxcas\TelTariffs, go to Call Charge Scheme>>Telephone Rate Table and click on “Change Tel.Rate Table” to connect to AT&T telephone tariff file there. 5.2.3.3)The properties of detail rate record 5.3.3.3.1)Basic properties of record rate Effected Date: The date onward, this call charge rate takes effect. Initial Period Rate: The rate for the first block of the call happened in Peak time. This column may change to Normal Rate if the CallType this AreaCode belong to not to be charged by different rate for first period and any additional period. You should reference to Init.Period and Add.Period parameters of CallType’s properties. If Add.Period=0, that means one rate for all charge block, the name of this column will be Normal Rate. Additional Period Rate: The rate for each additional block of the call happened in Peak time. This column will be hidden in case the CallType of this call not to be charged by different rate for first period and additional period. Please cross-check with Init.Period and Add.Period of CallType. If Add.Period = 0, that means the call belong to this CallType will be charged by one rate for all block, then this column is not visible. Double click to call the electronic calendar or the Call Charge Group Editor The latest Effected Date Rate for first block Rate for additional blocks Standard telephone rate: 4 fields are enough for calculating call charge In case the call can has discount, what more information needed to calculate discount and then adjust the call charge to amount of money the caller has to pay? Let us give you a summary about 6 different telephone discount cases as follows; 1. Off-Peak Discount bases on ratio. Call made in Off-Peak period has the rate less than the standard rate by a ratio. For example, 5%, 10%, 50% 2. Off-Peak Discount for the call made in Off-Peak period doesn’t have relation to the rate in normal time. For example, the standard rate of first block and additional block are A, B. The rate of that call made in Off-Peak period is A1 for first block and B1 for additional block. But if A1/A <> B1/B that means there is no ratio relationship between standard rate and OffPeak rate. 3. Holiday Discount bases on ratio for the call made in Holiday of week or Holiday of year. 4. Holiday Discount for the call made in Holiday of week or Holiday of year doesn’t has ratio relationship with standard rate. 5. If the call made in Off-Peak period of Holiday, customer may have both discounts or has only one of them. 6. Customer may have volume discount if total connection time exceed given mount of time. Designed, Programmed, Documented By Tran Hong Quang, [email protected]; [email protected] Page 49 of 168 Pbx Billing System - English User Manual If the Off-Peak Discount doesn’t base on ratio, we have to provide the detail rate for Off-Peak call. Two more columns will be appeared. They are “OffPeak Rate For First Period” and “OffPeak Rate For Additional Period“. Of course if Off-peak rate bases on a ratio of normal rate, you don’t have to explicitly input Off-peak rate. Check the parameter “OffPeak Discount On Ration Basic” of CallType. 1. OffPeak Rate For First Period: The rate for the first block of the call, which is made in OffPeak time. On the picture, you can’t see the whole column name because of lacking space. In fact you can scroll and extend the column width to see its name. 2. OffPeak Rate For Additional Period: The rate for each additional block of the call, which is made in Off-Peak time. Even the property “OffPeak Discount On Ration Basic” has value of False, this column is still invisible in case the property Add.Period of CallType is zero. Because if Add.Period=0, the same rate will be applied for the whole call duration, “OffPeak Rate For First Period” is enough information to calculate the call charge. To make the mentioned columns above to appear, you have to uncheck “OffPeak Discount On Ratio Basic” check box. The same thing applied to rate of the call made in Holiday. If the Holiday Discount doesn’t base on ratio, we have to provide explicitly the rate of call, which is made in Holiday. Two more another columns will be appeared. They are Holiday “Holiday Rate For First Period” and “Holiday Rate For Additional Period”. 1. Holiday Rate Fore First Period: The cost for the first block of the call, which is made in Off-Peak time. You couldn’t see the whole name on the picture above because of lacking space. In fact, you can extend the column width, scroll right and then you can see the whole column name. 2. Holiday Rate For Additional Period: The cost for the additional block of the call which is made in Off-Peak time. This column is invisible if the parameter Add.Period of CallType is zero. Because if Add.Period=0, one rate for the whole call duration => one rate you input for first period is enough. To make the mentioned columns above to appear, you have to uncheck “Holiday Discount On Ratio Basic” check box. 5.3.3.3.2)Step-based rate by block order Let talk about the demand of call rate, which is changing for different call period. For example, the rate of Telephone Company is 2 currency units (abbreviation is “cu” - I don’t want to use any currency name here) for 1 minute. Some hotels want to charge the telephone service like this: 10 cu 9 cu 8 cu 7 cu 6 cu 5 cu 2 cu (rate of telephone company) for 1 minute for next 1 minute for next 1 minute for next 1 minute for next 1 minute for next 10 minutes for the rest of the call This is away to get the service charge. The service charge is higher for beginning blocks of the call, it is down and down until it reach the rate of telephone company. Someone may think this is crazy call charge scheme. Actually it is not, it is intelligent method. It takes you more time to think about how you want to have Service Charge and update the telephone tariff. Designed, Programmed, Documented By Tran Hong Quang, [email protected]; [email protected] Page 50 of 168 Pbx Billing System - English User Manual The commonly used Service Charge is taking a percent basing on total call charge. This kind of service charge has some disadvantages: - If the call rate is very low, the call is short => the total call charge is very small => 5% or even 30% Service Charge is nothing, you may don’t have change to give back to caller. - If the call rate is very high like IDD call, the call is long => the total call charge may be very high => 5% or 30% Service Charge is too much and not reasonable to charge that amount of money as a service charge. By default, this feature is disabled. You have to activate it by going Application Tools>>Application Settings>>turn to page named “Option 1”>>Check the check box named “Multiple Rates Basing On Block Order”>>Click OK to save your change. Go back to Telephone Rate Table. Right mouse click on any column of existing rate record, you will have a shortcut menu, click on “Open Step-based Rate Form” to launch “Detail Rate By Block Order” form The basic rate will be copied to the right bottom corner of the windows. As I mentioned above, this rate will be applied for the rest duration of the calls. We will define the rate for first blocks on the list. Designed, Programmed, Documented By Tran Hong Quang, [email protected]; [email protected] Page 51 of 168 Pbx Billing System - English User Manual Rate Order: Because you can define multiple rate records on this list, we need a way to short your rate record. Then, the billing software will take one by one rate record from the first one on this list to calculate the call charge. Example below will explain more. Applied Blocks: For each record, you decide how many blocks this rate should be applied for. For example, I make a call lasting for 6 blocks. The steps taken to calculate the call charge are: Take the first record on the list, this rate record applied for 2 blocks at rate of 4000 There are 4 blocks left. Take the second rate record, this rate record can be applied for 5 blocks. Actually we still have 4 blocks. It is OK, we charge these 4 blocks at rate of 3900 for each. How about the call lasting for 100 blocks? 2 first blocks will be charged at rate of 4000 for each Next 5 blocks will be charged at rate of 3900 for each Next 6 blocks will be charged at rate of 3800 for each The remaining 87 blocks will be charged at rate of TelCo, which is 2273 for each block. 5.3.4)Be able to set multiple call charges by dial time per Area Code The call charge is changing from time to time. If you only keep the latest call charge rate, your bill is only correct for the new-made call with the dial date later than the EffectedDate of the call charge rate. But you might need to rebill the call in the past. In this case, the old calls will be applied the later call charge table. Pbx Billing SystemT M allows you to keep multiple call charge records for one Area Code. Each record will be attached a field look like the time stamp. The field is called EffectedDate. The dial date of given call will be compared again the EffectedDate to find out the right rate. On the Call Charge Rate Tables form, the latest rate will be displayed if there are multiple one for given Area Code. For example, you may have two call rates for the call made to Ha Noi as follows: Effected Date 01/10/2000 01/10/2002 First Block Rate 4500 4010 Additional Block Rate 2500 2060 Thus, the second rate record with First Block Rate = 4010 and Additional Block Rate = 2060 will be displayed on the Call Charge Rate Tables. To see all the rate record of an Area Code, you click on the “+” sign on the left of Area Code field. A sub form will be opened. On the sub form, you will find EffectedDate at first column and the other call charge information. You can edit the call charge directly on this form. Double click on EffectedDate to open electronic calendar to quickly select a desired date. 5.3.5)The rate selection order Recall 4 concepts: Detail Rate: Is the rate you define directly for each Area Code. Charge Template: The pointer of given Area Code, which points to Charge Template Area Code. Call Charge by Charge Template is a way to indirectly calcalate the call charge. The advantages of this model is reducing the time you have to input the rate and also update later on if the rate change in the future. Charge Group: Distance Charge: The call charge will be calculated upon the distance between the source and the destination of the call. To do this call charge model, you have to define the relative distance for destination. In fact, this model is only be applied for Inter-Province call of Viet Nam. Designed, Programmed, Documented By Tran Hong Quang, [email protected]; [email protected] Page 52 of 168 Pbx Billing System - English User Manual You can assign 1, 2, 3 or even all 4 charging methods mentioned above to a given Area Code. If so, the priority the application takes is that: Detail Rate --> Charge Template --> Charge Group --> Distance Charge That means: If an Area Code has valid rate information for all 4 methods, the application will use the method “Detail Rate” If an Area Code has valid information for Charge Template, Distance Charge and Charge Group, the rate information of Charge Template will be used. If an Area Code has valid rate information for Distance Charge and Charge Group, the rate of Charge Grouped will be used. 5.3.8)Call Charge Formula: I will try to summarize here the call charge formula based on all parameters of Rate Table. Yes, it is not simple formula as you may expect. But the Pbx Billing System supports all impossible cases of telephone tariff, so the formula is complicated. After you identify the case that meets your current telephone tariff, you can concentrate on that case only. And fore sure, it is only simple formula. The price of phone call will be calculated as follows: Total = Flat charge + Basic Cost * (1+ %SurCharge) Basically, we have 4 cases for calculating Basic Cost as described in below table: . Case 1 2 3 4 OffPeak Dist Ratio Yes Yes No No Holiday Dist Ration Yes No Yes No For each case, we may have the following sub-cases: 1. The call made in OffPeak hour of working day. So it has only Off Peak Discount. 2. The call made in Peak hour of Holiday. So it has only Holiday Discount. 3. The call made in OffPeak hour of Holiday. So it has combination discount. The combination discount depends on Discount Combination parameter. As you may saw from the form, Discount Combination can have 4 values. Because some combination is not valid, the total number of formula to calculate Basic Cost is 21. a)If the call has no OffPeak Discount and no Holiday Discount: Basic Cost = (Number Of First Period * First Period Rate + Number Of Additional Period * Additional Period Rate) Number Of First Period can be 0 or 1. Don’t surprise when I say Number Of First Period can be 0. Normally it is 1. It is 0 when your Call Type has a First Free Block > 0 and your first period belong to this free of charge period. Number Of Additional Period has deducted the free block you still have. That is the case in which Frist Free Block >0 and the number of free block left for you still >2. There is an accumulative variable to store the free block you have consumed from beginning of the month. That variable will be reset to zero at the first second of every month. In the picture below, Number Of Additional Period =3, number of First Block =0. You have to pay for additional blocks numbered 4, 5 and 6 only. Designed, Programmed, Documented By Tran Hong Quang, [email protected]; [email protected] Page 53 of 168 Pbx Billing System - English User Manual The way used to calculate Number Of First Period and Number Of Additional Period will be applied for all other cases below. b)If the call has discount: Case 1: Case 1.1: If the call made in OffPeak of working day: Basic Cost = (Number Of First Period * First Period Rate + Number Of Additional Period * Additional Period Rate) *OffPeak Discount Case 1.2: If the call made in Peak hour of Holiday Basic Cost = (Number Of First Period * First Period Rate + Number Of Additional Period * Additional Period Rate) *Holiday Discount Case 1.3: If the call made in OffPeak hour of Holiday: Basic Cost = (Number Of First Period * First Period Rate + Number Of Additional Period * Additional Period Rate) *Combination Discount Combination Discount depends on what you chose in Discount Combination Combo box. Discount Combination Combo Box Lowest Price Holiday Discount Only OffPeak Discount Only OffPeak Dist + Holiday Dis Combination Discount Min(Holiday Distcount, OffPeak Discount) Holiday Distount OffPeak Discount 1- (1 -OffPeak Distcount)*(1-Holiday Distount) Case 2: Case 2.1: If the call made in OffPeak hour.of working day The same with case 1.1: Basic Cost = (Number Of First Period * First Period Rate + Number Of Additional Period * Additional Period Rate) *OffPeak Discount Case 2.2: If the call made in Peak hour of Holiday Basic Cost = (Number Of First Period * Holiday Rate For First Period + Number Of Additional Period * Holiday Rate For Additional Period) Case 2.3: If the call made in OffPeak of Hoiday Discount Combination Combo Box Lowest Price Holiday Discount Only OffPeak Discount Only OffPeak Dist + Holiday Dis Basic Cost Min(Case 2.1, Case 2.2) Case 2.2 Case 2.1 Not available If you try to choose “OffPeak Dist + Holiday Dist”, you will get error message. Case 3: Case 3.1: If the call made in OffPeak hour of working day Designed, Programmed, Documented By Tran Hong Quang, [email protected]; [email protected] Page 54 of 168 Pbx Billing System - English User Manual Basic Cost = (Number Of First Period * OffPeak Rate For First Period + Number Of Additional Period * OffPeak Rate For Additional Period) Case 3.2: if the call made in Peak hour of Holiday The same case 1.2: Basic Cost = (Number Of First Period * First Period Rate + Number Of Additional Period * Additional Period Rate) *Holiday Discount Case 3.3: If the call made in OffPeak of Holiday: Discount Combination Combo Box Lowest Price Holiday Discount Only OffPeak Discount Only OffPeak Dist + Holiday Dis Basic Cost Min(Case 3.1, Case 3.2) Case 3.2 Case 3.1 Not available If you try to choose “OffPeak Dist + Holiday Dist”, you will get error message. Case 4: Case 4.1: If the call made in OffPeak hour of working day Basic Cost = (Number Of First Period * OffPeak Rate For First Period + Number Of Additional Period * OffPeak Rate For Additional Period) Case 4.2: If the call made in Peak hour of Holiday Basic Cost = (Number Of First Period *Holiday Rate For First Period + Number Of Additional Period * Holiday Rate For Additional Period) Case 4.3: If the call made in OffPeak hour of Holiday Discount Combination Combo Box Lowest Price Holiday Discount Only OffPeak Discount Only OffPeak Dist + Holiday Dis Basic Cost Min(Case 4.1, Case 4.2) Case 4.2 Case 4.1 Not available If you try to choose “OffPeak Dist + Holiday Dist”, you will get error message. The icon on the toolbar of Tariff is as follows: 5.3)Service Charge Policies As you may still remember from last session talking about the telephone rate table, you can give each CallType a way to calculate service charge, in case you want to have it. This kind of service charge can be called as destination-dependent, or CallType-dependent. Pls consider below use case: One big hotel has 3 classes of telephone users: 1. The guests who stay shortly in the hotel. They rent a room for a known period of time and agree to pay the telephone charge including your considerable-high service charge. 2. The guests who stay for a long time. Those guests often rent an apartment inside the hotel and they don’t want to pay service charge for telephone or they want it lower than shortstay guests. 3. The staff of hotel itself, also use telephone for business. For these phone call, the hotel owner only want to know exactly the cost, no need to add-on the service charge. Designed, Programmed, Documented By Tran Hong Quang, [email protected]; [email protected] Page 55 of 168 Pbx Billing System - English User Manual As a result, to support these requirements, we need a mechanism to assign service charge to calling party (Extension or AccessCode). The steps to do are as follows: Declaring Service Charge Policy Assigning that Service Charge Policy to corresponding calling party. You do it on Extension & AccessCode form. Here I concentrate on how to declare a Service Charge Policy. Service Charge Policy: This is free-text name. You can enter any name that meaningful to you. Sur Charge (%): The percent over the basic price of the call that you want to have as payment for your service. For example, you want to make-up 30%, pls enter 0.3 on this box. Flat Charge: The absolute amount of money you want to have. It won’t depend on how long the call will be, or how expensive the call will be. Because this is amount of money, so you need to select the currency for it. Currency: This is currency unit for the amount you enter on Flat Charge text box Formula: Call Charge incl Service Charge = (basic call charge)*SurCharge + FlatCharge Note: The Service Charge Policy assigned directly to calling party has higher priority to the service charge of CallType. The Service Charge Policy assigned directly to calling party is independent to CallType. Every call will be applied this service charge, despite of the CallType of the call. For example, you may have both Service Charge assigned to IDD call, and Service Charge directly assigned to extension numbered 100. A call made from Extension 100 to international number will be applied the service charge directly assigned to that extension, not the service charge of IDD CallType. More generally, the service charge directly assigned to extension 100 will be applied to every call made from extension 100, not only the call lead to international number. Here is a part of screenshot of form Extension & AccessCode which has Extension of 1000 assigned a Service Charge Policy: The icon on the toolbar of “Service Charge Policy” is as follow: Designed, Programmed, Documented By Tran Hong Quang, [email protected]; [email protected] Page 56 of 168 Pbx Billing System - English User Manual 5.4)Synchronizing The Telephone Rate Table (This feature is only available and valid for Viet Nam) The telephone tariff is changing often. Despite Pbx Billing SystemTM allows you to edit and update all call rates, customer is hunger for a mechanic, which is able to keep their telephone tariff up-to-date. They would like us – the software vendor, to monitor the change of telephone tariff and update for them. That is the reason why this form – “Synchronizing Telephone Rate Table”- was developed. The principle and the rules for updating the telephone tariff and also the procedure applied for confliction is quite complicated. On this session, I focus on the user-function on the form, how to use it only. For more information about the things behind the synchronizing process, please read Chapter 10 – Synchronizing Telephone Tariff. Master Telephone Rate Table: Click on the button next to this text box, browse your file system, and then point to the Master Telephone Rate Table file. You can contact us, or the reseller to get this file. Master Telephone Rate Table file contains the up-to-date telephone tariff. The Master Telephone Rate Table file, normally, has extension of “.mst” Slave Telephone Rate Table: Click on the button next to this text box, browse your file system, and then point to the Slave Telephone Rate Table file. The Slave Telephone Rate Table file, normally, is being used by Pbx Billing SystemTM . The extension of Slave Telephone Rate Table file is “.slv” Only update the newer data: If this check box is stick, only the rate records of Slave Telephone Rate Table with time stamp earlier than the time stamp of corresponding record in Master Telephone Rate Table will be updated. If this check box is unchecked, the records from Master Telephone Rate Table will update to the corresponding records in Slave Telephone Rate Table despite the time stamp. Synchronize: Click on this button, your current Slave Telephone Tariff will be backup to the file with the same name but the extension changed to “.bak” before synchronizing process. When synchronizing process finish, there is a congratulation messag. Last Update Report: Click on this button to make the detail report of what have been done during the last Telephone Rate Table synchronizing. The icon of this window on the toolbar is as follows: 5.5)Call Charge Tester: Customer always wants to check whether the price of the call is correct or not. Pbx Billing SystemTM provides the tool to test call charge manually. This tool is very useful for locating the cause of incorrect telephone bill. - if the result of this tool (the price of the call) is not correct you should check telephone tariff, rate, and discount policy… - If the result of this tool is correct, but the telephone bill of Pbx Billing SystemTM is different from the bill of Telephone Company you should ask your telephone company to send Polarity Pulse to you Pbx (You may have to pay for such additional service). And then check whether your Pbx is able to use Polarity Pulse to start recording call information. Some small Pbx isn’t able to do that. First page – Call Charge Calculation Test On this page, you can test the call charge by manually input all call parameters needed for charge calculation. Designed, Programmed, Documented By Tran Hong Quang, [email protected]; [email protected] Page 57 of 168 Pbx Billing System - English User Manual Under “Input” group: Dial Number: Enter the dial number of test call. Trunk: To check which tariff table please enters the trunk that routes the call to telephone service provider that offers you this tariff. Double click on this text box to open the form containing the list of trunk and then choose the right trunk you want. Dial Date: The day the test call is supposed to be dialed. You can set dial date to holiday to see holiday discount effectiveness on the price. Double click on this text box to open electronic calendar and then pick the date you want. Dial Time: The time, at which you assume the call is made. Duration: The connection time of test call. The input format depends on what format you have set for Duration column of the CDR on Application Settings. In case, you have set “Auto Detect” for Duration column, the format you have to type in this box will be hh:mm:ss. Extension / AccessCode: These are two optional boxes. If you have assigned a Service Charge Policy directly to your Extension or AccessCode, you can enter a assumed calling party to one of Extension or AccessCode, then the call charge will be applied that special service charge. If you don’t assign directly any service charge to calling party, in that case, both of these boxes are none-sense. Because the service charge of the CallType will be used. Depend on whether you are using AccessCode or not, one of mentioned boxes will be active and the other one is disable. For example, if you are using AccessCode, thus the AccessCode box will be active, the Extension box is inactive. Otherwise, if you won’t use AccessCode, that mean your telephone bill will base on Extension, then the Extension box is active, the AccessCode box is inactive. After enter all mandatory information, move the mouse to empty box on the right, the Bill button will be active. Click on Bill button to see the call charge. Under “Output” group: These are calculated factor of the call. Only one field you may wonder its significant is Adjusted Duration field. Pbx Billing SystemT M is able to adjust the call duration and the new call duration will be displayed on this field. Why does Pbx Billing SystemTM offer such feature? There are some Designed, Programmed, Documented By Tran Hong Quang, [email protected]; [email protected] Page 58 of 168 Pbx Billing System - English User Manual cases, in which customer would want to adjust the duration call. For example, if the PBX doesn’t use the Polarity pulse to detect the status of B-party, sot that the call duration, normally, is longer than actually it is. Customer can set a negative adjust value to reduce the difference. But for telephone service reseller like hotel owner, they would want to lengthen the call duration as a part of telephone service fee. The second page named “Raw CDR Processing Test”. On this page, the input to test is raw CDR. The test not only include call charge calculation test, but also raw CDR parsing test. The output result is also more detail. The icon on the toolbar of Call Charge Tester is as follows: 5.6)Reprocess Existing Calls: The telephone service provider may change the tariff long time ago. Although, they inform you, you may forget to update your tariff in time. So some calls may be charged by old-of-date tariff. How can we re-apply new tariff for old call. Recalculate Call Charge enables you to do that. Designed, Programmed, Documented By Tran Hong Quang, [email protected]; [email protected] Page 59 of 168 Pbx Billing System - English User Manual Apply To All Calls: The range is not limited by any Date. All existing CDR will be recalculated with current tariff. When this check box is in checked status, From Date, To Date will be disableD. Because in this case, From Date, To Date have no sense. From Date, To Date: The range in which the call was made will be re-applied new tariff. Made From: You can select Extension (or Access Code if you are using Access Code-based billing) where the calls made from and only such calls will be recalculated. This is usefull when you want to recalculate for given user or guest only. If you leave default value “(All)” on this combo box, every existing calls which match your time period criteria will be recalculated. “Recalculate The Call Charge For Archived Calls” check box is the switch to decide whether the Pbx Billing SystemT M reprocesses the call stored in the ArchivedCDR.mdb or not. In case you configure Pbx Billing SystemTM to output calculated CDR to external file – OnlineCDR.mdb, the check box named “Recalculate The Call Charge In The External Online CDR” and the command button named “Reoutput To Online CDR” will be active. Sticking “Recalculate The Call Charge In The External Online CDR” check box will reprocess the call stored in OnlineCDR.mdb as well. You can click on the “Reoutput To Online CDR” command to reoutput the call, satisfying the time frame, to the external file OnlineCDR.mdb. The role of OnlineCDR.mdb is working as an connector for other application to retrieve the telephone bill from Pbx Billing SystemT M . For more information about OnlineCDR, please read the Application Setting session. The icon on the toolbar of Recalculate Call Charge is as follows: Designed, Programmed, Documented By Tran Hong Quang, [email protected]; [email protected] Page 60 of 168 Chapter 6: ENTERPRISE-STYLE & HOTEL-STYLE TELEPHONE BILLS ENTERPRISE-STYLE & HOTEL-STYLE TELEPHONE BILLS Pbx Billing System - English User Manual Upon completion of this chapter, you should be able to: Know how to program the application to automatically make and send the different telephone bill to right person at scheduled time. Know how to alert the authorized person in case there is a “long” call or “expensive” call. Know how to make various Enterprise telephone bills. Know how to make Hotel-Style telephone bills (for Hotel, who has already other Hotel Management System, thus they buy only license for telephone billing) 6.1)Telephone Bill Master: Telephone Bill Master has 54 standard reports as you can see the box on the left of form (called report selector). On the right of that box, there are some boxes that enable you to create your criterion for the report and sort the report that is in the way you want. There are 5 groups of report as follows: 1. Detail Report: All detail information of the call will be written in the report. 2. Summary Report: No detail information. Total connection time, total charge, total number of call grouped by Call Type will be on the report. 3. Universal report: you can re-design the report to have the one you like. 4. Cross Tab Report: Allow you to have cross tab summary bill for each user or each department. 5. Others: like report of the call with special dial number you can give, report of long call, report of expensive call… The criterion you can change on the text boxes on the right of form will be saved for each report. Next time, when you return to this report, you will find the last setting of you. These user-parameters are also used for auto-making report and sending via email. You can try each one and find the one you like. For more information and sample of report please read Telephone Bill Manual. The functions of some controls are as follows: Designed, Programmed, Documented By Tran Hong Quang, [email protected]; [email protected] Page 62 of 168 Pbx Billing System - English User Manual 1. Report Selector: The combo box located at the beginning allows you to select the report group. The list of report under it will change accordingly. You can switch the report list from list view style to tree view style. 2. From Date, From Time, To Date, To Time: 4 boxes create the period of time (beginning, ending) for filter. Pbx Billing System processes only the calls that were made in this period. 3. Min Duration: Type here the call duration criteria. Only the call, which is longer than that duration will be included on the report. You have type your duration criteria in predefined format, which is prompted below. This is also the duration format, which you have defined for Duration column of CDR on Application Settings. The alternative way is that you have calculate the duration in second, then type the number of second here. For example, if you want to see only the call longer than 1 hour and 30 minutes you should enter 90 (or if duration format is hh:mm:ss, you can type 01:30:00) into the text box. 4. Min. Price: The currency of Price Over is base currency. Only the call has call charge over this number will pass the filter and appear on the report. 5. Departments: The report will be made for selected department only. If value of this combo box is “All” the report is telephone bill for whole company. 6. Users: The report will be made for selected user only. If value of this combo box is “All” the report is telephone bill for whole company or whole selected department (for universal report). 7. Call Types: The report will be made for the calls that belong to selected Call Type only. If value of this combo box is “All” all call regardless Call Type will appear on the report. 8. Trunk: The report will be made for the calls that went out of your Pbx by selected trunk. If value of this combo box is “All” no matter what trunk the call used. All call will appear on the report. 9. Dial Number: This is prefix filter of dial number. For example, you only want to see the call made to area code with beginning of 0916xxxxx yo just enter 0916 on this box. 10. Call Curr. Conv.: There are two possibilities: “Option 1 – Keep call currency unit intact” and “Option 2 – Convert it to report currency unit”. If Option 1 selected, the reports, which have mixed different-currency calls will list the call and its price in the original currency – the currency assign to the CallType the call belongs to. For example, if a given report has both within-VietNam call and International call. The call within Viet Nam will be charged in VND, the report displays the price in VND. The International call will be charged in USD, the report will list its price in USD. If Option 2 selected, all call charge will be exchanged to the report currency, which you can choose on the form. 11. Report By: Select currency for the report. Any call with other currency will be exchanged to this currency automatically. 12. Sort By: Select the field of the processed call to sort. For example: Date time, Duration, Price… 13. Sort Direction: The way to sort. If you have a Seri of number like 1,3,5,2,4 and you choose Ascending on this box, you will have 1,2,3,4,5. If you choose Descending, you will have 5,4,3,2,1. 14. Auto Send Report Monthly: This check box enable/disable auto-make-and-send report. 15. To,Cc: In case you activate auto-make-and-send feature of Pbx Billing System you have to provide email address to send to report to. To and Cc has the same meaning of To and Cc in any mail client. Designed, Programmed, Documented By Tran Hong Quang, [email protected]; [email protected] Page 63 of 168 Pbx Billing System - English User Manual 16. On Day: The in the month the report will be made. 17. At Time: The point of time the report will be made and sent on the day has been scheduled on text box “On Day”. 18. Report Interface Uses Customized Language: If you select this button, the language on the bill will be changed to customized language. You can define any language for customize language. See Language Phrase Dictionary for more information. There are two radio buttons with image of # (Shift-based billing model) and |<---->| (Point-to-Point billing model). The meaning of these radio buttons is how From Date, From Time, To Date, To Time create the time limit frame for the report. Look at the pictures below: The picture of Shift-based billing model If you check the first radio button, From Time is independent with From Date. To Time is also independent with To Date. Only the call made in the rectangle will be included in the report. The meaning of this time frame style is that you can divide a day into multiple shifts and make a report for given shift for given time. For example, you can make a report for all the call made after workinghour. The night guard will bear those call charge. If you check the second radio button (the first radio button will be unchecked automatically), the time limit frame will looked like below picture: The picture of Point-to-Point billing model The time will be the whole day. But the start time is on “From Date”, at “From Time”. The end time is on “To Date”, at “To Time”. The application for this time limit frame is hotel business. From Date + From Time is the Check-In time. To Date + To Time is Check-out time. All the call made between Check-In time and Check-Out time is billed to the guest renting the room. Designed, Programmed, Documented By Tran Hong Quang, [email protected]; [email protected] Page 64 of 168 Pbx Billing System - English User Manual The time limit model as explained above is set for all cooperate report, not specific one. That means you can’t set “General Detail Telephone Bill” to use “Shift-based billing model” while at the same time, set “Detail Telephone Bill -Grouped By User” to use “Point-to-Point billing model”. There are three buttons at the bottom of the form. The function of them is as follows: 6.1.1)Preview: Click on this button to create report for viewing (preview mode). You can select one telephone bill, and then click on Preview to diagnose it more deeply by your self. There is small arrow button next to button Preview. Click on this small button you will get short-cut menu which allows you to make Excel-based Telephone Bill for some major telephone bill. 6.1.2)Header/Footer Layout... Nowadays, almost companies are using Header/Footer paper. That is the paper with some information on the header and some other information on the footer. For example, you may want to print your Logo on the header of all pages and the company address on the footer. On the telephone bill, beyond Header/Footer concept, you may pay attention on Report Header. Report Header is only printed on the first page of the report, while the Page Header appears on every page from page numbered 2. Let start to learn how to customize the Report Header and Page Header/Footer. After installation, all telephone bills (reports) have default settings for Header and Footer. To customize them, you have to select “Customizable” value for “Customize Report Header, Page Header/Footer:” combo box. There are 6 objects and object-groups on the report header (or you may call it Bill Header) you can re-layout on the telephone bills that are: 1. Upper line 2. Report Title 3. Customer Name 4. Logo 5. From Date, From Time, To Date, To Time 6. Lower line Designed, Programmed, Documented By Tran Hong Quang, [email protected]; [email protected] Page 65 of 168 Pbx Billing System - English User Manual The layout of the object on the bill header is determined by Top (vertical position), Left (horizontal position), Width and Height. Display: Select how you want the report header will be displayed on only the first page or all pages. 1/Upper line: - “Upper Line’s Visible:” enables you to show or hide the upper line. If you select “No”, the upper line will disappear from the sample on Top Left corner and the text box to set its properties will be disabled. - You can only change the Top position by entering new value to text box under “Upper Line:/Top (twips)”. - The width of this line equals the width of the bill. The Height is fixed at 3 pixels. 2/Report Title: - “Show Report Title” enables you to show or hide the “Report Title” on the report header. If you select “No”, “Report Title” won’t appear on the report header, and the other boxes, which used to set Report Title’s property will be inactive. - The font used for “Report Title” and its alignment can be customized by 4 boxes under the rectangle of “Show Report Title”, which are “Front Name:”, “Front Size:”, “Font Style:”, “Alignment:”. You can enter the new value directly to each box. But for font, you can change it easily by double clicking on each font property or clicking on button named “Font Selector” on the Left Top corner. The font dialog box will be opened for you to select the new font. “Alignment:” is not property of font, so that you can’t be set it by Font Dialog box. - You can change both Top and Left position. Enter the Top position to the text box under “Report Title:/Top (twips)”. Enter the Left position to the text box under “Report Title/Left (twips)”. - The Width of this line equals the width of the bill. The Height always fit the character height. 3/Customer Name: - “Show Customer Name” enables you to show or hide the “Customer Name” on the report header. If you select “No”, “Customer Name” won’t appear on the report header, and the other boxes, which used to set Customer Name’s property will be inactive. - The font used for “Customer Name” and its alignment can be customized by 4 boxes under the rectangle of “Show Customer Name”, which are “Front Name:”, “Front Size:”, “Font Style:”, “Alignment:”. You can enter the new value directly to each box. But for font, you can change it easily by double clicking on each font property or clicking on button named “Font Selector” on the Left Top corner. The font dialog box will be opened for you to select the new font. “Alignment:” is not property of font, so that you can’t be set it by Font Dialog box. - You can change both Top and Left position. Enter the Top position to the text box under “Customer Name:/Top (twips)”. Enter the Left position to the text box under “Customer Name:/Left (twips)”. The Width of this line equals the width of the bill. The Height always fit the character height. 4/Logo: - “Logo On Report Header:” allows you to show or hide the company logo on the header of the bills. If you select “No” for this control, all other boxes, which used to set logo property will disabled. - “And On All Pages:” Like mentioned above, the first page of the bill has Report Header and Page Footer, the next page (from page numbered 2 and afterward) has Page Header and Page Footer. You can decide whether the company logo will appear not only on the first page, but also on all next pages by selecting “Yes” for “And On All Pages:”. Otherwise, the company logo only appears on the page numbered 1. - You can change its setting by the Logo group settings below. You can change Top, Left, Width, Height and also how it appear on the bill. Designed, Programmed, Documented By Tran Hong Quang, [email protected]; [email protected] Page 66 of 168 Pbx Billing System - English User Manual - You can change the way the Logo appear – the effect - by changing “Logo’s Special Effect:”. 5/ “From Date, From Time, To Date, To Time” group: - You have to define the position for the Top, Left of the group, that is “From Date” object. The other 3 objects will be adjusted automatically to keep fixed relative distance with the “From Date” object. Enter the Top position to the text box under “Date/Time Limit:/Top (twips)”. Enter the Left position to the text box under “Date/Time Limit:/Left (twips)”. - The Width and Height are kept unchanged. 6/Lower line: - “Lower Line’s Visible:” enables you to show or hide the lower line. If you select “No”, the lower line will disappear from the sample on Top Left corner and the text box to set its properties will be disabled. - You can change the Top position by entering new value to text box under “Lower Line:/Top (twips)”. - The width of this line equals the width of the bill. The Height is fixed at 3 pixels. The position unit is twips. 1440 twips equal 1 inch. Append To The Bills This Information: Click on small button next to it to open a dialog, which allows you to add some information at the end of the bill. Your change the position of the objects or object groups only effect on the bill, not immediately affect the picture on the left corner. The picture is kept as its default settings. Note: If you open this form from Telephone Bill Master, it will look a bit different from itself if you open it from Hotel Bill Master. The “From Date, From Time, To Date, To Time” isn’t available for Hotel-style bill. Thus, if you open this form from Hotel Bill Master, you won’t see mentioned 4 subobjects. The second page of this window allows you to customize the settings for Page Header/Footer. I’d like to emphasize that Page Footer will appear for all pages, while Page Header appears for all pages except the first page. Designed, Programmed, Documented By Tran Hong Quang, [email protected]; [email protected] Page 67 of 168 Pbx Billing System - English User Manual Let study how we can customize Page Header/Footer: When you previewing the telephone bill, there is a blank between the border of the paper and the first content of the bill. This distance is called printer page margin. Normally, all telephone bills have default value of 10 millimeters for page top margin and bottom margin. You can change this printer page margin before printing. But the new distance couldn’t be saved. That means, the next time you make this telephone bill, the printer page margin will be reset to default value. How to change the page margin permanently? The answer is: The default printer page margin is the minimum page margin you can set. That means you can’t set and save page margin shorter than the default value (normally is 10 millimeters). You can set and save for next use the page margin, which is longer than default printer page margin by changing the Sub Top Margin or Sub Bottom Margin. The effected page margin equal the default printer page margin plus the sub page margin (Sub Top Margin or Sub Bottom Margin) Sub Top Margin: Enter the distance for the Page sub top margin. This sub margin will be added to the default printer top margin and will be used as real page top margin. The unit is Twips. The comment next to the text box tells you the distance in centimeter. Sub Bottom Margin: Enter the distance for the Page sub bottom margin. This sub margin will be added to the default printer bottom margin and will be used as real page sub margin. The unit is Twips. The comment next to the text box tells you the distance in centimeter. Footer Content: By default, Footer content has date of created on the bottom left corner (call it “Footer1”) and page number on the bottom right corner (call it “Footer2”). If you want to change the footer content, you must select “Customizable” for this combo box, otherwise, the boxes used for customizing the footer content are disabled. Footer Line’s Visible: You can show or hide the Footer Line by selecting corresponding value. If you select “No”, the Footer Line will disappear on the bill, the box named “Top:” next to it will be disabled. If you select “Yes”, the Footer Line will be appear on the bill, the box named “Top:” allows you to set the Footer Line’s top position. 0 means the Footer Line will be next to the last content of the bill on the page. Designed, Programmed, Documented By Tran Hong Quang, [email protected]; [email protected] Page 68 of 168 Pbx Billing System - English User Manual Show Footer 1: Click on this check box to show Footer1, otherwise, the Footer1 will disappear. If you set Footer1 to be disappeared, the other boxed used to customize Footer1 will be disabled. Font Selector: Click on this button to open Font Dialog box, which allows you to select any font available on your computer and set its style and its size. The font settings you choose on the Font Dialog box will copy automatically to “Font Name:”, “Font Style:” and “Font Size:”. “Font Name:”, “Font Style:” and “Font Size:” (under “Show Footer1:”) allows you to directly change the font settings for Footer1. You can double click on one of these boxes to open Font Dialog box to select the font settings interactively. “Alignment:” (under “Show Footer 1:”) allows you to set the alignment of Footer1. “Footer Content 1:” Type any content you want to appear on Footer1. The “Top:” and “Left:” boxes next to “Footer Content 1:” is the Left Top corner’s position for Footer 1. The position unit is Twips, you can find the distance in centimeters next to these boxes. Below Footer 1 settings is the Footer2 settings. The meaning of text boxes and the way you change for Footer2 is exactly the same for Footer1. Note: - The top position of any object on the page footer is the distance from the last content of the bill, not the distance from the bottom border of the paper. - The lowest bottom of the objects on the page footer will be far from the border of the paper exactly the Printer Bottom Margin + Sub Bottom Margin. 6.1.3)Customization...: All reports have specific options to customize beside the common options. Depend on which report you are selecting on the left tree, when click on Customization button, you may have one of 4 below dialog to customize the selected report. Common customization dialog applied to all normal reports. Customization dialog of Universal Telephone Bill Customization dialog of Cross Tab By Department Customization dialog of Cross Tab By Department – User. 6.1.3.1)Common customization dialog applied to all normal reports: Click on this button to open “Telephone Bill Customization”, which is the form allowing you to set some customizable settings of selected report. That settings are rarely changed. There are 2 pages on this form. The first page is customized settings for color and font thickness of the bill. The second page is where you change bill title. The first page: Designed, Programmed, Documented By Tran Hong Quang, [email protected]; [email protected] Page 69 of 168 Pbx Billing System - English User Manual Apply CallType's Color Schema To Each Call: If checked, each call’s record on the form will be written in the color you have set for the CallType, which that call belong to. Set Bold The Call If Its Price or Duration Over: If checked, the call has price or duration over the values on two boxes below will be set to bold to let the reader easier to recognize. Price Threshold (Report Currency): Enter the price threshold. If the call’s price is over that value, the call’s record will be bold. The currency is the currency you have selected for summary session of the bill. For example, if you select USD as report currency, then the value here is the price in USD. Duration Threshold (Second): Enter the duration threshold. If the call’s duration is over that value, the call’s record will be bold. The unit is second. The second page: All the reports have default title, which show up how the report organizes the data. After familiar with the report, customer would want to change the report title to their favor one. The default report title is in Blue color and is un-change able. You enter your report title to The New Title text box, and then click Set New to confirm your change. You can also revoke the default report title by clicking on Set Default button. 6.1.4.1)Customization dialog of Universal Telephone Bill: The content look like Detail Telephone Bill By User, but when you select this report, you will see a button appearing next to it. Click on this button, you will get the following form, which allows you customize the layout of the report, the column order on the report… On the first page: Unused columns: The list of column won’t appear on the Universal Telephone Bill. Used columns: The list of column will appear on the Universal Telephone Bill. When you select one line in this list, you can custom the selected column’s properties by changing the value on the right text boxes. Indentation: The left Indentation. Width: The width of selected column. Align: The alignment of column. Report Alias: The alias of report. You can click on “Title Font” button or “Record Font” button to have Open Font Dialog Box. On Open Font Dialog Box, you can choose and customize the font, which will be used by the report title or the record on the report. Designed, Programmed, Documented By Tran Hong Quang, [email protected]; [email protected] Page 70 of 168 Pbx Billing System - English User Manual Reset button: Return every setting to default value. On the second page: Force Next User Telephone Bill To New Page: If this check box has been checked, each user data will be on the beginning of a page. No two user’s data shares the same page. Force Next Department To New Page: If this check box has been checked, each department data will be on the beginning of a page. No two department’s data shares the same page. Display Column Maker: If this check box has been checked, there are some makers, which show you the border of each column. This feature is only used when you are customizing the report. Whenever you finish settings, you should turn this feature off. Designed, Programmed, Documented By Tran Hong Quang, [email protected]; [email protected] Page 71 of 168 Pbx Billing System - English User Manual 6.1.4.2)Customization dialog of Cross Tab By Department: When you select Cross Tab By Department report, there is small button appears next to it. Click on that button to call the form named Define Cross Tab Report. On this report, each row is one department. The number of column can be 1 or 2. You can define what value will be summarized on those columns. Number Of Column On The Report: Here you can define your report have one column or double columns First Column Name: Here you can define the name for the first column. Currency: There are two combo boxes named “Currency”. The left currency combo box allow you to select the currency for the first column, the right currency box allows you to select the currency for second column. Note that the column on this report is currency-related. That mean each column calculates only the calls, which have the same currency. Call Type Is Using This Currency: There are also two List Boxes named so. The left List Box contains the list of call types, which uses the selected currency (on the Currency combo box above) for the first column. The right List Box has the same function but for the second column. If you want to exclude specific call type from the column, you can select one call type from the list, and then click on Delete button below. To take deleted call type back, you have to re-select currency on Currency combo box. If you want to use Single Column (by changing Number Of Column On The Report), then all the text boxes, combo box, list box of second column will be disabled. 6.1.4.3)Customization dialog of Cross Tab By Department-User: Designed, Programmed, Documented By Tran Hong Quang, [email protected]; [email protected] Page 72 of 168 Pbx Billing System - English User Manual This report has the same layout and principle with Cross Tab By Department, but the report groups the call by Users and Department. Both Cross Tab By Department and Cross Tab By Department User are using the same settings for their column. So that, if you change something for Cross Tab By Department, you will see its effect for Cross Tab By Department-User. You should try both Cross Tab report by yourselves. This is the best way to understand them. If you haven’t re-define the report on the form mentioned above, but you click on Preview button, you may get error message. This is normal because the current setting for Cross Tab report is installation value. It may not match your current Organization Data and Telephone Tariff. If you change any call type (add, remove, change currency for call type…), you should re-define Cross Tab report again. Note: You can’t make report (both in preview mode or printing mode) if you computer has no printer. Pbx Billing System uses page setting of default printer for format the report. The icon on the toolbar of Telephone Bill Master is as follows: 6.2)Hotel Bill Master Hotel Bill Master is the form allows you to make the professional telephone bills specially designed for Hotel business. The role of Hotel Bill Master and Telephone Bill Master is nearly the same. Some different points you should aware of are as follows: Hotel Bill Master allows you to customize some options but apply they for all hotel’s bill, not for specific one. Hotel Bill Master cut off some options, which are only suit to cooperate telephone bill like Departments, Users. Hotel bill only bases on the Extension. Hotel Bill Master enables you to edit the Welcome Message, Guest name in the bill. Hotel Bill Master supports only Point-to-Point Billing Model. All the call made between Check-in Time and Check-out Time is billed. Designed, Programmed, Documented By Tran Hong Quang, [email protected]; [email protected] Page 73 of 168 Pbx Billing System - English User Manual Hotel Bill List: The list of the reports, which are specially designed for Hotel business. You can click to select the report you like. Extension List: The list of Extension. Note that you are a hotel owner, you should enter the “Located In” field when creating the Extension list. The “Locate In” is the room number – that is the room you put the Extension in. On the bill, not only the Extension, but also the Room number will be displayed. The guest often remembers their room number, but may not know his Extension number. Check-in Date: This is electronic calendar enabling you to choose the date the guest check-in. Check-in Time: Enter the time the guest check-in. Check-in Date and Check-in Time together creates the start point for billing. Check-out Date: This is electronic calendar enabling you to choose the date the guest check-out. Check-out Time: Enter the time the guest check-out. Check-out Date and Check-out Time together creates the end point for billing. Min. Price: The minimum price criteria for a call to appear on the bill. The reason we offer this feature is that some PBX doesn’t support Polarity pulse. So that the information of the call received from your PBX is not 100% correct. Some cases, the B-party doesn’t pickup the phone, your PBX still record the call. Min. Duration: The same meaning as Min. Price except this is call duration criteria, not price. You have to type in the duration format, which is prompted below. This is also the duration format you have defined for Duration column of CDR on Application Settings. Report Currency Unit: Select the currency unit for the summary session of the bill. Call Currency Conversion: There are two possibilities for this combo box that are “Option 1” and “Option 2”. If you select “Option 1”, in the detail session of the bill, the call will be charged in their native currency. For example, If the bill has both within Viet Nam calls and International calls, the within Viet Nam calls will be charged in VND, while the International calls will be charged in USD. If you select “Option 2”, all the calls will be charged in the report currency. Return to the example, if Designed, Programmed, Documented By Tran Hong Quang, [email protected]; [email protected] Page 74 of 168 Pbx Billing System - English User Manual you select VND for report currency unit, the International calls will be charged in VND, instead of USD. Vice versa, if you select USD for report currency unit, the within Viet Nam calls will be charged in USD, instead of VND. Report Interface Uses Customized Language: If you select this button, the language on the bill will be changed to customized language. You can define any language for customize language. See Language Phrase Dictionary for more information. Guest Name: Enter your guest name here. Message Font: This is command button to call the Font Dialog. After selecting the font and closing the Font Dialog, your chosen font will be applied to both the Welcome Message on the bill and the Welcome Message box on the Hotel Bill Master form. You can choose the font for your language to display your language on the bill. However, the appearance on the Welcome Message box may be a bit different from the message on the bill. Welcome Message: You can enter maximum 255 characters for your welcome message in multiple lines. If you want to write Vietnamese, please select Vietnamese-support font, try to enter your Vietnamese string and make the bill to see how it appears on the bill. Note that there are some appearance differences between the text box where you enter the message and the bill where the message displayed. The reason is that some Vietnamese font is two byte font or combination coding. Border: The welcome message can be put inside a box for good-looking. You can select the border style here or even clear the border. There are 4 buttons at the bottom of the form, which are: Header/Footer...: Click on this button to open the form allowing you to re-layout the objects on the report header. Please look at “Telephone Bill Master” session for more information how to use it. Change Bill Title...: Click on this button to open the form allowing you to change the report title. Please look at “Telephone Bill Master” session for more information how to use it. Preview Bill: Click to see the bill. Cancel: Click on this button to close the form. The icon of Hotel Bill Master on the Toolbar is as follows: 6.3)Advanced Auto Send Email Service: Besides scheduling the report sending process on Telephone Bill Master, usually customer want to send telephone bill of each staff to himseft/herseft and may be CC to department head. Advanced Auto Send Email is where customer can do that. Advanced Auto Send Mail Service has 5 pages. Each page enables you to schedule different sending telephone bill process. The last page enables you to set alarm trigger. At the point of time you have set, Pbx Billing SystemTM will create telephone bill automatically and send it via e-mail also automatically to destination user The computer running Pbx Billing SystemTM.has to be installed MAPI Mail Client. For example, Outlook 97, Outlook 98, Outlook 2000, Outlook Express. The MAPI Mail Client has to be configured correctly. That means you can use the mail client on this computer to send/receive e-mail. Pbx Billing SystemTM will send e-mail by the account that is currently logon. For example, the account Designed, Programmed, Documented By Tran Hong Quang, [email protected]; [email protected] Page 75 of 168 Pbx Billing System - English User Manual “ubhnt01” currently logon this computer, the sender in each mail will be the e-mail address of account “ubhnt01” If MAPI mail client hasn’t been configured correctly, the sending process will fail. No warning message will appear on the screen, but warning message will be saved to log file. You can find it under the home folder of Pbx Billing SystemTM , its name is Pbxlog.txt If you are using Outlook 2000, be careful that Outlook 2000 has security and virus-protect feature that pauses any auto sending email process. If this feature is active, you will see a dialog box asking you to send or unsend the message. To have Pbx Billing SystemTM send telephone bill automatically, you have to disable this feature. If you have Windows Domain with Microsfot Exchange Server, you should select CDO for mailing method (go to second page of Application Settings). Using CDO, you won’t face the security problem as using mail client to send the bill. 6.3.1)Detail Bill By User: On this form, you can schedule the time to send the Detail Telephone Bill By User to him or her, and then may to department head. On the form named Telephone Bill Master that you will learn later, you can custom the appearance of the bill, set the criterion for the call on the bill, etc. All userset parameters will be saved and automatically be loaded when you return to the report. Advanced Auto Send Mail Service can obtain and use user-set parameters for auto-creating telephone bill as well. Send To Each User: If this button is in checked status, the application sends automatically the Detail Telephone Bill to each user. If this button is in unchecked status, Detail Telephone Bill won’t be sent and the other information in other text boxes, combo boxes doesn’t effect. And Cc To Department Head: Put the e-mail address of department head to CC field of E-mail. One copy of Detail Telephone Bill will be sent to his/her department head. Business/Private: There are two Detail Telephone Bills, one for all call made by the staff, another one contains only private call of the staff. You can send one of them or both of them. The possible values of this combo box are Only Business Call Bill, Only Private Call Bill, Both Of Them On The Day: The day the application will create this telephone bill will be sent. At The Time: The time the application will create this telephone bill and send it to destination. 6.3.2)Summary Bill By User: Exactly the same with the first page except the bill will be sent is summary bill. The summary bill doesn’t contain all detail information of the call but it concentrates on the total duration, total charge… etc. Designed, Programmed, Documented By Tran Hong Quang, [email protected]; [email protected] Page 76 of 168 Pbx Billing System - English User Manual 6.3.3)Detail Bill By Dept: The telephone bill that will be sent is Detail Telephone Bill By Department. All calls with detail information will be grouped by department on Detail Telephone Bill. Because it is department telephone bill so the first person in charge should be Department Head, not the member of the department. So E-mail address of Department Head will be put on “TO:” and all e-mail address of members may be put on “CC:”. Send To Department Head: If this button is in checked status, the e-mail address of Department Head will be put on “TO:” field of the mail. If this button is in unchecked status, the auto-sending process for Detail Telephone Bill By Department will be disable. In this case, the value in other text boxes and combo boxes take no effect. And Cc To Each Member: If this button is in checked status, a list of all member e-mail address will be put on “CC:” field of the mail. On The Day, On The Time: The point of time the mail will be sent. 6.3.4)Summary Bill By Dept: Exactly the same with the function on page named Detail Bill By Dept that has been explained above except the telephone bill will be Summary Telephone Bill By Department. Summary Telephone Bill By Department doesn’t contain detail information of each calls that made by all staff of the department, but concentrates on total charge, total duration, the number of call…etc Designed, Programmed, Documented By Tran Hong Quang, [email protected]; [email protected] Page 77 of 168 Pbx Billing System - English User Manual 6.3.5)Alert: It would be nice if you can give a warning about over telephone using to one staff. Normally the company only knows the staff who has used telephones too much at the end of month or when the company receives the official bill from Telephone Company. It is too late, isn’t it? Even you can warn the employee, but you have to pay the bill. Pbx Billing SystemTM can help you to control such action at the right time that is Alert feature. Active Send Alert: If this button has been checked an alert will be sent to in-charge person if a call exceeds a limit in time and money has been made. Send To: The e-mail address of in-charge person. If Duration Exceeds: The limit connection time. If the call is longer than that amount, alert will be sent to appropriate person. 0 is special value, that disables this feature only. You have to input in given duration format, which is written next to this text box. This is also the duration format of Duration column of CDR, which has been defined on Application Settings. The alternative way is typing the number of second. Or Price Exceeds: The limit of money which any call exceeds this limit will be informed. 0 is special value, that disables this feature only. If you want to use Alert feature basing on only one criteria and forget the other one, you can set special value for the criteria you don’t want to use. For example, you care only how much the call charge is, you don’t care about how long the call is. You should set “If Duration Exceeds” to 0. The icon on the toolbar of Advanced Auto Send Email is as follows: Designed, Programmed, Documented By Tran Hong Quang, [email protected]; [email protected] Page 78 of 168 Chapter 7: SECURITY MANAGER SECURITY MANAGER Pbx Billing System - English User Manual Upon completion of this chapter, you should be able to: Know how to change password for system account. Understand Public Access concept. Know how to use Account & Permission form to create system account and grant the permission for system account. 7.1)Change Password: You can change password of currently log on user by using this form. You can’t change password of other service user if this service user doesn’t logon. Current Password: Enter your current password for currently log-on account. Type New Password: Your new password. Retype Password: Enter your password again here. PbxAdmin, Operator are two pre-installation service users. You can’t delete those users. The password of these service users is the same with their user name. You should change the password of those users to secure your database. PbxAdmin is highest permission service user. You can create new service users. In case you forget password of new service users, you have to delete the service user and then re-create new service user. There is no way to re-set password by logging on by account of higher permission. If you forget password of PbxAdmin or Operator, you have to re-install the application or contact author by dropping me an email at [email protected] The icon on the toolbar of Change Password is as follows: 7.2)General Security: Page Public Access: Pbx Billing System divides all forms into three zones: Public Zone, Forbidden Zone, Access Zone. The form in the public zone can be accessed by any log-on account (called it service user to separate from telephone user). All the forms that not belong to Public Zone is secured forms. For each service user, the secured form may be accessible may be not. Not Accessible form is considered belong to Forbidden Zone, and Accessible form is considered belong to Access Zone. Designed, Programmed, Documented By Tran Hong Quang, [email protected]; [email protected] Page 80 of 168 Pbx Billing System - English User Manual Public Zone Secured Zone Resource Name: The name of the form. Public: Check on this button to make the form is one member of Public Zone. Page Hotel Business Security (Even in the working mode for Enterprise’s telephone billing, you can find this page. The setting in this page doesn’t effect any function you are using. You may read below paragraph just for your information) This page allows you to give password for 7 actions of hotel business. Designed, Programmed, Documented By Tran Hong Quang, [email protected]; [email protected] Page 81 of 168 Pbx Billing System - English User Manual Protects Re-editing Reservation: If you check this button, the text box password below will be active, then you have chance to give password to protect someone from free editing the room booking. The operator has to enter correct password before he/she can reedit room booking information. Protects Deleting Reservation: If you check this button, the text box password below will be active, then you have chance to give password to protect someone from free deleting the room booking. The operator has to enter correct password before he/she can delete the room booking information. Protects Re-editing Guest’s Services: If you check this button, the text box password below will be active, then you have chance to give password to protect someone from free re-editing Guest’s Services. The operator has to enter correct password before he/she can re-edit the Guest’s Services. Protects Deleting Guest’s Services: If you check this button, the text box password below will be active, then you have chance to give password to protect someone from free deleting Guest’s Services. The operator has to enter correct password before he/she can delete the Guest’s Services. Protects Deleting Guest’s Profile: If you check this button, the text box password below will be active, then you have chance to give password to protect someone from free deleting Guest’s Profile. The operator has to enter correct password before he/she can delete the Guest’s Profile. Page Logon Dialog: By default, the application will ask you for a pair of UserName/Password to authenticate and authorize you. Some of my customer wants to have the application to run automatically whenever the PC is restarted. To do that, the Logon Dialog has to be removed. The third page named “Logon Dialog” is where you can set or remove “Logon Dialog” Disable Logon Dialog: This button will be active if the “Logon Dialog” feature is being activated. You have to logon by “PbxAdmin”, then click on this button to disable the security mechanic. Close the application and run it again, this time, you won’t be asked for UserName/Password. You can put the shortcut to run this application into StartUp folder of Ms Windows. Thus, whenever you reboot your PC, the application is able to run again. Designed, Programmed, Documented By Tran Hong Quang, [email protected]; [email protected] Page 82 of 168 Pbx Billing System - English User Manual In this mode, every one, who can access the billing PC, will have full control on the PBX Billing System. Enable Logon Dialog: This button is only active if you have configured PBX Billing System.to run without asking UserName/Password (you have clicked on “Disable Logon Dialog” button before). Click on Enable Logon Dialog button to make the PBX Billing System.to be secured again. The icon on the toolbar of Public Access is as follows: 7.3)Account & Permission: This form is where you can create service user and assign permission for that user. Designed, Programmed, Documented By Tran Hong Quang, [email protected]; [email protected] Page 83 of 168 Pbx Billing System - English User Manual Permissions of: After this caption is current logon service user. You can move from this service user to other by pressing on the navigator at the bottom of the form. Form Name: The caption of the form. Open: If this check box is checked the service user (name is being displayed after “Permissions of” will has permission to open the corresponding form. List Of Service User: All service users have been created. There are also two buttons named “New User...” and “Delete User”. Click on Delete User button to delete being-displayed service user. Click on New User button if you want to create new service user. You may find some Service User on the left list but not on the List Of Service User. That is the case in witch you have more than one copies of Pbx Billing SystemTM running on your network and somebody has created a Service User remotely. That Service User can be logon at the remote Pbx Billing SystemTM only. You can see it on this form, but you can’t use it. You should not delete that Service User, unless the other machine can’t use that Service User any more. If you want to synchronize all Pbx Billing SystemTM on your network, you can create a Service User with the same name, and better if the same password with that Service User. The icon on the toolbar of Account & Permission is as follows: Designed, Programmed, Documented By Tran Hong Quang, [email protected]; [email protected] Page 84 of 168 Chapter 8: APPLICATION TOOLS APPLICATION TOOLS Pbx Billing System - English User Manual Upon completion of this module, you should be able to: Be able to set some parameters of serial port. Know how to define CDR format Customize the application interface. 8.1)Change Customer Logo: Change Customer Logo form is used to change the Logo on Switchboard and Background. There are some appearance settings you can change to make the logo more beautiful. Logo’s Left, Logo’s Top: These Up-Down buttons allow you to move the position of logo on the switchboard and the Background. The distance in cm is written in gray color next to them. Logo’s Height, Logo’s Width: Click on these Up-Down buttons to resize the logo. The size in cm is written in gray color next to them. Log’s Special Effect: Change the effect of logo. Logo’s Visible: Show or hide the logo on the switchboard. The picture box is where you can past the new picture. You may create the Logo in Bitmap format, for example, you can use Microsoft Paint to draw the logo, select the Logo, copy it to Clipboard (normally by pressing Ctrl-C), past it to this picture box by clicking on the picture box then press Ctrl-V. You can also click right mouse button on the picture box to call the shortcut menu and click the item you want. The icon on the toolbar of Logo is as follows: 8.2)License Key: You use this form in case you need to change your current license or export your current license key. We provide the Setup Package with default 10 licenses for billing feature (10 Extensions or 10 Access Codes) and 5 licenses for hotel business (Maximum 5 rooms can be created). If the number of Extension (or Access Code) of your company doesn’t exceed 10 and the number of room is less than or equal 5, you can use the product free of charge, with full feature, no expiration date. My strategy is giving it free to small company. If you want to expand your current license, please make Designed, Programmed, Documented By Tran Hong Quang, [email protected]; [email protected] Page 86 of 168 Pbx Billing System - English User Manual a license file and send it to us. We will send back new license file. After importing it your application license will be expanded. License Mode: Show you current license mode. If you change your license and after you import new license file, the new license mode will appeared here. Maximum Number Of Extension/AccessCode: As it meaned, this text box is holding the maximum number of Extension or AccessCode that you can create. If is also refreshed to show new value after importing new license file. Max Number Of Hotel Room: The license for Hotel Management System bases on the number of room you can create. The number in this text box is the maximum number of room you are licensed. Export Current License: Click on this button to open “Save file dialog” box. You choose path and name for your license file. Update New License: Click on this button to open “Open file dialog” box. Point to the license file we sent to you to import it. Update Language Pack: Actually, you can import language pack on the form named Language Phrase Dictionary and not only that, you can edit them there. One of my distributor want to have this button on license form. Normally, they supply their customer with English version. If customer purchase license, they will send customer both license key and local Language Pack as well. They want their customer to be able to import both License Key and Language Pack on this form. Remote Support: Your license file contains not only your current license but also configuration of your Pbx Billing System . We can diagnose and fix any problem for you remotely by checking your license file and sending new license file with new configuration to you. The icon on the toolbar of License Key is as follows: Designed, Programmed, Documented By Tran Hong Quang, [email protected]; [email protected] Page 87 of 168 Pbx Billing System - English User Manual 8.3)Communication Settings: Hotel Management System support communication with Pbx via both serial port or network card. You can select one of them or both of them from Select Pbx Communication Interface 8.3.1)Via Serial Port This form is where you set parameters for serial port. If you familiar with RS 232 communication standard or you used to set serial port of Microsoft Windows you can find out Serial Port Setting of Pbx Billing System is very the same. In case the settings of serial port of Microsoft Windows (You can change by System applet) conflicts with these settings, Pbx Billing System will use its own settings and overwrite the settings of Microsoft Windows The settings of the serial port of computer have to match the settings of serial port of Pbx unless you will see strange character in log file. The cause is that incorrect sampling happens. Normally, a PC has two physical serial ports. Pbx Billing System can use two serial ports at the same time. First Serial Port: The first one is used for receiving call data from your PBX. Second Serial Port: The second serial port has multiple purposes. You can decide whether you use it or not and what the purpose of second serial port. Let see how to do that Second Port: This combo box has two selected values. “Activate”: The second serial port is active. “Deactivate”: The second serial port won’t be available. Purpose: Once you activate the second serial port, you can set its purpose by selecting one of three possibilities: -“Relay Call Data”: You can connect a serial printer to second serial port to to online print out the call charge. Some of our customers are using this model just because they want to make sure they have a hard copy of telephone bill. -“Second PBX”: Pbx Billing System can handle two Pbx at the same time like a single one. Some customers have two small Pbx being in use because of history issue. We Designed, Programmed, Documented By Tran Hong Quang, [email protected]; [email protected] Page 88 of 168 Pbx Billing System - English User Manual support them to make telephone bill for both Pbx. No need to purchase another Pbx Billing System and another PC to run it. -“Control Connection”: If you select “Hotel Master” or “Hotel Slave”, the Pbx Billing System is able to control back your Pbx. For example, when a guest Check-In, the application is able to unlock the Extensions inside the room the guest will go in. When the guest Check-Out, the application must lock the Extension to make sure no unwanted call may be made from that Extension. So, Pbx Billing System needs a channel to control your Pbx. If this channel is the same with CDR channel, the responding messages from Pbx to the command of Pbx Billing System will be mixed with CDR. No problem at all because Pbx Billing System is able to filter it. But it is better to use separate channel for control signal. That is the case you should activate second serial port, then select “Control Connection” for its purpose. The picture in middle describers the communication flow. The way to set the setting for both In/Out serial port is the same and is as follows: Serial Port: The port you want Pbx Billing System use it to communicate with your Pbx. You can choose new parameter from a list; you can’t enter your parameter. Baud Rate: The speed your serial port transmits at. Byte Size: A block of bits is considered as a unit of transmission. It is not byte concept in the point of unit of memory or storage. Stop Bit: The period of time but calculated in Bit allows two parties re-handshake for the next sending/receiving block of data. Parity Bit: The bit used to check whether any error happened in transmission environment or not. Flow Control: The way the transmitter and receiver know the status of each other. The transmitter has to know whether or not the receiver can receive some more data. General Knowledge about Flow Control or Handshaking: In many cases, it is necessary for the transmitting device to know whether the receiving device is ready to receive information. You might, for example, be sending data to a printer, and the speed of communication may be faster than the speed of the printer. The printer will have to be able to stop the computer from sending any more characters until it has printed out the ones it has already received. Similarly, the private exchange may send data to a computer faster than capacity the computer can process. In both cases, information must be sent back from the receiving device to the transmitting device to indicate whether it is ready or not. This information is known as flow control or handshaking There are two types of handshaking: hardware and software. Both involve signals coming back from the receiving device to the transmitting device. With hardware handshaking, the receiving device sends a positive voltage (logic 0) along a dedicated handshaking circuit as long as it is ready to receive. When the transmitting receives a negative voltage (logic 1), it knows to stop sending data. With software handshaking, special characters will be transmitted along the data circuits rather than dedicated circuit. If the flow control setting of the serial port on private exchange doesn’t meet the flow control setting of the serial port on your PC, you may lose some call records in case the input buffer of serial port on your PC is full. Overflow may happen in case you set wrong flow control between your private exchange and your PC, the communication load of your private exchange is very heavy and Pbx Billing System is running on too slow PC. If the flow control is correct, overflow will never happen even the PC is very slow or the communication load is very heavy. Designed, Programmed, Documented By Tran Hong Quang, [email protected]; [email protected] Page 89 of 168 Pbx Billing System - English User Manual Xon/Xoff Flow Control: -The character with the ASCII code of Xoff will be sent when the input buffer reaches the upper limit, the character with the ASCII code of Xon will be sent when the input buffer reaches the lower limit. Xoff Limit Upper Limit Input buffer Lower Limit Xon Limit - The default value of Xon Char is 17 (or 11 in Hex); Xoff is 19 (or 13 in Hex). -Xon Limit, Xoff Limit is default setting of Microsoft Windows. Hardware Flow Control: A receiving device normally controls handshaking transmissions from transmission device by a wire called DSR (Data Set Ready) or another wire called CTS (Clear To Send). DSR pin of connector of receiving device is connected to DTR (Data Terminal Ready) of connector of transmitting device. CTS pin of connector of receiving device is connected to RTS (Request To Send) of connector of transmitting device. Note that receiving device can also be transmitting device. So for two ways communication, you have to make a cable with the wire map in such away satisfy two possible roles of a device. If the transmitting device was programmed to monitor both DTR and RTS, then it only sends data when the both wire (DTR and RTS) is at positive voltage. Pls. reference the cable wire map at the end of this document. 8.3.2)Via IP Select “IP Interface” on Select Pbx Communication Interface, you will have below window: Designed, Programmed, Documented By Tran Hong Quang, [email protected]; [email protected] Page 90 of 168 Pbx Billing System - English User Manual IP Working Mode: If your Pbx is working as Server, the billing software has to connect to it as client to retrieve CDR. Some Pbx can support to work as Client and automatically send CDR to external Server. In this case, you have to set IP Working Mode = Server. Client Settings part and Server Settings part below will be active or inactive depend on the mode you set on IP Working Mode. The software can work as Server and Client at the same time. If you select “Both Client & Server” for IP Working Mode, then both below part is active. Local Port: Local Port belongs to Server Settings, which is only active if IP Working Mode is “Server” or “Both Client & Server”. This is the port the software is listening for receiving CDR from Pbx Remote Host: This is IP address of Pbx in case Pbx is working as server. Remote Port: This is the port that Pbx is listening for CDR request from billing software, which is working as Client. Log On Account’s Prompt: Different Pbx may request the Client to authenticate itself by sending out different prompt. You have to enter that string here. Once the billing software get this string from Pbx, it known that it has to provide the Logon Account and Password. Logon Account: The account name to authenticate Password’s Prompt: When the billing software get this string from Pbx, it will respond by sending out the password, which you enter on next box. Password: Password to authenticate The icon on the toolbar of Serial Port Settings is as follows: 8.4)Application Settings: Application Settings is where you custom Pbx Billing System , change CDR format, create sample CDR for test purpose...There are four pages. On the bottom of the form, you find a button named “Connect To Datastore…”. Click on that button to open an Open File Dialog box allowing you to switch Pbx Billing System from this Datastore to another Datastore. Datastore file has extension of .Vit. Important notice: You can read from top to down, but some readers told me that the quicker way is reading first the Case Studies at the end of 8.4 session, then read again the detail guide. 8.4.1)First Page – “CDR Settings”: Designed, Programmed, Documented By Tran Hong Quang, [email protected]; [email protected] Page 91 of 168 Pbx Billing System - English User Manual Unused columns: The column can be in CDR format. But they are not being used now. Some columns have fixed name while the others can be re-defined name (alias) or dummy column. Used columns: The column is being used in CDR format. Column Separator: The criteria to separate two adjacent columns. There are two possibilities: Space(s) or Fixed Width. Please read the rule to separate CDR into column below. Fixed Width: This box is only active when value of Column Separator is Fixed Width. This is the number of character for selected column in “Used column” list box in CDR string. You can think it as the width of each field. Space(s): This box is only active when value of Column Separator is Space(s). You can choose One or Two spaces as separator of two adjacent column. Alias Of Definable Column: You enter alias name for DefinableColumn1, DefinableColumn2, DefinableColumn3, DefinableColumn4 and DefinableColumn5 if they are being selected in “Used column” list box. That is the way you give the name to not mandatory column (mandatory column of CDR has already recognized name). Dial Number Formatted: Whether or not the destination number is formatted. For easy reading, the destination number, sometime, is written in formatted string. For example: (056)(825-327). That formatted string is very difficult for PC to determine the area code of call. If your private exchange is using formatted destination, you have to tell Pbx Billing System about that. So Pbx Billing System will strip all formatted character before do next step. Beyond that, DialNumber can be complex string of digits, which caller has dialed not only the real B-party number, but also service selection code, card ID, password... In this case, you have to select “Service Selection” for this combo box. Then, there is small button appeared next to it. Click on this button to define sophisticated feature to parse the complex dial number. You can learn more how to parse complex dial number on sub-session named “Dial Number Settings” below. DialTime Is StartTime/EndTime: Almost Pbx records the time the call was started (StartTime) as DialTime. Thus, you can use directly DialTime to determine whether the call made in OffPeak Time or not. But some Pbx record the time the call finished as DialTime. In this case, you have to Designed, Programmed, Documented By Tran Hong Quang, [email protected]; [email protected] Page 92 of 168 Pbx Billing System - English User Manual minus the DialTime by call duration to have call StartTime before calculating the call charge. If this radio button is checked, the DialTime is StartTime. If this radio button is unchecked, the DialTime is EndTime. You can test how Pbx Billing System deal with DialTime=EndTime by opening Call Charge Tester, then enter a test call information, in which the DialTime is near the end of OffPeak Time. Make sure the call duration is long enough to have the StartTime of the call is in the OffPeak Time Period. You will see the result of call charge calculating show that the call gain OffPeak discount. Pbx Date Format: The Date format that your Pbx is using. The billing system will parse the Date column of CDR according to this format, then convert to Windows system date format to display it on the forms or report. I would like to emphasize that your Pbx date format and Windows date format can be independent if you want so and this case is common practice. But you may want both Pbx date format and Windows date format is the same. If so, you should click on Advance... button, go to tab named Others, check “Change System Date”, and key in the Pbx date format there. The billing system will do the best effort to change Windows date format to the Pbx date format. Why is “best effort” – because the account running billing software may haven’t got enough permission to change Windows date format. If you recognize that Windows date format is different than the Pbx date format, you should go to Control Panel to change it manually. Let me remind you again that this case – where Pbx date format is the same as Windows date format – is rarely used. Why I developed the feature, which is not mandatory and rarely use – the answer that one of my key customer want to have this feature. Pbx Time Format: If your Pbx uses standard Time format that can be understood by OS (Ms Windows), you can leave “System Time Format” for this combo box. For example, if your Pbx sends out Time column of 14:20 or 2:20 PM, these Time formats are supported by Windows and you can leave “System Time Format”. But if your Pbx sends out Time format of 1420, you have to enter “hhmm” on “Pbx Time Format”, since 1420 cannot be parsed as time value by Windows(don’t type double quotes for the format). Pbx Duration Format: You can leave the default value “Auto Detect” for this combo box if your Pbx is using common duration format which is supported by Windows. For example, 3 below duration samples can be supported by “Auto Detect” 00:12:20 00:12’20” 740 The first two samples will be parsed by using duration format = hh:mm:ss. The third sample is considered as 740 seconds. But if your Pbx sends out 1220 at the position of Duration column, and if you set “Auto Detect” on “Pbx Time Format”, the billing software will charge this call with duration = one thousand two hundred and twenty seconds. But if this call lasted only 12 minutes and twenty second, you should type hhmm on “Pbx Duration Format” There is a case, which Pbx records the metering pulse sent by upper public exchange. If so, you need a factor to convert from metering pulse number to duration counted in second. For example, a call last for 90 seconds will be recorded as 00:00:15 if public exchange sends out metering pulse every 6 second (15x6=90). How to set that conversion factor ? just double click on this combo box to open below dialog and enter the factor value. Designed, Programmed, Documented By Tran Hong Quang, [email protected]; [email protected] Page 93 of 168 Pbx Billing System - English User Manual 1 is default value of Conversion Factor, which means the Duration is counted by second as usual. View Additional Columns: There are some information which is calculated for the call. You can decide whether to show them on Online Call Detail Capturer, Importer, Exporter. Price: The cal charge Destination: The name of B-Party Currency: The currency for the call. Has Discount Of: Any discount the call may get. There are 3 buttons on this page, which are: Incoming CDR... Smart Checker... Advanced... 8.4.1.1)Incoming CDR Normally, the incoming call has different column compared with outgoing call. For example, almost the cases, the CDR of incoming call doesn’t have dial number(or CallerID as someone prefer calling so. For this software, you can put either CallerID or DialNumber at the position of calling party of incoming call). If you don’t see incoming CDR sent from Pbx, you have to configure your Pbx to record not only outgoing call but also incoming call. Some customers really want to record/bill the incoming call. Because, in general, we can’t know the A Party, so the incoming calls should be billed at fixed rate. On this window, you will configure the format of incoming calls. The way you configure incoming CDR format is the same with the way you configure outgoing CDR format. Some notes: Column Separator won’t be redefined for CDR of incoming call, in stead it is the same with CDR of outgoing call. Therefore, “Fixed Width” and “Space(s)” will be active exclusively and you can’t change its status from this dialog. Designed, Programmed, Documented By Tran Hong Quang, [email protected]; [email protected] Page 94 of 168 Pbx Billing System - English User Manual When the software is receiving a new CDR sent from Pbx, it will check whether it is incoming call or not before checking it as outgoing call. If “Incoming Call Marked By:” is found from newly-received CDR, this call will be assumed to be incoming call. “Incoming Call Marked By = None” means disable incoming call check. The incoming calls will be charged by a fixed rate as follows: If missing Duration column in the incoming call CDR format, the call will be charged exactly the mount you enter in “Fixed Rate:” If there is Duration column in the incoming call CDR format, then “Fixed Rate:” means the rate of 1 minute. For example, if the incoming call lasts for 10 seconds, the call charge will be “Fixed Rate:”/6 8.4.1.2)Smart Checker.... Please consider two cases that “can happen” in reality. Pbx may write wrong field to the field of duration. It will make serious problem for bill correctness. For example, if Pbx write a called number to the position of duration, and that called number is 171048469356. With that duration, the call charge is extremely high. If you don’t register with your telephone service provider to received reversal polarity pulse, or your Pbx isn’t able to capture it, there is the case if called party hang up first, the call was finished, but you don’t go on-hook correctly. In that case, your Pbx though that the call is till on until some one put the handset into right position. So the duration of the call can be from several hours to several days. Generally speaking, it is your task to find the strange and extreme long call and remove it by hand. But we can provide you “CDR Smart Checker” to automatically detect such call. You have to specify the criteria for the application to determine the fake calls. Enable CDR Smart Checker: If checked, the other slave fields may be activated allowing you to specify the criterion for fake call. Min. Duration: The normal call will have the duration ranging from this value to the value you enter in “Max. Duration” Max. Duration: The normal call will have the duration ranging the value you enter in “Min. Duration” to this value. Action If Duration Is Out Of Above Range: Select what you want to do with such fake call. - "Keep It. But Set Price To" -> Get the fake calls in, but set the price to default one, despite its duration and called number. Later on, if you change the criterion for fake calls, some former fake Designed, Programmed, Documented By Tran Hong Quang, [email protected]; [email protected] Page 95 of 168 Pbx Billing System - English User Manual calls can become normal call. You can make recalculate call charge for existing call to get right price for such calls. - "Ignore It" -> Doesn’t get the call in the database. In the future, if you change the criterion for the fake call, the former fake call still lost (but they still on raw log file). Default Price: This field will be active if you select "Keep It. But Set Price To" on above combo box. You can enter default price for fake call here. By default, it is 0. Currency: This field will be active if you select "Keep It. But Set Price To". You have to select currency unit for the mount of money you enter in “Default Price”. If you enter 0 in “Default Price”, year! No need to select currency unit. 8.4.1.3)Advanced... This window allows you to set some special features of CDR. 8.4.1.3.1)2 nd CDR Definition Let talk about the use case where we have to define multiple CDR definition first. Perhaps you may knows, some Pbx may record different CallType by different format. Recording like this will make extra difficult to billing system. The CDR may be – as an example – like this N 100 01 12/01/05 .................................................... A 3456 100 01 12/01/05............................................ In above example, the first column stands for type/sort of the outgoing call. N stands for normal call, A stands for expensive call and AccountCode must be entered correctly to authenticate before making the real call. To support these Pbx, the billing software must be able to support multiple CDR definitions at the same time. A mandatory requirement is that each CDR format must have a unique keyword inside to activate relevant CDR definition. Designed, Programmed, Documented By Tran Hong Quang, [email protected]; [email protected] Page 96 of 168 Pbx Billing System - English User Manual You can define the CDR format as normal use case, then click on Advance... button to open above dialog. Click on “Current CDR Setting Save As” to copy current CDR definition on Application Settings into one record here. Next you have to specify unique keyword to trigger this CDR definition by enter that Keyword to Trigger column. When receiving a CDR from Pbx, the billing software will search for Keyword. If a keyword is found, the billing software will load relevant CDR definition and parse the call by using this CDR definition. If none Keyword found, the billing software will take the CDR definition on Application Settings as default one to parse the call. 8.4.1.3.2)Character Filter This feature can be found here, as a sub-page of Advanced CDR Settings form, and you can also find it from tab named “Option 1” of Application Settings. Character Filter is a tool allows you which character or string you want to cut off from raw CDR before processing. Why we need to cut some characters from raw CDR. Let look at an example. Here is CDRs of Panasonic Pbx. 1/31/01 2:07PM 107 01 8291354 1/31/01 2:09PM 101 02 8244666* 00:02'00" 00:00'07" The first call is just normal call. But the second call, caller has pressed * when he/she finished dialling. If you don’t filter out *, then the DialNumber is considered as invalid number and the call won’t be charged. Using Character Filter, you can cut off * and process second call as normal call. Another example: 01/06/04 10:53 1 E104 T20402 8987148 00:00'00 You have to cut off E and T before parsing. Character To Be Cut Off: Enter string which you want to cut off from raw CDR. If you enter multiple row on this list, the longest string will be searched first, then shorter and shorter one. Designed, Programmed, Documented By Tran Hong Quang, [email protected]; [email protected] Page 97 of 168 Pbx Billing System - English User Manual Replace With: If you leave this column blank, the matched string will but cut off without inserting and string to its position. If you want to replace with any new string, you have to enter that new string to “Replace With”. If you want to replace with blank, you have to type “ “ to “Replace With” column (One blank in between 2 double quotes). 8.4.1.3.3)Pop-Up Pbx sends out not only raw CDR, but also other kind of message if you configure the Pbx to do so. User may want to be notified immediately if important message sent out by Pbx. You can use this feature to set notification as mention. Activate Incoming-Data-Based Pop-Up Trigger: Check this option to turn on notification basing on incoming data from Pbx. Incoming Data: Enter the string that you want to pop-up a notification when receiving it. Description: Any comment if any. 8.4.1.3.4)CDR Column Copier After parsing raw CDR into separate column, sometime you need to copy value between some columns. As you known, you can’t define 2 different columns at the same position of CDR format definition. For example, if you have put DialNumber at given position, you can’t put ProjectCode to that position to get the same value. CDR Column Copier allows you to set one value taken from raw CDR to multiple columns. Designed, Programmed, Documented By Tran Hong Quang, [email protected]; [email protected] Page 98 of 168 Pbx Billing System - English User Manual Destination Column: Browse to select the column which value of other column will be copied to. Source Column: Browse to select the column, which its value will be copied to another column. Comment: Any string to comment about your settings. 8.4.1.3.5)Conditional Set CDR After parsing raw CDR and have set value for all in-used column, you may want to change it basing on some criterion, before do the call charge calculation. Designed, Programmed, Documented By Tran Hong Quang, [email protected]; [email protected] Page 99 of 168 Pbx Billing System - English User Manual For example, you may to switch all the calls made from 19PM to 7AM of tomorrow to another Telephone Rate Table. To do so, of course you have to prepare something: creating at least 2 Telephone Rate Tables, assigning a dummy trunk to second Telephone Rate Table. Now, on this form, you set the criterion of DialTime, if it is between 19PM and 7AM, then set TelTariffSelector to the value of dummy trunk you just configured. Conditional CDR Column: Browse to select the column which its value will be checked again the condition. If the condition is matched, execute the set command to another column. Condition: Select the operator on this combo box. Value 1, Value 2: Depend on operator, you may have to enter values to Value 1 or Value 2 or both of them. This is criterion value. Set CDR Column: If the condition you have set on the first 3 columns is matched, the column you select on this combo box will be set a value on “To Value” column To Value: The value to set to column on “Set CDR Column” when the condition is matched. 8.4.1.3.6)Other On this tab, you can configure the billing software to work with some special CDR, I means the special CDR, which sometime is sent out from even the same Pbx, or special recording style of some Pbx The marker for transferred call: Some Pbx marks the transferred call by extra column at the end of CDR. This format is easier for billing system to parse the call. But some Pbx freely inserts the transferring marker inside the CDRs. The second case will make the number of column of a CDR is variable. This makes difficult for billing software to parse the CDR. Formula 1: Designed, Programmed, Documented By Tran Hong Quang, [email protected]; [email protected] Page 100 of 168 Pbx Billing System - English User Manual 01/06/04 10:53 1 E104 T20402 8987148 00:00'00 TR Formula 2: 1/31/01 * 2:09PM 101 02 8244666 00:00'07" For the first Formula (Formula 1), you can append Transfer column to the end of column list on Used List of Application Settings. Transfer column is optional one. For normal call, Transfer column will be empty. For transferred call, Transfer column will be different than null => it will trigger transferred call processing. For second Formula (Formula 2), you can’t simply add Transfer column to the position where maker is put. Because if you would do so, the billing software can parse successfully only transferred call, but the normal call will raise problem of lacking column (the number of column on the Used List is more than the number of column can be parsed from raw CDR). For this formula, you can only use the feature on this “Other” page to configure the billing system to recognize the transferred call. This method will check whether the call is transferred call or not by horizontally search for transferred marker (while inserting Transfer column is vertical parsing). Transferred Call Marked By: If “None” is selected, no special processing for even transferred call. You can type the marker here. Once the billing system found the marker from raw CDR, it will treat it as transferred call. Bill The First Part Of Transferred Call To Second Caller: Check this box if you want the billing software to do THE BEST EFFORT to find out the first part of the call, set it price to 0, then add its duration to second part. The use case that you need this feature is: receptionist may call on behalf of you, then transfer the call to you. In this case, the first call done by receptionist should be billed to you, not to receptionist bill. Why BEST EFFORT ? Let look back parameter “Dial Time Is” on Application Settings. You select relevant value on this combo box depend on your Pbx records DialTime is start time of the call or end time of the call. If Dial Time is end time, it is easy to find the first part of the call as you can see below diagram: Start call 1 Finished call 1. Transfer to person 2. Start call 2 Dial Time 1 Duration 2 Finished call 2. Dial Time 2 When billing software receiving a CDR with marker of transferring, because Dial Time is the end time, it is easy to calculate Dial Time 1 = Dial Time 2 – Duration 2, the billing software will search the first part of the call which was made around Dial Time 1. If Dial Time is start time, it is difficult to search the first part of the call. Look the diagram below: Designed, Programmed, Documented By Tran Hong Quang, [email protected]; [email protected] Page 101 of 168 Pbx Billing System - English User Manual Start call 1 Dial Time 1 Finished call 1. Transfer to person 2. Start call 2 Dial Time 2 Finished call 2. Duration 2 When receiving second call, we know it is transferred call, but from Dial Time 2 and Duration 2, we can’t calculate the Dial Time 1. We can’t know how far we should search for the first call. Actually, the billing software will try to search the first call in maximum 24 hour before. The marker for both success and unsuccessful call: Some Pbx records both success call and unsuccessful call. Unsuccessful calls can be the case that the B-party didn’t pickup the phone. The Pbx will mark the success and unsuccessful calls by different marker. For example, Philips Pbx will marks the success call by “$”, while the unsuccessful call has no marker. Since the marker is not mandatory column, we can’t capture it by adding a column to position of marker. On this form, you will define the marker of success/unsuccessful call and the marker of transferred call. Success Call Marked By: Enter the marker that your Pbx gives to CDR of success call. If you leave it “None”, all coming CDR is considered as success call. Unsuccessful Call Marked By: Enter the marker that your Pbx gives to CDR of unsuccessful call. If you leave it “None”, all coming CDR is considered as success call. Change System Date Format: This feature is rarely used, more or less it is still here because of historical cause. Some users want to enter the Pbx date format on the billing software and want the billing software to change the system date format of Windows to the same as Pbx. 8.4.1.3.7)Important note about features of Advance... box: Both “CDR Column Copier” and “Conditional Set CDR” features will change the value of column therefore they should affect each other. You should know the order that these features will be executed in other to configure correctly: “CDR Column Copier” will be executed first, then “Conditional Set CDR” is executed. 8.4.1.4)Dial Number Settings (to activate this feature, on Application Settings, tab “CDR Settings”, you have to change “Dial Number Formatted” to “Service Selection”. Then, a small button will be displayed on the right. Click on that button to open Dial Number Settings form) In some special cases, you have to manipulate the dial number. For example: Case study 1: a company wants to save money by force staff to use prepaid card to dial longdistance calls because normally prepaid service has lower rate compared with post-paid service. But the dial number column of the call using prepaid card is quite completed. Normally it has: [Prepaid Service Number][Language Selection Number][Prepaid Card ID][Password][Real Dial Designed, Programmed, Documented By Tran Hong Quang, [email protected]; [email protected] Page 102 of 168 Pbx Billing System - English User Manual Number]. Since this is prepaid service (the money you have already paid for the prepaid card), almost companies don’t need to trace the call charge. But some other companies want to have report of calls made by prepaid card to make sure that their staff doesn’t use company prepaid card at home. The difficulty here is that the first digits of dial number isn’t Area Code, instead it is Prepaid Service Number. You need a new mechanism to cut out only the real dial number to calculate the call charge. Case study 2: You want to allocate telephone service into multiple projects by dialling project code at the end of real dial number. For example, your real dial number is 6063219, you make this call for project which has ProjectCode = 100, you can dial like this 6063219*100# . You need a way to divide this complex dial number into real dial number to calculate call charge, and ProjectCode to allocate this call cost to. Case study 3: If you can dial the same dial number via different TelCo, you will have different rate. Some Hotels want to configure their Pbx to automatically re-route the call via cheaper TelCo, if the guests doesn’t explicitly dial some digits to select TelCo. Even the Hotel can re-route the PSTN call via VOIP system to have very cheap rate, but the guests don’t know about that and happy to pay for PSTN call. To reroute the call, Pbx may buffer the dial number, then add or change the prefix to route the call to cheapest network. The unexpected result may be that on the CDR, the new dial number is recorded. If you give the bill with this strange dial number to the Guests, they may refuse to pay. For example, the Guest dial 04334400, your Pbx will alternate the dial number and new dial number is 17104334400 to route the call via VOIP network. If on the bill, you still record the call’s dial number as 17104334400, then the Guest may refuse to pay. You need billing system to manipulate the new dial number to change it back to original one and calculate the call charge at higher price. You will have margin of price difference between two networks. One requirement is that the Pbx must be able to mark the re-routed call to make sure that billing system only change dial number for re-route call only. 8.4.1.4.1)Page “Trigger Condition & DialNumber Wizard” Designed, Programmed, Documented By Tran Hong Quang, [email protected]; [email protected] Page 103 of 168 Pbx Billing System - English User Manual There are 2 ways to trigger processing Dial Number: If Dial Number Has Prefix Of: Allows you to define the pattern of dial number which if matched, the dial number processor will be triggered. If Column/Equal: You select any CDR column and the expected value of that column. If matching, the dial number processor will also be triggered. The prefix pattern has following form: Form 1: xxxx Form 2: [0,1,2...9]xxxx Form 3: [0,1,2...9][0,1,2...9]xxxx Form 1 means any digits Form 2 means the first digit must be one of the digits you enter inside the brackets. Inside the brackets, each digit must be separated by comma. After that are any digits. Form 2 means the first digit must be one of the digits you enter inside the first brackets. The second digit must be one of the digits you enter inside the second brackets. From third digit is any number. For example, you want to trigger the Dial Number Processor if the Dial Number has prefix of 00, 02, 03, 04, 05, 06, 07, 08, you should enter below pattern on “If Dial Number Has Prefix Of:” [0][0,2,3,4,5,6,7,8] ChunkOf Digit: You specify from the width (calculated by the number of digits) from left to right and assign that chunk of digit to any CDR column. There are 2 special values that you can select are: Until *: take digits from beginning until * found. * itself won’t be included on string of digit which will be taken. If no * found, the whole remaining digits will be taken. Until #: take digits from beginning until # found. # itself won’t be included on string of digit which will be taken. If no # found, the whole remaining digits will be taken. Assign To CDR Column: Select the column to assign the string of digit, which is taken from DialNumber according to the rule on left column. By using this feature, you can divide a Prepaid Card call into a local call to the Prepaid Service number and the real call. It is up to you how you want to bill each member call. 8.4.1.4.2)Page “Member Call Wizard” In theory, you can divide a single call into two member calls, you can then change again DialNumber and Extension of the member calls. That is the function of second page named “Member Call Wizard”: For DialNumber/For Extension: the sessions allow you to manipulate the dial number and extension of the member call. If Column/Equal: You can define the trigger of member call processor. Action: Select what action you want. If Action = Append, the value in “Value or Column” will be added at the end of Dial Number of the member call. Because adding at the end, you don’t have to specify the position in “At Position”, sot “At Position” is inactive. If Action=Insert, “At Position” will be active requesting you to specify which position you want to insert. For Extension session: it allows you to change the Extension of each member call. You known, 2 calls will be considered duplicated calls if they have the same Extension, Dial Number and Dial Time. Thus, if you divide a complex call (like the call made by Prepaid Card), you have to change the Extension, since Dial Date and Dial Time of both member call are the same. A practical way is keeping the same Extension for the first member call and append one digit at beginning of Extension for second member call. Designed, Programmed, Documented By Tran Hong Quang, [email protected]; [email protected] Page 104 of 168 Pbx Billing System - English User Manual Insert This Prefix: Enter the digits you want to put at beginning of dial number of member call to avoid the problem of duplicate calls. Don’t hesitate to contact me for consultancy if you find this help isn’t enough for you to configure the software to match your case. 8.4.2)Second Page – “Option 1”: Designed, Programmed, Documented By Tran Hong Quang, [email protected]; [email protected] Page 105 of 168 Pbx Billing System - English User Manual Open At Startup: Select the form, which will be launched when you start the software. Working Mode: There are 7 working modes are as follows: Master: Pbx Billing System tries to get data online from serial port and process it fully. The application in this working mode activates also the alert feature, scheduling feature, export and sending to mail box or FTP server feature... Slave: Pbx Billing System doesn’t get data directly from serial. But it is the useful tool for you to process the existing call data in the database, which has been retrieved by Master one. Distributor: In this working mode, Pbx Billing System captures the draw CDR from PBX, and then relays them to the database of Semi-Master for call charge processing. Distributor Extension: The same functions as Distributor, but in this working mode, Pbx Billing System process the call charge as well. After that, it stores the call charge information in its local database. Thus, you have a backup of call data. Semi-Master: This working mode doesn’t captures draw CDR directly from PBX. It waits the CDR relayed from the Distributor or Distributor Extension. It works nearly the same with Slave mode. The difference between Semi-Master and Slave that Semi-Master calculates the call charge by default, while by default, Slave mode doesn’t calculate the call charge. Hotel Master: The function is the same with the Working Mode= Master, except the interface (menu and toolbar). The functions designed for Hotel business will appear, while the functions typically only used by Enterprise billing will hidden. Hotel Slave: The same function with Working Mode = Slave, while the interface (menu and toolbar) look exactly the same with Working Mode = Hotel Master. If you select this “Distributor” or “Distributor Extension”, there is a small button appeared on right side. Click on the button to call the form allowing set some options for this Working Mode. Read Chapter 11 for more information. Working mode and its application is not simple to explain all its aspect here. For more information about Working Modes, you should read Chapter 11. Auto Lock Timer: Set the period of time which no user action happen during that period, Pbx Billing System will close any opened form (except Online Call Detail Record Capturer and Switchboard) and lock itself Systray Icon: Set the mode for systray feature of the Pbx Billing System. If it is “Manual”, you will see an Icon on the Online Call Detail Record Capturer. Click on it to disappear the Pbx Billing Designed, Programmed, Documented By Tran Hong Quang, [email protected]; [email protected] Page 106 of 168 Pbx Billing System - English User Manual System from the Desktop and force it to run in the System Systray Icon. There are two other possibilities that are Disable and Automatic. You can try it and find what happen. If Systray Icon is holding Manual or Automatic value, a button will be displayed next to its text box. You can click on this button to open a window that allow you to set password for Systray Icon. Once Systray Icon has password, you have to type correct password to restore the Pbx Billing SystemTM to normal window state. Online Clock: Visible or invisible the Clock on the top-left corner. Report’s Call Dur.: There are two possibilities: Real Call Duration: The call duration is kept intact. The call charge is calculated base on the real call duration. Adjusted Call Duration: The call duration will be adjusted by the amount you set for the CallType, to which this call belongs. The call charge is calculated base on the adjusted duration. On all the report, the duration field is switched to the adjusted value of call duration. On the Call Charge Rate Tables form as explained above, there is a text box called “Adjust Duration”. You can enter a positive, 0 or negative value into this text box. The call’s duration is adjusted by that amount. Mailing Method: You can select the option to decide how Pbx Billing System sends the email to desired person. There are two options as follows: Via Mail Client: Pbx Billing System will try to put the mail need to be sent to the Outbox of your mail client. If your mail client is running, your mail client will send the mail for Pbx Billing System. If because of any reason, the mail service is not available at that time, the mail will be saved on Outbox folder of mail client and will be delivered to mail server whenever the mail service is up again. But the worse thing is that nowadays, Microsoft tends to stop sending mail like that to avoid virus-basing-on-mail (like LoveBug and many the viruses using mail client to steal mail addresses and send bulk mail to someone). The way Microsoft does is showing up a dialog box with message “A program is trying automatically send e-mail on your behalf. Do you want to allow this?”. You have to wait for 5 seconds, then explicitly click on “Yes” button to allow the mail to be sent, click on “No” button to throw the mail away. Pbx Billing System can automatically click on the “Yes” button for you. But this function won’t work if your computer is locked. Please read the Appendix of User Manual for more information. Directly To Mail Server: The Pbx Billing System will try to contact your Mail Server directly to send the email. Pbx Billing System uses the settings of mail client on your computer to authenticate with Mail Server, but Pbx Billing System doesn’t ask your mail client to relay the mail. Thus, you won’t see the security dialog (with message “A program is trying automatically send e-mail on your behalf. Do you want to allow this?”.). But if your mail server isn’t available at the time the mail is being sent, the mail won’t be saved to Outbox folder of mail client, so the will be lost. Records Buffer: There is 2 adjacent boxes. The first one’s value is the maximum number of CDR is being display on Online Call Detail Record Capturer. The second one is the number of last records will be displayed again if you close and reopen the Online Call Detail Record Capturer. The value on second text box should be equal or less than the value on the first box. There is small box next to it. Click on this button you will got currently buffered calls. Designed, Programmed, Documented By Tran Hong Quang, [email protected]; [email protected] Page 107 of 168 Pbx Billing System - English User Manual CDR Log Name: The default value is “By month”, which will name the log file by month with the naming convention is Pbxlog_MonthName-Year.txt. If you select “Be restarting times”. Click on small button on the right of CDR Log Name you can specify the path for log file. Normally, it will be stored on installation folder/logs. Protect CDR Capturer: CDR Capturer should be always running to retrieve CDR from Pbx. But some user may close it because of negligence. We need some ways to protect CDR Capturer from closing: None: No protection at all. If user clicks on close button of Online CDR Capturer, it will be closed completely. Asking For Decision: If user clicks on close button of Online CDR Capturer, a dialog will appear to ask you to confirm. You can continue or abort closing. Always On: Clicking on close button of Online CDR Capturer won’t close it. Hide On Closing: Clicking on close button of Online CDR Capturer will hide it, instead of closing it. The software continues to receive incoming CDR even you don’t see Online CDR Capturer on the screen. Commit The Change On Tel. Tariff: By default, your change will be updated when you move to another record. Almost customers accept this feature. However, a few of them would like to commit the change per session for sensitive information like Telephone Rate. The only nice result of committing per session is that you can cancel (undo) all your changes during last session. But the disadvantages are that when you closing the session, you will be asked for making decision. Here “Commit The Change On Tel. Tariff” is the option for you to configure the application to update your change on Telephone Tariff per session (select “per session” on this combo box) or per record (select “per record”) Exchange ID: Normally, if you use this software to bill for only one Pbx, you can forget this option and accept the default value “Only Me”. I have customer use my software for multiple Pbx, they install one install for one Pbx, but configure all instance to save data to central Datastore.vit. They want to print separate bill for each Pbx. Exchange ID can be used to tag the call come from each Pbx, and then make independent bill for each Pbx. If you have the same case, please email me, I will discuss with you more detail how to do that. I don’t intend to explain too much here, since almost users don’t need it. Add Pagebreak On Each Group Of Report: If this check box is in checked status, each group on any report will be put to beginning of new page. The rule is only applied for one main group per report. For example, if the report groups the call by Department, then by User, when you check this box, only grouped by Users will be affected. The call data of each user will be displayed at beginning of paper. Put The Application In To Operation Mode: There are two modes that are Test Mode and Operation Mode. In Test Mode, you let the Pbx Billing System process CDR without saving CDR to database. After testing everything completely, you can turn the Pbx Billing System to Operation Mode, in which the processed CDR will be saved to database. Enable Log File: If this check button is check, the log file containing raw data received from Pbx will be saved in the folder ...\PbxHomeFolder\Logs. It is not high security if you save raw data on your hard disk in case your Pbx is using call charge base on Access Code, not Extension. Because the log file is containing the Access Code as well. Any body can open log file and guess the Access Code of other staff. But this is only the case if Pbx could not map the actual dial Access Code and the code on CDR. Many Pbx can map Access Code to dummy extension or dummy code. For example, I have to dial *9 then my Access Code may be 225. But the CDR of my call has no 225 in Access Code field. It may be 01 because the Pbx map it. Communication Flow Or Picture On Background: The background can be Communication Flow or very famous landscape in Viet Nam – The Ha Long bay (landing dragon bay). The Communication Flow is useful for beginner. But later on, when you master the application, you may prefer a picture on background to the bored Communication Flow. Check this radio button to show Communication Flow, otherwise, Ha Long bay picture will be displayed. Designed, Programmed, Documented By Tran Hong Quang, [email protected]; [email protected] Page 108 of 168 Pbx Billing System - English User Manual Form Interface Uses Customized Language: Default language used for form and report is English. By checking this radio button, you switch all your form’s default English language to customized language. The fonts used are Unicode (Tahoma or Time New Romance). Thus, the customized language can be any language you want. For example, the customized language can be Vietnamese or Chinese. Please use Language Phrase Dictionary under Application Tools menu to define your customized language. You can, of course, use Language Phrase Dictionary to rewrite any string on any form. Character Filter Applied To Raw CDR: If this check button is checked, you will se a small button on the right. Click on that button to open a data sheet. You can enter each row a string that you may replace it by space on CDR before processing CDR string. There is another place to set this the same feature is on Advanced... dialog which you can open by clicking on Advance... button on the first tab. Allow Changing Caller (Extension) On-Fly: This feature often used by hotel. When the guest goes by receptionist desk, they may ask receptionist to make a phone call for him. Receptionist, later on, want to move this call to the Guest’s room. If you check this option, click OK to save your change and close Application Settings. Go back to Online CDR Capturer, you can move the call to another caller by clicking on the icon of the call twice (but not double clicks) to get a small box and then enter the Guest’s Extension. Click twice is not double clicks. The first click on the call’s icon to select the record. The second click on call’s icon will bring the small box for new caller. Enable Report Footer Hot Editing: This feature is often used by hotel. Hotel may need to write something at the bottom of the bill. For example, they may give the guest 5% discount on the total of bill. They want to say something about the discount and let the guest sign on it. If this option is checked, whenever you make the bill, a dialog will appear asking you to append the last lines to the bill if you have. Recheck and Upgrade Back End: Check this option and restart the application, the structure of data file will be analyzed and upgraded to match with Front End version. All common settings will be reset to default. You have to do it when you upgrade the software from old version to new version, in which you copy Datastore.vit, TelephoneRateTables.slv from old version to new version (There are 2 other better ways to upgrade the software. But some users may didn’t something wrong during doing that 2 upgrading procedures, then they have to check this option to redo it.). Best-Matched Timestamp Rate: As discussed on the Telephone Rate session, each rate record has time-stamp and it is considered as a valid rate record for given call only if the dial date is later than the time-stamp of rate record. This design helps you to keep track of all telephone rate change in the past up to now. But if the call has dialed date older than any rate record for its AreaCode, then the call charge calculation failed (price set to 0). Some users want in this case, take the oldest rate record for calculating call charge of that call, by pass timestamp checking. If so, check this option. Multiple Rates Basing On Block Order: If checked this option, you can charge the call by different rate for different block of call duration. Please go back to Telephone Rate Table session to learn more about how to setup step-based rate. 8.4.3)Third Page – “Option 2”: Designed, Programmed, Documented By Tran Hong Quang, [email protected]; [email protected] Page 109 of 168 Pbx Billing System - English User Manual Price Format: Normally, any field containing the price/value calculated in currency will be formatted in Operating System currency format. But some customer doesn’t want to see the currency sign in front of the value. “Price Format” offers some option for them to format the price field. Currency: This is the currency format of your Operating System. Go to Control Panel, click on Regional Settings applet (for Win2K or later, this applet name was changed to Regional Options), click on page named “Currency” to change the format. General Number: This is number format but no digit group. Standard: This is the number format of your Operating System. Go to Control Panel, click on Regional Settings applet (for Win2K or later, this applet name was changed to Regional Options), click on page named “Number” to change the format. Number Format: This option affects how Pbx Billing SystemTM formats the number field. There are two possibilities as follows: Standard: This is the number format of your Operating System. Go to Control Panel, click on Regional Settings applet (for Win2K or later, this applet name was changed to Regional Options), click on page named “Number” to change the format. General Number: This is number format but no digit group. You may confuse the affect scope between “Number Format” and “Currency Format”. “Number Format” will affect, for example, the field storing the number of call. This field is not price/value calculated in currency, so that, it is affected by only “Number Format”, not by “Currency Format” Time Format: Select how you format the time column on the bill. You can select the name of time format, which was defined by Ms Windows. If you want to change the format, you have to go to Control Panel>>Optional Settings. Format Of Exported Bill: You can send the bill via email. To send bill via email, firstly the billing software has to export this bill to external file. There is an automation done by Microsoft to export data from Ms Access to Ms Word, Ms Excel, Snapshot, HTML. Exported version in Word seem to be OK, but exported version to Excel is ugly. As you may known, almost often-used Telephone Bill has Excel version, which will be exporting by programming, not use the automation of Microsoft. We call it Excel(cust). Excel(cust) version can protect the layout of the bill, it look nice. But not all telephone bill has Excel(cust) version. So that if you select the exported format is Excel(cust) you have to select second exported version, which will be used for the telephone bill has no Excel(cust). There is small button on the right, click on it to open below form: Designed, Programmed, Documented By Tran Hong Quang, [email protected]; [email protected] Page 110 of 168 Pbx Billing System - English User Manual You can protect Excel(cust) by password. Telephone Service Tax: Quite simple, this telephone service tax. Hotel Room Service Tax: The tax on the room rental service. Hotel Additional Service Tax: The tax on other service used/bought by guest like beer, wine... Price and Rate: Different country has different policy for price and tax. Exclude Tax: The price you set is price before tax. On the bill, the grand total equal price + tax Include Tax: The price you set is price after tax. Then, on the bill, there is no grand total, instead of tax value. For example, Australia is using price after tax for telephone rate, room rate... Output Calculated CDR To External File: If this check box is checked, Hotel Management SystemTM will relay the calculated call data to the external database file named OnlineCDR.mdb right after Hotel Management SystemT M receives the CDR from your PBX. OnlineCDR.mdb is Ms Access 2000 database file. It is protected by database password. The initial default password of OnlineCDR.mdb is “OnlineCDR”. The target of OnlineCDR.mdb is building a billing connector for other application to retrieve the call charge online. For example, you can develop a Hotel Management. Then you connect your application to OnlineCDR.mdb to get online call data of your guest to make one single professional bill instead of one bill for room fee and one bill for telephone bill. Password Of Online CDR: If “Output Calculated CDR To External File” is checked, this text box will active allowing you to reedit the password to connect to OnlineCDR.mdb. Why does Hotel Management SystemTM allow you to reedit the password? You may change the password of OnlineCDR.mdb because of security reason (open Ms Access, go to menu Tools/Security/Set Database Password to change). If so, you have to provide the new password here, unless Hotel Management SystemT M couldn’t relay the calculated call data to OnlineCDR.mdb Show Only Chargable CDR: By default, on Online CDR Capturer, all the raw log which can be parsed successfully, will be displayed despite whether the call charge calculation is success or not. If you check this option, the call charge calculation is another criteria to be checked to display the call on Online CDR Capturer. Beep When A Call Is Coming: Check this option will make the billing PC sound BEEP whenever it receives a call. Designed, Programmed, Documented By Tran Hong Quang, [email protected]; [email protected] Page 111 of 168 Pbx Billing System - English User Manual Copy Print-Bill Call To Excel Buffer: You will find some Excel bill on the group of this application from Start bar. These are very special Excel bill, which fully allows you to customize its layout. The call data will be inserted between your objects. Where the call data come from? It comes from a buffer. If you check this option, whenever you making a bill by using internal interface (like Telephone Bill Master, Hotel Bill Master...), the software will copy the call data on internal bill to the buffer for external Excel-based bill. Support Tool: Click on this button you will have a dialog to run SQL command. Normally, you should not try to create SQL by yourselves. Some of my customer requests very strange things, which can not be done via interface. In that case, I will create SQL command and test it first, then send this SQL command to customer. They just open this tool to run the SQL command, then they got what they want. Extension/AccessCode Must Be Numeric: By default, Extension and AccessCode must be digit. But if you do billing for IP Phone or PC-based phone, you may bill the call by IP. In this case, you have to uncheck this option, then you can enter none-digit to Extension or AccessCode text box. 8.4.4)Fourth Page –“Sample CDR Creator”: This page is used to create sample CDR which allows you to test the Pbx Billing System . The CDR format is exactly with your CDR format you have set on the first page (named CDR Setting). So that right after creating sample CDR you can import it immediately or use any serial port tool to send that file via Null-modem cable. On this form, you can customize some field of CDR like “Direction”, “Definable Column x” and “Ignore Column x”. You will see your value assign to those column if those column is being used in CDR format. Assume each sample CDR was made from one of your Extension. The AccessCode may also appear on the sample CDR if your CDR format set on first page has AccessCode field. Therefore you have to create Organization Data before creating sample CDR. Pbx Billing System uses randomize function to pick one Extension (or AccessCode) from your Extension List (or AccessCode List) for each sample call record. Designed, Programmed, Documented By Tran Hong Quang, [email protected]; [email protected] Page 112 of 168 Pbx Billing System - English User Manual The first sample call record will be made at Start Dial Time on Start Dial Date. The next sample call record will be moved forward 1 second compare with previous call record. You can decide how many call record created by moving the slide named “The number of CDR”. The maximum sample CDR you can create is 80.000. Max Duration: Enter the number of second for maximum duration of the sample call. The call duration will be created in random between 1 and “Max Duration”. Randomly Decrease Dial Date: Check this option box to allow Pbx Billing SystemTM randomly move the dial date of sample CDR back to the past. The maximum distance to move back is set in Range text box. Thus, by checking this box, you decentralize the density of the call. Range: The maximum distance for randomizing the call dial date. This text box will be active if “Randomly Decrease Dial Date” is checked. There are four buttons at the bottom of the windows. The function of OK and Cancel buttons are common, for sure you know. Connect To Datastore...: Click on this button to call Open File Dialog twice. The first time allows you to browse your file system to select the Datastore.vit. The second time allows you to browse your file system to select your telephone tariff file (normally named TelephoneRateTable.slv) Connect To Online CDR...: Click on this button to call Open File Dialog to browse your file system to select the OnlineCDR.mdb – the database file, to which online calculated CDR relayed to. 8.4.5)The rule to separate CDR string into columns: 1.In case Column Separator=Fixed Width: The order of column within CDR string is the same order with corresponding column in “Used column” box. For each field (or may call column) we can set a fixed width. Pbx Billing System will count from left end the number of character equal the number of fixed width. Once Pbx Billing System has a data for specific column, Pbx Billing System will check that data agains criterion of that column. 2.In case Column Separator=Space(s) Depend on value of Space(s) text box below, Pbx Billing System will use One Space or Two Spaces as separator for two adjacent columns. Note that for each column, you can set Spaces(s) as separator with the next column independently with Spaces(s) of other columns. For example, you can set One in Space(s) text box for Trunk column that means there is at least one space between Trunk column and the next column. But you can set Two in Space(s) text box for Date column because the Date may contain one space inside (For example: 5/ 1/20001). 8.4.6)Case Study – Some examples of settings this software to understand your particular CDR format Below are real cases that I have supported my reseller around the world. I copied my hints for them to here (so that you may find something I mention is not related to this context) 8.4.6.1)Case Study 1 Your Pbx is sending out below CDR: 5/ 5/ 5/ 5/ 5/ 5/ 5/ 8/06 8/06 8/06 8/06 8/06 8/06 8/06 5:52PM 106 5:54PM 106 5:55PM 106 5:56PM 106 5:58PM 106 6:00PM 106 6:16PM 106 01 0126951151 01 0126951151 01 0126951151 02 0126951151 01 0126951151 01 0126951151 01 0126951151 00:00'04" .... 00:00'05" .... 00:00'02" .... 00:00'04" .... 00:00'02" .... 00:00'01" .... 00:00'02" .... Designed, Programmed, Documented By Tran Hong Quang, [email protected]; [email protected] Page 113 of 168 Pbx Billing System - English User Manual 5/ 8/06 6:18PM 106 01 0126951151 00:00'02" .... Go to Application Tools>>Application Settings, and set as I emphasize on Red cycle. I explain something: “Used Columns” list contains the columns that you can find from your RAW CDR. For example, the first field on your CDR is DialDate, so that DialDate is on the first row of Used Column.... Your Pbx Date format is mm/dd/yy, so that you enter that format into PBX Date(Time) Format. When receiving CDR, the billing software will correctly understand the date and converse it into PC Windows’ date. 8.4.6.2)Case Study 2 Your Pbx sends CDR as follows: Date Time Ext CO Dial Number Ring Duration Acc code CD -------------------------------------------------------------------------------11/20/04 05:11AM 8203 01 0126853 00:00'22 11/20/04 05:12AM 8203 01 0126859253 00:00'08 11/20/04 05:23AM 101 01 0126859253 00:00'08 ATQ0E0V1S0=1X0&D0 Date Time Ext CO Dial Number Ring Duration Acc code CD -------------------------------------------------------------------------------11/20/04 05:28AM 101 01 0126859253 00:00'08 11/20/04 05:36AM 101 01 0126859253 00:00'04 From the Left to Right, the column order of that CDR is DialDate DialTime Extension Co (or Trunk) Dial Number Duration The other remain columns have title, but actually the Pbx doesn’t record that parameters (That are Ring, Account Code, CD). Designed, Programmed, Documented By Tran Hong Quang, [email protected]; [email protected] Page 114 of 168 Pbx Billing System - English User Manual How to detect next column: There are two ways to search and take a column from the whole CDR: by fixed width or by space in between two adjacent columns. For Panasonic Pbx, the best way is detecting the space between two adjacent columns. The space between: DialDate and DialTime is ONE DialTime and Extension is 3. Extension and CO is ONE Co and Dial Number is ONE Dial Number and Duration is many. The Dial Time has the number and comment put together like this 05:12AM , no space inside between 05:12 and AM. Thus, we can separate any column by one ONE space (Just in case if we have a column but there is a space inside the column, we have to separate that column by two Spaces. For example, if the Dial Time was 05:12 AM, then we need 2 Spaces as criteria to recognize Dial Time column) Dial Date format is mm/dd/yy (11/20/04) Go to Application Tools menu >> Application Settings and set as I emphasize in Red cycles Click OK button to save your change. 8.4.6.3)Case Study 3 Your Pbx sends CDR as follows: Date Time Ext CO Dial Number Duration Acc code CD -------------------------------------------------------------------------------02/03/05 11:48AM 101 01 0722771763 00:00'42 3030 02/03/05 11:50AM 116 17 00096626489928 00:01'08 2425 02/03/05 11:49AM 122 01 0722771763 00:01'03 3030 TR 02/03/05 11:50AM 101 08 0722300967 00:00'37 3030 Designed, Programmed, Documented By Tran Hong Quang, [email protected]; [email protected] Page 115 of 168 Pbx Billing System - English User Manual 02/03/05 11:50AM 02/03/05 11:50AM 02/03/05 11:50AM 02/03/05 11:52AM 02/03/05 11:51AM 02/03/05 11:52AM 02/03/05 11:55AM 02/03/05 11:52AM 02/03/05 11:52AM 02/03/05 11:56AM 02/03/05 11:53AM 02/03/05 11:54AM 116 17 00096626489928 112 01 0722771763 101 02 223170 116 17 00096626489928 135 08 0722300967 101 01 0722515330 101 20 0722777713 114 08 0722300967 101 01 0722515330 101 20 0722881961 101 02 007222123315 101 01 900 00:00'04 2425 00:00'40 3030 TR 00:00'05 3030 00:01'14 2425 00:00'40 3030 TR 00:00'01 3030 00:00'14 3030 00:01'03 3030 TR 00:00'17 3030 00:00'22 3030 00:00'02 3030 00:00'59 3030 From the left to right, there are following column in order: DialDate DialTime Extension Trunk DialNumber Duration AccountCode There is no blank in between a column so that we can use the criteria of 1 blank to know the border between 2 adjacent columns (Some Pbxs, this can happen for DialDate when the date number is less than 10, then, the DialDate column can be 02/_3/05 . This is the case there is a blank in middle of a column). Go to Application Tools>>Application Settings, on “CDR Settings” tab, configure as the picture below. Note that the order of column in “Used Columns” is important. It must match the order of call log columns. To set the criteria for border between 2 adjacent columns, just click to select the first column on “Used Columns”, then on “Space(s)” combo box, select the number of space in between. Designed, Programmed, Documented By Tran Hong Quang, [email protected]; [email protected] Page 116 of 168 Pbx Billing System - English User Manual Be default installation, the border of DialDate and next column often Two spaces. You have to change to One space because your Pbx call log has only one space between DialDate and DialTime. Click OK to save your change. Now, make some test calls. You will see below Online Call Detail Record Capturer. 8.4.6.4)Case Study 4 Your Pbx sends out below CDR 09101205 0043 0 6331915 223 09101207 0029 0 8522042 225 09101208 0005 A 0 0904001515 227 09101220 0002 0 6406119 215 09101225 0007 0 0904001515 214 00 030104 00 040114 00 030105 00 040116 00 040117 You need to use Character Filter to cut off unneccessary character/string, in this case is A. Go to Application Tools>>Application Settings>>Option 1>> check the check box named “Character Filter Applied To Raw CDR”, then you will see small button appeared next to that check box. Click on that button to open a dialog box allowing you to enter character/string you want to cut off from raw CDR before parsing. In this case, you have to enter A into the first column on the dialog, just leave the second column empty. From Left to Right, the order of field appeared on raw CDR is: DialDateTime Duration IgnoredColumn1 DialNumber Extension IgnoredColumn2 Trunk - DialDateTime có format là mmddhhnn Note that in the same field, if you have both Month and Minute, then m stands for month and n stand for minute. - Duration format is hmmb b is block of 1/10 minutes (or 6 seconds) Go to Application Tools>>Application Settings and configure the software as I emphasize on Red cycles on picture below: Designed, Programmed, Documented By Tran Hong Quang, [email protected]; [email protected] Page 117 of 168 Pbx Billing System - English User Manual By default, the Duration format you set here will be used to format duration on the bill. It look not nice in our case because Duration format is hmmb. You can configure the software to transform duration format to your prefer one. Click on small button next to Duration Format combox box to open below dialog. Enter your prefer duration format to Duration Format On Report. 8.4.6.5)Case Study 5 – Bill Incoming Call Below is short instruction how to configure Pbx Billing System to support recording and billing incoming calls. Sample Raw CDRs: Date Time Ext. CO Dial number Duration Code -------------------------------------------------------------------------------12/25/05 10:08PM 119 02 0983081955 00:00'06" .... 12/25/05 10:07PM 102 01 7166823 00:02'08" .... 12/25/05 10:09PM 101 02 < incoming > 00:00'10" .... 12/25/05 10:09PM 102 01 0912597969 00:00'46" .... 12/25/05 *10:10PM 113 02 < incoming > 00:02'10" .... Designed, Programmed, Documented By Tran Hong Quang, [email protected]; [email protected] Page 118 of 168 Pbx Billing System - English User Manual 12/25/05 10:12PM 102 12/25/05 10:17PM 118 12/25/05 10:17PM 118 12/25/05 10:32PM 117 12/25/05 10:40PM 101 12/25/05 *10:41PM 112 01 0912907196 01 9274087 01 0904001688 01 0915077116 01 < incoming > 01 < incoming > 00:01'30" .... 00:00'03" .... 00:00'15" .... 00:04'39" .... 00:00'32" .... 00:00'13" .... Discussion We need a unique marker to trigger Incoming CDR parser. I would like to take incoming word inside each incoming CDR as the trigger. I think I should cut off < and >. In this case, we can cut off * for simple 8.4.7)Explanation the predefined columns When programming CDR format, you have to put predefined column to right position of it on raw CDR. The software will parse the raw CDR and set the found value to relevant column, then calculate call charge. AccessCode You can think it as AccountCode as many Pbx are using that term to refer to the secret digits you have to dial to activate service level which allows you to make long-distance call. If you put AccessCode to “Used Columns” list, go back to Organization Data>>Extensions & AccessCodes, you will find second tab to declare all AccessCode. You still have to declare Extension as normal. The reason I will explain later. If you don’t put AccessCode to “Used Columns”, the form Extensions & AccessCodes has one tab for Extension only. When activating AccessCode, your call will be tracked by AccessCode, instead of Extension. So that you can go around the office and make some calls, all these calls will be billed to you. It is inconvenience if you have to always dial AccessCode for all call types. Normally, customers want to control expensive calls only, and just forget cheap calls like local call. So that they ask Pbx engineer to program Pbx to request AccessCode for long-distance calls only, no need to key the AccessCode for local call. Then, the CDR of local call will missing AccessCode and lack information to bill the call to. Change Request from almost my clients is bill missing-AccountCode call to the person “owned” or “sitting nearest” the Extension. To do that, you have to declare a dummy AccessCode which equal Extension, and assign to “owner” both his own AccessCode and dummy AccessCode. When the software detect CDR missing AccessCode, it will take Extension on CDR as AccessCode. For example, you have 2 CDR, one with AccessCode and one has no AccessCode Date Time Ext CO Dial Number Duration Acc code CD -------------------------------------------------------------------------------11/20/04 05:11AM 8203 01 00126853 00:00'22 89076 11/20/04 07:21AM 8505 02 533489 00:10'23 - The first call has AccessCode = 89076 and will be billed to owner of this AccessCode - The second call has no AccessCode. The billing software will automatically create dummy AccessCode = Extension = 8505. And this call will be billed to owner of AccessCode=8505 What happen if you don’t declare dummy AccessCode=Extension and assign to user? If so, the call without AccessCode will be filtered out. Some clients have plan for AccessCode. For example the first 3 digits are real user’s AccountCode and the last 2 digits is ProjectCode. Why they do that, because they want to allocate the longdistance call by project. To devide AccessCode into real user’s AccountCode and ProjectCode for automatically allocating calls, please click on AccessCode row on “Used Columns” list, you will see a small button named “CDR Column Option” below it, click on it to configre how you chunk the AccessCode into two part as I just mentioned. If you do that, go back to Organization Designed, Programmed, Documented By Tran Hong Quang, [email protected]; [email protected] Page 119 of 168 Pbx Billing System - English User Manual Data>>Extension & AccessCode, you will find one more tab named “Project Code” allowing you to enter ProjectCode and Project Name associated with ProjectCode. Go to Telephone Bills>>Telephone Bill Master, you will find under All Telephone Bill there are some Project-based telephone bill. BillTo You can make a call from your Extension but it should be billed for other Extension. This feature is nice but not all Pbx support it. For example, receptionist call on behaft of manager and the call should be charged to manager. For common Pbx, if you want to charge a call to other users, there are two ways: 1/ Using AccessCode, and the caller must know the AccessCode of the person to be billed to. 2/ Change owner of the call manually. My software support you to change it on fly, but you have to activate this feature. When you see the call appeared on Online Call Detail Record Capturer, you can click on it and enter new Extension. CarryReturn&LineFeed Normally, CDR has one line, so that I can take the End-of-line character (Ascii Code 13 and 10) to know that one CDR has been completed transferred to billing PC. But some Pbx is using 2 line CDR. To wait for the second line, you have to put this column after the last column of the first line. So that the billing software won’t start parse the call when only the first line received, it will wait for second line and proccess both lines as one CDR. DialDate The date the call made DialTime The time the call made Duration The duration the call lasted DialNumber The destination number, or someone can call B-party telephone number. DefinableColumn1...DefinableColumn5 On CDR, there may be some fields which have no meaning in the point of call charge calculation, but users may want to record it. There are some limited bills support showing DefinableColumnx. But the goal of DefinableColumnx is not to show them on the predefined bill. Instead, you should develop your own software, connect it to Datastore.vit to online retrieve these data. DialDateTime CDR may have both DialDate and DialTime joined together, you can not use separate DialDate and DialTime columns to parse it. In this case, you have to put integrated DialDateTime column to relevant position and define the its format (like mmddyyhhnnss) Direction Pbx may record the direction of the call, its is a string, something like Outgoing, Incoming, InterOffice (multiple Pbx connecting together via Leased line, so that the call between two offices is still internall call even it has to go out on trunk) If you define CDR format for incoming call, this field will be assigned automatically a marker of incoming call, to differential it from normal outgoing calls. ExchangeID Designed, Programmed, Documented By Tran Hong Quang, [email protected]; [email protected] Page 120 of 168 Pbx Billing System - English User Manual You can have multiple Pbx, install this software for each Pbx, but connect the front-end of this software to central database. In center, you can make the bill for any Pbx. To differential calls from different Pbx, you have to give each Pbx an ExchangeID. When saving CDR to central database, the front-end will save its ExchnageID as well. Extension The extension of the call. For normal Pbx, this field must be numeric. For IP-PBX, caller may be IP or name, not always numeric. If so, you have to go to Application Tools>>Application Settings>>Option 2 tab>> uncheck “Extension/AccessCode Must Be Numeric” IgnoredColumn1...IgnoredColumn10 As I mentioned above, Character Filter is the tool to cut off unneccessary character/string, it do by row. IgnoredColumnx is the tool for you to cut off unneccessary character/string by column Meetering Call can be charged by dialnumber and duration which is recorded by Pbx. Some TelCo may record and calculate call charge for you, then send the result to Pbx as mettering. You don’t have to care about destination of the call, you just have to multiply Meetering with its rate. Putting Meetering to “Used Columns” will activate call charge calculation basing on Meetering and Rate, not by Duration and DialNumber. Ordinal CDR may be numbered so that you may recognize missing call if the number is not continuous. Ordinal is a field to save that numbering. Just for saving, no other usage, no display on bill... PrepaidCardID User can call IDD call, long-distance call using PrepaidCardID. Depend on Pbx, PrepaidCardID can be separated automatically as another column. But more general format for Prepaid call is its dialnumber as follows: ServiceNumber*PrepaidCardID*Password*RealDestinationNumber# If so, on Application Settings>>first tab named “CDR Settings”, you have to set Dialed Number Formatted = Service Selection. Then, click on small button next to it, you will have a form to parse complex dialed nubmer into multiple simple columns. Using that form, you can confiugre this software to get PrepaidCardID. There are a form under Organization Data allowing you to input all your PrepaidCardID and trace the calls using that ID. ProjectCode ProjectCode is a numeric value to allocate calls by project. If ProjectCode is activated, go to Organization Data>>Extensions & AccessCodes form, you will have another tab to enter ProjectCode number and Project Name. There are some project-based bills which only be showned if ProjectCode is enabled. There are 3 possible ways to enable ProjectCode: - Directly putting ProjectCode to Used Columns list if your Pbx is able to support caller to dial ProjectCode somehow and put it as separate column on CDR - Indirectly as a part of complex AccessCode. - Indirectly as a part of omplex DialNumber. Many many cheap Pbx won’t support project-based call. If so, one way is using complex AccessCode as I mentioned above. The disadvantages of this solution is that you have to configure too many AccessCode in your Pbx, and it is difficult to remember. Designed, Programmed, Documented By Tran Hong Quang, [email protected]; [email protected] Page 121 of 168 Pbx Billing System - English User Manual The third way is the best - dialing like this: RealDialNumber*ProjectCode# Your Pbx will send this complex digits to upper Pbx. Upper Pbx only care about the first digits which is enough to identify the route and destination of the call. The remain digits it doesn’t care. But you can use my software to take the ProjectCode and allocate the call by Project. How to do that? On Application Settings>>first tab named “CDR Settings”, you have to set Dialed Number Formatted = Service Selection. Then, click on small button next to it, you will have a form to parse complex dialed nubmer into multiple simple columns. Using that form, you can confiugre this software to get digits between $ and # and assign to ProjectCode. Go back to Organization Data>>Extension & AccessCode, you will find one more tab named “Project Code” allowing you to enter ProjectCode and Project Name associated with ProjectCode. Go to Telephone Bills>>Telephone Bill Master, you will find under All Telephone Bill there are some Project-based telephone bill. ReleasedDialTime Pbx may not record Duration, instead if record DialTime and ReleaseDialTime. If so, you have to remove Duration and put ReleasedDialTime to “Used Columns” list TelTariffSelector Normally, user dial regardless how the call will be routed. In the past, some companies have leased line and ask staff to dial long-distance call, IDD call via leased line first, if the leased line is busy, then use normal trunk. Leased line normally connect to TelCo in other country, so that you have to pay only local call. If you call via physical telco trunk, you have to pay IDD call to local telco. Recently, many companies has adapter to call via data network, no need to have leased line. So, the first priority when dialing IDD call is via data network. Even dialing via local Telco, that means your call goes over the physical trunk connecting to local Telco, you can select different service offered by that telco, so that the quality of your call is different. Different quality is different rate. Pbx can support (don’t ask me which one, there are too many) user to select service when dialing IDD (just by dialing special prefix). You have to take the service selection number to select relevant Telephone Tariff Table. Depend on Pbx, this digits can be independent column or it is a part of complex dial number. If it is independent column, you can simply put TelTariffSelector to that position. If it is a part of complex dial number, you have to set Dialed Number Formatted = Service Selection and click on small button next to it to get a form allowing you to parse complex dialed number into multiple columns. Next, go to Call Charge Scheme >> Telephone Rate Tables form, create new Telephone Rate Table, on Trunk property of newly-created Telephone Rate Table, you enter the servicce selection number. The principle to select Telephone Tariff is: Telephone Rate Table --------- Associate with -------- > list of trunk or dummy trunk (TelTariffSelector) When receiving a call, the billing software will check first TelTariffSelector, then Trunk, again the association I just mentioned above to find right Telephone Rate Table. After determining Telephone Rate Table, it will search for AreaCode to find rate record. Transfer You make an outgoing call, then transfer the call to your colleague. How do you want this call be billed? for your Telco, it is only one call. Designed, Programmed, Documented By Tran Hong Quang, [email protected]; [email protected] Page 122 of 168 Pbx Billing System - English User Manual Second use case, the company protect IDD call from all staff except the receptionist. Any staff want to make IDD call, they have to ask Receptionist to dial and transfer the call for them. Receptionist surely doesn’t want to be billed this call. Almost Pbx will record transferred call by two CDR. For Panasonic, and some other Pbx, the transferred call will be marked by spcial characters. If you want the first part of the transferred call to be billed to second caller, you have to put Transfer column to right position of CDR. Here is sample transferred call recorded by Panasonic Pbx: 06/08/04 09:33AM 06/08/04 09:33AM 06/08/04 09:33AM 06/08/04 09:33AM 06/08/04 09:34AM 06/08/04 09:35AM 06/08/04 09:35AM 06/08/04 09:35AM 06/08/04 09:35AM 06/08/04 09:36AM 06/08/04 09:37AM 06/08/04 09:39AM 06/08/04 09:39AM 06/08/04 09:41AM 101 0001 <D>92333433<I> 101 0008 0418426497 101 0002 <D>92333433<I> 121 0001 <D>92333433<I> 101 EXT106 101 0002 <D>92333433<I> 101 0003 <D>92333433<I> 101 EXT122 101 EXT100 106 EXT103 106 0002 <D>92333433<I> 101 EXT122 101 0001 <D>92333433<I> 122 0001 <D>92333433<I> 0'26 00:00'19 $00000.00 00:00'12 $00000.00 0'09 00:00'29 $00000.00 0'00 00:00'43 $00000.00 TR TR 0'44 00:00'30 $00000.00 0'06 00:01'50 $00000.00 0'00 00:02'50 $00000.00 TR 0'09 00:00'16 $00000.00 0'00 00:01'07 $00000.00 TR TR is marker for second part of transferred call. You have to put Transfer to right row on Used Columns list. Trunk The line number that the call going out over it. TelTariffSelector is a kind of trunk (dummy trunk) The icon on the toolbar of Application Settings is as follows: 8.5)Least Call Warning Almost customer puts the Billing machine in the control room. Even they may switch off the monitor. But customer has a demand to know whether both the PBX and the Billing System are working smoothly or not. Above is the reason to develop Least Call Warning feature. The idea of this feature is that allows you to set the number of call you expect to receive during given hour of given day (workingday, saturday or sunday). If Pbx Billing SystemTM receives less than that number of call, Pbx Billing SystemTM has to notify the authorized person in some means. Mail To: Enter the E-mail address of authorized person who should receive the alarm. From Time: The hour within a day. Working Day: Working day ranges from Monday to Thursday. Normally, the call frequency in Working Day is higher than holiday. Saturday, Sunday: The holiday of week. The call in these days normally is few. Designed, Programmed, Documented By Tran Hong Quang, [email protected]; [email protected] Page 123 of 168 Pbx Billing System - English User Manual You can set the at-least number of calls that you expect to receive for each hour on every day of week. 0 is special number meaning “don’t check alarm criteria” The Icon of “Least Call Warning” is as follows: 8.6)Archiving/Export Scheduling Settings This window offers two functions: Procedure applied to old call data Export and send the export file to mail box or FTP server. Procedure applied for old call data (call this feature Archiving): Designed, Programmed, Documented By Tran Hong Quang, [email protected]; [email protected] Page 124 of 168 Pbx Billing System - English User Manual Clear Out Call Records Older Than: This is combo box. You can select how many month a call will be considered as old call. If you select “Disable”, this feature is disabled. Archive Those Old Call Records Before Deleting: Checking this option will make Pbx Billing System to save the selected call data to archived file (Ms Access database named ArchivedCDR.mdb located under the sub folder Archiving) before deleting them from current database. Archiving feature is scheduled at the same time with AutoExport&Send. That means the date and time are set on “Start On Day” and “At Time”. But if you disable the AutoExport&Send feature, while activate Archiving feature, the Archiving feature will be scheduled to start on 1st day and at 10:00:00 Export and send the export file to mail box or FTP server (call this feature AutoExport&Send): Export Call Record: Check this option to enable automatically exporting features. Some child options are as follows: Start On Day: The day, on which the exporting process starts. At Time: The time of the “Start On Day” the exporting process starts. Export Format: Select your export file format. E-mail: The email address, to which Pbx Billing SystemTM send the export files. FTP Server: The domain name or IP address of the FTP server. FTP User: The account to logon the FTP server. Password: The password for the account in “FTP User” to logon the FTP server. “Do It Now” is the command button allowing you to start both Archiving function and also AutoExport&Send function immediately, no need to wait until the scheduled time. The “Archiving/Auto Export Scheduling Settings” doesn’t appear on the toolbar because of limited space of toolbar. You can open this form by following path: Application Tools>>”Archiving/Auto Export Scheduling Settings”. The icon is as follows: 8.7)Hotkey Assignment Hotkey Assignment is the tool enabling you to assign special form with special function key. The function keys you can use as Hot Key range from F2 to F12. F1 can’t be redefined its function since it is already Hot Key to call for help. Designed, Programmed, Documented By Tran Hong Quang, [email protected]; [email protected] Page 125 of 168 Pbx Billing System - English User Manual Click on each combo box of given function key to browse the list of form of the application. Then select your prefer form. Whenever you press the function key written in left of that combo box, you form will be opened. OK: Click on this button to close the form and save your settings. Cancel: Click on this button to close the form only. Your change won’t be saved. The icon of this window on menu is as follows: 8.8)Language Phrase Dictionary: All the form and report has caption, by default, in English. There are some common questions raised to us as follows: Can I change the caption – English phrase – by the customized phrase I like? Does the application support Vietnamese language? We have developed a mechanic to allow customer to change almost caption they want. Furthermore, customer can defined the customized phrase in any language they prefer. That mechanic is Language Phrase Dictionary. Generally speaking, Language Phrase Dictionary’s record has two fields. The first one names “Default Language” phrase, the second one names “Customized Phrase”. If you apply Language Phrase Dictionary to a form, Pbx Billing System / Hotel Management System will search all controls on the form. If the caption of any control matches the “Default Phrase” of any record of Language Phrase Dictionary, the control’s caption will be changed to “Customized Phrase” of that record. Thus, to redefine the language of the application, you run the application in Default English language, then edit Language Phrase Dictionary by adding “Default Phrase” field with the string you see on the form or report, enter customized phrase. When you switch the application into customized language mode, your customized phrase will replace the Default English phrase. Notice: The size of Default Phrase and Customized Phrase should be the same. Because the caption space on form or report is limited. Customize Phrase Of: There are two options that are “Report” and “Form”. The same “Default Phrase”, which appears both on form and report, has to define twice for Customized Phrase. The reason you have to define twice is that the room for that caption on the form is different from the room on the report. For example, the Default English Caption is “Duration”, you can define “Thời Lượng” for form, and “T.Lương” for report. Because the room for “Duration” on form is bigger than the room for “Duration” on the report. To switch the application to customized language, you have to: Designed, Programmed, Documented By Tran Hong Quang, [email protected]; [email protected] Page 126 of 168 Pbx Billing System - English User Manual For form, open Application Settings, go to second page, check “Form Uses Customized Language” For report, you will find “Report Uses Customized Language” somewhere on the form allowing you to create the report. Please check that button. For “Hotel Integrated Bill n”, you find “Report Uses Customized Language” of that reports on Hotel Settings form. Important notice: If you export the report to other Microsoft application like Microsoft Excel, Microsoft Word, the customized language couldn’t be kept in tact. The reason is that currently, the export automation of Microsoft doesn’t support two-byte font, which is used by Unicode. I do believe in the near future, Microsoft will release the new export automation, which support Unicode. Thus, you can switch both form and report or one of them to customized language. The Setup Package includes the Language Phrase Dictionary for Vietnamese. Export...: Click on this button to export the database of Language Phrase Dictionary to external file. You will see Save File dialog, please browse into the folder you want to store the file and give a file name to Save File dialog. The extension of that file is “.dic”. Import...: Click on this button to open Open File dialog. Please browse and select the database file containing the Language Phrase Dictionary. Each record in the external file will be compared with all record currently stored in Language Phrase Dictionary by “Default Phrase” field. The new-found record, the record exists in external file but not in current Language Phrase Dictionary, will be added to Language Phrase Dictionary. For the matched record in current Language Phrase Dictionary, it will have “Customized Phrase” field updated with the same name field of the matching record in external file. Thus, Import and Export together allows you to exchange the database of Language Phrase Dictionary. Tell Me More...: Click on this button to get valued information about the Language Phrase Dictionary. OK: Click on this button to close the form. Designed, Programmed, Documented By Tran Hong Quang, [email protected]; [email protected] Page 127 of 168 Pbx Billing System - English User Manual The icon of “Language Phrase Dictionary” isn’t on the toolbar because of limited space on the toolbar. You can call this form by going to Application Tools menu, you will find “Language Phrase Dictionary” with the icon is as follows: 8.9)Customer’s Information: The first time customer has used this application, you have this form and you are force to declare the mandatory information, unless the application will be closed automatically. Pbx Billing System ’s Working Mode and Base Currency are not your company information. But it is very important factor the application needs to know before starting. That is the reason why you have to make up your mind about the Working Mode at this step. Read chapter 11 for more information about Working Mode. Later on, you can change that information except the Working Mode. The icon on the toolbar of Customer’s Information is as follows: 8.10)About: It is very simple form. This is the information about the vendor, the licensed customer and version information. You can click on the button named “Instance Info...” for more information about the location of some database files. Designed, Programmed, Documented By Tran Hong Quang, [email protected]; [email protected] Page 128 of 168 Pbx Billing System - English User Manual System Info..: Click on this button to open a form displaying some information of your PC hardware and the files being used by the application. Behind Screen...: Click on this button to open a report telling about me – the programmer and owner of this application. You can find below icon of About dialog under Application Tools menu: 8.11)Security Dialog Box: You see this form whenever the Pbx Billing System has been put into locked status. You have to type the password of currently logon account correctly to unlock it. This form isn’t able to be called by any menu, but it can be called by clicking the button of key picture on the toolbar. There are two ways to lock the Pbx Billing System : By timer, which you can set in the Application Setting or By Manual. Designed, Programmed, Documented By Tran Hong Quang, [email protected]; [email protected] Page 129 of 168 Pbx Billing System - English User Manual The icon on the toolbar that calls Security Dialog Box is: Designed, Programmed, Documented By Tran Hong Quang, [email protected]; [email protected] Page 130 of 168 Chapter 9: SYNCHRONIZING THE TELEPONE RATE TABLE SYNCHRONIZING THE TELEPHONE RATE TABLE Pbx Billing System - English User Manual Upon completion of this module, you should be able to: Know the mechanic of telephone tariff synchronizing. Know how the application solve the confliction between two tariff records. 9.1)Introduction to synchronizing telephone tariff: The telephone tariff is changing often, while the Pbx Billing SystemTM user doesn’t have time to monitor and update their telephone tariff. Thus, after several month of using, customer recognizes that the correctness of Pbx Billing SystemT M is less and less. You have to correct your Telephone Tariff. This is take-time job. We provide you a mechanic to automatically update your telephone tariff. The information of currency exchange rate and telephone rate tables are stored in the file named TelephoneRateTable.mst and TelephoneRateTable.slv. The structure of both TelephoneRateTable.mst and TelephoneRateTable.slv is the same and the data can be updated from TelephoneRateTable.mst to TelephoneRateTable.slv (even vice versa). TelephoneRateTable.mst is called Master Telephone Rate Table file. We are in charge to update the content of this file. TelephoneRateTable.slv is called Slave Telephone Rate Table. The Pbx Billing SystemTM is using this file. The customer is able to add/delete/update the content of this file. 9.2)Normal Synchronizing: There are two groups of data inside each TelephoneRateTable.mst and TelephoneRateTable.slv that are Currency Exchange Rate information and Telephone Tariff information. When updating, the Currency Exchange Rate information from TelephoneRateTable.mst will update to the Currency Exchange Rate information in TelephoneRateTable.slv, the Telephone Tariff information from TelephoneRateTable.mst will update to the Telephone Tariff information in TelephoneRateTable.slv. But how Pbx Billing SystemTM find two corresponding records from two Telephone Tariff files to update? To do that, each record in Telephone Tariff file has a unique ID and a time stamp. Pbx Billing SystemTM compares the ID to find corresponding records and check the time stamp to see which one has modified time is later. Whenever you modify a record of TelephoneRateTable.mst or TelephoneRateTable.slv, the current date and time will be saved to time stamp. Designed, Programmed, Documented By Tran Hong Quang, [email protected]; [email protected] Page 132 of 168 Pbx Billing System - English User Manual Next If on the form named “Synchronizing Telephone Rate Table”, you check the “Only Update The Newer Data” check box, then the synchronizing process will compare two time stamps for matching records in TelephoneRateTable.mst and TelephoneRateTable.slv. If the record in TelephoneRateTable.mst has later time stamp, its content will write over the corresponding record in TelephoneRateTable.slv, unless no information exchanged. If you uncheck “Only Update The Newer Data” check box, all records in TelephoneRateTable.mst write over on the corresponding records in TelephoneRateTable.slv without checking the time stamp. There are some cases you should aware of as follows: 9.3)Adding and Deleting: If given record was deleted from TelephoneRateTable.mst, what will happen to corresponding record in TelephoneRateTable.slv ? If a new record was added to TelephoneRateTable.mst, what will happen to TelephoneRateTable.slv ? Look at the picture above. The synchronizing process includes two phases. The first phase will scan TelephoneRateTable.slv, while the second phase will scan TelephoneRateTable.mst. The task of each phase is as follows: Designed, Programmed, Documented By Tran Hong Quang, [email protected]; [email protected] Page 133 of 168 Pbx Billing System - English User Manual The first phase of synchronizing process is checking to find deleted record in TelephoneRateTable.slv. Pbx Billing SystemTM goes through TelephoneRateTable.slv one by one record and tries to find corresponding record in TelephoneRateTable.mst. For the record number 1’, Pbx Billing SystemTM can find corresponding records in TelephoneRateTable.mst. Thus, no delete action for these records. But Pbx Billing SystemTM couldn’t find the corresponding record in TelephoneRateTable.mst of the record number 3’. It assumes that the corresponding record in TelephoneRateTable.mst has been explicitly deleted, so it deletes the record number 3’.from TelephoneRateTable.slv That finishes the first phase of synchronizing process. Now Pbx Billing SystemT M jump into second phase by starting scan the TelephoneRateTable.mst to find new data to update to TelephoneRateTable.slv. For the first record, Pbx Billing SystemTM is able to find matching record (according to ID header). So the synchronizing process happen as I explained. For the Record number 2, Pbx Billing SystemTM coundn’t find corresponding record in TelephoneRateTable.slv. So Pbx Billing SystemTM creates a new record in TelephoneRateTable.slv, and then copies the data from the record number 2 in TelephoneRateTable.mst to the new-created record. 9.4)Confliction and the policy applied to customer-created record: The confliction is possible when both we, and the customer, also add the same role record to TelephoneRateTable.mst and TelephoneRateTable.slv. For example: The mobile phone network just creates new Area Code and announce about that, let says the number “xyzw”. We add this Area Code to TelephoneRateTable.mst. The customer also adds the Area Code of xyzw to their current Telephone Tariff – the file TelephoneRateTable.slv. Later on, they get the TelephoneRateTable.mst from us and try to synchronize the TelephoneRateTable.mst to their TelephoneRateTable.slv. The confliction happens. How does Pbx Billing SystemTM deals with confliction and detect the customer-created record? Furthermore, some customers want to exclude some Area Codes from the synchronizing process in such a way they have full control the call rate for these Area Codes Below is the steps taken to work out the confliction and reserve the customer-own record: - The ID of each record has Color Flag sub-field. The records created by customer will be marked with Red Flag. While the records originally created by us will be marked with Blue Flag.The Red Flag records won’t be deleted or updated by synchronizing process in any cases. Designed, Programmed, Documented By Tran Hong Quang, [email protected]; [email protected] Page 134 of 168 Pbx Billing System - English User Manual - Pbx Billing SystemTM only synchronizes the Blue Flag records between TelephoneRateTable.mst and TelephoneRateTable.slv Return to the example, which is drawn on the picture above. The record number 2’ of TelephoneRateTable.slv is marked by Red Flag, so the synchronizing process stops. The record number 3’ of TelephoneRateTable.slv is also marked by Red Flag, Pbx Billing SystemTM doesn’t delete it. In the future, if customer doesn’t want any more to exclude some records from synchronizing process, they just delete them, and then start synchronizing process again. For example, the mentioned Area Code “xyzw” should be deleted, and then customer can start again the synchronizing process. The Area Code “xyzw” with Blue Flag will be copied from TelephoneRateTable.mst to TelephoneRateTable.slv. Designed, Programmed, Documented By Tran Hong Quang, [email protected]; [email protected] Page 135 of 168 Chapter 10: THE WORKING MODES THE WORKING MODES Pbx Billing System - English User Manual Upon completion of this module, you should be able to: Understand the different Working Modes that the PBX Billing System supports Select the best Working Mode for your case. There are some working models that customer requires Pbx Billing System to support, depending on their private business. Simply speaking, you can custom Pbx Billing System to different releases supporting required features. But if you’d have done so, you have to maintenance multiple releases including bug-fixed, new development, documentation... Working Mode is an intelligent approach. Thus, Working Mode is very important option of Pbx Billing System . Working Mode decides which functions will be started and which features are available. Of course, some other functions and features aren’t available. To switch between Working Modes, go to Application Settings, click on second page named “Options”, you will find the Working Mode combo box. Depend on your setup package, you may find different list when click on Working Mode combo box. The Enterprise setup package (the most full release) has following choices for Working Mode: Distributor Extension Distributor Master Semi-Master Slave Hotel Master Hotel Slave For each Working Mode, you will have some more billing system topologies. To learn about each Working Mode, it is the best to discuss about the customer’s need, the topologies, then the right Working Mode to satisfy the demand. 10.1)Simple direct connection billing system Using one standalone PC connect directly to your PBX via serial port. This is the working model, normally, small customer prefers. The Pbx Billing System is configured to use the Working Mode = Master. Some customers would connect serial printer to second available serial port of billing pc to relay the calculated CDR to the printer The advantage of this model comparing to the model connecting the serial printer directly to your PBX is that the data, which is printed out is calculated data, not raw CDR. The call charge is on your printout. Designed, Programmed, Documented By Tran Hong Quang, [email protected]; [email protected] Page 137 of 168 Pbx Billing System - English User Manual But the disadvantage is that if you switch off the billing PC or you close Pbx Billing System , no data is sent to the printer. Some other customers seem to be nervous. They would want to have a mechanic to double receive the raw CDR. Their idea is that they afraid someone may switch off the billing PC suddenly or close Pbx Billing System . The model they want is as below: In this model, the billing PC and the serial printer connect to PBX in parallel. There are three major disadvantages as follows: The printer receives the raw CDR. You have to calculate the call charge manually. There is flow control mechanic between the sender – the PBX and the receivers – the billing PC and printer. If the printer runs out the paper, it sends stop sign to the PBX to pause sending CDR. Thus, even the billing PC is ready, the PBX doesn’t send out CDR any more. The cable wire map isn’t suggested by RS232 standard. The fan out capacity of the PBX’s serial port is limited. This model will decline the signal on RS232 cable. 10.2)Billing over the computer network: The model requires a computer network. Almost enterprise prefers this model because it brings some conveniences. Designed, Programmed, Documented By Tran Hong Quang, [email protected]; [email protected] Page 138 of 168 Pbx Billing System - English User Manual You install Pbx Billing SystemTM on the main billing PC connected directly to your PBX. The Working Mode option of this Pbx Billing SystemTM is configured as Master. Thus, it captures the CDR sent from PBX and processes it according to the telephone tariff. Normally, the main billing PC is put inside the control room. Rarely, people access the main billing PC directly. Customer can install another Pbx Billing SystemTM on any networked computer. The Working Mode option of this Pbx Billing SystemTM is configured as Slave. After that, connect this Pbx Billing SystemTM to the Datastore.vit on the main billing PC (click on “Connect To Datastore...” on Application Settings form to do that). The Slave Pbx Billing SystemTM allows user to do almost the functions and features. There are two main functions aren’t available in Slave Pbx Billing SystemTM is CDR capturing and job scheduling. But using Slave Pbx Billing SystemTM, you are still able to configure the functions only available to Master Pbx Billing SystemTM like CDR capturer and job scheduling. There is a command queue at Master Pbx Billing SystemTM. If you change some configuration on Slave Pbx Billing SystemTM , which affects the work of Master Pbx Billing SystemTM , your Slave Pbx Billing SystemTM will put a specific command on the command queue of Master Pbx Billing SystemTM . Not later than 1 minute, the Master Pbx Billing SystemTM will scan the command queue to find and execute the command of you. There is no limit the number of Slave Pbx Billing SystemTM on your network. But as many Slave Pbx Billing SystemTM running at the same time over your network as slow the Master Pbx Billing SystemTM in main billing PC. “Hotel Master” Working Mode is nearly the same with “Master” Working Mode and “Hotel Slave” Working Mode is the same with “Slave” Working Mode. Only the menu system and tool bar system is different. When choosing “Hotel Master” or “Hotel Slave”, you will Hide the following forms (Enterprise Business related forms): Departments Users Organization Chart Customer Database Report of Defined Data Least Call Warning Archiving/AutoExport Settings Advanced Auto Send Email Telephone Bill Master And show up new hotel business-related forms (Hotel business forms): Rooms Guests Guest Search RoomRack Pbx Command Set Hotel Tool Box Generally speaking, in “Hotel Solution” Working Mode, the functions closely related to Enterprise business are hidden. Some functions related to Hotel Business will be show up. Of course, if you return to “Master” Working Mode or other Working Mode designed for Enterprise business, the Hotel functions will be hidden, while Enterprise business functions are show up. If you would like to access the Enterprise business functions (because these functions allow you more access to Call Data) from “Hotel Solution” Working Mode, you can use the Switchboard. The Switchboard still offers Enterprise business functions. Designed, Programmed, Documented By Tran Hong Quang, [email protected]; [email protected] Page 139 of 168 Pbx Billing System - English User Manual The Working Mode is private setting for each Pbx Billing SystemTM instance. That means, over the network, you can choose any Working Mode for each instance. But make sure your combined choices make sense. For example, You can choose “Master” Working Mode for the Pbx Billing SystemTM running on the main billing PC, which is directly connected to your PBX. But over the network, you can set “Hotel Slave” for other instance of Pbx Billing SystemTM . Thus model allows you to access Enterprise business related forms in the main billing PC, while at the same time, you can use Hotel business related forms on the client Pbx Billing SystemTM . 10.3)Billing for two physical PBXs It is funny to invest two separate new PBX and put both of them into real operation. But in fact, there is such case. Our customer used to invest small PBX. Their business extended, so that they purchased new bigger PBX, which is able to support whole company and phase out the old one. The business is extending, they have new independent business unit. They reuse the old PBX for new business unit. But they don’t want to buy one more Pbx Billing SystemTM for PBX of the new business unit. They want the current existing Pbx Billing SystemTM supports as well the second PBX. You can connect the second PBX to available serial port of the billing PC. Thus, the Pbx Billing SystemTM will capture CDR from both PBX and save them into central repository. In this case, the Working Mode is Master 10.4)Virtual PBX model Small office building may offer the Virtual PBX service, which enable leasing companies to use the big PBX of office building as their own PBX. The advantage of Virtual PBX is that leasing companies don’t have to invest the telephone system and pay the maintenance fee. What is Virtual PBX? The leasing companies inside the building ask the telephone service provider to sell them some telephone trunks. And then, connect these trunks to the shared PBX of the office building. Designed, Programmed, Documented By Tran Hong Quang, [email protected]; [email protected] Page 140 of 168 Pbx Billing System - English User Manual The owner of Office Building installs some Extensions in the rooms that the companies reside. They have to reprogram the shared PBX in such a way the calls made from each company’s Extensions are routed via the company’s trunks only. So that the telephone bills from the telephone service provider, which bases on Trunk, must be correct. The owner of Office Building is able to give the leasing companies the Pbx Billing SystemTM software for their internal billing. The security reason requires that each company is able to see their calls only, not the call made by other company. So, how to configure Pbx Billing SystemTM to support the mode as mentioned above? Install Pbx Billing SystemTM on the main billing PC. Configure it to Distributor or Distributor Extension Working Mode. In Distributor or Distributor Working Mode, by default, Pbx Billing SystemTM divides the CDR received from PBX into two different groups basing on Extension or Trunk list. And then, it relays the first group of CDR to Semi-Master1 and second group of CDR to Semi-Master2. SemiMaster1 and Semi-Master2 are two sub folders named SemiMaster1 and SemiMaster2. You will find the file named Datastore.vit under each folder. Designed, Programmed, Documented By Tran Hong Quang, [email protected]; [email protected] Page 141 of 168 Pbx Billing System - English User Manual Ii is necessary to explain more about how Pbx Billing SystemTM divides the CDR by giving an example. Your company has 10 extensions ranging from 100 to 109. You decided the first company has extensions numbered from 100 to 104 and the second company has extensions numbered from 105 to 109. If the calls made from extension 100 to extension 104, the Pbx Billing SystemTM will save them to SemiMaster1. If the calls made from extension 105 to extension 109, the Pbx Billing SystemTM will save them to SemiMaster2. It is quite simple. Now, if you create one more extension, 110, but you don’t put 110 into either Extension List1 or Extension List2, what happen? There is an options allows you to set Pbx Billing SystemTM to: Relay the calls made from extension 110 to both SemiMaster1 and SemiMaster2. Don’t relay the call made from extension 110. The principle to divide the CDR is the same in case you select Trunk as dividing criteria. The difference between Distributor and Distributor Extension is: Distributor: Capturing the CDR sent from PBX and then relays the CDR according to dividing criteria, no call charge calculation done. Distributor Extension: Capturing the CDR sent from PBX, does the call charge calculation base on the default telephone tariff, and finally relays the CDR according to dividing criteria. The leasing companies will install the Pbx Billing SystemT M on their own computer. Configure Pbx Billing SystemTM to work in Semi-Master Working Mode. Semi-Master Working Mode has the same functions and features as Master Working Mode, except the function directly capturing the CDR from PBX. You can define your telephone tariff, make the telephone bill or schedule the job... Each Semi-Master Pbx Billing SystemTM manages their own telephone tariff and does the call charge calculation for itself. So that, the same calltype calls made by different companies may have different call charge. It is up to the telephone tariff of each leasing companies. The steps to configure this working model as follows: Run Application Settings, go to the second page, select “Distributor” or “Distributor Extension” for Working Mode combo box. There is small button appearing next to Working Mode combo box. Click on this button to call SemiMaster Setting form. Designed, Programmed, Documented By Tran Hong Quang, [email protected]; [email protected] Page 142 of 168 Pbx Billing System - English User Manual Semi-Master Setting has two sub pages named “Semi-Master 1” and “Semi-Master 2” and shared options on the right side. The content of two sub pages are similar. The first sub page is the options for Semi-Master1. The second sub page is the option for Semi-Master2. The meaning of the common options is as follows: CDR Distributed By: Select the criteria to distribute the call. There is two possibilities are Extension or Trunk. After selecting one of them, the sub form on the pages named “Semi-Master 1” and “Semi-Master 2” will be changed accordingly to Extension List or Trunk List. Undistributed CDR: As mentioned above, there might be some calls aren’t satisfied the rule to be distributed explicitly (like the case of extension 110). “CDR Distributed By “ option allows you to decide the procedure for such call. Don’t Send To Semi-Master: Such calls aren’t distributed. Send To All Semi-Master: Such calls are distributed to all Semi-Master. Distributor Will: Keep A Copy Of Semi-Master’s CDRs: This check box is only active in case you Working Mode = “Distributor Extension”. If Working Mode = “Distributor”, this check box is disable, since on “Distributor” mode, the Distributor Hotel Management SystemTM won’t save any coming CDR. If this check box is checked, Distributor Hotel Management SystemTM will save a copy of any CDR which belong to Semi-Master. You can make the bill for such call directly on Distributor Hotel Management SystemTM . If this check box is uncheck, Distributor Hotel Management SystemTM still make a copy of CDR belong to Semi-Master but mark that CDR as invisible (you can see it on Call Record Modifier, but you can’t make the bill including such calls). Online Display Semi-Master’s CDRs: If this check box is checked, you will se the CDR belong to Semi-Master will also be displayed on Distributor Hotel Management SystemTM . Otherwise, Distributor Hotel Management SystemTM relays that CDR to Semi-Master without displaying them. When Opening/Closing Distributor: This option set the way Distributor Pbx Billing SystemTM or Distributor Extension Pbx Billing SystemTM automatically call or close the Semi-Master(s). Don’t Launch Semi-Master: Distributor Pbx Billing SystemTM or Distributor Extension Pbx Billing SystemT M doesn’t automatically launch the Semi-Master application. Thus, the relayed calls will be stored in the buffer of Datastore.vit of each Semi-Master. The next time, when user runs the Semi-Master Pbx Billing SystemTM from client, the buffered calls will be processed at once. Designed, Programmed, Documented By Tran Hong Quang, [email protected]; [email protected] Page 143 of 168 Pbx Billing System - English User Manual Leave Semi-Master Running: Distributor Pbx Billing SystemTM or Distributor Extension Pbx Billing SystemTM automatically launches the Semi-Master application in the main billing PC as well. The Semi-Master Pbx Billing SystemTM will run on the System Tray, next the system clock. The relayed calls will be processed when they arrive. When you close the Distributor Pbx Billing SystemTM or Distributor Extension Pbx Billing SystemTM , the Semi-Master(s) are left to continue to run on the System Tray. Kill Semi-Master Immediately: Like the second option, but when you close Distributor Pbx Billing SystemTM or Distributor Extension Pbx Billing SystemTM, it kills the Semi-Master immediately. Send Close Request To Each Semi-Master: Like the second option, but when you close Distributor Pbx Billing SystemTM or Distributor Extension Pbx Billing SystemTM, it won’t kill the Semi-Master immediately. It sends the Close Request to command queue of SemiMaster(s). At maximum, 1 minute later, the Semi-Master(s) will close itself. Re-output All Call Data Or Limit To From Date, To Date: You set the time limit or no time limit for the calls, which will be re-output to Semi-Master. When you click on “Output” button, Pbx Billing System tries to resend the selected calls to all Semi-Master. This is the case you have to do after changing the configuration of the dividing criteria. The options on the sub page of “Semi-Master”: Semi Master 1’s Folder: The sub folder where the database files of Semi-Master are stored. Opened By Using Account: The account to be used to connect to Datastore.vit of Semi-Master. Password: The password of the account mentioned above. 10.5)Remote support We have established the professional billing system to support customer. We are increasing the percent of remote support comparing with traditional onsite support. Our server is connected to different kind of PBX at the same time. We installed all Pbx Billing SystemTM versions on the server to make the system to be ready to support you. The configuration of dedicated billing server is: Intel XEON 2.4 GHZ 1 GB RAM 40 GB HDD 1.4 Floppy Disk 2 USB External USB modem Designed, Programmed, Documented By Tran Hong Quang, [email protected]; [email protected] Page 144 of 168 Pbx Billing System - English User Manual 2 Serial Ports Windows 2000 Adv Server, service pack 2. The number of our customer is increasing dramatically. We have new customers every week. So that our strategic standard support is: Onsite for installation and contribute the first training to customer. The first training course takes around 4 hours. It shouldn’t be longer since customer, normally, needs time to master the new application. Wait for one week or more, for customer learn the Pbx Billing SystemTM by themselves, we will contribute second training course. After that, if customer want more onsite support or raise question, which is not bug, or issue of application, customer should pay for a job order. The alternative solution is remote support. Customer purchases a modem and active remote control service (like Norton PCAnyWhere or Microsoft Netmeeting) when they need our support. The remote support is also visible like we stands in front of your computer. Thus, everything can be discussed. The remote support, done via telephone line, is free during the warranty time if the call is within Ho Chi Minh City. For the customer is outside Ho Chi Minh City, customer has to pay for the long distance call. The standard support policy is what we are concentrate on. But for each case, the statement in the contract has higher priority than the standard support policy. For example, you purchase our Pbx Billing SystemTM at higher level of support service. The onsite service may be free of charge during the effected period of time stated in the contract. By using the dedicated billing system we have invested, we are now offer new service – The outsource full billing service. We will do all the things required by telephone billing and at the given day of each month, send you the telephone bills you want. The tasks done for out-source full billing service are: Weekly, checking the working condition of your billing PC and the Pbx Billing SystemTM running there. Weekly, copying the raw CDR file to our dedicated billing server. We will create a repository for your company in our server. We are in charge of monitoring the change in the telephone tariff and keep our telephone tariff up-to-date. We also have to update the change in your organization into your repository in our server. Finally, at the end of each month, we import all your CDR and make the bills for you. 10.6)Summary of Working Mode: No Functions or Features Master Hotel Solution Yes Slave Distributor 1 Capturing CDR via serial port 2 3 No Writing raw CDR to CDR log file Importing CDR from file Yes Yes No Yes 4 Exporting call data to external file Yes 5 Yes 6 7 8 Manually making telephone bill/Hotel bill Auto sending telephone bill via email Job Scheduling Auto FTP upload CDR Yes Yes Yes 9 Auto Flushing old CDR to external file Yes No 10 Configuring the application Yes Yes 11 Input core data like Department, User, Telephone Tariff, Extension List, Trunk List. Synchronizing Telephone Tariff Yes Yes Yes Relaying calculated CDR to OnlineCDR.mdb Distributing CDR bases on Extension or Trunk 12 13 14 Yes Distributor Extension Yes SemiMaster No Yes Yes Yes Yes No Yes Yes Yes Yes Yes Yes Yes Yes Yes No No No No No No No No No Yes Yes Yes No No Yes Yes Yes Yes Yes Yes Yes Yes Yes Yes Yes Yes No Yes Yes No No No Yes Yes No Designed, Programmed, Documented By Tran Hong Quang, [email protected]; [email protected] Page 145 of 168 Pbx Billing System - English User Manual 15 Distributing and save a copy of calculated CDR No No No Designed, Programmed, Documented By Tran Hong Quang, [email protected]; [email protected] Yes No Page 146 of 168 Chapter 11: USER DIGEST USER DIGEST Pbx Billing System - English User Manual Upon completion of this module, you should be able to: Know how to take the best advantages of PBX Billing System by viewing some sample cases. 11.1)How to lock the application: Click on the icon of red key to lock your application. After locking you have to enter correct password of currently logon service user to unlock it 11.2)System Log file: Pbx Billing System creates a system log file (differ from CDR log file) named Pbxlog.txt on home directory of it. You can check this file to see any error happened during runtime in the past. 11.3)Raw data of Pbx: The raw data of your Pbx is saved to “...\PbxHomeFolder\Logs”. This is exactly what Pbx Billing System receive at Serial Port You can re-input raw data by using Import Call Detail Record. Do worry about double the same CDR in database. Pbx Billing System can recognize and reject the double CDR. 11.4)Unknown Call: If you see a call with Destination is “Unknown” on Online Call Detail Record Capturer you should check: Whether the area code of this call has been created or not. If not, please create it. The call you just saw will be re-calculated after that. Is the trunk of this call has created or not. If not, Pbx Billing System doesn’t know which tariff to apply for this call. 11.5) System User, System Department: Pbx Billing System creates a virtual department called System Department and then add a virtual user to it, the user System User. System User will be assigned automatically any unassigned Extension or Access Code. Let me give an example. Your company has an extension in reception room. It hasn’t assigned to any body. But sometime somebody uses it to make outgoing call. That call will be belong to System User. Because the extension has been assigned to System User implicitly. You can’t see System Department and System User on the Departments form and Users form. But on the report, you may see System User and System Department if the example case happen. 11.6) How to run the Pbx Billing System whenever Ms Windows start without explicitely type User name and Password: -Restart your Pbx Billing System -When you see the dialog asking for User name and Password, you can log on by using Admin account (User name=admin, Password=admin). -Goto Security Manager and then click on Change Password. Please clear the password for Admin account (Current Password = admin, leave other two text boxes empty). Designed, Programmed, Documented By Tran Hong Quang, [email protected]; [email protected] Page 148 of 168 Pbx Billing System - English User Manual -Restart Pbx Billing SystemTM . You will go directly to Pbx Billing SystemTM without typing account name and password. -To run Pbx Billing SystemTM whenever Ms Windows start, you have to copy the link of Pbx Billing SystemTM to Startup folder of Ms Windows. Note: Admin is default account of Ms Access, not account of Pbx Billing SystemTM . So that you can’t see it from the User list of Account & Permission windows. Admin account will have the same permission with Operator account. So you can still grant permission to Admin by granting/revoking permission to Operator. Because Admin is low priority account, you can’t use this account to change system setting. So that when you want to log on again by another account like PbxAdmin, you have to goto Change Password and give any password to Admin. Once Admin account has password differed from blank, then you will see the log-on dialog again. Type account you want to use and its correct password to that boxes. High Risk Notice: -Your Pbx Billing SystemTM is running with no password protection. If you give too much permission to Operator account, you are taking risk. Because anyone who can access your computer can see all confidential information of Pbx Billing SystemTM . -You can increase the sercurity of Pbx Billing SystemTM by set Systray Icon to Automatic value and give password to restore Pbx Billing SystemTM to normal window state from Systray Icon. In this case, whenever you restart your Ms Windows, Pbx Billing SystemTM will be run in Systray mode automatically. If you forget passsword to restore Pbx Billing SystemTM , there is no way to use Pbx Billing SystemTM even it is running properly. In this situation, you can recover your call record only by doing as follows: You have to backup Datastore.vit, then remove Pbx Billing SystemTM , reinstall it again, enter all your company information, then import CDR from the backuped Datastore.vit. 11.7)Example of CDR format: Here is some typical CDR formats of some PBX. Almost PBX allows you to program CDR format. So don’t supprise if you find different CDR format for the same PBX branch. Alcatel PBX: 731 278 --> 1 NAT 18/09/00 8:17 732 352 --> 19 URB 18/09/00 8:16 733 231 --> 2 NAT 18/09/00 8:18 734 361 --> 3 NAT 18/09/00 8:20 735 276 -T> 14 URB 18/09/00 8:18 736 306 --> 5 NAT 18/09/00 8:22 737 306 --> 11 NAT 18/09/00 8:25 738 260 -T> 2 URB 18/09/00 8:26 1-04 1-55 1-09 0-43 4-28 1-47 0-07 0-44 088228333 819374 090903792 091940180 883432 088228333 03482 883515 Aristel : Co 01 05 02 Ext S Telephone Number Account MM/DD Start Duration Ring 12 0913234354 9125 12/01 08:35 00:05'35" 12 X 12345698 12/01 09:00 00:09'45" 17 D Incomming 1111 12/01 09:11 00:05'15' Panasonic PBX: 1/31/01 * 2:05PM 102 02 < incoming 1/31/01 2:07PM 107 01 8291354 1/31/01 2:09PM 101 02 8244666 > 00:01'49" .... 00:02'00" ..07 00:00'07" ..01 Designed, Programmed, Documented By Tran Hong Quang, [email protected]; [email protected] Page 149 of 168 Pbx Billing System - English User Manual 1/31/01 1/31/01 1/31/01 1/31/01 1/31/01 1/31/01 1/31/01 1/31/01 2:10PM 101 2:12PM 106 2:13PM 106 2:12PM 107 2:15PM 106 2:18PM 106 2:19PM 106 2:31PM 106 02 < incoming 01 090589469 01 090589469 02 091908199 01 090818254 01 063834278 01 090708939 02 091919422 > 00:01'12" .... 00:00'36" ..06 00:01'21" ..06 00:02'46" ..07 00:01'37" ..06 00:00'29" ..06 00:01'08" ..06 00:00'28" ..06 Siemens PBX: 1 2 3 4 5 6 7 8 9 321 002 415 214 415 415 415 416 416 426772 426774 102114 426776 100631 102152 426773 426772 100631 091916062 091802104 091916062 064852633 091916062 090750949 090750949 091916062 091916062 1. 9.1999 1. 9.1999 1. 9.1999 1. 9.1999 1. 9.1999 1. 9.1999 1. 9.1999 1. 9.1999 1. 9.1999 7:37:31 0: 1: 7 7:40: 7 0: 0:31 7:49:30 0: 0:19 7:49:33 0: 1:58 8: 0:56 0: 0:40 8: 3: 0 0: 0:35 8: 4:32 0: 0:39 8: 4:25 0: 1:15 8: 5:41 0: 0:23 Ericson PBX: N 102 00 237 T001001 08/06 08:18 00:05:50 71018360360 & 0000 0000 N 103 00 215 T001002 08/06 08:24 00:00:16 71011260 & 0000 0000 N 104 00 228 T001001 08/06 08:25 00:00:14 71018466003 & 0000 0000 N 105 00 278 T001005 08/06 08:25 00:00:32 71018265172 & 0000 0000 N 106 00 215 T001006 08/06 08:25 00:00:52 71011260 & 0000 0000 N 107 00 208 T001004 08/06 08:22 00:06:34 71011260 & 0000 0000 N 108 00 275 T001003 08/06 08:23 00:06:04 71015111373 & 0000 0000 N 109 00 278 T001001 08/06 08:28 00:01:38 71018259561 & 0000 0000 A 110 00 200 T001007 08/06 08:33 647788 & 0000 0000 N 111 00 216 T001005 08/06 08:34 00:00:26 71018202535 & 0000 0000 Ericson Pbx may output another CDR format looked like: 00 002 030106 347 159 0000 9 88202608 88202608 00 003 030106 347 159 00007 0000 9 8202608 8202608 a a 0009 a 0.00 I *#02 9 0012 a 0.00 I *#04 9 Designed, Programmed, Documented By Tran Hong Quang, [email protected]; [email protected] Page 150 of 168 Pbx Billing System - English User Manual 00 004 030106 348 153 00032 0000 9 9 090365017 00 005 030106 348 153 00026 0000 9 9 090365017 090365017 a 0009 a 0.00 I *#06 090365017 a 0009 a 0.00 I *#09 Or 001 002 003 004 005 006 007 008 009 010 030129 030129 030129 030129 030129 030129 030129 030129 030129 030129 2231 2232 2232 2233 2234 2235 2236 2237 2238 2239 100 101 102 103 104 105 106 107 108 109 000110 5 0000 823423423 a 2344 01 000212 3 0000 0044234234 a 1232 01 000213 2 0000 00189898234 a 9723 02 000105 132 0000 0568234234 a 8992 03 0125 234 0000 171234233 a 0992 02 232 2 0000 1710010234324 a 8768 01 423 34 0000 899234234 a 9982 09 515 12 0000 723423423 a 8000 04 612 10 0000 90234234 a 2342 05 123 09 0000 9234234234 a 2345 06 I’d like to explain about some main fields: - Date format is yyddmm. For example, 030129 is 29–jan-2003. - Time format is hhmm. For example, 2234 is 22h34’. This is the time the call hangs, not the time the call was made. - Duration format is hhmmss. For example, 000110 is 1 minute and 10 seconds. Philips PBX: O 112 O 112 O 112 O 112 O 210 O 112 O 112 O 112 O 112 O 210 O 210 700 700 700 700 700 700 700 700 700 700 700 868303 087330154 8684956 868840 868840 843425 868633 0913947664 0913941370 0896053635 089601315 00:00 09/29 08:50:09 00:01:27 00:00 09/29 10:34:38 00:01:23 00:00 09/29 11:27:12 00:00:25 00:00 09/29 11:29:05 00:00:21 00:00 09/29 12:48:11 00:00:51 00:00 09/29 15:28:55 00:00:20 00:00 09/29 17:24:57 00:01:17 00:00 09/29 17:56:16 00:01:25 00:00 09/29 18:19:10 00:00:40 00:00 09/29 18:43:39 00:01:17 00:00 09/29 18:45:15 00:01:01 $ $ $ $ $ $ $ $ $ $ See PowerPoint file for more information how to configure Pbx Billing SystemTM to work with such CDR format. 11.8)The limitation of exporting report There is a limitation to the number of record you can export to other Microsoft applications like Ms Word, Ms Excel. For exporting report, I experienced that you can export the report with maximum 230 pages to Ms Word 2000 or Ms Excel 2000. For Office 2003, you can export a bit more. If you get error message, like picture below, during exporting, please device your data to smaller one. For example, making report for shorter period of time will reduce the number of record on the report. Designed, Programmed, Documented By Tran Hong Quang, [email protected]; [email protected] Page 151 of 168 Pbx Billing System - English User Manual 11.9)Unicode issue As you may read from User Manual, the version running on Microsoft Office 2000 doesn’t “fully” support Unicode. If you store your data in Unicode, for example, you enter data in the language different than English, you can see your data correctly on screen. But if you export it to other Microsoft application like Ms Word or Ms Excel, you may not see it as it was. For example, if your bill using language different than English, you can see it being displayed on the bill correctly. You can also make a good print-out. But if you export that bill to Ms Word or Ms Excel, your language may not be protected. The special character which isn’t belong to English alphabet table, may be changed. For reservation letter, if your guest information were written in language other than English, then that information can’t filled correctly on the reservation letter. The problem is out of my control. Hopefully, the next version of Microsoft Office will fully support Unicode. If so (it should be so), the problem will be solved automatically. Please be patient. Designed, Programmed, Documented By Tran Hong Quang, [email protected]; [email protected] Page 152 of 168 APPENDIX: CABLE WIREMAP & OTHER VALUED INFORMATION CABLE WIREMAP & OTHER VALUED INFOMATION Pbx Billing System - English User Manual Upon completion of this module, you should be able to: Know the wire map for different connector types. Aware of some issue of Ms Access, Ms Outlook, which are the technology the application bases on. A)CABLE WIREMAP A.1)Nullmodem 9p-9p (To Computer 1). (To Computer 2). 9 PIN D-SUB FEMALE to Computer 1 9 PIN D-SUB FEMALE to Computer 2. Receive Data Transmit Data Data Terminal Ready System Ground Data Set Ready + Carrier Detect Request to Send Clear to Send D-Sub 1 2 3 4 5 6+1 7 8 D-Sub 2 3 2 6+1 5 4 8 7 Transmit Data Receive Data Data Set Ready + Carrier Detect System Ground Data Terminal Ready Clear to Send Request to Send A.2)Nullmodem 9p-25p (To Computer 1). (To Computer 2). 9 PIN D-SUB FEMALE 25 PIN D-SUB FEMALE to Computer 2. D-Sub 9 D-Sub 25 Receive Data 2 2 Transmit Data 3 3 Data Terminal Ready 4 6+8 System Ground 5 7 Data Set Ready + Carrier Detect 6+1 20 Request to Send 7 5 Clear to Send 8 4 to Computer 1. Transmit Data Receive Data Data Set Ready + Carrier Detect System Ground Data Terminal Ready Clear to Send Request to Send A.3)Nullmodem 25p-25p Designed, Programmed, Documented By Tran Hong Quang, [email protected]; [email protected] Page 154 of 168 Pbx Billing System - English User Manual (To Computer 1) 25 PIN D-SUB FEMALE to Computer 1 25 PIN D-SUB FEMALE to Computer 2. D-Sub 1 Receive Data 3 Transmit Data 2 Data Terminal Ready 20 System Ground 7 Data Set Ready + Carrier Detect 6+8 Request to Send 4 Clear to Send 5 (To Computer 2). D-Sub 2 2 3 6+8 7 20 5 4 Transmit Data Receive Data Data Set Ready + Carrier Detect System Ground Data Terminal Ready Clear to Send Request to Send A.4)Modem 9p-25p This cable should be used for DTE to DCE (for instance computer to modem) connections with hardware handshaking. (To Computer). (To Modem). 9 PIN D-SUB FEMALE to the Computer 25 PIN D-SUB MALE to the Modem Female Shield Transmit Data Receive Data Request To Send Clear To Send Data Set Ready System Ground Carrier Detect Data Terminal Ready Ring Indicator 3 2 7 8 6 5 1 4 9 Male 1 2 3 4 5 6 7 8 20 22 A.5)Modem 25p-25p This cable should be used for DTE to DCE (for instance computer to modem) connections with hardware handshaking. (To Computer). (To Modem). 25 PIN D-SUB FEMALE to the Computer Designed, Programmed, Documented By Tran Hong Quang, [email protected]; [email protected] Page 155 of 168 Pbx Billing System - English User Manual 25 PIN D-SUB MALE to the Modem Shield Ground Transmit Data Receive Data Request To Send Clear To Send Data Set Ready System Ground Carrier Detect Data Terminal Ready Ring Indicator Female 1 2 3 4 5 6 7 8 20 22 Male 1 2 3 4 5 6 7 8 20 22 A.6)Printer 9p-25p Use this cable between two computer DTE and printer DTE devices. (To Computer). (To Printer). 9 PIN D-SUB FEMALE to Computer 25 PIN D-SUB FEMALE to Printer. Receive Data Transmit Data Clear To Send + Data Set Ready Carrier Detect + Data Terminal Ready Ground D-Sub 1 3 2 8+6 1+4 5 D-Sub 2 3 2 20 Transmit Data Receive Data Data Terminal Ready 7 Ground A.7)Printer 25p-25p Use this cable between two computer (DTE) and printer (DTE) devices. (To Computer). (To Printer). 25 PIN D-SUB FEMALE to Computer. 25 PIN D-SUB FEMALE to Printer. Receive Data Transmit Data Clear To Send + Data Set Ready D-Sub 1 2 3 5+6 D-Sub 2 3 2 20 Transmit Data Receive Data Data Terminal Ready Designed, Programmed, Documented By Tran Hong Quang, [email protected]; [email protected] Page 156 of 168 Pbx Billing System - English User Manual Carrier Detect + Data Terminal Ready Ground 8 + 20 7 7 Ground A.8)Definition: DTE & DCE To prevent devices from attempting to talk to each other along the same wires, devices are divided into two types. Devices such as terminals which use pin 2 for output are known as DTE- Data Terminal Equipment. Devices such as modems which use pin 2 for input are known as DCE- Data Communication Equipment. According to RS232, DTE devices should have male connectors and DCE devices should have female connectors. However, manufacturers do not always comply with this rule and it is not always immediately obvious whether a given device is DTE or DCE. A.9)Wiring Wiring a cable for DTE to DCE communication is easy. All wires go straight from pin x to pin x. But wiring a cable for DTE to DTE (nullmodem) or DCE to DCE requires that some wires be crossed. A signal should be wired from pin x to the opposite signal at the other end. With opposite signals I mean for example Transmit & Receive. Designed, Programmed, Documented By Tran Hong Quang, [email protected]; [email protected] Page 157 of 168 Pbx Billing System - English User Manual B)OTHER VALUED INFORMATION: B.1)Microsoft acticles related to Ms Access B.1.1)A program is trying to automatically send e-mail on your behalf PSS ID Number: Q263084 Article last modified on 11-04-2000 WINDOWS:2000 ====================================================================== ------------------------------------------------------------------------The information in this article applies to: - Microsoft Access 2000 ------------------------------------------------------------------------Novice: Requires knowledge of the user interface on single-user computers. This article applies to a Microsoft Access database (.mdb) and a Microsoft Access project (.adp). SYMPTOMS ======== When you run the SendObject macro action or the SendObject Visual Basic for Applications method with the EditMessage argument set to No, you may receive the following message: A program is trying to automatically send e-mail on your behalf. Do you want to allow this? If this is unexpected, it may be a virus and you should choose "No". The Yes button in the dialog box is disabled for a few seconds, and then you are able to click Yes. If you click Yes, the e-mail message is sent. If you click No, the message is not sent, and you then see one of the following error messages. With the SendObject Macro Action: Designed, Programmed, Documented By Tran Hong Quang, [email protected]; [email protected] Page 158 of 168 Pbx Billing System - English User Manual Microsoft Access can't send a message for the reason stated in the preceding alert. Resolve that problem, and then send the message again. With the SendObject VBA Method: Run-time error '2293': Microsoft Access can't send a message for the reason stated in the preceding alert. CAUSE ===== You have applied the Outlook E-mail Security Update. MORE INFORMATION ================ For additional information about this security update, click the article number below to view the article in the Microsoft Knowledge Base: Q262631 OL2000: Information About the Outlook E-mail Security Update Steps to Reproduce the Behavior ------------------------------1. Apply the Outlook E-mail Security Update on a computer that is running Access 2000 and Outlook 2000. 2. Open the sample database Northwind.mdb. 3. In the Database window, click Macros, and then click New. 4. Create a new macro that has the following actions: Macro Name Action ----------------------TestSend SendObject TestSend Action Arguments ------------------------------SendObject Object Type: Report Object Name: Catalog Output Format: Rich Text Format To: <email address> Edit Message: No 5. On the File menu, click Save. 6. On the Run menu, click Run. Note that you receive the first message, "A program is trying to automatically...", that is described in the "Symptoms" section of this article. If you click Yes, your e-mail message is sent. If you click No, you see the error message: Designed, Programmed, Documented By Tran Hong Quang, [email protected]; [email protected] Page 159 of 168 Pbx Billing System - English User Manual Microsoft Access can't send a message for the reason stated in the preceding alert. Resolve that problem, and then send the message again. 7. Close the macro, and then on the Insert menu, click Module. 8. In the new module, type the following code: Sub VBATestSend() DoCmd.SendObject acReport, "Catalog", "RichTextFormat(*.rtf)", _ "<email address>", "", "", "This is a test", "", False, "" End Sub 9. In the Immediate window, type the following line, and then press ENTER: VBATestSend Note that you receive the message, "A program is trying to automatically...", that is described in the "Symptoms" section of this article. If you click Yes, your e-mail message is sent. If you click No, you receive the following error message: Run-time error '2293': Microsoft Access can't send a message for the reason stated in the preceding alert. REFERENCES ========== For more information about how other Microsoft Office products may be affected by the Outlook E-mail Security Update, please see one of the following articles in the Microsoft Knowledge Base, depending on which version of Outlook you have: Q262634 OL2000: Known Issues with the Outlook E-mail Security Update Q262618 OL98: Known Issues with the Outlook E-mail Security Update If you have questions about uninstalling the update, see the "Outlook Email Security Update - Frequently Asked Questions" page at the following Microsoft Web site: http://officeupdate.microsoft.com/2000/articles/Out2ksecFAQ.htm Additional query words: prb patch errmsg run time error 2293 Microsoft Access can t send a message for the reason stated in the preceding alert. ====================================================================== Keywords : kberrmsg kbinterop kbdta Technology : kbAccessSearch Version : WINDOWS:2000 Designed, Programmed, Documented By Tran Hong Quang, [email protected]; [email protected] Page 160 of 168 Pbx Billing System - English User Manual Issue type : kbprb ======================================================================= Copyright Microsoft Corporation 2000. Office 2000 SP-2, Winodows 2000 Service Pack 2 include the Outlook E-mail Security Update, so you'll want to consider carefully whether you want to install this set of fixes. You can’t uninstall Outlook E-mail Security Update. B.1.2)Solution to solve Microsoft E-mail Security - There is no programming solution that be able come over this barrier. You can check with Microsoft Website: www.microsoft.com or search www.google.com the message on the dialog box (A program is trying to automatically send e-mail on your behalf). - Only on solution is having the security dialog box (named “Microsoft Outlook” as you see its snapshot in previous session) clicked on Yes button. Normally, the user has to do so. But luckily, we can develop an application, which can do that job for you. I write a Windows Script called ByPass.vbs to do that automatically. The Windows Script ByPass.vbs (the file is stored under the home folder) will be run before the mail is sent out. The ByPass.vbs is run as process, you can’t see it title on windows bar. The ByPass.vbs waits for the Microsoft Outlook Security Dialog box for a while. At least, after 5 seconds from the time the ByPass.vbs was started, if that dialog box appears, the ByPass.vbs will try to 1. Activate it (Microsoft Outlook dialog). 2. Send “y” key code to it. So, the ByPass.vbs does the job of waiting 5 seconds and clicking on the security dialog. 5 seconds is the time you have to wait until the “Yes” button is active. Microsoft wants users to wait 5 seconds to avoid malicious send too many mail (bomb mail). Important notice: Because the event, which simulate click on yes button is sent to only active windows, so that ByPass.vbs has to activate the Outlook Security dialog before sending out that event. The mechanic will work smoothly if you let the computer alone, no touch. But you may get problem if at the the, ByPass.vbs activate the Outlook Security dialog, you click on other windows. So, the other windows will be active windows at this moment. The Click-Yes event is sent to that windows, instead of Outlook security windows as we expect. in this case, you have to click (yes or no) on that Outlook Security dialog to close it. Unless Pbx Billing System / Hotel Management System will wait for closing Outlook Security dialog fore ever. The Click-Yes script (ByPass.vbs) couldn’t run correctly if you lock your computer or set Screen Saver with Password Protected (You may wonder about “Lock computer”. I can give an example as follows: You are using Windows 2000 or Windows NT 4.0. You press Ctrl-Alt-Del, you will see Windows Security dialog, if you click on “Lock Computer”, your computer will be locked) So, If you activate the mailing feature of Pbx Billing System/Hotel Management System, you have to make sure you don’t violate two cases mentioned above. Designed, Programmed, Documented By Tran Hong Quang, [email protected]; [email protected] Page 161 of 168