1
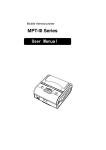
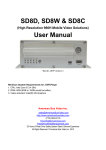
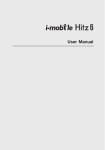
DYGSM Alarm System User Manual
Preface
Copyright:
Esteemed Guests:
Thank you for using our GSM Alarm System. For a better understanding
of this product, pls. read this user manual thoroughly before using it.
In addition , keep this instruction manual so that you may read it at anytime
when necessary
z The device is protected by patent right at home and abroad.
z the Company reserves all the right to interpret.
www.deltasecurity.cn
DYGSM Alarm System User Manual
Cautions
To avoid personal Injury and the damage to the product, Please take the following preventive measures.
z
z
z
z
z
z
z
【Input voltage】
:DC12V 1A;
【Using the professional tools for Assembling to avoid the damage to the main Panel】.
【Press the touch keypad lightly】
【Keep it away from the moist environment】
【This product should not be place in flammable explosive environment】.
【Keep the Product dry & clean】.
【Keep the product in a well-ventilated place】.
【Functions & Advantages】:Features (as short as possible)
1: Ultra-thin design with Unique Touch keypad ,stylish appearance。
2: Arm/Disarm by RFID Card , which can be Named easily.and the main panel will Send SMS to the preset phone numbers when the setting is completed.
3: Easy to operate with in-built input systems.
4: Easy to control the Host by your mobile with In-Built Bluetooth function up to100 meters In open place, (it works may up to 60 meters in the house )
5. Adjustable Volume of the Main Panel up to 8 levels..
6: Up to 50 Defense Zones,each defense zone can be coded with Remote Controller or other sensors/detectors, also they Can be named individually.
7: With the function of Automatic detection for the Doors/Windows ,the Main Panel Keeps Indicating while arming the system if any Door/Window is
open ,100% Security Guaranteed.
8: With the wireless Siren indicating, You will know the status of the alarm System
9:In order to operate the Alarm system quickly, you can set one preset telephone number as the owner’s number , which can access to the Main Panel without
Password.
10: No need to replace the battery up to 3 years for the Ultra-low power consumption.
11: With the self-checking function, Reminder will be sent when the battery is low and should be replaced.
12: Support CID
13: New feature of Voice Prompt: The music goes on from the Main Panel when someone opens the door.
14: In-built USB Slot: Easy to update the software for the latest functions and services.
15: In-built Engineering model:Easy for the malfunction examination & better maintenance.
www.deltasecurity.cn
—————————————————————————————————————
1
———————————————————————————————————————
DYGSM Alarm System User Manual
Chapter 1: Alarm Host Diagram
www.deltasecurity.cn
【GSM Signal Indicator】 :No SIM card or searching network: flashes once every second ;GSM Signal in normal: Flashes once every 3 seconds
【RF Signal Indicator】: Flashes while sending or receiving RF signals
【LCD Screen】:Display System Menu & Information.
【RFID Card Reader】:for the RFID card reading。
【Menu Operation Buttons】
:To adjust the settings in the Options menu.
【Out Arm】: Press the [Out Arm] button, then input the password to Arm the System.
【Home Arm】: Press the [Home Arm] button, then input the password to Make the system into Home Mode.
【Disarm】: Press the [Disarm] button, then input the password to disarm the system.
【Emergency/SOS】: Press the [Emergency/SOS] button, the Host alarms and calls the preset phone numbers.
【Land Wire Slot】: For the A/C power cord.
【MIC】 For a better effect, speak at 35cm away from the Host.
【Tamper Switch】
:Fix the backplane firstly, then Hang up the Host .
【SIM Card Slot】
:To insert SIM Card before using.
【Debugging Interface】:For the Collecting information from the host and Correction Program by Manufacturer as well.
【Battery Case】: For the back-up batteries.
【Upgrading switch】
:Turn on the switch before updating the alarm system.
—————————————————————————————————————
2
———————————————————————————————————————
DYGSM Alarm System User Manual
【Power switch】: Power on / off the back-up batteries.
【USB Slot】: For A/C adapter and upgrading system as well.
【Interface for the wired Defense Zones】:2 inputs for wired sensors.(2 Wired Defense Zones)
【Loudspeaker】.
Chapter 2:Operation Instructions
Note: Please follow the instructions on the LCD screen, then press the button accordingly.
MUTE
Switch off the sound
VOL+
Turn the volume up
VOL-
Turn the volume Down
MENU
Menu
BACK
Return
DOWN
Page down
UP
Page Up
ENTER
OK
SAVE
Save
ABC/abc/123
Switching the Input method
DELETE
Delete the setting
Note: You can NOT make any settings until into the set up state, here are the steps as belows:
MENU→Select Program→ENTER→Input the password(888888)→into setup state→Making settings
www.deltasecurity.cn
1.
Alarm Phone number/SMS Receiving Number Settings
① In Setup state→Select [DOWN] →Select Phone Numbers/SMS Numbers→select [ENTER]。
② Select [Add] →Select [ENTER]
③ Input the phone number→select[SAVE]→“SET Successful” displays on screen,which indicates the number is set successfully.
④ Select [BACK] to Exit.
—————————————————————————————————————
3
———————————————————————————————————————
DYGSM Alarm System User Manual
No:1
No:2
2.
www.deltasecurity.cn
Coding of Remote Controllers & Sensors/Detectors
①In Setup state→Select [Remote Controllers/Sensors] →select [ENTER]
② Select [Add] →Select [ENTER]
③Press any button on Remote Controller or Trigger the Sensor/Detector for coding→Series Code of the sensor displays on the screen→Select [Save]
④Name the Remote Controller or Sensor/Detector→Select [SAVE] to next step
⑤Select [RECORD] to Record the name of the Remote Controller or Sensor/Detector,also the position where it is.
→“SET Successful” displays on screen, which indicates the coding successfully.
⑥Select [BACK] to Exit
No:1
—————————————————————————————————————
4
———————————————————————————————————————
DYGSM Alarm System User Manual
No:2
3.
Wireless Siren Setting
① In Setup state→Select [Wireless Sirens] → Select [ENTER]。
②Select [Add] → Select [ENTER]
③The Wireless siren will be named Sirens 1 by the Host→Select [ENTER]
④“Put Siren In setting Mode” displays on screen →Switch on the Wireless siren ,and then press the [add remote] on the siren.
⑤Select [ENTER] →The Siren emits a Long Beep →“SET Successful” displays on screen, which indicates the coding successfully.
⑥Select [Back] to Exit.
www.deltasecurity.cn
4.
Coding of RFID Card
①In Setup state→Select [RFID] →Select [ENTER]
②Select[Add] → Select [ENTER]
③Have the RFID card close to the RFID Card Reader Zone→Series Code of the sensor displays on the screen→Select [Enter] to next step
④Name the RFID Card ,Select the [Save] to store the Name→“SET Successful” displays on screen, which indicates the coding successfully.
⑤Select [Back] to Exit.
—————————————————————————————————————
5
———————————————————————————————————————
DYGSM Alarm System User Manual
5.
Pair the Host with your Mobile phone Via Bluetooth
①Install the APP provided by Manufacturer (Please refer to your mobile user manual for installing)
②Enabling The APP on your Mobile, input the Alarm Host information, including SIM card Number, Operation Password etc.(Please refer to the APP User
Manual)
③Click the Bluetooth Scanning button on your Mobile→The Host name displays on your mobile after scaning→ Click the Host Name for pairing(Please refer
to the APP User Manual)→ “Bluetooh Pair Request” Displays on the Host Screen → Click [Accept] on the Host
④Now you can control the Alarm Host by your mobile phone(Please refer to the APP User Manual)。
⑤Select [Back] to Exit.
www.deltasecurity.cn
Notes:
You will have to pair every mobile phone to the Host again if you format the system;
The Host can be paired up to 8 mobile phones;
To avoid the malicious interference, Please make the Host on the status of Invisible if there is no need to pair new mobile → Just Select【No】.
And when you need to pair new mobile, just select【Yes】to make the Host Visible.
With the function of Automatic detection for the Doors/Windows ,the Main Panel Keeps Indicating while arming the system if any Door/Window is
open ,100% Security Guaranteed.
6.
To Enable the Auto Search Sensor
Notes:
—————————————————————————————————————
6
———————————————————————————————————————
DYGSM Alarm System User Manual
a).Works for Door Sensors Only;
b).After Enabling the Function, You will have to Press & Hold the [Out Arm] or [Home Arm] button for 3 seconds to arm the system if any Door/Window is open.
Otherwise, you can not Arm the system;
c).For sure, you can arm the system easily without enabling the function.
①In setup state,→Select [Sensors] →Select [ENTER]
②Select [Edit] → Select [ENTER]
③Select [Auto Search Sensor] → Select [ENTER] →Triggering the Door Sensor you would like to Enable the function →Select [ENTER] when the Sensor’s
name displays on the Host screen;
④Select [DOWN] → Select [Chime Zone] → Select [ENTER]
⑤Select [UP] → Select [Yes] → Select 【SAVE】→ Enable the Auto Search Sensor successfully when you see the 【√】on The Host Screen
⑥Select【BACK】to Exit.
www.deltasecurity.cn
7.
Query the IMIE Code
①In Setup state→ Select [Down] → Select [System About] → Select [ENTER]
②Select[DOWN] → Select [IMEI] → Select [ENTER]
③IMIE Code[15 digitals] will display on the Screen.
8.
How To Use the CID Function?
The Standard ADMECO Contact ID Protocol was used in the Alarm System.
Firstly, You need to get a telephone number & User ID from your Service Provider .
—————————————————————————————————————
7
———————————————————————————————————————
DYGSM Alarm System User Manual
And input them into the Alarm Host. In addition, Setting up the Host to upload Alarm Data & Arm/Disarm Data is needed.Now,your Service provider can
Monitor your alarm System for you.
8.1 Set up the Monitoring Center Number
①In set up state → Select [Monitoring Center] → Select [ENTER]
②Select [Monitoring Center Number] → Select [ENTER]
③Select [Add] → Select [ENTER]
④Select [Phone#1] or [Phone#2] → Select [ENTER]
⑤Input the Monitoring Center Phone number → Select [SAVE] → “SET Successful”
www.deltasecurity.cn
8.2 Set up the Contact ID
①In Setup State → Select [Monitoring Center] → Select [ENTER]
②Select [ADMECO Contact id] → Select [ENTER]
③Input ID number[4-digitals] → Select [SAVE] → “SET Successful”
8.3 Set up to upload the Alarm data to the Service Provider
① In Setup State → Select [Monitoring Center] → Select [ENTER]
②Select[Upload Alarm Data] → Select [ENTER]
③Select [Yes] → Select [SAVE] → “Set Successful”
④Select [BACK] to Exit.
—————————————————————————————————————
8
———————————————————————————————————————
DYGSM Alarm System User Manual
8.4 Set up to upload the Arm/Disarm Date to Service Provider
① In Setup State → Select [Monitoring Center] → Select [ENTER]
②Select [Upload Arm/Disarm Data] → Select [ENTER]
③ Select [Yes] → Select [SAVE] → “Set Successful”
④Select [BACK] to Exit.
www.deltasecurity.cn
Chapter 3: Accessories
1.
Wireless Remote Control
—————————————————————————————————————
9
———————————————————————————————————————
DYGSM Alarm System User Manual
Press (Arm ) to arm the alarm panel and the LED indicator lights on (siren hoots once), the system enters Arm state.
If there comes an intruder, the siren will hoot to deter the intruder.(The siren turns off after ringing for 5 minutes as default setting.) At the same time, the system dials
the pre-stored phone numbers automatically.
Press (Disarm ) to disarm the alarm panel and the LED indicator blacks out (siren hoots twice), the system is disarmed.
When intruders are detected, siren will keep hooting. Press (Disarm ) to stop siren hooting.
www.deltasecurity.cn
Press (Arm ) button on the remote control, the system state LED is on. All the sensors in other zones are armed except the motion detector in Home Mode Zone
which is disarmed so that user can move freely at home.
No matter what state the control panel is in, once SOS button on the remote control is pressed, the system immediately goes into emergent alarming state.
2. Wireless Door/Window Contact
Features
The is a Door/Window Contact that can be installed on doors, windows, and any other objects that open and close. The sensor transmits signals to the control panel
—————————————————————————————————————
10
———————————————————————————————————————
DYGSM Alarm System User Manual
when a magnet mounted near the sensor is moved away. External input for wired accessory is available at the N/C interface. The tamper protection ensures that
sabotage attempts to move the contact will result in an alarm activation.
Appearance / PCB Layout / Installation & Notice
LED Indication
LED flashes once: Door/window is opened and transmitter sends signal to the control panel.
LED lights on: Low battery. Please replace the battery immediately.
3.
Wireless PIR Motion Detector
Features
www.deltasecurity.cn
PIR is a high performance wireless P.I.R. motion detector.
It consists of digital dual-core fuzzy logic infrared control chip and intelligent analysis which effectively identify interference signals from body movement signals
and reduce false alarm rate. With automatic temperature compensation and anti-air turbulence technology, it easily adapts to environmental changes. The detector also
has the advantages of energy saving, reliability and easy installation.
Appearance / PCB Layout / Installation & Notice
—————————————————————————————————————
11
———————————————————————————————————————
DYGSM Alarm System User Manual
LED Indication
Flash continuously: Under the self-testing state.
Flash once: Intruder is detected.
Flash twice: Self-testing is finished, enters the working mode.
Normally on: Under voltage voltage indication, please change the batteries immediately.
Chapter4: Menu Description
1.
MENU
【Program】 Programming
【Chime】Doorbell Function On/Off
【Alarmed Record】: For Alarming Record Checking
【Event】: For The checking of the Records About opening doors
2.
Remote Controllers
www.deltasecurity.cn
【ADD】 :For the Coding of Remote Controllers, up to 8 ones
【Edit】: Edit the Remote Controllers
------【Edit Owner Name】: Edit the name of the Remote’s Holder( More easier to remember the User)
------【Edit Owner Name】: Edit the Voice Record of the Remote’s Holder ( More easier to remember the User
【Delete】: To Delete the Remote Controller
【Delayed Arm】
3.
Sensors
【ADD】: For the coding of Sensors, Up to 80 sensors.
【Edit】 : To edit the attributes of the Sensors
------【Auto Search Sensor】: Trigger the sensor you would like to Edit, and Edit the attributes of sensor.
------【Manual Search Sensor】: Find the Sensor you would like to edit by manual.
………..…..【Edit Zone Name】: Edit the name of the sensor (easy to remember)
………..…..【Record Zone Name】: to Make the voice Record of the sensor
………..…..【Emergency Zone】 : Set up “Yes”, the system under the status of “Out Arm” will alarm when the sensor’s triggered
………..…..【Home Zone】 : Set up “Yes”, the system under the status of “Home Arm” will alarm when the sensor’s triggered
—————————————————————————————————————
12
———————————————————————————————————————
DYGSM Alarm System User Manual
………..…..【Chime Zone】: Set up “Yes” to enable the Auto Search Sensor(works for Door Sensors Only)
………..…..【Delayed Zone】: Set up “Yes” to Delay the System Alarming & Calling the preset numbers when the Sensor’s triggered
………..…..【Siren Enabled】 : Set up “Yes” to enable the siren when the sensor’s triggered
【Delete】:Delete the Sensor
4.
RFID
【ADD】 : Coding of the RFID Cards, up to 8 ones.
【Edit】 : Edit the name of the Card holder
【Delete】: To Delete the RFID Card
【Arm/Disarm Send SMS】: To Enable / Disable the SMS
5.
Wireless Sirens
【ADD】 : Coding of Wireless Siren ,up to 3 ones
【Edit】 : Edit the name of the Wireless Siren
【Delete】 :Delete the Wireless Siren
【Siren Enable】: To Enable/Disable the Wireless . To set up [No],There will be no Siren Sound while alarming
【Duration】:To set up the Alarm Duration
【Arm/Disarm Tone】 : To set up the Siren to beep or not While Arming or Disarming the system
【Encrypt】 : To set up the password for the Wireless Siren, which will result in less false-alarming
6.
Phone Numbers
www.deltasecurity.cn
【ADD】: To Add the Alarm-Receiving Number, up to 6 Numbers including Telephone number or Mobile)
【Edit】 : To Set up the phone number to control the Alarm System With password or Not
-------Auto Login →Select [yes] ,which means that the number can control the Alarm System without password。
【Delete】: To Delete the Alarm-Receiving Number
7.
SMS Numbers
【ADD】 : To Add the SMS-Receiving Number, Up to 3 Mobile numbers
【Delete】: To Delete the SMS-Receiving Number
【Arm/Disarm Notification】: To enable/Disable the SMS Function for the Status of Alarm System
8.
Outgoing Message
【Edit Text Message】: To Edit the Message that will be sent to the SMS-Receiving numbers with Alarming information together when System is Alarming
【Record Voice Message】: To Edit the Voice Record that will play automatically when answering the Alarm-calling from the Alarm System
—————————————————————————————————————
13
———————————————————————————————————————
DYGSM Alarm System User Manual
9.
Monitoring Center
【Monitoring Center Number】: To Edit the CID Phone Number, which will receive the information from the Alarm System upon enabling the CID Service
【ADMECO Contact id】 : User ID, Provided by your CID service provider
Upload Alarm Data: To enable/Disable the Function of Uploading the Alarm Data to your Service Provider or Not
【Upload Arm/Disarm Data】: Enable/Disable the Function of Uploading the Arm/Disarm Data to your Service Provider
10. Timely Arm/Disarm
【Enable】: To Start the Timer for Arm/Disarm
-------Set Arm Time: To set the starting-time to Arm
-------Set Disarm Time: To set the time to Disarm
【Disable】:To close the Timer for Arming/Disarming
11. BlueTooth settings
【BlueTooth On/Off】: Enable/Disable the Bluetooth Function of the Host
【Device Name】: To Modify the name of the Device
【Visible】: To make the Host visible/invisible to the other Bluetooth Device. To avoid the malicious interference, Please make the Host on the status of
Invisible if there is no need to pair new mobile → Just Select【No】.
【Delete Paired Mobile】: To delete the Device that already paired with the Host
12. System settings
www.deltasecurity.cn
【Password】: To set up the password to the System
【Arm Delay Time】: To set up the delay-time to Arm the System, which means that the system will not Arm until the delay time’s up.
【Alarm Delay Time】: To set up the Delay time for Alarming, which means that the System will not alarm until the Delay time’s up
【Door/Window Open Tip】: To set up to skip the Function of Door/Window-Open-Reminding or Not when Arm the System, To Select [Yes] means that you
can Arm even the Door/Window is open.
【Date/Time】 : To set up the date/Time of the System
……………Display Format: To set up the date format of the System
12.1 Language: System Language
【English】
12.2 Factory Reset
【Restore Defaults】: Enable [Yes] means that you need to reset the information excluding Remote Controller, Sensors/Detectors, Wireless Sirens, RFID Cards,
Bluetooth Mobiles.
—————————————————————————————————————
14
———————————————————————————————————————
DYGSM Alarm System User Manual
【Format system】 :Enable [Yes] to Delete all settings.
12.3 System About
【Version】 :System Version
【Production Date】: The date of Manufacture。
【Manufacture By】 : The Manufacturer (Da Ying Inc.)
【IMEI】 : IMEI Numbers(15 Digitals) for CID Service
【BlueTooth Address】
12.4 Hardware Test
【Lcd Test 】: To test whether the LCD screen can work normally
【Led Test】: To test whether the Led Lights including the backlights can work normally
【Key Test】: To test whether the every button can work normally
【RFID Test】:To Test whether the RFID Reader can work normally
【Voice Test】: To test whether the Voice Prompts is Accurate & Complete
【Record Test】: To Test Whether the Host can Record Normally
【RF Receive Test】 : To test whether the Host can receive the Wireless Sensors/Detectors’ signal normally
【RF Send Test】: To test whether the Host can sending the signal normally
【Battery Test】: To test the Battery power
【Power Off Test】: To Test whether the Adapter can charge the Host normally
【Call Test】: To test whether the Host can receive the calling & act according to the instructions
【Net Central Test】 : To test whether the Host can connect to the Monitoring Center Normally
【Wired Zone Test】: To test whether the wired defense zone work normally when triggering
【BuleTooth Test】: To test whether the Host can Scan the other Bluetooth devices normally
www.deltasecurity.cn
—————————————————————————————————————
15
———————————————————————————————————————