1
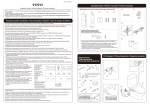
Instruction Manual with Warranty Information
Washlet B100
TCF6401U
Enjoy the convenient features
How to Use
Extend product life and maintain cleanliness
Every joyful day starts in the bathroom
Maintenance
Troubleshooting tips for the product
2014. 2. 17
D08568S
What to Do?
Questions
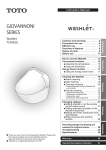
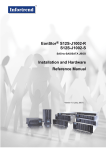
This section presents some of frequently asked questions regarding use of the Washlet.
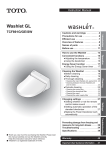
the Seat Switch?
When you sit on the toilet seat, the seat switch turns ON, enabling you to
use various features.
See Page 9 for details.
4
Grounding Instructions
8
Operational Precautions
9
Introduction to Features
10
Initial Settings
11
Part Names
12
Preparing to Use the Washlet for the First Time
13
Standard Use
14
Convenience Functions
16
16
Adjusting the temperature
Selectable Energy-Saving
Saving energy automatically Auto energy-saving
Operation
What is
• The specifications, model number, etc. are
subject to change without prior notice.
Safety Precautions
Introduction
Frequently asked
• Thank you very much for your recent purchase of
the TOTO Washlet. Please read this instruction
manual to ensure proper use.
18
19
Saving energy by designating a time period
The toilet seat lowers.
Why do the Washlet features
not operate when
the buttons
on
the control panel is pressed?
How can
energy be
saved?
Timer energy-saving
Before cleaning your Washlet
19
22
Cleaning the Main Unit
24
When you feel water pressure has weakened
28
Freeze Damage Prevention
29
Procedure for Long Periods of Disuse
31
Troubleshooting
33
Specifications
37
Limited Warranty
39
See Page 18 for details.
The features cannot be used
unless the seat switch is
ACTIVATED. See Page 9 for details.
What is needed to
Why are toilet seat
and water sometimes
not warm?
care for and
clean the
Washlet?
See Page 22 for details.
If the energy saving LED is
on, the energy saving feature
may be keeping the toilet
seat and water from warming.
See Page 21 for details.
2
3
Maintenance Troubleshooting
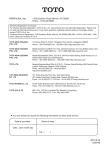
Switch
ACTIVATED
The seat
switch is built
in here.
DANGER
Be sure to follow these precautions.
Please read the descriptions in this "Safety Precautions" section before using your Washlet.
The precautions shown below are important for safe usage. Be sure to follow them.
DANGER
This symbol indicates the
mishandling may result in death
or serious injury.
WARNING
Avoid damaging the electrical cord or toilet seat cord.
Do not crack, bend, twist or pull the cords.
Do not treat or heat the cords or place heavy
objects on top of them
This symbol indicates the
mishandling may result in injury
or physical damage.
● Use of damaged electrical cords may result in a short circuit, electrical shock or fire.
Do not use a loose or faulty electrical outlet.
● Doing so may cause fire or electrical shock.
READ ALL INSTRUCTIONS BEFORE USING
This product should be used with 120V, 60Hz electrical current only.
● Use of multi-prong outlet adapters with this product may result in overheating or fire.
The following symbols are used to indicate important safety instructions for the use of the product.
Symbol
Do not use a water supply that is not tap or potable well water (underground water.)
● Use of water that is not safe for drinking may cause irritation or injury to the skin.
Definition
The symbol indicates a prohibited use of the product. The symbol
to the left means "Do not disassemble this product".
Do not install the Washlet on moving bodies such as automobiles, boats and vessels.
● Otherwise, fire, electric shock or trouble may be caused.
● The Washlet may dislodge and fall, causing injury.
This symbol is used to indicate a required step in the use of this
product. The symbol to the left means "Always follow this precaution".
Improper use of heated toilet seats can result in a low-grade burn.
● When sitting on the heated toilet seat for extended periods of time, turn the
temperature setting to OFF.
● Make sure that the temperature setting for the heated toilet seat has been set to
the OFF position before being used by the following:
- Young children, the aged or users who cannot perform
appropriate setting of the temperature.
- Sick or disabled users who do not have freedom of movement.
- Users who are on medication that causes drowsiness.
- Users that have consumed a great deal of alcohol or who are
extremely tired and may fall asleep while using the toilet.
This product is classified as Class 1 Equipment and must be grounded.
Install this equipment where the electrical outlet is accessible.
This appliance is not intended for use by persons (including children) with reduced physical, sensory or mental
capabilities, or lack of experience and knowledge, unless they have been given supervision or instruction
concerning use of the appliance by a person responsible for their safety.
Children should be supervised to ensure that they do not play with the appliance.
Use the new hose set included with this equipment. Do not reuse an old hose set.
Periodically remove dust and dirt from the electrical plug and make sure it is
securely plugged into the wall outlet.
● Failure to do so may result in electrical shock or fire.
● Pull the plug out from the outlet and wipe clean with a dry cloth.
DANGER
Avoid direct contact with
water
Do not wash the main unit or electrical plug with water or detergent.
● Doing so may cause fire or electrical shock.
Do not use this product in
wet or damp places
Do not install the product in a room where the humidity can exceeds 90% RH.
● Doing so may cause fire or electrical shock.
Do not disassemble
Never disassemble, repair or modify this product.
● Doing so may cause fire or electrical shock.
Do not handle the electrical
plug with wet hands
Do not handle the electrical plug with wet hands.
● Doing so may cause electrical shock.
Do not unplug by pulling on cord. To unplug, grasp the plug, not the cord.
● Pulling on the cord may cause damage and result in electrical shock or fire.
Preliminary studies in females suggest that overuse of continuous spraying
can increase the possibility of vaginal mucosa drying and potential
reduction in desirable microbial organisms.
Although these studies have not been validated, please consult your
healthcare provider for concerns regarding whether these circumstances
may apply to you.
More importantly, if you are an individual suffering from any immune
deficiency as a result of disease, chemotherapy, or other medical condition
compromising the immune system you should consult your healthcare
provider before use of this product.
Do not continue to use the product if it is malfunctioning.
● If the following occurs, disconnect the electrical plug from the wall outlet, and
close the water shutoff valve to prevent the water flow.
Possible malfunctions:
● Water leaks from either the main
unit or the water pipes.
● The product makes a strange noise
or emits a strange odor.
● The product feels extremely hot.
● The product is cracked or broken.
● The product is smoking.
● Continued use of a product that is malfunctioning may result in fire or electrical
shock or cause water damage.
4
Introduction
Introduction
Safety Precautions
Removal of the electrical
plug
When removing the main unit for cleaning, be sure to unplug the electrical
cord from the wall outlet to prevent the risk of electrical shock.
Grounded Outlet
Make sure that a properly grounded (3 prong) outlet has been installed.
● Failure to install in a grounded outlet could result in electrical shock in the event
of a malfunction or short circuit.
5
Introduction
Introduction
DANGER To reduce the risk of electrocution:
WARNING
Use only a mild dish detergent diluted with water to clean your Washlet. Do
not use the following to clean the Washlet.
Toilet bowl cleaner, household cleaner, benzene, paint thinner, powdered cleanser,
or nylon scrubbing pads.
● Use of any cleaning product other than diluted dish detergent may crack the
plastic and cause injury to the user or may damage the hose resulting in water
leakage.
Do not stand on or place heavy objects on top of the toilet.
● To avoid injury or damage to the toilet unit, do not stand on or place heavy
objects on top of the toilet.
Do not raise the toilet seat or lid while objects are resting on top of the toilet.
● Lifting the toilet seat/cover with objects resting on them could cause the main unit
to become detached, resulting in injury.
Do not bend or crush the water hose.
● Otherwise, water leakage may occur.
To prevent sudden water leakage, do not remove the water filter with drain
valve when the water shutoff valve is open.
● Refer to Page 28 for instructions on cleaning the water filter.
● Do not install base plate to Washlet when not attached to the toilet.
R Fire or damage may result.
Do not use this product while smoking.
● To avoid the risk of fire, do not smoke while using this product.
When not using the Washlet over an extended period of time, drain the water
out of the hose and pull the electrical plug from the wall outlet.
● Water left standing in the toilet hose over an extended period of time could cause
irritation to the skin.
Refer to Page 31 for instructions on draining the hose.
1. Do not use while bathing.
2. Do not place or store the product where it can fall or be pulled into the tub or sink.
3. Do not place in or drop into water or other liquid.
4. Do not reach for the product when it has fallen into water. Unplug immediately.
WARNING To reduce the risk of burns, electrocution, fire or injury to persons:
1. Close supervision is necessary when this product is used by, on, or near children or
invalids.
2. Use this product only for its intended use as described in this manual. Do not use
attachments not recommended by the manufacturer.
3. Never operate this product if it has a damaged cord or plug, is not working properly, has
been dropped or damaged, or has been dropped in water. Return the product to a service
center for examination and repair.
4. Keep the cord away from heated surfaces.
5. Never block the air openings of the product or place it on a soft surface, such as a bed or
couch, where the air openings may be blocked. Keep the air openings free of lint, hair, and
other similar items.
6. Never use while sleepy or drowsy.
7. Never drop or insert any object into any opening or hose.
8. Do not use outdoors. Do not operate where aerosol (spray) products are being used or
where oxygen is being administered.
9. Connect this product to a properly grounded outlet only. See Grounding Instructions.
If water leakage should occur,
always close the water shutoff valve
and then turn off the water.
10. Reservoir should be filled with water only.
See “Grounding Instructions” in Page 8.
Turn it clockwise.
Water shutoff
valve
When installing the water filter drain valve, make sure that it is securely
tightened in its proper position.
● Improper tightening of the water valve may result in water leakage.
Preventing damage due to frozen pipes and hoses.
● Frozen water pipes will cause the main unit and the pipes to break, resulting
in water leakage.
● Regulate the room temperature to prevent the pipes and hoses from freezing
during cold months.
Refer to Page 29,30 for instructions on how to prevent frozen pipes.
Push the Washlet securely into the base plate.
● Push the Washlet until a click sound is heard and then pull it slightly toward you
to make sure that the Washlet does not come off.
● Otherwise, the Washlet may dislodge and fall whereby causing injury.
6
7
This product should be grounded. In the event of an electrical short circuit, grounding reduces the risk of
electric shock by providing an escape wire for the electrical current. The plug must be plugged into an
outlet that is properly installed and grounded.
DANGER- Improper use of the grounding plug can result in a risk of electric shock.
Operational Precautions
Please follow the below instructions.
For prevention of flaws and damage
For prevention of trouble
Do not wipe the main unit, toilet
seat, toilet lid and other parts made
of plastic with dry cloth, toilet paper,
etc.
Avoid wetting the main unit
and the wand with urine.
Do not lean back against
the toilet lid.
See “Maintenance” in Page 22.
If repair or replacement of the cord or plug is necessary, do not connect the grounding wire to either flat
blade terminal.
Do not use the Washlet with
the toilet lid removed.
◎ Wipe the Washlet with well-squeezed
wet, soft cloth.
If there is a possibility of
lightning strike
Check with a qualified electrician or serviceman if the grounding wire instructions are not completely
understood, or if in doubt as to whether the product is properly grounded.
Unplug the power beforehand.
This product is factory equipped with a specific electric cord and plug to permit connection to a proper
electric circuit. Make sure that the product is connected to an outlet having the same configuration as the
plug. No adapter should be used with this product. Do not modify the plug provided - if it will not fit in the
outlet, have the proper outlet installed by a qualified electrician. If the product must be reconnected for
use on a different type of electric circuit, the reconnection should be made by qualified service personnel.
If it is necessary to use an extension cord, use only a three wire extension cord that has a three blade
grounding plug, and a three-slot receptacle that will accept the plug on the product. Replace or repair a
damaged cord.
Introduction
Introduction
Grounding Instructions
◎ Otherwise, trouble with the product
may occur.
For prevention of malfunctions
Do not expose the product to direct sunlight.
Use radios, etc. away from the Washlet.
Otherwise, discoloration or temperature variation of the
heated seat may be caused.
Electrical noise may be heard from the radio.
Do not put any objects on the toilet seat or toilet
lid. Do not press on the seat or lid by hand.
If the Washlet is used with a booster seat for
infants or a soft highchair over the toilet seat,
remove it after use.
Otherwise, the seat switch may turn ON and, when you touch
the switch on the control panel, warm water will come out from
the wand and wet the floor.
(The seat switch turns ON when a load is applied to the toilet
seat and toilet lid.)
Some functions cannot be use in this case.
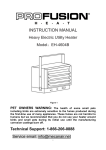
About the seat switch
• When you sit on the toilet seat, the seat switch is
ACTIVATED, enabling you to use various functions.
Grounding Pin
* The seat switch may not turn ON unless you sit back on the toilet
seat.
(When a child uses the Washlet, the seat switch may not be
ACTIVATED by their light body weight.)
The seat
switch is built
in here.
Save these instructions.
(Not sitting back) (Sitting back)
• A click sound is heard when the seat switch is
ACTIVATED.
• Since the toilet seat is designed to move up and down,
a clearance is provided between the toilet seat cushion
and the toilet bowl.
8
Clearance
Switch
ACTIVATED
The toilet seat lowers.
9
Washing Features
Ref.
Page
Rear cleansing
Washes your rear.
15
Soft cleansing
Washes your rear with mild water pressure.
15
Front cleansing
Serves as a bidet for ladies.
15
The wand position can be adjusted to the front or rear.
15
The water pressure can be adjusted to soft or strong in rear washing.
15
The wand moves back and forth to wash your rear thoroughly.
15
Wand position
adjustment
Water pressure
adjustment
Oscillation
Convenience Features
Heated seat
Temperature
adjustment
Seat sensor
(Seat switch)
Soft closing
Ref.
Page
The toilet seat is heated.
16
The temperature of the warm water and toilet seat can be adjusted.
16
Functions start working when you sit on the toilet seat.
9
Ref.
Page
Initial Settings
Warm water
temperature
Medium
Toilet seat
temperature
Medium
16
The temperature can be adjusted with
these buttons.
Auto
energy-saving
OFF
Timer
energy-saving
OFF
16
The auto energy-saving feature can be set to “ON” or “OFF”.
The timer energy-saving feature can be set to “ON” or “OFF”.
The energy-saving time can be changed.
19
19
Ref.
Page
Timer
energy-saving
Auto
energy-saving
Once set, the toilet seat heater and the warm water heater are turned OFF to
save energy . (The energy-saving time can be set to either 6 hours or 9 hours.)
19
The Washlet memorizes the time period where the toilet is used less frequently
and lowers the toilet seat temperature automatically to save energy.
19
Operation
ON/OFF button
When this button is set in the OFF position, the heated seat operation stops to
enable economical energy-saving.
12
Sanitary Features
Ref.
Page
Removable toilet
lid
The toilet lid can be removed easily.
25
One-touch removal
The Washlet can be removed by one-touch operation to facilitate cleaning.
26
Antibacterial
coating
The parts that come in direct contact with skin, such as the toilet seat, buttons, etc.
are treated with an antibacterial coating.
12
Self-cleaning
The wand end is washed automatically before and after washing.
Thorough wand
cleaning
Wand cleaning
button
Functions
The table shows the factory settings of each function.
The toilet seat and the toilet lid move down gently to close.
Energy-Saving Features
10
Initial Settings
Introduction
Introduction
Introduction to Features
The wand body is washed thoroughly when it extends and retracts.
The wand can extend without spraying water for easier cleaning.
27
11
Introduction
Introduction
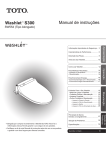
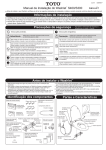
Part Names
Preparing to Use the Washlet for the First Time
[Right side of the main unit]
Toilet lid Antibacterial
Toilet lid cushion
Main Unit
Washlet removing button
1: Check the power plug.
Make sure that the power plug is
inserted into the outlet.
See Page 26.
Water shutoff
valve
Power plug
Seat switch
(Built-in here)
Heated seat Antibacterial
Wand Antibacterial
Check the LED's on the control
panel.
• None of the features can be used unless the “POWER”
LED is lit. (Except during energy-saving)
See Page 27.
button on
• If the “POWER” LED is not lit, press the
the Washlet control panel. (The LED lights up.)
[Lower part of the main unit]
Water supply hose
Washlet Control Panel
Water filter drain
valve
Toilet seat
cushions
See Page 28.
Water drain valve
See Page 31.
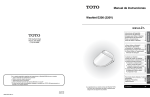
Washlet control panel
Antibacterial
• For sight-impaired persons, tactile symbols (projections) are provided on the
Stop button
See Page 15.
Rear cleansing button
oscillating
( with
)
feature
See Page 15.
Front cleansing button
oscillating
( with
)
feature
See Page 15.
Temperature adjustment LED's
Temperature adjustment buttons
and
.
Wand cleaning ON/OFF
button
See Page 27.
See Page 16.
2: Open the water shutoff valve.
Indication
LED's
Fully open the water
shutoff valve.
Water pressure adjustment button
See Page 15.
Soft cleansing button
(with oscillating feature)
See Page 15.
12
Wand position
adjustment button
See Page 15.
Turn the water shutoff valve in the
direction of arrow.
Energy-saving ON/OFF
indication LED
See Page 19.
Energy-saving ON/OFF
button
See Page 19,20.
Operation ON/OFF button
See Page 13.
Water shutoff
valve
Turn it counterclockwise.
13
Washlet control Panel
Standard Use
You can use various functions.
Stop Button
The seat switch is activated to enable you
to use the functions.
Stops rear washing, soft washing and bidet.
Wash and stop
Choose a function from the Washlet
control panel.
See “About the seat switch” in Page 9.
Rear Cleansing Button
(Oscillationing ON/OFF)
Soft Cleansing Button
(Oscillationing ON/OFF)
Front Cleansing Button
(Oscillationing ON/OFF)
Washes your rear.
Washes your rear with
mild water pressure.
Serves as bidet.
See below for Oscillationing feature.
See below for Oscillationing feature.
Operation
Operation
Sit on the toilet seat.
See below for Oscillationing feature.
Seat Switch
ACTIVATED
Sit back on the toilet seat.
Tip
○ The seat switch may not activate if you do not sit
back.
○ When you sit back on the toilet seat, the best
washing position is ensured and water splashing
is minimized.
◎ Tap water or potable water is used directly for the
Washlet. (Water in the toilet tank is not used.)
◎ Because the internal water heater is a tank-type,
consecutive use before the new water in the tank
can be heated will result in lower water temperature.
Water Pressure adjustment button
Stand up from the toilet seat.
You can adjust the water pressure as
desired to 5 different levels.
* The water pressure adjustment LED's
lights up when you sit on the toilet seat.
Water
pressure
adjustment
LED display
Oscillationing feature
The wand moves back and forth to wash your
rear thoroughly.
Press the button you
want to use.
Weak
1
Strong
2 Press the same button again.
Wand position adjustment button
You can adjust the washing position
as desired to 5 different points.
* The washing position returns to the
standard position (3rd point) when
you stand up from the toilet seat.
Oscillated feature starts.
3 Press the same button one more time.
Oscillated feature stops.
◎ To keep your Washlet clean, drain the water remaining in the wand (for about 30sec.).
◎ Water sometimes comes out from around the wand. This is due to expansion of the water in the warm water tank.
14
15
Convenience Features
The temperature adjustment LED lighting
changes each time the button is pressed.
Adjusting the temperature
Toilet Seat Temperature
Adjustment Button
You can adjust the toilet seat
temperature (3 levels).
You can turn “ON/OFF” the toilet
seat heater.
Warm Water Temperature
Adjustment Button
You can adjust the warm water
temperature (3 levels).
You can turn “ON/OFF” warm water
heater.
Tip
Change of the temperature
adjustment LED lighting
HIGH MEDIUM LOW
OFF
The temperature adjustment LED goes out when
you remove your hand from the button for about
10 sec. If the LED goes out during temperature
adjustment, press the button again and set the
temperature to the desired level.
Operation
Operation
The temperature of warm water, toilet seat and drying air can be adjusted from the temperature
buttons on the Washlet control panel.
Use your Washlet at the desired temperature.
Temperature Adjustment
LED
Press the temperature
adjustment button repeatedly
until the temperature reaches
the desired level.
Setting Complete
To turn the warm water temperature and toilet seat temperature “OFF”
Press the temperature
adjustment button(s) on the
Washlet control panel.
Press either of the
or
set them in the OFF position
Example: Turn “OFF” the
toilet seat heater
buttons to
The temperature adjustment LED
indicates the current temperature level.
Lights up.
Indication LED
The “WATER HEATER” LED and “SEAT HEATER”
LED light up when the warm water temperature
button and the toilet seat temperature button are set
in the “ON” positions.
Press the temperature adjustment button(s) on the Washlet
control panel.
Press any of the
and
change the temperature.
buttons to
Example: Change the
toilet seat temperature
The temperature adjustment LED
indicates the current temperature level.
Tip
16
The temperature adjustment LED is used jointly
to indicate warm water temperature and toilet seat
temperature.
The temperature level of the pressed button is
indicated only when the temperature adjustment
button is pressed.
Press the temperature
adjustment button repeatedly
until the temperature
adjustment LED goes out.
Tip
When the temperature adjustment LED goes out,
the temperature indication LED goes out at the
same time.
Goes out.
Goes out.
Setting Complete
To set the temperature adjustment button in the
or
ON position again, press either of the
buttons to set them in the ON position and
light up the temperature adjustment LED.
Lights up.
Tip
When the temperature adjustment LED lights up,
the temperature indication LED lights up at the
same time.
17
Saving energy automatically
Selectable Energy-Saving
y by setting a timer.
The user can save energ
It is wasteful to consume electric energy in
the night and early morning when members
of the household are asleep.
Users are often away from home at the
same time of the day.
Auto energy-saving
Timer energy-saving
Once set, the toilet seat heater and the warm
water heater will be turned OFF automatically
at the same preset time everyday. The
energy-saving time period can be set to either
6 hours or 9 hours.
Example The toilet is used less frequently
from 21:00 to 6:00.
Example The toilet is not used from 8:00 to
17:00.
Normal Temp
Low
Temp
Normal Temp
See “how to set the energy-saving feature” in Page 19.
OFF
Press the
button.
The LED indication changes each time this
button is pressed.
<Set to the OFF position>
Press the button repeatedly until the auto
energy-saving ON/OFF LED goes out.
LED is lit.
“ON”:
LED lights up.
*While energy-saving
is ON
“OFF”:
LED goes out.
Setting Complete
<Set to the ON position>
Press the button repeatedly until the auto
energy-saving ON/OFF LED lights up.
Setting Complete
The Washlet memorizes the times that the
toilet is used, finds the time period where the
toilet is used less frequently and lowers the
toilet seat temperature (26℃ ) automatically in
that time period to save energy.
Low
Temp
How to save energy automatically
Operation
Operation
ve energy
The Washlet can sa
automatically.*
Auto energy-saving
Normal Temp
See “how to set the energy-saving feature” in Page 19.
↓
Energy is saved automatically by lowering the
toilet seat temperature. The energy-saving
LED lights up when the time period where the
toilet is used less frequently is reached.
○ It takes about 10 days to find the time period when the toilet is used less frequently.
Tip
○ When you sit on the toilet seat (seat switch is “ON”), the energy-saving LED goes out.
Saving energy by designating a time period
Timer energy-saving
How to save energy using the timer
The auto energy-saving mode and the timer energy-saving mode can be used at the same time.
Timer energy-saving + Auto energy-saving
When the timer energy-saving mode is not in operation, the Washlet works in the auto energysaving mode to save energy.
Example The timer energy-saving and the auto energy-saving modes are combined.
Low
Temp
Nor mal
Temp
OFF
Normal Low
Temp Temp
Timer energy-saving
Auto energy-saving
See “how to set the energy-saving feature” in Page 19 and 20.
The Washlet can be used even while energy-saving is set. (The toilet seat will be heated temporarily
while you sit on the toilet seat.)
* It takes about 10 days to find the time periods when the toilet is used less frequently.
18
Example
Energy is saved from 1:00 am to 7:00 am (for 6 hours)
When the time (1:00 am) you want
to start saving energy is reached,
press the
button repeatedly
until the "6" LED lights up.
The LED indication changes each
time this button is pressed.
When the energy-saving time
is set to 6 hours,
→the "6" LED lights up.
When the energy-saving time
is set to 9 hours,
→the "9" LED lights up.
LED is lit.
The LED indication changes each time this
button is pressed.
↓
The energy-saving LED lights up.
Setting Complete
Tip
When you sit on the toilet seat (seat switch is
“ON”), the energy-saving LED goes out.
19
Changing the energy-saving time period
Press the
The energy-saving time can be changed to either 6 hours or 9 hours.
button.
The LED indication changes each time this
button is pressed.
Press the button repeatedly until the LED of
the time you want to set lights up.
9 hours
In auto energy-saving mode
During normal operation
(When the timer is set to 6 hours)
Lights up.
Lights up.(Orange)
Lights up.
Lights up.(Green)
Lights up.(Green)
OFF
(Goes out)
* To change the energy-saving time (6 hours
or 9 hours), set the timer again to the time
you want to start saving energy.
Tip
Timer energy-saving mode
Operation
Operation
6 hours
g energy-saving
LED indication durin
・Toilet seat heater: Low temperature
・Warm water heater: Preset temperature
When changing the time to start saving energy, first stop the timer energy-saving mode then press
the
button again to set the time you want to start saving energy.
Tip
・Toilet seat heater: OFF
・Warm water heater: OFF
・Toilet seat heater: Preset temperature
・Warm water heater: Preset temperature
When you sit on the toilet seat (seat switch is
“ON”), the energy-saving LED goes out.
Disable the timer energy-saving mode
Press the
button until
the “Timer energy-saving”
LED goes out.
Goes out.
Economical energy-saving
● Adjust the temperature to a lower level.
It saves energy to adjust the temperature to a lower level.
● Close the toilet lid.
Energy-saving stops.
When the toilet lid is kept closed, the heat on the surface of the toilet seat does not readily
dissipate and energy is saved.
↓
The “POWER”, “WATER HEATER” and
“SEAT HEATER” LED's on the control panel
light up.
● Set the “POWER ON/OFF” button in the OFF position when the Washlet is not to
be used for a long period of time.
Lights up.
When using the timer energy-saving feature and
the auto energy-saving feature at the same time
Energy is saved when the
button is kept in the OFF position.
See “Washlet control panel” in page 12
When enabling both features, you can enable them in any order.
Set the timer energy-saving mode.
See page 19 for instructions on how to enable the timer energy-saving mode.
Set the auto energy-saving mode.
See page 19 for instructions on how to enable the auto energy-saver mode.
20
21
The components can be removed for thorough cleaning.
Maintenance
Attention!
For safety reasons, unplug the power.
* Except when the “WAND CLEANING” function is being used.
* The timer energy-saving feature is reset when the power is unpluged.
Rest the timer energy-saving features.
(The timer energy-saving LED at which time has been set flickers.)
See Page 19.
Before cleaning your Washlet
Attention!
Toilet lid (Removable)
Cleaning the wrong way may damage your Washlet.
Clean your Washlet using cleaning detergents and tools suitable to the
materials of each part.
Cleaning the main
unit, toilet seat and
toilet lid
Material: Earthenware
Basic cleaning tools
Basic cleaning tools
Neutral kitchen
detergent
Soft cloth
bowl and tank
Maintenance
Maintenance
Materials: Plastic (resin) or rubber
Cleaning the toilet
See Page 25.
Toilet bowl
brush
Toilet bowl cleaner
(without abrasive)
Soft cloth
Water shutoff
valve
Toilet bowl
cleaner
Neutral
detergent
Do not use the following to clean parts made
of plastic (resin) or rubber.
Thinner, benzine, cleanser, nylon scrubber,
dry cloth and toilet paper
Power plug
Main unit
Do not use the following to clean parts made
of ceramic material.
Strong acidic or alkaline detergents,
abrasive cleanser, metal brush and nylon
scrubber impregnated with abrasive soap
Water filter drain valve
shutoff valve
Cleaning the water
See Page 28.
See Page 27
Wand
(Wand extends without
spraying water.)
Material: Metal
Basic cleaning tool
Soft cloth
Do not use the following to clean metal parts.
Scrubber, nylon scrubber, cleanser, scouring
powder, detergent containing coarse particles,
thinner, benzine, chlorine-based detergent
and strong alkaline chemicals
22
23
Cleaning the area between the toilet
seat and toilet lid
Cleaning the Main Unit
Cleaning the main unit, toilet seat and
toilet lid
Unplug the power.
Wipe with a soft, wet cloth that
has had excess water rug from it.
Monthly
The toilet lid can be detached for thorough cleaning.
Daily
Press a thin cloth into the clearance
between the main unit and the toilet
lid. Wipe off dirt.
Main unit
Toilet lid
● Wipe gently while pressing the cloth
with your palm and without scratching
the surface with your nails.
● Use a thin cloth for wiping the clearance
between the Washelt main unit and the
toilet lid.
How to detach the toilet lid
Unplug the power.
Hold the toilet lid as
shown in the figure.
● Tilt the toilet lid slightly toward
you to facilitate detaching.
Hinge
1
2
Recess
2
Maintenance
Maintenance
Insert the power plug.
Pull the left side
outward, remove
the hinge from the
recess and raise
the toilet lid.
Remove the right side.
1
* Careful not to pinch your fingers.
◎ Do not wipe plastic parts with dry cloth or toilet paper. They may be damaged.
Otherwise, the dirt repellant effect of the wand body may decrease.
Attention!
◎ The Washlet is an electric appliance. Use due care not to allow water to penetrate
the unit. Completely wipe off detergent that may remain in the clearance between the
main unit and the toilet bowl.
◎ Do not push or pull the wand cover with undue force.
(Otherwise, breakage may occur.)
For heavy dirt
Clean the main unit, toilet seat and toilet lid.
“Cleaning the main unit, toilet seat and toilet lid” on Page 24.
How to attach the toilet lid
Insert the pin and the hinge on the right side.
Pull the left side outward and insert the hinge in the recess.
● Use neutral kitchen detergent on a soft cloth and wipe gently while pressing the cloth
with your palm.
Pin
● Wipe with a damp cloth.
Hinge
Hinge
Recess
1
2
Insert the power plug.
24
25
Cleaning the clearance between the
main unit and the toilet bowl
Monthly
Cleaning the wand and around the wand
Monthly
The wand extends without spraying water to facilitate cleaning.
The main unit can be removed to enable you to clean the top of the toilet bowl
and the bottom of the main unit.
button on the control
Press the
panel of the main unit.
Unplug the power.
The wand extends.
Remove the main unit.
● The cleansing water comes out from the base of the wand.
● The wand retracts automatically in about 5 min.
Base plate
Pull the main unit toward you while pressing the
main unit removal button on the right side of the
main unit.
* Since the water supply hose and the power cord
are connected to the main unit, do not pull the
main unit excessively.
Pull the main unit
toward you while
pressing the button.
Clean.
Clean.
Washlet removing
button
Clean using the same procedure as in “Cleaning
the Main Unit”
on Page 24.
Press the
Mount the main unit.
1 Align the center of the main
unit with the center of the
base plate.
2 Slide the main unit on the
toilet bowl and push it forward
completely until a click sound
is heard.
Maintenance
Maintenance
Wipe the wand with a damp soft cloth.
* Do not pull, push or press the wand with undue force.
(Otherwise, the wand may be damaged or break.)
button again.
Base plate
The wand retracts and cleans itself
automatically.
Push the Washlet
until a click sound is
heard.
Pull the main
unit slightly
toward you
to make sure
that it will not
detach.
Insert the power plug.
26
27
When you feel water pressure has weakened
Cleaning the water filter drain valve
Semiannually
Close the water shutoff valve to stop the water supply.
After pressing the
button to
extend the wand, press the
button again to retract the wand.
See Page 33.
Water filter drain
valve
(Water drain valve)
(By so doing, pressure in the piping is released.)
Troubleshooting
Freeze Damage Prevention
◎ Do not use the energy-saving feature if there is a risk of the product being exposed
to freezing temperatures.
The product may be broken by internal water freezing.
Attention!
See Page 19,20 to stop the energy-saving feature.
<Lower part of the main unit>
Water filter drain valve
Remove the water filter drain valve.
◎ If the water in the product freezes, parts may break, resulting in water leakage.
Turn it
counterclockwise.
Flat-head
screwdriver
Dustcloth, etc.
CAUTION
Do not remove the water filter drain valve
when the water shutoff valve open.
● Otherwise water may gush out.
Clean.
● Remove foreign particles completely using toothbrush, etc.
● Remove any dust accumulated in the hole of the water filter drain
valve using a cotton-tipped swab, etc.
Drain the water in the toilet
tank.
1 Close the water shutoff
valve and stop water
supply.
2
○ Wash it with water (no detergent).
Tip
Insert the water filter drain valve.
CAUTION
How to drain the water in the toilet tank
Push it in.
Turn it clockwise.
Tighten the water filter drain valve securely.
● If it is not tightened securely, water may leak.
Water filter drain valve
Required
Turn the flush handle of
the toilet tank to the full
flush side to deplenish
the toilet tank.
Tip
Troubleshooting
Maintenance
Loosen the water filter drain valve using a flat-head
screwdriver. Then pull to remove the water filter drain
valve.
Prohibited
◎ Warm the bathroom so that the temperature around the product is not below freezing
or take appropriate measures against freezing temperatures.
Turn it
clockwise.
Water
shutoff
valve
Flush handle of
the toilet tank
Hold the flush handle in the full flush position
until the water in the toilet tank completely
flows out.
Flat-blade screwdriver
Tighten it securely using
a flat-head screwdriver.
Open the water shutoff valve.
28
See Page 13.
29
Procedure for Long Periods of Disuse
Drain the water in the piping.
1
button on
After pressing the
the control panel of the main unit
to extend the wand, press the
button again to retract the
wand.
Water filter drain
valve
(Water drain valve)
<Lower part of the main unit>
Water filter drain valve
How to drain the toilet tank
(By so doing, water remaining in the product be
drained out.)
2
After loosening the water filter
drain valve using a flat-head
screwdriver, remove the water
filter drain valve by pulling.
◎ Water remaining inside the main unit may stagnate and cause skin inflammation
when used. Also, the product may break. Drain the water without fail.
Attention! ◎ When leaving your home unheated in the winter, drain the water to prevent freezing.
Turn it
counterclockwise.
Flat-head
screwdriver
Dustcloth, etc.
Drain the water in the toilet tank.
Drain the water in the piping.
See Page 29.
See Page 30.
CAUTION
Prohibited
When water draining work is
over, press the Water filter drain
valve back into the original
place, and tighten it securely
using a flat-head screwdriver.
Remove the main unit.
Push it in.
Turn it clockwise.
Water filter drain valve
Flat-head screwdriver
CAUTION
Prohibited
Tighten the water filter drain valve securely.
● If it is not tightened securely, water may
leak.
Keep the Washlet warm inside.
Make sure that the "POWER" LED
on the control panel is lit and set
the temperature of the warm water
and the toilet seat to "H".
See Pages 16 and 17 for instructions on how to set the
temperature of the warm water and the toilet seat to "H".
* After completing these steps, keep the toilet
seat and toilet lid closed.
30
Tighten it securely using
a flat-head screwdriver.
Base plate
Pull the main unit toward you while pressing the
main unit removal button on the right side of the
main unit.
* Place the removed main unit on the front top side
of the toilet bowl.
Troubleshooting
Troubleshooting
3
Pull out the power plug.
Do not remove the water filter drain valve
when the water shutoff valve is open.
● Otherwise, water may gush out.
Pull the main unit
toward you while
pressing the button.
WARNING
Be sure to unplug the power when removing
the main unit.
Required ● Otherwise, fire or electric shock may be
caused.
Main unit removal
button
Remove the water drain valve
and drain the water in the main
unit.
Water comes out from the side of the wand. Drain
it into the toilet bowl. It takes about 2 min. to drain
the water completely.
(Water filter drain valve)
Water Drain valve
<Lower part of the main unit>
Water drain valve
Turn it
counterclockwise.
Flat-head
screwdriver
Dustcloth, etc.
Loosen it by flat-head screwdriver.
31
Mount the water drain valve.
Troubleshooting
Water drain valve
Turn it clockwise.
CAUTION
Push it in.
Flat-head screwdriver
Tighten it securely using
a flat-head screwdriver.
Base plate
Mount the main unit.
1 Align the center of the main
unit with the center of the base
plate.
2 Slide the main unit on the
toilet bowl and push the main
unit to the rear until a click
sound is heard.
Required
Turn it
clockwise.
If water leakage occurs, close
the water shutoff valve to stop
water supply.
Water
shutoff
valve
Push the Washlet
until a click sound is
heard.
Pull the main
unit slightly
toward you
to make sure
that it will not
detach.
Check the operation LED on the control panel.
* If the operation LED is not lit, none of the functions can be used.
◎ Is the operation LED lit?
<If the operation LED is not lit>
● Are
[ Washlet control panel ]
all of the LED's on the control panel out?
button on the control panel.
→If they are not lit, press the
the energy-saving LED lit?
→If it is lit, the energy-saving feature is activated.
● Is
Troubleshooting
Troubleshooting
Flush the water accumulated in the toilet bowl.
Check the following points before seeking repairs.
See Page 21.
● Are
all of the LED's out?
→If that is the case, check if the operation LED lights up by the
following procedure.
How to restore the water supply
Is there a power failure or is the circuit breaker in the OFF position? Wait until the power comes back
or flip the circuit breaker back on.
Open the water shutoff valve.
After the above-mentioned troubleshooting, go to “Check the following” on the next page.
* Make sure that water does not leak from the
piping and the main unit.
Insert the power plug.
Water
shutoff
valve
Turn it
counterclockwise.
Spray water from the wand.
Press the
button on the control panel while pressing
the right side of the toilet seat by hand, and spout water
from the wand for 2 min.
(It takes about 1 min. until the water is completely sprayed
out. Collect the sprayed water in a paper cup, etc.)
32
33
The toilet seat is cold.
Check the following
Trouble
The rear cleansing,soft cleansing and front cleansing do not work.
Trouble
Check & Result
Does the wand extend
when the
The rear
cleansing,
soft cleansing
and front
cleansing
do not work
even when
their buttons
are pressed.
and
,
buttons are
pressed?
If the wand extends
but the washing
water does not
come out (or the
water pressure is
very weak.)
It is possible that no
water is supplied to
the Washlet?
If the wand does not
extend
It is possible that the seat
sensor continued detection
for a long time and the
safety device triggered?
It is possible that the seat sensor cannot detect
the user?
Is a toilet seat cover or
toilet lid cover being
used?
If a toilet seat cover or
toilet lid cover is used,
the seat sensor may
keep detecting the
cover/lid for a long time
and the seat heater and
rear washing functions
may become
inoperable.
Has a water failure occurred? Press the
Have you been seated
for a long time?
Ref.
Page
Remedy
Check & Result
button
and wait for restoration from the water failure.
Is the water shutoff valve closed? Open the water
shutoff valve by turning it counterclockwise.
13
Is the water supply filter clogged with foreign
matter? Clean the water supply filter.
28
As a safety precaution, the rear washing, soft
rear washing and front cleansing functions
becomes inoperable if you stay seated
continuously for longer than 2 hours. Stand up
off the toilet seat and use it again.
The seat sensor can have difficulty detecting the
user depending on sitting posture. Sit back on the
toilet seat.
Did you put anything on
the toilet seat or the
toilet lid?
The toilet
seat will not
warm up.
(It is cold.)
Is the seat switch having difficulty detecting the
user?
Is a toilet seat cover or
toilet lid cover being
used?
9
Trouble
Check & Result
The auto
energy-saving
feature is
inoperable.
Remedy
No Washlet features will
work if the product is not
plugged in.
Turn ON the timer energy-saving feature again.
(When the power is turned OFF, the “Timer
Energy-saving” LED flickers to indicate that the
power- is OFF.)
When the “Auto Energy-saving” button is set to “ON”, the
Washlet learns the status of use for several days and determines
See “Selectable Energy Saving.”
the energy-saving time period. Therefore, the energy-saving
feature may not have had enough time to determine the
energy-saving time period depending of the frequency of use.
Ref.
Page
18
21
The seat switch may have difficulty detecting the
user depending on the sitting posture. Sit back on
the toilet seat.
9
Remove the cover.
Lit
Adjust the temperature by pressing the
Ref.
Page
16
button on the control panel.
17
When you sit on the toilet seat, the heater is
turned ON temporarily. Wait about 10 min.
18
Lit
The warm water heater
is turned OFF to save
energy.
Is the cleansing water cold only in the beginning?
When the temperature of the supply water and
the bathroom is low, the warm water temperature
may also be low when first sprayed.
Water pressure for rear cleansing, soft cleansing and front cleansing is low.
Check & Result
Remedy
Is the toilet seat temperature set to “OFF” or a low
level?
Is the energy- saving
ON/OFF LED on the
control panel lit?
The toilet seat heater
is turned OFF to save
energy.
Lit
Ref.
Page
Adjust the temperature by pressing the
16
button on the control panel.
17
When you sit on the toilet seat, the heater is
turned ON temporarily and the toilet seat will
reach the desired temperate in about 15 minutes.
19
Trouble
Check & Result
Is the water pressure set to weak?
Lit
Lit
The toilet
seat will not
warm up.
(It is cold.)
Water for
rear
cleansing,
Is the energy- saving
soft cleansing ON/OFF LED on the
and front
control panel lit?
cleansing is
cold.
18
The toilet seat is cold.
Trouble
Remove the object from the toilet seat or the
toilet lid.
Remedy
Is the warm water temperature set to “OFF” or a
lower level?
~
The timer
energy-saving
and the auto Is the power unpluged?
energy-saving
features are
inoperable.
Stand up once from the toilet seat and use it
again.
Troubleshooting
Troubleshooting
Check & Result
If a toilet seat cover or
toilet lid cover is used,
the seat switch may
remain activated for a
long time. The seat
heater and rear
cleansing functions may
become inoperable.
Ref.
Page
The cleansing water is cold.
Remove the cover.
Energy-saver features are not functioning.
Trouble
Remedy
If the seat sensor
continuously detects
something for longer than
20 min., the seat
temperature lowers and,
if it detects that
something is continuously
pressing on the seat for
longer than 1 hour, the
safety device triggers and
turns “OFF” the seat heater.
Washing
water
pressure is
weak.
Remedy
Adjust the water pressure from the
buttons on the control panel.
15
Is the supply water filter clogged?
Clean the supply water filter.
28
Is the water shutoff valve closed?
Open the water shutoff valve by turning it
counterclockwise.
13
Is the water drain valve loosened?
Tighten the water drain valve securely.
Lit
When you sit on the toilet seat, it will warm up
temporarily.
Ref.
Page
31
32
19
The toilet seat
temperature is lowered
to save energy.
34
35
The rear cleansing, soft cleansing and front cleansing start or stop unexpectedly.
Trouble
The rear
cleansing,
soft cleansing
and front
cleansing stop
unexpectedly
in the middle
of use.
Water comes
out
unexpectedly
from the wand.
Check & Result
Did you use these
functions continuously?
The rear cleansing, soft
cleansing, and front
cleansing functions stop
automatically if these
functions are used
continuously for longer
than about 5 min.
Does the seat switch have difficulty detecting the
user?
Remedy
Ref.
Page
Specifications
Item
Rated power supply
Press the buttons again to use the functions.
A sound is
heard when
you sit on the
toilet seat.
Troubleshooting
Toilet seat and
toilet lid closing
speed differs
between the
winter season
and the summer
season.
Type
The seat switch temporarily stops detection if
you raise yourself slightly from the toilet seat or
do not sit back on it. Sit back on the toilet seat
to use it.
Annual power consumption *
9
Power cord length
About 9.8 - 20.3 oz/min (About 0.29 - 0.60L/min) (at 0.2MPa water pressure)
Soft cleansing
About 9.8 - 18.6 oz/min (About 0.29 - 0.55L/min) (at 0.2MPa water pressure)
Front cleansing
About 9.1 - 18.6 oz/min (About 0.27 - 0.55L/min) (at 0.2MPa water pressure)
Water sometimes comes out around the wand.
This is due to expansion of the water in the warm
water tank.
14
Warm water temperature
Heating capacity
Toilet tank capacity
Remedy
This sound is the seat switch activating.
Ref.
Page
Safety devices
9
Backflow prevention device
Surface temperature
Heated
seat
The closing speed varies depending on the
variation in room temperature and the frequency
of use.
Heater capacity
Safety device
Water supply pressure
Tighten the bolts on the base plate securely.
There is clearance between the toilet seat
cushion and the toilet bowl for activating the seat
sensor. When you sit on the toilet seat, the toilet
seat subsides slightly to activate the seat sensor.
9
Temperature adjustable range: OFF, About 95 - 104°F (About 35 - 40°C)
248 W (instantaneous)
0.2 gallon (0.78L)
Temperature fuse, overtemperature thermostat (auto-rest type bimetal),
boil-dry safety float switch
Vacuum breaker, check valve
Temperature adjustable range: OFF,
about 82 - 95°F (About 28 - 35°C)(with Auto Energy Saver: About 79°F (About 26°C))
50W
Temperature fuse
7psi - 110psi (0.05Mpa - 0.75Mpa)
Supply water temperature
32 - 95°F (0 - 35°C)
Working ambient temperature
32 - 104°F (0 - 40°C)
Product dimensions
Product weight
Retighten any loose fittings using a crescent
wrench.
Water leaks
from the
pipe
connections.
Rear cleansing
Water
flow
rate
Check & Result
About 170 kWh/year (About 240kWh/year)
3.9 ft (1.2m)
14
Washlet
313W
Warm water accumulation type
When you stand up off of the toilet seat, water
remaining in the wand is drained out (for about 30
sec.) to keep the wand clean for use every time.
Are the bolts of the base plate anchoring the main
unit loose?
The Washlet
is unstable.
120VAC, 60Hz
Rated power consumption
Other problems
Trouble
TCF6401U
18.9″ x 20.6″ x 6.8″ (W 480mm, D 522mm, H 173mm)
10.6 lbs (4.8kg)
* These values were measured according to the Law concerning the Rational Use of Energy (2012 standard) in Japan.
The value in ( ) shows the annual power consumption without the energy-saving features enabled.
The water supply hose connections are an
exception and should only be tightened by
hand, not with tools.
Are the connections loose?
Water supply hose
connection
Water supply hose
* If the water leak does not stop, shut OFF the
water shutoff valve and seek repair.
36
37
MEM O
Limited Warranty
1. TOTO warrants its S400, S300, E200, C110 and B100 series washlets ("Washlet") to be free from defects in materials and
workmanship during normal use when properly installed and serviced, for a period of one (1) year from date of purchase. This
limited warranty is extended only to the ORIGINAL PURCHASER of the Washlet and is not transferable to any third party,
including but not limited to any subsequent purchaser or owner of the Washlet. This warranty applies only to TOTO Washlet
is purchased and installed in North, Central and South America.
2. TOTO's obligations under this warranty are limited to repair, replacement or other appropriate adjustment, at TOTO's option,
of the Washlet or parts found to be defective in normal use, provided that such Washlet was properly installed, used and
serviced in accordance with instructions.
TOTO reserves the right to make such inspections as may be necessary in order to determine the cause of the defect. TOTO
will not charge for labor or parts in connection with warranty repairs or replacements. TOTO is not responsible for the cost of
removal, return and/or reinstallation of the Washlet.
3.This warranty does not apply to the following items:
a) Damage or loss sustained in a natural calamity such as fire, earthquake, flood, thunder, electrical storm, etc.
b) Damage or loss resulting from any accident, unreasonable use, misuse, abuse, negligence, or improper care, cleaning, or
maintenance of the Washlet.
c) Damage or loss resulting from sediments or foreign matter contained in a water system.
d) Damage or loss resulting from improper installation or from installation of the Washlet in a harsh and/or hazardous
environment, or improper removal, repair or modification of the Washlet. This includes locations where the water pressure
is above local codes or standards. (NOTE : Washlet model codes allow a maximum of 80 PSI. Check local codes or
standards for requirements).
e) Damage or loss resulting from electrical surges or lightning strikes or other acts which are not the fault of TOTO or which
the Washlet is not specified to tolerate.
f) Damage or loss resulting from normal and customary wear and tear, such as gloss reduction, scratching or fading over
time due to use, cleaning practices or water or atmospheric conditions.
4. If the Danger Label which has been placed over the seams on the back of the Product s top unit is broken or otherwise not
intact, this limited warranty is void.
5. In order for this limited warranty to be valid, proof of purchase is required. TOTO encourages warranty registration upon
purchase to create a record of Product ownership at http://www.totousa.com. Product registration is completely voluntary and
failure to register will not diminish your limited warranty rights.
6. If the Product is used commercially or is installed outside of North, Central or South America, TOTO warrants the Product to
be free from defects in materials and workmanship during normal use for one (1) year from the date of installation of the
Product, and all other terms of this warranty shall be applicable except the duration of the warranty.
7. THIS WARRANTY GIVES YOU SPECIFIC LEGAL RIGHTS. YOU MAY HAVE OTHER RIGHTS WHICH VARY FROM
STATE TO STATE, PROVINCE TO PROVINCE OR COUNTRY TO COUNTRY.
8. To obtain warranty repair service under this warranty, you must take the Product or deliver it prepaid to a TOTO service
facility together with proof of purchase (original sales receipt) and a letter stating the problem, or contact a TOTO distributor
or products service contractor, or write directly to TOTO U.S.A., INC., 1155 Southern Road, Morrow, GA 30260 (888) 295
8134 or (678) 466-1300, if outside the U.S.A. If, because of the size of the Product or nature of the defect, the Product cannot
be returned to TOTO, receipt by TOTO of written notice of the defect together with proof of purchase (original sales receipt)
shall constitute delivery. In such case, TOTO may choose to repair the Product at the purchase'r s location or pay to
transport the Product to a service facility.
WARNING! TOTO shall not be responsible or liable for any failure of, or damage to, this Product caused by either
chloramines in the treatment of public water supply or cleaners containing chlorine (calcium hypochlorite).
NOTE: The use of a high concentrate chlorine or chlorine related product's can seriously damage the fittings. This damage
can cause leakage and serious property damage.
THIS WRITTEN WARRANTY IS THE ONLY WARRANTY MADE BY TOTO. REPAIR, REPLACEMENT OR OTHER
APPROPRIATE ADJUSTMENT AS PROVIDED UNDER THIS WARRANTY SHALL BE THE EXCLUSIVE REMEDY
AVAILABLE TO THE ORIGINAL PURCHASER. TOTO SHALL NOT BE RESPONSIBLE FOR LOSS OF THE PRODUCT OR
FOR OTHER INCIDENTAL, SPECIAL OR CONSEQUENTIAL DAMAGES OR EXPENSES INCURRED BY THE ORIGINAL
PURCHASER, OR FOR LABOR OR OTHER COSTS DUE TO INSTALLATION OR REMOVAL, OR COSTS OF REPAIRS
BY OTHERS, OR FOR ANY OTHER EXPENSE NOT SPECIFICALLY STATED ABOVE. IN NO EVENT WILL TOTO'S
RESPONSIBILITY EXCEED THE PURCHASE PRICE OF THE PRODUCT. EXCEPT TO THE EXTENT PROHIBITED BY
APPLICABLE LAW, ANY IMPLIED WARRANTIES, INCLUDING THAT OF MERCHANTABILITY OR FITNESS FOR USE OR
FOR A PARTICULAR PURPOSE, ARE EXPRESSLY DISCLAIMED. SOME STATES DO NOT ALLOW LIMITATIONS ON
HOW LONG AN IMPLIED WARRANTY LASTS, OR THE EXCLUSION OR LIMITATION OF INCIDENTAL OR
CONSEQUENTIAL DAMAGES, SO THE ABOVE LIMITATION AND EXCLUSION MAY NOT APPLY TO YOU.
38
39