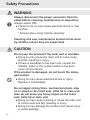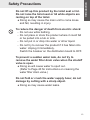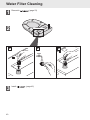
1
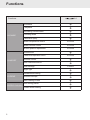
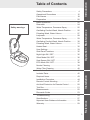
USER GUIDE
Electronic Bidet Seat
NATURAL SIMPLICITY
Designed by Daniel Debiasi and Federico Sandri
Functions
Functions
L4
Rearwash
Ladywash
Oscillating comfort wash
CLEANSE
Pulsating wash
Panorama spray
Water temperature control
3 Levels
Water volume control
3 Levels
Nozzle position adjustment
3 Levels
Heated seat
Heated seat temperature control
COMFORT
3 Levels
Remote control
Soft close seat and lid
User settings
Night light
Antibacterial coating
HYGIENE
Rimless concept
Self-cleaning nozzle
ENERGY SAVING
2
Auto energy saver
Instant water heating
3 Users
Introduction
Table of Contents
Safety Precautions .................................................. 4
Operational Precautions ....................................... 15
Part Names .........................................................
18
Preparation ........................................................... 20
Basic Operations ................................................. 22
Rearwash .............................................................. 24
Water Temperature, Panorama Spray ................... 25
Operation / Maintenance
Oscillating Comfort Wash, Nozzle Position.................
26
Pulsating Wash, Water Volume ............................. 27
Ladywash ............................................................... 28
Water Temperature, Panorama Spray ................... 29
Oscillating Comfort Wash, Nozzle Position.............. 30
Pulsating Wash, Water Volume................................31
Heated Seat .......................................................... 32
User Settings ...........................................................33
Side Panel Functions ...............................................35
Night Light ON / OFF .............................................. 35
Silent Mode ON / OFF ........................................... 36
Seat Sensor ON / OFF ........................................... 37
ECO Mode ON / OFF.............................................. 38
Nozzle Cleaning ...................................................... 39
Water Filter Cleaning ................................................40
Installation Guide.................................................... 41
Installation
Included Parts......................................................... 42
Required Items........................................................ 43
Installation Procedure............................................. 44
Remote Control Mounting....................................... 47
Anti-theft Protection for Remote Control ..................50
Trial Run...................................................................51
Measurements........................................................ 52
Dismantle Guide...................................................... 53
Troubleshooting...................................................... 54
Specifications......................................................... 57
Important User Guidance Information................... 58
Reference
Safety warnings
Warranty.................................................................. 59
3
Safety Precautions
These precautions are important for safe usage. Be sure to
follow them and use the product correctly.
Symbols and Meanings
WARNING
May result in death or serious injury.
CAUTION
May result in injury or property damage.
The following symbols are used to indicate important safety
instructions for the use of the product.
This symbol indicates a prohibited use of the product.
This symbol is used to indicate a required step in the
use of this product.
●
●
●
●
4
This product is classified as class 1 equipment and must be grounded.
This appliance is not intended for use by persons (including children) with reduced physical, sensory or mental capabilities, or lack of experience and knowledge, unless they have been given supervision or instruction concerning use of the appliance by a person responsible for their safety. Children should be supervised to
ensure that they do not play with the appliance.
This product should only be installed using the
authorized installation kit provided. Please refer to the connection manuals in order to find out more about the water and electric connections.
The pressure of the water used to supply this appliance should be within the range of 0.1 to 0.68 MPa.
Introduction
Safety Precautions
● The resistivity of the water supply must not be less
than 0.1 Ωcm.
Never sit on the lid of this appliance.
WARNING
Do not touch the power connector with wet hands.
● Doing so may cause electrical shock.
Do not get any water or cleaning solution on the
main unit or power plug or electrical box.
● Doing so may cause fire, electrical shock, heat or short circuit.
● Doing so may cause the product to crack resulting in injury or water damage.
Never disassemble, repair or alter.
● Doing so may cause fire, electrical shock, heat, short circuit or permanent damage.
Do not install the product on moving vehicles such
as wheeled vehicles or boats.
● Doing so may cause fire, electric shock, short
circuit or malfunction.
● The toilet seat, toilet lid, main unit or other parts may come loose and fall off, resulting in injury.
CHILDRENS SAFETY
This appliance can be used by children aged from 8 years
and above and persons with reduced physical, sensory or
mental capabilities or lack of experience and knowledge if
they are supervised or have been instructed in how to use
the appliance in a safe way and understand the hazards
involved. Children should not be allowed to play with the
appliance. Cleaning and user maintenance should not be
done by children unless they are supervised.
5
Safety Precautions
WARNING
Do not use
if a malfunction occurs.
● Always unplug the power connector.
Always switch the breaker on the distribution board to OFF.
● Close the water shutoff valve to stop water supply.
Possible malfunctions:
- Water is leaking from a pipe or the main unit.
- The product is cracked or broken.
- The product makes a strange noise or emits a strange odor.
- The product emits smoke.
- The product is abnormally hot.
- The toilet seat cushion is out of place.
● Continued use after malfunction could cause a fire, electric shock, heat, short circuit, injury or water
damage.
Only use tap water or potable well water (underground water).
Do not use seawater, industrial water or rainwater
for the water supply.
● Doing so may cause irritation to the skin and
malfunction.
Do not touch the power connector during thunderstorms.
● Doing so may cause electrical shock.
Do not allow the water supply hose to touch the
power connector.
● Doing so may cause condensation resulting in a fire, electrical shock, heat or a short.
6
Do not do anything that may damage the power
cord, power connector.
Do not strike, yank, twist, excessively bend, damage,
alter, or heat the electrical cords. Also, do not place
anything heavy on, bind or pinch the electrical cords.
● Using a damaged electrical cord may result in a fire, electrical shock, heat or short.
● The appliance must be permanently connected to fixed wiring.
Do not use a loose or faulty electrical connection.
● Doing so may cause fire or short circuit.
Do no use any outlet or wiring equipment beyond
its specified rating.
● Plugging too many plugs into the same outlet, for
example using outlet splitters, can cause fire due to heat.
Do not use any power supply other than the one
specified.
AC 220V - 240V, 50Hz
● Doing so may cause fire or excessive heat.
CAUTION
In order to avoid a hazard due to inadvertent resetting
of the thermal cut-out, this appliance must not be powered by an external switching device, such as a timer, or
connected to a circuit that is regularly switched on and
off by the utility.
Make sure not to splash water, detergents, or urine
to the power supply.
● Doing so may cause an electrical shock.
7
Introduction
Safety Precautions
Safety Precautions
WARNING
To reduce the danger of burns, death from electric
shock, fire or other human injury:
- Never operate this product if it has a damaged cord or plug, if it is not working properly, if it has been dropped or damaged, or if it has been dropped in water. Return the product to Villeroy & Boch AG
(Europe) or Villeroy & Boch Trading Shanghai
Co., Ltd. (Asia) for examination and repair.
- Never block the air openings of the product or place it on a soft surface, such as a bed or a couch, where the air openings could be blocked. Keep the air openings free of lint, hair or a similar material.
- Never use it while sleepy or drowsy.
- Never drop or insert anything into any opening or hose.
- Do not use it outdoors where aerosol (spray)
products are being used or where oxygen is being administered.
Do not bend or distort the nozzle.
● Doing so may cause product damage and perfor- mance reduction.
Keep cigarettes and other open flames away from
the product. Do not place a heater near the product.
● Failure to do so may cause fire.
8
Beware of irritation or burn
●Improper use of the toilet seat may cause irritation or burn.
When sitting for a long time on the toilet seat, switch the toilet seat temperature adjustment to „OFF“.
When any of the following persons use a heated seat or warm air drying, someone should switch the toilet seat temperature adjustment to „OFF“.
- Young children, the aged and other users unable to set the temperature appropriately themselves
- The ill, physically disabled and others who do not have freedom of movement.
- Those using any medicines that cause drowsiness (sleeping or cold medicine), those who have been drinking heavily, anyone severely fatigued and
anyone else liable to fall asleep.
To reduce the danger of burns, death from electric
shock, fire or other human injury:
- Close supervision is necessary when this product is used by or near children or handicapped.
- Use this product only for its intended use as descri-
bed in this manual. Do not use accessories not
recommended by the manufacturer.
- Keep the cord away from heated surfaces.
- Connect this product to a properly grounded outlet only.
- The tank should only be filled with water.
9
Introduction
Safety Precautions
Safety Precautions
WARNING
This is an electrical product. Do not install it anywhere where water is likely to get on the product or
anywhere with humidity high enough that water is
likely to form on the surface of this product. When
using the product in a bathroom, install a fan or
ventilation port and ensure good air flow through
the bathroom.
●Failure to do so may cause fire or electrical shock.
Always connect
to the cold water supply.
●Connecting to hot water supply may result in burns and equipment damage.
Electrical power supply should be built by qualified
electrical personnel.
Check that an appropriate ground is installed.
●If the ground is not installed, if there is a breakdown or electrical current leak, the lack of a ground could cause electrical shock.
For the ground, use copper wire with a ground resis-
tance of 100 Ω max. and a diameter of 1.6 mm min.
* If there is no ground installed, ask the contractor who did the installation to install the ground.
Make sure that a properly grounded (3 prong) outlet
has been installed.
●Failure to install a grounded outlet could cause elec-
trical shock in the event of a malfunction or short circuit.
10
Check that the outlet for electrical power is as follows.
●Failure to do so may cause fire or electrical shock.
a. Apply a current to the outlet (or device) through a differential residual current device (DDR) whose re lease current does not exceed 30 mA.
b. Install the outlet (or device) and its wiring plug at least 0.60 m away from the outside of the shower tub or bathtub.
* Check that the wiring in a. and b. above is
complete. If the wiring has not been completed, ask the contractor who did the installation to do it.
Insert the power connector securely.
Check that the power cord is connected.
●Failure to do so may cause fire, heat or short circuit.
* When installing this product, observe the local laws and regulations regarding installation.
To unplug, hold the connector, not the cord.
Do not unplug by pulling the cord.
●Pulling on the cord may cause damage and result in fire or heat.
Do not use wet hands to insert or deinsert power
connectors.
●Doing so may cause a fire or an electrical shock.
If the electric cord is damaged, avoid danger by
having the manufacturer’s repair department or
equivalent specialist replace it.
11
Introduction
Safety Precautions
Safety Precautions
WARNING
Always disconnect the power connector from the
outlet before cleaning, maintenance or inspection.
Always switch OFF.
●Failure to do so may cause electrical shock or mal-
function.
* Except when using „Nozzle cleaning“
Cleaning and user maintenance should not be done
by children unless they are supervised.
CAUTION
Do not use the product if the main unit is unstable.
●Doing so may cause the main unit to come loose and fall, resulting in injury.
●If there is backflash in the main unit, consult the
installer, seller or the contact listed on the back
cover of this manual.
If the product is damaged, do not touch the damaged section.
●Doing so may cause electrical shock or injury.
Replace it immediately.
Do not apply strong force, mechanical shock, step
on or stand on the toilet seat, toilet lid or main unit.
Also do not place any heavy object on the toilet
seat, toilet lid or main unit.
●Doing so may cause cracking or cause the main unit to come loose and fall, resulting in injury.
●Doing so may damage the product and cause injury or water damage.
12
Do not lift up this product by the toilet seat or lid.
Do not raise the toilet seat or lid while objects are
resting on top of the toilet.
●Doing so may cause the main unit to come loose and fall, resulting in injury.
To reduce the danger of death from electric shock:
- Do not use while bathing.
- Do not place or store the product where it could fall or be pulled into a tub or sink.
- Do not put in or drop into water or other liquid.
- Do not try to recover the product if it has fallen into water. Unplug it immediately.
Switch the breaker on the distribution board to OFF. To prevent a sudden water leak, do not try to
remove the water filter drain valve when the shutoff
valve is open.
●Doing so will cause water to spurt out.
(Refer to Page 40 for instructions on cleaning the
water filter drain valve.)
Do not fold or crush the water supply hose; do not
damage by cutting with a sharp object.
●Doing so may cause water leaks.
13
Introduction
Safety Precautions
Safety Precautions
CAUTION
If a water leak should occur, always close the shutoff valve.
When the ambient temperature is likely to drop to
0°C or lower, prevent damage to the pipes and hoses due to freezing.
●Frozen water pipes could cause the main unit and the pipes to break, resulting in a water leak.
●Regulate the room temperature to prevent the pipes and hoses from freezing during cold months.
●Drain the water.
When installing the water filter drain valve, make
sure that it is securely tightened in its proper position.
●Failure to securely tighten it may cause water leaks.
14
Introduction
Operational Precautions
For prevention of damage
● Wipe plastic areas such as the main unit and remote
control with a soft, wet cloth or tissue.
● Do not lean against the toilet lid.
Problem Prevention
● Disconnect the power connection if there is a risk of lightning.
Switch the breaker on the distribution board to OFF.
● A toilet seat cover or a toilet lid cover can not be used. (The body sensors may not function properly.)
Do not place any
covers here.
● Do not urinate on the main unit, toilet seat or nozzle.
(Doing so may cause pink or brown stains or a malfunction.)
● Do not apply strong forces to the control panel of the remote control.
● When using a toilet cleaner to clean the toilet, wash it off within 3 minutes and leave the toilet seat and toilet lid open.
Wipe off any cleaner that remains on the toilet bowl.
(If vapor from a toilet bowl cleaner enters the main unit, it may cause a malfunction.)
● Do not expose to direct sunlight. (Doing so may cause changes in color, irregular heated seat temperature,
malfunction due to remote control malfunction or
the change in temperature.)
● Use radios, etc. away from
could cause interference with the radio signal.)
(
● If you use a booster seat for infants or a soft high chair,
remove it after use. (Keeping it installed may prevent some of the functions from being used.)
● Do not apply force to the remote control. (May cause
malfunction.) To prevent the remote control from being dropped, set it in the hanger when you are not using it. Be careful not to expose it to water.
15
Operational Precautions
About rearwash, rear soft cleanse and ladywash
● These functions wash away waste and dirt from a localized area of your body.
● Do not cleanse too much or for too long.
Doing so may wash away normal bacteria, upsetting the
balance of bacteria inside your body.
● People who are receiving medical treatment or therapy in this localized area should consult their doctor before use.
About the seat sensor
Body sensor detects changes in heat.
● When you sit on the toilet seat, the seat sensor enables you to use various features.
Sensor
ON
Sit back on the toilet seat.
● The seat sensor will not switch
unless you sit on the seat properly.
to feature mode NOTE
● When a child uses
, the seat sensor may not be activated by their light body weight.
16
SAFETY OF THE DISABLED
● This appliance is not intended for use by persons including children with reduced physical, sensory or mental
capabilities, or lack of experience and knowledge, unless
they have been given supervision or instruction concerning use of the appliance by a person responsible for their
safety.
CHILDREN UNDER 8
● This appliance can be used by children aged from 8 years and above.
REPLACEMENT OF POWER CORD
● If the supply cord is damaged, it must be replaced by the manufacturer, its service agent or similarly qualified
persons in order to avoid a hazard.
REPLACEMENT OF WATER HOSE
● The new hose-sets supplied with the appliance are to be used and that old hose-sets should not be reused.
17
Introduction
Safety Rules
Part Names
Toilet lid
Safety warnings
Nozzle cover
Nozzle
Heated seat
Seat sensor
(Built-in)
Control panel
Remote control
receiver
Power LED
18
STOP
Ladywash
Rearwash
Introduction
Toilet lid cushion
Toilet seat cushions
Remote control
receiver
Model name,
serial number,
technical data
Water inlet
Power cord
Water filter
Button to remove
19
Preparation
(Using the product for the first time)
1
1. Insert the coin batteries
1. Remove the remote control
from the hanger.
Remote control
Hanger
2. Open the battery cover and insert four CR 2032 3V coin batteries
A
B
4x
CR 2032 3V
C
3. Mount the remote control in
the hanger.
20
About the coin batteries
● Use dry cell, alkaline coin batteries. Follow the instructions below to prevent the coin
batteries from rupturing or leaking fluid.
● When replacing the coin batteries, use new coin batteries of the same brand.
● If you will not be using the remote control for a long time, remove the coin batteries.
● Do not use rechargeable coin batteries.
Introduction
2 Turn on the power
Press power button on the remote control.
●Beep sound ●The Power LED goes ON
●
works according to setting condition
PRESS
Power Button
When
is on and you press the
power button,
will then shut itself
down and all its functions will be unavailable
to the user until the power button is pressed
again.
Power LED
21
Basic Operations
(Remote control key overview)
L4
Press a button on the remote
control; a beep sounds when the
main unit receives the signal
Functions
Stop
Ladywash
On,Off
Rearwash
Heated seat
Features
Controlling of seat temperature /
air dryer temperature / water volume
22
Water
temperature
Seat
temperature
Panorama
spray
Oscillating
comfort wash
Pulsating
wash
Nozzle
position
Water
volume
User settings
On,Off
Stop
Ladywash
Rearwash
Operation
Oscillating comfort wash
Pulsating wash
Panorama spray
Water temperature
Water volume
Nozzle position
Heated seat
Seat temperature control
User settings
23
Rearwash
PRESS
Pressing the „Rearwash“ button activates the
rear wash.
●The nozzle comes out of
sprays water on the user‘s rear.
and Also, by activating this function, other features related to the
function can be activated. The corresponding buttons can be
found on the lower part of the remote.
During operation, all related functions remain available to
the user.
After some time without any activity, the LEDs go off.
The nozzle washes itself before and after the Rearwash
has been performed.
The following features are ready to be used:
As long as the „Rearwash“
function is running, the user
should be able to change
setting after setting by
pressing the corresponding
buttons.
e.g. After you change the „Nozzle position“,
you can adjust the
„Water volume“.
24
Water
temperature
(Page 25)
Panorama
spray
(Page 25)
Oscillating
comfort wash
(Page 26)
Nozzle
position
(Page 26)
Water
volume
(Page 27)
Pulsating
wash
(Page 27)
Water Temperature
cold
mildly warm
PRESS
increase
decrease
temperature
temperature
The LEDs show on
which level the temperature is set.
Operation
warm
very warm
Press – or + as many times
as necessary to achieve the
desired temperature.
Panorama Spray
straight beam
wide beam
PRESS
decrease
beam angle
The LEDs show on
which angle the beam
is set.
increase
beam angle
very wide beam
Press – or + as many times
as necessary to achieve the
desired beam angle.
25
Rearwash
Oscillating Comfort Wash
PRESS
PRESS
Oscillating
function is on.
Press again to turn
off.
Nozzle Position
nozzle at the back
nozzle in the middle
nozzle at the front
PRESS
move nozzle
backwards
The LEDs show on
which position the
nozzle is set.
26
move nozzle
forwards
Press – or + as many times
as necessary to achieve the
desired nozzle position.
Pulsating Wash
PRESS
Pulsating
massage is on.
Operation
PRESS
Press again to turn
off.
The spray intensity varies for a
pleasant washing experience.
Water Volume
low volume
medium volume
high volume
PRESS
decrease
increase
water volume water volume
The LEDs show on
which volume level
the beam is set.
Press – or + as many times
as necessary to achieve the
desired volume.
STOP Rearwash
PRESS
In order to stop the Rearwash, just press the „STOP“ button.
This works at any moment when the „Rear Wash“ function is running.
27
Ladywash
PRESS
Pressing the „Ladywash“ button activates the
lady wash.
●The nozzle comes out of
and sprays water on the female‘s front intimate zone.
Also, by activating this function, other features related to the
function can be activated. The corresponding buttons can be
found on the lower part of the remote.
During operation, all related functions remain available to
the user.
After some time without any activity, the LEDs go off.
The nozzle washes itself before and after the Ladywash
has been performed.
The following features are ready to be used:
As long as the „Ladywash“
function is running, the user
should be able to change
setting after setting by
pressing the corresponding
buttons.
e.g. After you change the „Nozzle position“,
you can adjust the
„Water volume“.
28
Water
temperature
(Page 29)
Panorama
spray
(Page 29)
Oscillating
comfort wash
(Page 30)
Nozzle
position
(Page 30)
Water
volume
(Page 31)
Pulsating
wash
(Page 31)
Water Temperature
cold
mildly warm
PRESS
decrease
increase
temperature temperature
The LEDs show on
which level the temperature is set.
Operation
warm
very warm
Press – or + as many times
as necessary to achieve the
desired temperature.
Panorama Spray
straight beam
wide beam
PRESS
decrease
beam angle
The LEDs show on
which angle the beam
is set.
increase
beam angle
very wide beam
Press – or + as many times
as necessary to achieve the
desired beam angle.
29
Ladywash
Oscillating Comfort Wash
PRESS
PRESS
Oscillating
function is on.
Press again to turn
off.
Nozzle Position
nozzle at the back
nozzle in the middle
nozzle at the front
PRESS
move nozzle move nozzle
backwards
forwards
The LEDs show on
which position the
nozzle is set.
30
Press – or + as many times
as necessary to achieve the
desired nozzle position.
Pulsating Wash
PRESS
Pulsating
massage is on.
Operation
PRESS
Press again to turn
off.
The spray intensity varies for a
pleasant washing experience.
Water Volume
low volume
medium volume
high volume
PRESS
decrease
increase
water volume water volume
The LEDs show on
which volume level
the beam is set.
Press – or + as many times
as necessary to achieve the
desired volume.
STOP Ladywash
PRESS
In order to stop the Ladywash, just press the „STOP“ button.
This works at any moment when the „Ladywash“ function is running.
31
Heated Seat
PRESS
Pressing the „Heated Seat“ button activates the
seat temperature regulation.
seat heating off
mildly warm
PRESS
warm
decrease
temperature
The LEDs show on
which level the temperature is set.
increase
temperature
Press – or + as many times
as necessary to achieve the
desired seat temperature.
The seat heater remains as set until it is changed by any user.
32
very warm
User Settings
Once you have used
and changed its settings according to your comfort, you can
save those settings into any of the three available user spaces. This way, you will not need to
‘s settings the next time you use it.
readjust
Programming User Settings
user 1
user 2
previous
user
The blinking LEDs show
for which user the current
settings can be saved.
Operation
user 3
2 sec
PRESS & HOLD
next user
Press – or + as many times
as necessary until desired
user is chosen.
The user settings have
been saved.
The remote goes back
to standard mode.
PRESS
Saving user settings for another user
In order to save the settings of another user, first change the settings during use and
start this process again by pressing and holding the user settings button.
33
User Settings
Picking the User
user 1
user 2
user 3
PRESS
previous
user
The LEDs show on
which user‘s settings
is set.
Press – or + as many times
as necessary until desired
user settings are on
The following settings can be saved:
Water
temperature
34
Seat
temperature
Panorama
spray
Oscillating
comfort wash
Nozzle
position
Water
volume
next user
Pulsating
wash
Side Panel Functions
Night Light ON
STOP
●
2
Rearwash
beeps and the side panel LED blinks.
Press „STOP“ on remote control.
beeps twice.
PRESS
Operation
1
Press and hold „STOP“ and „Rearwash“ on side panel.
Wait 10 seconds until the blinking stops.
Light will turn ON.
Night Light OFF
1
Press and hold „STOP“ and „Rearwash“ on side panel.
STOP
●
2
Rearwash
beeps and the side panel LED blinks.
Press „STOP“ on remote control.
beeps once.
PRESS
Wait 10 seconds until the blinking stops.
Light will turn OFF.
35
Side Panel Functions
Silent Mode ON
1
Press and hold „STOP“ and „Rearwash“ on side panel.
STOP
●
2
Rearwash
beeps and the side panel LED blinks.
Press „STOP“ on side panel.
beeps twice.
Wait 10 seconds until the blinking stops.
Silent Mode will turn ON.
Silent Mode OFF
1
Press and hold „STOP“ and „Rearwash“ on side panel.
STOP
●
2
Rearwash
beeps and the side panel LED blinks.
Press „STOP“ on side panel.
Wait 10 seconds until the blinking stops.
Silent Mode will turn OFF.
36
beeps once.
Seat Sensor ON
STOP
●
2
Rearwash
beeps and the side panel LED blinks.
Press „Ladywash“ on side panel.
Operation
1
Press and hold „STOP“ and „Rearwash“ on side panel.
beeps twice.
Wait 10 seconds until the blinking stops.
Seat sensor will turn ON.
Seat Sensor OFF
1
Press and hold „STOP“ and „Rearwash“ on side panel.
STOP
Rearwash
CAUTION
●
2
beeps and the side panel LED blinks.
Press „Ladywash“ on side panel.
beeps once.
Do not activate the
Rearwash or the
Ladywash while the
sensor is off, otherwise water will be
spilled on the floor.
Wait 10 seconds until the blinking stops.
Seat sensor will turn OFF.
37
Side Panel Functions
ECO Mode ON
1
Press and hold „STOP“ and „Rearwash“ on side panel.
STOP
●
2
Rearwash
beeps and the side panel LED blinks.
Press „Rearwash“ on side panel.
Wait 10 seconds until the blinking stops.
ECO Mode will turn ON.
beeps twice .
does not detect a
If
user for approximately 5 seconds,
the seat temperature is set to
28°C in order to reduce energy
consumption.
ECO Mode OFF
1
Press and hold „STOP“ and „Rearwash“ on side panel.
STOP
●
2
Rearwash
beeps and the side panel LED blinks.
Press „Rearwash“ on side panel.
Wait 10 seconds until the blinking stops.
ECO Mode will turn OFF.
38
beeps once.
The seat heater will be kept warm
is not
even while
being used.
Nozzle Cleaning (Perform monthly)
Before and after
‘s rearwash or ladywash are activated, an automatic cleansing of
the nozzle is performed. However, it is recommended that you clean the nozzle manually on
a regular basis.
1
Press „Rearwash“ and „Ladywash“ for
2 seconds.
Ladywash Rearwash
Soft cloth soaked in water
Operation
• Toilet paper
• Dry cloth
• Nylon scrubbing pads
(May cause damage.)
● The nozzle will fully extend for
2 minutes.
Nozzle
2
Wipe with a soft, wet cloth.
● Do not pull, push or press the nozzle with excessive force.
(May cause damage or malfunction.)
Cleaning
(Perform monthly)
3
After 2 minutes the nozzle retracts itself
automatically.
Apply a neutral detergent to a soft cloth or
sponge and clean the product.
- Failing to do so may result in deformation or product damage.
Do not use thinner or benzene.
Do not clean the product using a coarse scrub or abrasive detergent.
39
Water Filter Cleaning
1
Dismantle
(page 53)
2
B
A
3
40
Install
(page 45)
C
Installation Guide
Before installation, be sure to read this installation manual and the separate safety
precautions sheet. Mount parts properly according to the directions.
Precautions before installation
Operation / Maintenance
●Turn on the electricity and water supply for the product only after all other installation work is complete.
●Do not damage the connection components on the water supply hose
●The water supply pressure range is 0.11MPa <dynamic> - 0.68MPa <static> in Europe and Russia, and 0.05MPa <dynamic 10L/min or more> - 0.75MPa (static) in China, Asia, Oceania. Use the unit within the said pressure range.
●The temperature of the water supply should be within a range of 0 to 35°C. Make sure the temperature is within this range.
●Working ambient temperature is within the range of 5 to 35°C. Make sure the
temperature is within this range.
●If the water shutoff valve is supplied by your installer, be sure to use it. Do not use any other water supply hose than the one provided by a professional.
*Because a water flow test is conducted on each product at the factory, water may remain inside the product. This water does not indicate a problem with the product.
Installation
Symbols and their meanings
Task that must be conducted by the installer.
Actions that
should perform automatically.
Visual confirmation required.
Work flow direction.
41
Included Parts
A-1
A-2
C-1
C-3
A-3
A-4
A-5
A-9
A-6
A-7
A-9
Anti-theft parts for
remote control
A-10
A-8
Please ask home owner if they would like the remote control anti-theft kit installed before starting installation. Please
leave the anti-theft kit with the owner if it is not installed.
The power plug (A-9) shape, power cord
length, voltage, rated power consumption
vary depending on the version of the product.
Check the appropriate type and then wire and
install the product correctly.
Prepare a position in advance that
conforms to the regulations in your country.
42
Required Items
B-1
B-2
B-3
B-4
Subway 2.0
wall mounted
Use to prevent damage to the
product.
B-5
B-6
Ø = 3mm
B-7
B-8
B-9
Subway 2.0
wall mounted
B-10
Installation
Ø = 6mm
Anti-theft for remote control
43
Installation Procedure
1
1A
Subway floor standing
Architectura floor standing
A-8
A-7
2
3
A-6
A-7
B-9
B-4
Subway floor standing
Architectura floor standing
Do not exceed 7 kgF
A-6
B-1
44
A-6
4
5
A-9
B-10
A-7
Neutral
Live
Earth
6
7
Installation procedure
Installationsanleitung
Notice de montage
SP
NL
IT
1
Manual de instalación
Installatiehandleiding
Istruzioni di installazione
80
C-1
100
Installation
355
[mm]
[MM]
44
FR
320
DE
220
EN
Insert C-1 into A-6 until a click sound
is heard.
B-6
2
3
A-6
3A
EN
DE
FR
SP
NL
IT
RU
Subway floor standing
Architectura floor standing
Subway bodenstehend
Architectura bodenstehend
Subway sur pied
Architectura sur pied
Subway de pie
Architectura de pie
Subway staand
Architectura staand
Subway a pavimento
Architectura a pavimento
Subway напольный
Architectura напольный
1
Please refer to the connection manuals in order to find out more about
the water and electric connections.
45
Installation Procedure
8
A
A-9
B
C
D
9
46
A-10
B-1
Remote Control Mounting
10
B
A
A-3 (4x CR 2032 3V)
A-1
C
300mm
11
250mm
390mm
Installation
760mm
Side wall
1060mm
A-1
250mm
760mm
Rear wall
1060mm
A-1
47
Remote Control Mounting
12
Temporarily place the remote control in the position determined in 14
and confirm the signal reception of A-1.
A
B
Hold down
A-1
B-3
C
C-3
13
C
11
48
13
A
Ø = 6mm
Ø = 3mm
B-5
B-5
A-2
A-2
B
B-1
B-1
A-5
A-4
A-4
C
Installation
A-1
A-2
49
Anti-theft Protection for Remote Control
13A
A
B-1
B
50
C
Trial Run
14
A
B
C
B-2
Hold down
A-1
Hold down
B-3
B
Installation
A
15
A-1
C-3
51
Measurements
370mm
237mm
270mm
478mm
537mm
141mm
55mm
568mm
219mm
392mm
102°
527mm
Information for the installer
●Please explain the features and operation of
to the customer
●If the product will not be used for a long time (like when it is installed in an
unoccupied, newly constructed building), turn off the breaker on the distribution board or disconnect the power plug.
52
Dismantle Guide
1
A
B
C
D
Installation
2
3
53
Troubleshooting
First, try the actions described on pages 55 to 56.
If the problem persists, consult the installer, seller or the contact listed on the back cover of
this manual.
Please check first
Check the water supply.
Check the power supply.
●Is water being supplied to your household?
●Is the water shutoff valve turned off?
●Is there electricity in your household?
●Is the connector inserted?
●Is the safety power switch off?
Is the POWER LED lit?
● Does the LED light up when you press and hold the STOP button on the main unit?
STOP
● Is the breaker on the distribution
board turned on?
Check wether there is a power
outage or the breaker has
turned „OFF“.
Is the remote control working?
● Are the remote control batteries dead?
→ Replace the batteries
● Is the remote control transmitter or the
remote control receiver blocked?
→ Remove obstructions, dirt, water drop-
lets or any other blockages.
A
B
Do not drop the remote control or spray water
on it. This will cause a malfunction in the
remote.
C
54
Remote control
transmitter
There are some error messages that
will show in case a malfunction occurs.
The error message can be identified by the number of times
beeps:
1 x beep:
The desired water temperature is not reached. - Turn
2 x beep:
3 x beep:
4 x beep:
The water volume is too low. The seat is overheated. The inlet water is too warm or the water inside
- Turn
- Turn
off
off
off
5 x beep:
is being overheated. The necessary voltage or frequency is either not
- Turn
off
reached or is reached too late.
- Turn
6 x beep:
7 x beep:
There is a malfunction in one of the sensors. There is an electric leakage in the circuit. off
off
does not work
- Turn
- Turn
off
Please check
Is
ON?
Press the POWER button on the
remote or press and hold the
STOP button on the side panel.
Did the battery run out of power?
Replace with new batteries.
Are the positive poles and negative
pole of the batteries set correctly?
Reset the battery to correct
position.
Low battery?
Update witth new batteries.
Is the remote control signal transmission or reception window
covered with dust or blocked?
Clean the signal transmission or
reception window.
Is the remote control too far away
from the product, and not within the
sensor range of the remote control?
Please use the remote control in
the effective sensor range.
Seat temperature is not
warm enough during usage
Is seat temperature set on „OFF”
or lower setting?
Reset the seat temperature on a
higher setting.
Seat temperature is hot
Is the seat temperature set on
higher setting?
Reset the seat temperature on
a lower setting.
Remote control does not
work
Remote control button is
insensitive
Seat temperature is cold
when skin touches the seat
set in save ECO
Is
mode?
If yes, the seat temperature will
Automatically increase after sitting
on
.
This is normal.
Reference
Seat heating
Remote control
Product out
of work
Trouble
55
Troubleshooting
Trouble
When activating the front or rear
wash function, the nozzle will clean
itself for a couple of seconds and,
then moves out for washing. This
operation will take several seconds.
This is normal.
Is the water flow set on a lower
setting?
Reset the water flow on a higher
status by the remote control.
Is the water filter blocked?
Clean the filter.
Is the connection nut of the water
supply hose loose? Does water leak
from the hose?
Lock the nut tightly.
Is the water temperature set on
„low” or „off” status?
Reset the water temperature on
„high” or „middle” status by the
remote control.
During washing, nozzle will stop
spray water and move back automatically after 3 minutes.
This is normal.
The user stood up shortly during the
operation or is not properly seated
Sit on the sensor detection position of the seat again and press
the front or rear wash button.
When the temperature of the water
supply or the bathroom is low, the
water temperature may be low when
first sprayed.
This is normal.
Dryer temperature is not
warm enough
Is the dryer temperature set on a
lower level or OFF?
Reset the dryer temperature on a
higher level.
Warm dryer stops suddenly
The user stood up shortly during the
operation or is not properly seated.
Sit on sensor detection position
of the seat and press the dryer
function.
Is the user sitting properly on the
seat sensor?
Sit on sensor detection position
of the seat and press the dryer
button.
Did you select any washing function?
Turn off the washing function and
press the drying button.
Front / Rear wash function
Nozzle moves out too slowly
Low water pressure
Low water temperature
Nozzle stops to spray water
suddenly
Dryer function
Please check
Dryer function does not work
Manual nozzle
cleaning mode
Night light
function
During washing, nozzle will stop
spraying water and moves back
automatically after 3 minutes.
56
This is normal.
Night light off
Night light is set on „OFF” status.
Turn on the night light following
the instructions on the „side panel“ section.
Nozzle moves back
automatically
Nozzle will move back automatically
after 2 minutes of manual cleaning.
This is normal.
Specifications
L4
Item
Color
Power rating
Maximum power consumption
Water supply pressure
Dimension (Width x Depth x Height)
Net weight
White
220 ~ 240 V AC, 50 Hz
1000 W
0.11 MPa ~ 0.68 MPa
392 mm x 537 mm x 141 mm
4.2 kg
Material seat and lid
seat : ABS(flame resistance), cover-seat : ABS
Material hull (visible parts)
cover-top /body-frame : ABS(flame resistance)
Warm water cleansing device
Supply water temperature
Spreading Water Flow (Rearwash)
5 ~ 35 °C
Level 1/Level 2/Level 3 :
350 ml/ 420ml/ 500 ml/min, ±10% ml
Spreading Water Flow (Ladywash)
Level 1/Level 2/Level 3 :
350 ml/ 420 ml/ 500 ml/min, ±10% ml
Water temperature control
Level 1/Level 2/Level 3/Level4 : Room temp. /
31.5±1.5°C / 34.5±1.5°C / 37.5±1.5°C
Heater power consumption
750 W + 450W
Heated seat
Surface temperature
Leve 1/Level 2/Level 3/Level4 : Room temp. /
31±3°C / 34±3°C / 37±3°C
Heater power consumption
50W
Additional Information
Water connection
Ingress protection rating
5°C~35°C
1/2“
Product : IPX4, Remote Controller : IPX2
Reference
Permissible ambient temperature
57
Important User Guidance Information
If you want to dispose this product, do not mix it with general household waste.
There is a separate collection system for used electronic products in accordance
with legislation that requires proper treatment, recovery and recycling.
Private households in the member states of the EU, Switzerland and Norway may return
their used electronic products free of charge to designated collection facilities or to a retailer
(if you purchase a similar new one).
For countries not mentioned above, please contact your local authorities for the correct method of disposal.
By doing so you will ensure that your disposed product undergoes the necessary treatment,
recovery and recycling, which prevent potential negative effects on the environment and
human health.
Only discard discharged batteries. They should not be disposed of with household waste, but
rather at appropriate collection sites or at the product retailer.
58
Warranty
This electronic bidet seat has been designed and manufactured with great care and attention
to detail. It is an illustration of quality, beauty and longevity.
We give our word on that and 24 months warranty.
In the following cases the warranty does not apply:
a) Damage or loss sustained in fire, earthquake, flood, thunder, or other act of providence, pollution, gas damage (hydrogen sulfide gas), salt damage and abnormal voltage
b) Damage or loss resulting from any installation against the installation manual, any
unreasonable use, mise, abuse, negligence against the cautionary statements of owner’s manual and label on the product, or improper maintenance of the product against the user manual
c) Damage or loss resulting from modification, disassembly and destruction of the product
d) Damage or loss resulting from water stain retention, sediments or foreign matter
contained in a water system
e) Damage or loss resulting from the quality of water in the region where the product is used
f) Damage or loss resulting from relocation after installment, improper installation or
hazardous environment
g) Damage or loss resulting from defect other than product such as change in shape of
building frame
h) Damage or loss resulting from bite by animals or insects such as mouse, or residual of dead animals or insects
i) Damage or loss resulting from freeze of product
j) Damage or loss resulting from undesignated power supply (voltage, frequency) and
electromagnetic wave generated in outside of product such as power lines and peripheral device
k) Damage or loss resulting from the use mounted on moving vehicles such as cars and ships
m) Damage or loss resulting from abrasion of daily maintenance points (water drain valve,
filter, O-ring, packing, etc.)
59
Reference
l) Damage or loss resulting from consumption of battery, etc
VILLEROY&BOCH
GERMANY
Villeroy&Boch AG
Unternehmensbereich Bad und Wellness
Hauptverwaltung
66693 Mettlach
EN
02-2014
Shades and dimensions subject to the usual tolerances. We reserve the right to make technical modifications to the range and alter colours