1
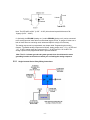
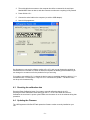
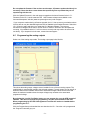
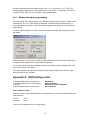
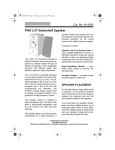
LC-1 Digital Air/Fuel Ratio (Lambda) Sensor Controller Manual Warning! The Oxygen Sensor used in this device gets very hot in operation. Do not touch the hot sensor. Do not let a hot sensor touch a combustible surface. Do not use the sensor with or near flammable liquids or gases. Failure to heed these warnings may result in severe burns, explosions or fires. When installed in the exhaust, the oxygen sensor MUST be connected and operating with the LC-1 whenever the car is running. An un-powered oxygen sensor will be quickly damaged when exposed to hot exhaust gases. Overview................................................................................................................................... 2 Wiring and Mounting the LC-1 ................................................................................................. 3 2.1 Mounting ........................................................................................................................... 3 2.2 Wiring ................................................................................................................................ 3 2.2.1 Single Innovate Device Relay Wiring Instructions ..................................................... 4 2.3 Sensor Placement ............................................................................................................. 5 3 Sensor Calibration .................................................................................................................... 6 3.1 Heater Calibration ............................................................................................................. 6 3.2 Free Air Calibration ........................................................................................................... 6 3.3 Calibration Schedule ......................................................................................................... 7 4 Programming the LC-1 ............................................................................................................. 7 4.1 Installing the LM Programmer Software ........................................................................... 7 4.2 Hooking up the LC-1 device to the computer ................................................................... 7 4.3 Resetting the calibration data ........................................................................................... 8 4.4 Updating the Firmware ...................................................................................................... 8 4.5 Programming the analog outputs ...................................................................................... 9 4.5.1 Advanced output programming................................................................................ 10 Appendix A: LED blinking codes .................................................................................................. 10 Appendix B: LC-1 Error Codes and Troubleshooting Tips ........................................................... 11 Appendix C: Limited Warranty ...................................................................................................... 12 1 2 Document # 11-0053 11-0053 LC-1_Manual_2.0.doc 1 Overview The LC-1 is a stand-alone Wideband Controller used to measure the Air/Fuel Ratio (AFR) or Lambda for an engine. For gasoline-driven engines, the theoretically optimal air fuel ratio is 14.7 pounds of air for every pound of fuel. At this ratio, theoretically, all available oxygen in the air combines with all available fuel. This ratio is called the stoichiometric ratio. Stoichiometric for different fuels are as follows: Gasoline LPG (Propane) Methanol Ethanol CNG Diesel 14.7 15.5 6.4 9.0 17.2 14.6 The measurement Lambda is the actual air fuel ratio over the stoichiometric ratio. A Lambda measurement of “1” equates to the air fuel ratio of 14.7 (for gasoline engines). When Lambda is less than 1 the engine runs “rich”, i.e., unburned fuel exists in the exhaust stream. If lambda is greater than 1 the engine runs lean, i.e., free oxygen (02) is present in the exhaust. Depending on the engine, maximum power is typically delivered when the engine runs slightly rich (for example at lambda values of 0.8 to 0.9 for most engines). This instrument provides a means to measure the actual air fuel ratio or lambda in the engine in operation directly from the exhaust. For this a special wide-band oxygen sensor is used to measure the lambda value derived from the oxygen content (or lack thereof) of the exhaust gases. -2- 2 Wiring and Mounting the LC-1 2.1 Mounting 1. Find a suitable location under your vehicle where the LC-1 body can be mounted. Using zip ties or other suitable method, fasten the body of the LC-1 device securely to the frame-rails or other mounting points as far away from the heat of the exhaust system as the sensor cable allows. DO NOT zip-tie the LC-1 by the cables. 2. Route the cables from the LC-1 (except sensor cable) into the car interior under the dash. In addition to isolating the LC-1 from heat sources, the unit and it’s corresponding cables should also be isolated from all ignition and/or other potential RF emitting sources. 2.2 Wiring The LC-1 has 6 stripped wires, a serial IN, and a serial OUT port. 1 Connect the RED wire to a switched 12V source in your car. A switched 12V source goes ON as soon as the ignition on the car is on. The circuit to which you will pull power from should be able to support an additional 3 amp draw. Make sure the connection is fused with a minimum fuse size of 5A. Circuits that share power with the vehicle’s stereo, ignition system, ECU, lighting, or fuel pump should not be used. When in doubt, create an additional circuit using an automotive relay available at any automotive parts supplier. See the next section for a relay installation diagram. 2 The BLUE and WHITE wires should all be grounded together to a solid ground source. The best possible ground source would be the battery ground (-) post. * If you have an LC-1 with 7 stripped connect the additional green wire to the same ground source as the blue and white wires. If other Innovate Motorsports devices are going to be daisy-chained along with the SCG-1, it is recommended that all devices be connected to a single ground point, ideally the battery ground (-) post. 3 Connect the LED and momentary pushbutton between the LC-1’s BLACK calibration wire and ground. Connect the red wire (Anode) of the included LED AND one side of the push button to the calibration wire (black) of the LC-1. Connect the black wire (Cathode) of the LED AND the other side of the push button to ground (preferably to the same ground point as the blue and white wires.) Refer to the schematic below. -3- Note: The LED will fit a 5/32” (0.155” - 0.158”) hole size and a panel thickness of 28– 16gauge (0.031” - 0.062”). 6. Optionally, the YELLOW (Analog out 1) and/or BROWN (Analog out 2) can be connected to the analog inputs of other devices such as data loggers, ECUs, or gauges. If either one or both of these wires are not being used, isolate and tape the wire(s) out of the way. The analog outputs can be programmed, see chapter titled “Programming the Analog Outputs”. The default analog outputs are as follows: Analog output one is 1.1V = 14 AFR and .1V = 15 AFR. Analog output two is setup as 0V = 7.35 AFR and 5V = 22.39 AFR. The analog outputs can be programmed with the provided software Note: The LC-1’s heater ground and system ground wires should share the same grounding location as the device to which you are feeding the analog outputs to. 2.2.1 Single Innovate Device Relay Wiring Instructions -4- 2.3 Sensor Placement Optimum bung placement will vary from application to application, but using the guidelines below will ensure the longest sensor life with the most accurate readings. Using a bung is the preferred method for mounting the oxygen sensor in all applications. Weld the bung at least 24 inches after the turbocharger. Using a clock as reference, mount the bung between the 9:00 o’clock and 3:00 o’clock position. Welding the bung in the lower section of the exhaust pipe can result in sensor damage caused by condensation making contact with the sensor’s internal heating element. A 1” bung (provided in the kit) will best protect the sensor. When fully threaded, the sensor’s tip will sit flush with the inside of the exhaust piping, this does not adversely effect the readings. The bung should always be welded before the Catalytic Converter. Welding the bung after the catalytic converter will skew the readings toward lean. The skew in readings will vary with engine load and the efficiency of the catalytic converter. Leaded fuel and two stroke applications will reduce the sensor’s life. There are many other factors that dictate the sensor’s lifespan so it is impossible to predict total sensor longevity. Exhaust leaks, camshaft overlap, and open (shorty) exhausts will cause false lean readings at light engine loads. Typically, once the engine is under load and the exhaust gas volume increases, you will see accurate readings. When installed in the exhaust, the oxygen sensor must be connected to a powered, functional SCG-1 (no error codes) whenever the engine is running. An un-powered sensor will be damaged in a short period of time when exposed to exhaust gas. Do not pre-warm the sensor before starting the engine, start the engine as you normal would. Allowing the sensor to pre-warm before starting the engine will increase the possibility of damaging the sensor from shock-cooling. The maximum temperature of the sensor at the bung (the sensor mounting location) should not exceed 500 oC or 900 oF. If these temperatures are exceeded in your application you should install the Innovate Motorsports HBX-1 heat sink bung extender. (p/n 3729.) As the O2 sensor measures the oxygen content of the exhaust gas to provide an accurate O2 reading, even a small pin-hole leak in a poorly welded sensor bung will effect the accuracy and performance of your O2 sensor. Remember, any deviation from the instructions provided for proper sensor installation will lead to inaccurate O2 readings. -5- 3 Sensor Calibration There are two types of calibration for the LC-1: sensor heater calibration and free air calibration The sensor heater calibration should be performed when the LC-1 is first installed and after replacing the sensor. The free air calibration should be done periodically to achieve maximum precision. Refer to the chapter titled Calibration Schedule for our recommended calibration schedule based on your application. The sensor should be removed from the exhaust and in free air for both the heater and free air calibrations 3.1 Heater Calibration 1. Remove the sensor from the exhaust, the sensor needs to be in free air for this procedure. 2. Disconnected the sensor from the LC-1’s sensor connector. 3. Switch 12V supply to the LC-1 ON. The LED will flash a two blink sequence with a 2 second pause during this time. Leave the unit powered ON for 20 seconds. 4. Switch the 12V supply off after 20 seconds. 5. Connect the sensor to the LC-1’s sensor interface connector but do not put the sensor in the exhaust. The sensor must be removed from the exhaust and exposed to free air for this calibration. 6. Switch the 12V supply to the LC-1 ON. The LED will first blink steady about 2 times/second: indicating that the sensor is warming up. The LED will then start a faster blinking sequence about 4 times/second indicating a Heater calibration. When the Heater Calibration is done the LED will light up and remain solid. 7. While the sensor is still removed from the exhaust perform a free air calibration. 3.2 Free Air Calibration The sensor must be removed from the exhaust and exposed to free air for this calibration. 1. Remove the oxygen sensor from the exhaust and expose it to free air (outside of the exhaust pipe) for calibration purposes. The sensor should be connected to the LC-1. 2. Switch the 12V supply to the LC-1 ON. The LED will first blink steady about 2 times/second indicating that the sensor is warming up. Once the sensor is warmed up the LED will light up and remain solid. 3. After the sensor has warmed up, press the push button for 30 seconds. While you are pressing the button the LED should turn off. 4. Release the button, the LED will light up and remain solid. The free air calibration procedure has occurred, you can now power the LC-1 off and put the sensor in the exhaust. To achieve maximum precision, the LC-1 and its sensor needs to be recalibrated frequently. -6- 3.3 Calibration Schedule Normally aspirated daily driver: - Calibrate before installation of new sensor - Calibrate new sensor again after 3 month of use - Thereafter calibrate once a year or every 20,000 miles, whichever comes first Turbo car, daily driver (tuned rich): - Calibrate before installation of new sensor - Calibrate new sensor again after 3 month of use - Thereafter calibrate twice a year or every 10,000 miles, whichever comes first Race car - Calibrate before first installation of new sensor - Calibrate once per race weekend Dyno use - Calibrate a new sensor - Calibrate every 2-3 days, depending on usage 4 Programming the LC-1 The LC-1 is programmable with the following functionality: 1. Change the relationship between Lambda and AFR. 2. Upgrade the firmware. 3. Change the output characteristics of the Analog outputs. Avoid connecting or disconnecting any of the ports labeled IN or OUT while the unit is powered ON. 4.1 Installing the LM Programmer Software Put the included CD in your CD-drive on your computer and follow the instructions on screen. The Software will be installed including pre-set directories for log-data and downloaded software. 4.2 Hooking up the LC-1 device to the computer 1. Power the LC-1 OFF 2. Insert the terminator plug in the serial port labeled IN. Make sure this connection is fully seated by twisting the connectors. -7- 3. The serial cable that connects to the computer should be connected in the serial port labeled OUT. Same as above, twist the connects to make sure everything is fully seated. 4. Power ON the LC-1 5. Connect the serial cable to the computer (or serial to USB adapter). 6. Launch LM programmer. On this page you can see the software version of the LC-1 and you can change the multiplier to calculate AFR from Lambda. A number of different multipliers are already pre-selectable but you can change it to a custom one for the particular fuel you are using. If you plan to use multiple LC-1’s, change the device name to something identifying which LC-1 is connected where. For example LC1-Cyl1 for a LC1 connected to Cylinder 1. The device name can be up to 8 characters long. 4.3 Resetting the calibration data Press the Reset Calibration button if you want to reset all calibration data in the LC-1. Pressing the Reset Calibration button will trigger the LC-1 to do a full Heater and Free Air Calibration the next time it is power cycled. Make sure the sensor is not in the exhaust during that procedure. 4.4 Updating the Firmware The LM Programmer Info/Set AFR tab reports the firmware version currently installed on your unit. -8- Do not update the firmware if the versions are the same. A firmware update should only be necessary if there has been a new release that specifically fixes a problem that you are experiencing with the unit. Click the 'Update Firmware' in the main page to upgrade to the latest firmware for the LC-1. Firmware for the LC-1 has the extension dld. New firmware releases are available on the Innovate Motorsports’ web site (www.tuneyourengine.com) under ‘Support.’ If your computer crashes during a firmware upgrade, the LC-1 has a recovery mechanism where it will be able to retry the download again and not be disabled by half loaded firmware. Switch the LC-1 off and on again and then try to restart the LC1 Manager software. The recovery mechanism is designed to be able to recover 99.9% of the time. While we don’t anticipate this occurring, it is possible that the LC-1 will not recover correctly and may need to be serviced at our factory. If you suspect this is the case, contact Innovate support. 4.5 Programming the analog outputs Select one of the Analog output tabs. The Analog output page looks like this: This shows the analog output voltages versus Lambda for one of the two analog outputs. The graph display is automatically scaled to the selected voltages. For each output you can specify a minimum and maximum lambda value and the associated voltages. Below the minimum and above the maximum lambda values the output voltages stay constant at the associated programmed voltage. By selecting the ‘use Air-Fuel-Ratio’ button you can program the curve by AFR instead of Lambda. This does not change the programming, only the representation of the data. When programming by AFR the LM Programmer converts the number to Lambda before programming the LC-1. Click the Program button to download the new data into the LC-1. Once the unit is programmed the “Program” button will grey out. -9- As factory programmed the first analog output one is 1.1V = 14 AFR and .1V = 15 AFR. The second output is programmed to output between 0 V for an AFR of 7.35 (gasoline) and 5.0V for an AFR of 22.39. Other curves of course are easily programmable 4.5.1 Advanced output programming The normal state of the analog outputs is to update the outputs every time the LC-1 takes a new measurement. The LC-1 is fast enough to distinguish individual pockets of exhaust gas. For many applications this will be too fast. The advanced programming allows to set the analog out update speed. Press the “Advanced button” to set the advanced analog out settings. The following dialog box will appear: When setting the LC-1 to the slower response speed settings the measured mixture data will be averaged over the response time setting before being output. You can also specify what output voltage is visible on the analog outputs during warm-up of the sensor and during error conditions. The ‘High Impedance’ setting allows to specify that the analog outputs do not drive the output during warm-up or error condition. Appendix A: LED blinking codes 1. Blinking steady about 2 times/second: 2. Blinking steady at about 4 times/second: 3. LED off 4. Blink sequence with 2 second pause Warming up Heater calibration No Power or free air calibration Error indication Error indication details: Count the number of fast flashes between 2 second pauses. The number of flashes indicates the error code as in 1 Flash 2 Flashes Error 1 Error 2 And so on. See Appendix B for error code details. - 10 - Appendix B: LC-1 Error Codes and Troubleshooting Tips Error Code Error 1 Error 2 Error Message Likely Root Cause Fix Heater circuit shorted Heater circuit open 1. Short in sensor 1. Damaged sensor cable or Cable connector not fully seated Error 3 Pump cell circuit shorted 1. Short in sensor cable 2. Short in sensor 3. Sensor heater calibration incorrect 4. Sensor overheating 5. EGT >1700º F Error 4 Pump cell circuit open 1. Damaged sensor cable or sensor connector not fully seated 2. Sensor heater calibration incorrect Error 5 Reference cell circuit shorted Reference cell circuit open 1. Short in sensor cable 2. Short in sensor 8. Damaged sensor connector not fully seated 9. Damaged Sensor 1. Replace sensor. 1. Verify Sensor connector is fully seated into unit. Repair/replace Sensor or cable. 1. Repair sensor cable. 2. Replace sensor. 3. Perform sensor heater recalibration. 4. Move your sensor bung as far downstream as possible OR add a heatsink to isolate the sensor from the pipe. 1. Verify sensor connector is fully seated into unit. Repair/replace cable. 2. Perform complete heater calibration (not just free air calibration). See section 4 1. Repair sensor cable. 2. Replace sensor. 1. Verify sensor connector is fully seated into unit. 2. Replace sensor Typically a software error Error 8 General System error (typically a software error). Sensor Timing error (typically a damaged sensor). Error 9 Supply Voltage too low Error 6 Error 7 1. Sensor overheating. (The Bosch LSU4.2 is rated to operate at a sensor housing temperature of < 900 degrees (measured at the bung) for maximum accuracy and control. When this operating temperature range is exceeded, the sensor can no longer be accurately controlled. ) 2. Sensor is damaged Supply voltage too low for sensor regulation - 11 - Reboot LC-1 by cycling power. Re-flash unit if necessary. 1. a. Perform sensor heater recalibration; b. Move your sensor bung as far downstream as possible. Right before the cat, or 2-3 feet from the end of the tailpipe are good locations; c. Add a heatsink to isolate the sensor from the pipe. The HBX-1 is an available accessory. 2. Replace sensor. Check your 12V connection for corrosion. Appendix C: Limited Warranty LIMITED WARRANTY Innovate stands behind the quality of its products. Innovate makes the following warranty to purchasers of its products: All new Innovate products carry a one year warranty from the date of purchase. If proof of purchase cannot be provided, warranty will be determined by date of manufacture. When Warranty Void This warranty shall terminate and Innovate shall have no obligation pursuant to it if (i) your Innovate product has been modified or repaired in a manner not previously authorized by Innovate in writing, (ii) the identification markings on your Innovate product have been removed, defaced, or altered; (iii) your Innovate product was subjected to accident, abuse, shipping damage, or improper use; (iv) your Innovate product was not used or configured as specified in the product manual; or (v) your Innovate product was subjected to operating conditions more severe than those specified in the product manual. Exclusions From This Warranty Oxygen Sensors are excluded from this warranty. Repairs Under This Warranty In the unlikely event that your Innovate hardware product should prove defective during the warranty period, contact Innovate Customer Support for a return material authorization (RMA) at (800) 348 3037. Products returned for service must be securely packed to prevent damage and shipped charges pre paid, along with proof of purchase and the return material authorization form, to the Innovate repair location as instructed by Customer Service. Innovate within a reasonable amount of time from its receipt of your product so shipped, will ship to you, at its option, the repaired product or a new or reconditioned product of comparable or greater specified functionality. All repaired or replacement products shall be warranted for the remainder of the original product warranty. Disclaimer INNOVATE MAKES NO OTHER EXPRESS OR IMPLIED WARRANTY WITH RESPECT TO YOUR INNOVATE PRODUCT OTHER THAN THE LIMITED WARRANTY SET FORTH ABOVE. No Innovate dealer, agent, or employee is authorized to make any modification, extension, or addition to this warranty, unless enforceable or unlawful under applicable law, INNOVATE DISCLAIMS ALL IMPLIED WARRANTIES, INCLUDING THE IMPLIED WARRANTIES OF MERCHANTABILITY, NONINFRINGEMENT, AND FITNESS FOR A PARTICULAR PURPOSE, AND THE LIABILITY OF INNOVATE, IF ANY, FOR DAMAGES RELATING TO ANY ALLEGEDLY DEFECTIVE PRODUCT SHALL UNDER ANY TORT, CONTRACT, OR OTHER LEGAL THEORY BE LIMITED TO THE ACTUAL PRICE PAID FOR SUCH PRODUCT AND SHALL IN NO EVENT INCLUDE INCIDENTAL, CONSEQUENTIAL, SPECIAL, OR INDIRECT DAMAGES OF ANY KIND EVEN IF INNOVATE IS AWARE OF THE POSSIBILITY OF SUCH DAMAGES. Some states do not allow limitations on how long an implied warranty lasts or the exclusion or limitation of incidental or consequential damages, so the above limitations or exclusions may not apply to you. - 12 -