1
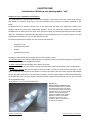
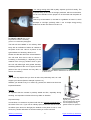
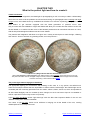
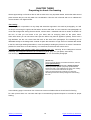
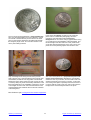
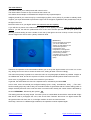
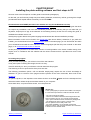
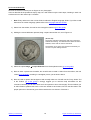
NUMISMATIC PHOTOGRAPHY Getting Started Guide (… Meaning, you don't need expensive equipment to achieve good results) Reproduction in full or in part is prohibited, without permission. All rights reserved. Written by Il Numismatico 1̶̶ English Translation by: WisardCoin Written by Il Numismatico 2 English Translation by: WisardCoin Introduction Welcome to this little guide about numismatic photography. The aim I ask myself (and I hope to achieve) is to make the matter hereof simple and clear for everyone, even (and perhaps especially) for anyone who thinks to be hopeless in photography. The "lessons" will be few and brief (basically there is not much to say, since we have to shoot a simple planchet large, at most, a few centimeters), and set as the targets to provide concepts, rather than procedures to be followed, all presented trying not to forget the simplicity and clarity of explanation. The concepts that we will examine may be obviously revised and improved depending on your personal taste, even after the numerous trials you will perform in practice. Trials that will lead you (as it is still in my case) for a long time even after you will think to have reached a satisfying qualitative result. Topics in this guide, will be the following: 1 Introduction: Build-up our photographic “set” 2 What is the perfect light and how to create it 3 Preparing to shoot: the framing 4 The shutter setting and white balance 5 Last settings before shooting 6 We take our first numismatic photograph 7 Post-Processing (PP): what is it and how should be done 8 Installing the photo editing software and first steps in PP So, please feel free to contact me for any question or doubt, at my E-mail address ([email protected]), or through my FaceBook or Twitter pages. I will be glad to solve together any problems about numismatic photography. Certainly, it will be a good chance for everyone to learn new things in a quick and funny way. Last but not least, I want to sincerely thank to the numistatic Forum “la moneta.it” staff (www.lamoneta.it) for their interest and given support. Sincerely, Written by Il Numismatico 3 English Translation by: WisardCoin CHAPTER ONE Introduction: Build-up our photographic “set” Support for coin: Capabilities and Features You might think that a standard blank white sheet of paper on which lean on the coin is more than enough, and indeed it is. However, by doing so, you can't separate out the coin from its shadow, reflected on the sheet. An appropriate set on which to rest the coin, on the other hand, will allow us to eliminate the effect of the shadow, making the photo more aesthetically pleasant, and at the same time making the process less troublesome if we want to work our photo in PP (post-processing) by replacing the background with a totally white one, as happens in professional photographs of auction catalogs (see, for example, picture 2.1) If this aspect does not interest you, you can skip this part as well. Here are the parts which compose our "low-cost" but functional set: • A support for coin • An energy-saving bulb • A stand • A glass 24x18 cm size We begin to see in detail how to arrange this set. That's what we need: - A cartonboard box cut in half and high at least ten centimeters, where we will make openings on both sides, so as to allow more light to enlighten the bottom - A white cardboard that we will apply at the bottom of the box - A glass wide enough to cover more thoroughly the entire width of the box (well clean, with no fingerprints) - An adhesive felt pad (like the one applied under the chairs to make no noise) that we will apply on the glass, so that the coin will have a soft surface on which to be rested, and at the same time this will facilitate the firm grip without wavering. I use more than one glass, on which I apply pads of various sizes, depending on the diameter of the coin (pay attention that the felt does not spill over the edge of the coin, since it would not be a pleasant thing). In the picture 1.1 we can see the final result (Picture 1.1) Simple support to place the coin A common cartonbox cut in the front to facilitate the entrance of the light to the base with a glass (note the felt pad that allows you to rest and take back the coin conveniently and safely) and a blank sheet of paper behind it is already an excellent support to lay your coin, thus avoiding to take pictures with the shadow of its thickness. Written by Il Numismatico 4 English Translation by: WisardCoin - An energy-saving bulb. With a paltry expense you'll find it easily. The important thing is the color of the light produced, which must be white, so as not to interfere on the proper hue of the metal and the patina of the coin. Take it by at least 6000° K, the ideal is a gradation of 6400° K, which develops a cold light, perfectly white. I use a simple energy-saving bulbs such as the one shown in Picture 1.2 (Picture 1.2) An ordinary 11W bulb with a color temperature of 6400° K is already good for our numismatic photographs The bulb will be installed on an ordinary desk lamp, with an inclination of about 45° relative to the plane of the coin. Here is a picture of the typical distance of shooting, about 20 cm. Please note that this will not be a fixed distance. You will need from time to time to correct it, increasing or decreasing it, depending on the material of the coin (eg. whether silver or gold, the coin will reflect light with greater intensity, something different if the coin is copper) and the patina of the coin (if intense and very dark, or mild or non-existent). (Picture 1.3) The distance between the the lamp and the coin is about 20 cm Stand This is the only aspect that you have to take care particularly well, as it will support your camera (See an example in picture 1.4). Whether you decide to buy it or made it by yourself, the stand must have two important features: Stability: It's important that the camera is perfectly stable and firm, especially during shooting. It is important to isolate it from any shake or vibration. Perpendicularity: It must allow our camera to be placed with the lens perfectly perpendicular to the center of the coin. If you use an ordinary tripod, make sure that the rods do (Picture 1.4) Typical photographic stand. The arm holding the camera can be adjusted, offering greater freedom of operation not reflect (once turned on the light) the shadow on the plane of coin or, even worse, any colorful reflections of what surrounds you or the coin itself. Written by Il Numismatico 5 English Translation by: WisardCoin A glass I use an ordinary glass taken from a portrait frame, those are soldl to contain pictures. A dimension of 10x18 cm is already excellent. We will use this glass to "play" with the light beam. Now that we have everything needed to photograph our coin, we can get to work. But before we take our first picture we need to examine some other very important detail. The first of these, and perhaps the most difficult, is to obtain an appropriate light. Let's see how we can do this in Chapter 2: What is the perfect light and how to create it Written by Il Numismatico 6 English Translation by: WisardCoin CHAPTER TWO What is the perfect light and how to create it. A little introduction Contrary to what you might think, the ideal light for photographing a coin is not easy to obtain. Unfortunately this is the root cause of all the problems we will encounter during our photographic tests. Intensity and angle of light in fact, are indeed those key variables that will allow us to achieve a pleasing photographic results even before to get cameras equipped with the latest generation of powerful macro lens. Only a correct and wise calibration of light and shadow will allow you to make alive the reliefs of a coin with all their details, or to make vivid the colors of the fantastic patinas that can sometimes enhance our coins, with all their phantasmagorical iridescences and color shades. The practice and imagination will allow us to figure out a variety of techniques to mask the light, reflecting and control it. So as to achieve very pleasing results, as in the picture 2.1 (Picture 2.1) Morgan Dollar 1885 New Orleans Mint With a little patience and perseverance (even better if there is also passion), here's the result you can get. The photo was taken with an old digital compact camera, while the PP and the photomontage of the two sides, has been done using a free software called GIMP. The perfect light: Natural daylight or Artificial? The appropriate lighting (for convenience and flexibility) in this case, is, in my opinion, the artificial one. That's for two simple reasons that are impossible to achieve with the natural light: the artificial light can be controlled (with the necessary precautions we can mask it, reflect it, filter it, and so on, which is impossible to do with natural daylight), and it is constant (it never changes, so we do not have to hope in nice weather or wait for a precise moment of day to take our pictures). Light too close and direct causes "light burnings" with the effect that important details of the coin are "flashed" making them indeed unreadable. Vice versa, a light too soft, would not be sufficient in bringing out all the details of the coin, causing underexposures too much pronounced. Written by Il Numismatico 7 English Translation by: WisardCoin Also to use multiple light sources is not ideal, because it would eliminate the shadows in our photo, which have a very important role in making a certain three-dimensionality of the reliefs thereby giving naturalness to the photo. What is the best solution? The "ideal" light is a diffused light. The diffused light: a small compromise to begin to "play" with light It is impossible to describe "the secret" to get a perfect light spread. "The Secret" does not exist. Please note in advance that getting a diffused light is something not easy at all, because if a certain shade of light is good for a coin, may be it does not work for all the others. In this guide we will discuss a small system, quick and easy to apply. Remember however that this method is only a small compromise, but it will allow us to get started today both to take some pictures and become familiar on how to "play" with the light. This means that we should come up with different ways to improve the diffusion and control of light as we acquire more familiarity with photography. To begin you could install the light bulb on a lamp that can be adjusted easily and quickly in height and angle of incidence of the light beam (see picture 2.2 and 2.3). Indeed, not always the distance light-coin you have chosen will be ideal for all the coins. Various metals, with various shades of patina in fact, drastically affect the beam of light needed to illuminate duly the whole coin and to be able to capture it in a clear, readable, and enjoyable way. Remember: a picture, if it is not readable, it is not a good picture. A good shot first of all must be legible and clear, before being beautiful. The beauty is not the first requirement of a numismatic photograph. To get started we will use a small glass placed between the camera lens and the coin. "Playing" with the tilt of the glass, the light being projected from the lamp will undergo the interference of the inclination of the glass, being, let me say, "educated" by the glass and changing in intensity. Thanks to the rotation of the glass, we will be able to change the light direction controlling the beam, and just this detail will allow us to "bring out" the coin that we are photographing. We will come back, however, on this particular aspect of the glass and we will better understand the meaning of the term "playing with light" in the section relevant to shoot (See Chapter 6: We take our first numismatic photograph). To change the angle of the light we can bring it closer or away from the coin thanks to our adjustable lamp, thereby obtaining a “softer" light if we give to the light an oblique angle more than 45° with a distance of about 20 cm from the coin (as in the picture 2.2), or by dropping the light more directly on the coin in a more "aggressive" way by setting our lamp to an greater angle, at about 40 cm from the coin, as in picture 2.3. Written by Il Numismatico 8 English Translation by: WisardCoin (Picture 2.2) The glass should be placed between the coin and the lens (the camera must be already on the stand). Change the tilt of the glass to "seek" the more suitable inclination angle. REMARK: Be careful not to generate shadows on the coin, or interfere with the camera shutter. Be care with our hands: they can give the photo a reddish saturation, typical of the skin color. It is a small drawback that we can solve with PP or using a pair of gray gloves. Written by Il Numismatico 9 (Picture 2.3) In the case of coins having a very heavy patina, we need to get an impact more "decisive" of light. In this case have changed the incidence of light on the coin to obtain a more deep effect. It is mandatory to do several tests to understand what is the right angle of light, and its right distance. English Translation by: WisardCoin CHAPTER THREE Prepairing to shoot: the framing We are approaching our first shot. But we will not miss some very important details, which often take second place because they are not duly taken into consideration: How the coin is framed and how to calibrate the correct shutter in our digital camera. The framing The photographic composition is a very deep and extensive argument in the world of photography, so I will not skip it even though it might be at first istance obvious and trivial. It is not unusual to see photographs of coins with backgrounds having diverse colorful, various tissue / materials and with an insane inclinations of the coin, so that you are forced to tilt your head, with an annoying effect for the photo vision. Some other times you can see some scans (but the basics may also be applied to photos), which have a high definition, but the coin covers less than 30% of the area of the photograph. The remaining 70% is dedicated entirely to the background. A waste of space that results in a huge amount of useless data stored in the file, and longer waiting times either in case of upload (ie sending the picture to our server if we want to publish it in some forum or social network), or in download, for all those who want to see it. A proper picture must concern solely and exclusively the coin, removing all the background excess. Preferably, the background should be in a neutral tone (white, gray, or if your prefer, even black). The following example shows how the final result should be in a numismatic photograph. (Picture 3.1) Here is a picture already processed with the PP, and with proper photo framing. The coin is perfectly aligned, with a background that takes up minimal space. I purposely represented the background with a color different from white. that I usually use, so as to show the total size of the photo. Note how the background is reduced to a minimum, eliminating all the unnecessary background surrounding the coin. In the following page I have shown four of the most common mistakes that we should avoid in framing. For each picture there is a comment that helps in remembering important aspects to consider for proper framing. Written by Il Numismatico 10 English Translation by: WisardCoin The coin must be photographed in a easily readable way. So it must be represented in the correct direction. If there are vertical or horizontal lines (such as lines in the lower part or in the feminine depictions) should be aligned with the imaginary angle of 90°. This can also be done in PP with a photo editing software. In the picture the subject occupies a more prominent place. Even in numismatics photography the same principle is used. Eliminate all the unnecessary background. You can do this using a graphic editor. Doing so you will improve the readability of the photograph, and the final weight of the file. Note how in the photo shown on the left, although the direction of the coin is wrong, the photo has a more pleasing aspect than the above one. Only use backgrounds having neutral colors (such as white, black or gray). This will make the picture more clear and readable, as well as more enjoyable. A multicolored background (such as the pages of a book, a piece of cloth or a messy desk) only store unnecessary information in the files giving detriment in the readability of the photo, as well of its "weight" in terms of Kb. Also note that there is some contrast between the smallness the coin and the vastness of the background. The coin must be placed on a perpendicular plane with respect to the camera lens. Basically the ground plane should not have any inclination, and the center of the coin should correspond to the center of your lens. In this case, even if the ground plane is perfectly horizontal, the lens is not in line with the center of the coin. Also in this case the background is unnecessarily dominant in the photo. Now it's time to put our fingers to the camera equipment. Written by Il Numismatico 11 English Translation by: WisardCoin CHAPTER FOUR The shutter setting and white balance In this section we will focus in setting up the settings of our camera. Since each camera is different from each other, we will discuss the operations broadly quoting in detail only those "abbreviations" which are a standard for all models. The exposure In photography, this is one of the most complex and important topics. If you want to know more, you can go back to the many guides that you can find on internet, as well as to refer to the basic manual of your camera. Surely they explain the issue in a more clearly and accurately way than that I'd be able to do. I shall therefore deal in this part in very few words, leaving out the details of all the features that are the “bread and butter” of those who handle a digital reflex camera (eg. ISO, aperture and shutter speed, just to name a few) Without getting into too much technical terms and definitions, we can define the exposure as the time during which the sensor is exposed to the light beam. The higher is the exposure time, the more the picture will be bright; The shorter is the exposure time, the less will be the light that reaches the sensor, then the picture will be darker. Obviously, it is important to calibrate the exposure as accurately as possible, otherwise we will get a picture in which there is a coin photographed with too much light, (a phenomenon called over-exposure) or a very dark picture with a coin that barely can be seen (phenomenon called under-exposure). How to measure correctly the right time of exposure? You can adjust it by the EV value followed by a number indicated on the LCD screen of your camera. The EV value is read from your digital camera according to the settings of certain values, which are: Metric measuriment exposure: If this feature is available, it sets which part of the subject to measure to determine the exposure. In this way you let the exposure is determined automatically by the camera. Set a measurement in the center. ISO sensitivity: If available, set it at the minimum value (even 100 is fine). Generally, this feature allows to get brighter images in the dark. It is not our case. Aperture value (F-stop): Is represented by the value F followed by a number (such as F3.5) Set the number as higher as possible. Typically it indicates the depth of field. The EV value displayed is the result of these settings. Of course you can and should act on this value. Set it trying to make it as close to zero as possible (greater than 0 means you will have a picture with a marked over-exposure, vice versa, there will be an under-exposure). In order to correctly understand how to act with it, refer to your camera's User Guide. Let us now see the white balance. Written by Il Numismatico 12 English Translation by: WisardCoin The white balance This feature allows you to take pictures with natural colors. The camera does not have an eye as smart as the human one. Let's take a short example to understand this simple but very important aspect. Imagine yourself in your room lit only by a colorful light (eg. Blue, red or yellow). If you take an ordinary sheet of paper, your eyes will be able to perceive the right color of the paper, regardless of the predominant color of the light in the room. But it will not be so for your digital camera. No cameras have this capability. If you will shot a picture of the blank sheet of paper in those lighting conditions, without making the white balance, you will see that the predominant hue of the room will take precedence over your picture, by returning a sheet tending to have a shade of cool color (if the light in the room is blue) or warm color (if the source of light in the room is red or yellow). instead of white. (Picture 4.1) Here is the result we will get if you do not calibrate the settings of white balance. The camera will reproduce incorrectly the color temperature of the light that surrounds us by returning a picture having a shade completely wrong. In this case, the photo has a cool tone (blue). Therefore the operation of the white balance allows you to set up the digital camera color tones in a correct way, taking into account how to render the white color, setting all other colors accordingly. This action has primary importance to make the colors of our photograph as faithful as possible. Imagine to not calibrate the white, and to shot a picture of a silver coin with a beautiful patina: What would come out? Once more, my suggestion is to refer to the manual of your camera. In general, the white balance is found in a separate menu, indicated by the letters WB. In this menu, there are several pre-configured settings (auto, cloudy, incandescent, sunny ...) The “auto” function usually plays very well his duty, but it would be better to get familiar with the custom setting (which is always the best) and learn how to set the white in manual mode. Usually the custom mode is identified by the word PERSONAL, followed by this symbol: This setting procedure is pretty simple. Just shot a photo to a white blank sheet with the same shade of light that will be used to photograph the coins, and we will have "learned" about how our digital camera will decrypt the white color from now on, in the light condition in which we intend to shoot. Obviously, if we were in a different light conditions, the operation must be repeated again. Written by Il Numismatico 13 English Translation by: WisardCoin CHAPTER FIVE Last settings before shooting On this section is important to refer to the user manual of your camera. The "MACRO" function This mode allows you to have a proper focus when photographing very close subjects. Enabling it is very simple, just press the button that is usually is found on the body of our camera, marked with the icon of a flower: The focus Having already set the macro mode, you should already have a good focus without getting into major problems in this regard. In any case, always check the mode that has been set. The option is activated in the FOCUS menu, and has several pre-configured settings. Set the focus at the center function AF , or if present, set the , that is more specific to focus on small objects. Check if the focus is correct. Do this by lightly pressing the shutter button, and if the indication into the viewfinder is green, everything will be perfectly set. Self-timer When shooting with macro mode, it is important to avoid any vibration, because this results in effects of micro-camera shake and lack of sharpness in details. We can overcome this by using the handy self-timer function with delay set to 2 seconds. This function is marked by the following symbol , and the numbers indicate the shutter trip delay. Now we are finally ready for our first photo shoot to our coin! Written by Il Numismatico 14 English Translation by: WisardCoin CHAPTER SIX We take our first numismatic photograph Take stock of the state – We set up our "photographic set" on a perfectly horizontal plane, placing in the right direction and securely our coin on the felt pad sticked to a glass that is very clean, dust-free, and above all without those unsightly fingerprints. – We turned on our lamp, placing it at about 20 cm from the coin at an angle of about 45° from it (if the coin has a heavy patina, or there is a strong reflection of light, we need to increase the distance between the light and the plane of coin. See more details about this on section "ideal light") – We also checked that there are no lint on the coin of any kind, (in case you just blow lightly on, and wait a few moments for the evaporation of any condense that may have formed on the coin) – We have to hand our second glass, cleaned as well … – We have properly set the white balance, shutter, macro mode and focus. At this point we check that the exposure and focus are set correctly We can do this by lightly pressing the shutter button. Obviously we need to place the camera at the right distance from the coin for a proper focus. If the viewfinder indicator that will appear when you press the shutter release button is green, it means that everything is perfectly set. We can go further. – We framed correctly the coin in the viewfinder of the camera. – … and finally we set the self-timer … Almost there ... At this point, we're almost ready to shoot. Let's lay the second glass in front of the light, with an angle of approximately 45°, and begin to rotate it, keeping always the same distance from the light, and look (through the camera's LCD screen) the result of the glass.movement on the coin. We will see that the light is reflected in different ways and at different intensity depending on the glass inclination. In the meanwhile we have to pay attention to two very important things: – Pay attention that our hands or arms do not create shadows on the coin, or that the exposure value is not affected by our movements (remember that this value should be close to zero; Otherwise, with a negative sign before the value we are underexposing, while a positive sign is symphtom of overexposure). Written by Il Numismatico 15 English Translation by: WisardCoin – Pay attention that our hands, our clothes, or anything else that surrounds us does not reflect particular colors on the coin. We could solve this problem subsequently, with the PP, but if we can avoid it before shoting, it would be much better. Our first photo shoot Now here we are! It 'time to shoot. Checking the result that creates the movement of the glass reflecting the light beam on the coin, we can choose when is the best time to shoot. At the time when we see "coming out the coin," stop "playing" with the light halting movement of the glass, let the final checks that nothing interferes in the photograph through the data that appear on the LCD screen (shadows, reflections colorful, exposure ...), gently press the shutter button, and at the further confirmation that focus is ok (indicated by the viewfinder steady green indicator), go! press with determination the shutter button, and rely the self-timer task to capture the precious fruit of all our preparations. We came up to the final shot. The photo is made and we may verify the result on the fly, checking the picture on the LCD screen. Advice, however, verify the results through the screen of your PC, as the LCD display, given its small size, do not allows you to have objective feedback of the actual quality of the photograph. Are you satisfied about the result? Probably you are not, but if don't worry, this is normal. The improvements, however, will come, and will always be proportional to your determination to get them, to your patience and your passion. However, our journey goes on, and in the last two lessons we will see how we can slightly improve the picture obtained with a photo editing software. But before that, we want to say a few words about what the PP is, and how should be done to use it in the proper manner. To next lesson. Written by Il Numismatico 16 English Translation by: WisardCoin CHAPTER SEVEN Post-Processing (PP): What is it and how should be done As the word says, the PP includes a whole series of operations that are implemented on our photo after we have shot it. Please note one very important thing: the PP should not be used to improve the coin shown in the picture, but just to make it as close as possible to reality. This must be a notion that we must never forget if we want to do something with the PP. Why PP Most of the time, the shooting phase does not allow to obtain optimal photographic results; Brightness, contrast, color saturation and alignment of frame are just some of the factors that distraction or limitations due to the available photographic equipment, may give a not fully satisfactory result, and therefore can be improved with the aid of an editing software, in order to obtain a photograph of our coin as faithful as possible to reality (I never grow tired of repeating that, trying to make it better would be a misuse of the PP), and at the same time, also try to improve the photographic presentation, for example removing any unnecessary background, improving the alignment if needed, and laying out the two faces the coin placed side by side or many other things that we can give free vent to your imagination. Post-Processing: a powerful tool to be used with care ... As you can imagine, the PP is a world apart. We get into the heart of a reign which combines, today more than ever, digital photography with computer graphics. The use of a PP software therefore requires a certain knowledge not only about the use of its tools and its functions, but also (indeed, especially!) of those basic notions (which are common for all editing softwares) that allow you to use the graphical tools provided by the PP software in an appropriate manner and not reckless. For this reason, in the last part we will see only a few simple steps that will allow us to improve the presentation of our photos, but that will as well highlight the boundless potential of a ordinary PP software. Although I'm not absolutely a professional in the field (in fact, I'm still learning such s simple fan), I stimulate you, if you have any questions or problems about this issue, to contact me directly at my personal email [email protected]. It would be great to solve together your doubts or any problems arising from your tests. Certainly it is a great way by which we can learn more, faster, and in a fun way! In this brief introduction we will see what is the PP, and will browse through the fundamentals that should guide us in executing it: refine our picture to make it first and foremost as close to reality as possible, and only in the second place, more enjoyable to watch. We are then ready to choose our editing software, and run it on a few small steps on our photograph. In the last lesson of this little guide will move the first steps in this fascinating and boundless world, that nowadays goes hand in hand with professional photography. Written by Il Numismatico 17 English Translation by: WisardCoin CHAPTER EIGHT Installing the photo editing software and first steps in PP Here we come to the final part of our little guide to numismatic photography. On the web you can find many totally free photo editing softwares, and all very valid to go through the simple procedures that will explain below. Personally I've chosen GIMP. Download and install GIMP (the links to the website are only for the Windows version) You can download the portable version at this web address (Portable: is a version of the program that does not require any installation, and is as well immediately bootable on a USB key that you can take with you anywhere; Unique price to pay is the slowness in the startup process). At the time I'm writing this guide, is available the software version 2.8. Usually the program detects the system language and download the relevant installation package. More information on this can be found in the online help (also shown below). Otherwise, if you prefer the installer, you can download it from the official website where in the same page you can find the file who allow you to download and install the user manual in several languages (still the Gimp user manual on the same page), or to consult the web version on Internet. At this point you just have to choose which version to install (portable or the classic installer setup), then acquire a bit of confidence with the website and the various resources that it provides such as the user manual. Launching the program Once you start the program, you will be in front of the user interface. It may seem quite confusing at first sight, but do not worry. If the PP will thrill you, soon you will learn to feel at ease with this program. The first thing to do is to open the file of the photo we shot. The following procedures (which I will not describe step-by-step) require the use of basic knowledge of Windows. To get an overview of the program and the position of the main commands, take a look at the guidelines. To open the picture, in the dropdown menu select the item on the File Open and in the subsequent form select the location where the photo has been stored on your computer. Once that's done, our picture will be shown, as in the picture 8.1 (Picture 8.1) A "raw" photograph just opened in the GIMP. Let's analyze it to see what improvements could be made with the PP: - The coin needs to be rotated. - There is an imbalance between the background and the area covered by the coin. You can get around with the "crop" option to eliminate all the unnecessary background. - The background does not have a uniform color. We can replace it with a totally white color. - For better readability, we can slightly increase the brightness values, and arrange it for better color saturation to achieve a more realistic result. Written by Il Numismatico 18 English Translation by: WisardCoin Let's start with the PP Here we are at the moment to put our fingers on our photograph. I will not describe all the operations step by step, but I will mention only the main steps, inserting in each one a reference link to the online help. Let's start! • Note: Every reference to the on-line Guide is referred to English Language Guide. If you like to read instructions in another language, please refer to the language selection section 1) Select from the toolbox, the tool for the rectangular selection (go to the guide) 2) Holding the mouse left button pressed, drag a square around the coin, as in Figure 8.2: (Picture 8.2) The square selection indicates the total area of the photo selected for trimming. The dashed lines indicate the active selection, which waits to receive commands. The selection is one of the most powerful commands you can use in a photo editing software. 3) Select the option Image Crop to Selection from the dropdown menu (go to the guide) 4) Now we have a picture much smaller, but we still have to rotate it. Select from the toolbox, the tool rotate (go to the guide), resulting in a straighter picture, just as shown above. 5) Now we need to replace the background with a totally white one. We will use the Fuzzy Select Tool in the Toolbox (go to the guide). I strongly suggest you to read the help information for this command, because you will use it often and it is important to know it thoroughly. This tool allows you to select areas of pixels those have a color tone similar to each others; We can set this value in the proper option box. We need to get a similar result as the one shown in Picture 8.3: Written by Il Numismatico 19 English Translation by: WisardCoin (Picture 8.3) Fuzzy Select Tool: Try to make the selection as homogeneous as possible. Pressing the SHIFT key (or uppercase) and clicking with the left mouse button, we can select the entire background of the photo excluding the coin. For more information, see the reference guide Then set the background color to white, by the appropriate box in the Toolbox ( see chapter 2 of the guide) After that, you have just to press the DELETE key on the keyboard, and you will see how all the background will look totally white. To remove the points in which still remained part of the background, you can use the Eraser Tool (go to the guide) 6) Usually the edge of the coin always hides some problem with some debris that remain visible in the background. Here comes back at this stage any aspects that have not been duly treated in the phase of shot. Not enough diffused lighting or any areas that are too dark, can make difficult the selection of pixels with the "Fuzzy Select Tool". In this case, go back to step 5) and reduce the value you set. To improve the accuracy of the edge, you can use the Select Feather option (go to the guide). It will take a bit of time and patience before you learn how to make a proper use of all these tools and with the time you will also understand how to solve any trouble right from the stage of shooting. 7) The color has extreme importance to give naturalness to the numismatic pictures. Just think about colors of the patinas (especially on silver or bronze medals in the Imperial Age), and various shades of copper, for example ... It 's important to learn how to calibrate it accurately to the benefit of photographic fidelity. Using the Colors Hue-Saturation tool you can calibrate all of these variables (go to the guide), while Colors Brightness-Contrast allow you to adjust the highlights and shadows. Be careful not to exaggerate in using these tools. They should be used with caution and in an appropriate manner (go to the guide). Written by Il Numismatico 20 English Translation by: WisardCoin Picture 8.4 The final result: After several steps, here is how appears our photograph. Making a comparison with the pictures we had at the beginning, we performed the following steps: - We rotated the axis of the coin with the rotate tool - We removed with the crop tool all the redundant background, focusing solely on the subject - We have replaced the color of the background (using the fuzzy select tool) with an uniform and deep white, as in the picture of the professional catalogs - We gave a bit of brightness (without exasperating the lights too much), and slightly softened the shadows - We calibrated the color saturation by removing a bit of yellow. In this way the coin has its natural color, with a light brown/reddish patina that is forming We came to end of our little journey into the world of numismatic photography. I hope you have found it interesting and fun, as well as clear, simple and informative. I renew the invitation to contact me for further clarification or information either via email: [email protected] or through my FaceBook or Twitter pages. Till next time! English translation by Written by Il Numismatico 21 English Translation by: WisardCoin