1
THE SIPP UTILITIES USER'S MANUAL
Unicon Research Corporation
1640 Fifth Street, Suite 100
Santa Monica, CA 90401
Version 3.0
November 2005
Copyright © 2005 by Unicon Research Corporation
All Rights Reserved
Development of SIPP Utilities is funded by grant no. 2 R44 HD39618-02 from the
National Institute of Child Health and Human Development.
Caveats
Unicon Research Corporation provides this manual, as well as the accompanying documentation and CD/DVDs, on an "as is"
basis. These products bear no warranty of any kind, either expressed or implied, including but not limited to the implied
warranties of merchantability and fitness for a particular purpose. Unicon Research Corporation may make improvements
and/or changes in any of these products at any time and without notice.
Neither Unicon Research Corporation, its data sources, nor its funding agencies bear any responsibility for the uses of this
collection or for the interpretation of inferences based upon such uses.
Section 3 - 2
THE SIPP UTILITIES USER'S MANUAL
Table of Contents
Caveats ........................................................................................................................................................................................... 2
Table of Contents ........................................................................................................................................................................... 3
1. ACKNOWLEDGMENTS......................................................................................................................................................... 4
2. INTRODUCTION AND BACKGROUND .............................................................................................................................. 4
3. MINIMUM SYSTEM REQUIREMENTS ............................................................................................................................... 4
4. COMPONENTS OF SIPP UTILITIES ..................................................................................................................................... 5
4.1. Data files............................................................................................................................................................................ 5
4.2. Documentation files........................................................................................................................................................... 5
4.3. Software files..................................................................................................................................................................... 5
5. INSTALLATION...................................................................................................................................................................... 6
5.1. Installation procedure ........................................................................................................................................................ 6
5.2. Closing and re-opening SIPP Utilities............................................................................................................................... 6
5.3. Optional copying of data files to hard disk........................................................................................................................ 6
6. USING SIPP UTILITIES .......................................................................................................................................................... 7
6.1. Feature Summary............................................................................................................................................................... 7
6.1.1. General documentation package ................................................................................................................................ 7
6.1.2. Consolidation of variable documentation on single pages......................................................................................... 7
6.1.3. Finding variables of interest....................................................................................................................................... 7
6.1.4. Find variables if the Census Bureau names are known.............................................................................................. 7
6.1.5. Filter extraction on values of variables ...................................................................................................................... 7
6.1.6. Relate source files to calendar months....................................................................................................................... 8
6.1.7. Output options - file type ........................................................................................................................................... 8
6.1.8. Output options - combined files................................................................................................................................. 8
6.1.9. Output options - shape ............................................................................................................................................... 8
6.1.10. Extraction preview ................................................................................................................................................... 8
6.1.11. Manage extraction request files ............................................................................................................................... 8
6.1.12. Periodicity................................................................................................................................................................ 8
6.1.13. 1996 and 2001 Core/Longitudinal files.................................................................................................................... 9
6.1.14. Core and Longitudinal files, output formatting equivalency in general................................................................... 9
6.1.15. Longitudinal weights files........................................................................................................................................ 9
6.1.16. Topical modules....................................................................................................................................................... 9
6.1.17. Common Core/Topical variables ............................................................................................................................. 9
6.1.18. Results screen .......................................................................................................................................................... 9
6.1.19. Last word on combining inputs and merging outputs ............................................................................................ 10
6.2. Sample Extraction............................................................................................................................................................ 10
6.3. Detailed usage instructions .............................................................................................................................................. 10
6.3.1. Request screen ......................................................................................................................................................... 12
6.3.2. Sources screen.......................................................................................................................................................... 14
6.3.3. Variables screen....................................................................................................................................................... 15
6.3.3.1. Finding variables of interest............................................................................................................................. 15
6.3.3.2. Variable-specific extraction options................................................................................................................. 17
6.3.3.3. Variable-specific documentation...................................................................................................................... 18
6.3.3.4. Census name matching..................................................................................................................................... 19
6.3.4. Options screen.......................................................................................................................................................... 21
6.3.5. Extract screen........................................................................................................................................................... 22
6.3.6. Results screen .......................................................................................................................................................... 23
6.3.7. Menu items .............................................................................................................................................................. 24
6.3.7.1. Preferences ....................................................................................................................................................... 24
6.3.7.2. Documentation ................................................................................................................................................. 25
6.3.7.3. Help.................................................................................................................................................................. 25
7. CONTACT US........................................................................................................................................................................ 25
Section 3 - 3
1. ACKNOWLEDGMENTS
The Survey of Income and Program Participation (SIPP) is conducted by the U.S. Census Bureau, which is the source of the
data included in SIPP Utilities. Much of the documentation is derived directly from Census Bureau publications.
Development of this product is funded by grant no. 2 R44 HD39618-02 from the National Institute of Child Health and Human
Development, Bldg 31, Room 2A32, MSC 2425, 31 Center Drive, Bethesda, MD 20892-2425
2. INTRODUCTION AND BACKGROUND
SIPP Utilities facilitates access to SIPP data by providing search, documentation, and extraction tools.
SIPP interviews are conducted in 4-monthly waves on panels of subject persons. New panels were started each year from 1984
to 1993, and then in 1996 and 2001. Each interview includes a set of core questions, the results being recorded in ‘core data
files’. Most interviews also contain questions on particular topics, which vary from wave to wave. These results are recorded
in ‘topical data files’. (In the 1984-1989 panels, the topical data were appended to the core data files). For the 1984-1993
panels, the Census Bureau also released a ‘longitudinal data file’, summarizing core data for all the waves. For the 1996 and
2001 panels, longitudinally consistent core files, and separate ‘longitudinal weights files’ were released. More information
about the structure of the interviews and data files is provided in the SIPP Utilities general documentation (see section 6.3.7.2
below).
This version of SIPP Utilities includes all core and longitudinal data (and weights) for all panels. It also includes a selection of
the topical modules for all panels. Later versions will add the remainder of the topical module data.
In SIPP Utilities, the core, topical, longitudinal, and weights files are collectively referred to as ‘file types’. File types, panels,
and waves are collectively referred to as ‘sources’. Each ‘source’ usually corresponds to one Census Bureau data file.
SIPP Utilities consists of tools to help the user find variables of interest in the SIPP files, view in a concise format all important
information for a variable across all sources, and extract subsets of the data by simply naming variables and sources, and
specifying filter criteria if needed.
It includes a facility for creating and editing extraction requests, and it displays the contents of the output files directly on the
screen. Hyperlinks in the documentation files allow convenient review of related variables and appendices.
SIPP Utilities runs under Microsoft Windows, providing the user with an intuitive visual interface.
3. MINIMUM SYSTEM REQUIREMENTS
•
•
•
•
•
Pentium grade PC running Windows 98, 2000, Me, NT, or XP
500 MB free disk space (or up to 8GB if the option to load data files to disk is exercised)
64 MB RAM
1024 x 768 resolution display (or proportionately more if the display font size has been increased from
‘Normal size’).
CD or DVD reader
Some of the SIPP data files are large. Depending on typical usage, the increased performance of a system with abundant
memory, disk space, and operating speed may be preferred.
Section 3 - 4
To utilize all the features of SIPP Utilities, three third-party “helper” applications must be present on the computer. Probably,
they are already installed, but in case they aren't, they may be downloaded free of charge from their publishers' web sites, using
the links below.
The first is the Adobe Acrobat Reader. Version 4.05 or later is required to view this manual and the other .pdf files. If
necessary, download the latest version from Adobe (http://www.adobe.com/products/acrobat/readstep.html).
The second is a component of Microsoft Internet Explorer 4.0 or later, required to view the SIPP Utilities Documentation and
Results screens. Internet Explorer does not need to be the default browser, or even present in full on the computer. The
necessary component is included with Windows 98 or later, and Windows NT 4.0 or later.
The third is a viewer for Microsoft Excel, required to read the cross-reference tables. If Excel is not installed, the viewer may
be downloaded free of charge from Microsoft (http://www.microsoft.com/office/000/viewers.asp).
(If any of those links fail, the publisher has rearranged their site since we prepared this manual. Try the Adobe
(http://www.adobe.com/) or Microsoft (http://www.microsoft.com/) home pages).
Follow the publishers’ instructions to install the downloaded applications.
4. COMPONENTS OF SIPP UTILITIES
SIPP Utilities consists of three components: data, documentation, and software. They are fully discussed later in this manual.
The documentation and software are copied to the hard disk during installation.
4.1. Data files
This version includes numerous data files, one for each source. Each is a compressed copy of the corresponding file (or
sometimes multiple files) distributed by the Census Bureau. On installation, they may be copied to a hard disk, or may remain
on the CDs.
4.2. Documentation files
The documentation component consists of documentation files for each of the variables, and a comprehensive set of general
documents. The general documents are copied to the \documentation subdirectory under the installation directory.
There are over 6,000 variable documentation files, one for each variable (except allocation flags and certain unedited versions
of variables, which are documented within the documentation file of the variable to which they refer) . Information for that
variable for all sources is included in the variable’s one file, which may be displayed as described in section 6.3.2.1 below.
Each separately-documented variable has a user-friendly SIPP Utilities variable name, with a maximum length of 8 characters
(or 10 in the case of the ‘common core-topical’ variables discussed in Appendix M). The variable documents each contain a
description of the variable, its coding information, its source or sources, references to related variables, the name(s) used by the
Census Bureau for that variable, and any other information we think might be helpful.
The general documents include cross-reference tables enabling identification of the variable from the names and file positions
shown in the Census Bureau documentation, topics lists, a group of appendices, this manual, and a documentation guide.
4.3. Software files
The software files are on a CD or DVD labeled ‘Installation Software’. On installation, the software and associated tables,
lists, and indexes are copied to the hard disk. Full installation details are shown in the following section of this manual.
As a bonus, the SIPP Utilities CD/DVDs also include copies of many Census Bureau documents which are not integrated into
SIPP Utilities. They may be found on the discs labeled ‘Census Support Documents’.
Section 3 - 5
5. INSTALLATION
5.1. Installation procedure
5.1.1. Insert the CD/DVD labeled ‘Installation Software’ into the reader.
5.1.2. If the machine allows CDs/DVDs to autorun, a message will soon appear requesting confirmation that SIPP Utilities is
to be installed. Click ‘Yes’. If the message does not appear, click Start, select Run..., enter d:\setup in the box, and click OK.
(Substitute the CD/DVD drive letter for ‘d’ if necessary).
5.1.3. Follow the screen instructions until software installation is complete. Be patient if nothing happens immediately at some
of the steps. Installation will proceed in a few seconds.
5.1.4. When a message shows indicating that installation was successfully completed, keep the ‘Launch the program’ box
checked, and click ‘Finish’.
5.1.5. SIPP Utilities will open, initially copying more files from the disc to the installation directory. During this process, it
shows an ‘Install dictionary files’ screen, providing status of the copying process. (If it is hidden behind other windows, it may
be displayed by clicking its button on the Windows taskbar).
5.1.6. If this is a first installation of SIPP Utilities on this machine, a ‘Select CD/DVD and Data Drives’ screen will then show.
Verify that the drive letter displayed is the one for the CD/DVD drive in use (if there are multiple drives, it may need to be
changed, using the adjacent ‘Browse’ button). The ‘CD/DVD drive’ box will now show the drive letter, and the ‘Data file
directory’ box will show the drive’s ‘\data’ directory.
5.1.7. Either now or later, this screen may be used to copy data files to your hard disk. See ‘Optional copying of data files to
hard disk’, below.
5.1.8. Click OK to close the ‘Select CD/DVD and Data Drives’ screen.
5.1.9. If this is a first installation of SIPP Utilities on this machine, follow the screen instructions to specify a working
directory and open an extraction request file.
5.1.10. SIPP Utilities is now ready to be used.
5.2. Closing and re-opening SIPP Utilities
Close SIPP Utilities by clicking the ‘Exit’ button at top right of the SIPP Utilities screen.
Re-open by clicking the Windows ‘Start’ button and selecting ‘SIPP Utilities’ from the ‘Programs’ list.
To place a shortcut to SIPP Utilities on the desktop, hold down the right mouse key over ‘SIPP Utilities’ in the ‘Programs’ list,
and drag it to the desktop. A menu will show. Select ‘Create Shortcut(s) Here’ or ‘Copy Here’.
5.3. Optional copying of data files to hard disk
Some or all of the data files may optionally be copied to a hard disk. There are several benefits of copying the data to disk. If
they are not copied, the correct data CD/DVD will need to be inserted for the required extraction. Some extractions require
more than one disc, so there will be prompts to change discs. Reading data from hard disk is usually considerably faster than
reading from a CD/DVD.
The only reason not to copy the data files is the disk space required. The SIPP Utilities data files occupy 15 CDs, or 2 DVDs,
and will take nearly 8GB of disk space if you copy them all.
Section 3 - 6
Data files may be copied to your disk (or deleted) at any time. It is not a necessary part of the installation process.
If they are copied, different locations may be used for different files, and some may be left on the discs. If they are not all in
the same location, when extracting data, the user must return to the ‘Select CD/DVD and Data Drives’ screen to specify the
data file directory containing the data from which to extract.
Each of the CDs/DVDs is labeled with the file types, panels, and waves of the data it contains. The 1996 and 2001 weights
files are present on each of the CDs containing data to which they refer. This is to allow SIPP Utilities to integrate the weights
with the data in a single extraction, if the files are not copied to the hard disk. When copying to the hard disk, files that are
already present, such as weights files already copied from a different CD, are ignored.
To copy data files to the hard disk after installation, open SIPP Utilities, click ‘Preferences’ in the top menu bar, and click
‘CD/DVD and Data Drives’ in the sub-menu. The ‘Select CD/DVD and Data Drives’ screen will show, allowing a location to
be selected for the data file directory, and the CD/DVD drive letter to be specified.
Use the ‘Browse’ buttons on the ‘Select CD/DVD and Data Drives’ screen to make the necessary selections, and click ‘Copy’.
Screen messages will indicate progress and allow copying to be interrupted if desired. When all the data files on the disc have
been copied, the user will be prompted to insert another disc, or to exit the copying process.
6. USING SIPP UTILITIES
6.1. Feature Summary
Following are some of the principal features of SIPP Utilities, with quick references to their usage. For more details, check the
applicable sections of this manual below.
6.1.1. General documentation package
Click ‘Documentation’ in the top menu bar, and browse. Be sure to check Varlist core-long.xls, the topical module variable
detail spreadsheets, and DataSources.xls, under the ‘Spreadsheets’ sub-menu item.
6.1.2. Consolidation of variable documentation on single pages
On the Variables screen, highlight any variable in the left list, and click ‘Dictionary’.
6.1.3. Finding variables of interest
On the Variables screen, click ‘Alphabetically’, and use the ‘Filter list by...’ control. Browse the options under the ‘By
category’, and ‘Search...’ controls.
6.1.4. Find variables if the Census Bureau names are known
On the Variables screen, click ‘Show Census names’ to show the Census names screen. Enter Census names in the top box and
click ‘Search’, or highlight variables in the left list of the Variables screen. Or, use Varlist core-long.xls and the topical module
variable detail spreadsheets, or just ‘Search’ the variable documentation files for them.
6.1.5. Filter extraction on values of variables
Section 3 - 7
On the Variables screen, right-click on a variable in the list at right. A menu will show. Click ‘Add selection criteria for ...’. A
dialog box will show. Enter a value or values, and click OK. The extraction will be limited to records with those values of that
variable.
6.1.6. Relate source files to calendar months
On the Sources screen, browse the panel-wave chart and the slice chart.
6.1.7. Output options - file type
Select any of the seven option buttons at left of the Options screen.
6.1.8. Output options - combined files
There are over 150 separate SIPP source data files. To expedite analysis of related data from multiple source files, SIPP
Utilities provides options to combine extractions from multiple files into a single output file. These options are described and
selected in the ‘Combining options’ frame at right of the Options screen.
6.1.9. Output options - shape
SIPP Utilities allows the user to produce extractions in either wide or long format, from a core file in any panel. The wide
format is a single record per person, matching the format of the Census data files for the 1984-1989 panels. The long format is
one record per reference month per person, matching the Census format for the 1990 and later panels.
Further shaping options are available if files are combined.
These options are described and selected in the ‘Combining options’ frame at right of the Options screen.
6.1.10. Extraction preview
Since there are many extraction options, the Extract screen previews information about the output. Try different extraction
options and preview their effect. Click ‘Extract’ to run the extraction.
6.1.11. Manage extraction request files
A request file contains the full definition of an extraction request, including the variables, the source files from which the
extraction is to be made, and the formatting and other options. On the Request screen, note how working directories for request
files and their resulting extractions can be specified. Note also how new request files can be made from existing ones if a series
of similar extractions is required.
6.1.12. Periodicity
A variable’s periodicity is its interval between observations. SIPP Utilities uses periodicity to prevent or minimize repetition
of redundant information in the output files. See Appendix P for a detailed discussion (click ‘Documentation’ in the top menu
bar, and select ‘Appendices’ from the sub-menu). Use the Extract screen to preview the effect of including or excluding the
variable AGE (which has a periodicity of Month) in an extraction of variables having longer periodicities.
Section 3 - 8
6.1.13. 1996 and 2001 Core/Longitudinal files
For the 1996 and 2001 panels, the Census Bureau did not issue separate longitudinal files. Instead, they released
‘longitudinally consistent’ core files for each wave. SIPP Utilities calls these files simply ‘core files’ and enables the user to
emulate the functionality of the earlier longitudinal files by combining them and producing a single extraction file, just like the
earlier panels.
For instance, if _ID and EDFUND are extracted from all waves of the 1993 longitudinal and 1996 core files in the wide format,
with ‘Combine Waves’ checked on the Options screen, the results will be identically formatted. (Use the ‘Limit number of
records written’ checkbox on the Options screen to skim through the files quickly).
6.1.14. Core and Longitudinal files, output formatting equivalency in general
On the Sources screen, a subset of the waves in the panel may be selected for any longitudinal file, or all the waves in a panel
may be selected for core files. On the Options screen, multiple waves may be combined into a single output file, or they may
be kept separate. Using these options, extractions from any set of core files in a panel can be formatted longitudinally, or
extractions from one longitudinal file can be formatted as separate waves.
6.1.15. Longitudinal weights files
For the 1996 and 2001 panels, the Census Bureau issued separate longitudinal weights files. For earlier panels, these weights
were included in the longitudinal files. Transparently to the user, SIPP Utilities processes the 1996 and 2001 longitudinal
weights so that they appear as they did in the earlier panels. For example, extract variables _ID and FNLWGT96 from any or
all of the 1996 core files. FNLWGT96 will automatically be extracted from the separate weights file. For comparison, extract
_ID and FNLWGT93 from the 1993 longitudinal file. The results will be equivalent.
6.1.16. Topical modules
On the Sources screen, select ‘Topical’ under ‘Select file type(s), click ‘Select by topical module subject’, and select one of the
topics. The panel-wave chart and the source list will show where that topic appears. On the Variables screen, if there is text
below the ‘Filter list by...’ button, click the button and uncheck the two boxes. Click ‘By category’. Click ‘Change category’
and ‘Topical’ to show the topical modules if necessary, and then click the module that was selected on the Sources screen.
The categories (sub-topics) for that module will display. Select one or more (or all) of the categories and click OK.
Then proceed with variable selection and extraction as for core and longitudinal variables.
All the formatting and combining options are also available with topical module files. Variables from different topical
modules, core and longitudinal files, and multiple waves and panels may be included in the same extraction request.
6.1.17. Common Core/Topical variables
Recent topical module files contain a set of demographic variables common to all topical modules. SIPP Utilities distinguishes
then from their core file equivalents by suffixing ‘_T’ to the variable name. SIPP Utilities also automatically extracts them
from the core files if they are not present in the topical files. See Appendix M and spreadsheet TM Core-Topical Common.xls
for details.
6.1.18. Results screen
Most of it is self-explanatory. Run any extraction and examine the report. Click ‘List’ to get a visual confirmation that the data
are as expected, and to link to the variable documentation. The ‘Execute code’ (or ‘Load to Stata’, etc.) button is a key feature.
Section 3 - 9
Depending on the output option selected, and assuming the applicable program is installed and properly associated with the file
extension, it loads the extracted data to Stata or a spreadsheet, or loads the custom program code to the SAS or SPSS code
editor.
6.1.19. Last word on combining inputs and merging outputs
As an extreme example, SIPP Utilities can extract data from all 24 core and topical files, and the separate weights file, in the
1996 panel, and output the result as a single file with a single record per person. To verify: start a new request file, and on the
Sources screen select core and topical file types and all the 1996 waves; on the Variables screen add SEX and SEX_T; and on
the Options screen check Combine File types and Waves, and select Wide (person records). To save time, limit number of
records written to 1000.
On the Extract screen, verify the selections and see what output will result. Click Extract. When the Results screen shows,
verify.
6.2. Sample Extraction
Among the documents distributed with the CDs is a set of pages titled ‘Sample Extraction’. They guide the user through an
example showing the steps required to find variables of interest and extract their values.
The Sample Extraction document may also be accessed by selecting it from the Documentation menu item in the top menu bar
of the SIPP Utilities screen.
For further information on SIPP Utilities functions, check the applicable sections of this manual below.
6.3. Detailed usage instructions
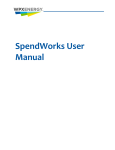
After installation is complete, when SIPP Utilities opens, it appears as in Figure 1. There are five overlapping windows, any of
which may be brought to the top by clicking its button in the toolbar near the top, or on any part of it that is visible. Above the
toolbar is the menu bar, providing access to general documentation and other items.
The five numbered windows (screens) are described in turn below.
Section 3 - 10
Figure 1. SIPP Utilities, showing the five overlapping screens.
Section 3 - 11
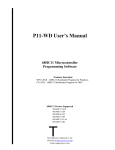
6.3.1. Request screen
Figure 2. Request screen
The Request screen allows the user to create files in which to store the details of extraction requests. The two lists at the
bottom of the Request screen show the sources and variables currently specified for the selected request file. The contents of
those two lists are specified on the next two screens. They cannot be changed from this screen.
The center list contains all the request files in the current working directory. The buttons at the right allow the user to start a
new request, to delete an existing request, to copy or move an existing request, or to change to a different working directory.
On first installation, messages show, asking the user to select a working directory and to start a new request file.
Once one or more request files have been created, they may be easily copied or combined using the dialog shown in Figure 3,
which appears when the ‘New Request’ button is clicked.
Section 3 - 12
Figure 3. ‘New Request’ dialog
When the extraction is run, the results are saved in a sub-directory with the same name as the request file. The full paths to the
result files are listed in the Extraction Report, shown in Figure 16 below. The contents of the lower two lists on the Request
screen are automatically updated to show the sources and variables currently listed on the Sources screen and the Variables
screen when the extraction is run.
Typically, the user would not return to the Request screen after changing the sources or the variables and before running the
extraction, but if that does happen, the dialog shown in Figure 4 will show, allowing the user to continue with their changes or
revert to the original selections.
Figure 4. Dialog allowing request file changes to be saved before running an extraction
Section 3 - 13
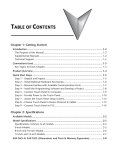
6.3.2. Sources screen
Figure 5. Sources screen
The Sources screen allows the user to select the files from which data extractions are to be made. The selected files are listed
in the box at lower right. The file types (core, longitudinal, topical) are selected in the list box to its left. The upper right part
of this screen shows the Panel-Wave chart, where one or more specific files may be selected. Selected files are indicated by a
green background in the chart, as well as being listed in the box below.
Multiple file types, panels, and waves may be selected for a single extraction. Output files may be combined, or kept separate,
using the choices provided on the Options screen.
The longitudinal weights files for the 1996 and 2001 panels are not shown as separate sources. Instead, they are accessed
automatically when longitudinal weights variables are included in an extraction request from the other 1996 or 2001 sources.
The Panel-Wave chart shows the calendar months represented in each panel and wave, for each reference month and rotation
group, specified in the ‘Select date display’ frame at upper left. The same information may be displayed in a different format
by clicking the ‘Show slice chart’ button.
Instead of clicking in the chart, the controls in the ‘Select panel(s) and wave(s)’ frame, at lower left, allow panels and waves to
be selected either by topical module subject, or by calendar period.
Section 3 - 14
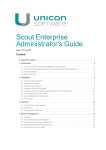
6.3.3. Variables screen
6.3.3.1. Finding variables of interest
Figure 6. Variables screen
The large box at the left initially contains all the SIPP variables. The box at the right shows the variables currently specified
for extraction in the request file selected on the Request screen.
Variables may be added to the request file in several ways. They may be dragged from the left box, or selected in the left box
and added with the ‘Add’ button, either individually or in a group. Their names may be typed into the box above the list, and
added with the ‘Add’ button.
The contents of the left list scrolls horizontally to display more variables. Its contents may be filtered to a more convenient size
is several ways. The ‘Filter list by...’ button displays the dialog shown in Figure 7, which allows the user to keep only the
variables in the file type(s) and/or panel(s) of interest. When this filtering is in effect, its definition is shown in a text entry
below the ‘Filter list by...’ button, as in Figure 6.
Section 3 - 15
Figure 7. Filter list dialog
The three option buttons at upper left further define the content of the left list. The ‘By category’ button filters the list by
subject, as selected in the dialogs shown in Figures 8a or 8b, one of which displays when the ‘Change category’ button is
clicked. The two versions of this dialog may be toggled by clicking the applicable button at the top.
Figure 8a. Select core/longitudinal category
Figure 8b. Select topical module category
The ‘Search’ button allows the variable documentation files to be searched for specific text in two ways, using the dialogs
shown in Figures 9a and 9b. The ‘Search results’ option button displays the results of the most recent search.
Section 3 - 16
Figure 9a. Word search dialog
Figure 9b. String search dialog
The ‘Show titles’ checkbox toggles display of the titles for each of the variables in the left list.
6.3.3.2. Variable-specific extraction options
When the right mouse button is clicked over a variable in the right list, a menu to apply value filtering and other variablespecific extraction options, as in Figure 10, is displayed.
Figure 10. Right-click menu
Section 3 - 17
Some of the right-click menu items display additional dialog boxes as illustrated in Figures 10a and 10b.
Figure 10a. Filter on value(s) of variable
Figure 10b. Rename variable
The menu item ‘Add allocation flag for...’ adds the applicable allocation flag (or flags) for the variable to the extraction.
Allocation flags cannot be added directly to the request file. Allocation flags cannot be extracted for variables to which the
rename option is applied.
The right-click menu items selections are saved in the request file as arguments to the variables to which they apply, as shown
in Figure 11. Figure 11 also shows that if there is more than one variable with filter criteria, option buttons are provided to
make the filtering inclusive or exclusive.
Figure 11. Request file, showing right-click choices
6.3.3.3. Variable-specific documentation
Each variable has a documentation file showing detailed information about the variable in all the sources in which it exists
(Figure 12). The documentation file may be displayed by selecting the variable in the left list and clicking the ‘Dictionary’
button, or by double-clicking the variable name in either list.
Section 3 - 18
Figure 12. Variable-specific documentation (Dictionary) screen
Hyperlinks in the variable documentation enable the user to immediately show the documentation for related variables and
appendices. The left and right arrows at top right allow the user to browse all the variables shown since the window was
opened. The dictionary screen can be resized if required, by dragging its borders. Buttons on this screen enable the user to find
text, copy, print, and save the contents of the display. The ‘New variable’ button displays an alphabetic variable list, allowing
the documentation of other variables to be displayed without returning to the Variables screen. The ‘Add ... to request file’
button adds the displayed variable to the request file without returning to the Variables screen.
6.3.3.4. Census name matching
Consistent variable naming across file types, panels, and waves is a valuable feature of SIPP Utilities, facilitating comparison
of like data from multiple sources. However, users may initially be more familiar with the Census Bureau names. SIPP
Utilities therefore includes tools for matching Census names with SIPP Utilities names, and, if desired, renaming variables
with their Census names.
The most direct way is to use the table of Census names at the beginning of the dictionary file for each variable (Figure 12). If
a Census name is entered in the ‘Word Search’ dialog (Figure 9a), all variables with that Census name will quickly be found.
Another way is to search the spreadsheets accessible from the ‘Documentation’ menu item for Census names.
A more interactive way is to highlight a variable in the left list on the Variables screen, and check the ‘Show Census names’
box. The table shown in Figure 13 will display, showing all the Census names used for that variable. The user may then
simply click on other variables in the left list to display their Census names.
Section 3 - 19
Figure 13. Census name matching table
The ‘Search’ button on the table in Figure 13 provides matching in the opposite direction, i.e. if a Census name is entered in the
adjacent box, on clicking ‘Search’, the SIPP Utilities name is displayed, along with all the other Census names used for that
variable.
More interactively still, if a Census name, e.g. EAFNOW, is entered in the box above the right list on the Variables screen, on
clicking ‘Add’, the user is prompted to open the Census name matching table, which then displays the corresponding SIPP
Utilities name, and all the other Census names used for that variable.
The option buttons in the Census name matching table enable the user to rename the variable to the appropriate Census name.
Thus, if the option button associated with the 2001 Core entry is selected, as in Figure 13, on clicking the ‘Add’ button on the
Variables screen, the entry ‘AFNOW rename { EAFNOW }’ is added to the request file.
Section 3 - 20
6.3.4. Options screen
Figure 14. Options screen
The seven option buttons in the frames at upper left of this screen allow the user to select types of output files to be produced,
to suit the user’s preference for further processing of the extracted data. The top button produces a Stata dataset directly, the
next three produce data as ascii files with code segments for loading the data file into Stata, SAS, or SPSS, and the last three
produce differently formatted ascii tables, including a comma-separated value format for loading directly to a spreadsheet.
The first checkbox at lower left allow variable labels or titles to be included in the output files (its caption changes depending
on the output file type selection). The second checkbox skips the extraction and just produces the output report. The third
checkbox adds a section to the extraction report providing additional information about each variable, including any renaming
and filtering specified. The fourth checkbox allows a short preliminary extraction to take place so the user can verify the
output is as expected. The number of records output will not always equal the number of IDs specified in the adjacent box, as
variations may occur depending on filtering and combining options.
The options shown at the right of this screen allow the user to combine and merge extractions, to facilitate longitudinal
analysis.
New users are recommended to keep both checkboxes under ‘Combine’ unchecked. They will then get one output file per
source file, thereby avoiding the variable name suffixes and auxiliary variables necessary to distinguish sources when
combining extractions from multiple sources into a single output file.
The two option buttons at lower right format core file extractions from any panel as either person-month (long, like the 19902001 Census files) or person (wide, like the 1984-1989 Census files). If variables with Month periodicity, such as AGE, are
included in the extraction, reference months are distinguished in long format by the auxiliary variable _REFMO, and in wide
format by suffixes _M1, etc., e.g. AGE_M1 through AGE_M4.
Section 3 - 21
If the checkbox to combine waves is checked, the two option buttons have a similar effect. For example, if on the sources
screen all waves of the 1993 panel are highlighted, in the long format there would be up to 36 records per person, with auxiliary
variables _WAVE distinguishing waves, and _REFMO distinguishing months, and in the wide format AGE would appear 36
times, as AGE_W1M1 through AGE_W9M4.
If the checkbox to combine file types is checked, only the wide output option is available, as the longitudinal and topical file
types do not distinguish reference months. Following the principle used to distinguish months and waves, the source of
variables that exist in multiple file types is identified by another suffix, _C, _L, or _T, for core, longitudinal, or topical.
Further information on periodicity, and its influence on the formatting of data extractions, is provided in Appendix P.
6.3.5. Extract screen
Figure 15. Extract screen
The purpose of this screen is simply to collect and display to the user all the selections made on the other four screens, and to
summarize the expected results.
The selections are listed in the upper part of the screen.
The three list boxes show (left) the source(s) for each output file, (center) the variables that will be included in the output file
selected in the left list, and (right) the values of any auxiliary variables that SIPP Utilities needs to produce.
Auxiliary variables are required when the output file, as specified on the Options screen, is in the person-month (long) format.
In such cases, as shown in Figure 15, there are multiple records in the output file for each person, and they must be
distinguished by one or more auxiliary variables, in this case _REFMO.
When the output file is specified to be in the wide format, the variables that change by reference month are suffixed in the
output file, e.g. as AGE_M1 through AGE_M4, and they are shown as such in the center list.
Section 3 - 22
The user may make adjustments to the choices on the other four screens, and immediately check the effects on this screen.
When ready, the ‘Extract’ button may be clicked to begin the extraction.
During the extraction, a progress box will be displayed. The extraction may be aborted if desired, by clicking the ‘Esc’ key on
the keyboard. On completion, the Results screen is displayed, initially showing the Extraction Report (Figure 16).
6.3.6. Results screen
Figure 16. Results screen, showing beginning of Extraction Report
The Extraction Report documents the extraction. Following the details shown in Figure 16 is a list of the extraction options
selected, and the documentation for each of the extracted variables.
Buttons at lower right of the Results screen allow the screen contents to be searched, copied, printed, or saved in a different
location.
The ‘Display other files’ box at center right is shown if multiple sources are selected for extraction, but not combined. It
allows the results from any of the extractions to be shown.
The option buttons at top right enable other results of the current extraction to be displayed. The ‘List’ option displays the
extraction as a table, for visual verification that the extraction produced the intended results (Figure 17).
Section 3 - 23
Figure 17. Results screen, showing extracted data list
The variable names at the top of the table may be clicked to display the variable’s documentation. The arrows at top right of
the Results screen enable the user to move backwards and forwards through the screen contents previously displayed.
The remaining three option buttons at top right of the Results screen allow the contents of the files produced by the extraction
to be displayed directly.
Below the option buttons is the ‘Execute code’ button. Depending on the type of output file selected on the Options screen,
this button may be differently named, and may function slightly differently. In each case it will take the appropriate action to
initiate further examination of the extracted data.
For instance, if the selected output file format was ‘Comma delimited ASCII table’, the button will start Excel and load the
extraction into it. In the case shown in Figures 16 and 17, the extraction produced an ascii data file and matching Stata .do and
.dct files to load the data file. The ‘Execute code’ button starts Stata and runs the .do file to load the extracted raw data.
Correct functioning of this button requires the proper application to be present on the user’s computer and correctly associated
with the file name extension of the applicable file (as listed at the top of the Extraction Report, figure 16).
6.3.7. Menu items
These items are in the menu bar at the top of the SIPP Utilities window, Figure 1.
6.3.7.1. Preferences
The ‘CD/DVD and Data Drives’ sub-menu item displays the screen shown during installation, where the user sets the CD/DVD
drive letter and the location of the data files, and optionally copies data files from the disc. It allows the user to change these
Section 3 - 24
settings if desired. The ‘Message duration’ sub-menu item allows the user to adjust the time certain messages display, or to
suppress them altogether. Typically, these messages appear between panels or waves of extractions from multiple sources. For
instance, one such message warns the user if previously-extracted files are about to be overwritten.
6.3.7.2. Documentation
This menu item leads to a number of sub-menu items giving access to all the SIPP Utilities general documentation. Many
important documents are included here. Users are advised to browse these items extensively.
6.3.7.3. Help
Instructions for most SIPP Utilities operations are shown directly on the applicable screens. Where further information is
likely to be needed, ‘Help’ or ‘More information’ buttons are provided on the screens.
In case further help is needed, the user may consult the pages accessible under this menu item.
7. CONTACT US
We are anxious to hear your suggestions that will improve the convenience of SIPP Utilities. If you wish to suggest changes or
make comments, please feel to call us at Unicon (310 393-4636; ask for Eanswythe Grabowski, Bryan Rickard or Barbara
Moore), or send us e-mail at [email protected]. Check our website (http://www.unicon.com) periodically for
announcements and updates.
Section 3 - 25