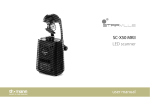
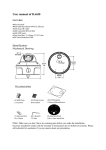
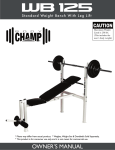
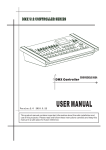
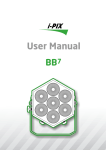
1
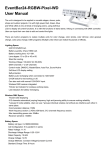
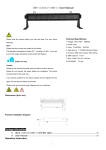
User Manual Unpacking: Thank you for your purchasing our YL-LED-24-1RGBW. In order to proper use and operate the unit, please read the manual carefully before you use. There are important safety operation advice and operation instruction in this manual, please keep the manual properly for future use. Every unit has been strictly tested before shipment, wonderful programme has been built-in as well when shipped. Please check all the accessories inside the box ( list is attached ). If the carton was damaged during transportation, and the accessories are lost or working improperly, please contact our after sales department before you return the products. Attention: Please make sure the power is connected to earth properly before use to avoid electric shock. The unit is indoor use only. Make sure no water, no wet or no vibration, the stable working environment is 0-35 degree. Warranty label should not be tore off, or the warranty will not be responsible. If there are problems in the unit, please contact our after sales department directly, staff not from our company or authorized persons are not allowed to dismount the unit. Please don't throw away the packing materials, when there is problem, the unit can be packed using the original parking materials and returned to our after sales department. Lighting Specs: Working Voltage : AC 100-240V, 50-60Hz Power: 45W LED type: 6 1W Red, 6 1W Green, 6 1W Blue, 6 1W White Bean Angle: 50 degree Control Mode: Wireless DMX, Auto, Manual, Sound DMX Channel: Mode A: 24 CH Mode B: 7 CH Connection: DMX ( 3 Pin XLR) Net Weight: 4.5Kgs Dimensions: 460(L) x 120(W) x 340(H) mm Wireless DMX Specs: Tricolor LED displaying 126 channels automatical jumping frequency, high anti-jamming ability to ensure working reliability. 7 groups ID code settable, User can use 7 groups individual wireless net without any interfere each other in the same place. Communication distance: 700M Work frequency section: 2.4GHz ISM band,126 channels frequency section. Max transmitting power rate: 20dBm Receiver sensitive: -94dBm Battery Specs: 1 Cell QTY: CJ18650/2200MAh X 21PCS Cell Composition: 7 in parallel 3 in series Rated Voltage: 11.1V Discharge Voltage Range: 8.25-12.6V Rated Capacity: 19.8Ah Charge Voltage: 12.6V Charge Methods: Constant Voltage/Constant Current Standard Charge Time: 8 Hours Discharge Cut-off Voltage: 2.75V/Cell Overcharge Protection Voltage: 4.25V/Cell Circulation Life: Not less than 300 times The battery should not explode, fire, smoke or leak after vibration, crash, free fall, overcharge, overdischarge, shortcircuit or hit by heavy objects, while deformation is allowed. Function Setup Working Mode: To receive data from DMX controller or Master unit. AutoMode --- The unit will automatically chase through the different colors (18 effects ). MaulMode --- The unit will work manually as desired. SoudMode --- The unit will react to sound, chasing through the built in programs. sys_set --- To set all parameters Button and LED indicators positions: High power individual controllable LED, using 4 buttons and LCD display for operation menu. Press ESC to get back to last menu. Press ENTER to get into function menu. Press Down, UP to edit current parameter. Wireless ID indicator 1 Menu Operation ***±1 Mode: 0 Enter ESC UP/DOWN DmxMode UP/DOWN ESC Mode: 1 ***±1 ESC UP/DOWN Enter Auto: 0 Sped UP/DOWN ***±1 ESC ESC Enter UP/DOWN AutoMode ESC Enter Auto: 17 UP/DOWN Sped UP/DOWN ***±1 ESC ESC Enter Red ESC UP/DOWN UP/DOWN Green Enter ESC Enter UP/DOWN Enter Blue ESC UP/DOWN White Enter ESC Dimmer UP/DOWN Shutter Enter ESC Enter ESC ***±1 *** UP/DOWN UP/DOWN UP/DOWN ***±1 *** UP/DOWN ESC ***±1 *** UP/DOWN MaulMode ***±1 *** ***±1 *** UP/DOWN ***±1 *** UP/DOWN UP/DOWN Soud:0 SoudMode UP/DOWN ESC Soud:17 WIRELES ID SETUPS UP/DOWN ***±1 ESC Enter UP/DOWN ***±1 ESC UP/DOWN ***±1 ESC UP/DOWN Enter Sys_set R/L_SET Menu R/L S:R、R/L S:L ESC UP/DOWN Slave 1 UP/DOWN UP/DOWN ESC ***±1 Note: When to receive wireless dmx signal, through Sys_set --- WIRELESS ID SETUPS, you can set ID code, when the color of the ID indicators from both transmitting and receiving ends are the same, the communication is setup successfully. Through Sys_set --- R/L_SET, you can choose via wire or wireless to receive signal. When choose R/L_S:R, via wireless to receiver signal. When choose R/L_S: L, via wire to receive signal, then using cable to connect all lights. Address Code calculation ADDR = CH_NUM × N + 1 CH_NUM: Allocated DMX Channels, CH_NUM>=24 N: Loop No., N=0,1,2,3…… For example: Each loop allocated 36 DMX channels No.0 Loop ADDR = 1 No.1 Loop ADDR = 25 No.2 Loop ADDR = 49 No.3 Loop ADDR = 93 Wireless ID setup Sys_set --- WIRELES ID SETUPS Press SETUP, UP OR DOWN at present mode to display current ID, press again to setup new ID, ID value will be added 1 more by pressing one time, ID indicator color will change according one by one. Working Status: LED constant light: Showing current ID, no DMX or wireless signal RED LED flash: Transmitting Green LED flash: Receiving ID code and LED color corresponding relationship: 1:RED 2:GREEN 3:RED+GREED---------------Yellow 4:BLUE 5:RED+BLUE------------------Purple 6:GREEN+BLUE--------------Cyan 7:RED+GREED+BLUE------White Slave Setup Sys_set slave At present mode, press ENTER, UP or DOWN to setup Slave mode, choose slave mode, its output is the same as that of the Master Unit. DMX Control Channels Table (DMX Mode A) 1 DMX CH Function DMX512 Value Descriptions CH1 Red Dimming 0~255 Red Dimming 0% - 100% CH2 Green Dimming 0~255 Green Dimming 0% - 100% CH3 Blue Dimming 0~255 Blue Dimming 0% - 100% CH4 White Dimming 0~255 White Dimming 0% - 100% CH5 Red Dimming 0~255 Red Dimming 0% - 100% CH6 Green Dimming 0~255 Green Dimming 0% - 100% CH7 Blue Dimming 0~255 Blue Dimming 0% - 100% CH8 White Dimming 0~255 White Dimming 0% - 100% CH9 Red Dimming 0~255 Red Dimming 0% - 100% CH10 Green Dimming 0~255 Green Dimming 0% - 100% CH11 Blue Dimming 0~255 Blue Dimming 0% - 100% CH12 White Dimming 0~255 White Dimming 0% - 100% CH13 Red Dimming 0~255 Red Dimming 0% - 100% CH14 Green Dimming 0~255 Green Dimming 0% - 100% CH15 Blue Dimming 0~255 Blue Dimming 0% - 100% CH16 White Dimming 0~255 White Dimming 0% - 100% CH17 Red Dimming 0~255 Red Dimming 0% - 100% CH18 Green Dimming 0~255 Green Dimming 0% - 100% CH19 Blue Dimming 0~255 Blue Dimming 0% - 100% CH20 White Dimming 0~255 White Dimming 0% - 100% CH21 Red Dimming 0~255 Red Dimming 0% - 100% CH22 Green Dimming 0~255 Green Dimming 0% - 100% CH23 Blue Dimming 0~255 Blue Dimming 0% - 100% CH24 White Dimming 0~255 White Dimming 0% - 100% DMX Control Channels Table (DMX Control Mode B) DMX CH Function DMX512 Value DMX Mode 0~10 Auto Mode 11~170 18 Effects for selection Sound Mode 171~255 18 Effects for selection Red Dimming 0~255 Red Dimming 0% - 100% CH2 Auto Speed Adjusting 0~255 Speed Adjusting (Auto Mode Only) CH3 Green Dimming 0~255 Green Dimming 0% - 100% CH4 Blue Dimming 0~255 Blue Dimming 0% - 100% CH5 White Dimming 0~255 White Dimming 0% - 100% CH6 Overall Dimming 0~255 Overall Dimming 0% - 100% CH7 Strobe Speed Adjusting 0~255 0~10: No Strobe 11~25: Strobe Speed from fast to slow CH1 1 Descriptions DMX Effect Selection Operation Instructions General Operation Setup Mode: Setup working mode as per the real situation of the client. If it is DMX mode, the DMX address of the unit should be set as well. Control cable connection: Connect DMX control cable and the DMX controller, if it is one unit, no cable is required. Connect to power: The system will run the previous saved working mode. If in DMX mode, you can use DMX controller to edit and control programme effects. If in Auto mode, then the unit will run built-in programmes. If in AaulMode, then you can change all parameters when in Red, Green, Blue and White modes. Individual Mode In Individual Mode --- Auto mode or Manual Mode or Sound Mode, no controller and cable required, running the built-in programmes inside auto or manual or sound modes. Setup working modes, like AutoMode, and setup the parameter of Sped, MaulMode, SoudMode. Connect to power, system will run the previous saved working mode. If in SoudMode, running programmes as per outside heavy or light sound, if in AutoMode, then running built-in programmes, if in MaulMode, then you can choose all kinds of effects manually. Master/Slave Mode Master/Slave mode --- Auto or Manual or Sound modes, no controller required, when running the programmes of auto or manual modes, master unit controls salve unit to achieve synchronizing effects. Setup working modes, like AutoMode, and setup the parameter of Sped, MaulMode, SoudMode. Cable connecting: Use XLR-XLR control cable to connect the input connection of the first salve unit from the DMX output connection of the master unit, then connect the input connection of the second slave unit from the DMX output of the first slave unit, and so on, until all salve units are connected. When there is no control cable, the units can communicate with each other via wireless, the preconditions are the ID codes of the master unit and the slave unit should be the same. Connect to power, system will run the previous saved working mode. If in SoudMode, running programmes as per outside heavy or light sound, if in AutoMode, then running built-in programmes, if in MaulMode, then you can choose all kinds of effects manually. Note: If there are more than one master unit or connecting with DMX512 controller, the slave units will work improperly. 1 Connecting Diagram of Master/Slave Mode DMX mode DMX mode, international standard DMX512 controller is required to use for control. Setup the working mode: DMXMode Cable connecting: Use XLR-XLR control cable to connect the input connection of the first salve unit from the DMX output connection of the master unit, then connect the input connection of the second slave unit from the DMX output of the first slave unit, and so on, until all salve units are connected. When there is no control cable, the units can communicate with each other via wireless, the preconditions are the ID codes of the master unit and the slave unit should be the same. Connect to power, system will run the previous saved working mode. Use controller to control. Connecting Diagram of DMX mode User instruction and safety regulation: Recommended to use: Read the user manual and labels on the lighting carefully before use. Please use the unit where there is no rain. When using, keep away of hot source, high pressure, avoid kids, never throw or hit the unit. Use the supplied power adapter only, never charging over 24 hours. Never dismount the light or battery by yourself, not to place the unit in a wet environment to avoid danger. When not using the unit for long term, please save the unit properly in a dry place, battery should be half charged. Please bury the used unit, never throw to fire or water. Danger Warnings There are protection structure and circuit for the battery inside the unit, any inappropriate dismount of the light or battery might break the protection function and lead to batter getting hot, smoking, deforming or fire. Never shortcircuit the unit. Heating and burning will melt the battery separator, causing loss of protection function or burning of electrolyte and overheat will cause heating, smoking, deformation or burning of batteries. Never use the unit in an environment over 80 degree; not to charge the unit close to fire source or under direct sun. Even never wet or throw the unit to water, otherwise, the protection function inside the battery might lose or abnormal chemical reaction might arise, causing battery to be hot, smoking, 1 deformation or fire. It is dangerous charging not to use the supplied power adapter. Never break the light or battery, not to weld the battery or dismount the battery to be used in other equipment, not to touch the leaked battery electrolyte. Warning Place the unit where kids can't reach. If the charging time over the standard charging time for long, it is advised to stop charging. It will extend the charging time if charging while using, it is advised to turn off the light when charging. Never place the unit inside microwave oven or any pressure container, instant heating or leakage (or abnormal smell), the unit should be abandoned and treated properly. Not to use the unit in an environment where there is static electricity, the battery protection circuit might easily get broken if the static electricity is over 1000V, causing battery working abnormally, heating, smoking, deforming or fire. 1