
1
P3PC-5092-02ENZ2
Basic Operation Guide
(Windows)
Contents
About This Manual ................................................................................................................. 4
Safety Information..................................................................................................................................5
Manuals ...............................................................................................................................................6
Trademarks...........................................................................................................................................9
Manufacturer....................................................................................................................................... 10
Symbols Used in This Manual................................................................................................................ 11
Arrow Symbols in This Manual............................................................................................................... 12
Screen Examples in This Manual ........................................................................................................... 13
For Windows 8.1 or Windows 8 Users .................................................................................................... 14
Abbreviations Used in This Manual ........................................................................................................ 15
What You Can Do with the ScanSnap ................................................................................. 17
Scanning a Document.......................................................................................................... 20
Scanning Documents with the ScanSnap by Inserting Two Documents at a Time or by
Inserting the Next Document While the Current Document Is Being Scanned .............. 25
Scanning Documents Larger Than A4 or Letter Size (by Directly Inserting Them in the
ScanSnap) ..................................................................................................................... 31
ScanSnap Overview............................................................................................................. 35
Parts and Functions ............................................................................................................................. 36
System Requirements .......................................................................................................................... 38
Overview of the ScanSnap Related Software........................................................................................... 40
How to Install the Software.................................................................................................................... 41
ScanSnap Manager Icon....................................................................................................................... 42
Right-Click Menu ................................................................................................................................. 43
ScanSnap Setup Window ..................................................................................................................... 45
Turning the ScanSnap On or Off ............................................................................................................ 46
Turning the ScanSnap On.............................................................................................................. 47
Turning the ScanSnap Off.............................................................................................................. 49
Sleep Mode.................................................................................................................................. 50
Documents to Scan.............................................................................................................................. 51
Documents That Can Be Loaded Directly into the ScanSnap .............................................................. 52
Documents That Can Be Scanned Using the Carrier Sheet ................................................................ 54
Using the ScanSnap According to Your Needs ................................................................... 56
Managing Business Forms in ScanSnap Organizer ................................................................................. 57
Saving Business Cards in CardMinder .................................................................................................... 60
Useful Usages...................................................................................................................... 62
Scanning Documents Larger Than A4 or Letter Size (with the Carrier Sheet) .............................................. 63
Scanning Documents Such as Photographs and Clippings ........................................................................ 68
Troubleshooting ................................................................................................................... 72
How to Find Your Solution..................................................................................................................... 73
If Your First Attempt to Install Failed ....................................................................................................... 74
If You Have Installed the Software Before ............................................................................................... 75
2
Uninstalling the Software ............................................................................................................... 76
Removing the Installation Information .............................................................................................. 77
Installing the Software from the [ScanSnap Setup] Window ................................................................ 81
Installing One Software at a Time.................................................................................................... 82
When the ScanSnap Manager Icon Does Not Appear ............................................................................... 83
Displaying the ScanSnap Manager Icon........................................................................................... 84
When ScanSnap Manager Does Not Operate Normally ............................................................................ 85
Removing Unnecessary Icons from the Notification Area.................................................................... 86
Checking the Connection between the ScanSnap and the Computer ................................................... 87
Checking If ScanSnap Manager Is Operating Normally ...................................................................... 88
Removing the ScanSnap's Connection Information ........................................................................... 91
When You Cannot Uninstall the Software................................................................................................ 93
Cleaning ............................................................................................................................... 94
Specifications of Cleaning Materials ....................................................................................................... 95
Cleaning the Outside of the ScanSnap ................................................................................................... 96
Cleaning the Inside of the ScanSnap ...................................................................................................... 97
Cleaning the Carrier Sheet .................................................................................................................. 100
Appendix ............................................................................................................................ 101
Uninstalling the Software .................................................................................................................... 102
Specifications of Optional Parts ........................................................................................................... 104
Specifications of the ScanSnap............................................................................................................ 105
About Customer Support and Maintenance ....................................................................... 107
3
About This Manual
About This Manual
l "Safety Information" (page 5)
l "Manuals" (page 6)
l "Trademarks" (page 9)
l "Manufacturer" (page 10)
l "Symbols Used in This Manual" (page 11)
l "Arrow Symbols in This Manual" (page 12)
l "Screen Examples in This Manual" (page 13)
l "For Windows 8.1 or Windows 8 Users" (page 14)
l "Abbreviations Used in This Manual" (page 15)
4
Safety Information
Safety Information
The attached "Safety Precautions" manual contains important information about the safe and correct
use of the ScanSnap. Make sure that you read and understand it before using the ScanSnap.
5
Manuals
Manuals
Read the following manuals according to your needs when using the ScanSnap.
Before Using the ScanSnap
Manual
Description and Location
Safety Precautions
This manual contains important information about the safe use of the ScanSnap.
Make sure you read this manual before using the ScanSnap.
Safety Precautions is included in the package.
In addition, when the software is already installed, this manual can be accessed by
selecting [Start] menu → [All Programs] → [ScanSnap Manuals] → [S1100i Safety
Precautions] (for Windows 8.1/Windows 8, by selecting [S1100i Safety Precautions]
under [ScanSnap Manuals] on the All apps screen).
When Setting Up the ScanSnap
Manual
Description and Location
ScanSnap S1100i Getting
Started
This manual explains the setup procedure from the moment you open the package to
testing the operations.
Getting Started is included in the package.
In addition, when the software is already installed, this manual can be accessed by
selecting [Start] menu → [All Programs] → [ScanSnap Manuals] → [S1100i Getting
Started] (for Windows 8.1/Windows 8, by selecting [S1100i Getting Started] under
[ScanSnap Manuals] on the All apps screen).
When Operating the ScanSnap
Manual
Description and Location
ScanSnap S1100i Basic
Operation Guide (this
manual)
This manual explains the basic operations and cleaning procedure for the ScanSnap.
ScanSnap Advanced
Operation Guide
This manual describes operations including various scanning methods and useful
usages of the ScanSnap.
Visit the following web page to refer to the Advanced Operation Guide:
http://www.pfu.fujitsu.com/imaging/downloads/manual/advanced/v62/en/common/
index.html
ScanSnap Manager Help
This Help file describes the windows, operational troubles and the solutions, as well as
messages of the ScanSnap Manager.
This manual can be accessed by one of the following methods:
in the notification area located at the
l Right-click the ScanSnap Manager icon
far right of the taskbar, and select [Help] → [Help] from the "Right-Click Menu"
(page 43).
l Select [Start] menu → [All Programs] → [ScanSnap Manager] → [ScanSnap
Manager Help] (for Windows 8.1/Windows 8, select [ScanSnap Manager Help]
under [ScanSnap Manager] on the All apps screen).
l Click the Help button (
) for ScanSnap Manager.
l Press the [F1] key on the keyboard while a window is displayed.
l Click the [Help] button in any window.
6
Manuals
When Saving Scanned Images to a Mobile Device
Manual
Description and Location
ScanSnap Connect
Application User's Guide
(iOS)
This manual describes operations to be performed on an iOS-based mobile device
when you save scanned images to the mobile device.
This manual can be accessed by the following method:
1. Start up ScanSnap Connect Application on the mobile device.
a The [File List] screen appears.
2. Tap the [
] button.
a The [Information] screen appears.
3. Tap the [Help] button.
ScanSnap Connect
Application User's Guide
(Android)
This manual describes operations to be performed on an Android-based mobile device
when you save scanned images to the mobile device.
This manual can be accessed by the following method:
1. Start up ScanSnap Connect Application on the mobile device.
a The [File List] screen appears.
2. Open the menu.
Perform one of the following operations:
l Press the [Menu] button on the mobile device.
l Tap the [Menu] button displayed on the screen of the mobile device.
a The menu appears.
3. Tap the [
] button.
a The [Information] screen appears.
4. Tap the [Help] button.
Scan to Mobile Help
This Help file describes the operations, windows, and messages of Scan to Mobile.
This Help file can be accessed by one of the following methods:
l The [Scan to Mobile] icon is displayed in the menu that appears when you click
in the notification area located at the far right of the taskbar. Right-click the
[Scan to Mobile] icon, and select [Help] from the menu that appears.
l Press the [F1] key on the keyboard while a window is displayed.
l Click the [Help] button in any window.
When Updating the Software
Manual
Description and Location
ScanSnap Online Update
Help
This Help file describes the operations, windows, and messages of ScanSnap Online
Update.
This Help file can be accessed by one of the following methods:
l Select [Start] menu → [All Programs] → [ScanSnap Online Update] → [Help] (for
Windows 8.1/Windows 8, select [Help] under [ScanSnap Online Update] on the All
apps screen).
l Press the [F1] key on the keyboard while a window is displayed.
l Click the Help button in any window.
7
Manuals
When Using Bundled Applications
Manual
Description and Location
ScanSnap Organizer Help
This Help file describes the operations, windows, and messages of ScanSnap
Organizer.
This Help file can be accessed by one of the following methods:
l Select [Start] menu → [All Programs] → [ScanSnap Organizer] → [Help] (for
Windows 8.1/Windows 8, select [Help] under [ScanSnap Organizer] on the All apps
screen).
l Click the Help button (
) for ScanSnap Organizer.
l Press the [F1] key on the keyboard while a window is displayed.
l Click the [Help] button in any window.
CardMinder Help
This Help file describes the operations, windows, and messages of CardMinder.
This Help file can be accessed by one of the following methods:
l Select [Start] menu → [All Programs] → [CardMinder] → [Help] (for Windows 8.1/
Windows 8, select [Help] under [CardMinder] on the All apps screen).
l Click the Help button (
) next to the Basic Search Toolbar.
l Press the [F1] key on the keyboard while a window is displayed.
l Click the [Help] button in any window.
ABBYY FineReader for
ScanSnap User's Guide
This manual describes the overview and operations of ABBYY FineReader for
ScanSnap.
This manual can be accessed by one of the following methods:
l Select [Start] menu → [All Programs] → [ABBYY FineReader for ScanSnap(TM)
5.0] → [User's Guide] (for Windows 8.1/Windows 8, select [User's Guide] under
[ABBYY FineReader for ScanSnap(TM) 5.0] on the All apps screen).
l Press the [F1] key on the keyboard while a window is displayed.
l Click the [Help] button in any window.
8
Trademarks
Trademarks
Microsoft, Windows, Windows Vista, Excel, PowerPoint, Outlook, SharePoint, Windows Live, and
Internet Explorer are either registered trademarks or trademarks of Microsoft Corporation in the
United States and/or other countries.
Word is the product of Microsoft Corporation in the United States.
Adobe, the Adobe logo, Acrobat, and Reader are either registered trademarks or trade names of
Adobe Systems Incorporated in the United States and/or other countries.
ABBYY™ FineReader™ Engine © ABBYY. OCR by ABBYY
ABBYY and FineReader are trademarks of ABBYY Software, Ltd. which may be registered in some
jurisdictions.
Evernote is a registered trademark or trademark of Evernote Corporation.
Google, Google Docs, Android, and Google Play are registered trademarks or trademarks of Google
Inc.
Salesforce, the Salesforce logo, and Salesforce CRM are registered trademarks or trademarks of
salesforce.com, inc. in the United States and other countries.
Wi-Fi, Wi-Fi Protected Setup, and the Wi-Fi Protected Setup logo are trademarks of Wi-Fi Alliance.
ScanSnap, the ScanSnap logo, ScanSnap Manager, ScanSnap Organizer, CardMinder, and Rack2Filer are registered trademarks or trademarks of PFU LIMITED in Japan.
Other company names and product names are the registered trademarks or trademarks of the
respective companies.
9
Manufacturer
Manufacturer
PFU LIMITED
International Sales Dept., Imaging Business Division, Products Group Solid Square East Tower 580
Horikawa-cho, Saiwai-ku, Kawasaki-shi, Kanagawa 212-8563, Japan
Phone: (81-44) 540-4668
© PFU LIMITED 2014
10
Symbols Used in This Manual
Symbols Used in This Manual
The following indications are used in this manual to obviate any chance of accident or damage to
you and people near you, and your property. Warning labels indicate the warning level and
statements. The symbols indicating warning levels and their meanings are as follows.
Indication
Description
WARNING
This indication alerts operators of an operation that, if not strictly observed, may result
in severe injury or death.
CAUTION
This indication alerts operators of an operation that, if not strictly observed, may result
in safety hazards to personnel or damage to the product.
11
Arrow Symbols in This Manual
Arrow Symbols in This Manual
Right-arrow symbols (→) are used to connect icons or menu options you should select in
succession.
Example: Select [Start] menu → [Computer].
12
Screen Examples in This Manual
Screen Examples in This Manual
Microsoft product screenshots are reprinted with permission from Microsoft Corporation.
The screenshots used in this manual are of Windows 7.
The actual windows and operations may differ depending on the operating system.
Icon in the Notification Area
The ScanSnap Manager icon
notification area.
is displayed in the menu which appears when you click
To have the ScanSnap Manager icon
and drop it onto the notification area.
in the
always displayed in the notification area, drag the icon
The notification area is located at the far right of the taskbar.
The explanations in this manual use the case in which the ScanSnap Manager icon
displayed in the notification area.
13
is always
For Windows 8.1 or Windows 8 Users
For Windows 8.1 or Windows 8 Users
To start ScanSnap applications or display Control Panel, use the All apps screen.
The All apps screen is displayed by following the procedure below.
Windows 8.1
1.
Click
To display
on the lower left side of the Start screen.
, move the mouse cursor.
Windows 8
1.
Right-click the Start screen.
2.
Click [All apps] on the app bar.
14
Abbreviations Used in This Manual
Abbreviations Used in This Manual
When a ScanSnap model is referred to in this manual, "Color Image Scanner ScanSnap" is omitted.
Also, the following abbreviations are used in this manual.
Abbreviation Used
Designation
Windows 8.1
Windows® 8.1 operating system, English Version
Windows® 8.1 Pro operating system, English Version
Windows® 8.1 Enterprise operating system, English Version
Windows 8
Windows® 8 operating system, English Version
Windows® 8 Pro operating system, English Version
Windows® 8 Enterprise operating system, English Version
Windows 7
Windows® 7 Starter operating system, English Version
Windows® 7 Home Premium operating system, English Version
Windows® 7 Professional operating system, English Version
Windows® 7 Enterprise operating system, English Version
Windows® 7 Ultimate operating system, English Version
Windows Vista
Windows Vista® Home Basic operating system, English Version
Windows Vista® Home Premium operating system, English Version
Windows Vista® Business operating system, English Version
Windows Vista® Enterprise operating system, English Version
Windows Vista® Ultimate operating system, English Version
Windows
Windows 8.1, Windows 8, Windows 7, or Windows Vista operating system
Microsoft Office
Microsoft® Office
Word
Microsoft® Word 2013
Microsoft® Word 2010
Microsoft® Office Word 2007
Excel
Microsoft® Excel® 2013
Microsoft® Excel® 2010
Microsoft® Office Excel® 2007
PowerPoint
Microsoft® PowerPoint® 2013
Microsoft® PowerPoint® 2010
Microsoft® Office PowerPoint® 2007
SharePoint
Microsoft® SharePoint® Server 2010, English Version
Microsoft® Office SharePoint® Server 2007, English Version
Microsoft® SharePoint® Foundation 2010, English Version
Microsoft® Windows® SharePoint® Services 3.0, English Version
Internet Explorer
Windows® Internet Explorer®
.NET Framework
Microsoft® .NET Framework
15
Abbreviations Used in This Manual
Abbreviation Used
Designation
ABBYY FineReader for
ScanSnap
ABBYY FineReader for ScanSnap™
Google Docs
Google Docs™
Android
Android™
ScanSnap
Color Image Scanner ScanSnap series (*1)
Carrier Sheet
ScanSnap Carrier Sheet
All the descriptions in this manual assume the usage of ABBYY FineReader for
ScanSnap bundled with the ScanSnap. Unless otherwise specified, the term ABBYY
FineReader for ScanSnap refers to the ABBYY FineReader for ScanSnap bundled
with the ScanSnap.
Note that ABBYY FineReader for ScanSnap may be upgraded without notice. If the
descriptions in this manual differ from the actual displayed screens, refer to the
ABBYY FineReader for ScanSnap User's Guide.
*1: The ScanSnap N1800 series is not included.
16
What You Can Do with the ScanSnap
What You Can Do with the ScanSnap
Scanning Multiple Documents Continuously
When you scan multiple documents with the ScanSnap, you can scan one or two document at a
time. To scan two documents at a time, you can insert two documents at a time or you can insert the
next document while another document is being scanned.
l Scanning one document at a time
After scanning a document is completed, when you insert the next document in the ScanSnap,
the next scan is started automatically.
For details, refer to "Scanning a Document" (page 20).
l Scanning documents by inserting two documents at a time or by inserting the next document
while the current document is being scanned (dual scan)
When scanning small size documents such as business cards and postcards, you can insert two
documents at a time in the ScanSnap. Alternatively, you can insert the next document while
another document is being scanned. In either method, you can scan up to 20 documents
continuously in a single scanning operation.
These scanning methods are referred to as dual scans.
For details, refer to "Scanning Documents with the ScanSnap by Inserting Two Documents at a
Time or by Inserting the Next Document While the Current Document Is Being Scanned" (page
25).
Scanning Documents Larger Than A4 or Letter Size by Directly
Inserting Them in the ScanSnap
By folding an A3, B4, or Double Letter size document in half and scanning each side continuously,
the scanned images of both sides can be automatically merged into a single image.
17
What You Can Do with the ScanSnap
Scanned images can be merged only when there is text, diagram, or a table on the fold line of the
folded document.
For details, refer to "Scanning Documents Larger Than A4 or Letter Size (by Directly Inserting Them
in the ScanSnap)" (page 31).
Scanning Documents That Cannot Be Inserted Directly in the
ScanSnap
You can use the optional Carrier Sheet to scan the following documents.
l Documents that are larger than A4/Letter size and not larger than A3 size
For details, refer to "Scanning Documents Larger Than A4 or Letter Size (with the Carrier
Sheet)" (page 63).
l Documents that can be damaged quite easily such as photographs, or non-standard size
documents such as clippings
For details, refer to "Scanning Documents Such as Photographs and Clippings" (page 68).
18
What You Can Do with the ScanSnap
19
Scanning a Document
Scanning a Document
The procedure for scanning documents by inserting one document at a time is as follows.
For details about documents that can be scanned, refer to "Documents to Scan" (page 51).
1.
Open the feed guide of the ScanSnap.
Feed Guide
HINT
l If you want the document to be ejected from the front of the ScanSnap or when there is not
enough space where the document exits the ScanSnap, open the output guide.
For details about documents that can be scanned with the output guide open, refer to
"Documents to Scan" (page 51).
Output Guide
l How the document is ejected differs as below depending on whether the output guide is open
or closed.
-
When the output guide is closed
-
When the output guide is open
a The [Scan/Stop] button flashes in blue. The button returns to being lit normally when
document scanning is enabled.
In addition, the ScanSnap Manager icon in the notification area located at the far right of
the taskbar changes from
to
.
20
Scanning a Document
2.
Insert the document straight into the feeding section of the ScanSnap, with
the scanning side facing up.
a The document is pulled in until it is set inside the ScanSnap.
ATTENTION
l If you specify a standard size instead of selecting [Automatic detection] (default), insert the
document by aligning it with the left edge of the feeding section.
You can configure the scan settings in the "ScanSnap Setup Window" (page 45).
l When you perform scanning with the output guide closed, leave enough space at the back of
the ScanSnap to allow the document to be completely ejected. In addition, when you scan
long page documents, hold the scanned documents with your hands to prevent them from
falling off the unit where the ScanSnap is placed on.
Make sure that the area where the document exits the scanner is clear of any obstacles.
Otherwise, paper jam may occur.
l If you scan the following documents with the output guide open, a paper jam may occur and
damage the documents. Scan the following documents with the output guide closed.
-
Thick paper (80 g/m2 [20 lb] or heavier)
-
Postcards
21
Scanning a Document
-
Business cards
-
Plastic cards
-
Carrier Sheet
Output Guide
3.
Press the [Scan/Stop] button on the ScanSnap to start scanning.
ATTENTION
Do not perform the following operations during scanning. Doing so will stop scanning.
l Connect or disconnect the ScanSnap and other USB devices.
l Close the feed guide.
l Switch users.
l Allow the computer to enter sleep mode.
a The [Scan/Stop] button on the ScanSnap flashes in blue while the documents are being
scanned.
The [ScanSnap Manager - Image scanning and file saving] window appears.
a When scanning is complete, the [ScanSnap Manager - Image scanning and file saving]
window displays a scanning standby status.
22
Scanning a Document
HINT
To continue scanning, insert the next document to be scanned. When the document is inserted,
scanning starts automatically.
4.
Press the [Scan/Stop] button on the ScanSnap to finish scanning.
a The Quick Menu appears.
5.
In the Quick Menu, click the icon of the application to link with ScanSnap
Manager.
For details about linking the following applications with ScanSnap Manager, refer to "Using the
ScanSnap According to Your Needs" (page 56).
l ScanSnap Organizer
l Scan to CardMinder
23
Scanning a Document
a The selected application starts up. For details, refer to the Advanced Operation Guide.
ATTENTION
l You cannot start scanning when the Quick Menu is displayed. Either select an icon from the
Quick Menu and finish the process, or close the Quick Menu before you perform the next
scan.
l Do not move, delete, or rename scanned images using other applications while the Quick
Menu is displayed.
HINT
l Clicking
displays the description of an application. Placing the mouse cursor over the
icon of another application displays the description of the application.
l Performing a scan while an application that can be automatically linked with is active
automatically starts the linkage between ScanSnap Manager and the application.
For details, refer to the Advanced Operation Guide.
24
Scanning Documents with the ScanSnap by Inserting Two Documents at a Time or by Inserting the Next Document While the Current
Document Is Being Scanned
Scanning Documents with the ScanSnap by
Inserting Two Documents at a Time or by
Inserting the Next Document While the Current
Document Is Being Scanned
When scanning small size documents such as business cards and postcards with the ScanSnap,
you can insert two documents at a time or you can insert the next document while the current
document is being scanned. These scanning methods are referred to as dual scans.
Documents can be inserted in the following two methods:
l Inserting two documents at a time in the ScanSnap
l Inserting the next document while the current document is being scanned
For details about documents that can be scanned, refer to "Documents to Scan" (page 51).
ATTENTION
l When you select an option other than [Automatic detection] for [Paper size] in the [Paper] tab of the
"ScanSnap Setup Window" (page 45), the dual scan function is disabled.
l Use a dual scan to scan a document within the following ranges. If one of the following ranges is
exceeded, a length error occurs and part of the document may not appear in the scanned image.
-
Maximum scanning length: 863 mm (34 in.) (355.6 mm (14 in.) when [Excellent] is specified for
[Image Quality] in the [Scanning] tab of the "ScanSnap Setup Window" (page 45))
-
Maximum number of documents for scanning: 20 sheets
l When you continue scanning by inserting the next document while the current document is being
scanned, the [Scan/Stop] button flashes more quickly if the scanning length exceeds 650 mm (26
25
Scanning Documents with the ScanSnap by Inserting Two Documents at a Time or by Inserting the Next Document While the Current
Document Is Being Scanned
in.) . If this occurs, wait until scanning is complete without continuing to insert more documents.
After scanning is complete, insert the next document. The next scan is started automatically.
1.
Open the feed guide of the ScanSnap.
Feed Guide
HINT
l If you want the document to be ejected from the front of the ScanSnap or when there is not
enough space where the document exits the ScanSnap, open the output guide.
For details about documents that can be scanned with the output guide open, refer to
"Documents to Scan" (page 51).
Output Guide
l How the document is ejected differs as below depending on whether the output guide is open
or closed.
-
When the output guide is closed
-
When the output guide is open
a The [Scan/Stop] button flashes in blue. The button returns to being lit normally when
document scanning is enabled.
In addition, the ScanSnap Manager icon in the notification area located at the far right of
the taskbar changes from
2.
to
.
Insert the document straight into the feeding section of the ScanSnap, with
the scanning side facing up.
Insert each document in the center of the left or right half of the feeding section.
26
Scanning Documents with the ScanSnap by Inserting Two Documents at a Time or by Inserting the Next Document While the Current
Document Is Being Scanned
ATTENTION
When inserting the documents, insert them at least 10 mm (0.39 in.) apart from each other. If the
space between the documents is less than 10 mm (0.39 in.), the scanned images may not be
cropped correctly.
a The document is pulled in until it is set inside the ScanSnap.
ATTENTION
l When you perform scanning with the output guide closed, leave enough space at the back of
the ScanSnap to allow the document to be completely ejected. In addition, when you scan
long page documents, hold the scanned documents with your hands to prevent them from
falling off the unit where the ScanSnap is placed on.
Make sure that the area where the document exits the scanner is clear of any obstacles.
Otherwise, paper jam may occur.
l If you scan the following documents with the output guide open, a paper jam may occur and
damage the documents. Scan the following documents with the output guide closed.
-
Thick paper (80 g/m2 [20 lb] or heavier)
-
Postcards
-
Business cards
Output Guide
3.
Press the [Scan/Stop] button on the ScanSnap to start scanning.
ATTENTION
Do not perform the following operations during scanning. Doing so will stop scanning.
l Connect or disconnect the ScanSnap and other USB devices.
27
Scanning Documents with the ScanSnap by Inserting Two Documents at a Time or by Inserting the Next Document While the Current
Document Is Being Scanned
l Close the feed guide.
l Switch users.
l Allow the computer to enter sleep mode.
a The [Scan/Stop] button on the ScanSnap flashes in blue while the documents are being
scanned.
The [ScanSnap Manager - Image scanning and file saving] window appears.
HINT
When the [ScanSnap Manager - Image scanning and file saving] window is maximized,
multiple scanned images are displayed in the preview area. When you use a dual scan, it is
recommended that you maximize the [ScanSnap Manager - Image scanning and file saving]
window to check that scanned images are created correctly while scanning documents.
28
Scanning Documents with the ScanSnap by Inserting Two Documents at a Time or by Inserting the Next Document While the Current
Document Is Being Scanned
a When scanning is complete, the [ScanSnap Manager - Image scanning and file saving]
window displays a scanning standby status.
HINT
To continue scanning, insert the next document to be scanned. When the document is inserted,
scanning starts automatically.
4.
Press the [Scan/Stop] button on the ScanSnap to finish scanning.
a The Quick Menu appears.
5.
In the Quick Menu, click the icon of the application to link with ScanSnap
Manager.
29
Scanning Documents with the ScanSnap by Inserting Two Documents at a Time or by Inserting the Next Document While the Current
Document Is Being Scanned
For details about linking the following applications with ScanSnap Manager, refer to "Using the
ScanSnap According to Your Needs" (page 56).
l ScanSnap Organizer
l Scan to CardMinder
a The selected application starts up. For details, refer to the Advanced Operation Guide.
ATTENTION
l You cannot start scanning when the Quick Menu is displayed. Either select an icon from the
Quick Menu and finish the process, or close the Quick Menu before you perform the next
scan.
l Do not move, delete, or rename scanned images using other applications while the Quick
Menu is displayed.
HINT
l Clicking
displays the description of an application. Placing the mouse cursor over the
icon of another application displays the description of the application.
l Performing a scan while an application that can be automatically linked with is active
automatically starts the linkage between ScanSnap Manager and the application.
For details, refer to the Advanced Operation Guide.
30
Scanning Documents Larger Than A4 or Letter Size (by Directly Inserting Them in the ScanSnap)
Scanning Documents Larger Than A4 or Letter
Size (by Directly Inserting Them in the
ScanSnap)
By folding an A3, B4, or Double Letter size document in half and scanning each side continuously,
the scanned images of both sides are automatically merged and saved as a single image.
For details about documents that can be scanned, refer to "Documents to Scan" (page 51).
ATTENTION
l Scanned images are automatically merged only when there is text, diagram, or a table on the fold
line of the folded document.
-
When scanned images are automatically merged
-
When scanned images are not automatically merged
l After a document is scanned, if the scanned images are not merged automatically, you can use the
ScanSnap Organizer Merge Pages function to merge the scanned images.
For details, refer to the ScanSnap Organizer Help.
l For a document that will have scanned images which are merged automatically, you can use the
optional Carrier Sheet to scan the document and merge the scanned images automatically.
For details, refer to "Scanning Documents Larger Than A4 or Letter Size (with the Carrier Sheet)"
(page 63).
l If scanned images are unexpectedly merged, clear the [Merge both side images] checkbox on the
[Scanning mode option] window, and then scan the document again.
To open the [Scanning mode option] window, click the [Option] button in the [Scanning] tab of the
"ScanSnap Setup Window" (page 45).
31
Scanning Documents Larger Than A4 or Letter Size (by Directly Inserting Them in the ScanSnap)
1.
Open the feed guide of the ScanSnap.
Feed Guide
a The [Scan/Stop] button flashes in blue. The button returns to being lit normally when
document scanning is enabled.
In addition, the ScanSnap Manager icon in the notification area located at the far right of
the taskbar changes from
2.
to
.
Fold the document in half so that the sides to be scanned are facing out.
ATTENTION
Fold the long side of the document in half. If the left and right areas of the folded document are
different in size from each other, the scanned images may not be merged automatically.
3.
Insert the document straight into the feeding section of the ScanSnap, with
the scanning side facing up.
a The document is pulled in until it is set inside the ScanSnap.
32
Scanning Documents Larger Than A4 or Letter Size (by Directly Inserting Them in the ScanSnap)
HINT
If you scan a document folded in half with the output guide open, a paper jam may occur. Make
sure to close the output guide when you scan a document folded in half.
Output Guide
4.
Press the [Scan/Stop] button on the ScanSnap to start scanning.
a The [Scan/Stop] button on the ScanSnap flashes in blue and the [ScanSnap Manager Image scanning and file saving] window appears while the document is being scanned.
When scanning is complete, the scanned image of the scanning side is displayed in the
preview area.
5.
Turn over the document and insert it as described in step 3.
ATTENTION
Make sure to scan the front and back sides of the document folded in half consecutively.
a Scanning starts automatically.
HINT
Repeat steps 2 to 5 to continue scanning more A3, B4, or Double Letter size documents. You
can also continue scanning documents smaller than A4 or Letter size.
For details about scanning a document, refer to "Scanning a Document" (page 20).
6.
Press the [Scan/Stop] button on the ScanSnap to finish scanning.
a The Quick Menu appears.
7.
In the Quick Menu, click the icon of the application to link with ScanSnap
Manager.
33
Scanning Documents Larger Than A4 or Letter Size (by Directly Inserting Them in the ScanSnap)
When you select
Organizer.
, you can manage scanned images by folder with ScanSnap
For details, refer to "Managing Business Forms in ScanSnap Organizer" (page 57).
a The selected application starts up. For details, refer to the Advanced Operation Guide.
ATTENTION
l You cannot start scanning when the Quick Menu is displayed. Either select an icon from the
Quick Menu and finish the process, or close the Quick Menu before you perform the next
scan.
l Do not move, delete, or rename scanned images using other applications while the Quick
Menu is displayed.
HINT
l Clicking
displays the description of an application. Placing the mouse cursor over the
icon of another application displays the description of the application.
l Performing a scan while an application that can be automatically linked with is active
automatically starts the linkage between ScanSnap Manager and the application.
For details, refer to the Advanced Operation Guide.
34
ScanSnap Overview
ScanSnap Overview
This section provides an overview that you should be aware of before operating ScanSnap.
l "Parts and Functions" (page 36)
l "System Requirements" (page 38)
l "Overview of the ScanSnap Related Software" (page 40)
l "How to Install the Software" (page 41)
l "ScanSnap Manager Icon" (page 42)
l "Right-Click Menu" (page 43)
l "ScanSnap Setup Window" (page 45)
l "Turning the ScanSnap On or Off" (page 46)
l "Documents to Scan" (page 51)
35
Parts and Functions
Parts and Functions
This section explains the names and functions of the ScanSnap parts.
Front
1
2
3
4
5
No.
Name
Description
1
Feed guide
Open it to use the ScanSnap.
Opening it turns on the ScanSnap. Then, you can load a document
on it.
2
Output guide
Open it to eject documents from the front of the ScanSnap.
Select an ejection method depending on the document type you are
scanning.
For details about documents that can be scanned with the
ScanSnap, refer to "Documents to Scan" (page 51).
l When the output guide is closed
l When the output guide is open
36
Parts and Functions
No.
Name
Description
3
Top cover
Open it to remove jammed documents or clean the inside of the
ScanSnap.
For details about how to clean the inside of the ScanSnap, refer to
"Cleaning the Inside of the ScanSnap" (page 97).
4
[Scan/Stop] button
Press this button to start or finish scanning.
Indicates the status of the ScanSnap as follows:
Blue (lit): Ready
Blue (flashing): Scanning
Orange (flashing): Error
5
Feeding section
Insert the document here to load.
Side
6
7
No.
Name
Description
6
Tape seal
Remove this tape seal after installing the software.
7
USB connector
Used to connect a USB cable.
37
System Requirements
System Requirements
The ScanSnap has the following system requirements.
For the latest information on requirements, please visit the ScanSnap Support Site at:
http://scansnap.fujitsu.com/g-support/en/
Operating system
Windows 8.1 (32-bit/64-bit) (*1)
Windows 8 (32-bit/64-bit) (*1)
Windows 7 (32-bit/64-bit)
Windows Vista (32-bit/64-bit) (*2)
CPU
Intel® Core™ i5 2.5 GHz or higher
Memory
4 GB or more
Display resolution (*3)
Windows 8.1/Windows 8: 1024 × 768 pixels or higher
Windows 7/Windows Vista: 800 × 600 pixels or higher
Disk space
Free space required to install the software related to the ScanSnap is as follows:
(*4)
l ScanSnap Manager: 700 MB
l ScanSnap Organizer: 670 MB
l CardMinder: 660 MB
l ABBYY FineReader for ScanSnap: 620 MB
l ScanSnap Online Update: 10 MB
l Scan to Microsoft SharePoint: 40 MB
l ScanSnap S1100i Basic Operation Guide: 200 MB
USB port
USB3.0 (*5)/USB2.0/USB1.1
*1: The software bundled with the ScanSnap operates as a desktop application.
*2: Service Pack 2 or later is required.
*3: When the font size is large, some screens may not be displayed correctly.
In such a case, use a smaller font size.
*4: To save scanned images, more free space is required.
For details about estimated image data size, refer to the ScanSnap Manager Help.
*5: When the ScanSnap is connected to a USB 3.0 port, the port operates as a USB 2.0 port.
ATTENTION
l If the system requirements above are not satisfied, the ScanSnap may not operate.
l If a USB port on the keyboard or on the monitor is in use, the ScanSnap may not operate.
l When using a commercially available USB hub, use a type that is powered from an electrical power
supply (and that comes with an adapter).
l Scanning speed decreases in the following cases:
-
The CPU or the memory does not meet the recommended specifications.
-
The version of the USB port or the USB hub is USB 1.1.
l The actual disk space used for the installation of the software and the disk space required for the
installation may be different because of the disk management in your Windows system.
l To scan a document, a disk space that is approximately three times larger than the size of the file
to be saved is required.
38
System Requirements
l If characters are not correctly displayed when using CardMinder, Scan to Mobile, Scan to
Salesforce Chatter, Scan to SugarSync, or Scan to Dropbox, install the universal font (Arial
Unicode MS) from the setup disk of Microsoft Office 2007 or later.
HINT
For Windows 8.1, Windows 8, or Windows Vista, when the following software programs are
installed, .NET Framework 3.5 SP1 (which requires 500 MB of free disk space at most) may be
installed at the same time:
l ScanSnap Manager
l ScanSnap Organizer
l CardMinder
39
Overview of the ScanSnap Related Software
Overview of the ScanSnap Related Software
This section gives an overview of each bundled software and their functions. You can edit, manage,
and arrange the scanned image by using the following software:
ScanSnap Manager
This scanner driver is required to scan documents with the ScanSnap. Scanned images can be
saved as PDF or JPEG files to a computer.
You need to have ScanSnap Connect Application installed on your mobile device to save PDF or
JPEG files to your mobile device.
You can download ScanSnap Connect Application for your mobile device from its application
market.
ScanSnap Organizer
You can use this application to display image data (PDF or JPEG files) without opening them,
create folders and arrange files as you like.
CardMinder
You can use this application to efficiently digitalize a large number of business cards.
Text recognition can be performed on business cards and you can create a database to facilitate
card data management and searches. Data in the database can be printed and linked with various
applications.
ABBYY FineReader for ScanSnap
This application can perform text recognition on the scanned images using OCR (Optical
Character Recognition) to convert the image data to Word, Excel, or PowerPoint files that can be
edited.
ScanSnap Online Update
This application checks if any updates have been released on the download server, and
automatically updates the programs.
Scan to Microsoft SharePoint
You can easily save files in SharePoint using the ScanSnap.
Evernote for Windows
You can easily save files in Evernote using the ScanSnap.
Dropbox for Windows
You can easily save files to your Dropbox folder using the ScanSnap.
SugarSync Manager for Windows
You can easily save files to your SugarSync folder using the ScanSnap.
40
How to Install the Software
How to Install the Software
When you insert the Setup DVD-ROM into the DVD-ROM drive on your computer, the [ScanSnap
Setup] window appears.
ATTENTION
l Do not connect the ScanSnap to the computer before installing the software. Doing so may cause
the ScanSnap not to be recognized by the computer. In that case, install the software, and then
reconnect the ScanSnap to the computer.
l If a DVD-ROM drive is not available, the installers for the software programs can be downloaded
from the following web page.
http://scansnap.fujitsu.com/g-support/en/
The functions of each button in the [ScanSnap Setup] window are as follows.
Button
Function
Readme
Displays the [Readme] window. You can refer to the Readme file of each software in
this window.
Install Products
Displays the [Install Products] window. You can start installing software.
Manuals
Displays the [Manuals] window. You can refer to Safety Precautions, Getting Started,
the Basic Operation Guide (this manual), and the manual of each software program in
this window.
Browse DVD Contents
Opens Windows Explorer to display the files from the Setup DVD-ROM.
Support
Displays contact information for customer support.
41
ScanSnap Manager Icon
ScanSnap Manager Icon
When ScanSnap Manager is running, the ScanSnap Manager icon is displayed in the notification
area. The notification area is located at the far right of the taskbar.
The ScanSnap Manager icon indicates whether or not ScanSnap Manager is successfully
communicating with the ScanSnap. The appearance of the icon changes according to the
communication status as shown below.
Communication Status
ScanSnap Manager Icon
Communicating
Not communicating
HINT
Turn the ScanSnap on to begin communication between ScanSnap Manager and the ScanSnap. For
details about how to turn on the ScanSnap, refer to "Turning the ScanSnap On" (page 47).
You can display the menu for scanning documents and ScanSnap Manager settings from the
ScanSnap Manager icon.
l Right-clicking
Displays the "Right-Click Menu" (page 43).
l Left-clicking
Displays the Left-Click Menu.
For details, refer to the Advanced Operation Guide.
42
Right-Click Menu
Right-Click Menu
This menu appears when you right-click the ScanSnap Manager icon
located at the far right of the taskbar.
in the notification area
Item
Function
Scan
Scans the document inserted in the ScanSnap.Follows the settings configured in
[Scan Button Settings].
Scan Button Settings
Displays the "ScanSnap Setup Window" (page 45). You can configure the scan
settings in this window.
Profile Management
Displays the [ScanSnap Manager - Profile Management] window.
You cannot select [Profile Management] when the [Use Quick Menu] checkbox is
selected in the ScanSnap setup window.
For details, refer to the Advanced Operation Guide.
Connect by Wi-Fi
Displays the [ScanSnap Manager - Connect by Wi-Fi] window.
Available with iX500 and iX100.
ScanSnap Folder Settings
Displays the ScanSnap setup window. You can configure the scan settings for using
ScanSnap Folder in this window.
For details, refer to the Advanced Operation Guide.
43
Right-Click Menu
Item
Function
Show scanning results
After scanning is completed, a message appears to inform you whether the image is
rotated.
Preferences
Displays the [ScanSnap Manager - Preferences] window.
Help
Displays the following menu:
l Help
Opens the ScanSnap Manager Help.
l Troubleshooting
Displays [Troubleshooting] in the ScanSnap Manager Help.
l ScanSnap Portal Site
Opens the ScanSnap global homepage (http://scansnap.fujitsu.com).
l About ScanSnap Manager
Displays the [ScanSnap Manager - Version Information] window.
l ScanSnap information
Displays the [ScanSnap Manager - Scanner and driver information] window.
Displayed when the ScanSnap and computer are connected.
l Online Update
Starts the ScanSnap Online Update.
For details, refer to the Advanced Operation Guide.
To establish connection
Displayed when ScanSnap Manager is not communicating with the ScanSnap
correctly.
Exit
Exits ScanSnap Manager.
44
ScanSnap Setup Window
ScanSnap Setup Window
in the notification area located at the far right
When you right-click the ScanSnap Manager icon
of the taskbar, and select [Scan Button Settings] from the "Right-Click Menu" (page 43), the
following ScanSnap setup window appears.
In the ScanSnap setup window, you can use the [Use Quick Menu] checkbox to specify whether or
not to use the Quick Menu. You can also use the profile buttons and detail setting tabs to specify
scan settings according to your scanning needs.
For details, refer to the ScanSnap Manager Help.
Profile Buttons
Detail Setting Tabs
45
Turning the ScanSnap On or Off
Turning the ScanSnap On or Off
This section explains how to turn the ScanSnap on or off.
l "Turning the ScanSnap On" (page 47)
l "Turning the ScanSnap Off" (page 49)
l "Sleep Mode" (page 50)
46
Turning the ScanSnap On or Off
Turning the ScanSnap On
1.
Turn on the computer.
a The computer starts up and the ScanSnap Manager icon
area located at the far right of the taskbar.
appears in the notification
HINT
is not displayed in the notification area, select [Start]
l If the ScanSnap Manager icon
menu → [All Programs] → [ScanSnap Manager] → [ScanSnap Manager] to start up
ScanSnap Manager (for Windows 8.1/Windows 8, select [ScanSnap Manager] under
[ScanSnap Manager] on the All apps screen to start up ScanSnap Manager).
l If ScanSnap Manager does not automatically start when you log on to your computer, change
the setting in the following procedure:
1. Right-click the ScanSnap Manager icon
in the notification area and select
[Preferences] from the "Right-Click Menu" (page 43).
a The [ScanSnap Manager - Preferences] window appears.
2. In the [Auto Startup] tab, select the [Start up ScanSnap Manager when you log on]
checkbox.
2.
Open the feed guide of the ScanSnap to turn the power on.
a The [Scan/Stop] button flashes in blue. The button returns to being lit normally when
document scanning is enabled.
In addition, the ScanSnap Manager icon in the notification area changes from
to
.
ATTENTION
With some computers, the initialization of the ScanSnap may be performed several times when
the computer is started up.
HINT
l It may take more time for the ScanSnap Manager icon in the notification area to change to
depending on computer performance, operating environment, or loading, for example,
when many software programs are running at the same time.
47
Turning the ScanSnap On or Off
l When the ScanSnap is turned on, a pop-up balloon notifies you of the ScanSnap's
communication status.
To disable notifications of the ScanSnap's communication status, change the setting in the
following procedure:
in the notification area and select
1. Right-click the ScanSnap Manager icon
[Preferences] from the "Right-Click Menu" (page 43).
a The [ScanSnap Manager - Preferences] window appears.
2. Clear the [Notify of the communication status] checkbox in the [Status Display] list.
48
Turning the ScanSnap On or Off
Turning the ScanSnap Off
1.
Close the feed guide.
a The [Scan/Stop] button turns off.
In addition, the ScanSnap Manager icon in the notification area changes from
to
.
ATTENTION
If moving the ScanSnap, first turn the power off and remove all cables.
HINT
l The power of the ScanSnap is linked with the power of the computer to which the ScanSnap
is connected. If you keep the ScanSnap connected to the computer, you do not have to worry
about turning the power ON/OFF.
l With some computers, it may take 2 to 3 minutes until the light of the [Scan] button goes out
after the computer is turned off.
l When the ScanSnap is turned off, a pop-up balloon notifies you of the ScanSnap's
communication status.
To disable notifications of the ScanSnap's communication status, change the setting in the
following procedure:
1. Right-click the ScanSnap Manager icon
in the notification area and select
[Preferences] from the "Right-Click Menu" (page 43).
a The [ScanSnap Manager - Preferences] window appears.
2. Clear the [Notify of the communication status] checkbox in the [Status Display] list.
49
Turning the ScanSnap On or Off
Sleep Mode
When the ScanSnap is on and has not been used for one minute, it enters sleep (power saving)
mode.
50
Documents to Scan
Documents to Scan
This section explains about the conditions for documents that can be loaded directly into the
ScanSnap and the conditions for documents that can be scanned using the Carrier Sheet.
l "Documents That Can Be Loaded Directly into the ScanSnap" (page 52)
l "Documents That Can Be Scanned Using the Carrier Sheet" (page 54)
51
Documents to Scan
Documents That Can Be Loaded Directly into the ScanSnap
Conditions for documents that can be loaded directly into the ScanSnap are as follows:
Eject method
(*1)
With the output guide closed
With the output guide open
Document type
Office paper, postcards, business cards
Plastic cards conforming to the ISO7810 ID-1
type (54 × 86 mm/3.37 × 2.13 in.) (*2)
Office paper
Paper weight
52.3 to 209.3 g/m2 (14 to 56.1 lb)
52.3 to 80 g/m2 (14 to 20 lb)
When merging scanned images
automatically (*3)
52.3 to 104.7 g/m2 (14 to 28 lb)
Plastic cards
0.76 mm (0.03 in.) or less (embossed cards
can be used)
Paper size
Width
25.4 to 216 mm (1 to 8.5 in.)
For a dual scan, a total width of 200 mm (7.87 in.) or less for two documents
Length
25.4 to 360 mm (1 to 14.17 in.)
For long page documents, up to 863 mm (34 in.)
When merging scanned images automatically (*3)
l A3 (297 × 420 mm)
l B4 (257 × 364 mm)
l Double Letter (11 × 17 in. (279.4 × 432 mm))
*1: For details about the eject methods, refer to "Parts and Functions" (page 36).
*2: A dual scan cannot be used for plastic cards.
*3: Fold in half to scan.
ATTENTION
l The following types of documents must not be scanned:
-
Documents attached with the metals such as paper clips or staples that can damage the inside
of the ScanSnap
Remove the metals for scanning.
-
Documents on which the ink is still wet
Wait until the ink dries completely to scan these documents.
-
Documents larger than 216 × 863 (mm)/8.5 × 34 (in.) (width × length)
-
Documents other than paper such as fabric, metal foil and OHP film
l When you scan picture postcards, be aware that the picture side may get damaged. It is the
responsibility of the customer to scan picture postcards.
l Be careful of the following when you scan plastic cards:
-
Cards that are bent may not be fed properly.
-
If the surface of the card is dirty with grease marks such as fingerprints, perform scanning after
wiping the dirt off.
52
Documents to Scan
-
Insert the plastic card straight into the feeding section of the ScanSnap. Do not tilt the plastic
card when you insert it because the plastic card may not be fed properly.
-
When you scan plastic cards with strong luster, some parts of the image may appear lighter or
darker than the original.
Example: gold colored credit card
-
When you scan an embossed card, insert it in the direction shown below.
1234567890
ABCDEFG
-
0987654321
GFEDCBA
If the embossed characters are not coated in gold or silver and the background color of the card
and the color of the embossed characters are similar, it may be difficult for the ScanSnap to
recognize embossed characters.
In which case, performing the following may result in an improvement.
1. Click the [Option] button in the [Scanning] tab of the "ScanSnap Setup Window" (page 45).
a The [Scanning mode option] window appears.
2. Select the [Increase text contrast] checkbox.
53
Documents to Scan
Documents That Can Be Scanned Using the Carrier Sheet
The optional Carrier Sheet is a sheet designed to transport documents through the ScanSnap.
You can scan documents that are larger than A4/Letter size, photographs, and clippings.
Conditions for documents that can be scanned using the Carrier Sheet are as follows:
CAUTION
l Do not use a damaged Carrier Sheet. Otherwise, it may damage or cause
the ScanSnap to malfunction.
l Be careful not to cut your finger on the edge of the Carrier Sheet.
Eject method
With the output guide closed
Document type
Documents that cannot be loaded directly into the ScanSnap
Paper weight
Up to 52.3 to 104.7 g/m2(14 to 28 lb)
When scanning documents folded in half:
Up to 64 g/m2(17 lb)
Paper size
Carrier Sheet size (216 × 297 mm)
A3 (297 × 420 mm) (*1)
A4 (210 × 297 mm)
A5 (148 × 210 mm)
A6 (105 × 148 mm)
B4 (257 × 364 mm) (*1)
B5 (182 × 257 mm)
B6 (128 × 182 mm)
Postcard (100 × 148 mm)
Business card (90 × 55 mm, 55 × 90 mm)
Letter (8.5 × 11 in. (216 × 279.4 mm))
11 × 17 in. (279.4 × 431.8 mm) (*1)
Custom size
Width: 25.4 to 216 mm (1 to 8.5 in.)
Length: 25.4 to 297 mm (1 to 11.69 in.)
*1: Fold in half to scan.
Documents for Which the Carrier Sheet is Recommended for
Scanning
It is recommended that you use the Carrier Sheet to scan the following documents.
l Documents written in pencil
Because there may be black traces left on the documents, it is recommended that you use the
Carrier Sheet to scan such documents.
When you scan such documents directly without using a Carrier Sheet, dirt will accumulate on
the rollers, which may cause feeding errors. Clean the rollers occasionally.
For details about how to perform cleaning, refer to "Cleaning the Inside of the ScanSnap" (page
97).
l Carbonless paper
54
Documents to Scan
Because carbonless paper may contain chemicals that can harm the ScanSnap internal rollers, it
is recommended that you use the Carrier Sheet to scan such documents.
Make sure to clean the rollers occasionally to maintain the scanner performance when scanning
carbonless paper directly without using the Carrier Sheet. For details about how to perform
cleaning, refer to "Cleaning the Inside of the ScanSnap" (page 97).
Depending on the type of carbonless paper, the life span of the scanner may be shortened
compared to scanning office paper.
l Scanning the following types of documents without using the Carrier Sheet can result in
documents being damaged or scanned incorrectly
-
Documents smaller than 25.4 × 25.4 (mm)/1 × 1 (in.) (width × length)
-
Documents whose paper weight is less than 52.3 g/m2 (14 lb)
-
Documents with an uneven surface (such as envelopes and paper sheets with attached
materials)
-
Wrinkled or curled documents
-
Folded or torn documents
-
Tracing paper
-
Coated paper
-
Photographs (photographic paper)
-
Perforated or punched documents
-
Documents that are not rectangular or square
-
Carbon paper or thermal paper
-
Documents with memo papers or sticky notes attached
ATTENTION
l Using the Carrier Sheet
Be careful of the following when you use the Carrier Sheet:
-
Do not stain, or cut the end with a black & white pattern. Otherwise, the Carrier Sheet will not be
recognized properly.
-
Do not place the Carrier Sheet upside down. Otherwise, a paper jam may occur and damage
the Carrier Sheet and the document inside.
-
Do not fold or pull the Carrier Sheet.
-
Paper jams may occur when several small size documents such as photographs and postcards
are placed inside the Carrier Sheet to be scanned at once. It is recommended that you scan
such documents one at a time.
l Storing the Carrier Sheet
Be careful of the following when you store the Carrier Sheet:
-
Do not leave your document inside the Carrier Sheet for a long time. Otherwise, the ink on the
document may be transferred onto the Carrier Sheet.
-
Do not leave the Carrier Sheet in high temperature places such as under direct sunlight or near
a heating apparatus for a long time. Also, do not use the Carrier Sheet in high temperature
places. The Carrier Sheet may be deformed.
-
To avoid deformation, store the Carrier Sheet on a flat surface without any weight on it.
55
Using the ScanSnap According to Your Needs
Using the ScanSnap According to Your Needs
This section explains how to scan a document and link with a bundled application according to your
needs when using the ScanSnap.
l "Managing Business Forms in ScanSnap Organizer" (page 57)
l "Saving Business Cards in CardMinder" (page 60)
56
Managing Business Forms in ScanSnap Organizer
Managing Business Forms in ScanSnap Organizer
This section explains how to digitize business forms such as quotation sheets and manage the data
for each customer company in ScanSnap Organizer.
1.
Scan a quotation sheet with the ScanSnap.
For details about scanning a document, refer to "Scanning a Document" (page 20).
a The Quick Menu appears.
2.
Click the [ScanSnap Organizer] icon
a The [ScanSnap Organizer] window appears.
57
in the Quick Menu.
Managing Business Forms in ScanSnap Organizer
3.
Click
on the [Home] tab.
a A new cabinet is created in the folder list.
4.
Rename the created cabinet to the customer company name.
HINT
To create multiple cabinets for each customer company, repeat steps 3 to 4.
5.
Select the scanned image of the quotation sheet from the file list, and drag
and drop it to the cabinet for the customer company.
58
Managing Business Forms in ScanSnap Organizer
a The scanned image of the quotation sheet is moved to the cabinet for the customer
company.
HINT
ScanSnap Organizer has various functions for using saved files.
For details, refer to the ScanSnap Organizer Help.
59
Saving Business Cards in CardMinder
Saving Business Cards in CardMinder
This section explains how to digitize business cards and save the card data in CardMinder.
ATTENTION
If you do not log on as a user with Administrator privileges, you may not be able to link the ScanSnap
with another application properly.
1.
Scan business cards with the ScanSnap.
For details about scanning business cards, refer to the following.
l "Scanning a Document" (page 20)
l "Scanning Documents with the ScanSnap by Inserting Two Documents at a Time or by
Inserting the Next Document While the Current Document Is Being Scanned" (page 25)
a The Quick Menu appears.
2.
Click the [Scan to CardMinder] icon
a The [CardMinder] window appears.
60
in the Quick Menu.
Saving Business Cards in CardMinder
3.
Check the card data.
Make sure that the text on the card images are displayed correctly in the Edit Data pane.
If the card data must be corrected, click the text to be corrected and then directly edit it.
Edit Data Pane
Card Image Pane
HINT
When you scan double-sided business cards, you must scan one side of each card and edit the card
data in CardMinder.
For details, refer to the CardMinder Help.
61
Useful Usages
Useful Usages
This section explains how to use the Carrier Sheet to scan documents that are larger than A4/Letter
size or documents such as photographs and clippings that can be damaged quite easily.
l "Scanning Documents Larger Than A4 or Letter Size (with the Carrier Sheet)" (page 63)
l "Scanning Documents Such as Photographs and Clippings" (page 68)
62
Scanning Documents Larger Than A4 or Letter Size (with the Carrier Sheet)
Scanning Documents Larger Than A4 or Letter Size
(with the Carrier Sheet)
Documents larger than A4/Letter size (such as A3, 11 × 17 in. and B4) can be scanned with the
optional Carrier Sheet. By folding the document in half and scanning both sides, one at a time, the
two sides are merged into a single image.
For details about documents that can be loaded, refer to "Documents That Can Be Scanned Using
the Carrier Sheet" (page 54).
ATTENTION
The [Deskew by text on document] checkbox in the [Scanning mode option] window will be disabled.
To open the [Scanning mode option] window, click the [Option] button in the [Scanning] tab of the
"ScanSnap Setup Window" (page 45).
HINT
Both sides of a double-sided A4/Letter size document or smaller can also be scanned and merged into
a single image.
1.
Right-click the ScanSnap Manager icon
in the notification area located at
the far right of the taskbar, and select the [Scan Button Settings] from the
"Right-Click Menu" (page 43).
a The ScanSnap setup window appears.
2.
In the [Paper] tab, select [Automatic detection] in [Paper size], and then click
the [Carrier Sheet Settings] button.
a The [Carrier Sheet Settings] window appears.
3.
Select [one double-page spread image] in [Save as] and click the [OK]
button.
For details, refer to the ScanSnap Manager Help.
63
Scanning Documents Larger Than A4 or Letter Size (with the Carrier Sheet)
4.
Click the [OK] button to close the ScanSnap setup window.
5.
Place the document inside the Carrier Sheet.
1. Fold the document in half so that the sides to be scanned are facing out.
Fold it tightly and smooth out any creases.
2. Open the Carrier Sheet to bind the document.
Align the fold line with the right edge of the Carrier Sheet so that the document fits in the
upper right-hand corner of the Carrier Sheet.
64
Scanning Documents Larger Than A4 or Letter Size (with the Carrier Sheet)
HINT
Note that the front side of the Carrier Sheet has a black and white pattern at the top and a
thick vertical line in the upper right-hand corner.
6.
Insert the part with the black and white pattern straight into the feeding
section of the ScanSnap, with the front side of the Carrier Sheet facing up.
a The Carrier Sheet is pulled in until it is set inside the ScanSnap.
HINT
If you perform a scan using the Carrier Sheet with the output guide open, a paper jam may occur
and damage the documents. Make sure to close the output guide when you perform a scan using
the Carrier Sheet.
Output Guide
7.
Press the [Scan/Stop] button on the ScanSnap to start scanning.
a Scanning starts and the [ScanSnap Manager - Image scanning and file saving] window
appears. When the front side of the Carrier Sheet is scanned, the scanned image is
displayed in the preview area.
65
Scanning Documents Larger Than A4 or Letter Size (with the Carrier Sheet)
8.
Turn over the Carrier Sheet and insert it as described in step 6.
ATTENTION
Make sure to scan the front and back side of the Carrier Sheet consecutively.
a Scanning starts automatically and the [ScanSnap Manager - Image scanning and file
saving] window appears. When scanning is completed, scanned images of the front and
back side of the document inside the Carrier Sheet are displayed as a double-page spread
image in the preview area.
HINT
Repeat steps 5 to 8 to scan more documents larger than A4/Letter size. You can continue to
scan documents that can be inserted directly in the ScanSnap.
For details about scanning a document, refer to "Scanning a Document" (page 20).
9.
Press the [Scan/Stop] button on the ScanSnap to finish scanning.
a The scanned images of the front and back sides of the document are saved as a doublepage spread image.
66
Scanning Documents Larger Than A4 or Letter Size (with the Carrier Sheet)
ATTENTION
l There may be a line or a gap appearing between the front and back side images. Also when you
scan a thick document in the Carrier Sheet, the scanned image on the left and the scanned image
on the right of a double-page spread image may skew towards each other from the top.
These symptoms may be improved when you place the document in the Carrier Sheet as follows:
-
Fold the document properly
-
Neatly align the edges of the document with the edges of the Carrier Sheet
-
Turn over the Carrier Sheet to the other (reverse) side
l If [Automatic detection] is specified for [Paper size] in the [Carrier Sheet Settings] window, an
optimal size will be selected automatically from the available standard sizes (A3, B4, or 11 × 17 in.)
in [Paper size]. Note that the size of the image may become smaller than the original document
depending on the document.
Example: When characters and illustrations are printed to fit in A4 size in the center of an A3
size document, the scanned image is output in B4 size.
To output the scanned image in its original size, specify the document size in [Paper size].
l Part of the scanned image around where the document is folded may appear missing. In that case,
place the document so that its edge is about 1 mm (0.04 in.) inside from the edge of the Carrier
Sheet.
67
Scanning Documents Such as Photographs and Clippings
Scanning Documents Such as Photographs and
Clippings
Using the optional Carrier Sheet allows you to scan documents that can be damaged quite easily
such as photographs, or non-standard size documents that are difficult to load directly such as
clippings.
For details about documents that can be loaded, refer to "Documents That Can Be Scanned Using
the Carrier Sheet" (page 54).
ATTENTION
The [Deskew by text on document] checkbox in the [Scanning mode option] window will be disabled.
To open the [Scanning mode option] window, click the [Option] button in the [Scanning] tab of the
"ScanSnap Setup Window" (page 45).
1.
Right-click the ScanSnap Manager icon
in the notification area located at
the far right of the taskbar, and select the [Scan Button Settings] from the
"Right-Click Menu" (page 43).
a The ScanSnap setup window appears.
2.
In the [Paper] tab, select [Automatic detection] in [Paper size], and then click
the [Carrier Sheet Settings] button.
a The [Carrier Sheet Settings] window appears.
3.
Select [two separate images (front and back)] in [Save as] and click the [OK]
button.
For details, refer to the ScanSnap Manager Help.
68
Scanning Documents Such as Photographs and Clippings
4.
Click the [OK] button to close the ScanSnap setup window.
5.
Place the document inside the Carrier Sheet.
Open the Carrier Sheet and place the top of the document against the top center of the Carrier
Sheet.
6.
Insert the part with the black and white pattern straight into the feeding
section of the ScanSnap, with the scanning side of the document inside the
Carrier Sheet facing up.
69
Scanning Documents Such as Photographs and Clippings
a The Carrier Sheet is pulled in until it is set inside the ScanSnap.
ATTENTION
If you perform a scan using the Carrier Sheet with the output guide open, a paper jam may occur
and damage the documents. Make sure to close the output guide when you perform a scan using
the Carrier Sheet.
Output Guide
7.
Press the [Scan/Stop] button on the ScanSnap to start scanning.
a When scanning is complete, the scanned image of the document that is inside the Carrier
Sheet is displayed in the preview area.
HINT
Repeat steps 5 to 7 to scan more documents such as photographs and clippings.
You can continue to scan documents that can be inserted directly in the ScanSnap.
For details about scanning a document, refer to "Scanning a Document" (page 20).
70
Scanning Documents Such as Photographs and Clippings
8.
Press the [Scan/Stop] button on the ScanSnap to finish scanning.
a The scanned image is saved.
ATTENTION
l The scanned image is output at the center of the page in the size specified for [Paper size] in the
[Carrier Sheet Settings] window.
l If [Automatic detection] is specified for [Paper size] in the [Carrier Sheet Settings] window, an
optimal size will be selected automatically from the available standard sizes (A3, B4, or 11 × 17 in.)
in [Paper size]. Note that the size of the image may become smaller than the original document
depending on the document scanned, or part of the image may appear missing.
Example: When the contents are printed to fit in A5 size in the center of an A4 size document,
the scanned image is output in A5 size.
To output the scanned image in its original size, specify the document size in [Paper size].
HINT
In the following cases, place a blank (white) sheet of paper underneath the document when scanning:
l The scanned image is not saved in the correct size (when [Automatic detection] is selected for
[Paper size] in the [Carrier Sheet Settings] window)
l Shadows appear around the edges of the scanned image
l Black lines appear around the edges of a uniquely shaped cutting
71
Troubleshooting
Troubleshooting
This section explains how to solve troubles you may encounter upon installing or uninstalling the
bundled software.
l "How to Find Your Solution" (page 73)
l "If Your First Attempt to Install Failed" (page 74)
l "If You Have Installed the Software Before" (page 75)
l "When the ScanSnap Manager Icon Does Not Appear" (page 83)
l "When ScanSnap Manager Does Not Operate Normally" (page 85)
l "When You Cannot Uninstall the Software" (page 93)
For details about the troubles you may encounter and the solutions while using the ScanSnap, refer
to the following:
l "Troubleshooting" in the ScanSnap Manager Help
in the notification area, and
To display this section, right-click the ScanSnap Manager icon
select [Help] → [Troubleshooting] from the "Right-Click Menu" (page 43).
l ScanSnap Support Site (http://scansnap.fujitsu.com/g-support/en/)
If you cannot solve the problem after referring to the above section, contact your FUJITSU scanner
dealer or an authorized FUJITSU scanner service provider.
72
How to Find Your Solution
How to Find Your Solution
When software installation fails, or the ScanSnap does not operate normally after installation is
complete, refer to the flow chart below for troubleshooting.
Yes
No
1
Have you installed
the software before?
2
Is the installation
complete?
3
Does the ScanSnap Manager
icon
appear
in the notification area?
4
No.
Topic to Be Referred to
1
"If Your First Attempt to Install Failed" (page 74)
2
"If You Have Installed the Software Before" (page 75)
3
"When the ScanSnap Manager Icon Does Not Appear" (page 83)
4
"When ScanSnap Manager Does Not Operate Normally" (page 85)
73
If Your First Attempt to Install Failed
If Your First Attempt to Install Failed
This section explains how to troubleshoot when the first attempt to install the bundled software
failed.
If any software bundled with the ScanSnap (including models other than S1100i) has been installed
before, refer to "If You Have Installed the Software Before" (page 75).
1.
Restart the computer and log on as a user with Administrator privileges.
2.
Reinstall the software.
For details, refer to "How to Install the Software" (page 41).
74
If You Have Installed the Software Before
If You Have Installed the Software Before
This section explains how to troubleshoot if your attempt to reinstall the software bundled with the
ScanSnap (including models other than S1100i) failed.
l "Uninstalling the Software" (page 76)
l "Removing the Installation Information" (page 77)
l "Installing the Software from the [ScanSnap Setup] Window" (page 81)
l "Installing One Software at a Time" (page 82)
75
If You Have Installed the Software Before
Uninstalling the Software
Uninstall the software that is already installed.
The uninstallation procedure is as follows.
1.
If the ScanSnap is connected to the computer, unplug the USB cable from
the computer.
2.
Log on as a user with Administrator privileges.
3.
If anti-virus software is running, disable the software temporarily.
ATTENTION
If you cannot disable the anti-virus software, check if the software is set to lock the application.
4.
Uninstall the software.
The following software programs must be uninstalled:
l ScanSnap Manager
l ScanSnap Organizer
l CardMinder
For details, refer to "Uninstalling the Software" (page 102).
l If the software was successfully uninstalled, proceed to "Installing the Software from the [ScanSnap Setup]
Window" (page 81).
l If the software still remains in the list, proceed to the next topic "Removing the Installation Information" (page
77).
76
If You Have Installed the Software Before
Removing the Installation Information
If the name of the software that you tried to uninstall still remains in the list in [Programs and
Features] of the Control Panel, or if the software cannot be uninstalled for some reason, the
installation information needs to be removed.
Remove the installation information in the following procedure.
ATTENTION
If you cannot successfully remove the installation information, contact your FUJITSU scanner dealer or
an authorized FUJITSU scanner service provider.
1.
Log on as a user with Administrator privileges.
2.
Insert the Setup DVD-ROM into the DVD-ROM drive.
a The [ScanSnap Setup] window appears.
3.
Click the [Close] button to close the [ScanSnap Setup] window.
4.
Start up the tool for removing the installation information.
1. From Windows Explorer, open the [Tool] folder in the Setup DVD-ROM.
2. Right-click "SSClean.exe" and select [Run as administrator] from the displayed menu.
a The [User Account Control] window appears.
3. Click the [Yes] button ([Continue] button in Windows Vista).
a The [Remove Installation Information] window appears.
5.
Select the software from which you want to remove the installation
information.
l ScanSnap Manager
1. Select [ScanSnap Manager] and click the [Remove] button.
77
If You Have Installed the Software Before
a A confirmation message appears.
2. Click the [Yes] button.
a A message appears to check whether or not to remove the profile information.
3. Click the [Yes] button to remove and the [No] button to keep the profile information.
78
If You Have Installed the Software Before
ATTENTION
If the problem persists when you kept the profile information then reinstalled the
software, try again after removing the profile information.
a The installation information is removed, and the following message appears.
4. Click the [OK] button to close the [Remove Installation Information] window.
l ScanSnap Organizer/CardMinder/ScanSnap Online Update
1. Select [ScanSnap Organizer], [CardMinder], or [ScanSnap Online Update], and click
the [Remove] button.
a A confirmation message appears.
2. Click the [Yes] button.
79
If You Have Installed the Software Before
a The installation information is removed, and the following message appears.
3. Click the [OK] button to close the [Remove Installation Information] window.
6.
By repeating step 5, remove the installation information of all the software
listed in the [Remove Installation Information] window.
7.
Click the [Close] button to close the [Remove Installation Information]
window.
8.
Confirm that the installation folder no longer exists.
If the [ScanSnap] folder remains in the following location, rename the folder (such as [ScanSnap]). This folder can later be deleted once the installation is successfully completed.
Path: DriveName (such as C):\Program Files\PFU
After completing the procedure, proceed to "Installing the Software from the [ScanSnap Setup] Window" (page
81).
80
If You Have Installed the Software Before
Installing the Software from the [ScanSnap Setup] Window
Once the software is uninstalled or the installation information is removed, install the software from
the [ScanSnap Setup] window.
Install the software in the following procedure.
1.
Restart the computer.
2.
Log on as a user with Administrator privileges.
3.
If anti-virus software is running, disable the software temporarily.
ATTENTION
If you cannot disable the anti-virus software, check if the software is set to lock the application.
4.
Install the software.
For details, refer to "How to Install the Software" (page 41).
If you did not perform the procedure in "Removing the Installation Information" (page 77) and then failed to install
the software, perform the following procedures again:
l "Uninstalling the Software" (page 76)
l "Removing the Installation Information" (page 77)
l "Installing the Software from the [ScanSnap Setup] Window" (page 81)
If you still could not reinstall the software after performing the above procedures, proceed to "Installing One
Software at a Time" (page 82).
81
If You Have Installed the Software Before
Installing One Software at a Time
Install the software one by one in the following procedure.
1.
Restart the computer.
2.
Log on as a user with Administrator privileges.
3.
If anti-virus software is running, disable the software temporarily.
ATTENTION
If you cannot disable the anti-virus software, check if the software is set to lock the application.
4.
Insert the Setup DVD-ROM into the DVD-ROM drive.
a The [ScanSnap Setup] window appears.
5.
Click the [Close] button to close the [ScanSnap Setup] window.
6.
Install the software.
Open the Setup DVD-ROM from Windows Explorer, and run the "setup.exe" of each software.
l ScanSnap Manager
DVD-ROM drive:\Software\ScanSnap\setup.exe
l ScanSnap Organizer
DVD-ROM drive:\Software\Organizer\setup.exe
l CardMinder
DVD-ROM drive:\Software\Card\setup.exe
Install one of the software above, and then install the following application.
l ScanSnap Online Update
DVD-ROM drive:\Software\Online Update\Setup.exe
a The setup window appears.
Follow the instructions on the screen to continue with the installation.
If you cannot proceed further because a message appears to indicate that the software is
already installed, start over again from the procedure in "Uninstalling the Software" (page
76).
ATTENTION
If the "setup.exe" for a software program is not included in the Setup DVD-ROM, download the
installer for the software program from the following web page, then install it.
http://scansnap.fujitsu.com/g-support/en/
7.
Restart the computer.
82
When the ScanSnap Manager Icon Does Not Appear
When the ScanSnap Manager Icon Does Not Appear
does not appear in
This section explains how to troubleshoot when the ScanSnap Manager icon
the notification area even though the software is installed and the ScanSnap is connected to the
computer.
l "Displaying the ScanSnap Manager Icon" (page 84)
83
When the ScanSnap Manager Icon Does Not Appear
Displaying the ScanSnap Manager Icon
1.
Start up ScanSnap Manager by selecting [Start] menu → [All Programs] →
[ScanSnap Manager] → [ScanSnap Manager] (for Windows 8.1/Windows 8,
start up ScanSnap Manager by selecting [ScanSnap Manager] under
[ScanSnap Manager] on the All apps screen).
HINT
If the problem is solved, you can change the setting so that ScanSnap Manager will start up
automatically from the next time you log on to the computer. The procedure is as follows.
1. Right-click the ScanSnap Manager icon
in the notification area located at the far right of
the task bar and select [Preferences] from the "Right-Click Menu" (page 43).
a The [ScanSnap Manager - Preferences] window appears.
2. In the [Auto Startup] list, select the [Start up ScanSnap Manager when you log on] checkbox.
If the problem persists, refer to "When ScanSnap Manager Does Not Operate Normally" (page 85).
84
When ScanSnap Manager Does Not Operate Normally
When ScanSnap Manager Does Not Operate
Normally
If the ScanSnap Manager icon in the notification area located at the far right of the taskbar is
displayed as
even though the software is installed and the ScanSnap is connected to the
computer, perform the following procedures.
l "Removing Unnecessary Icons from the Notification Area" (page 86)
l "Checking the Connection between the ScanSnap and the Computer" (page 87)
l "Checking If ScanSnap Manager Is Operating Normally" (page 88)
l "Removing the ScanSnap's Connection Information" (page 91)
85
When ScanSnap Manager Does Not Operate Normally
Removing Unnecessary Icons from the Notification Area
1.
Check the software icons in the notification area, and exit the software that
you are not using.
a The icon is removed from the notification area.
2.
in the notification area and select
Right-click the ScanSnap Manager icon
[Exit] from the "Right-Click Menu" (page 43).
3.
Start up ScanSnap Manager by selecting [Start] menu → [All Programs] →
[ScanSnap Manager] → [ScanSnap Manager] (for Windows 8.1/Windows 8,
start up ScanSnap Manager by selecting [ScanSnap Manager] under
[ScanSnap Manager] on the All apps screen).
If the problem persists, refer to "Checking the Connection between the ScanSnap and the Computer" (page
87).
86
When ScanSnap Manager Does Not Operate Normally
Checking the Connection between the ScanSnap and the
Computer
1.
Unplug the USB cable from the computer and the ScanSnap, then plug it
back in.
Make sure to leave at least 5 seconds between unplugging and plugging the cable.
If you are using a USB hub, connect the USB cable to the computer directly.
If the problem persists, refer to "Checking If ScanSnap Manager Is Operating Normally" (page 88).
87
When ScanSnap Manager Does Not Operate Normally
Checking If ScanSnap Manager Is Operating Normally
1.
Turn off the ScanSnap and then turn it on again.
Make sure to leave at least 5 seconds between turning off and on the ScanSnap.
If the problem persists, proceed to step 2.
2.
If you are using a USB hub, connect the ScanSnap to the computer directly
with a USB cable.
If the problem persists, proceed to step 3.
3.
If there is more than one USB port on the computer, connect the USB cable
to a different USB port.
If the problem persists, proceed to step 4.
4.
If a USB device other than the ScanSnap is connected to the computer,
disconnect it.
If the problem persists, proceed to step 5.
5.
If anti-virus software is running, disable the software temporarily.
ATTENTION
If you cannot disable the anti-virus software, check if the software is set to lock the application.
If the problem persists, proceed to step 6.
6.
Check the privileges to access the installation files.
1. Select [Start] menu → [All Programs] → [ScanSnap Manager] → [ScanSnap Support Tool]
(for Windows 8.1/Windows 8, select [ScanSnap Support Tool] under [ScanSnap Manager]
on the All apps screen).
a The [ScanSnap Support Tool] window appears.
2. Click the [Check] button on the [Recover] tab, and proceed by following the instructions
displayed on the screen.
88
When ScanSnap Manager Does Not Operate Normally
a If the message "The recommended privileges have been applied." appears, turn off the
ScanSnap and then turn it on again. Make sure to leave at least 5 seconds between
turning off and on the ScanSnap.
If the message "Failed to change the privileges. Uninstall ScanSnap Manager then install it again."
appears or the problem still persists, proceed to step 7.
7.
Recover the connection with the ScanSnap.
1. Select [Start] menu → [All Programs] → [ScanSnap Manager] → [ScanSnap Support Tool]
(for Windows 8.1/Windows 8, select [ScanSnap Support Tool] under [ScanSnap Manager]
on the All apps screen).
a The [ScanSnap Support Tool] window appears.
2. Click the [Recover] button on the [Recover] tab, and proceed by following the instructions
displayed on the screen.
89
When ScanSnap Manager Does Not Operate Normally
8.
Turn off the ScanSnap and restart the computer.
If the problem persists, refer to "Removing the ScanSnap's Connection Information" (page 91).
90
When ScanSnap Manager Does Not Operate Normally
Removing the ScanSnap's Connection Information
The ScanSnap might have been connected to the computer before the software was installed. In this
case, the ScanSnap's connection information needs to be removed. Remove the ScanSnap's
connection information in the following procedure.
1.
Connect the ScanSnap to the computer, and turn on the ScanSnap.
2.
Open Device Manager.
l Windows 8.1
on the lower left side of the Start screen → [Control Panel] under [Windows
Click
System] → [Hardware and Sound] → [Device Manager].
l Windows 8
Right-click the Start screen, and select [All apps] on the app bar → [Control Panel] under
[Windows System] → [Hardware and Sound] → [Device Manager].
l Windows 7
Select [Start] menu → [Control Panel] → [Hardware and Sound] → [Device Manager].
l Windows Vista
Select [Start] menu → [Control Panel] → [System and Maintenance] → [Device Manager].
3.
Select [Imaging devices] and right-click on [ScanSnap S1100i] (or [Other
devices] → [ScanSnap S1100i]), and then select [Uninstall] from the
displayed menu.
4.
If other USB ports have been used to connect to the ScanSnap, perform
steps 1 to 3 for each of the ports.
5.
Turn off the ScanSnap.
6.
Unplug the USB cable from the computer.
7.
Restart the computer.
8.
Connect the USB cable to the computer.
9.
Turn on the ScanSnap.
a The ScanSnap Manager icon appears in the notification area. Make sure that the displayed
icon is
.
91
When ScanSnap Manager Does Not Operate Normally
If the problem persists, refer to "If You Have Installed the Software Before" (page 75).
If the problem still persists, perform the procedures described in "When ScanSnap Manager Does Not Operate
Normally" (page 85) once again.
If the above procedures do not solve the problem, please attach the data of your system information to an email and
send it to your FUJITSU scanner dealer or an authorized FUJITSU scanner service provider. For details about how
to collect system information, refer to "Troubleshooting" in the ScanSnap Manager Help.
92
When You Cannot Uninstall the Software
When You Cannot Uninstall the Software
This section explains how to troubleshoot when you cannot uninstall the following software
programs:
l ScanSnap Manager
l ScanSnap Organizer
l CardMinder
l ScanSnap Online Update
1.
Restart the computer and log on as a user with Administrator privileges.
2.
Remove the installation information.
a For details, refer to "Removing the Installation Information" (page 77).
3.
Install the software.
a For details, refer to "How to Install the Software" (page 41).
4.
Uninstall the software.
a For details, refer to "Uninstalling the Software" (page 102).
93
Cleaning
Cleaning
This section explains about the cleaning materials and how to clean the ScanSnap.
l "Specifications of Cleaning Materials" (page 95)
l "Cleaning the Outside of the ScanSnap" (page 96)
l "Cleaning the Inside of the ScanSnap" (page 97)
l "Cleaning the Carrier Sheet" (page 100)
94
Specifications of Cleaning Materials
Specifications of Cleaning Materials
Cleaning materials and their part numbers are as below.
Product Name
Part No.
Unit
Note
Cleaner F1
PA03950-0352
1 bottle
Size: 100 ml
Cleaning Paper (*1)
CA99501-0012
1 pack
10 sheets
Cleaning Wipe (*2)
PA03950-0419
1 pack
24 packets
Commercially
available
-
-
PFU LIMITED
Lint-free dry cloth (*3)
*1: Used with Cleaner F1.
*2: The cleaning wipes are wet tissues that have been soaked with Cleaner F1. In place of this
product, you can use a cloth soaked with Cleaner F1.
*3: Any lint-free cloth can be used.
Contact your FUJITSU scanner dealer or an authorized FUJITSU scanner service provider for
details about purchasing the cleaning materials.
For details, refer to the following web page:
http://scansnap.fujitsu.com/
95
Cleaning the Outside of the ScanSnap
Cleaning the Outside of the ScanSnap
Clean the outside of the ScanSnap in the following procedure.
1.
Unplug the cables from the ScanSnap.
2.
Clean the outside of the ScanSnap with a dry cloth, or a cloth moistened with
Cleaner F1/mild detergent.
ATTENTION
l Never use paint thinner or any other organic solvents. The shape or color may be changed.
l When cleaning the ScanSnap, prevent liquids from entering the ScanSnap.
l It may take a long time for Cleaner F1 to dry if an excessive amount is used. Moisten the
cloth with moderate quantity. Wipe off the cleaner completely with a soft cloth to leave no
residue on the cleaned parts.
Cloth
96
Cleaner F1 or
Mild Detergent
Cleaning the Inside of the ScanSnap
Cleaning the Inside of the ScanSnap
Scanning repeatedly may cause dust and paper dust to accumulate inside the ScanSnap resulting in
a scanning error.
As a guideline, the inside of the ScanSnap should be cleaned every 100 sheets scanned. Note that
this guideline varies depending on the types of documents you scan. For instance, it may be
necessary to clean the scanner more frequently when you scan documents on which the toner is not
sufficiently fused.
HINT
To check the number of sheets scanned with the ScanSnap, see [Total Page Count] in the [ScanSnap
Manager - Scanner and driver information] window.
To open the [ScanSnap Manager - Scanner and driver information] window, right-click the ScanSnap
in the notification area located at the far right of the taskbar, and click [Help] →
Manager icon
[ScanSnap information] from the "Right-Click Menu" (page 43).
WARNING
l Before you clean the ScanSnap, you must close the feed guide, turn off the
ScanSnap, and unplug the USB cable. Not doing so may cause fire or
electrical shock.
l Do not use aerosol spray or spray that contains alcohol to clean the
scanner. Paper dust and other dust blown up by strong air from the spray
may enter inside of the scanner which may cause scanner failure or
malfunction.
Also note that sparks generated by static electricity may cause a fire.
1.
Clean the glass and idler rollers.
1. Unplug the cables from the ScanSnap.
2. Open the top cover and output guide.
Top Cover
Output Guide
Feed Guide
3. Clean the following locations with a cloth moistened with Cleaner F1.
ATTENTION
l Do not use water or mild detergent to clean the inside of the ScanSnap.
l It may take a long time for Cleaner F1 to dry if an excessive amount is used. Moisten the
cloth with moderate quantity.
97
Cleaning the Inside of the ScanSnap
Wipe off the cleaner completely to leave no residue on the cleaned parts.
Glass (x 2)
Idler Roller (x 12)
l Glass (× 2, one on the top cover and one on the opposite side)
Gently wipe the dirt and dust off the surface of the glass sections.
l Idler roller (× 12, located on the top cover)
Gently wipe the dirt and dust off the rollers as you rotate them manually. Be careful not
to damage the surface of the rollers. Make sure that they are cleaned properly because
residue on the rollers will affect the feeding performance.
2.
Clean the feed roller and eject roller.
1. Connect the USB cable to the USB connector on the ScanSnap and the USB port on the
computer, and press the [Scan/Stop] button for three seconds with the top cover open.
ATTENTION
Connect the USB cable to the USB port on the computer only when cleaning the feed rollers
and eject rollers.
2. Clean the following locations with a cloth moistened with Cleaner F1.
ATTENTION
l Do not use water or mild detergent to clean the inside of the ScanSnap.
l It may take a long time for Cleaner F1 to dry if an excessive amount is used. Moisten the
cloth with moderate quantity.
Wipe off the cleaner completely to leave no residue on the cleaned parts.
Eject Roller (x 1)
Feed Roller (x 1)
l Feed roller (× 1)
Press the [Scan/Stop] button to rotate the roller. Gently wipe the dirt and dust off while
taking care not to damage the surface of the roller. Make sure that they are cleaned
properly because residue on the roller will affect the feeding performance.
l Eject roller (× 1)
Press the [Scan/Stop] button to rotate the roller. Gently wipe the dirt and dust off while
taking care not to damage the surface of the roller. Make sure that they are cleaned
properly because residue on the roller will affect the feeding performance.
98
Cleaning the Inside of the ScanSnap
If eject roller is difficult to clean, try cleaning it from the back while you keep the top
cover slightly open.
Eject Roller (x 1)
HINT
Pressing the [Scan/Stop] button seven times will rotate the feed roller and the eject roller one
revolution.
3.
Close the top cover and the output guide.
Output Guide
Top Cover
Feed Guide
a It clicks when it returns to its original position.
ATTENTION
Make sure that the top cover is completely closed.
Otherwise, paper jams or other feeding errors, or image faults may occur.
99
Cleaning the Carrier Sheet
Cleaning the Carrier Sheet
As you keep using the Carrier Sheet, dirt and dust will accumulate on the surface and the inside.
Clean the Carrier Sheet regularly because it may result in scanning errors.
The procedure for cleaning the Carrier Sheet is as follows.
Cleaning
Gently wipe the dirt and dust off the surface and the inside of the Carrier Sheet with a dry cloth, or a
cloth moistened with Cleaner F1/mild detergent.
ATTENTION
l Do not use paint thinner or any other organic solvents.
l Do not use force to rub. The Carrier Sheet may be damaged or deformed.
l Be careful not to leave any crease on the Carrier Sheet.
l After cleaning the inside of the Carrier Sheet with a cloth moistened with Cleaner F1/mild detergent,
make sure that it is completely dry before closing the Carrier Sheet.
l The Carrier Sheet should be replaced approximately every 500 scans.
100
Appendix
Appendix
l "Uninstalling the Software" (page 102)
l "Specifications of Optional Parts" (page 104)
l "Specifications of the ScanSnap" (page 105)
101
Uninstalling the Software
Uninstalling the Software
This section explains how to uninstall the following software programs:
l ScanSnap Manager
l ScanSnap Organizer
l CardMinder
l ABBYY FineReader for ScanSnap
l Scan to Microsoft SharePoint
HINT
If all of the following software programs are uninstalled, ScanSnap Online Update is also uninstalled at
the same time:
l ScanSnap Manager
l ScanSnap Organizer
l CardMinder
The procedure is as follows.
1.
Turn on the computer and log on as a user with Administrator privileges.
2.
Exit all running software programs.
3.
Select [Start] menu → [Control Panel] → [Uninstall a program] under
[Programs] (for Windows 8.1/Windows 8, select [Control Panel] under
[Windows System] → [Uninstall a program] under [Programs] on the All apps
screen).
a The [Uninstall or change a program] window appears with a list of currently installed
software programs.
4.
Select a software program to uninstall.
HINT
To uninstall more than one software program, repeat steps 4 to 6 for each software program.
5.
Click the [Uninstall] button.
a A confirmation message appears.
6.
Click the [Yes] button.
a The software program is uninstalled.
ATTENTION
If you cannot successfully uninstall the following software programs, refer to "When You Cannot
Uninstall the Software" (page 93):
l ScanSnap Manager
l ScanSnap Organizer
l CardMinder
102
Uninstalling the Software
l ScanSnap Online Update
103
Specifications of Optional Parts
Specifications of Optional Parts
The product names and part numbers of optional parts are as follows.
Product Name
Part No.
Note
ScanSnap S1100 Case
PA03610-0001
Useful for carrying the ScanSnap.
USB CABLE
PA03610-0021
ScanSnap S1100 Feed Guide
PA03610-0002
ScanSnap S1100i Output Guide
PA03610-0017
ScanSnap Carrier Sheets
PA03360-0013
5 sheets
Contact your FUJITSU scanner dealer or an authorized FUJITSU scanner service provider for
details about purchasing the optional parts.
For details, refer to the following web page:
http://scansnap.fujitsu.com/
104
Specifications of the ScanSnap
Specifications of the ScanSnap
The following table summarizes the specifications of the ScanSnap.
Item
Specification
Product Name
ScanSnap S1100i
Scanning method
Manual feed (Continuous Document Feeding (CDF) function
supported), simplex scanning, two selectable paper paths (Uturn path (*1), straight path (*2))
Scanning color mode
Simplex, color/gray/black and white/auto (automatic color,
gray, and B&W detection)
Optical system/image sensor
Selfoc lens equal-magnification optics/color CIS × 1
Light source
3 color LED (Red/Green/Blue)
Scanning speed (A4 portrait)
Automatic resolution/normal/better/best
7.5 sec/sheet
Excellent
35 sec/sheet
Scan area
Refer to "Documents to Scan" (page 51)
Document thickness
Interface
Input power
USB 2.0/USB 1.1 (connector: USB Mini-B type) (*3)
Voltage
Power consumption
Temperature/humidity
allowable ranges
5 V (USB bus power)
During operation: 2.5 W or less
During sleep mode: 1.0 W or less
Temperature
During operation: 5 to 35 degrees C/41 to 95 degrees F
During standby: -20 to 60 degrees C/-4 to 140 degrees F
During storage/transportation: -20 to 60 degrees C/-4 to 140
degrees F
Humidity
During operation: 20 to 80%
During standby: 8 to 95%
During storage/transportation: 8 to 95%
Outer dimensions (Width × Depth × Height)
Min.: 273 × 47.5 × 34 mm/10.75 × 1.87 × 1.42 in. (when the
feed guide and output guide are closed)
Max.: 273 × 77 × 52 mm/10.75 × 3.03 × 2.05 in. (when the
feed guide and output guide are open)
Weight
350 g (approx. 0.88 lb)
Environmental specification
Compliant with the International Energy Star Program, and
RoHS Directive
Related Software
Scanner driver
ScanSnap Manager
File management
ScanSnap Organizer
Business card
management
CardMinder
Text recognition
ABBYY FineReader for ScanSnap
Update management
and application
ScanSnap Online Update
ECM linkage
Scan to Microsoft SharePoint
*1: When the output guide is open.
105
Specifications of the ScanSnap
*2: When the output guide is closed.
*3: When the ScanSnap is connected to a USB 3.0 port, the port operates as a USB 2.0 port.
106
About Customer Support and Maintenance
About Customer Support and Maintenance
Customer Support
l ABBYY FineReader for ScanSnap
From the [Start] menu, select [All Programs] → [ABBYY FineReader for ScanSnap(TM) 5.0] →
[User's Guide] → [Technical Support] (for Windows 8.1/Windows 8, select [User's Guide] under
[ABBYY FineReader for ScanSnap(TM) 5.0] on the All apps screen → [Technical Support]).
l Evernote
Refer to the following web page:
http://www.evernote.com/about/contact/support/
l Google Docs
Refer to the Google Docs Help Center or Google Help Forum.
To open them, select [Help] in Google Docs.
l Salesforce
Contact the system administrator of your Salesforce.
l SugarSync
Refer to the following web page:
https://sugarsync.custhelp.com/
l Dropbox
Refer to the following web page:
http://www.dropbox.com/contact
l ScanSnap
For other inquiries on the ScanSnap, refer to the following web page:
http://scansnap.fujitsu.com/g-support/en/
If your problem cannot be solved after referring to the above web pages, visit the following web
page to check the contact information of a suitable Fujitsu office and contact the Fujitsu office.
http://imagescanner.fujitsu.com/warranty.html
Suppliers of Consumables/Optional Parts
http://scansnap.fujitsu.com/
Maintenance
Contact your FUJITSU scanner dealer or an authorized FUJITSU scanner service provider for
repairs on this product.
For details, refer to the following web page:
http://imagescanner.fujitsu.com/warranty.html
ATTENTION
For safety reasons, never attempt repairs by yourself.
107


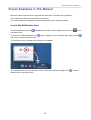
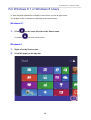
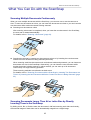
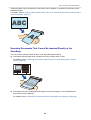

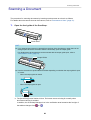
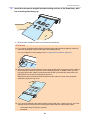
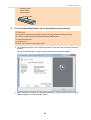
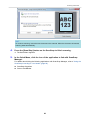

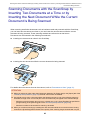
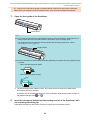
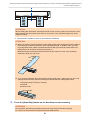


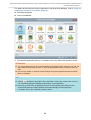
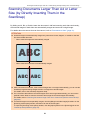
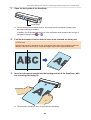
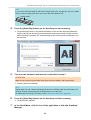
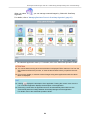

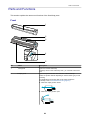
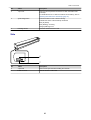
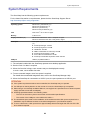


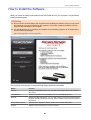
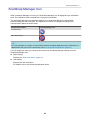

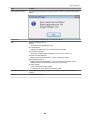
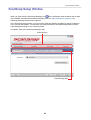


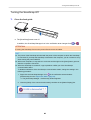


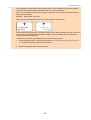


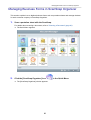
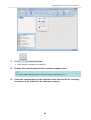
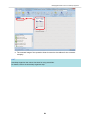
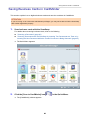
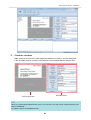

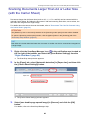

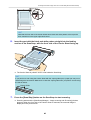
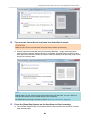
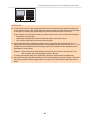

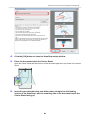
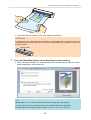

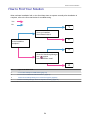


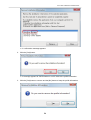
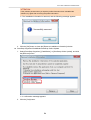
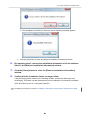
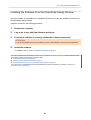


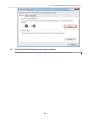
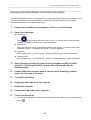

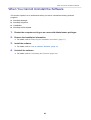

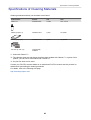

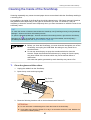
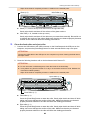
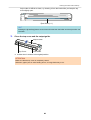


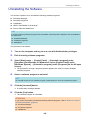

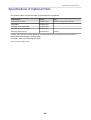
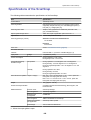


![[Scan] button on the ScanSnap.](http://vs1.manualzilla.com/store/data/005658366_1-513fc66afaf683e0c3b25d8948918383-150x150.png)


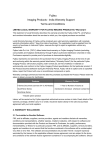


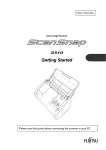
![3. Clique no botão [OK]](http://vs1.manualzilla.com/store/data/006085780_1-1e963248ed17cdf0be3b5a5218e98297-150x150.png)
![3. Clique no botão [Aplicar]](http://vs1.manualzilla.com/store/data/006085959_1-abc442ce88b6545b36fcdec1f957320c-150x150.png)