1
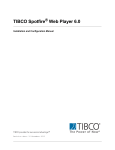
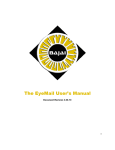
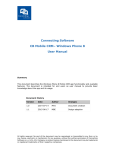
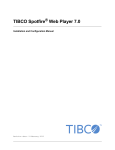
TIBCO Spotfire® Automation Services 6.5 Installation and Deployment Manual Revision date: 17 April 2014 Important Information SOME TIBCO SOFTWARE EMBEDS OR BUNDLES OTHER TIBCO SOFTWARE. USE OF SUCH EMBEDDED OR BUNDLED TIBCO SOFTWARE IS SOLELY TO ENABLE THE FUNCTIONALITY (OR PROVIDE LIMITED ADD-ON FUNCTIONALITY) OF THE LICENSED TIBCO SOFTWARE. THE EMBEDDED OR BUNDLED SOFTWARE IS NOT LICENSED TO BE USED OR ACCESSED BY ANY OTHER TIBCO SOFTWARE OR FOR ANY OTHER PURPOSE. USE OF TIBCO SOFTWARE AND THIS DOCUMENT IS SUBJECT TO THE TERMS AND CONDITIONS OF A LICENSE AGREEMENT FOUND IN EITHER A SEPARATELY EXECUTED SOFTWARE LICENSE AGREEMENT, OR, IF THERE IS NO SUCH SEPARATE AGREEMENT, THE CLICKWRAP END USER LICENSE AGREEMENT WHICH IS DISPLAYED DURING DOWNLOAD OR INSTALLATION OF THE SOFTWARE (AND WHICH IS DUPLICATED IN THE LICENSE FILE) OR IF THERE IS NO SUCH SOFTWARE LICENSE AGREEMENT OR CLICKWRAP END USER LICENSE AGREEMENT, THE LICENSE(S) LOCATED IN THE "LICENSE" FILE(S) OF THE SOFTWARE. USE OF THIS DOCUMENT IS SUBJECT TO THOSE TERMS AND CONDITIONS, AND YOUR USE HEREOF SHALL CONSTITUTE ACCEPTANCE OF AND AN AGREEMENT TO BE BOUND BY THE SAME. This document contains confidential information that is subject to U.S. and international copyright laws and treaties. No part of this document may be reproduced in any form without the written authorization of TIBCO Software Inc. TIBCO and Spotfire are either registered trademarks or trademarks of TIBCO Software Inc. and/or subsidiaries of TIBCO Software Inc. in the United States and/or other countries. All other product and company names and marks mentioned in this document are the property of their respective owners and are mentioned for identification purposes only. This software may be available on multiple operating systems. However, not all operating system platforms for a specific software version are released at the same time. Please see the readme.txt file for the availability of this software version on a specific operating system platform. THIS DOCUMENT IS PROVIDED “AS IS” WITHOUT WARRANTY OF ANY KIND, EITHER EXPRESS OR IMPLIED, INCLUDING, BUT NOT LIMITED TO, THE IMPLIED WARRANTIES OF MERCHANTABILITY, FITNESS FOR A PARTICULAR PURPOSE, OR NON-INFRINGEMENT. THIS DOCUMENT COULD INCLUDE TECHNICAL INACCURACIES OR TYPOGRAPHICAL ERRORS. CHANGES ARE PERIODICALLY ADDED TO THE INFORMATION HEREIN; THESE CHANGES WILL BE INCORPORATED IN NEW EDITIONS OF THIS DOCUMENT. TIBCO SOFTWARE INC. MAY MAKE IMPROVEMENTS AND/OR CHANGES IN THE PRODUCT(S) AND/OR THE PROGRAM(S) DESCRIBED IN THIS DOCUMENT AT ANY TIME. Copyright © 1996 - 2014 TIBCO Software Inc. ALL RIGHTS RESERVED. THE CONTENTS OF THIS DOCUMENT MAY BE MODIFIED AND/OR QUALIFIED, DIRECTLY OR INDIRECTLY, BY OTHER DOCUMENTATION WHICH ACCOMPANIES THIS SOFTWARE, INCLUDING BUT NOT LIMITED TO ANY RELEASE NOTES AND "READ ME" FILES. TIBCO Spotfire is covered by U.S. Patent No. 6,014,661 and U.S. Patent No. 7, 216,116. Other patent(s) pending. TIBCO Software Inc. Confidential Information 2 (20) TIBCO Spotfire® Automation Services 6.5 Contents 1 Install Automation Services 1.1 1.2 1.3 1.5 1.6 1.7 1.8 1.9 Overview Prerequisites Automation Services Web Service Installer Enable Active Scripting Deploy the Automation Services Job Builder Client Job Sender Antivirus and Malware Scanning Software Install Hotfixes 4 4 6 7 8 10 10 11 2 Configure Automation Services 12 2.1 2.2 2.3 14 2.4 2.5 Overview 12 Secure the Automation Services Web Service 12 Authentication to Spotfire Server with Integrated Windows Authentication 3 Upgrade to Automation Services 6.5 17 4 Troubleshoot Automation Services 18 5 Remove Automation Services 20 Authentication to Spotfire Server with Client Certificates Control Data Function-Based Data Sources Embedding Behavior TIBCO Spotfire® Automation Services 6.5 4 15 16 3 (20) Install Automation Services 1 Install Automation Services 1.1 Overview This manual provides the information you will need to install and configure TIBCO Spotfire Automation Services 6.5. This installation requires that you understand the Microsoft Internet Information Services (IIS) installation and administration as well as the installation and Administration of IIS add-ons. For more information about installing or configuring IIS or IIS add-ons, see the documentation for those programs or visit Microsoft support. 1.2 Prerequisites The version of the Automation Services package that you deploy to your environment must match the version of the TIBCO Spotfire Server and client that users will use to access the server. Before you install the Automation Services web service, the following software must be installed and configured on the server: Windows Server 2008, 2008 R2, or 2012. Microsoft .NET Framework version 4.5. Note: Make sure to upgrade to the latest version of Microsoft .NET Framework. Make sure that ASP.NET 4.030319 is Allowed in Internet Information Services. On Windows Server 2012, you must enable Microsoft .NET Framework 3.5. The Remap Information Services Catalogs and Schemas task requires Java to be installed on the machine running the jobs. Allowing ASP.NET 4.030319 in Internet Information Services 4 (20) TIBCO Spotfire® Automation Services 6.5 Install Automation Services 1 In the Internet Information Services Manager navigation pane, select the server (top) node, and then select ISAPI and CGI Restrictions. 2 Make sure that ASP.NET 4.0.30319 is present in the list and set it to Allowed. Note: If ASP.NET 4.0.30319 is not present on Windows Server 2008 or 2008 R2, open the command line and run the following command: C:\Windows\Microsoft.NET\Framework64\v4.0.30319\aspnet_regiis.exe /i and then return to step 1. Note Make sure to use the correct versions of each application. Newer versions, if available, may not work as expected. For comprehensive system requirements, refer to the TIBCO Spotfire System Requirements Web page: http://support.spotfire.com/sr.asp Best practice Before you install or update Automation Services you should review the TIBCO Spotfire System Requirements Web page for updated information. Enabling Microsoft .NET Framework 3.5 on Windows Server 2012 1 On the Microsoft Windows 2012 Server, navigate to the Administrative Tools options, and then select Server Manager. 2 Select Dashboard in the left hand list, and click Add Roles and Features. 3 In the Add Roles and Features Wizard, if the “Before you begin” dialog appears, click Next. TIBCO Spotfire® Automation Services 6.5 5 (20) Install Automation Services 4 In the Select installation type dialog, select Role-based or feature-based installation and click Next. 5 In the Select destination server dialog, select the target server and click Next. 6 In the Select server roles dialog, click Next. 7 In the Select features dialog, select the check box next to .Net Framework 3.5 Features and click Next. 8 In the Confirm installation selections dialog, you are prompted to specify an alternate source path for .NET 3.5. Comment: If the target computer does not have access to Windows Update, specify the path to the \sources\sxs folder on the installation media and then click OK. After you specify the alternate source, or if the target computer does have access to Windows Update, close the warning. 9 10 Click Install. When the installation completes, click Close. For more information on deploying .NET 3.5, see Microsoft .NET Framework 3.5 Deployment Considerations at http://msdn.microsoft.com/library/windows/hardware/ hh975396. 1.3 Automation Services Web Service Installer 6 (20) Installing the Automation Services Web Service 1 On the server where you will install Automation Services, copy all files in the Automation Services installer kit to a temporary directory on the server. 2 From the temporary directory on the server, run setup.exe. 3 On the “Welcome” page, click Next. 4 On the “License Agreement” page, read the license agreement and select the appropriate radio button, and then click Next. 5 On the “Destination Folder” page, specify the installation path, and then click Next. 6 On the “IIS Web Application Settings” page, type a name for the Automation Services Application and specify the IIS port, and then click Next. 7 On the “Configuration for TIBCO Spotfire Server” page, specify the URL to a Spotfire Server and credentials that have permission to access the Spotfire Server. If you are using Integrated Windows Authentication, leave username and password blank. TIBCO Spotfire® Automation Services 6.5 Install Automation Services 8 On the “Configuration for mail” page, type a valid SMTP host and a From e-mail address, which Automation Services can use to send automatic e-mails, and then click Next. Comment: These settings are required by the Send Mail functionality. Postinstallation, you can modify these settings in the Spotfire.Dxp.Automation.Launcher.exe.config file, stored in the <installation directory>\webroot\bin directory. 9 10 On the “Ready to Install the Program” page, click Install. On the “Install Complete” page, you can open the installer log file, otherwise click Finish. Comment: If the installation does not succeed, review the installer log file. A common case is that the installer determines that the target computer does not meet the system requirements. 1.4 Deploy Extensions Created extensions must be deployed to the TIBCO Spotfire Automation Services to be able to run. Deploying extensions 1 Copy all files needed to run the extension except modules.xml from the TIBCO Spotfire Client modules folder. 2 Paste the files into the Automation Services bin folder. 3 Open modules.xml from the TIBCO Spotfire Client modules folder. 4 Copy the extensions section. 5 Open AddIns.xml from the webroot/bin folder. 6 Paste the extensions section from modules.xml into the AddInRegistry section in AddIn.xml. Comment: There are some differences in letter cases between modules.xml and AddIns.xml. Make sure to replace all occurrences of “addIn fullTypeName” with “AddIn FullTypeName”. 7 1.5 Save changes in AddIn.xml. Enable Active Scripting For the Automation Services export tasks to work properly with Text Areas, you must enable Active Scripting on the Automation Services computer. TIBCO Spotfire® Automation Services 6.5 7 (20) Install Automation Services Enabling Active Scripting 1 Start the Local Group Policy Editor (gpedit.msc). 2 Under Local Computer Policy expand Computer Configuration > Administrative Templates > Windows Components > Internet Explorer > Internet Control Panel > Security Page > Internet Zone. 3 Right-click Allow active scripting and select Properties. If you are on Windows Server 2008 R2 or Windows Server 2012, select Edit. 4 In the Allow active scripting dialog, select Enabled. 5 In the Options area, make sure that the Allow active scripting list is set to Enabled, and then click OK. Note: If you complete this procedure after you install and configure IIS, you must restart IIS for the changes to take effect. 1.6 Deploy the Automation Services Job Builder If users need the Automation Services Job Builder functionality, you must deploy it to the Spotfire Server. Deploying the job builder package to the server 1 From a Web browser, open the Administration Console located at http://spotserver/ spotfire/administration (where spotserver is the name of a Spotfire Server). 2 Log in to the Spotfire Server as a Spotfire Administrator. 3 Select the Deployment tab, from the View list, select a Deployment Area that contains a valid Spotfire deployment and then click Add. Comment: You must select a Deployment Area that contains Spotfire Dxp.sdn. 4 In the Add to Deployment dialog, click Browse. 5 In the File Upload dialog, browse to the package file AutomationServices.spk. 6 In the Add to Deployment dialog, to upload and add the file to the distribution, click OK. Response: The list of packages is updated with the contents of the file. 8 (20) 7 In the lower left corner, click Validate to make sure the deployment is not damaged or corrupted. 8 In the lower left corner, click Save to save and publish the deployment. TIBCO Spotfire® Automation Services 6.5 Install Automation Services 9 10 In the Save Deployment dialog, type a version number and description for the deployment, and then click OK. Restart TIBCO Spotfire and log in as usual. Response: On startup the TIBCO Spotfire client downloads the new client package. Verifying the Job Builder License 1 Start TIBCO Spotfire. 2 Log in with a user account that has administrator user rights. 3 If prompted, download all updates from the server. Response: TIBCO Spotfire will open after the update is downloaded and installed. 4 Select Tools > Administration Manager, and then select the Groups and Licenses tab. 5 In the Available groups list, select a group. 6 In the right-hand pane, select the Licenses tab. 7 Click the plus sign (+) to expand the “TIBCO Spotfire Extensions” license, the “Automation Services Job Builder Tool” license is displayed. 8 Make sure that both Access to Extensions and the Automation Services Job Builder Tool are selected (indicated by a green check mark as in the following image). 9 If Access to Extensions and Automation Services Job Builder Tool are not selected, click Edit. 10 In the “Licenses for group” dialog, click the plus sign (+) to expand the “TIBCO Spotfire Extensions” license. 11 Select the check boxes for Access to Extensions and Automation Services Job Builder Tool and then click OK. 12 Repeat Step 5 through Step 11 for every group of users permitted to use Automation Services. 13 Verify the licenses for all groups, and then close the Administration Manager. For more information on using the Groups and Licenses tab, see the Administration Manager online help or the “TIBCO Spotfire – Deployment and Administration” manual. TIBCO Spotfire® Automation Services 6.5 9 (20) Install Automation Services 1.7 Client Job Sender Automation Services includes the Client Job Sender tool that you can use to automate jobs created by the job builder. The Client Job Sender tool and associated configuration file can be installed on any computer with HTTP or HTTPS (if configured) connectivity to the Automation Services web server. Make sure that both files are in the same directory. Client Job Sender File name Executable Spotfire.Dxp.Automation.ClientJobSender.exe Configuration file Spotfire.Dxp.Automation.ClientJobSender.exe.config The Automation Services Client Job Sender returns different codes depending on if a job succeeded or failed. If the job failed, the return code also returns a message indicating how it failed. The return values are stored in the ERRORLEVEL environment variable and the valid return codes are listed below. Return code value Return code Message 0 Success Job succeeded. 1 CommandLineParameterError Incorrect command line parameter was supplied. 2 ServerExecutionError The job failed on the server. 3 ClientExecutionError The client failed to send the job to the server. For information about how to use the Client Job Sender, see the TIBCO Spotfire Automation Services - User’s Manual. 1.8 Antivirus and Malware Scanning Software You should disable on-access scanning of files in the Automation Services webroot directory and all sub-directories. When certain antivirus and malware scanning software packages perform an on-access scan, they modify the files or the attributes of the file that they scan, which results in IIS triggering a restart of the web application. When the web application restarts, clients can no longer receive the status of the jobs executing and will report them as failed or not loaded. For performance reasons, we recommend that you disable the on-access scanning for these types of software packages for folders that are used by Automation Services. 10 (20) TIBCO Spotfire® Automation Services 6.5 Install Automation Services Exclude the following folders from on-access scans: <Program Files>\TIBCO\Automation Services\ C:\Windows\Microsoft.NET\Framework64\v4.0.30319\Temporary ASP.NET Files 1.9 Install Hotfixes Before you continue, you must check if any hotfixes have been released for this version of the server. If hotfixes are available, use the following procedure to install the hotfixes. Installing Hotfixes 1 Open the TIBCO Spotfire Product Hotfixes web site at http://support.spotfire.com/ patches.asp. Download the hotfixes that are available and follow the installation instructions included with each hotfix package. 2 Always make sure you have installed the latest hotfixes before troubleshooting or reporting any problems. When you have installed the hotfixes, the next step is to configure the installation. See “Configure Automation Services” on page 12. TIBCO Spotfire® Automation Services 6.5 11 (20) Configure Automation Services 2 Configure Automation Services 2.1 Overview To improve security, and to access a Spotfire Server that has a certain authentication configured, this section covers some settings that you may want (or need) to tweak. 2.2 Secure the Automation Services Web Service Encrypt Traffic between Clients and Automation Services By default, the Automation Services Web Service is set up to use the non-encrypted HTTP protocol for communication between clients (Web browsers) and the Web Service. If you wish to encryption traffic between clients and Automation Services, you can enable an SSL binding on the IIS Web site that the Automation Services Web Service is configured in. However, if you do this you must ensure that the SSL certificate used to encrypt the traffic, or its certification authority, is trusted by the clients. Important If the SSL certificate is not trusted by the clients, the Automation Services Web Service will not function. For more information about how to enable SSL in Internet Information Services and how to make clients trust SSL certificates, see the Microsoft Internet Information Services documentation. Set Up Authentication By default, any user accessing the Automation Services Web Service with a web browser can run the web service. For security reasons, however, you may want to allow for only a limited number of users to access Automation Services. You can accomplish this in two steps. First, you must disable Anonymous Authentication and then enable Windows Authentication to the Automation Services Web Service using Internet Information Services Manager. Setting Up Web Service Authentication 1 Open the Internet Information Services Manager and find the Authentication settings. Select the SpotfireAutomation Application and double click the Authentication icon. 2 Disable Anonymous Authentication and enable Windows Authentication. Next, you must configure Automation Services to grant access to certain users. 1 12 (20) Granting access to certain users Open the Automation Services web configuration file from: TIBCO Spotfire® Automation Services 6.5 Configure Automation Services <installation dir>\webroot\Web.config 2 Add the following text within the <system.web> element: <identity impersonate="false"/> <authentication mode="Windows" /> <authorization> <allow users="domain\user1" /> <allow users="domain\user2" /> <deny users="*"/> </authorization> Replace domain\user1 etc. with the domain and users applicable in your organization. You can add as many users here as needed. Example of allowing one user in the domain serenity: <identity impersonate="false"/> <authentication mode="Windows" /> <authorization> <allow users="serenity\malcolm" /> <deny users="*"/> </authorization> Encrypt Sections of the Automation Launcher Configuration File If you added authentication information to the Spotfire Server or to an SMTP server in the Spotfire.Dxp.Automation.Launcher.exe.config file, you can encrypt this section of the file. You can encrypt this section by executing the Spotfire.Dxp.Automation.Launcher.exe tool (located in <installation folder>\webroot\bin) with the /encryptSection argument followed by the name of the section. Examples Use the following command to encrypt the section containing the login information used to authenticate with the Spotfire Server: Spotfire.Dxp.Automation.Launcher.exe /encryptSection:"Spotfire.Dxp.Automation/authentication" Use the following command to encrypt the section containing login information for an SMTP server: Spotfire.Dxp.Automation.Launcher.exe /encryptSection:"spotfire.dxp.automation.tasks/smtp" If you need to decrypt an encrypted section, use the /decryptSection argument followed by the name of the section. Examples Spotfire.Dxp.Automation.Launcher.exe /decryptSection:"Spotfire.Dxp.Automation/authentication" Spotfire.Dxp.Automation.Launcher.exe /decryptSection:"spotfire.dxp.automation.tasks/smtp" TIBCO Spotfire® Automation Services 6.5 13 (20) Configure Automation Services 2.3 Authentication to Spotfire Server with Integrated Windows Authentication If your Spotfire Server is configured to use Integrated Windows Authentication, you must configure the Automation Services Web service to run as a user with login and library permissions to the Spotfire Server. Setting the Automation Services Web Service User 1 In the Internet Information Services Manager, in the left pane, locate and select Application Pools. 2 In the Application Pools pane, right-click the TIBCO Spotfire Automation Services Application Pool, select Advanced Settings, and then edit the Identity field. 3 Change the identity to a domain user that has login and library permissions to the Spotfire Server. Now that the Automation Services Web Service is running as a non-standard user, you must also grant this user Full Control over files in the Automation Services installation folder. Setting File Permissions to the Automation Services Installation Folder 1 In the Internet Information Services Manager, in the left pane, and then expand the Automation Services Web Application. 2 Right-click the subfolder bin and select Edit Permissions. 3 On the Security tab, click Edit. 4 Add the user who you designated to run the Automation Services Application pool, if it is not present. 5 Make sure that the this user has the Full control permission. If you entered a username and password when you installed Automation Services, you must also remove these from the configuration file. 1 Removing Credentials from the Automation Services Configuration File Use a text editor to open the Automation Services configuration file: <installation dir>\webroot\bin\ Spotfire.Dxp.Automation.Launcher.exe.config 2 In the authentication section, leave the serverUrl entry but remove the values for both username and password. When you finish editing this line it should be similar to the following: <authentication serverUrl="http://spotfireserver/" username="" password=""> 14 (20) TIBCO Spotfire® Automation Services 6.5 Configure Automation Services 2.4 Authentication to Spotfire Server with Client Certificates If your Spotfire Server is set up to use Client Certificates, you must install the certificate used for authentication on the Automation Services server and configure Automation Services to use it when authenticating to the Spotfire Server. Then you must configure the access rights to the certificate so that the NETWORK SERVICE account has access. Refer to the TIBCO Spotfire Server Installation and Configuration Manual for more information about Client Certificates. Installing a client certificate 1 Open Microsoft Management Console (MMC) and add the Certificates snap-in. Select to manage certificates for Local Computer. 2 Install the certificate in the Personal container. 3 In the Microsoft Management Console, right click the installed certificate and select All Tasks\Manage Private Keys. 4 Grant the user NETWORK SERVICE access rights to the certificate. 1 Configuring Automation Services to use a client certificate In a text editor, open the configuration file <installation dir>\webroot\bin\ Spotfire.Dxp.Automation.Launcher.exe.config 2 In the certificate section, if the section is commented out, remove the comment markers. 3 Set useCertificates to true, and then set storeName, storeLocation, and serial number to match the installed certificate. Example <Spotfire.Dxp.Automation> <authentication serverUrl="https://spotfireserver.yourorganization.com"> <!-- <proxy username="" password="" /> --> <certificates useCertificates="true" storeName="MyStore" storeLocation="LocalMachine" serialNumber="00AABB11CCDD2233DD" /> </authentication> </Spotfire.Dxp.Automation> TIBCO Spotfire® Automation Services 6.5 15 (20) Configure Automation Services 2.5 Control Data Function-Based Data Sources Embedding Behavior When using Automation Services jobs to save analyses containing data function-based data sources (for example, all on-demand data tables) that are configured to “Load automatically”, these data sources are not loaded automatically by default, but must be manually refreshed. Use the settings below to control this behavior. 1 Modifying the force update behavior for embedded data Use a text or xml editor to open the configuration file: <installation dir>\webroot\bin\ Spotfire.Dxp.Automation.Launcher.exe.config 2 Locate the saveAnalysis line and set the force update behavior to be either true or false. <saveAnalysis forceUpdateBehaviorManualWhenEmbeddingData="false"/> 3 Save the changes in Spotfire.Dxp.Automation.Launcher.exe.config and then for the changes to take effect you must restart the Automation Services application pool. Modifying the force update setting for a specific TIBCO Spotfire Professional installation If you want to test Jobs by executing them locally you can modify this setting on your own TIBCO Spotfire Professional computer using these steps. 1 On the computer where TIBCO Spotfire Professional is installed, in the Spotfire Forms Modules directory, locate Spotfire.Dxp.Main.dll.config. For example: C:\Program Files (x86)\TIBCO\Spotfire\4.0.0\Modules\ Spotfire DXP Forms_9.14.5830.4061 2 In the <configuration><configSections> node add the following: <sectionGroup name="spotfire.dxp.automation.tasks"> <section name="saveAnalysis" type="Spotfire.Dxp.Automation.Tasks.SaveAnalysisSettings, Spotfire.Dxp.Automation.Tasks, Version=3.0.2736.26364, Culture=neutral, PublicKeyToken=789861576bd64dc5" requirePermission="false" /> </sectionGroup> 3 Anywhere inside the topmost <configuration> node, add: <spotfire.dxp.automation.tasks> <saveAnalysis forceUpdateBehaviorManualWhenEmbeddingData="false"/> </spotfire.dxp.automation.tasks> 4 16 (20) Restart TIBCO Spotfire Professional to use the new settings. TIBCO Spotfire® Automation Services 6.5 Upgrade to Automation Services 6.5 3 Upgrade to Automation Services 6.5 This section describes what you need to do in order to upgrade from a previous version of Automation Services. Upgrading the Web Service 1 Navigate to the <installation directory>\webroot\bin directory. 2 Make a copy the Spotfire.Dxp.Automation.Launcher.exe.config file. Comment: The copy of this file is what you will refer to as a reference when you are configuring the new version of this configuration file. 3 If you have deployed any custom extensions you should make a copy of these as well as the AddIns.xml file. 4 Uninstall the previous Automation Services web service. 5 Install the Automation Services 6.5 web service by running setup.exe on the computer that hosts the web server. Follow the instructions in the installation wizard. 6 Complete the procedure “Secure the Automation Services Web Service” on page 12. Tip View the old Spotfire.Dxp.Automation.Launcher.exe.config next to the new version so that you can copy the necessary settings from the previous file to the new file. Upgrading the Job Builder The Automation Services upgrade will replace the old job builder package with the new version. Upgrading the Command-Line Client You should use the Automation Services 6.5 command-line client instead of one from a previous version. TIBCO Spotfire® Automation Services 6.5 17 (20) Troubleshoot Automation Services 4 Troubleshoot Automation Services 4.1 Configure the Automation Services Log File If Automation Services is not configured correctly, the users will not be able to run jobs on the server. An error message will appear directing the user to contact their Spotfire Administrator. To discover what went wrong, you must review the Spotfire.Dxp.Automation.log file, located in the <installation directory>\LogFiles directory. The Spotfire.Dxp.Automation.Launcher.exe.config file, located in the <installation directory>\webroot\bin directory contains all of the configuration settings. If you need to change the URL to the Spotfire Server, for instance, or the hostname of your SMTP server, you can do this by opening the file in a text or XML editor. Configuration File Extract <!-If username and password are empty or doesn't exist, then we login using the current Windows account (using Windows Authentication). serverUrl (Required): The url to the Spotfire Analytics Server "http[s]://<server>[:port]/" username: The spotfire user to authenticate with. password: The password to authenticate with. proxy (you need to set the system.net/defaultProxy/proxy: proxyaddress to use it if you run under a system account (from web sites etc.)): username: Proxy username for communication between web server and Spotfire Analytics Server. password: Proxy password for communication between web server and Spotfire Analytics Server. certificates (Certificates to use when authenticating with Analytics Server): useCertificates (false): Should we use certificates storeName (TrustedPeople): The store name to get the certificates from. [AddressBook|AuthRoot|CertificateAuthority|Disallowed |My|Root|TrustedPeople|TrustedPublisher] storeLocation (LocalMachine): [CurrentUser|LocalMachine] The location to take the certificates from. serialNumber: The serial number of the certificate to use. --> 18 (20) TIBCO Spotfire® Automation Services 6.5 Troubleshoot Automation Services <authentication serverUrl="http://spotserver/" username="" password=""> 4.2 Library Import Conflict Mode In cases where a user opens Automation Service Job Builder to configure Import Library Items and selects the option to Include permissions, the files are moved, instead of copied, from the source directory. This behavior results because the import task is defined to adhere to keep new conflict resolution mode and a GUID conflict results in the operation. Since the newest version is in the target directory, the files in the source directory are discarded. TIBCO Spotfire® Automation Services 6.5 19 (20) Remove Automation Services 5 Remove Automation Services To uninstall Automation Services, open the Control Panel and use Program and Features on the server. Locate TIBCO Spotfire Automation Services entry and launch it. Automation Services will be removed from the server and the added Internet Information Services configuration will also be removed. Note: Some files may remain in the installation folder after the uninstall process. You can remove them by deleting the installation folder. 20 (20) TIBCO Spotfire® Automation Services 6.5