1
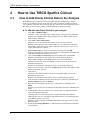
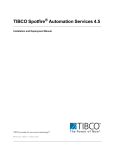
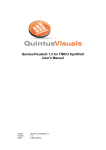
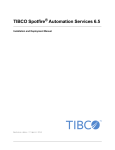
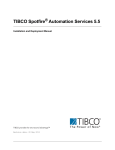
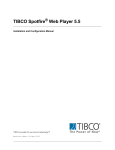
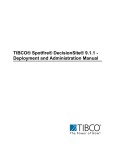
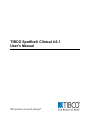
TIBCO Spotfire® Clinical 4.0.1
User's Manual
Important Information
SOME TIBCO SOFTWARE EMBEDS OR BUNDLES OTHER TIBCO SOFTWARE. USE OF SUCH
EMBEDDED OR BUNDLED TIBCO SOFTWARE IS SOLELY TO ENABLE THE FUNCTIONALITY
(OR PROVIDE LIMITED ADD-ON FUNCTIONALITY) OF THE LICENSED TIBCO SOFTWARE.
THE EMBEDDED OR BUNDLED SOFTWARE IS NOT LICENSED TO BE USED OR ACCESSED
BY ANY OTHER TIBCO SOFTWARE OR FOR ANY OTHER PURPOSE.
USE OF TIBCO SOFTWARE AND THIS DOCUMENT IS SUBJECT TO THE TERMS AND
CONDITIONS OF A LICENSE AGREEMENT FOUND IN EITHER A SEPARATELY EXECUTED
SOFTWARE LICENSE AGREEMENT, OR, IF THERE IS NO SUCH SEPARATE AGREEMENT, THE
CLICKWRAP END USER LICENSE AGREEMENT WHICH IS DISPLAYED DURING DOWNLOAD
OR INSTALLATION OF THE SOFTWARE (AND WHICH IS DUPLICATED IN
LICENSE_TIBCOSPOTFIRECLINICAL.PDF) OR IF THERE IS NO SUCH SOFTWARE LICENSE
AGREEMENT OR CLICKWRAP END USER LICENSE AGREEMENT, THE LICENSE(S) LOCATED
IN THE “LICENSE” FILE(S) OF THE SOFTWARE. USE OF THIS DOCUMENT IS SUBJECT TO
THOSE TERMS AND CONDITIONS, AND YOUR USE HEREOF SHALL CONSTITUTE
ACCEPTANCE OF AND AN AGREEMENT TO BE BOUND BY THE SAME.
This document contains confidential information that is subject to U.S. and international copyright laws
and treaties. No part of this document may be reproduced in any form without the written authorization of
TIBCO Software Inc.
TIBCO and Spotfire are either registered trademarks or trademarks of TIBCO Software Inc. and/or
subsidiaries of TIBCO Software Inc. in the United States and/or other countries. All other product and
company names and marks mentioned in this document are the property of their respective owners and are
mentioned for identification purposes only. This software may be available on multiple operating systems.
However, not all operating system platforms for a specific software version are released at the same time.
Please see the readme.txt file for the availability of this software version on a specific operating system
platform.
THIS DOCUMENT IS PROVIDED “AS IS” WITHOUT WARRANTY OF ANY KIND, EITHER
EXPRESS OR IMPLIED, INCLUDING, BUT NOT LIMITED TO, THE IMPLIED WARRANTIES OF
MERCHANTABILITY, FITNESS FOR A PARTICULAR PURPOSE, OR NON-INFRINGEMENT.
THIS DOCUMENT COULD INCLUDE TECHNICAL INACCURACIES OR TYPOGRAPHICAL
ERRORS. CHANGES ARE PERIODICALLY ADDED TO THE INFORMATION HEREIN; THESE
CHANGES WILL BE INCORPORATED IN NEW EDITIONS OF THIS DOCUMENT. TIBCO
SOFTWARE INC. MAY MAKE IMPROVEMENTS AND/OR CHANGES IN THE PRODUCT(S)
AND/OR THE PROGRAM(S) DESCRIBED IN THIS DOCUMENT AT ANY TIME.
Copyright © 1996- 2012 TIBCO Software Inc. ALL RIGHTS RESERVED.
THE CONTENTS OF THIS DOCUMENT MAY BE MODIFIED AND/OR QUALIFIED, DIRECTLY
OR INDIRECTLY, BY OTHER DOCUMENTATION WHICH ACCOMPANIES THIS SOFTWARE,
INCLUDING BUT NOT LIMITED TO ANY RELEASE NOTES AND "READ ME" FILES.
TIBCO Spotfire is covered by U.S. Patent No. 6,014,661 and U.S. Patent No. 7, 216,116.
Other patent(s) pending. TIBCO Software Inc. Confidential Information
Table of Contents
Table of Contents
1
INTRODUCTION .......................................................................................................1
2
HOW TO USE TIBCO SPOTFIRE CLINICAL ...........................................................2
2.1
2.2
2.3
3
3.1
3.2
3.3
3.4
4
4.1
4.2
4.3
4.4
4.5
4.6
5
5.1
6
How to Add Oracle Clinical Data to the Analysis ...............................................................................2
How to Replace Oracle Clinical Data ................................................................................................3
How to Create Reports from an Analysis ..........................................................................................4
DETAILS ON ADD ORACLE CLINICAL DATA .......................................................5
Details on Add Oracle Clinical Data - Select Data Source ................................................................5
Details on Add Oracle Clinical Data - Select Study ...........................................................................6
Details on Add Oracle Clinical Data - Select Views ..........................................................................7
Details on Add Oracle Clinical Data - Select Columns ......................................................................8
DETAILS ON REPLACE ORACLE CLINICAL DATA ..............................................9
Details on Replace Oracle Clinical Data - Replace Study .................................................................9
Details on Replace Oracle Clinical Data - Select New Data Source .................................................9
Details on Replace Oracle Clinical Data - Select New Study ......................................................... 10
Details on Replace Oracle Clinical Data - Select New Views ........................................................ 11
Details on Replace Oracle Clinical Data - Select New Columns .................................................... 12
Details on Replace Oracle Clinical Data - Match Views ................................................................. 13
AUTOMATION SERVICES .....................................................................................14
Using Automation Services to Replace Oracle Clinical Data ......................................................... 14
INDEX .....................................................................................................................15
iii
Introduction
1
Introduction
TIBCO Spotfire Clinical allows you to easily connect to Oracle Clinical databases and open
data from one or more clinical studies in TIBCO Spotfire. The functionality is closely integrated
with the Add Data Tables tool of TIBCO Spotfire. You can also replace Oracle Clinical data
using a separate tool which allows you to match new views to previously added ones.
These additional help topics provide a description of the functionality in TIBCO Spotfire
Clinical only. It is important to note that these topics do not cover any further analysis done in
TIBCO Spotfire. See the main TIBCO Spotfire help topics for more information about how you
can analyze your data.
To get access to the Add Oracle Clinical Data tools, you need to have the SpotfireClinical.spk
deployed on your TIBCO Spotfire Server, and the license feature Open Oracle Clinical Data
under TIBCO Spotfire Clinical must be enabled. See the TIBCO Spotfire Clinical - Installation
and Configuration manual for more information.
1
TIBCO Spotfire® Clinical - User's Manual
2
2.1
How to Use TIBCO Spotfire Clinical
How to Add Oracle Clinical Data to the Analysis
With TIBCO Spotfire Clinical, you can bring together data from multiple views, multiple
studies or even multiple Oracle Clinical data sources into one analysis. Each Oracle Clinical
view is added as a data table in your analysis, and once relations have been defined between the
data tables you can set up any number of linked visualizations showing your data.
► To add data from Oracle Clinical to your analysis:
1.
Select File > Add Data Tables....
Comment: You can start either with an empty analysis or with previously loaded data.
Response: The Add Data Tables dialog is displayed. See the TIBCO Spotfire User's
Guide for more information.
2. Select Add > Oracle Clinical Data....
Comment: You can also add data from other sources in the same operation.
Response: If more than one Oracle Clinical data source is available, the Add Oracle
Clinical Data - Select Data Source dialog is displayed, otherwise go to step 4 (or 5 if
no user authentication is required).
3. Select the data source to connect to from the drop-down list and click OK.
Response: If the data source has been set up to use user authentication, the Data Source
Login dialog is displayed. Otherwise, go to step 5.
4. Type your Username and Password for the selected data source and click OK.
Response: The Add Oracle Clinical Data - Select Study dialog is displayed.
5. Click to select a snapshot from a study in the tree view, then click Next >.
Comment: You can only select one snapshot at a time, but you can run the wizard
multiple times if desired.
Response: The Add Oracle Clinical Data - Select Views dialog is displayed.
6. Click to select one or more views in the Available views list, then click Add > to send
them to the Selected views list.
7. Click Next >.
Comment: If all columns from the selected views should be added, you can click
Finish directly in this step.
Response: The Add Oracle Clinical Data - Select Columns dialog is displayed.
8. If not all columns should be imported, select the ones to exclude for each View in the
Selected columns list and click < Remove.
9. When the selected columns from all views of interest have been modified, click
Finish.
Response: The selected views are added to the Data tables field in the Add Data Tables
dialog.
10. If desired, click each Oracle Clinical view to edit its name or to add transformation
steps for that particular data table.
Comment: Each view will be interpreted as a separate data table when added to
TIBCO Spotfire. For more information about transformations, see Transforming Data
in the TIBCO Spotfire User's Guide.
Response: Any name changes and added transformation steps will be reflected in the
Data tables field.
11. If desired, click Manage Relations... to add relations between the different data tables
in your analysis.
2
How to Use TIBCO Spotfire Clinical
Comment: You can always add relations at a later stage through the Data Table
Properties dialog. For more information about relations, see To define a new relation in
the topic How to Insert Multiple Data Tables into the Analysis in the TIBCO Spotfire
User's Guide.
12. Click OK.
Response: The selected views are added to the analysis as new data tables.
Once the data are all in the analysis, use the standard functionality of TIBCO Spotfire to set up
visualizations, make calculations and comparisons, etc.
2.2
How to Replace Oracle Clinical Data
You can replace Oracle Clinical data using a separate tool which is very similar to the Add
Oracle Clinical Data Wizard.
► To replace Oracle Clinical data:
1.
Select File > Replace Oracle Clinical Data....
Response: If more than one Oracle Clinical study is available in the analysis, the
Replace Oracle Clinical Data – Replace Study dialog is displayed, otherwise go to step
3 (or 4 if only one data source is available).
2. Select the study to replace from the drop-down list and click OK.
Response: If more than one Oracle Clinical data source is available, the Replace
Oracle Clinical Data – Select New Data Source dialog is displayed, otherwise go to
step 4 (or 5 if no user authentication is required).
3. Select the data source to connect to from the drop-down list and click OK.
Response: If the data source has been set up to use user authentication, the Data Source
Login dialog is displayed. Otherwise, go to step 5.
4. Type your Username and Password for the selected data source and click OK.
Response: The Details on Replace Oracle Clinical Data – Select New Study dialog is
displayed.
5. Click to select a snapshot from a study in the tree view, then click Next >.
Comment: You can only select one snapshot at a time, but you can run the wizard
multiple times if desired.
Response: The Details on Replace Oracle Clinical Data – Select New Views dialog is
displayed.
6. Click to select one or more views in the Available views list, then click Add > to send
them to the Selected views list.
7. Click Next >.
Response: The Details on Replace Oracle Clinical Data – Select New Columns dialog
is displayed.
8. If not all columns should be imported, select the ones to exclude for each View in the
Selected columns list and click < Remove.
9. When the selected columns from all views of interest have been modified, click
Finish.
Response: The Replace Oracle Clinical Data – Match Views dialog is displayed.
10. Check that the new views replace the old views in your preferred way; if they do not,
select a view under Oracle Clinical views and change the drop-down list under
Selected view above replaces to a different view.
11. If columns cannot be matched automatically you may also encounter one or more
Match Columns dialogs where you can manually match columns for each data table
you replace. Click OK in the dialog when the matching is done.
3
TIBCO Spotfire® Clinical - User's Manual
Comment: Each view will be interpreted as a separate data table when added to
TIBCO Spotfire.
Response: The selected views are added to the analysis as new data tables.
2.3
How to Create Reports from an Analysis
Once you have set up the interesting visualizations and analysis views of your Oracle Clinical
data, you may want to distribute the analysis to your colleagues. There are several options
available:
► Publish the analysis to the library for Web Player users:
When an analysis is published to the library, it will become available for other users of TIBCO
Spotfire. Use this option when others need to be able to modify the analysis using filtering and
marking, or more complex analyses.
1. Select File > Save As > Library Item....
2. Select a suitable location in the library by browsing the folders or creating new folders.
3. Since the access to the analysis is determined by the Folder Permissions, you may
need to edit the permissions for your folder.
4. Type a suitable Name.
5. Click Next >.
6. If desired, edit the Description and Keywords for the analysis.
Comment: This information may help other people locate your analysis in the library.
7. Click Next >.
8. If desired, edit the settings for the data tables in the analysis.
Comment: To get access to the latest data and to ensure that other users of the analysis
have to provide their Oracle Clinical credentials, the data sources should be linked to
the analysis rather than embedded. If you still want to embed data in the analysis, it is
vital to ensure that data remains secure through folder permissions set in the library or
some other file system security.
9. Click Finish.
Response: A dialog informing about the location of the analysis is displayed.
► Export the analysis to a PDF, a PowerPoint presentation or to
HTML:
Use this option to create static reports with fixed images of your visualizations.
1. Select File > Export > To PDF... (or To Microsoft® PowerPoint®... or To HTML...).
Response: The Export to PDF dialog is displayed.
2. Adjust to your preferred settings in the dialog.
3. Click Export.
Response: If you selected the check box "Open in PDF reader after export" the
resulting PDF document will be opened in your default PDF reader.
4
Details on Add Oracle Clinical Data
3
3.1
Details on Add Oracle Clinical Data
Details on Add Oracle Clinical Data - Select
Data Source
This dialog is shown when you have access to more than one Oracle Clinical data source. The
data source access is determined by the access rights settings for each data source. This is
specified in the library when setting up the data source, or changed afterwards using the Library
Administration tool.
Option
Description
Select data source
(Select data
source)
Select the data source to connect to from the drop-down list.
5
TIBCO Spotfire® Clinical - User's Manual
3.2
Details on Add Oracle Clinical Data - Select
Study
This dialog displays all studies available based on the content of the selected data source and
the folder permissions of your user account.
6
Option
Description
Select study
(Select study)
Browse the tree view and click to select a study snapshot of interest.
Click the plus sign to expand and the minus sign to collapse the tree.
Details on Add Oracle Clinical Data
3.3
Details on Add Oracle Clinical Data - Select
Views
This dialog displays all views available based on the content of the selected study snapshot.
Option
Description
Available views
(Available views)
Lists all views in the selected study that are available for loading into
TIBCO Spotfire.
Add >
(Add)
Adds the views selected in the Available views field to the Selected
views field.
< Remove
(Remove)
Removes the views selected in the Selected views field and sends them
back to the Available views field.
Remove All
(Remove All)
Removes all views from the Selected views field.
Selected views
(Selected views)
Lists all views that have been selected to be added to your analysis.
7
TIBCO Spotfire® Clinical - User's Manual
3.4
Details on Add Oracle Clinical Data - Select
Columns
This dialog displays all columns available based on the content of the selected views.
8
Option
Description
View
(View)
Select the view for which to change the columns to retrieve. Use the
drop-down list to modify the selected columns for all views where you
do not need to load all columns. (All columns are selected per default
for each view.)
Available columns
(Available
columns)
Lists all columns in the selected views that are available for loading
into TIBCO Spotfire.
Add >
(Add)
Adds the columns selected in the Available columns field to the
Selected columns field.
< Remove
(Remove)
Removes the columns selected in the Selected columns field and sends
them back to the Available columns field.
Remove All
(Remove All)
Removes all columns from the Selected columns field.
Selected columns
(Selected columns)
Lists all columns that have been selected to be added to your analysis.
Details on Replace Oracle Clinical Data
4
4.1
Details on Replace Oracle Clinical Data
Details on Replace Oracle Clinical Data Replace Study
This dialog is shown when you have more than one Oracle Clinical study in your current
analysis.
4.2
Option
Description
Select study to
replace
(Select study to
replace)
Select the study to replace from the drop-down list. All data tables
associated with the study selected here will be removed when the study
is replaced, even those views that are not matched to a view in the new
study.
Details on Replace Oracle Clinical Data - Select
New Data Source
This dialog is shown when you have access to more than one Oracle Clinical data source. The
data source access is determined by the access rights settings for each data source. This is
specified in the library when setting up the data source, or changed afterwards using the Library
Administration tool.
Option
Description
Select data source
(Select data
source)
Select the data source to connect to from the drop-down list.
9
TIBCO Spotfire® Clinical - User's Manual
4.3
Details on Replace Oracle Clinical Data - Select
New Study
This dialog displays all studies available based on the content of the selected data source and
the folder permissions of your user account.
10
Option
Description
Select study
(Select study)
Browse the tree view and click to select a study snapshot of interest.
Click the plus sign to expand and the minus sign to collapse the tree.
Details on Replace Oracle Clinical Data
4.4
Details on Replace Oracle Clinical Data - Select
New Views
This dialog displays all views available based on the content of the selected study snapshot.
Option
Description
Available views
(Available views)
Lists all views in the selected study that are available for loading into
TIBCO Spotfire.
Add >
(Add)
Adds the views selected in the Available views field to the Selected
views field.
< Remove
(Remove)
Removes the views selected in the Selected views field and sends them
back to the Available views field.
Remove All
(Remove All)
Removes all views from the Selected views field.
Selected views
(Selected views)
Lists all views that have been selected to be added to your analysis.
11
TIBCO Spotfire® Clinical - User's Manual
4.5
Details on Replace Oracle Clinical Data - Select
New Columns
This dialog displays all columns available based on the content of the selected views.
12
Option
Description
View
(View)
Select the view for which to change the columns to retrieve. Use the
drop-down list to modify the selected columns for all views where you
do not need to load all columns. (All columns are selected per default
for each view.)
Available columns
(Available
columns)
Lists all columns in the selected views that are available for loading
into TIBCO Spotfire.
Add >
(Add)
Adds the columns selected in the Available columns field to the
Selected columns field.
< Remove
(Remove)
Removes the columns selected in the Selected columns field and sends
them back to the Available columns field.
Remove All
(Remove All)
Removes all columns from the Selected columns field.
Selected columns
(Selected columns)
Lists all columns that have been selected to be added to your analysis.
Details on Replace Oracle Clinical Data
4.6
Details on Replace Oracle Clinical Data - Match
Views
This dialog allows you to match views from the new Oracle Clinical data to views from the old
data, even though some views may have a different name in the new data.
Option
Description
Oracle Clinical
views
(Oracle Clinical
views)
Lists all available views in the new study along with information
about which view it will replace in the old study and any
transformations that will be applied to each view.
Settings
(Settings)
Displays settings for the new view selected above.
Selected view
above replaces
( Selected view
above replaces)
Select the view in the old study that should be replaced by the selected
new view.
Only those views not already chosen for replacement are available.
Select (None) or another view to make a previously selected view
available.
Keep original
transformations
(Keep original
transformations)
Select this check box to apply the same transformation to the new
view as had been previously specified for the old view that is to be
replaced.
Show/Hide
transformations
(Show/Hide
transformations)
Expands the dialog and allows you to apply transformations on the
data table you want to add. For more information, see Details on Show
Transformations in the main TIBCO Spotfire help.
13
TIBCO Spotfire® Clinical - User's Manual
5
5.1
Automation Services
Using Automation Services to Replace Oracle
Clinical Data
If you have access to Automation Services you have the possibility to create automated jobs that
include a replace Oracle Clinical data step. Select Tools > Automation Services Job Builder
to create a new job.
► Example of an Automation Services job replacing Oracle Clinical
data:
1.
2.
3.
A Set Data Source Credentials task to log into your Oracle Clinical data source.
An Open Analysis from Library task to open the analysis to use as a template.
A Set Data Source Credentials task (needed if the new study is located on a different
database).
4. A Replace Oracle Clinical Data task to replace the data.
5. A Save Analysis to Library task to save the new, updated analysis.
Note: You cannot match views or columns when using Automation Services to replace data;
nor is it possible to change the transformation for a view. For the best result, the views and
columns in the new data should match those in the current data completely. If columns and
views do not match you may need to make modifications to some visualizations manually.
14
Index
6
Index
A
Add Oracle Clinical Data
Select Columns ............................................................... 8
Select Data Source ......................................................... 5
Select Study .................................................................... 6
Select Views ................................................................... 7
Adding Oracle Clinical data .................................................. 2
Automation Services ......................................................... 14
C
Creating reports .................................................................. 4
I
Introduction ........................................................................ 1
R
Replace Oracle Clinical Data
Match Views ................................................................ 13
Replace Study................................................................. 9
Select New Columns .................................................... 12
Select New Data Source ................................................. 9
Select New Study ......................................................... 10
Select New Views ......................................................... 11
Replacing Oracle Clinical data ............................................. 3
15