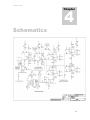
1
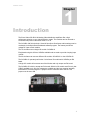
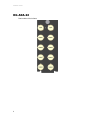
SIERRA VIDEO OG-ADA-108 Analog Video Distribution Amplifiers OG-ADA-10, OG-ADA-21, & OG-ADA-22 Rear I/O Modules User’s Manual OG-ADA-108 ANALOG VIDEO DISTRIBUTION AMPLIFIERS User’s Manual Sierra Video P.O. Box 2462 Grass Valley, CA 95945 Tel: (530) 478-1000 Fax: (530) 478-1105 Email: [email protected] Version 2.0 Publication Date: February 2012 The information contained in this manual is subject to change by Sierra Video © Sierra Video Table of Contents Introduction 1 Warnings & Safety Regulations Warnings Cautions EMC Regulatory Notices Delivery Damage Inspection Factors Affecting Quality of Results OG-ADA-108 OG-ADA-10 2 2 2 3 3 3 4 5 Installation 7 Introduction Module Mounting Rear I/O Panel Video Connections Dashboard Software 7 7 7 8 9 OG-ADA-108 Module Block Diagrams Circuit Description Input Stage Gain Adjust Stage Video Presence Detector Video Output Drivers Power Power LED Behavior Micro-controller 11 11 12 13 13 13 13 14 14 15 Schematics 17 Specifications 19 Warranty 21 SIERRA VIDEO 1 Chapter Introduction The Sierra Video OG-ADA-108 Analog Video distribution amplifiers offer a high performance solution to your video distribution needs. The modules can be removed or re-inserted with power to the frame either on or off. The OG-ADA-108 fits in both the 10 and 20 slot Open Gear frame and its settings can be monitored via the Open Gear Dashboard software program. The frames provide low voltage DC input to each module. The 10 slot frame uses a single I/O module: OG-ADA-10 Each board using this I/O has 10 BNCs available and are used to provide a looping input 1x8 DA. The 20 slot frame can use two different I/O modules: OG-ADA-21 or the OG-ADA-22. The OG-ADA-21 operates just like the 10 slot frame I/O module with 10 BNCs per DA board. A single I/O module will consume two of the 20 slots and only accept one DA board. The OG-ADA-22 is built to accept two DA boards. With this I/O module each DA only has 5 BNCs available on it. Only four outputs are available and the input must be internally terminated in 75 ohms using the P1 jumper near the connector end of the DA. This jumper must be set to ON. 1 SIERRA VIDEO Warnings & Safety Regulations The information in the following section provides important warnings and safety guidelines for both the operator and service personnel. Specific warnings and cautions may be found throughout this manual. Please read and follow the important safety precautions noting especially those instructions relating to risk of fire, electrical shock and injury to persons. Any instructions in this manual that require opening the equipment cover or enclosure are intended for use by qualified service personnel only. To reduce the risk of electrical shock, do not perform any servicing other than what is contained in the operating instructions unless you are qualified. Warnings Heed all warnings on the unit and in the operating instructions. Disconnect AC power before installing any options. Do not use this product in or near water. This product is grounded through the grounding conductor of the power cord. To avoid electrical shock, plug the power cord into a properly wired receptacle before connecting inputs and outputs. Route power cords and other cables so that they are not likely to be damaged, or create a hazard. Dangerous voltages exist at several points in this product. To avoid personal injury, do not touch unsafe connections and components when the power is on. To avoid fire hazard, use only the specified type, correct voltage, and current rating of fuse. Always refer fuse replacement to qualified service personnel. Have qualified personnel perform safety checks after any completed service This is an FCC class A product. In a domestic environment, this product may cause radio interference, in which case the user may be required to take necessary measures. Use the proper AC voltage to supply power to the switcher. When installing equipment, do not attach the power cord to building surfaces. To prevent damage to equipment when replacing fuses, locate and correct trouble that caused the fuse to blow before applying power. Use only the recommended interconnect cables to connect the switcher to other frames. Follow static precautions at all times when handling the equipment. Leave the side, top, and bottom of the frame clear for air convection cooling and to allow room for cabling. Slot and openings in the frame are provided for ventilation and should not be blocked. Only an authorized Sierra Video technician should service the switchers. Any user who makes changes or modifications to the unit without the expressed approval of the Sierra Video will void the warranty. Cautions 2 OG-ADA-108 EMC Regulatory Notices Federal Communications Commission (FCC) Part 15 Information: This device complies with Part 15 of the FCC standard rules. Operation is subject to the following conditions: This device may not cause harmful interference This device must accept any interference received including interference that may cause undesirable operations. Delivery Damage Inspection Carefully inspect the frame and exterior components to be sure that there has been no shipping damage. Make sure all modules are seated correctly and have not detached during shipment. Factors Affecting Quality of Results There are many factors affecting the quality of results when signals are transmitted from a source to a destination. Signal cables — Use only the best quality cables to avoid interference and degraded signal quality and elevated noise levels. Sockets and connectors of the sources and destinations — Use only the highest quality, since "zero ohm" connection resistance is the target. Connectors should also match the required impedance (75 ohm in video) to minimize return loss. Amplifying circuitry — Must have quality performance when the desired end result is high linearity, low distortion, and low noise. Distance between sources and destinations — Plays a major role in the final result. For long distances (over 15 meters) between sources and destinations, special measures should be taken to avoid high frequency cable losses. These measures include using higher quality cables and/or adding line cable equalizing amplifiers. Interference from neighboring electrical appliances — These can have an adverse affect on signal quality. Balanced audio lines are less prone to interference, but unbalanced audio should be installed away from any main power lines, electric motors, transmitters, etc. even when the cables are shielded. CAUTION! Only an authorized Sierra Video technician can service these products. Any user who makes changes or modifications to the unit without the expressed approval of the manufacturer will void the warranty 3 SIERRA VIDEO OG-ADA-108 Configuration P3 *Factory Use Only Gain Adjust R6 Power and Video Presence LED 4 Internal Termination Jumper P1 OG-ADA-108 OG-ADA-10 Single module- 10 slot frame OG-ADA-21 Single module- 20 slot frame 5 SIERRA VIDEO OG-ADA-22 Dual modules- 20 slot frame 6 SIERRA VIDEO 2 Chapter Installation Introduction Installation procedures are similar for all modules covered under this manual. Exceptions, if any, have been noted in each of the following paragraphs. Module Mounting Carefully inspect the module to ensure that there has been no shipping damage. Make sure all shipping material is removed from the module and frame. Install the module in any available slot in the frame with the ejector tab towards the bottom. Lock the module in place with the ejector tab. Rear I/O Panel OG-ADA-10 The 10 slot frame uses a single I/O module: OG-ADA-10 Each board using this I/O has 10 BNCs available and are used to provide a looping input 1x8 DA. Note: The 20 slot frame can use two different I/O modules: OG-ADA-21 or the OG-ADA-22. OG-ADA-21 The OG-ADA-21 operates just like the 10 slot frame I/O module with 10 BNCs per DA board. The board supports 1 ADA-108 module. A single I/O module will consume two of the 20 slots and only accept one DA board. 7 SIERRA VIDEO OG-ADA-22 The OG-ADA-22 is built to accept two DA boards. With this I/O module each DA only has 5 BNCs available on it. Only four outputs are available and the input must be internally terminated in 75 ohms using the P1 jumper near the connector end of the DA. This jumper must be set to ON. Note: If the OG-ADA-108 module is installed in a 20 slot frame using the OG-ADA-22 I/O module and you do not have the termination set correctly the PWR LED and the board status indicator on Dashboard will be yellow. Dashboard will also display the state of the termination Jumper. Video Connections OG-ADA-10 and OG-ADA-21 There are two BNC connectors associated with the input of each video module. This is called a “looping” input. This allows a signal connected to one of these connectors to be available on the second connector. Note: If the second connector is unused it must be terminated with 75 ohms with either a 75ohm terminator or the jumper P1 placed in the ON configuration. Factory default for jumper P1 is OFF. OG-ADA-22 The OG-ADA-22 is built to accept two DA boards. When the OG-ADA-22 is used then only four outputs are available and the input must be internally terminated in 75 ohms using the P1 jumper near the connector end of the DA. This jumper must be set to ON for 20 slot frames. Video system interconnects are made by using 75 ohm transmission lines (coax cable). The device driving the line has a “source” impedance of 75 ohms, the cable has a 75 ohm impedance and the end of the interconnect must be terminated with 75 ohms (see note above). The accuracy of the termination affects signal level. Use either a 1% or 0.1% termination. Unused amplifier positions do not need a termination. Only the outputs which are used need to be terminated. 8 OG-ADA-108 Dashboard Software The DashBoard Control System enables you to monitor and control openGearTM frames and controller cards from a computer. The DashBoard software and manual can be downloaded from the Sierra Video Systems website (www.Sierravideo.com). Using the Menus and Menu Descriptions You must first install the DashBoard Control System software on your computer. Refer to the DashBoard User Manual for software installation procedures and for using the DashBoard interface. 9 SIERRA VIDEO The Menu System The following table describe the menus, items, and parameters available from the DashBoard Control System software for the module. Menu Module Info Product Tab (Read Only) Menu Module Info Status Tab (Read Only) 10 Item Product Supplier Serial Number Board Revision Software Revision Item Power + 12V (W) Power – 7.5V (W) Board Alarms Input Termination Parameters ADA-108 Sierra Video, A Kramer Co. ##### ##### #### Parameters Power Consumption of the +12V Supply Power Consumption of the -7.5V Supply Alarm Status Internal 75ohm Termination Status SIERRA VIDEO 3 Chapter OG-ADA-108 Module Block Diagrams 11 SIERRA VIDEO Circuit Description Please refer to the Block Diagram above and the schematic in the following section when reading the circuit description. The ADA-108 is a 1x8 composite video distribution amplifier designed to work in an openGear 2 RU frame. The openGear frame can be either a 10 slot or a 20 slot frame. In a ten slot frame all 8 outputs are available and the input is a loop thru input, meaning that there two BNCs connected to the input of the DA. One input BNC will receive the video from a source such as a VTR or a router and the other BNC, loop-thru, can either be terminated in 75 ohms or connected to another device with a cable. The other device must terminate the cable in 75 ohms or loop-thru to another device that terminates in 75 ohms. If the 20 slot openGear frame is used then only four outputs are available and the input must be internally terminated in 75 ohms using the P1 jumper near the connector end of the DA. This jumper should be set to ON for 20 slot frames. The ADA-108 is DC coupled from input to output. There are no clamps or provisions to AC couple the video through this DA. There is one front edge adjustment on the board for setting the overall gain. This adjustment has a guaranteed range of 0dB, +/- 3dB. 0dB is unity gain, which means that a 1V peak to peak input signal will produce a 1V peak to peak signal out with input and output properly terminated in 75 ohms. Refer to the Block Diagram for the video path and the schematic in the next section. There are three stages to the VDA. First an input buffer stage, then a gain stage used for adjusting the overall gain of the DA and lastly the output drivers. 12 OG-ADA-108 Input Stage The Input stage, U1, buffers the input and has a positive gain of 2 which is set by R3 and R4. Input gain G = [1+(R4/R3)]. P1 allows us to internally terminate the input in 75 ohms with a shorting jack between pins 1 & 2 of P1. By putting the shorting jack between pins 2 & 3, OFF position, or between pins 1 & 2, we can inform the microPIC which position the internal termination is set. This means that the shorting jack must always be present so that the reporting of the internal termination is correct. The R2, 22.1k, is needed for a DC bias path to the non-inverting input of the input stage in case there is no input and 75 ohm termination at the input. R2 will be in parallel with the 75 ohm input but since it is such a large value compared to 75 ohms it has little effect on return loss or gain at the input. Gain Adjust Stage The gain stage is located at the front of the module so that the gain can be adjusted easily. R5, 100 ohms, at the output of the input stage acts as a termination resistance for the trace going to the gain stage. R9, 100 ohms, at the input of the gain stage acts as the termination resistance and also creates 6dB loss from the input stage to the gain stage. The gain stage will see a unity gain signal at its input. C58, 47pF, cap creates a low pass filter with R5 to roll the overall response of the DA to approximately -3dB at 50MHz. The gain of the gain stage is set by the feedback resistors around U2, R6,7, and 8. The values were chosen to give an adjustable gain range of +/-4dB so that we would always be able to make the +/-3dB adjustment range over the tolerance range of the feedback resistors. The output of this stage also has a termination resistor, R10, 100 Ohms, to drive the long trace from the front of the board to the rear of the board and the output drivers. Video Presence Detector When video is present the Power LED will illuminate green, orange when video is not present. The output of the gain adjust stage also drives the video presence detector through a voltage divider made of two 100 Ohm resistor, R32 and R85, then is AC coupled to U7 a sync separator IC, LMH1981. C9 and the voltage divider creates a low pass filter for the video going into the sync separator and will remove most of the subcarrier in a PAL or NTSC composite signal. This helps the sync separator find sync. The vertical sync output from the LMH1981 will only be present if the IC can find sync. Vertical sync is about 3 lines wide and negative going during the board pulses in vertical. This signal is used to turn on PNP transistor Q1 which discharges 1uF cap C13 pulling the voltage at R36, VID_PRESENT, high indicating that video is present. During the period of time when the vertical sync pulse is not low the voltage at C13, R37 junction will charge toward ground from the current coming through R37. If vertical sync does not return within two fields then C13 charges down below the threshold of the PIC32 input and indicates no video present. Video Output Drivers The adjustable gain stage has a source termination of 100 Ohms and the end of the trace at the output drivers is also terminated in 100 Ohms, R27. The trace to the drivers is daisy chained to each of four amplifiers with R27 being at the end of the daisy chain. A small resistance at the non-inverting inputs of the drivers is to isolate the input capacitance from the trace and reduce any high frequency feedback paths that could cause oscillations in the output drivers. Each driver has a gain of two from its noninverting input to the output pin of the driver. Each driver drives two output BNCs at the 13 SIERRA VIDEO rear of the frame with a source termination of 75 Ohms for each BNC. The feedback values are chosen for best frequency response and minimum peaking. Power The POWER LED has two diodes, one Red and one Green. Either LED can be on by itself or both on together which will give an Orange color for the POWER LED. Please refer the following descriptions using sheet 2 of the schematic and the block diagram. J2 connects the board to the mid-plane connector where it gets +12V and -7.5V supply voltages. J2 also has one pin that indicates the slot ID, 1 through 20 in the 20 slot frame and 1 through 10 in the 10 slot frame. The CAN bus is also on this connector and allows the micro-controller on each board in the frame to communicate with the network card. There are also two buffered reference inputs that are distributed to each board in the frame but not used by this board. There are three regulated voltages on this board, +/-5V for the video amplifiers and +3.3V for the micro-controller and logic circuits. Each regulator is a linear regulator. U13 regulates the +5V and U15 regulates the -5V supplies. U14 is for the +3.3V supply. An input current monitors, U11 and U12, monitors both the positive and negative supply inputs respectively. Supply voltages are also measured by the micro-controller and reported to the openGear control program, Dashboard. By knowing both the supply voltages and supply currents, the micro-controller calculates and displays the power consumption for the board in Dashboard. Power LED Behavior Behavior Off Steady Green Steady Red Steady Orange Alternate Orange/Green 14 Condition No Power Power and Status OK Card is not operational or wrong Rear I/O ID Card is starting up Primary signal or reference input missing OG-ADA-108 Micro-controller The micro-controller is used to monitor power consumption of the board, status of the internal termination, video presence, slot ID, rear IO ID and set the configuration of the board to display serial number, model and software version. After measuring and monitoring, the controller communicates over the CAN bus to the network card in the frame so that Dashboard can display the board status and also be used to change the configuration parameters. 15 SIERRA VIDEO 4 Chapter Schematics 17 SIERRA VIDEO 18 SIERRA VIDEO 5 Chapter Specifications Nominal Input Level 1V p-p Maximum Input Level 1.5V p-p Input Impedance High-Z Looping or 75ohm Input Return Loss >40db @ 5MHz Superimposed Input DC ± 1V Impedance 75ohms Output Return Loss >40db @ 5Mhz Coupling DC Coupled DC offset Input to Output ± 50 mV Isolation Between Outputs 40db @ 5MHz Nominal Gain Unity Gain Adjustment Range ± 3db Frequency Response +/- 0.1db to 10Khz – 5Mhz Differential Phase Error ± 0.1 degree @ 3.58 or 4.43MHz Differential Gain Error ± 0.1% @ 3.58 or 4.43MHz Signal to Noise Ratio >80db @ 5MHz Bandwidth Bandwidth -3 dB >30MHz 19 SIERRA VIDEO 6 Chapter Warranty A. General Buyer assumes all responsibility for ascertaining the suitability of Sierra Video (hereinafter "SVS") products for Buyer's intended use. No product sold by SVS is designed or manufactured for use in any manner or under any conditions other than those described in SVS's instruction manuals and other printed material for each particular product. If any product is used or applied in a manner or under conditions not specifically authorized by such written materials or if any product is used by unqualified or improperly trained personnel, Buyer agrees that SVS shall have no liability of any kind arising from such use, and Buyer agrees to indemnify and hold SVS harmless from any claims of third parties arising from such use, and Buyer shall provide SVS with counsel of SVS's choice to defend against such claims. B. Limited Warranty 1. This warranty applies only to the original purchaser and is non-transferable. This warranty begins on the date of purchase and will be in effect for five (5) years for new equipment or and for three (3) years for "Factory Refurbished" equipment. Power Supplies and fans are warranted for three (3) years from the date of purchase for new equipment and two (2) years for “Factory Refurbished” units, from the date of purchase. Buyer must obtain a Return Material Authorization ("RMA") number from SVS prior to returning a product for repair. If, in SVS' sole discretion, the product is found to be defective during the term of this warranty, SVS will at its option: (a) provide free replacement parts, and/or (b) repair the unit at an SVS facility. During the warranty period, SVS will make every reasonable effort to support critical emergencies by supplying no-cost loan equipment while the defective unit is being repaired. SVS will provide replacement parts and/or factory service at no charge. Buyer bears the cost of shipping products returned to SVS under this warranty. SVS will bear the cost of shipping repaired products or replacement parts to the Buyer. This limited warranty shall not apply to any of SVS's goods which have been altered or which shall have been subjected to misuse, mishandling, improper storage or negligence. The aforementioned provisions do not extend the original warranty period of any goods which have been replaced by SVS. This limited warranty shall not apply to any goods not of SVS's manufacture, Buyer to be entitled only to the warranty set forth in the original manufacturer's limited warranty. 21 SIERRA VIDEO THIS LIMITED WARRANTY IS EXPRESSED IN LIEU OF ALL OTHER WARRANTIES, EXPRESS, IMPLIED OR STATUTORY, INCLUDING WITHOUT LIMITATION THE IMPLIED WARRANTIES OF MERCHANTABILITY AND OF FITNESS FOR A PARTICULAR PURPOSE, AND ALL OTHER OBLIGATIONS OR LIABILITIES ON SVS'S PART. SVS neither assumes nor authorizes any other person to assume for SVS any other liabilities in connection with the sale of products of its own manufacture. 2. SVS's liability hereunder on any claim of any kind, except as set forth herein for any loss, injury to person or property or damage, shall in no case exceed the price allocable to the goods which give rise to such claim. 3. In no event shall SVS be liable for any damages or injuries to person or property if any goods do not meet the above limited warranty, including, without limitation, incidental expenses or consequential or special damages, except as set forth in such limited warranty. The foregoing states the exclusive remedy of Buyer and the exclusive liability of SVS for any breach of the foregoing limited warranty. C. Cancellation Except as provided in paragraph B immediately above, all sales are final, and Buyer may cancel this order or return products only upon written consent of SVS. D. General A. In the event of a breach of any of the terms hereof, the non-breaching party shall be entitled to recover all of its costs, fees, and expenses, including, without limitation, reasonable attorney's fees, from the breach party incurred as a result of such breach, regardless of whether or not a suit is actually filed to enforce the terms hereof. B. The provision hereof shall be governed by the laws of the State of California (excluding its choice of law provisions). C. The headings are for convenience only and do not limit or amplify the terms and provisions hereof. D. In case any one or more of the provisions set forth herein shall be held to be invalid, illegal, or unenforceable in any respect, the validity, legality, and enforceability of the remaining provisions contained herein shall not in any way be affected or impaired thereby. E. No waiver, alteration, or modification of any of the provisions hereof shall be binding unless in writing and signed by an authorized Officer of SVS. NOTE: All products returned to SVS for service must have prior approval. Return authorization requests may be obtained from your SVS dealer. 22