1
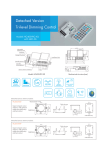
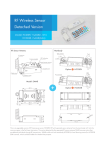
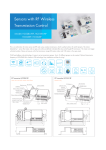
TM Integrated SensorDIM LED Driver Daylight Monitoring Version Model: HEC7030 with HRC-05 4.1 LED + LED 60 69 LED current selection Detection area Hold-time Daylight threshold N L EXT EXT. PUSH Stand-by period 99 108 Antenna module connector 22.2 ] Stand-by dimming level Extended antenna Model: HEC7030 Mechanical structure (mm) %FUFDUJPO1BUUFSO Further 20% saving %BZMJHIU .POJUPSJOH 5. IPVST NBOVBMPO )PMEUJNF T_NJO _-VY "NCJFOUEBZMJHIU UISFTIPME 2 in 1 and cost effective! This is a smart integration of microwave motion sensor and multiple current selection LED driver, which gives pre-selected constant current to drive the LEDs to work based upon movement detection. Designed in the software and thanks to our worldwide patented circuit, the built-in daylight sensor is prior to motion sensor so as to achieve utmost energy saving purpose. With the detached sensor antenna SAM5, it requires very little space on the LED panel. Only the antenna is installed on the surface, while the mainbody can be hidden behind the panel. Completely shadow free. Detached sensor antenna module: 35.9 Cable side entry 8.8 30.7 40.4 6.8 Daylight sensor 13 25.2 Super-compact sensor antenna, with optional cable entry (side entry and back entry) Infrared remote receiver 2.5 Model SAM5 11.2 Cable back entry Functions and Options 1 Daylight Monitoring Function Hytronik specially designed this function in software for deep energy-saving purpose: 1. With sufficient natural light, the light won’t turn on when motion detected. 2. After hold-time, the light turns off completely if surrounding natural light is sufficient. 3. When stand-by period is preset at “+∞”, the light will turn off completely when surrounding natural light is sufficient during stand-by period, and turn on at dimming level automatically when natural light is below daylight threshold. 1 2 15:00 17:30 3 17:35 4 17:50 With sufficient natural light, the At dusk,as the natural light The light switches on at 100% Light dims to stand-by level after light does not switch on even drops below threshold value, when there is movement the hold-time. there is movement detected. the sensor turns on the light at the dimmed level. detected. 5 08:00 3 6 09:30 4 goes in cycle during the night ... 100% on when movement detected, and dims to10% in At dawn, light turns off completely when natural light Light does not switch on even when movement detected long absence. reaches above daylight threshold. during the daytime. 2 Settings on this demonstration: Hold-time 10min Daylight threshold 50lux Stand-by period +∞ Stand-by dimming level 10% Tri-level Dimming Control (Corridor Function) Same as Tridonic excel control gear, Hytronik builds this function inside HEC7030 to achieve tri-level dimming control, for some areas that require a light change notice before switch-off. It offers 3 levels of light:100%-->dimmed light (10%, 30%, optional)-->off. With sufficient natural light, the light does not switch on when movement detected. With insufficient natural light, it switches on the light when person enters the room. After hold-time, the light dims to stand-by level or turns off completely if surrounding natural light is above the daylight threshold. The light switches off automatically after the stand-by period elapsed. 3 Master/Slave Group Control By connecting the “EXT” terminals in parallel (maximum 10pcs, see wiring diagram), no matter which sensor detects motion, all HEC7030 in the group will turn on the lights when surrounding natural light is below daylight threshold. The sensor antenna is shared and the detection area could be widely enlarged in this way. Other settings such as hold-time, stand-by period, stand-by dimming level and daylight threshold on each individual unit stay the same. Note: if the 4 Ambient Daylight Threshold Switch the power supply to the sensor two times within 2 seconds, the sensor can set the ambient lux level as the new threshold. Both the settings on DIP switch and the ambient lux threshold learned can over write each other. This feature enables the daylight sensor to be commissioned to the environment in which it is installed. The latest action controls. (More details of the operation procedure please refer to user manual). 5 8H Manual on Mode For LED Lamp Rapidly turn off/on the power supply three times within 3 seconds, the light will be 100% on for 8 hours, and then goes to sensor mode automatically after 8 hours. Useful when sensor function is not needed in special occasion. Note: this 8H manual on mode can be cancelled by turning off/on the power supply one time within 1second. 6 Manual Override This sensor reserves the access of manual override function for end-user to switch on/off, or adjust the brightness by push-switch, which makes * Short push (<1s): on/off function; On → off: the light turns off immediately and can not be lighten for a certain time (equals to hold-time preset) even movement is detected. After this period, the sensor goes to sensor mode. Off → on: the light turns on and goes to sensor mode, no matter if ambient Lux level exceeds the daylight threshold or not. * Long push (>1s): dim up/down the hold-time brightness between 30% and 100%. Both the settings on DIP switch and manual override can overwrite each other, the latest action controls. Note: 1. if end-user do not want this manual override function, just leave the “push” terminal alone and don’t connect it to any wire. 2. if the detection area is set at “Sensor OFF”, HEC7030 becomes a dimmable LED driver which can be dimmed (1% ~ 100%) by push-switch. 7 Absence Detection Function In many other cases, people do not want to have a sensor to switch on the light automatically, for example, when people is just passing by, there is no need to have the light on. The solution is to apply ‘absence detection’: by pressing the “M/A” button on the remote control and manual initiation on the push-switch, the motion sensor remains active, turns on and dims the light automatically, and eventually switches it off in absence. This is a good combination of sensor automation and maunal override control, to have the maximum energy saving, and at the same time, to keep 8 Light does not switch on when presence detected. Short push to activate the sensor and switch on the light With the manual short press on the push-switch, the sensor is activated and switches on the light. 80% Power Output @ Initial 10,000 Hours Due to deprecation of LED luminaire output after initial 10,000 hours, this extra 20% @ 10,000 hours can now be saved by pressing the “Power 80%” button on the remote control. Deep energy saving! Note: it is required to return to 100% power output after the initial 10,000 hours, by pressing the “Power 100%” button on the RC. 9 LED Current Selections 1 2 3 900mA 750mA 700mA 550mA 500mA 350mA Current The current can be easily configured by choosing the correct combination of the DIP switches (see table on the left). 10 LED Maximum Load and Voltage This multiple current LED driver has a wide range of loading capacity: Maximum load @ different currents: Maximum voltage @ different currents: 3.5~21W (350mA) 5~30W (500mA) 5.5~30W (550mA) 7~30W (700mA) 7~30W (750mA) 9~23W (900mA) 10~60V (350mA) 10~60V (500mA) 10~55V (550mA) 10~43V (700mA) 10~40V (750mA) 10~25V (900mA) Settings (Remote Control HRC-05) ON/ OFF Permanent ON/OFF function Press the “ON/OFF” button, the light goes to permanent on or permanent off mode, sensor is disabled. * Press “Auto Mode”, “RESET” or “Scene mode” buttons to quit from this mode. Auto Mode ON/ OFF Auto Mode SC1 SC2 Sensor mode Press “Auto Mode” button, the sensor starts to work and all settings remain the same as the latest status before the light was switched on/off. Power 100% Scene mode SC3 SC4 Power 80% 50% - 10% Daylight Sensor Stand-by dimming level Reset function + Dim Detection range 100% RESET Reset 10% 20% 30% 2Lux 30s 1min 5min 10Lux Press “RESET” button, all settings go back to the value of DIP switch settings. Test 2s + Hold-time Dim +/- Long press “Dim +” or “Dim ” to adjust the light brightness during hold-time. “ + ” means dimming up, “ ” means dimming down. 5min 10min 30min 50Lux 0s 10s 1min Disable Lux Stand-by period Test mode The button “Test 2s” is for testing purpose only. The sensor goes to test mode (hold-time is 2s) automatically after commissoning, meanwhile the stand-by period and daylight sensor are disabled. * This mode can be ended by pressing “reset”, or any button of “scene mode” and “hold time”. The sensor setting is changed accordingly. 10min 30min M/A HRC-05 Note: the buzzer beeps one time when RC receives signal successfully. M/A Manual override / absence detection By pressing this button, the sensor goes to manual override or absence detection function. Note: The buzzer beeps twice if it’s manual override function, and beeps once if shifts to absence detection function. Power 100% Power 80% Power output By pressing these two buttons, the output shifts between 80% (at initial 10,000 hours) and 100%, for energy saving purpose. Lux Disable Lux disable Press this button, the built-in daylight sensor stops working, and all motion detected could turn on the lighting fixture, no matter how bright the natural light is. Ambient daylight threshold Press this button, the latest surrounding lux value over writes previous lux value learned, and is set as the daylight threshold. This feature enables the fixture to function well in any real application circumstance. Scene mode There are 4 scene modes fixed program built-in the remote control to choose for different applications: Scene options Detection range Hold-time Stand-by period SC1 100% 1min 10min Stand-by dimming level 10% Daylight sensor 2Lux SC2 100% 5min 10min 10% 2Lux SC3 100% 10min 30min 10% 10Lux SC4 100% 10min 10% 50Lux Note: End-user can adjust the settings by pressing buttons of detection range/hold-time/stand-by period/stand-by dimming level/daylight sensor. The lastest setting stays in validity. Detection range Press the buttons of “detection range” to set detection range at 10% /50% /100%. Hold-time Press the buttons of “hold-time” to set hold-time at 30s / 1min / 5min / 10min / 30min. Daylight sensor Press the buttons of “daylight sensor” to set daylight threshold at 2Lux / 10Lux / 50Lux. Stand-by period (corridor function) Press the buttons of “stand-by period” to set stand-by period at 0s / 10s / 1min / 10min / 30min / +∞. Note: “0s” means on/off control; “+∞” means bi-level dimming control, light never switches off when daylight sensor is disabled. Stand-by dimming level Press the buttons of “stand-by dimming level” to set the stand-by dimming level at 10% / 20% / 30%. Wiring Diagram_Push Wiring Diagram_Push + EXT. Switch Dim N L EXT. EXT. Push N L EXT. EXT. Push N L EXT. EXT. Push N L EXT. EXT. Push Switch Dim LED+ LED- LED+ LED- LED+ LED- LED+ LED- Maximum10pcs Detection Pattern 10% 30% 50% 75% Wall mounted height (m) Ceiling mounted height (m) 10% 30% 50% 75% Ceiling mounted detection pattern (m) Wall mounted detection pattern (m) Settings 1 Detection area Detection area can be reduced by selecting the combination on the DIP switches to fit precisely for each specific application. Note: by choosing “Sensor OFF”, it becomes a dimmable driver without sensor mode. 2 Hold-time Hold-time means the time period to keep the lamp on 100%, after all motion has ceased (detection area vacated). Note: the maximum brightness during hold-time can be overridden by long push on the push-switch. 3 Daylight sensor The daylight threshold can be set on DIP switches, to fit for particular application. 1 2 100 % 75% 50 % Sensor OFF I II III IV 3 4 5s 30s 3min 10min I II III IV I – 100% II – 75% III – 50% IV – Sensor OFF I – 5s II – 30s III – 3min IV – 10min 5 6 I II III IV Disable 50Lux 10Lux 5 Lux I – Disable II – 50Lux III – 10Lux IV – 5Lux 4 Stand-by period (corridor function) 7 8 This is the time period you would like to keep at the low light output level before it is completely switched off in the long absence of people. 8 Note: “0s” means on/off control; “+ ”means bi-level dimming control, fixture never switches off when daylight sensor is disabled. 5 0s 10s 30min I II III IV + Stand-by dimming level 9 This is the dimmed low light output level you would like to have after the hold-time in the absence of people. I II 10% 30% I – 0s II – 10s III – 30min IV – +∞ I – 10% II – 30% Technical Data Operating voltage 220-240VAC 50/60Hz Input current 0.17-0.16 A Input power 35W (Max.) Warm time 20s Detection area Sensor OFF/50% /75% /100% Hold-time 5s /30s /3min /10min Daylight threshold 5Lux/10Lux/50Lux/disable Stand-by period 0s/10s/30min/+∞ Stand-by dimming level 10%/30% Microwave frequency 5.8GHz+/-75MHz Microwave power 0.2mW Detection range Max. (OxH): 8m x 5m Detection angle 30 ~150 Mounting height Max.5m Output LED current 350mA/500mA/550mA/700mA/750mA/900mA Output LED voltage 10~60V (350mA) 10~60V (500mA) 10~55V (550mA) 10~43V (700mA) 10~40V (750mA) 10~25V (900mA) 3.5~21W (350mA) 5~30W (500mA) 5.5~30W (550mA) 7~30W (700mA) 7~30W (750mA) 9~23W (900mA) Output LED power o (100% /50% /10% on RC) (TEST 2s/30s /1min /5min /10min /30min on RC) (2Lux /10Lux / 50Lux /Lux disable on RC) ( 0s /10s / 1min / 10min/ 30min /+∞ on RC) (10%/ 20%/ 30% on RC) o Empty load voltage 70V Power factor > 0.9 Efficiency 85% (Max.) Operating temperature -20 C ~ +50 C Abnormal protection Output short-circuit protection with auto-reset EMC standard Part 15B Safety standard UL 8750 Certification Semko, CB, EMC, CE, R&TTE, SAA o o o TC:75 C Dielectric strength Input→output:3750Vac /5mA/1min IP rating IP20