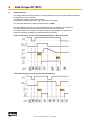
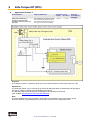
Download 638 Series - HVS System

Transcript
638 Series
Digital
Servo Drive
Product
Manual
07-02-12-02-EN-V0608.doc
Additional Supporting Documentation
UL: CD
EASYRIDER® Windows - Software
UL: 07-02-0902
HIPERFACE® Feedback System
UL: 07-05-0203
Product Manual - Bus Interface SUCOnet K
UL: 07-05-0302
Product Manual Bus Interface CAN
UL: 07-05-0402
Product Manual - Bus Interface Profi Bus DP
UL: 07-05-0502
Product Manual - Bus Interface Interbus S
UL: 07-05-0702
Product Manual - I/O Interface
UL: 07-05-0802
Product Manual - Bus Interface DeviceNet
UL 07-09-04-02
Product Manual - Suppression Aids EH
UL: 10-06-03
Product Manual – Serial Tranfer Protocol EASY-Serial
2
07-02-12-02-EN-V0608.doc / Type: 638
Additional Supporting Documentation
UL: 10-06-05
Product Manual - BIAS® Commands
UL: 12-01
Product Manual - Plugs
UL: 12-02
Product Manual - Cables
UL: 12-03
Product Manual - Ballast Resistors
©Parker Hannifin GmbH Co. KG
All rights reserved. No portion of this description may be produced or processed in any form
without the consent of the company.
Changes are subject to change without notice.
Parker Hannifin has registered in part trademark protection and legal protection of designs.
The handing over of the descriptions may not be construed as the transfer of any rights.
Made in Germany, 2008
07-02-12-02-EN-V0608.doc / Type: 638
3
Table of Contents
Page
The Most Important Thing First ............................................................................. 8
Safety Precautions .................................................................................................. 9
1
General Information................................................................................... 11
1.1
●
●
●
●
1.2
●
●
●
1.3
●
●
System Description ...........................................................................................................................11
Special Features of the 638 Servo Drive ..........................................................................................11
Overview of Standard Digital Communication ..................................................................................11
Determining Criteria for the Utilization of the 638 Drive....................................................................12
Operation Configuration ....................................................................................................................12
Model Code .......................................................................................................................................13
Combination Possibilities for the Various Communication / I/O - Modules.......................................14
Module Slots Layout..........................................................................................................................15
Module Design ..................................................................................................................................15
Dimensions........................................................................................................................................16
638A Series.......................................................................................................................................16
638B Series.......................................................................................................................................17
2
Connection Assignments and Functions ............................................... 18
2.1
2.2
●
●
2.3
●
●
●
●
2.4
●
●
●
2.5
2.6
●
●
2.7
●
2.8
●
●
●
●
2.9
●
●
●
●
●
●
2.10
●
2.11
●
●
−
2.12
●
●
−
Insulation Concept ............................................................................................................................18
Overview of Compact Unit Connections ...........................................................................................19
638A01.. to 638A06.. ........................................................................................................................19
638B03.. to 638B15.. ........................................................................................................................20
Assignments Power Connections .....................................................................................................21
Power, Ballast, DC Bus - Connection X60........................................................................................21
24V - Control Supply Voltage X01 ....................................................................................................21
Motor - Connection X61 ....................................................................................................................21
Brake / Thermo - Connection X62 ....................................................................................................22
Feedback Sensor X30.......................................................................................................................23
Feedback - Module X300 ..................................................................................................................23
Feedback Connection X30 (SUB D 09 Socket) ................................................................................24
Feedback - Module X300 with Memory 638A ...................................................................................25
Service-Interface COM1 (RS232) .....................................................................................................26
Safe Torque Off.................................................................................................................................27
Connection Safe Torque Off X11 ......................................................................................................27
Connection WITHOUT the utilization of the Safe Torque Off, (STO), function.................................27
Signal Connection .............................................................................................................................28
Control Signal Plug X10 (SUB D25 Socket) .....................................................................................28
Multi-Function X40 ............................................................................................................................29
Incremental - Output .........................................................................................................................30
Incremental - Input ............................................................................................................................30
Stepper Motor Input ..........................................................................................................................31
SSI-Encoder Interface.......................................................................................................................32
Fieldbus Interface COM2 ..................................................................................................................33
Pinning for RS232 .............................................................................................................................33
Pinning for RS422/485 ......................................................................................................................33
Pinning for CAN or DeviceNet...........................................................................................................34
Pinning for Profibus DP.....................................................................................................................34
Pinning for SUCOnet K .....................................................................................................................34
Pinning for EA5 I/O-Interface (Digital In and Outputs)......................................................................35
Fieldbus Interface COM2 in Combination with COM3 (OPTION SLOT A/B) .................................36
Pinning for Interbus S (RP IBS) ........................................................................................................36
Fieldbus Interface RP 2CA, 2C8 .......................................................................................................37
Pinning CAN1-BUS and CAN2-BUS.................................................................................................37
Pinning RP 2C8 X120 (with I/O’s) .....................................................................................................37
DIP Switch Position for Option Module RP 2CA and RP 2C8 ..........................................................38
Fieldbus Interface RP CCA, CC8......................................................................................................39
Pinning CAN1-BUS, CAN2-BUS and RS485....................................................................................39
Pinning RP CC8 X120 (with I/O’s) ....................................................................................................39
DIP Switch Position for Option Module RP CCA and RP CC8 .........................................................40
4
07-02-12-02-EN-V0608.doc / Type: 638
Table of Contents
Page
Connection Assignments and Functions
2.13
●
●
−
2.14
Fieldbus Interface RP PCA, PC8 ......................................................................................................41
Pinning Profibus DP and CAN2-BUS and RS485 ............................................................................41
Pinning RP PC8 / X120 (with I/O’s)...................................................................................................41
DIP Switch Position for Option Module RP PCA, PC8 .....................................................................42
Overview of the Terminal Cross Section...........................................................................................43
3
Operating Mode ......................................................................................... 44
3.1
3.2
3.3
3.4
Operating Mode General...................................................................................................................44
Operating Modes and Pin Functions.................................................................................................45
Configurable Pin Functions (Operating Mode Dependent)...............................................................46
Functions Diagrams with Protection Mode “Switch Off” ...................................................................47
4
Mechanical Installation ............................................................................. 49
4.1
4.2
4.3
Mounting............................................................................................................................................49
Control Cabinet Mounting .................................................................................................................49
Cooling and Ventilation .....................................................................................................................49
5
Electrical Installation................................................................................. 50
5.1
●
●
●
●
●
●
5.2
●
●
●
●
–
●
5.3
●
●
●
●
●
●
5.4
●
●
●
5.5
●
●
Installation General ...........................................................................................................................50
Safety ................................................................................................................................................50
Danger of Electric Shock...................................................................................................................50
Dangerous Areas ..............................................................................................................................50
Grounding - Safety Grounding ..........................................................................................................50
Ground Connections .........................................................................................................................50
Short-Circuit Capacity and Discharge Currents................................................................................50
Power Mains Connection ..................................................................................................................51
Types of power mains .......................................................................................................................51
Mains supply voltage range 638A .....................................................................................................51
Mains supply voltage range 638B/C .................................................................................................51
Protective Ground Connection (PE)..................................................................................................51
Cable cross section...........................................................................................................................51
Dimensioning of power mains cable and the over-current protection...............................................51
DC Link Parallel Connection .............................................................................................................54
General..............................................................................................................................................54
Variation 1; Servo Drives without DC LINK protection......................................................................54
Variation 2; Servo Drives with DC LINK protection...........................................................................55
Function Softstart ..............................................................................................................................56
Installation Instructions and Warnings ..............................................................................................56
Layout of the Ballast Capacity...........................................................................................................57
Fuses , Contactors ............................................................................................................................58
638A ..................................................................................................................................................58
638B ..................................................................................................................................................58
638C..................................................................................................................................................58
Brake Resistor...................................................................................................................................59
Selection of the Brake Resistor.........................................................................................................59
Configuration of the Brake Resistor ..................................................................................................60
6
Wiring Instructions .................................................................................... 62
6.1
●
●
●
●
●
6.1
●
●
General Wiring Instructions...............................................................................................................62
General Information ..........................................................................................................................62
Control Cabling..................................................................................................................................62
Power Cabling ...................................................................................................................................62
Analog Setpoint .................................................................................................................................62
Safety Rules ......................................................................................................................................62
Electromagnetic Compatibility (EMC) ...............................................................................................63
Hints for Mounting .............................................................................................................................63
Example for Mounting .......................................................................................................................64
07-02-12-02-EN-V0608.doc / Type: 638
5
Table of Contents
Page
7
Hardware Configuration............................................................................ 65
7.1
●
●
Jumpers.............................................................................................................................................65
Power Board Layout Plan 638A ........................................................................................................66
Power Board Layout Plan 638B/C ....................................................................................................66
8
Commissoning........................................................................................... 67
8.1
8.2
8.3
●
●
●
●
8.4
●
●
8.5
●
●
8.6
8.7
8.8
Commissioning Preparation ..............................................................................................................67
Step 1 : Wiring and Communications Test........................................................................................68
Step 2 :Feedback Test and Motor Selection.....................................................................................69
Step 2.2 Motor Selection...................................................................................................................70
Step 2.3 Motor with Resolver Feedback ...........................................................................................71
Step 2.4 Motor with HIPERFACE Feedback.....................................................................................71
Step 2.5 Motor with SIN-COS Feedback Linear Motor.....................................................................71
Step 3 : Power Up and Drive Activation............................................................................................72
Step 3.1 Power Up ............................................................................................................................72
Step 3.2 Drive Activation...................................................................................................................72
Step 4 : Control Loop Optimization ..................................................................................................73
Step 4.1 Control Loop Optimization with Rotary Motors...................................................................73
Step 4.2 Control Loop Optimization with Linear Motors ...................................................................74
Step 5 : Operation Mode Selection ...................................................................................................75
Step 6 : Fieldbus Interface ................................................................................................................76
Step 7 : Data Save ............................................................................................................................77
9
Safe Torque Off (STO) ............................................................................... 79
9.1
●
●
●
●
●
●
9.2
●
●
9.3
9.4
●
●
●
●
9.5
9.6
General Introduction..........................................................................................................................79
Important Technical Terms and Explanations...................................................................................79
Stop Category according to EN 60204-1 (Chapter. 9.2.2)................................................................80
Applications in Accordance with the Regulations .............................................................................81
Trained Personnel.............................................................................................................................81
Benefits with the Employment of the Safe Torque Off Function .......................................................81
Safety Instructions and Limitations ...................................................................................................82
Safe Torque Off Function, (STO) ......................................................................................................83
Block Circuit Diagram........................................................................................................................83
Status Diagram and Function of Terminals STO1# und STO2# ......................................................84
Configuration and Parameter Settings..............................................................................................85
Application Example of STO (Safe Torque Off) ................................................................................90
Application Example 1.......................................................................................................................91
Application Example 2.......................................................................................................................92
Application Example 3......................................................................................................................93
Application Example 4.......................................................................................................................94
STO Function Test ............................................................................................................................95
Signal Inputs Technical Data - Terminal Connection X11 ................................................................97
10
Diagnosis and Trouble-Shooting ............................................................. 98
10.1
10.2
10.3
7-Segment-Display............................................................................................................................98
Reset of a Drive Trouble .................................................................................................................103
Trouble-Shooting.............................................................................................................................104
11
Standards and Certifications.................................................................. 105
11.1
Compliance with Regulations, Limitations and Basic Conditions ...................................................105
6
07-02-12-02-EN-V0608.doc / Type: 638
Table of Contents
Page
12
Technical Data ......................................................................................... 107
12.1
●
●
●
●
●
●
●
●
●
●
●
●
12.2
●
●
●
●
●
General Technical Data ..................................................................................................................107
Power Circuit ...................................................................................................................................107
Control Circuit..................................................................................................................................107
Signal Inputs and Outputs - Connection X10..................................................................................107
Thermo-Control X30........................................................................................................................107
Thermo-Control X62........................................................................................................................108
Brake-Control X62...........................................................................................................................108
Signal Inputs and Outputs - Connection X120B resp. 120C...........................................................108
Digital Control..................................................................................................................................109
Digital Communication ....................................................................................................................109
Resolver Evaluation / Transmitter Principles ..................................................................................109
Controller System............................................................................................................................110
Mechanical Data .............................................................................................................................110
Technical Unit Data.........................................................................................................................111
638A ................................................................................................................................................111
Output Power 638A.........................................................................................................................112
Singlephase and Threephase supply..............................................................................................112
638B ................................................................................................................................................113
Output Power 638B.........................................................................................................................114
13
Software.................................................................................................... 115
13.1
13.2
●
●
●
●
13.3
EASYRIDER® Windows - Software ................................................................................................115
Introduction......................................................................................................................................116
Program layout ................................................................................................................................117
Execute a BIAS program.................................................................................................................117
Execute a PLC program..................................................................................................................118
Execute a Mathematics program ....................................................................................................118
BIAS - Commands...........................................................................................................................119
14
Appendix .................................................................................................. 120
14.1
STO - Safety - Parameter - Report - Proposal................................................................................120
15
16
Memo ........................................................................................................ 121
Modification Record ................................................................................ 122
07-02-12-02-EN-V0608.doc / Type: 638
7
The Most Important Thing First
Thank you for your confidence in choosing our products.
These operating instructions are intended to provide an overview of the technical data and
features of our products.
Please read the operating instructions completely before operating the product.
Should you have any questions, please contact your nearest service representative.
Improper application of this product in combination
with dangerous high voltage can lead to serious injury
or death.
Damage can also occur to motors or other products.
Therefore, we request that you strictly observe our
safety
and installation instructions.
Safety Precautions
We assume that as an expert, you are familiar with and will observe all of the relevant safety
regulations, especially in accordance with VDE 0100, VDE 0113, VDE 0160, EN 50178, the
accident prevention regulations of the employer’s liability insurance company and the DIN
regulations.
Additionally, it is imperative that all relevant European Union Safety Directives be observed.
Depending on the type and location of the installation, additional regulations, e.g. UL, DIN, must
also be fully observed.
If our products are operated in connection with components from other manufacturers, their
operating instructions are also subject to be strictly observed.
8
07-02-12-02-EN-V0608.doc / Type: 638
Safety Precautions
Safety Precautions
Digital servo drives, corresponding to EN 61800-5-1/VDE 0160, are electronic
power components utilized for the regulation of the flow of energy in highvoltage
electrical power installations. They are exclusively designed, configured and
approved to supply our servo motors. Handling, installation, operation, and
maintenance are only permitted under the conditions of and in keeping with the
effective and/or legal regulations, regulation publications and this technical
document.
Attention !
The operator must make sure that these regulations are strictly followed.
The Concept of Galvanic Separation and Insulation:
Galvanic separation and insulation corresponding to EN 61800-5-1/VDE 0160,
provides for additional insulation protection.
In addition, all digital signal inputs and outputs are provided with a galvanic
separation utilizing either a relay or an optical coupler. In this way, an increased
level of protection against potential interference and a limitation of potential
damage due to incorrect connections are provided.
The voltage level must not exceed the designated low safety voltage of
60V DC or 25V AC, respectively, in accordance with EN 61800-5-1/VDE
0160.
The operator must make sure that these regulations are strictly followed.
High Voltage!
Danger of Electrocution!
Life Threatening Danger!
Danger !
Certain parts of the servo drive are supplied with dangerous
electrical current. Physical contact with these components
can cause death, life threatening injuries and/or serious damage to
equipment and property.
Due to safety considerations and product guarantees, the operator
is prohibited from opening the servo drive case. Service,
maintenance and repair of our products should only be carried out
by specified representatives of the company. Expert configuration
and professional installation, as described by this document, are
the best way to insure problem-free operation of our servo drives!
Caution !
07-02-12-02-EN-V0608.doc / Type: 638
9
Safety Precautions
Please
Observe !
Pay Special Attention to the Following:
Permissible Protection Class: Protective Grounding - operation is only permitted
when the protective conductor is connected according to regulations.
Operation of the servo drive when employing a residual current operated
protective device as the sole protection against indirect touching, is not
permissible.
The servo drive may only be used in conjunction with machines or
electrical systems when placed in control cabinets which comply with
EEC- Directive98/37EEC (Machine Directive) and
EEC Directive 89/336/EEC (EMC – Directive).
Work on or with the servo drive may only be carried out with insulated tools.
Installation work may only be done in a de-energized state. When working on
the
drive, one should not only block the active input, but also separate the drive
completely from the main power connection.
CAUTION - Risk of Electrical Shock:
Wait 3 minutes after switching the component off to allow the capacitors to
discharge.
Screws sealed with varnish fulfill an important protection function and may not
be
tampered with or removed.
It is prohibited to penetrate the inside of the unit with objects of any kind.
Protect the unit from falling parts, pieces of wire, metal parts, etc., during
installation or other work in the control cabinet. Metal parts can lead to
a short-circuit in the servo drive.
Before putting the unit back into operation, remove any additional covers so that
the unit does not overheat. When conducting measurements on the servo drive
it is imperative to pay attention to the electrical isolation.
We are not liable for damage which may occur when the product
instructions and/or the applicable regulations are not explicitly observed!
Stop !
10
07-02-12-02-EN-V0608.doc / Type: 638
1
General Information
1
General Information
1.1
●
System Description
Special Features of the 638 Servo Drive
• The digital 638 servo drive provides for the electrical connection, rotational speed and position
control of the AC servo motor.
• All of the functions and system controls are digitally regulated, employing a
sampling rate of 105µs.
• The 638 servo drive supports the safety function ”Safe Torque Off“, STO, providing for a
definitive system shut-down, for protection against an unanticipated start-up, in accordance
with
the requirements as stated in EN 13489-1, Category 4, Performance Level e and EN1037.
• The feedback generated from the braking energy is dissipated through the employment of
internal ballast resistance and when required through the employment of additional external
ballast resistance.
• The AC supply voltage can be directly connected or it can be connected through a transformer,
as required. (Important: only operated on networks which are grounded at the centre point
(TN networks)
• The servo drive additionally requires a 24 V DC control supply voltage connection.
• The built-in internal EMC filter corresponds to the requirements regarding susceptibility to
interference for industrial systems as described in EN50081-1.
• By employing various option modules, through 2 additional plug-in receptacles, it is possible
to increase the potential connections to the field bus system and/or the input/output terminals.
• Various motor feedback loop systems can be supported by employing the flexible
feedback module X300.
• Through the employment of additional 638 drives it is optionally possible to couple the DC link.
• Minimal Housing Dimension is provided through the intelligent compact design of the unit.
●
Overview of Standard Digital Communication
07-02-12-02-EN-V0608.doc / Type: 638
11
1
●
General Information
Determining Criteria for the Utilization of the 638 Drive
Decisions relating to the appropriate selection of the motor type, feedback system and drive type,
as well as the system layout and option modules required, are dependant upon the specific
application and the anticipated operating mode of the system.
There are 6 operating modes to choose from:
• 0 Seed / Current control
switchable via Input X10.24
• 1 Speed control
• 2 Current control
• 3 Speed / Position control
switchable via Input X10.24
• 4 Position control without
BIAS – execution
• 5 Position control with
BIAS - execution
●
Operation Configuration
There are opportunities ranging from simple current and speed control to programmable
position control processes (PLC), supported by the 1500 BIAS command blocks.
"BIAS" User shell for intelligent drive controls:
See Chapters: “■ Operation Modes“ and “■ Software“
12
07-02-12-02-EN-V0608.doc / Type: 638
1
General Information
1.2
Model Code
Special
Marking
Type:
a
638
b
X
c
XX
d
X
e
F
Marking
a
b
f
X
g
STO
h
XXX
h1
XXX
i
XXX
j
XXX
Description
638
=
6th. Generation Digital Servo Drive
A
=
01
02
04
06
=
=
=
=
Size A
Rated Current:
1,0 amps
2,0 amps
4,0 amps
6,0 amps
3
=
e
F
A
=
=
Size:
Size B
C
= Size C
Rated Current:
03
=
2,5 amps
05
=
5,0 amps
being prepared
08
=
7,5 amps
10
= 10,0 amps
15
= 15,0 amps
Intermediate Voltage:
638A
638B
325 VDC / 230 VAC
3
= 325 VDC / 230 VAC
6
= 565 VDC / 400 VAC
7
= 678 VDC / 480 VAC
With Integrated Filter
= Standard
less leakage current (AC-side Y-capacitators deactivated; JP600 open)
f
0
=
Without EMC - Clip
c
d
g
STO =
h
000
232
422
485
CAN
2CA
2C8
CCA
PC8
DEV
SUC
PDP
IBS
PC8
PCA
EA5
=
=
=
=
=
=
=
=
=
=
=
=
=
=
=
=
h1
000 =
EAE =
B
=
Safety Performance:
Safe Torque Off
= Standard
Additional option-module RP -XXX on the drive for communication via COM2
No Option
RS 232 interface
≅ slot A (A, B)
RS 422 interface
≅ slot A (B)
RS 485 interface
≅ slot A (B)
CAN – Bus
≅ slot A (B)
2 x CAN (without I/O’s)
≅ slot B (A) / [C*]
2 x CAN + 4 outputs and 4 inputs
≅ slot B (A) / [C*]
2 x CAN + RS 485
≅ slot B (A)
2 x CAN2 + 4 outputs and 4 inputs + RS 485
≅ slot B (A)
CAN - Bus / DeviceNet
≅ slot B (A)
SUCOnet K
≅ slot B (A)
Profibus DP
≅ slot B (A)
Interbus S
≅ slot B (A)
Profibus DP + CAN2 + 4 outputs and 4 inputs + RS 485
≅ slot B (A)
Profibus DP + CAN2 + RS 485
≅ slot B (A)
I/O - Interface (5 inputs, 2 outputs)
≅ slot B (A)
Additional Options Module on the drive via X200
No Option
I/O - Interface (14 inputs, 10 outputs)
RM1 =
HM1 =
SM1 =
X300 – Functions Module
Standard X30 Resolver – Module 2nd Version
HIPERFACE® – Module 2nd Version
Sine / Cosine - Module 2nd Version
with Memorychip as of firmware V 8.35
Resolver + Memory- Module 2nd Version
HIPERFACE® + Memory- Module 2nd Version
Sine/Cosine + Memory- Module 2nd Version
X7x
BSx
Enter only when used
Broad-band contact X10.7 - X10.8
Moisture/Condensation Protection
i
RD2 =
HF2 =
SC2 =
j
=
=
= Standard
≅ slot C
= Standard
≅ slot D
≅ slot D
≅ slot D
≅ slot D
≅ slot D
≅ slot D
*Only CAN2 can be employed when utilizing the option module located at slot [C], (internal BUS / COM3 B).
07-02-12-02-EN-V0608.doc / Type: 638
13
1
●
General Information
Combination Possibilities for the Various Communication / I/O - Modules
Slot
Option Module
A
2
3
2
4
2
2
-
4
8
5
-
C
A
N
-
2
C
A
-
2
C
8
-
C
C
A
-
C
C
8
-
D
E
V
-
B
S
U
C
-
P
D
P
-
I
B
S
-
E
A
5
-
P
C
8
-
P
C
A
-
C
E *2 *2
A C C
E A 8
-
Model Code
638xxxxFxSTO232000xxx
638xxxxFxSTO232EAExxx
638xxxxFxSTO2322CAxxx
638xxxxFxSTO2322C8xxx
638xxxxFxSTO422000xxx
638xxxxFxSTO422EAExxx
638xxxxFxSTO4222CAxxx
638xxxxFxSTO4222C8xxx
638xxxxFxSTO485000xxx
638xxxxFxSTO485EAExxx
638xxxxFxSTO4852CAxxx
638xxxxFxSTO4852C8xxx
638xxxxFxSTOCAN000xxx
638xxxxFxSTOCANEAExxx 638xxxxFxSTO2CA000xxx
638xxxxFxSTO2CAEAExxx
638xxxxFxSTO2C8000xxx
638xxxxFxSTO2C8EAExxx
638xxxxFxSTOCCA000xxx
638xxxxFxSTOCCAEAExxx 638xxxxFxSTOCC8000xxx
638xxxxFxSTOCC8EAE xxx 638xxxxFxSTODEV000xxx
638xxxxFxSTODEVEAExxx 638xxxxFxSTOSUC000xxx
638xxxxFxSTOSUCEAExxx 638xxxxFxSTOPDP000xxx
638xxxxFxSTOPDPEAExxx 638xxxxFxSTOPDP2CAxxx
638xxxxFxSTOPDP2C8xxx
638xxxxFxSTOIBS000xxx
638xxxxFxSTOIBSEAExxx
638xxxxFxSTOIBS2CAxxx
638xxxxFxSTOIBS2C8xxx
638xxxxFxSTOEA5000xxx
638xxxxFxSTOEA5EAExxx
638xxxxFxSTOPC8000xxx
638xxxxFxSTOPC8EAExxx
638xxxxFxSTOPCA000xxx
638xxxxFxSTOPCAEAExxx 638xxxxFxSTO000EAExxx
000 = No Option
Possible Combination
* Only CAN2 can be employed when utilizing the option module located at slot [C], (internal BUS / COM3 B)
Example:
638A043F0STO232EAERD2
638
= 6th. Generation Digital Servo Drive
A
= Size A
04
= 4 Amps Rated Current
3
= 325 VDC (230 VAC)
F
= With Integrated Filter
0
= Without EMC - Clip
STO
= Safe Torque Off
232
= RS 232 Interface
≅ on slot A
EAE
= I/O Interface 14/10
≅ on slot C
RD2 = Standard X30 Resolver ≅ on slot D (Motor - Feedback system)
14
07-02-12-02-EN-V0608.doc / Type: 638
1
●
General Information
Module Slots Layout
Module Slots:
A
232
422
485
CAN
B
2CA
2C8
CCA
CC8
DEV
SUC
C
PDP
IBS
EA5
PCA
PC8
EAE
*2CA
*2C8
Motor - Feedback System:
D
●
RD2: Standard Resolver
HF2: Option HIPERFACE®
SC2: Option Sine / Cosine
with Memorychip as of FW V8.35
RM2: Resolver + Memory
HM2: HIPERFACE® + Memory
SM2: Sine/Cosine + Memory
Module Design
Design A
Design B
Design C
07-02-12-02-EN-V0608.doc / Type: 638
15
1
General Information
1.3
Dimensions
●
638A Series
Important:
Please note that on the front side of the unit, approximately 70 mm of additional space
is required for the signal mating plugs!
When installing multiple servo drives, there is minimum space on the side.
The unit should only be mounted vertically as shown.
16
07-02-12-02-EN-V0608.doc / Type: 638
1
●
General Information
638B Series
Important:
Please note that on the front side of the unit, approximately 70 mm of additional space is
required for the signal mating plugs!
When installing multiple servo drives, there is minimum space on the side.
The unit should only be mounted vertically as shown.
07-02-12-02-EN-V0608.doc / Type: 638
17
2
Connection Assignments and Functions
2
Connection Assignments and Functions
2.1
Insulation Concept
The insulation of the 638 units is achieved in various insulation classes or groups.
18
07-02-12-02-EN-V0608.doc / Type: 638
2
2.2
●
Connection Assignments and Functions
Overview of Compact Unit Connections
638A01.. to 638A06..
07-02-12-02-EN-V0608.doc / Type: 638
19
2
●
20
Connection Assignments and Functions
638B03.. to 638B15..
07-02-12-02-EN-V0608.doc / Type: 638
2
2.3
●
Connection Assignments and Functions
Assignments Power Connections
Power, Ballast, DC Bus - Connection X60
638A Plug - X60
PIN
1
2
3
4
5
6
7
Designation
0VP
RB1/+UCC
RB2
L1
L2
L3 / N
PE
Function
0 Volt DC Bus
External – Ballast Resistor / + DC - Bus
External – Ballast Resistor
Power Connection 1, 230V AC
Power Connection 2, 230V AC
Power Connection 3, 230V AC / Ground
Protective Ground
638B Plug - X60
PIN
1
2
3
4
5
6
7
●
Designation
0VP
RB1/+UCC
RB2
L1
L2
L3
PE
Function
0 Volt DC Bus
External – Ballast Resistor / + DC - Bus
External – Ballast Resistor
Power Connection 1, 400V AC
Power Connection 2, 400V AC
Power Connection 3, 400V AC / Ground
Protective Ground
24V - Control Supply Voltage X01
Plug - X01
●
PIN
Designation
1
2
3
4
+24V
+24V
0V
0V
Function
Supply Us (Input)
Supply Us (Output with PIN 1 jumpered)
Reference Potential 0V
Setup and Wiring
example
Motor - Connection X61
638A
Plug - X61
PIN
Designation
Function
1
M1 / U
Motor Supply
2
M2 / V
Motor Supply
3
M3 / W
Motor Supply
4
PE
Protective Ground
638B
07-02-12-02-EN-V0608.doc / Type: 638
21
2
●
Connection Assignments and Functions
Brake / Thermo - Connection X62
638A
Stecker - X62
PIN
Bezeichnun
g
1
+24V
Input; Supply Voltage Mechanical Brake
2
0V
Input; Refer. Potential Supply Voltage
Mechanical Brake
3
BR+
Control Mechanical Brake
4
BR-
Control Mechanical Brake
5
-
Not assigned
6
TH+
Thermo PTC1) /NTC
7
TH-
Thermo PTC1) /NTC
1)
22
Funktion
638B
Setup and
Wiring
example
With parameter setting PTC can you temperature sensor Typ KTY (note poling)
or thermo switch used.
EASYRIDER Menu „Configuration Motor / X30 Switch off at:“ use resistor value in Ohm.
For thermo switch is the value 1000 Ohm in the EASYRIDER Menu
„Configuration Motor / X30 Switch off at:“
07-02-12-02-EN-V0608.doc / Type: 638
2
2.4
Connection Assignments and Functions
Feedback Sensor X30
The feedback system creates a digital value from the feedback position sensor.
From this value the following is derived:
Commutation according to the pole division
Actual rotational speed value
Position value for the position controller
●
Feedback - Module X300
The X30 connection is directly connected to the Feedback - Module X300.The mode of operation
of the feedback system is specified by this plug-in module. (see: ● Layout Module Slots)
The 638 – Drive system therefore offers a built-in flexibility and provides for the possibility
of future modification.
638B
638A
Model Type X300 Description
X300_RD2
Resolver
X300_HF2
HIPERFACE®
X300_SC2
Sine/Cosine
X300_RM1
Resolver + Memory
X300_HM1
HIPERFACE®+ Memory
X300_SM1
Sine/Cosine + Memory
Additional types available upon request.
Standard
Option
Option
Option as of Firmware V 8.35
Plug and Play
The 638 Servo Drive is able to identify the type of X300 Module employed.
The EASYRIDER® Windows – Software loads the correct function code.
You follow the instructions in the EASYRIDER® Windows – Software.
For feedback module RD2 the function code is already pre-set (factory default).
Note
When employing the Feedback Module X300_HF2 (HIPERFACE®),
please pay attention to documentation 07-02-09-02-E-Vxx.
07-02-12-02-EN-V0608.doc / Type: 638
23
2
●
Connection Assignments and Functions
Feedback Connection X30 (SUB D 09 Socket)
Pinning for the Motor - Feedback - Socket X30 when employed with:
Resolver Module X300_RD2 or X300-RM1(Standard Module)
Module: X300_RD2 / X300_RM1
PIN
X30
1
2
3
4
5
6
7
8
9
1)
24
Function
PTC1) / NTC optional
cos +
sin +
carrier +
PTC1) / NTC optional
cos sin carrier -
Setup and Wiring example
With parameter setting PTC can you temperature sensor Typ KTY (note poling)
or thermo switch used.
EASYRIDER Menu „Configuration Motor / X30 Switch off at:“ use resistor value in Ohm.
For thermo switch is the value 1000 Ohm in the EASYRIDER Menu
„Configuration Motor / X30 Switch off at:“
07-02-12-02-EN-V0608.doc / Type: 638
2
Connection Assignments and Functions
HIPERFACE® - Module X300_HF2 or X300_HM1
Module: X300_HF2 / X300_HM1
PIN
X30
Function
1
2
3
4
5
6
7
8
9
GND
10 VDC
cos +
sin +
data ref cos
ref sin
data +
Sine / Cosine - Module X300_SC2 or X300_SM1
Module: X300_SC2 / X300_SM1
PIN
X30
1
2
3
4
5
6
7
8
9
●
Function
GND
5,5 V
cos +
sin +
zero pulse ref cos
ref sin
zero pulse +
Feedback - Module X300 with Memory
638A
As of firmware version V8.35 the 638 Drive supports the
X300-xM-Modules.
This module has an additional memory chip (Flash).
This flash stores the complete drive data. (firmware, function code,
parameters, application program)
When a drive is defect the X300-memory module can be replaced
with the complete drive data in the new drive.
You need no additional configuration work or software tools.
Requirement: The drive type must be equal (same current)!
Attention during the 1.st switch on of the control voltage
after the X300 module replacement!
After the replacement of the X300 module, make sure that the 1st switch on of
the 24V control voltage has no interruption during 60 seconds.
(It is necessary that the copy program for Firmware and X300 Feedback function
code are not interrupted.)
Applications in Accordance with the Regulations
When the 638A Drive supports the safety function “Safe Torque Off”, in the sense
of providing a definitive stopping of the equipment, with protection against
unanticipated start-up, in accordance with regulations EN954-1, Category 3 and
EN, after the X300 module change one must follow the instructions completely as
stated in the validation report.
07-02-12-02-EN-V0608.doc / Type: 638
25
2
Connection Assignments and Functions
2.5
Service-Interface COM1 (RS232)
Functions:
Supports all diagnostic and parameter configuration activities
PC connection utilizing our communications cable KnPC/D
Communication utilizing our operational program software
(EASYRIDER® Windows - Software)
Com 1 RS232
Function Drive Side
PIN
RS232 on PC
PIN
4-Pin Modular Plug
RXD
TXD
Receive Serial Data
Send Serial Data
Do Not Connect
Ground
GND
1
2
3
4
Order code
KnPC637+/631-03.0
KnPC637+/631-05.0
Length
3m
5m
3
2
TXD
RXD
5
GND
Description
PC-Side Sub D 09-Plug
Drive-Side 4-Pin RJ 10-Plug
Note:
The service interface port is not galvanically separated and should therefore not be used
as the operations interface port (fixed wiring)!
The network connection with the PC must be located near the Drive in order to receive the
reference potentials of the units together.
26
07-02-12-02-EN-V0608.doc / Type: 638
2
2.6
●
Connection Assignments and Functions
Safe Torque Off
Connection Safe Torque Off X11
Plug - X11
PIN
1
2
3
4
5
6
Description
STO1 #
STO1 #
0V / PE
STO2 #
-
Function
Channel 1 (ACTIVE_STO1)
Channel 1 (ACTIVE_STO1) Parallel to PIN 1
Reference Potential 0V
Channel 2 (ACTIVE_STO2)
Ready potential-free contact assembly
Further description of this function can be found in Chapter “Safe Torque Off“ (STO)
●
Connection WITHOUT the utilization of the Safe Torque Off, (STO), function
Input ACTIVE
(24V)
0VSPS
PIN
1
2
3
4
5
6
Description
STO1 #
STO1 #
0V / PE
STO2 #
-
The control supply voltage must be definitively separated, in accordance to
regulation EN 1578
07-02-12-02-EN-V0608.doc / Type: 638
27
2
Connection Assignments and Functions
2.7
Signal Connection
●
Control Signal Plug X10 (SUB D25 Socket)
Inputs / Outputs
Control Signal Plug X10
PIN
X10
1
2
3
4
5
6
7
8
9
10
11
12
13
14
15
16
17
18
19
20
21
22
23
24
25
Function
Type
Description
Shielding Connection
Screen
Configurable (Operating Mode)
OPTO Input
Stabilized Auxiliary Supply Voltage
Output
-12VDC; max. 80 mA
Auxiliary Supply Voltage
Configurable (Operating Mode)
OPTO Input
Reference Point to X10.18
Input Analog
0...+/-10V / Ri = 10 kOhm
Configurable
Output Analog
Through JP100 (soldered jumper)
Optional
assignable as a free and loopable
potential for the READY Contacts
ON: Drive trouble free
Relays Output
OFF: Drive problem or
Constant: Ready
power supply interruption
Reference Point for Digital Input
Reference Point for
Digital Inputs
Ground for Analog Signal
Ground
Configurable (Operating Mode)
OPTO Input
Configurable (Operating Mode)
OPTO Output
Configurable (Operating Mode)
OPTO Output
Configurable (Operating Mode)
OPTO
Configurable (Operating Mode)
OPTO
Stabilized Auxiliary Supply Voltage
+12V DC; max 80 mA
Configurable
Rotational Speed Setpoint;
Scaleable differential with
respect to X10.5
Specifications for the Power Limits can be activated and are scaleable
(0..+10V for 0.. Imax)
Configurable (Operating Mode)
OPTO
Nominal: 24VDC
Configurable (Safety Functions)
OPTO
Configurable (Operating Mode)
OPTO
Configurable (Operating Mode)
OPTO
Input
Input
Output
Auxiliary Supply Voltage
Output Analog
Input Analog
0...+/-10V / Ri = 10 kOhm
Input Analog
0..+10V
Ri = 10 kOhm
Output
Supply for Outputs
Input
Input
Input
Data for the digital in and outputs: See Chapter. “■ General Technical Data“
28
07-02-12-02-EN-V0608.doc / Type: 638
2
Connection Assignments and Functions
2.8
Multi-Function X40
Description of the X40:
Via a programmable I/O processor, the X40 connection can be configured differently.
EASYRIDER® Windows - Software
Standard functions:
- Incremental output
- Incremental input
- Stepper motor - pulse inputs
- SSI interface
The unobstructed configurability provides ideal conditions for synchronous applications.
General Data
Plug Type:
Maximum Input or Output Frequency:
Maximum Cable Length - connected to
galvanically insulated terminals (Encoder,
controls)
Maximum Cable Length - connected to ground
related terminals (other drives, controls)
Maximum Number of Signal Inputs - to one as
incremental output configured device
Output Signals:
Differential Logic Level:
Nominal Range:
Input Signals:
Differential Input Level:
Nominal Signal Difference:
Current Consumption:
X40
SUB D 09 male plug
312 kHz
25 m;
For extended distances please contact our engineer
2 m,
Pay attention to provide for good common grounding
!
8
Driver Model MAX483 or compatible, RS422
L ≤ 0,5V
H ≥ 2,5V
0,0 ... 5,0V
150mA max.
Receiver Model MAX481 or compatible, RS422
Diff min = 0,2V
1,0V
1...4 mA (depending on the frequency)
Notice:
Master / Slave Operation
1 Master, Maximum 8 Slaves
Condition: Devices must be located directly side by side!
07-02-12-02-EN-V0608.doc / Type: 638
29
2
●
Connection Assignments and Functions
Incremental - Output
EASYRIDER® Windows - X40 Connection: Mode = Incremental Output
Incremental encoder simulation for processing in positioning modules
Standard: 1024 increments with Pulse Duty Cycle
Additional selectable pulse settings: 16384, 8192, 4096, 2048, 512, 256, 128, 64
Inc. I/O X40
PIN
X40
1
2
3
4
5
6
7
8
9
Function
Designation
Channel B
Channel B - Inverted
Shield Connector
Channel A
Channel A - Inverted
Reference *
B
/B
Shield
A
/A
GND
/Z
Z
+ 5 VDC
Channel Z - Inverted Zero Impulse
Channel Z, zero impulse
Supply Voltage Output Max. 150 mA
Pulse resulution
≥1024 Incr./rpm
2048 Incr./rpm
4096 Incr./rpm
8192 Incr./rpm
16384 Incr./rpm
Max. permissible speed
12000 rpm
7600 rpm
3800 rpm
1900 rpm
950 rpm
Design Rule:
The input frequency range of the connected control must equal at least the value
of the pulse output frequency on the X40.
n = max. speed (rpm)
x = increments e.g. 1024
f = output frequency at X40.1,2,4,5
Formula: f = 1,2 * (n * x) = [Hz]
60
Example: n = 4000 1/min
f=
●
1,2 * (4000 * 1024)
= 81920 Hz
60
Incremental - Input
EASYRIDER® Windows - Software X40 Connection: Mode = Incremental Input
Parameter range of the input signals: 10...1000000 increments
Figure:
Note:
The operation of incremental encoders via long cables may cause a voltage drop of the encoder
power supply. We recommend the use of a separate voltage supply if necessary.
30
07-02-12-02-EN-V0608.doc / Type: 638
2
●
Connection Assignments and Functions
Stepper Motor Input
Two different modes are available
EASYRIDER® Windows - Software X40 Connection: Mode = Stepper Motor (Pulse+Direction)
EASYRIDER® Windows - Software X40 Connection: Mode = Stepper Motor (2*Pulse)
INCR. I/O X40
PIN
X40
1
2
3
4
5
6
7
8
9
Function
Mode: Pulse+Direction Mode: 2*Pulse
Output: Drive Active - Inverted
Output: Drive Active
Shield Connector
Pulse Inverted
Pulse - Inverted
Pulse
Pulse Reference Potential (generally to connect)
/READY
READY
Shield
GND
Direction Inverted
Pulse + Inverted
Direction
Pulse +
Supply Voltage Output Max. 150 mA
+5 VDC
Designation
Figure: Pulse+Direction
Figure: 2*Pulse
07-02-12-02-EN-V0608.doc / Type: 638
31
2
●
Connection Assignments and Functions
SSI-Encoder Interface
EASYRIDER® Windows – Software
• X40 Connection: Modus = SSI_13 Bit Singleturn Input
• X40 Connection: Modus = SSI_14 Bit Singleturn Input
• X40 Connection: Modus = SSI_25 Bit Multiturn Input / (13 Bit Single- / 12 Bit Multiturn)
• X40 Connection: Modus = SSI_26 Bit Multiturn Input / (14 Bit Single- / 12 Bit Multiturn)
• X40 Connection: Modus = SSI_18 Bit Multiturn Input / (16 Bit Single- / 2 Bit Multiturn)
Incr. I/O X40
PIN
X40
1
2
3
4
5
6
7
8
9
Function
Designation
Serial Data from SSI Encoder,
GRAY Code up to 26 Bit - Inverted
Serial Data from SSI Encoder,
GRAY Code up to 26 Bit
Shield Connector
Clock Output - Inverted
Standard Frequenzy: 179 kHz
Clock Output
Standard Frequenzy: 179 kHz
Reference Potential
/DATA
Shield
/TAKT
Do Not Connect
Do Not Connect
Supply Voltage Output Max. 150 mA
If other data required:
a) Use of X300 Module
b) External Supply
+5 VDC
DATA
TAKT
GND
TAKT and /TAKT twisted pairs
DATA and /DATA twisted pairs
Cable Shielded - shielding grounded at both ends,
Max. Cable Length: 200m
Note:
For further information about SSI (Synchronous Serial Interface),
please refer to the documentation of the appropriate suppliers.
(e.g.: Comp. Sick or Hengstler)
32
07-02-12-02-EN-V0608.doc / Type: 638
2
2.9
Connection Assignments and Functions
Fieldbus Interface COM2
Additional functions can be realized through the optional employment of the Options Modules
●
Pinning for RS232
Module: RP 232
PIN
1
2
3
4
5
6
7
8
9
●
Function
RXD
TXD
GND / 485-GND
-
Pinning for RS422/485
Module: RP 422 oder RP 485
PIN
1
2
3
4
5
6
7
8
9
Function
Data In
GND
Data In - Inverted
Data Out - Inverted
Data Out
-
Options module RP 422, without galvanic separation
Options module RP 485, with galvanic separation
Parallel wiring for up to 16 units. (Full - Duplex, 4-Wire)
07-02-12-02-EN-V0608.doc / Type: 638
33
2
●
Connection Assignments and Functions
Pinning for CAN or DeviceNet
Module: RP CAN (CAN BUS1) or RP DEV
PIN
1
2
3
4
5
6
7
8
9
Function
CAN_L Bus Line
(dominant low)
Ground
Optional Ground
Designation
CAN_L
CAN_H Bus Line
(dominant high)
-
CAN_H
CAN-GND
CAN-GND
-
with galvanic separation
●
Pinning for Profibus DP
Module: RP DP
PIN
1
2
3
4
5
6
7
8
9
Function
Designation
Line B
Request to Send
Ground
Potential +5V
B
RTS
PDP-GND
+5V
A
-
Line A
with galvanic separation
●
Pinning for SUCOnet K
Module: RP SUC
PIN
1
2
3
4
5
6
7
8
9
Function
Designation
Data Line +
Signal Ground
Data Line -
TA/RA
SGND
TB/RB
-
with galvanic separation
34
07-02-12-02-EN-V0608.doc / Type: 638
2
●
Connection Assignments and Functions
Pinning for EA5 I/O-Interface (Digital In and Outputs)
Module: RP EA5
PIN
1
2
3
4
5
6
7
8
9
Function
Designation
BIAS Input 101
BIAS Input 102
BIAS Input 107
BIAS Input 108
0VSPS
Standard
Standard
Standard
Standard
Ground reference
0VSPS
Standard
Standard
Standard
Ext. +24V feed-in
BIAS Input 106
BIAS Output 109
BIAS Output 110
+24VSPS
Status
Input
Input
Input
Input
B
Input
Output
A
UB
with galvanic separation
Notice !
The inputs with the internal numbers 107 and 108 must be connected to pin numbers 3 and 4.
The outputs with the internal numbers 109 and 110 must be connected to pin numbers 7 and 8.
07-02-12-02-EN-V0608.doc / Type: 638
35
2
Connection Assignments and Functions
2.10
Fieldbus Interface COM2 in Combination with COM3
(OPTION SLOT A/B)
●
Pinning for Interbus S (RP IBS)
Remote OUT - Outgoing Interface (SUB D09 Socket)
Module: RP IBS
PIN
Function
Designation
Data Line OUT Forward
DO2
1
(error voltage A)
Data Line IN Backward
DI2
2
(error voltage A)
3
Reference Potential
IBS-GND
4
5
VCCI
+5V
Data Line OUT Forward
/DO2
6
(error voltage B)
Data Line IN Backward
/DI2
7
(error voltage B)
8
9
Reporting Input *
RBST
* for additional Interbus S - Interfaces
Remote IN - Incoming Interface (SUB D09 Plug)
Module: RP IBS
PIN
Function
Data Line IN Forward
1
(error voltage A)
Data Line OUT Backward
2
(error voltage A)
3
Reference Potential
4
5
Data Line IN Forward
6
(error voltage B)
Data Line OUT Backward
7
(error voltage B)
8
9
with galvanic isolation
36
Designation
DO1
DI1
IBS-GND
/DO1
/DI1
-
07-02-12-02-EN-V0608.doc / Type: 638
2
2.11
●
Connection Assignments and Functions
Fieldbus Interface RP 2CA, 2C8
Pinning CAN1-BUS and CAN2-BUS
Module: RP 2CA, 2C8
PIN
1
2
3
4
5
6
Function
Designation
CAN_L Bus Line
(dominant low)
Ground
Optional Ground
-
CAN_H Bus Line
(dominant high)
-
7
8
9
CAN2
CAN1
CAN_L
CAN-GND
CAN-GND
CAN_H
-
with galvanic isolation
●
Pinning RP 2C8 X120 (with I/O’s)
X120
1
2
3
4
5
6
7
8
9
10
Function
0
1
Reset
Drive Fault
BIAS
Limit Switch +
BIAS
Limit Switch Reference
BIAS
Switch
BIAS
Cam 1
BIAS
Cam 2
BIAS
Cam 3
BIAS
Cam 4
Ext. +24 V Supply
Ground Reference 0 V
BIAS
BIAS PIN
Status
Input 121
Input
Input 122
Input 123
Input
Input
Input 124
Input
Output 125
Output 126
Output 127
Output 128
-
I/O’s
Output
Output
Output
Output
Ub
B
The signal status of the I/O’s is shown with a 2mm LED
LED on I/O = high / LED off I/O = low.
(min./max. cable cross-section: 0,08mm² / 1,5mm²)
07-02-12-02-EN-V0608.doc / Type: 638
37
2
−
Connection Assignments and Functions
DIP Switch Position for Option Module RP 2CA and RP 2C8
DIP – Switch Position CAN
DIP – Switch Position BUS – Termination (Example 638A)
38
07-02-12-02-EN-V0608.doc / Type: 638
2
2.12
●
Connection Assignments and Functions
Fieldbus Interface RP CCA, CC8
Pinning CAN1-BUS, CAN2-BUS and RS485
Module: RP CCA, CC8
PIN
1
2
3
4
5
6
7
8
9
1
2
3
4
5
6
7
8
9
Function
Designation
CAN_L Bus Line
(dominant low)
Ground
Optional Ground
CAN_L
CAN_H Bus Line
(dominant high)
CAN2
CAN_L Bus Line
(dominant low)
Ground
Ground
CAN_H Bus Line
(dominant high)
-
CAN_H
CAN-GND
CAN-GND
CAN1
RS485
Data-IN inv.
485-/CAN-GND
DATA-IN
GND (optional)
485-/CAN-GND
-
CAN2-BUS / RS485
Data-OUT
Data-OUT inv.
with galvanic isolation
●
Pinning RP CC8 X120 (with I/O’s)
X120
1
2
3
4
5
6
7
8
9
10
Function
0
1
Reset
Drive Fault
BIAS
Limit Switch +
BIAS
Limit Switch Reference
BIAS
Switch
BIAS
Cam 1
BIAS
Cam 2
BIAS
Cam 3
BIAS
Cam 4
Ext. +24 V Supply
Ground Reference 0 V
BIAS
BIAS PIN
Status
Input 121
Input
Input 122
Input 123
Input
Input
Input 124
Input
Output 125
Output 126
Output 127
Output 128
-
I/O’s
Output
Output
Output
Output
Ub
B
The signal status of the I/O’s is shown with a 2mm LED
LED on I/O = high / LED off I/O = low.
(min./max. cable cross-section: 0,08mm² / 1,5mm²)
07-02-12-02-EN-V0608.doc / Type: 638
39
2
−
Connection Assignments and Functions
DIP Switch Position for Option Module RP CCA and RP CC8
DIP – Switch Position CAN
40
07-02-12-02-EN-V0608.doc / Type: 638
2
2.13
●
Connection Assignments and Functions
Fieldbus Interface RP PCA, PC8
Pinning Profibus DP and CAN2-BUS and RS485
Module: RP PCA, PC8
PIN
1
2
3
4
5
6
7
8
9
Designation
Line B
Request to Send
Ground
Potential +5V
B
RTS
PDP-GND
+5V
A
RS485
Data-IN inv.
-
Line A
CAN2
CAN_L Bus Line
(dominant low)
Ground
Ground
1
2
3
4
5
6
CAN_H Bus Line
(dominant high)
-
7
8
9
●
Function
485-/CAN-GND
DATA-IN
GND (optional)
485-/CAN-GND
Profibus DP
CAN2-BUS / RS485
Data-OUT
Data-OUT inv.
Pinning RP PC8 / X120 (with I/O’s)
X120
1
2
3
4
5
6
7
8
9
10
Function
0
1
Reset
Drive Fault
BIAS
Limit Switch +
BIAS
Limit Switch Reference
BIAS
Switch
BIAS
Cam 1
BIAS
Cam 2
BIAS
Cam 3
BIAS
Cam 4
Ext. +24 V Supply
Ground Reference 0 V
BIAS
BIAS PIN
Status
Input 121
Input
Input 122
Input 123
Input
Input
Input 124
Input
Output 125
Output 126
Output 127
Output 128
-
I/O’s
Output
Output
Output
Output
Ub
B
The signal status of the I/O’s is shown with a 2mm LED
LED on I/O = high / LED off I/O = low.
(min./max. cable cross-section: 0,08mm² / 1,5mm²)
07-02-12-02-EN-V0608.doc / Type: 638
41
2
−
Connection Assignments and Functions
DIP Switch Position for Option Module RP PCA, PC8
DIP – Switch Position CAN2 / RS485 and Profibus DP
Further information for the Profibus DP: See Documentation 07-05-04-02-E-Vxxxx.
42
07-02-12-02-EN-V0608.doc / Type: 638
2
2.14
Connection Assignments and Functions
Overview of the Terminal Cross Section
Cross Section
638A
[mm2]
Solid Core /
Multiple conductor line
Flexible with ferrule
without plastic sleeve
Flexible with ferrule with
plastic sleeve
Flexible with TWINferrule with plastic sleeve
Approbation Data
UL/C-UL-US
CSA
Stud Torque [Nm]
Solid Core and
X01
Multiple conductor line
Control
Voltage
Flexible with ferrule
X11
without plastic sleeve
STO, Active
Flexible with ferrule with
X62
plastic sleeve
Brake,
Flexible with TWINThermo
ferrule with plastic sleeve
Approbation Data
UL/C-UL-US
CSA
Stud Torque [Nm]
Solid Core /
X61
Multiple conductor line
Motor
Flexible with ferrule
without plastic sleeve
Flexible with ferrule with
plastic sleeve
Approbation Data
UL/C-UL-US
CSA
Stud Torque [Nm]
Solid Core and
X120
Multiple conductor line
Option 2C8,
PC8, CC8
Approbation Data
UL/C-UL-US
CSA
X60
Line,
Brakeresistor
,
DC-Link
638B
[mm2]
0,2-10
0,2-6
638C
[mm2]
0,75-16
0,75-16
0,25-2,5
0,25-6
0,5-16
0,25-2,5
0,25-4
0,5-16
0,5-1
0,25-1,5
0,5-6
0,2-2,5
[AWG]
30-12
28-12
0,5-0,6
Spring tension
1,7-1,8
0,14-1,5
0,14-1,5
0,14-1,5
0,25-1,5
0,25-1,5
0,25-1,5
0,25-0,5
0,25-0,5
0,25-0,5
0,5-1
0,25-1
0,25-1
[AWG]
30-14
30-14
0,2-0,22
0,2-2,5
0,2-2,5
[AWG]
30-14
30-14
0,2-0,22
0,2-10
0,2-6
0,25-6
[AWG]
30-14
30-14
0,2-0,22
0,2-10
0,2-6
0,25-6
0,25-4
0,25-4
[AWG]
30-12
28-12
0,5-0,6
[AWG]
28-8
28-8
0,7-0,8
[AWG]
28-8
28-8
0,7-0,8
0,08-1,5
0,08-1,5
0,08-1,5
[AWG]
28-14
28-14
[AWG]
28-14
28-14
[AWG]
28-14
28-14
0,25-2,5
0,25-2,5
07-02-12-02-EN-V0608.doc / Type: 638
[AWG]
20-6
43
3
Operating Mode
3
Operating Mode
3.1
Operating Mode General
The preselection of the device functions are carried out by choosing the operating modes 0...5
according to the following table, see: ■ Operating modes and pin functions,
(EASYRIDER® Windows - Software).
Each operating mode allows for the assignment of different in and output functions (F0..F6).
Operating
Mode
Reference Source
Hints for Selecting the Operating Mode
0
1
2
Analog (X10.5/18)
Switching the operating modes 1 and 2 through input X10.24
Speed control analog
Torque controller analog
3
Analog (X10.5/18) /
Digital
Simple applications with the requirement of switching between
position and speed control position controller (input X10.24).
Handling like operating mode 4
4
Digital or Analog in acc.
to parameter setttings
5
Digital or Analog in acc. Simple to complex systems using BIAS instructions to programming or via (up to 1500 command blocks)
digital communication PLC Functions
(e.g. fieldbus)
44
General position controlled systems - Up to 10 positions can be
stored under identifier-numbers and activated as shown.
07-02-12-02-EN-V0608.doc / Type: 638
3
3.2
Operating Mode
Operating Modes and Pin Functions
0
Available Torque / SpeedControl
Contact
Numbers
1
Speed
Control
Operating Modes
2
3
Torque
Position /
Control
Speed
Control
4
Position
Control
5
Position Control
+ BIAS
Functions
Input
X10.14
F0, F1
F0, F1
F0, F1
F0, F1, F2,
F3
F0, F1, F2,
F3,F6
F0, F1, F2,F6
Input
X10.15
F0, F1
F0, F1
F0, F1
F0, F1, F2,
F3
F0, F1, F2,
F3,F6
F0, F1, F2,F6
Input
X10.4
---
---
---
---
F2,F6
F0, F2, F3,F6
Input
X10.25
---
---
---
---
F2,F6
F0, F2, F3,F6
Input
X10.11
F1
F1
F1
F1
F1,F2,F6
F0, F1, F2, F3,F6
---
---
F1, F2,F6
F1, F2, F3,F6
Input
X10.24
F0
L = torqueH = speed
control
F0
L = torqueH = speed
control
Input
X10.2
---
---
---
---
F0
F2, F3
Output
X10.12
F0, F2, F5
F0, F2, F5
F0, F2, F5
F0, F1,F3, F5
F0, F1,F3,
F5
F0, F1, F2, F3,
F4, F5
Output
X10.13
F0, F2, F5
F0, F2, F5
F0, F2, F5
F0, F1,F3, F5
F0, F1,F3,
F5
F0, F1, F2, F3,
F4, F5
Output
X10.20
F0, F2, F5
F0, F2, F5
F0, F2, F5
F0, F1,F3, F5
F0, F1,F3,
F5
F0, F1, F2, F3,
F4, F5
Output
X62.3
X62.4
F0, F2, F5
F0, F2, F5
F0, F2, F5
F0, F1,F3, F5
F0, F1,F3,
F5
F0, F1, F2, F3,
F4, F5
07-02-12-02-EN-V0608.doc / Type: 638
45
3
Operating Mode
3.3
Configurable Pin Functions (Operating Mode Dependent)
Input Functions (Operating Mode Dependent)
Input
Nr.
Function
F0
Input
X10.14
Input
X10.15
Function
F1
⌧
⌧
⌧
3)
1) move manually
limit switch - set selection
data 2a
⌧
⌧
extended
latch
Input
X10.25
latch input 2
Input
X10.11
3)
start (slope 0>1) for BIAS regulator
trouble reset
move
commands
3)
operating mode
selection
reference
sensor
(0) – 1or 2
(3) – 1or 4
⌧
Input
X10.2
start (slope 0-->1)
with position set
selection in
position control (4)
⌧
Output
X10.12
position
reached
reference
output
Output
X10.13
temperature
monitoring
reference
output
Output
X10.20
warning
reference
output
Output
X62.3
X62.4
active ok
(motor brake)
1)
2)
3)
46
Function Function Function
F4
F5
F62)
⌧
latch input 1
⌧
Function
F3
3)
1) move manually
+
limit switch + set selection
data 20
Input
X10.4
Input
X10.24
Function
F2
reference
output
1)
set selection
data 2b
1)
set selection
data 2c
1)
set selection
data 2d
1)
set selection
data 2max
strobe
(slope 0-->1)
for BIAS-set
selection
⌧
⌧
⌧
⌧
⌧
⌧
⌧
⌧
⌧
⌧
CAN
Node no.
20
CAN
Node no.
2a
⌧
CAN
Node no.
2b
⌧
CAN
Node no.
2c
⌧
CAN
Node no.
2d
⌧
⌧
⌧
CAN
Node no.
2max
⌧
⌧
⌧
⌧
tracking
window
exceded
tracking
window
exceded
tracking
window
exceded
tracking
window
exceded
synchronformat
trigger
no
drive trouble
-
start offset
trigger
no
regulator
trouble
⌧
no
drive trouble
-
no
drive trouble
-
⌧
-
BIAS function is freely programmable in operating mode 5. - No function in operating modes 0 to 4.
Fast input for optimal timing.
With every row (from the top to the bottom) in which the function F2 is assigned to an input, the binary
value (2n) increases by 1. (See example)
Operating mode 4: Only numbers 0 - 9 are allowed to be set!
Only possible with module RP-CAN.
If the Option RP 2C8 / PC8 (See: Fieldbus - interface - COM2-COM3) is inserted, the contact functions
as described for the X10-plug are not valid. The inputs are freely programmable utilizing the BIAS
program.
07-02-12-02-EN-V0608.doc / Type: 638
3
3.4
Operating Mode
Functions Diagrams with Protection Mode “Switch Off”
In accordance with EASYRIDER® Windows – Software “Commissioning / Motor / Motor/30”
07-02-12-02-EN-V0608.doc / Type: 638
47
3
48
Operating Mode
07-02-12-02-EN-V0608.doc / Type: 638
4
4
4.1
Mechanical Installation
Mounting
In order to guarantee the best possible air circulation for the cooling unit, the servo drive should
only
be installed in a vertical position. The vertical installation above other systems or heat producing
units can cause overheating.
4.2
Control Cabinet Mounting
Installation should be carried out only in a control cabinet in which the inside is free from dust,
corrosive fumes, gases and liquids.
Make absolutely sure that the condensing of evaporating liquids including atmospheric moisture
is avoided. Should the digital servo drive be installed in a place where condensation is likely,
a suitable anti-condensation heater must be installed. The heater must be SWITCHED OFF during
normal operation.
Automatic switch off is recommended
The servo drives should not be installed in areas which have been classified as dangerous,
unless they have been installed in an approved enclosure and in accordance with applicable
regulations. In such an application double check all aspects of the installation.
Please pay attention during installation of the unit to provide for adequate space and ventilation!
(See: “■ Dimensions“)
General Rule:
It is better to place heat-producing devices low in an enclosure to support internal convection and
to spread out the heat. If placing such devices up high is unavoidable, enlarging the upper
dimensions at the expense of height or the installation of fans should be considered.
4.3
Cooling and Ventilation
The digital servo drives are inherently designed to protect against damage which may be caused
due to overheating. A temperature sensor is mounted on the heat sink. When the temperature
reaches a level above >95°C, the unit will be automatically shut-down.
This setting can not be altered.
The cooling of the power module will be assisted as much as possible with an internal fan.
Depending upon the temperature the fan unit will operate at one of two levels, in order to limit
unnecessary wear and potential pollution.
Make sure a cabinet of proper size is selected for adequate air circulation.
If the device is placed and operated in a non-ventilated environment, the case volume of the
specified control cabinet must be calculated in accordance with the following table!
Unit
638A01..- 638A06..
638B03..- 638B05
638B08..- 638B15
638C
Volume / Cabinet
0,12 m³
0,15 m³
0,25 m³
0,35 m³
For more specific information, please refer to the information provided by the manufacturer
of the cabinet.
07-02-12-02-EN-V0608.doc / Type: 638
49
5
Electrical Installation
5
Electrical Installation
5.1
Installation General
●
Safety
The voltages carried by power supply cables, motor cables, connectors, and certain parts of the
drive can cause serious electric shock and even death
●
Danger of Electric Shock
Caution !
Risk of electrical shock, wait 3 minutes after switching off, for discharging of the capacitors.
Disconnect the drive unit from the mains before working on it. A period of three minutes must
pass after switching off so that the internal capacitors can discharge completely. Until the
discharge
time is over, there can be dangerous voltage stored in the module !
Persons, who monitor or carry out electrical installation and maintenance must be adequately
qualified and schooled in these activities.
●
Dangerous Areas
The use of variable speed drives of all kinds can invalidate the certification for dangerous areas
(apparatus group and/or temperature class) of explosion-protected motors. Inspection and
certification for the complete installation of servo motors and electronic components must be
obtained.
●
Grounding - Safety Grounding
The grounding impedance must meet the requirements of local industrial safety regulations and
should be inspected and checked at appropriate and regular intervals
●
Ground Connections
It is recommended to attach a ground bus, made of high conductivity copper, as near as possible
to
the servo-rack or regulator modules in order to minimize the length of the cable run connections.
The recommended dimensions are:
Thickness: d = 5 to 6 mm
Length
Width
(m)
(mm)
< 0,5
20
0,5 < 1,0
40
1,0 < 1,5
50
d
b
grounding bus-bar
l
Due to increased discharge currents > DC 10mA resp. > AC 3,5mA the grounding connection of
the drive has to be connected 2 times. At power supply connector X60.7 and at the housing
grounding screw!
●
Short-Circuit Capacity and Discharge Currents
Due to the working principles of servo drives, there may discharge currents to the ground
exceeding DC 10mA resp. AC 3,5mA.
Suitable for use in a system capable of delivering not more than 5000 RMS symmetrical
amperes 240V (638A) or 480V (638B/C) maximum. (Note according to UL508C)
50
07-02-12-02-EN-V0608.doc / Type: 638
5
5.2
●
Electrical Installation
Power Mains Connection
Types of power mains
The 638 servo drives can be directly connected to TT- and TN-Systems
(TT- and TN-Systems are three-phase systems with grounded neutral).
When using the servo drive in IT mains (three-phase systems without grounded neutral),
isolation transformers must be used.
The secondary neutral must be grounded and connected to the 638 protective ground conductor.
General is valid, that with a phase-earth voltage (rated isolation voltage) > 300V AC the
isolation requirements (necessary clearance- and creapage distance, Test voltage, etc.)
Concerning the EC Low Voltage Guideline is not filled anymore and so that the CE conformity
is not given.
●
Mains supply voltage range 638A
The nominal supply voltage range is 1/3*230V AC +/-10%.
Respective intermediate transformers must be used for higher supply voltages.
With grounded power mains, autotransformers can also be used to adjust the voltage.
Neutral does not have to be connected for this type of transformer.
It is possible to use a lower supply voltage range. Note: In this case the internal DC–BUS capacity
may be not high enough (specially in 1 phase mains supply) and the user has to adjust the
undervoltage monitoring parameter of the drive.
●
Mains supply voltage range 638B/C
The nominal supply voltage range is 3*400 / 480 AC +/-10%.
It is possible to use a lower supply voltage range. Note: In this case the internal DC–BUS capacity
may be not high enough and the user has to adjust the undervoltage monitoring parameter of the
drive.
●
Protective Ground Connection (PE)
The following information concerning the protective ground connection corresponds to
EN 61800-5-1 Item 4.2.5.4.1and 4.2.5.4.2.
–
Cable cross section
The cross section for the protective ground conductor at X60 corresponds to the external
conductor.
The 638 servo drive is a devices with increased leakage current (larger than 3,5 mA AC or 10mA
DC). Therefore a second protective ground conductor must be connected at the case-groundbolt.
(with the same cross-section as the first protective ground conductor on X60).
●
Dimensioning of power mains cable and the over-current protection
The cross-section from the power main cable and the rated current for the over-current protection
should be dimensioned for the average current load to be expected.
In the supply line a protection about a protective circuit breaker or fuse shall be provided.
Circuit breakers with tripping-characteristic C or fuses with tripping-characteristic gM are to be
used.
One determines the load to be expected on the average as follows:
[ ]
1-phase supply: I mains A =
S [VA]
S [VA]
3-phase supply: I mains[ A] =
UNetz[V ]
3 × UNetz[V ]
The apparent power S can be calculated to that as follows:
S [VA] = Meff [Nm ]× k ×
2 × π × naverage[min − 1]
60
The constant k for the different servo drives can be taken from the following table:
07-02-12-02-EN-V0608.doc / Type: 638
51
5
Electrical Installation
Type
constant k
638A-1A
1,4
638A-2A
1,22
638A-4A
1,22
638A-6A
1,2
Type
constant k
638B-03
1,29
638B-05
1,13
638B-08
1,13
638B-10
1,11
638B-15
1,08
When information about load torque, Inertia and the friction-situation be there, the effective
momentum is calculated with following formula:
(in case of correct motor dimensioning also the rated torque of the employed motor can be used):
M eff [ Nm ] =
1
T cycle [s ]
×
∑ M [Nm ]2 × t [s ]
i
i
i
For the determination of naverage there must be corresponding information about the positioningcycle.
naverage[min − 1] =
1
Tcycle[s ]
× ∑ ni[min − 1] × ti[s ]
i
The cross section of the power main cable and the rated current of the used fuse are chosen in
accordance with table "Current-carrying capacity of PVC isolated three-phase cable or single
conductors" so, that the permissible current-carrying capacity of the chosen cross section larger or
alike to the calculated main current. With drive groups this is the sum of the main currents.
Icurrent-carrying capacity ≥
Imain
Icurrent-carrying capacity ≥
∑Imain
The rated current of the fuse must be equal to or less than the permissible current-carrying
capacity of the chosen cross sectional cable.
IR ≤ Icurrent-carrying capacity IR ≤ ∑Icurrent-carrying capacity
The following table show the maximum current load of PVC insulated three-phase cables (or
conducting wires) according to IEC60204-1 at 40°C environmental temperature and 70°C
maximum conductor temperature.
Line cross section
[mm2]
0,75
1,0
1,5
2,5
4,0
6,0
10
16
Individual wires
in insulating
conduit or
cable duct
B1
[Aeff]
7,6
10,4
13,5
18,3
25
32
44
60
Cable in
insulating
conduit or
cable duct
B2
[Aeff]
Cable on walls
Cable in a
cable tray
C
[Aeff]
E
[Aeff]
9,6
12,2
16,5
23
40
40
53
11,7
15,2
21
28
36
50
66
11,5
16,1
22
30
37
52
70
When determinating the cross section for he power mains, make sure that the cross section
selected is within the range that can be used with power mains terminal X60. See Assignments
Power Connections.
–
52
Dimensioning the Line Contactor
The rated current of the line conductor is oriented to the over-current for the power mains
connection.
The line contactor is set up so that nominal operating current specified by the manufacturer of the
line contactor for catergory AC-1 is approximately 1.3 times the rated current of the over current
protection.
07-02-12-02-EN-V0608.doc / Type: 638
5
●
Electrical Installation
Fault Current Protection
Servo Drive of the 638series can cause a DC current in protective grounding.
Where for the protection in case of a direct or indirect contact residual current device (RCD)
is used, only a RCD of the type B (AC-DC sensitive) is permissible on the current supply side.
If is permissible for application should types with increased trip current (300mA) and/or.
short time-delayed to be used.
A another preventive measure must be used, e.g. separation from the environment by double or
reinforced insulation or separation from the public supply system by a transformer.
–
Rated Fault Current
Line filters have high discharge currents due to intern capacities.
In the servo drive of the series 638 an intern line filter is integrated.
Additional discharge currents are caused by the capacities of the Motor cable
and the motor winding.
Through the PWM frequency of the Inverter the leakage
current have high frequently rates.
The suitability of the RCD is to test for the respective application.
Generally we do not recommend the operation with RCD’s.
The value of the leakage current depends on the following points:
Lenght and characteristic of the motorcable
PWM-Frequency
Operation with or without shielding
How and where is the motor housing grounded
Comment:
High fault currents can occur:
Extreme unbalance factor of the three phase system.
When connecting to the power mains
(short-term single- or two-phase operation because of contact chatter on the line contactor)
Estimation:
Single-phase or two-phase operation (as
intermediate state when switching on the line
contactor):
IA[A] =
UNetz[V ]× 2 × π × fNetz[Hz ]× CA[F ]
Single-phase operation with neutral line:
IA[ A] =
UNetz[V ]× 2 × π × fNetz[Hz ]× CA[F ]
2× 3
3
The discharge capacitance CA the various 638 Servo Drives can be taken from the following table:
Servo Drives
Filter
638A-01..06
638A-01..06
638A-01..06A
LNF RA-230/12
1phase
3phase
1/3phase
1phasig
(JP 600 open)
Discharge
230nF
277nF
136nF
10nF
capacitance
-
Servo Drives
638B03..15
3phasig
1610nF
638B03..15 x A
3phasig
200nF
Discharge
capacitance
Recommendation:
For less leakage current operation with 1phase supply it can be recommended the following
combination. Use a Servo Drive with the optional Version 638Axx-3-A 1) and a low leakage linefilter Typ LNF RA *230/12.
1)
AC-sided Y-Capacitance deactive (JP600 open, see chapter Jumper)
When several 638A servo drives operates with 1phase supply and 3 phase are available in the
machine, the drives should be divided similar on the 3 phases so that the charging currents
obliterate mutually when the system is powered up.
Note:
It only allowed, to connect the DC-Link Voltage between drives which are
connected to the same phase or which have 3 phase supply.
07-02-12-02-EN-V0608.doc / Type: 638
53
5
Electrical Installation
5.3
●
DC Link Parallel Connection
General
With the operation of a group of drives it is possible to couple the DC link circuit of the 638 Drives.
Advantages:
Positive energy balancing - utilization of braking energy, with energy equalization achieved
through the DC link
Smaller load on the ballast resistors
Increased DC link capacity through smaller residual rippling, specifically with single phase
applications
Increase of the internal ballast peak performance
Increase of the internal ballast continuous power rating
Internal unit balancing resistance provides for a uniform rectifier load sharing with a parallel
incoming power supply
●
Variation 1; Servo Drives without DC LINK protection
Block Diagram 1
Advantage:
no DC-fuses necessary.
Disadvantage:
Sum of power limited by line fuse.
54
07-02-12-02-EN-V0608.doc / Type: 638
5
●
Electrical Installation
Variation 2; Servo Drives with DC LINK protection
Block Diagram 2
Advantage:
Sum of power not limited by line fuse.
Disadvantage:
DC-fuses necessary.
07-02-12-02-EN-V0608.doc / Type: 638
55
5
●
Electrical Installation
Function Softstart
When switch on the supply voltage the DC link capacities become over a resistance loaded.
Attain the undervoltage threshold + constant waiting period (2,4s) that becomes charging resistor
by
a relay bridges. The operating status „undervoltage “changes at the same time in „ready“.
When switching the supply voltage off the soft starting function becomes only after falling below
undervoltage threshold again actively. It is therefore particularly with intermediate circuit-coupled
Drives importantly before restarting the supply voltage to wait to those under voltage threshold is
reached.
Up to standard undervoltage threshold of 160V the unchargeing time for the 6A-Drives
is approx. 30 seconds.
Uncharging time to undervoltage threshold (160V) see table:
Typ
time
●
638A01..06
max. 30sec.
638B03..05
max. 28sec.
638B08..15
max.42sec.
638C
being prepared
Installation Instructions and Warnings
The DC-Link connections of the Series 638 are not short circuit - and earth fault proof and not
protected against polarity reversal. A short circuit on the DC-Bus wires can be damage the
rectifier in the Device.
In order to protect the rectifier also in the circuit variant 1, mains fuses of the class gRL must
be set in. These are fuses with combined protection for wires and semiconductors.
With a common DC link bus, one should employ the 638A Series of Servo Drives exclusively.
Drives which are located immediately next to each other, within the same control cabinet,
should be carefully arranged with the DC links being made employing a short wire connection.
Note:
Connect maximum 4 Servo drives together.
Note:
Units should be turned on together as shown. (Contactor K1)
Switching delays can endanger the function of the rectifier and the
“soft-power-up-circuitry“, (wear effect).
Note:
The failure of individual AC fuses can go unnoticed as the power continues
to be delivered through the DC-bus of the units connected in parallel.
Regular checks of the fuses are therefore strongly recommended.
Note:
Careful planning and wiring are imperative!
A short-circuit on DC bus link connections can cause serious damage to the
rectifiers and drives.
Note:
With single phase power-supply at 638A Devices it is recommended that only
the same phase is used for all coupled drives. The connection of different
phases generates a DC-Link voltage of 565V DC! This can damage the
devices.
56
07-02-12-02-EN-V0608.doc / Type: 638
5
●
Electrical Installation
Layout of the Ballast Capacity
Energy, which is produced by the electrical brake motor, will be fed into the DC link and then
through the DC link coupling to serve other motors within the sequence. Only a portion of the
energy which is produced in this manner leads to an increase in the DC link voltage and will then,
at a specified voltage threshold, be converted to heat and released through the units’ internal or
external ballast. Therefore, an energy exchange occurs between the units, creating a positive
energy balancing and overall work load balance of the ballast switches. A significant reduction
factor in the load can be anticipated, depending upon the specifics of the installation.
Layout Step by Step (without reduction factors)
Addition of all internal unit ballast continuous ratings
Addition of all internal unit ballast peak performance
ratings
For information concerning the required data and
design layout of the ballast resistance: See Chapter
“● Layout of the Ballast Resistance“
Arrange the external ballast resistance with regard
for the braking power occurrence, if possible.
Remarks
The load on the internal ballast will
be evenly divided between all of the
units connected in parallel.
v
07-02-12-02-EN-V0608.doc / Type: 638
57
5
Electrical Installation
5.4
Fuses , Contactors
●
638A
Servo - Driver
Fuse, Contactor
FI – Switch
Input Supply Current
1 phase
Input Supply Current
3 phase
Fusible cut-out VDE
Automatic circuit breaker VDE
Fusible cut-out UL
Line contactor
Fusible cut-out
DC-link resp. AC-supply
variant 1
●
1) [A]
1) [A]
638A02..
Not recommended
2, 8
4,7
1,6
2,7
638A04..
638A06..
9,4
11
5,4
7,8
Type 6..16A gG 6..16A gG 10..16A gG 16A gG
Type B6A..16A B6A..16A B10A..16A
B16A
2) Type 6A..15A
6A..15A
10..15A
15A
3) Type DILM7
DILM7
DILM7
DILM7
4) Type 10A..16A 10A..16A
10A..16A 10A..16A
gRL
gRL
gRL
gRL
638B
Servo - Driver
Fuse, Contactor
FI – Switch
Input Supply Current
3 phase
Fusible cut-out VDE
Automatic circuit breaker VDE
Fusible cut-out UL
Line contactor
Fusible cut-out
DC-link resp. AC-supply
variant 1
●
638A01..
638B03..
1) [A]
638B05..
Not recommended.
3,2
5,6
638B08..
8,5
638B10.. 638B15..
8,9
Type 6..16A gG 6..16A gG 10..16A gG 16A gG
Type B6A..16A B6A..16A B10A..16A
B16A
2) Type 6A..15A
6A..15A
10..15A
15A
3) Type DILM7
DILM7
DILM12
DILM15
4) Type 10A..30A 10A..30A 10A..30A 16..30A
gRL
gRL
gRL
gRL
11,4
16A gG
B16A
15A
DILM15
16A..30A
gRL
638C
Servo Drive
Fuse, Contactor e
FI – Switch
Input Supply Current
3 phase
Fusible cut-out VDE
Automatic circuit breaker VDE
Fusible cut-out UL
Line contactor
Fusible cut-out
DC-link resp. AC-supply
variant 1
638Cxx
1) [A]
638Cxx
Not recommended
xx
xx
Type 32A gG
Type B32A
2) Type
35A
3) Type DILM32
4) Type 32A gRL
40A gG
B40A
40A
DILM40
40A gRL
1)
2)
3)
4)
At maximum output voltage and rated current.
UL listed (JDDZ) Fusible cut-out Class K5 or H, or rather UL listed (JDRX) Class H.
Recommended e.g. Klöckner Moeller
Class gRL are fuese with combient protect for Cable and Semiconductor.
e.g. Fa. SIBA Sicherungs-Bau GmbH
Serie 60 034.34.16; Fuseholder 5106304.x (up to 30A)
Serie 50124.34.xx, Fuseholder 5105804.3 (up to 40A)
If these fuses are used, the mains voltage may only be switched on, when the Softstart - function is
active. (Device in Undervoltage operating state).
58
07-02-12-02-EN-V0608.doc / Type: 638
5
5.5
●
Electrical Installation
Brake Resistor
Selection of the Brake Resistor
When employing a breaking mechanism with an operating motor driven system, the contained
energy flows back into the drive. The capacitors within the motor can absorb a small portion of the
excess energy. The rest of the energy must be dissipated through a resistor in heat. The activation
of the Brake Resistor occurs, depending upon the voltage threshold. The resistance load is
electronically simulated and monitored by our software (EASYRIDER® Windows - Software).
Peak power (Pmax) and continuous power output (Pd) must be configured so that the specific
requirements of the application are fulfilled.
The general rule for resistance measurements is as follows: Pmax / Pd <= 59.
RPM
n1
I [A]
Ib
Movement
Definition of Data
T
tb1
t [sec]
t [sec]
Braking-Current
Speed at Brake-Start
Braking Time
Cycle-Time
Total Inertia
Braking-Current
Motor-Resistance
Cable-Resistance
Values for Example
n1 = 3000 RPM
tb1 = 0,1 sec.
T = 2,0 sec.
J = 0,0005 kgm²
Ib = 3,2 A
Rph = 3,6 Ohm
RL = 0,3 Ohm
Selection
Step 1
Example
Evaluation of the Brake Capacity
(Approximation without capacitor load,
friction and drive power loss)
Power of Motion:
Pkin = 0,0055 * J * n1² / tb1 [W]
Pkin = 0,0055 * 0,0005 * 3000²/0,1
Pkin = 247 W
Pvmot = 3,2² * (3,6 + 0,3)
Pvmot = 40 W
Motor Power Loss:
Pvmot = Ib² * (Rph + RL) [W]
Continuous Power:
Pd = 0,9 * (Pkin-Pvmot) * tb1 / T [W]
Pd = 0,9 * (247 - 40) * 0,1 / 2
Pd = 9,3 W
Peak Power:
Pmax = ( 1,8 * Pkin ) - Pvmot [W]
Pmax = (1,8 * 247) - 40
Pmax = 405 W
Measurements Used:
J
Total Inertia [kgm²]
n1
RPM at Start of Braking [RPM]
tb1
Braking Time [Sec]
T
Cycle Time [Sec]
Ib
Motor Braking Current [A]
Rph Motor Resistance (terminal/ terminal ) [Ω]
RL
Cable Resistance of the Power Cable [Ω]
07-02-12-02-EN-V0608.doc / Type: 638
59
5
Electrical Installation
Example-Drive Type:
638
Step 2
Is internal and/or external Brake Resistor required ?
Is the internal Brake Resistor sufficient or is no internal
resistance available? Should no resistance be available
then appropriately sized external Brake Resistor can be
employed to meet system requirements according to the
table (See below),
Overall Rating:
Internal Resistance:
Continuous Power Pd = 20W
Peak Power Pmax = 0,83kW
Requirement:
Pd = 9,3W Pmax = 405W
Result: The internal
configuration is sufficient
External and internal resistance can be employed in a
parallel configuration. In this case the internal and external
capacities can be added together.
Selection Brake Resistor
Only Parker or by our released ballast resistors used !
Servo Drives
Possible Brake Resistor
638A01.. / 638A02.. / 638A04.. / 638A06..
33R 100W
638B033.. / 638B053..
100R 100W, 56R 200W
638B036.. / 638B056..
100R 100W
638B037.. / 638B057..
100R 100W
638B083..
100R 100W, 56R 200W, 36R 300W, 33R 300W
638B086..
100R 100W,
638B087..
100R 100W
638B106.. / 638B156..
100R 100W, 56R 200W, 36R 300W, 33R 300W
638B107.. / 638B157..
100R 100W, 56R 200W, 36R 300W, 33R 300W
638C..
●
being prepared
Configuration of the Brake Resistor
Brake Resistor Circuit Configurations
1. Activate Electronic Resistance:
The electronic resistance will be activated. “Activate Brake Resistor = Y“
(Default - setting)
2. Switching Threshold:
The switching threshold is to be selected.
“Ucc Brake Resistor On = 375V“ for a 230V AC incoming power supply (Default - setting)
“Ucc Brake Resistor On = 375V“ for a 400V AC incoming power supply (Default - setting)
“Ucc Brake Resistor On = 375V“ for a 480V AC incoming power supply (Default - setting)
3. Resistance Value:
The total resistance value is determined by the selection of both the internal and external
brake resistor values which are combined to provide the overall parallel resistance.
When the brake resistors deviate from the table ”Selection Brake Resistor”, it should be noted
that the minimal external resistance value of the controller is not undercut.
(see ■ Technical Unit Data).
4. Rated Power:
The brake resistor performance rating is determined by the sum of the selected internal and
external brake resistor capacity values.
When the brake resistors deviate from the table ”Selection Brake Resistor”, it should be noted
that the minimal external resistance value of the controller is not undercut.
(see ■ Technical Unit Data).
Note:
The somewhat similar ratio of Pd – continuous power rating to Pmax – peak
power rating is a prerequisite for the correct monitoring of the brake resistor
employed in a parallel configuration.
This is guaranteed with the standard design configurations.
60
07-02-12-02-EN-V0608.doc / Type: 638
5
Electrical Installation
Example for 638A:
EASYRIDER
Determination of the resistance values through the employment of both internal and external
resistors.
Internal “Brake Resistor = 170 Ohm“
External “Brake Resistor = 33 Ohm“
Formula :
1
1
1
=
+
Rges. R int . Rext.
1
1
1
=
+
⇒ Rges. = 27,6Ω
Rges. 170Ω 33Ω
Selected Resistance Value = 27,6 Ohm
Determination of the brake resistor rating through the employment of both the internal and external
brake resistor ratings
Internal “Brake Resistor Rating = 20 Watt“
External “Brake Resistor Rating = 100 Watt“
Formula : Pges. = Pint. + Pext.
Pges. = 20W + 100W ⇒ Pges. = 120W
Selected Power Rating = 120 Watt
CAUTION!
Installation of External Brake Resistors
Brake resistors create heat !
The Brake Resistor must therefore be installed in a manner which provides safeguards against the
potential danger of inadvertent touching or the danger of fire, during both normal operations and
under fault conditions.
07-02-12-02-EN-V0608.doc / Type: 638
61
6
Wiring Instructions
6
Wiring Instructions
6.1
General Wiring Instructions
●
General Information
Digital servo drives are designed for operation in metallic grounded enclosures.
For problem free operation, as well as for the observance of all regulations,
the drive unit back must be connected with the cabinet mounting plate electrically and fixed.
●
Control Cabling
Recommended cross section 0,25 mm².The control signal lines must be laid seperately from
the power signal lines: See “● Hints for Mounting“
The resolver cable must contain three shielded pairs and must be shielded as a whole.
The shielding should be connected to the ground spread out on the drive side.
We recommend using the resolver cable KIR.
Cables utilized for transmitting data must always be shielded !
●
Power Cabling
Recommended selection according to rated current. Use only 75° Cu-cables.
●
Analog Setpoint
The setpoint input is a differential input. Therefore the poling can be configured depending upon
the application requirements.
Important: the setpoint voltage must be galvanically connected to the reference potential of the
control connections (plug X10). It is possible to connect one pole directly to the ground, GND.
●
Safety Rules
Caution !
Plug / Unplug all mating connector is only allowed :
• Power Supply off
• Control Voltage off
• DC – Link discharge (discharge time > 3 minutes)
• The user must ensure protection against accidental touching
62
07-02-12-02-EN-V0608.doc / Type: 638
6
6.1
Wiring Instructions
Electromagnetic Compatibility (EMC)
Conformity, in accordance with the EEC Directive 89/336/EEC has been evaluated using a referencesystem, consisting of a compact type drive and a line-filter on mounting-plate, connected to an
AC-synchronous motor. The motor cable is mainly responsible for EMC emissions. The motor cable
must be installed therefore employing exceptional care. The layout of grounding is very important.
Grounding has to be low-impedance for high frequencies. That means, all ground connecting parts
have to be connected over a large surface contact area. The measurements provided are valid only
with the use of our cables, suppression aids and line filters and by application of the following wiring
instructions:
●
Hints for Mounting
A
B
C
D
E
All components are mounted inside of
a steel control cubicle on a mounting plate
(min. thickness 3mm).
Recommended: Galvanized
3mm
The connection between the drive housing, the filter
housing and the mounting plate must be bare metal
and not reduced by varnish.
All screws must be properly tightened !
Use only our filters and cables for motor and
resolver connections.
Place all wires and cables as close as possible to
grounded metal parts.
Separate power and control cables.
Minimum distance: 0,3m
Cross Points: 90°
F
Avoid cable loops. The run between the line-filter and
drive has to be as close and short as possible (drilled).
G
Maintain the shielding as close as possible to the
cable-end (max distance 8 cm).
H
I
Connect shielded connections according to general
view of connections: See chapter 2.1. Ground shielding
on both sides, with the shortest possible cable run.
For long cables: Connect additional shielded areas
along the way.
Connect the shielded area to well grounded points.
K
Connect unused wires in cables to the ground.
L
Install control cables close to grounded metal parts or
shielding when leaving the control cubicle
Pay close attention to the grounding of controltransformer (DC 24V). Use a transformer with a metal
socket and pay attention to provide for good conductive
contact on mounting plate.
Pay close attention to the overall grounding of the
complete system. Interconnect several mounting plates
using copper rails or copper band. Pay attention to the
ground connection between the control cabinet and the
equipment !
0,3 m
90°
8 cm max
M
N
07-02-12-02-EN-V0608.doc / Type: 638
63
6
●
Wiring Instructions
Example for Mounting
X61 Motor Connector Wiring:
64
07-02-12-02-EN-V0608.doc / Type: 638
7
Hardware Configuration
7
Hardware Configuration
7.1
Jumpers
All jumpers are set to a standard preset !
JP100, Bridged Pad
2 and 3 (standard)
1 and 3
JP101, Bridged Pad.
2 and 3 (standard)
1 and 3
READY contact with reference to common
output supply voltage on X10.21
READY contact can be freely wired
Analog input X10.19 without internal pull-up.
Analog input X10.19 with internal pull-up
to +12 V
JP1, JP2, Bridged Pad
2 and 3 (standard)
1 and 3
Adjust identically !!
X10.15 = high active
X10.15 = low active
JP3, JP4, Bridged Pad
2 and 3 (standard)
1 and 3
Adjust identically !
X10.14 = high active
X10.14 = low active
JP2.8, JP2.3, JP2.7,
JP2.2
Open
Close
JP600
Open
Close
Default, RP -CAN, -DEV, -2CA, -2C8,-CC8,
-CCA, -PDP, -PC8, -PCA,
RP -232, -422, -485, -IBS, -EA5, -SUC
Default
Minimal current leakage with external
filter operation
07-02-12-02-EN-V0608.doc / Type: 638
65
7
●
Hardware Configuration
Power Board Layout Plan 638A
View solder side (solder jumper)
●
Power Board Layout Plan 638B/C
View solder side (solder jumper)
66
07-02-12-02-EN-V0608.doc / Type: 638
8
Commissoning
8
Commissoning
8.1
Commissioning Preparation
Caution !
Improper installation conditions and/or wiring can cause uncontrolled
movement and operation of the equipment.
Please carefully observe all safety instructions and regulations for the
protection of both the equipment and personnel!
It is recommended that one utilize the EASYRIDER® Windows - Software Program for the
initial set-up of the equipment. This program communicates through the serial interface of the
computer to the attached drive.
Information concerning the operation of the EASYRIDER® software is discussed in this
chapter. We suggest that the software be first run in the “Simulation“ mode in order for the
user to become familiar with and comfortable the system. The EASYRIDER®
Windows - Software also provides for additional interactive “Help” functions.
Due to security concerns some of the Menus are password protected.
The set up and start up of the equipment must be carried out by qualified personnel only.
The installation must be performed taking into consideration all of the specific safety
regulations and security related functions, concerning the equipment.
Double check all safety and security related items, including the limit switch.
The conformity of the motor feedback system and the X300 feedback module built-in to the
drive must be checked by examining the name plates on the equipment.
For the initial equipment start up involving critical applications, we recommend that a test be
run without the mechanical connection being made. If problems do arise then they can be
solved without risk of damage to any other attached equipment.
An experienced installer does have the possibility of tailoring the installation to meet the
specific application requirements, provided that he/she assumes all of the responsibility for
any
alterations or deviations from the prescribed installation instructions.
07-02-12-02-EN-V0608.doc / Type: 638
67
8
Commissoning
8.2
Step
: Wiring and Communications Test
Action, Function
1.1
1
1.2
#
1.3
Anticipated Result
Before Starting the Equipment!
Check the wiring; in particular:
supply voltage, incoming powerline,
motor wiring, motor polarity,
feedback system, (Resolver; HIPERFACE® etc.),
polarity Sine / Cosine etc.
First uncouple the motor shaft, before
addressing critical mechanical problems.
Connection of the Diagnostic Interface Link for
the Drive - COM1 RS232 Connection to the PC
and start EASYRIDER Windows Software.
Remark,
Cause of Fault
Condition
638 Connector
Assignment
Electrical Installation
Wiring Instructions
Model Code
-
Limitation of potential danger
EASYRIDER for Windows
Software Start side:
EASYRIDER Software
Cable Interface
USB RS232 Adapter
¢
1.4
Settings for the Connected COM Ports
With the PC in Options
Menu select „Interface Selection“.
The selected COM Port is shown
on the lower right hand corner of
the window of the EASYRIDER for
Windows Software
The available
connections to the PC
are shown in the Device
Manager under System
Control
1.5
Supply Voltage US = 24V DC
through X01-Connection to the system.
7 Segment Display:
Pin Assignments for the
Power Supply
Connection X01
¢
1.6
7 Segment Display
Symbol:
Check the communications connections and
functions by utilizing the Diagnosis window or by
employing the F9 button on the keyboard.
On to Step
68
EASYRIDER Diagnosis Window:
☺ 5
07-02-12-02-EN-V0608.doc / Type: 638
It is always the last
window where settings
have been made which
will be opened!
8
8.3
Commissoning
Step
. :Feedback Test and Motor Selection
Action, Function
2.1.1
1
Anticipated Result
638 X30
Connector Assignment
Prerequisite:
Step
The feedback sensor is
connected to the 638 Drive
through the X30 connection port.
Optionally. Temperature sensor
and/or Brakre are connected to the
X62 connector.
(with X62 Thermo notice Step
2.2.3
2.1.2
2.1.3
Remark,
Cause of Fault
Condition
Make the X30 connection to the drive
only when the power supply is
disconnected!
638 X62
Connector Assignment
Eliminate the risk of a short circuit!
Check the counter function by looking at the
Actual Position Locator – Display 1 under the
Drive Diagnosis window of the EASYRIDER
Software and the movement of the
motor shaft. 34. - with linear motors the
movement of the rotor.
07-02-12-02-EN-V0608.doc / Type: 638
When employing a motor
with a brake, make
certain that the brake is
opened
69
8
●
Commissoning
Step 2.2 Motor Selection
Action, Function
Remark,
Cause of Fault
Condition
Anticipated Result
638 X61
Connector Assignment
2.2.1
Prerequisite:
1
The motor cable is connected to
the 638 Drive through the X61
connection port
2.2.2
In the EASYRIDER configuration menu for
„Motor“, select Motor Library and then scroll down
to the appropriate motor utilizing the motor type
information as listed on the name plate.
2.2.3
Optionally: select temperature sensor
Step
-
When employing motors
from other manufacturers
it is possible to input and
store the specific motor
characteristics in the
Customer Motor Library.
Select the temperature sensor
connection
X30 or X62 in EASYRIDER.
638 X30
Connector Assignment
or
638 X62
Connector Assignment
Default : X30
2.2.4
70
In the EASYRIDER configuration menu for
„Motor“, send the selected motor information on
to the drive and save the selection.
-
07-02-12-02-EN-V0608.doc / Type: 638
8
Commissoning
●
Step 2.3 Motor with Resolver Feedback
Action, Function
2.3
☺ 5
Step 2.4 Motor with HIPERFACE Feedback
Action, Function
2.4
Remark,
Cause of Fault
Condition
With standard motors, equipped with Resolver
Feedback, when the unit is properly wired and the
proper motor is selected, no additional action is
required. For every360° motor shaft turn a
position value of 216 = 65536 pulses is sensed.
On to Step
●
Anticipated Result
Anticipated Result
Remark,
Cause of Fault
Condition
The characteristics of the HIPERFACE –
Feedback System, as the absolute measuring
device (multi-turn provider), allows for 2 additional
parameter settings.
1. Selection of the position location, per rotation
16 or 20 bit.
2. Selection of the absolute position value
according to the connection between the motor
and the mechanical component.
Note: It is necessary to initially provide the angular
commutation parameter value as the absolute
value for the HIPERFACE provider, when
employing a motor from another manufacturer with
HIPERFACE- Feedback
On to Step
●
☺ 5
Step 2.5 Motor with SIN-COS Feedback Linear Motor
Action, Function
2.5
Anticipated Result
Remark,
Cause of Fault
Condition
Additional settings are required with the
employment of this variation, which are described
in the following section:
Step 4.2. Optimization Linear Motors .
On to Step
☺ 5
07-02-12-02-EN-V0608.doc / Type: 638
71
8
Commissoning
8.4
Step
●
: Power Up and Drive Activation
Step 3.1 Power Up
Action, Function
3.1.1
1
3.1.2
3.1.3
X60 Connector
Assignment
Prerequisite:
Step
+
The power supply is connected to
the X60 connection of the 638
Drive.
Establish the X60 connection, when
lacking, only when the drive system is not
connected to the power supply!
Terminals 1 and 4 on the
X11 STO connection
should be set at 0 V.
3.1.4
Turn on the power and check the voltage in the
Drive Diagnostic Menu.
●
Step 3.2 Drive Activation
Action, Function
3.2.1
3.2.2
Remark,
Cause of Fault
Condition
Anticipated Result
It is necessary to make additional settings
as described in Step 4.2 Optimization
Linear Motor, when employing a motor
with a Sin/Cos Feedback system.
Terminals 1 and 4 on the X11 STO connection
should be set at 24 V.
In the event that no fault condition arises
On to Step
-
In order to eliminate the risk of a
short circuit!
The drive remains in a nonactivated condition even after the
power is connected.
The drive will show a DC link
voltage Ucc of approx. 325 V DC
with an incoming supply of 230 V
AC, in a non-activated condition.
X11 Connector
Assignment
STO = Safe Torque Off
7 Segment Display:
Remark,
Cause of Fault
Condition
Anticipated Result
In the event that the Feedback
System = Sin/Cos
On to Step 4.2
Driver – power stage is
activated and the 7
segment display shows:
X11 Connector
Assignment
The drive is now set in the
operations mode
(Delivery condition; Speed control
set to the analog setpoint)
The motor shaft can be
set to turn slower through
the 0-V offset setting of
the analog setpoint input.
☺ 5
Further function test from the STO – terminal, as per statement in chapter
Safe Torque Off.
Otherwise
3.2.3
With unanticipated operation or overheating
of the motor, turn off the drive and attempt
to locate the cause of the problem. Identify
and rectify the fault condition.
and perform Step
72
again
07-02-12-02-EN-V0608.doc / Type: 638
Diagnosis and
Troubleshooting
8
8.5
●
Commissoning
: Control Loop Optimization
Step
Step 4.1 Control Loop Optimization with Rotary Motors
Action, Function
4.1.1
+
Remark,
Cause of Fault
Condition
☺ 5
Prerequisite:
Step
4.1.2
Anticipated Result
+
In the EASYRIDER Commissioning Menu select
„Speed Controller“
Check the speed and power
variation characteristics utilizing
an oscilloscope and through the
adjustment of the P and I
sections set the parameters for
the control rigidity.
and with F8=Start the Test Generator.
4.1.3
#
Attach the mechanical component with
the motor shaft.
4.1.4
Perform step 4.1.2 again
Pay attention with linear motion!
The speed generator is
controlled by time and
recognizes no parameters
unless
the limit switch is configured!
4.1.5
Within the EASYRIDER Commissioning Menu
select „Position Control“, when employing the
position control settings.
Check the speed, power
variation
and control deviation
characteristics utilizing an
oscilloscope and through the
adjustment of the P, I and V
sections set the parameters for
the power control rigidity.
Set the position and speed, with F8=Start the
Test Generator.
On to Step
☺ 5
07-02-12-02-EN-V0608.doc / Type: 638
73
8
●
Commissoning
Step 4.2 Control Loop Optimization with Linear Motors
Step
4.2.1
Action, Function
Anticipated Result
☺ 5
Prerequisite:
Step
+
Remark,
Cause of Fault
Condition
+
Under
Construction!!!
On to Step
74
☺ 5
07-02-12-02-EN-V0608.doc / Type: 638
8
8.6
Commissoning
Step
: Operation Mode Selection
Action, Function
5.1
+
+
+
In the EASYRIDER configuration menu, select
„General“ and then select the appropriate
operating mode.
With the selection of the
operating mode, one must also
select additional settings.
For example:
* On/Off Configuration
* Analog Setpoint Selection
and Integrator
* Position Blocks
* BIAS Program
* Fieldbus Interface
On to Step
Remark,
Cause of Fault
Condition
☺ 5
Prerequisite:
Step
5.2
Anticipated Result
Additional information
and assistance is
available through the
utilization of the online
help for
EASYRIDER Software.
☺ 5
07-02-12-02-EN-V0608.doc / Type: 638
75
8
Commissoning
8.7
Step
: Fieldbus Interface
Action, Function
6.1
☺ 5
Prerequisite:
Step
+
+
6.2
The overall system commissioning and the
communications test of the fieldbus interface are
dependent upon the interface configuration of the
drive. If there is not an options board connected
then there are no more additional settings required,
and one can move on to Step 7.
6.3.
In the configurations menu, under „Fieldbus“
additional settings may be required, depending
upon the connection interface for the fieldbus
board.
On to Step
76
Anticipated Result
Additional information
concerning
start up procedure for the
fieldbus
interface connection can be
found
in the handbook about the
Options
Board.
☺ 5
07-02-12-02-EN-V0608.doc / Type: 638
Remark,
Cause of Fault
Condition
8
8.8
Commissoning
Step
: Data Save
Action, Function
7.1
Anticipated Result
☺ 5
Prerequisite:
Step
+
+
+
+
Remark,
Cause of Fault
Condition
+
7.2
Read the parameters shown in the EASYRIDER Data Menu
under „Drive Parameters“.
7.2
In the Menu, under commands select „Save Data on the Drive“
07-02-12-02-EN-V0608.doc / Type: 638
77
8
Commissoning
7.3
In the Menu under Data, select „Save As“ , to save the drive
parameters on the computer, utilizing the file suffix *.wdd .
First system start up procedure
Steps
+
+
+
+
+
+
successfully accomplished.
78
07-02-12-02-EN-V0608.doc / Type: 638
☺ 5
9
Safe Torque Off (STO)
9
Safe Torque Off (STO)
9.1
General Introduction
The following documentation is meant to provide the basic information concerning our drive
controller and an understanding about the advanced, safety oriented machine construction.
References to standards or other regulations are made in a general overview manner. The
specific
standards or regulations for your installation will vary depending upon the equipment employed
and
the specifics of your application.
For more information we suggest referring to specific technical literature, for example:
BIA-Report 6/97 and BIA-Report 5/2003 (Information of the German Professional Trade
Association).
These reports can be downloaded from: http://www.hvbg.de/d/bia/pub/rep/index.html
●
Important Technical Terms and Explanations
Term
Explanation
Safety Category 3
Performance Level d
according to EN 13849-1
Definition according to the regulation:
Circuit with built-in protective functions for individual fault conditions.
Some, but not all faults will be recognized.
The frequent occurrence of fault conditions can lead to a loss of the safety functions.
The remainder of the risk must be understood and accepted.
The determination for the application of the appropriate safety category requirements,
(risk analysis), lies with the installer and operator of the equipment.
You can reference the method described in EN13849-1:1996, Appendix B,
as an example.
Definition according to the regulation
The safety related parts must be designed in a way, that a single fault condition in
each safety related part will not guide to loss of the safety function and the single fault
will be detected before or on next demand of the safety function.
If this is not possible, ab accumulation of faults should not a lead to the loss of the
safety function.
The determination for the application of the appropriate safety category requirements,
(risk analysis), lies with the installer and operator of the equipment.
You can reference the method described in EN13849-1:1996, Appendix B,
as an example.
Safety Category 4
Performance Level e
according to EN 13849-1
‚Safe Stop’
or alternatively:
‚Safe Torque Off’
or abbreviated as:
With the activation of “Safe Torque Off“, the energy supply to the drive is definitively
interrupted, according to the requirements of EN1037, section 4.1. The drive unit is
not allowed to rotate and will therefore not be able to generate any dangerous
rotational movements, (See EN 1037, section 5.3.1.3).
The stopping position must not be monitored.
Should there be the potential of an outside energy source affecting the drive and STO
function, for example the dropping of a hanging load, then additional action needs to
be taken to guarantee that no additional movement takes place, (i.e. installation of a
mechanical brake).
STO
Start-Up Lockout
The following measures are appropriate for incorporation with ”Safe Torque Off”:
Protection between power connection and the drive system
(Line Fault Protection)
Protection between the power unit and the motor (Motor Protection)
Protected lock of the control of the solid state power component
( Start-up Lockout)
Protected lock of the control of the solid state power component.
With help of this function one can establish the activation of the “Safe Torque Off”.
07-02-12-02-EN-V0608.doc / Type: 638
79
9
Safe Torque Off (STO)
●
Stop Category according to EN 60204-1 (Chapter. 9.2.2)
Stop
Category
80
Requirement
System
Reaction
Note
0
Shutdown by immediate shut-off
of power supply to the machines’
driving components
Uncontrolled
Shutdown
1
Shutdown, by a means which
maintains the power supply
connection to the machine drive
component, to bring movement
to a standstill. The power
connection will be broken only
after standstill has been
achieved.
Controlled
Shutdown
Uncontrolled shutdown is the stopping of the
machines’ movement by eliminating the power supply
to the power components of the machine. Available
brakes and/or other mechanical braking systems
should be employed.
Controlled shutdown is the stopping of the machines’
movement by for example, the setback of the
electronic command signals to zero as soon as the
stop signal is recognized by the controller, while the
power supply to the machine drive components
remains intact until a standstill condition is achieved.
2
Shutdown, by a means which
maintains the power supply
connection to the machine drive
component.
Controlled
Shutdown
This category will not be covered in the functions
description of the manual.
07-02-12-02-EN-V0608.doc / Type: 638
9
●
Safe Torque Off (STO)
Applications in Accordance with the Regulations
The 638 Drive supports the safety function “Safe Torque Off”, in the sense of providing a definitive
stopping of the equipment, with protection against unanticipated start-up, in accordance with
regulations EN ISO 13849-1, Category 4, Performance Level e and EN 1037.
The motor must stopped controlled through the machine controller. However, it does not provide
for any verification of cessation of movement which may have been produced from some external
source. One must pay specific attention to the vertical axes, without a
mechanical self-inhibitor or balanced weight.
According to Machine Regulations 89/392/EWG, i.e. EN 292; EN 954 und EN 1050,
when considering the safety and risk analysis, the machine constructor is responsible to make
certain that the overall safety system for the whole machine takes all of the integrated components
into consideration. Note that the electrical drives must also be included in this consideration.
One must pay attention to and follow the instructions completely as stated in the validation report,
with regard to the initial start-up, service intervals, troubleshooting and repair of the equipment.
The STO conformance protocol outlines a suggestion for the documentation of the relevant safety
parameters in the validation report.
●
Trained Personnel
Planning, installation and initial system commissioning require a detailed understanding of this
information.
Protective safety standards and risk mitigation issues which are connected to the specifics of the
installation must be recognized and taken into consideration, as well as appropriate actions to be
taken in the event of an emergency.
●
Benefits with the Employment of the Safe Torque Off Function
Safety Category 4 performance Level e according to EN 13849-1:
Performance
Feature
Requirement
Application of the Safe
Torque Off Function
Conventional Solution : Utilization of
External Switching Components
Reduced
Switching Effort
Simple circuitry, certified application
examples The grouping of multiple
drives together on a main contactor is
possible.
Extremely high switching frequency
through the use of almost wear-free
technology (Low voltage relays and
an electronic switch). The condition
“Safe Torque Off” is achieved through
the use of a wear-free electronic
switches (IGBT’S).
Two safety-oriented performance protections in
series connections required.
The drive remains power and control
related in a connected condition. No
significant wait time with re-start.
With the utilization of power contactors on the
incoming power line, a long wait time is required for
the energy discharge from the DC link.
Application in
Production Processes
High Switching
Frequency,
High Reliability,
Less Wear
Application in
Production Processes
Faster Reaction Time,
Faster Re-Start
Emergency Stop
Function
According to the German Edition of
the Standards: Permissible without
mechanical power switch element
activation 1)
This performance feature is not achievable through
the employment of conventional technology.
With the use of two motor side power contactors, it
is possible to increase the reaction time, however
one must recognize the potential disadvantages::
a) Make certain that switching occurs only in a
power free condition, (DC Power! Prevent arcing).
b) Increased cost for EMC conforming cabling.
Shutdown employing a mechanical switching
element is required.
1) According to the forward of the German edition of the standards EN 60204-1/11.98, electronic equipment for use with the
emergency stop mechanism is acceptable, as long as the requirements in the safety categories, like those required
in EN13849-1, are completely observed.
07-02-12-02-EN-V0608.doc / Type: 638
81
9
●
Safe Torque Off (STO)
Safety Instructions and Limitations
No Galvanic Separation of the Outputs
The galavanic separation does not occur through the starting lockout function.
This therefore does not in any way provide protection against an “electrical
spike”.
For operation interruptions, maintenance, service and cleaning of the equipment,
the entire system must be definitively and galvanically separated from the power
supply at the main switch box and confirmation should be made that the system
can not restart (See EN 60204-1;5.3).
Potential Sudden Jerking or Movement under Fault Condition
In the event that two fault conditions appear at the same time in the power unit,
it is possible that unit may exhibit a sudden jerking or movement within a small
angle of rotation. This is dependent upon the number of pole pairs of the motor.
(Rotary Type:2-pole = 180°, 4-pole = 90°, 6-pole = 60°, 8-pole = 45°;
Linear Motors: 180° electric).
Malfunction during the Active Braking Phase with Stop Category 1;
EN 60204-1
(controlled stop with reliable monitored time delay)
If a fault in the drive system occurs during the active braking phase, the axel can
coast to a stop, uncontrolled or in the worst case continue to operate until the
expiration of the predetermined shut-off time.
Hanging Loads or Influencing External Forces
In the event of a power failure the hanging loads can possibly fall in an
uncontrolled manner endangering people or equipment. The operation of
hanging
axes therefore requires special attention relating to risk analysis and mitigation
with hanging loads.
Not for Use in Drive Applications in Field Weakening Operation Ranges!
With motors which are employed in field weakening operation ranges, it is
important to note that the operation of the STO function can be adversely
affected, specifically involving an uncontrolled increase in rotational speed,
life threatening over voltage and explosion of the drive unit!
Minimal request of safety function
The safety function STO must activate for at least weekly.
Acknowledgement
The configurable acknowledgement is only permissible with category B.
82
07-02-12-02-EN-V0608.doc / Type: 638
9
9.2
Safe Torque Off (STO)
Safe Torque Off Function, (STO)
General
The electricity flow to the motor windings is controlled through a solid state power component
bridge
(6-times IGBT). A microprocessor switch with PWM logic switches the IGTB’s rotating field
orientation. Optical couplings are employed between the control logic and the power unit to provide
for electrical isolation.
The X11 Connector Plug (STO) is located on the front of the drive unit. This connector plug is
controlled utilizing two optical couplings which communicate over two channels through terminals
STO1# and STO2#, and which in a controlled condition supplies the PWM optical coupler with
control of the solid state power component.
A test takes place to determine the condition of the input channels. Within the given window of time
the condition of both channels must be identical. In the event that a fault condition exists,
(different signals from STO1# and STO2#), then the coupling power supply is shut-off and a signal
is sent to the 7 segment display.
The re-activation of the power supply to the coupling is then only possible by performing
a hardware reset, by turning the equipment off and then back on again.
In addition to the description of the hardware based shut-off through the two channel
communication, the internal unit processor provides for a software based shutdown of the PWM
circuit. The PWM circuit can be set for time delayed activation, after the recognition of the
activation
of both STO inputs, through the programming of the safety parameters for the active time delay.
●
Block Circuit Diagram
07-02-12-02-EN-V0608.doc / Type: 638
83
9
●
Safe Torque Off (STO)
Status Diagram and Function of Terminals STO1# und STO2#
•
With hardware monitoring of the contact difference between STO1# und STO2#
(Tolerance - ca. 20 Sec.)
•
Active Time Delay tva > 0
•
No additional special functions
Diagram: Flow chart of the switching status from STO1# and STO2#
Note for Standard Operation:
• The STO inputs should always be operated simultaneously.
If the safety parameter Active Time Delay is tva = 0 s, then both STO inputs will be turned on
immediately after recognition.
84
07-02-12-02-EN-V0608.doc / Type: 638
9
9.3
●
Safe Torque Off (STO)
Configuration and Parameter Settings
General Instructions for Parameter Settings
The safe torque off, ’STO’, basic function is a built-in, hardware oriented safety function which is
not configurable.
Depending upon the specific application however, it is possible to alter specific settings on the
drive
side which can increase the operational safety factor.
The configuration and programming of the safety parameters can be accomplished utilizing the
Diagnosis and Parameter Setting screen in EASYRIDER for Windows.
This configuration process has been designed to assist the user in making the proper parameter
settings, in an attempt to eliminate the potential for systematic programming errors and/or improper
parameter settings.
Required Actions for the Configuration of Relevant Safety Parameters
•
•
•
•
•
•
Special password protected access is required to reach the relevant
safety parameter setting screens.
The transmission of the data through the PC interface follows a specially
designed protected procedure, including: CRC check, drive specific
password and a double confirmation and acknowledgement process for
the parameter values entered.
After the confirmation and acknowledgement of the entered data, the
parameter values are saved in the drive and protected even in the event
of a power loss.
The parameter values are stored twice within the drive, and provide for
automatic periodic verification of the memory cell accordance.
Any other means of accessing the safety and security related data,
as described here, is not permitted.
The creation of a parameter protocol, which can be stored as a document
with appropriate name and date information.
The relevant safety, secondary function parameters – Acknowledgement and
Active Time Delay, can only be set within the Configuration Safety dialog box.
The data are saved under Parameter Data utilizing the suffix *.WDD. But the
safety relevant data will not transmit by “Transmit Parameters”.
In the Configuration Safety dialog box the relevant safety parameters will
shown by an open parameter file. The user has to transmit the parameter
safely to the drive.
07-02-12-02-EN-V0608.doc / Type: 638
85
9
●
Safe Torque Off (STO)
EASYRIDER Safety Parameter Data Entry Dialog Boxes
1. Commissioning menu - select “Safety“ :
2. Access password - enter “BGSM“
and verify with “OK“
3. Enter Safety Password, select Parameter
Nr. and enter the appropriate Value
4. Send the Parameter - press “Send”one time
4. When the yellow display is correct - press
the “Acknowledge” button twice to accept
5. When the parameter display is green, it
confirms that the value is correct, has been
stored and power loss protected in the drive
unit!
Once all of the relevant safety data
parameters have been entered, then it is
possible to call up the protocol form of the
actual safety parameter settings by pressing
the “Protocol file” button.
(ACROBAT Reader is required!)
Note:
A copy of the Safety-Parameter-Protocol Form
is available in the appendix of the Servo Drive
Handbook and can be used for verification
purposes.
86
07-02-12-02-EN-V0608.doc / Type: 638
9
●
Safe Torque Off (STO)
Safety Parameter List
The following safety functions are presently able to be configured:
•
•
•
Parameter 0: Function Input X10.22
Parameter 1: Active-Time Delay
Parameter 2: STO-Power-On-Test
Parameter 0
Value Range
Without Function
Acknowledgement
+ Emergency Stop
Function X10.22
Acknowledgement
Emergency Stop
Parameter 1
Explanation
No safety relevance.
Function X10.22 is freely
programmable (BIAS)
Initial Factory Settings
(default values)
STO-function activation
through additional
low high
edge of the X10.22 input
acknowledgement and
Emergency Stop before the
STO shutdown through
additional high low edge of
the X10.22 input.
STO-function activation
through additional
low high
edge of the X10.22 input
acknowledgement.
Before the STO shutdown
through additional
high low
edge of the X10.22 input.
Note
Flow Chart
See below
After the
recognition of the
edge – the active
time delay will be
started!
After the
recognition of the
edge, when the
rotational speed =0
then the emergency
stop ramp will be
executed and when
the rotational speed
=0, the time delay
for the brake will be
started!
Value Range
4 Initial Factory
Settings
(Default Value)
Active-Time Delay 4- 500 (*10 ms)
(in 10 ms
increments)
Explanation
Time delay for the activation of the final stage after
acknowledgement (24 V) of both STO inputs, for example of the
acknowledgement inputs (in the event that they have been
configured).
Parameter 2
Explanation
The STO-Power-on-Test does not allow by deactivated STO
(STO1# and STO2# High) to activate the drive.
The 7-Segment-Display shows . The drive will able to activate
after the safety function STO was activated and is deactivate.
The safety function could activated by a safety gate or an
emergency stop
It is possible to use a PLC to automate this test.
Note: If the STO inputs, for example, the acknowledgement
inputs are removed (0V) before the expiration of the active time
delay, then the time will be reset and only reactivated with a new
edge (24 V).
Value Range
activate (0),(default)
STO-Power-OnTest
deactivate (1)
07-02-12-02-EN-V0608.doc / Type: 638
87
9
●
Safe Torque Off (STO)
Safety Password
The safety password must be entered in the appropriate field, every time that the Safety Parameter
Configuration screen is selected.
The password is always comprised of 4 letters.
The difference between large and small case letters is recognized.
The drive side initial factory setting of the password is “SAFE“.
The responsibility to set the new safety password lies with the operator of the equipment.
The new safety password should only be shared with authorized personnel,
for example: anyone who works on the STO, and/or has responsibilities in the areas of
equipment operating guidelines or equipment safety and security.
Flow Chart Diagram: Function X10.22 Acknowledgement + Emergency Stop
Flow Chart Diagram: Function X10.22 Acknowledgement
88
07-02-12-02-EN-V0608.doc / Type: 638
9
Safe Torque Off (STO)
Flow Chart Diagram: Function X10.22 Emergency Stop
07-02-12-02-EN-V0608.doc / Type: 638
89
9
Safe Torque Off (STO)
9.4
Application Example of STO (Safe Torque Off)
Example
Function
Application Example 1
Safety door monitoring or emergency shut-down
with protection monitoring switch
Safety door monitoring or emergency shut-down
with protection monitoring switch and time delay
Safety door monitoring or emergency shut-down
WITHOUT protection monitoring switch
Safety door monitoring or emergency shut-down
with protection monitoring switch and time delay
of several drives
Application Example 2
Application Example 3
Application Example 4
Minimal request of safety function (from Cat. 3 and PL d)
The safety function STO must activate for at least weekly.
This request is very important for application continuous operation and is satisfy by open the guard
door and activate the emergency stop. If the Safe torque off is activate very often, additional
measures are not necessary.
(Only if the Guard door and/or the emergency stop is connected directly or via safety unit
at the 638 X11).
Additional Minimal request of safety function by Cat. 4 and PL e
The category 4 and PL e can only be attained if the STO-power on test is enabled.
The STO-power on test needs low-level at both STO# inputs by switch on the 24V control voltage.
The drive can not activate if one or both STO-inputs have high-level.
The function must configure in the Safety-Dialog parameter 2 (default Active).
These minimal requests are necessary to detect a failure. Failure detection is only possible if the
safety function is activated.
Both measures could execute by a PLC.
90
07-02-12-02-EN-V0608.doc / Type: 638
9
●
Safe Torque Off (STO)
Application Example 1
Function/Action
Response
Protection Level
EN 954-1
Safety door monitoring or
emergency shut-down with
protection monitoring switch
The ‚STO’ is tripped when the safety
door is opened or emergency shutdown switch is activated.
Cat. 4
ISO 13849-1
Stop Cat.
According to
EN60204
PL e
0
Important
The category 4 and PL e protection level can only be achieved with an active STO-Power-On-Test.
Note
The acknowledgement is only necessary, when after the cancellation of the STO function by the
automatic start-up, a potential danger for the people in the area or the equipment exists.
07-02-12-02-EN-V0608.doc / Type: 638
91
9
●
Safe Torque Off (STO)
Application Example 2
Function/Action
Response/Reaction
Protection Level
EN 954-1
Safety door monitoring or
emergency shut-down with
protection monitoring switch and
time delay
Active braking occurs when the safety
door is opened, the emergency shutdown switch is activated or tripping of
the ‚STO’ occurs due to time delay.
Cat. 4
ISO 13849-1
PL e
Stop Cat.
According to
EN60204
1
Important
The category 4 and PL e protection level can only be achieved with an active STO-Power-On-Test.
Explanation
The protection switch unit A1 must be set up with a fail-safe time delay as determined and required by
the specific category relating to the application environment.
The 638 Servo Drive must be properly configured for the operating environment
(See: Chapter ■ Configuration and Parameter Settings).
Note
The acknowledgement is only necessary, when after the cancellation of the STO function by the
automatic start-up, a potential danger for the people in the area or the equipment exists.
92
07-02-12-02-EN-V0608.doc / Type: 638
9
●
Safe Torque Off (STO)
Application Example 3
Function/Action
Response/Reaction
Protection Level
EN 954-1
Safety door monitoring or
emergency shut-down WITHOUT
protection monitoring switch
The ‚STO’ is tripped when the safety
door is opened or emergency shutdown switch is activated.
Cat. 3
ISO 13849-1
PL d
Stop Cat.
According to
EN60204
0
Explanation
The signals for STO1# and STO2# are delivered utilizing two separate channels. The wiring layout
plan
must allow for the physical separation of the wiring channels or incorporate adequate insulation
protection and separation.
Note
The acknowledgement is only permissible with category B.
The acknowledgement is not permissible for use if the dangerous area is accessible. In this case,
employment of an external acknowledgement unit is necessary.
The acknowledgement is only necessary, when after the cancellation of the STO function by the
automatic start-up, a potential danger for the people in the area or the equipment exists.
07-02-12-02-EN-V0608.doc / Type: 638
93
9
●
Safe Torque Off (STO)
Application Example 4
Function/Action
Response/Reaction
Protection Level
EN 954-1
Safety door monitoring or
emergency shut-down with
protection monitoring switch and
time delay of several drives
Active braking occurs when the safety
door is opened, the emergency shutdown switch is activated or tripping of
the ‚STO’ occurs due to time delay.
Cat. 4
ISO 13849-1
PL e
Stop Cat.
According to
EN60204
1
Important
The category 4 and PL e protection level can only be achieved with an active STO-Power-On-Test.
Explanation
The protection switch unit A1 must be set up with a fail-safe time delay as determined and required by
the specific category relating to the application environment.
The 638 Servo Drive must be properly configured for the operating environment
(See: Chapter ■ Configuration and Parameter Settings). Only 16 drives could plug together in a group.
Note
The acknowledgement is only necessary, when after the cancellation of the STO function by the
automatic start-up, a potential danger for the people in the area or the equipment exists.
94
07-02-12-02-EN-V0608.doc / Type: 638
9
Safe Torque Off (STO)
9.5
STO Function Test
The STO function must be tested when:
• The system is set-up for the first time. See: Commissioning
• Any component of the system is replaced.
• Any activity involving the wiring takes place.
• After all modifications to the drive system. (For example: parameter modifications, software
updates, etc.)
• Established maintenance schedules dictate or after the machine has been inactive for a long
period of time.
The STO functions test must be carried out by qualified personnel, with consideration for the
required safety provisions. Depending upon the system configuration and application, additional
or other tests may be required.
Test Steps:
STO Test Step 1
STO Test Step 2
STO Test Step 3
STO Test Step 4
STO Test Step 5
STO-TEST
Step
STO-TEST
1.1
Action / Function
STO-TEST
1.3
STO-TEST
Step
STO-TEST
2.1
STO-TEST
2.2
STO-TEST
2.3
STO-TEST
2.4
Remark,
Cause of Fault
Condition
Prerequisite:
1.1.1 Safety Parameter:
STO “Power On” Test is Active
1.1.2
STO-TEST
1.2
Anticipated Result
Supply Voltage US = 0 V (off)
If the safety parameter,
“Start-up Test” – is
deactivated, then the drive
will be activated immediately
after the switch is turned on!
24V DC Voltage to
Terminal X11.1 and
Terminal X11.4
Supply Voltage US = 24 V to the System
Action / Function
Test steps 2-4 can then be
performed anyway.
Anticipated Result
Terminal X11.1 Test:
Switch off 24 V DC
Voltage at
terminal X11.1
Wait approx. 20 seconds
After approx. 20 seconds
Switch on 24 V DC
Voltage at
Terminal X11.1
Remark,
Cause of Fault
Condition
flash
Check
7-SegmentDisplay
Check
7-SegmentDisplay
flash
Software-STO
control mechanism
successful
Hardware- STO
control mechanism
successful
07-02-12-02-EN-V0608.doc / Type: 638
95
9
STO-TEST
Step
STO-TEST
3.1
STO-TEST
3.2
Safe Torque Off (STO)
Action / Function
Terminal X11.4 Test:
Rebuild
STO Test Step 1
Anticipated Result
Remark,
Cause of Fault
Condition
Switch the 24V
Supply Voltage
Off On
Switch off 24 V DC
Voltage at
Terminal X11.4
flash
Wait approx. 20 seconds
STO-TEST
3.3
Check
7-SegmentDisplay
flash
STO-TEST
3.4
STO-TEST
3.5
STO-TEST
Step
STO-TEST
4.1
STO-TEST
4.2
STO-TEST
4.3
STO-TEST
4.4
STO-TEST
Step
STO-TEST
5
96
After approx. 20 seconds
Check
7-SegmentDisplay
Switch on 24 V DC
Voltage at
Terminal X11.4
Hardware- STO
control mechanism
successful
Action / Function
Terminal X11.1 and
Terminal X11.4 Test:
Rebuild
STO Test Step 1
Software-STO
control mechanism
successful
Anticipated Result
Remark,
Cause of Fault
Condition
Switch the 24V
Supply Voltage
Off On
Switch Off 24 V DC
Voltage at
Terminal X11.1 and
Terminal X11.4
Wait approx. 20 seconds
After approx. 20 seconds
Switch on 24 V DC
Voltage at
Terminal X11.1 and
Terminal X11.4
Check
7-SegmentDisplay
If the drive has no
fault and no other
switch off condition
is set - then the drive
is activated.
Action / Function
Once all of the relevant safety test steps have been accomplished, the actions taken must be
documented.
The protocol form can be found in the Appendix
■ STO - Safety - Parameter - Report - Proposal.
07-02-12-02-EN-V0608.doc / Type: 638
9
9.6
Safe Torque Off (STO)
Signal Inputs Technical Data - Terminal Connection X11
General
Nominal Voltage from the Inputs
Required Insulation from the
Control Voltage 24V
STO – Control Voltage Protection
Number of Inputs
Signal Inputs via Opto-Coupler
STO1#
STO2#
Break Time at Unequal Input Conditions
Function see Status Diagram
The technical data provided in the section
General Technical Data is valid, with the
exception of the data listed below.
24 V DC
protective extra-low voltage (PELV)
1A
2
L = 0...7 V DC or open
H = 15...30 V DC
Iin at 24VDC: 8 mA
L = STO activate
H = STO deactivate
L = STO activate
H = STO deactivate
approx. 20 seconds
07-02-12-02-EN-V0608.doc / Type: 638
97
10
Diagnosis and Trouble-Shooting
10
Diagnosis and Trouble-Shooting
10.1
7-Segment-Display
Many sources of faults can be narrowed down with the diagnosis display.
Display
(Code)4
00h
Output
Explanation
Comment
Servo drive
Ready Warnin 631
g2)
no display
off
off
on
off
on
off
off
off
off
off
deactivated via input.
on
off
deactivated via serial command.
off
off
Active input is activated with switching on
24 V control voltage
off
off
635/637
637+
637f/638
X10.22
X10.2
2
X10.22
any control voltage? external fuses ok?
03h
system ready for operate
drive ready, not active
01h
drive active and ready for operate!
DC link voltage within the limits,
power stage active, fault-free
12h
internal STOP with serial deactivating
activate drive via serial interface
82h
drive of serial interface (bus interface) deactivated !
only if bus interface is integrated
90h
92h
deactivated with delay time for the brake
X10.7
switch enable X10.xx switch on 0 V and
after that 24 V
46h
Under voltage of control voltage
off
off
off
off
off
off
off
off
Power supply switched on? Power supply o.k ?
internal fuse o.k.? control voltage < 17 V
60h
Under voltage in DC-bus < Ua low threshold
check power supply (power supply unit, wiring,
fuse), check under voltage parameter
DAh
feedback system error (e.g. resolver)
wiring to encoder system ok?
encoder system supply ok?
DAh
00h
„flashing“
Resolver - Feedbacksystem Error
8.36
wiring to resolver system ok?
98
DAh
„flashing“
HIPERFACE Feedbacksystem Error
6Eh
wiring to HIPERFACE system ok?
Check serial HIPERFACE channel
off
off
07-02-12-02-EN-V0608.doc / Type: 638
8.36
10
Diagnosis and Trouble-Shooting
Display
(Code)4
F2h
Output
Explanation
Comment
Ready Warnin 631
g2)
I²t- overload of the drive
1)
1)
1)
1)
1)
1)
1)
1)
off
off
on
1)
off
1)
on
1)
on
off
on
on
off
off
off
off
Servo drive
635/637
637+
637f/638
does the control loop oscillate?
P-amplification too high mechanics stiff?
requirements too high? is warning /8/ evaluated?
66H
I²t overload of the motor
does the control loop oscillate?
P-amplification too high mechanics stiff?
requirements too high? is warning /8/ evaluated?
B6h
over temperature of the output stage (> 90°C)
adequate cooling of the regulator?
ambient temperature too high?
3Eh
over voltage on DC bus
ballast module ok? adequate ballast module?
E0h
chassis shorting and short circuit due to hardware
motor cabling ok? digital-loops setup ok?
short circuit to chassis in the motor? braking
resistor: ohm- value too low? try to start fresh! send
in for repair
FEH
WARNING!
Overload of the regulator I²t or motor I²t or temp.output stage too high. If no reaction within approx.
3sec.it switches off with signals /3/, /4/ or /5/.
Signal /8/ clears when there is no more danger or it
is switched off
mechanics stiff? defective bearings; cold grease?
reduce requirements and creep to next possible
STOP
F6h
over temperature motor(NTC/PTC)
check overload of the motor / cooling etc.
2Eh
motor temperature too high
check overload of the motor / cooling etc.
80h
ballast active
Brake energy is removed
38h
Warning: I²t ballast too high
ballast resistance usage >90%
7Ch
switch off ballast
ballast resistance overloaded
6Ch
X 300 – Module not inserted
or wrong inserted or defect
X 300 testing
07-02-12-02-EN-V0608.doc / Type: 638
99
10
Diagnosis and Trouble-Shooting
Display
(Code)4
6Eh
Output
Explanation
Comment
Servo drive
Ready Warnin 631
g2)
off
X 300 – setting wrong
635/637
637+
637f/638
X10.8
X10.14
X10.1
4
X10.14
X10.9
X10.15
X10.1
5
X10.15
X10.8
X10.9
X10.14
X10.15
X10.1
4
X10.1
5
X10.14
X10.15
off
X 30 / X40 Counter-Configuration test in
the EASYRIDER® Windows – Software
1Ch
tracking window exceeded 3)
on
only in operation mode position control, will be
deleted with the next run-command
1Eh
tracking error with switch off
on
off
on
off
only in operation mode "position control"
20h
limit switch + 3)
limit switch + X10.xx on 0 Volt, from Firmware 6.16
08h
on
limit switch - 3)
off
limit switch - X10.xx on 0 Volt, from Firmware 6.16
3)
9Eh
limit switch + / limit switch -
on
off
both limit switch X10.xx on 0 Volt,
from Firmware 6.16
76h
memory-checksum-error
off
off
aus
aus
off
off
on
off
off
off
try new start, store the value again
76h
Different Drive type on X300-xM Module
62h
DC Bus Unterspannung < 100 V
638 with
X300 xMModule only
4Eh
1: internal software error, Watchdog
2: blinking: BIAS software error
1: Firmware version check
2: Bias program error fix
EEh
starting lockout RP SBT with 637f
starting lockout STO1 and STO2 with 638
Terminal X290. 3/4 check with 637f
TerminalX11. 1/4 check with 638
24h
STO1 und STO2 Signale Difference>20 Seconds
Switch Off /On Control Voltage
100
07-02-12-02-EN-V0608.doc / Type: 638
638 only
10
Diagnosis and Trouble-Shooting
Display
(Code)4
26h
Output
Explanation
Comment
Servo drive
Ready Warnin 631
g2)
X10.22 Quickstop Ramp active
on
635/637
637+
637f/638
off
638 only
42h
X10.22 low high slope missing
on
off
638 only
2Ah
Max. speed overload
off
off
on
off
check speed limits resp. setpoint speed
4Ah
CAN - Open 402 Sync Message error in
Interpolated positioning mode
6.19c
8.19d
9Ch
on
SSI – Encoder Error
off
8.21
9Ch
1Ah
CAN1-BUS Error
Flashing display
Noise on bus or lane missing!
on
off
8.33
CAN2 Bus Error
8.36
Flashing Display: Control loop synchronization
between drives
CEh
on
Profibus-Module Error
off
8.31
ECh
30h
Warning:setpoint current maximum limit reached
and no actual current measurement
(check motor connection)
on
638 Active Delay time runs
on
off
8.34
off
638 only
8Eh
638 SAFETY- Parameter Ram Error
off
off
638 only
C4h
638 X300 xM Module, Memory Error
Firmware, Alteracode and Parameters missing
off
off
44h
638 X300 xM Module, Memory Error
Alteracode and Parameter- and BIAS-Data missing
off
off
07-02-12-02-EN-V0608.doc / Type: 638
638 only with
X300 xMModule
101
10
Diagnosis and Trouble-Shooting
Display
(Code)4
Output
Explanation
Comment
Ready Warnin 631
g2)
04h
638 X300 xM Module, Memory Error
Alteracode missing
off
off
40h
638 X300 xM Module, Memory Error
Parameter- and BIAS-Data missing
off
off
1)
2)
3)
4)
Servo drive
635/637
637+
Reaction to these errors chapter: “■ Function diagrams from inputs and outputs”
With configuration corresponding chapter : “■ Operating modes and pin functions”
Operating mode “Position Control” only
The display code you can get with the serial command „internal diagnosis 2“ (0x26) in byte 16.
The error signals are shown as long as there is control voltage (Us), also when the power (DC-Bus)
is switched off for safety reasons.
102
07-02-12-02-EN-V0608.doc / Type: 638
637f/638
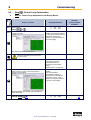
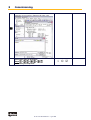
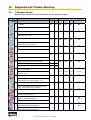
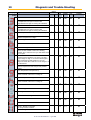
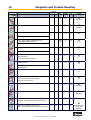
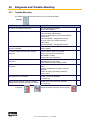
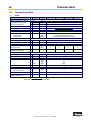
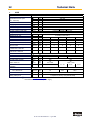
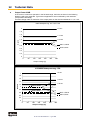
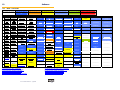
10
10.2
Diagnosis and Trouble-Shooting
Reset of a Drive Trouble
A general precondition for correct execution of the Reset is the elimination
of the error cause.
Possible error signals
at
blinking
(BIAS)
The error signals of the drive can be reset via:
1. Control voltage OFF/ON,
2. the serial command “Drive Reset“ 0x02
The host login must be occurred.
The drive must be deactivated via the serial command “deactivate Drive“ 0x00.
3. the fieldbus-command “ Drive Reset“ 0x16 (22 decimal)
The host login must be occurred via the BUS command 0x01.The drive must be deactivated
via the BUS command “deactivate Drive“ 0x14.
The fieldbus command “Drive Reset“ with constant repetition of the fieldbus command 0x16
will be works-off only once.
For further processing, it is necessary, meanwhile to send another control word
(e.g. 0 status order).
4. Viva 0 – 1 flank on input X10.11
Precondition:
- The input X10.11 is with function 1“Reset drive fault“ configured
(EASYRIDER® Windows – Software)
- There is no host login.
- The input Active,(X10.22) is inactive (0V)
- The signal must be present min. 250 ms
5. Viva 0 – 1 flank on input X120.1
Precondition:
- The input X120.1 is with function 1“Reset drive fault“ configured
(EASYRIDER® Windows – Software)
- There is no host login.
- The input Active,(X10.22) is inactive (0V) 1)
- The signal must be present min. 250 ms
Notice !!
After remove of the tracking error deactivation
the warning message
(tracking error) is active up to the next move command.
The error signal
(releasing before ready) can be reset by deactivation the drive.
07-02-12-02-EN-V0608.doc / Type: 638
103
10
Diagnosis and Trouble-Shooting
10.3
Trouble-Shooting
The following list refers to faults which can occur during operation.
Display:
Error
Explanation and remedy
no motor run despite current flow
motor mechanically blocked?
motor brake released?
check setpoint wiring
check grounding and shielding
too high P-amplification in the speed controller
reduce value
(with EASYRIDER® setting/speed control)
too small I-time in the speed controller?
reduce value
(with EASYRIDER® setting/speed control)
Limit switch functions
effective (BIAS)
motor cables interrupted?
Is input "I extern" (X10.19) activated
(config. menu) and not notched up?
motor runs unevently
no reaction of setpoint progression, despite
torque in standstill
no current flow;
no torque despite activating the regulator
correctly
1)
limit switch - input
activated and not notched up?
Interference symptoms with power
Ground loops in setpoint or actual value wiring?
frequency
Shieldings laid on both sides?
Signal cables near high voltage cables?
Motor takes up preferred positions after
Position encoder or motor cables with reversed
activation
poles?
Resolver or Feedback- encoder incorrectly
adjusted?
Number of motor poles wrong matching?
(config. menu)
Motor runs up immediately after activation
Motor cables or feedback- cables reversed?
although there is no setpoint
Encoder incorrectly adjusted?
(e.g. Resolver)
Motor reaches in idling cycle very different
Feedback-Encoder incorrectly adjusted
speed when running to the right or to the left (e.g. Resolver)
1) Display
104
or
mostly short after activating; before warning
07-02-12-02-EN-V0608.doc / Type: 638
1)
1)
11
Standards and Certifications
11
Standards and Certifications
11.1
Compliance with Regulations, Limitations and Basic Conditions
European Directives
In accordance with EN61800-5-1
Safety requirements – Electrical, thermal and energy.
EN 61 800-3, Emissions and immunity levels for
Power drive systems.
EG Low-Voltage Guidlines
2006/95/EC
EG-EMC-Directive
2004/108/EC
UL - Approved / being prepared
Underwriter Laboratory Standard
UL File-No.
Canadian Standards Association
UL 508 C
E….
C22.2 No.14
Power Conversion Equipment
Industrial Control Equipment
Insulation Requirement
EN 50 178
IEC 60364-4-443:1999
EN 61800-2, 4.1.2.1
Protection Class
Overvoltage Category
Pollution Degree
I
III
2
Environmental Conditions
General Environmental
Ambient Temperature Rating:
Operations
Storage
Transport
Allowable Humidity:
Operations
Storage
Transport
Vibration:
Air Pressure
Protection
Altitude
Method of Cooling
EN 61800-2
IEC 60721-3-3
IEC 60721-3-3
IEC 60721-3-2
+ 5 bis +40 °C, 3K3
-25 bis +55 °C, 1K4
-25 bis +70 °C, 2K3
IEC 60721-3-3
IEC 60721-3-3
IEC 60721-3-2
EN60068-2-6
Test FC
<= 85% non-condensing, 3K3
<= 95%, 1K4
<= 95% at +40 °C, 2K3
10Hz ≤ f ≤ 57Hz sinusoidal
0,075mm amplitude
57Hz ≤ f≤150Hz sinusoidal 1g
10 sweep cycles per axis
1 Oktave / Minute
86 kPa – 106 kPa
EN 60529
IP20
Under <= 1000m above sea level with 100%
power rating
Over >1000m .. <= 2000m above sea level, decrease
the power rating by 1% per 100m
638B 03 / 05
Convention cooling
All 638A,
Forced ventilation (internal fan)
638B 08 / 10 / 15
All 638C
07-02-12-02-EN-V0608.doc / Type: 638
105
11
Standards and Certifications
EMC - Requirement
638A
EMC – Emission
(Conducted)
EMC – Emission
(Radiated)
EMC – Immunity
Levels
EMC – Emission
(Conducted)
EN 61 800-3
First Environment
C1
First Environment
C2
Second Environment C3
EN 61 800-3
First Environment
C1
First Environment
C2
Second Environment C3
EN 61800-3
(include EN 50081-2
and EN 50082-2)
EN 61 800-3
First Environment
C1
First Environment
C2
Second Environment C3
638B
638C
max. Motor cable length
20m 1)
40m
2)
3)
3)
20m
20m
meet
meet
meet
meet
Minimum standards for the Second
Environment are kept to.
1)
for max. 100m motor cable length, use the drive with Option A (less leakage current) and
the external filter Type LNF RA *230/12.
2)
With external Filter of the Serie LNFB, is a group RFI suppression for max. 4 Device with a
overall
Motor cable length of 60m, possible.
3)
For the operation in the first environment with unlimited availability is a cabinet damping of at
least
10 dB in the frequency range of 30-1000MHz necessary.
106
07-02-12-02-EN-V0608.doc / Type: 638
12
Technical Data
12
Technical Data
12.1
General Technical Data
●
Power Circuit
Galvanic Separation from the Control
Circuit
Specifications in accordance with
Short Circuit and to Frame Test for
Overvoltage Monitoring
Undervoltage Monitoring
Overheating Switch Off at
Clock Frequency Powerstage
Frequency of Current Ripple
●
max. 400V DC ±5V DC
max. 810V DC ±10V DC (638B/C)
min. 15V DC; configurable
95 ° C +/- 5%
638A:
9,5 kHz
638B/C:
4,75kHz / 9,5kHz
9,5 kHz / 19 kHz
in acc. with EN 61800-5-1 / UL 508
See: “■ Insulation Concept“
Signal Inputs and Outputs - Connection X10
Additional Galvanic Separation from Power
and Control Circuit
Nominal Voltage of the In and Outputs
Number of Outputs
Signal Outputs via OPTO Coupler
Signal Outputs via RELAY
Contact Protection with Inductive Load
Number of Inputs
Signal Outputs via OPTO Coupler
Shortest Time for a Signal to All Inputs - to
Accept the Signal in an Application:
Damping of the Transfer from
Low to High (0-->24V):
Interrupt Response Time for Fast Input
Damping of the Transfer from
High to Low (24-->0V)
●
EN 61800-5-1 / UL 508C and cUL
min. 2000 releases
Control Circuit
Galvanic Separation from the Power Circuit
Further Information:
●
in acc. with EN 61800-5-1/ UL 508C
24 V DC
5
Umax = 45V DC;
I = 0..60 mA; short circuit proof,
resistive load
Umax = 45V DC;
I = 1uA...1,2A
internal varistor
8
L = 0...7 V DC or open
H = 15...30 V DC
Iin 24VDC: 8 mA
> 1 ms
fast input:
20µs (X10.4, X10.25)
10µs (X10.4, X10.25)
fast input:
250µs (X10.4, X10.25)
default input:
200µs
default input:
1000µs
Thermo-Control X30
No galvanic Separation to the Control Circuit
Measurement Voltage at 100 / 1640 / 9999 Ohm 0,15V / 1,7V / 3,8V
Measurement Range
100..9999Ohm, short-circuit proof
(Thermoswitch evaluable)
07-02-12-02-EN-V0608.doc / Type: 638
107
12
●
Technical Data
Thermo-Control X62
Galvanic Separation to the Control Circuit
Galvanic Separation to the Power Circuit
Basic Isolated in acc. with EN 61800-5-1
Double Isolation in acc. with EN 61800-5-1
Measurement Voltage at 100 / 1640 / 6000 Ohm
0,15V / 1,7V / 3,2V
100..6000Ohm, short-circuit proof
(Thermoswitch evaluable)
Measurement Range
●
Brake-Control X62
Galvanic Separation to the Control Circuit / Power Circuit
Nominal Voltage Supply
Max. Brake Current
Contact Protection for inductive Load
●
Double Isolation in acc.
with EN 61800-5-1
24V DC
2A
Internal Varistor (BR+ <-> BR-)
Signal Inputs and Outputs - Connection X120B resp. 120C
Additional Galvanic Separation from Power and
Control Circuit
Nominal Voltage of the In and Outputs
Number of Outputs
Signal Outputs via OPTO Coupler
Number of Inputs
Signal Outputs via OPTO Coupler
Shortest Time for a Signal to All Inputs to Accept
the Signal in an Application:
Damping of the Transfer from
Low to High (0-->24V):
Damping of the Transfer from
High to Low (24-->0V)
108
24 V DC +20% / -10%
4
resistive load Imax. = 2A
inductive load max. 1Henry
Iout.
Inductance Max. Switching
Frequency
1A
1H
1Hz
1A
0,1H
10Hz
0,33A
1H
10Hz
0,2A
0,5H
50Hz
short-circuit current limited by (5A)
over-heating protection, active
overvoltage clamping (50V); keyed
4
L = 0...7 V DC or open
H = 15...30 V DC
Iin at 24VDC: 8 mA
> 1 ms
default input:
200µs
default input:
1000µs
07-02-12-02-EN-V0608.doc / Type: 638
12
●
Technical Data
Digital Control
Current Control
Loop-Cycle-Time
Settings
Current Limits - Adjustment by:
105 µs
according to factory specifications or
motor data
speed control -menu
Analog Input
0..10V = 0..100%; can be standardized,
10Bit
Speed Control
Loop-Cycle-Time
Settings
Differential Setpoint Input Analog
Resolution (including sign)
●
Digital Setpoint Input
105 µs
speed control menu
Usoll = 10 V, can be normed; Ri = 10k
14 bit
via interfaces
Position Control
Loop-Cycle-Time
105 µs
Digital Communication
RS232 - Service Interface
COM1
19200 baud, 8 data bits, 1 start bit,
1 stop bit, parity: even
Optional
RS232 / RS422 / RS 485
on SUB D – Socket
CAN1, Profibus DP, SUCOnet K
on SUB D – Socket
Interbus S on SUB D – Socket (OUT)
Interbus S (Remote IN)
CAN2
●
COM2
additional on SUB D – socket
Resolver Evaluation / Transmitter Principles
General:
The specified data refers to the combination of the standard resolver interface with
Function Module - X300_RD2; operated with the SSD Drives Resolver R 21-T05, R15-T05
Carrier Frequency
Ripple of the Actual Speed Value Signal
Max. Position Resolution for One Revolution
Absolute Position Accuracy
Relative Position Accuracy
1)
ft = 4,75 kHz
2% 1)
65536 / 16 bit
+/- 0,7 ° 1)
+/- 0,08 ° 1)
Data was checked – actual data results: Quality improved
07-02-12-02-EN-V0608.doc / Type: 638
109
12
●
Technical Data
Controller System
System Start-Up Time after Switching On
the Control Voltage
Data Memory / Organization
●
Flash Eprom 256 KB
RAM 64 KB;
EEPROM 96 kByte
Mechanical Data
Dimensions
Weight
110
max. 6 seconds
see “■ Dimensions“
638A
638B03 638B08
/05
/10/15
1,6 Kg
2,7Kg
4,4Kg
07-02-12-02-EN-V0608.doc / Type: 638
638C
12
12.2
●
Technical Data
Technical Unit Data
638A
Servo Drive
Input
Supply Voltage 50..60 Hz
(grounded at the centre
point TN networks)
Phases
Supply System
Inrush Current Limitation
Control Voltage
Control Current Incl. Fan
Permanent:
Inrush peak:
Output
Sine Voltage with Un
Derating of Unr
Rated Current Efficiency
Max. Current Efficiency
Time for Imax
Min. Motor Inductance
(terminal / terminal)
Brake Circuit
Operating Point DC
Max. Power
Rated Power
Internal Brake Resistor
Min. Ext. Brake Resistor
General
Power Loss
Fan, Electronics
Fan Control
Power Loss
Rating Class per A
1)
2)
638A01..
1)
2)
638A04..
638A06..
min.
Un
max.
[V]
[V]
tolerance
type
Us
Is DC
[V]
14
230
+10%
1 or 3
“■ Fuse, Contactors, Filter“
Softstart : capacitor - pre-charging over 390Ω
21,5 ... 24 … 29
[A]
[A/ms]
nominal 0,4 maximum 0,8
nominal 3 maximum 6/0,8; 2,5/25
Unr
[Veff]
Inr
Imaxr
Lph/ph
[A]
[A]
Sec
[mH]
220
Depending on load or with 1-phase supply
1
2
4
6
2
4
8
12
5
5
5
5
10
6
3
2
Ub
Pbmax
Pbnenn
Rbint
Pd
Pmax
Rbextmin
[V]
[kW]
[W]
[Ω]
[W]
[W]
[Ω]
375
5,5
600
170
20
830
33 (use only our approved types)
max.
[W]
17
[V]
2-stage control
[W/A]
7 (4,75kHz) / 9 (9,5kHz
1)
2)
638A02..
nominal
Reference “● Output Power“
Recommended: Transformer power supply
07-02-12-02-EN-V0608.doc / Type: 638
111
12
●
Technical Data
Output Power 638A
In the event of continuous operation in the full-load range, the limits as shown in the following
diagram need to be respected. Typical servo applications are not affected by this restriction.
(S3 operation: Start/Stop).
1) At servo drive 638A/06.. :
Load limitations decreased to 66% with 1phase incoming supply and continuous operation and speed.
(S1)
●
Singlephase and Threephase supply
Due to the line-ripple of the DC-Bus, the rate of usable output voltage is reduced as follows.
This reduction affects the maximum attainable speed of the applied motor.
Three-phase supply: The unloaded output voltage will be reduced to approx. 90%, maximally 85 %
Single-phase supply: 50 – 60Hz: see following Diagram:
Hint for Parameterization:
To avoid the unexpected tripping of the under voltage threshold, the parameter setting should be left
on the default values (EASYRIDER® Windows – Software).
Required motor-terminal-voltage for specified speed.
Approximation: (up to 3000RPM)
Ukl = 1,2 * (EMF * n / 1000) + I * (Rph + RL) [V]
Ukl
Required Motor Voltage [V RMS]
EMF Back-EMF of Motor [V RMS] / 1000 RPM
Rph
Resistance of Motor (between terminals) [Ω]
RL
Line Resistance of Motor cable [Ω]
I
Motor Current [A RMS]
112
07-02-12-02-EN-V0608.doc / Type: 638
12
●
Technical Data
638B
Servo-Drive
638B03..
Input
Supply Voltage 50..60 Hz
(grounded at centre point
TN – networks)
Phases
Supply System
Inrush Current Limitation
Control Voltage
Control Current nominal/maximal
Control Current Inrush peak:
Output
Sine-Voltage with Un
Minderung von Unr
Rated Current 400V AC/ 4,75kHz
Rated Current 400V AC/ 9.5 kHz
Rated Current 480V AC/ 4,75kHz
Rated Current 480V AC/ 9,5kHz
Max. Current efficiency
Time for Imax
Min. Motor Inductance
4,75kHz 400 / 480V AC
Min. Motor Inductance
9,5kHz 400 / 480V AC
Brake Circuit
Operating Point DC
Max. Power 400/480V AC
Rated power
Internal Brake Resistor
400V / 480V AC
min. ext. Brake Resistor
400/480V
General
Power Loss
Fan, Electronics
Fan Control
Power Loss
Rating Class per A
1)
2)
min.
Un
max.
3)
1)
4)
638B08..
638B10.
638B15..
[V]
[V]
olerance
14
400 /480
-25% / +10%
type
Us
Is DC
Is DC
[V]
[A]
[A/ms]
3
“■ Power Mains Connection“
Softstart : capacitor – pre-charging over 340Ω
21,5 ... 24 … 29
0,6 / 1,0
0,7 / 1,1
0,8 / 1,2
nominal 3 maximal 6/0,8; 2,5/25
Unr
[Veff]
Inr
Inr
Inr
Inr
Imaxr
minimal
[A]
[A]
[A]
[A]
[A]
Sec
Lph/ph
1)
2)
638B05..
[mH]
2,5
2,5
2,5
2,5
5
5
8,9 / 10
388 / 465
According to the load 1)
5
7,5
10
5
7,5
10
5
7,5
10
4,5
6,8
9
10
15
20
5
5
5
4,5 / 5,0
3,3 / 3,0
2,2 / 2,5
15
10
14,5
9
30
5
1,5 / 1,7
Lph/ph
[mH]
4,4 / 5,0
2,2 / 2,5
0,7 / 0,8
Ub
Pbmax
Pbnenn
Rbint
Pd
Pmax
[V]
[kW]
[W]
6,5 / 7,4
Rbextmin
[Ω]
680
15
670 / 849
78 / 88
maximal
[W]
24
[Ω]
[W]
[W]
[V]
nominal
[W]
1,5 / 1,7
675 / 760
9,8 / 10,9
1100
54 / 62
26,4
1,1 / 1,2
22 / 25,5
330
30
1380 / 1750
22/24
22/24
28,8
24
11,5 (400V/4,75kHz), 15,8 (400V/9,5kHz),
11,8 (480V/4,75kHz), 16,8 (480V/9,5kHz)
Reference “● Output Power 638B“
Recommended: Transformator power supply
07-02-12-02-EN-V0608.doc / Type: 638
113
12
●
Technical Data
Output Power 638B
In the event of continuous operation in the full-load range, the limits as shown in the following
diagram need to be respected. Typical servo applications are not affected by this restriction.
(S3 operation:Start/Stop).
At mains voltage 400V no restriction of the output power on the devices withstands 5 / 7,5 / 10A.
480V Netzspannung: 5A / 7,5A / 10A
2
> 5 sec
1,8
1,6
> 10 sec
Imaxr/Inr
1,4
> 20 sec
1,2
1
480V 4,75kHz
480V 9,5kHz
0,8
0,6
0,4
0,2
0
0
80
160
240
320
400
480
Output Voltage [V]
400/480V Netzspannung: 15A
> 5 sec
2
1,8
1,6
> 10 sec
Imaxr/Inr
1,4
> 20 sec
1,2
400V 4,75kHz
1
0,8
400V 9,5kHz
0,6
480V 4,75kHz
480V 9,5kHz
0,4
0,2
0
0
114
80
160
240
320
Output voltage [V]
400
480
07-02-12-02-EN-V0608.doc / Type: 638
13
13
13.1
Software
Software
EASYRIDER® Windows - Software
EASYRIDER® Windows software is a useful and convenient tool to use to control all drive
functions.
Detailed online help information and instructions are available.
EASYRIDER® Instructions: (extract)
Auto pilot function as an interactive tutorial
System identification
BIAS instruction-set editor
Oszilloscope function
Start-up and commissioning tools
Setting of parameters and setting of configurations
Servo diagnostics, interface diagnostics and fieldbus diagnostics
Motor library
Save system data in file and load system data from file
Send system data to servo drive and save system data in servo drive
Load system data from servo drive
Important:
Edited data in EASYRIDER® is transmitted to the RAM of the servo drive and becomes active only
after executing the SEND command. Only the instruction “SAVE in EEPROM”, writes data into a
non volatile memory. Data is stored there in the event of power failure.
07-02-12-02-EN-V0608.doc / Type: 638
115
13
Software
13.2
Introduction
The selection of the Operating Mode 5 with the Drives 630 Serie activates the complete
functionality of all control loops and the BIAS-program processing.
The EASYRIDER Software is the programming tool to create, load and save the BIAS Programs.
The programming language “BIAS“
Bedienersprache für intelligente Antriebs – Steuerungen
was developed to allow the programming of complex and yet clear programs.
Therefore the BIAS commands were divided according to their function into the 12 following
command groups:
0.
1.
2.
3.
4.
5.
6.
7.
8.
9.
10.
11.
Move command
Move command + parameters
Parameter commands
”Parameter from variables” - commands
”Parameter into variables” – commands
Control commands
Flag commands
In-/ output commands
Variable commands
Mathematics commands 1
Mathematics commands 2
Floating point commands
BIAS – Command overview
With these commands you will be able to program the required machine process in chains of steps
The size of a program is limited to a maximum of 1500 BIAS commands
The design of the programs occurs with EASYRIDER software at the PC and can be transmitted
into the servo drive via serial communication.
If you create the BIAS program with the EASYRIDER shell, jump labels, comments and a unit for
the position presettings are provided.
A further possibility is programming or transmitting and controlling the BIAS program via a field bus
respectively. The necessary command coding is listed in the command instruction.
During the calculation of a BIAS-program is is possible to start parallel a PLC SPS-Task and/or a
Mathematics-Task.
The PLC-Task is calculated parallel to the BIAS-Task and has a subset of the commands.
Save Table
The command is allowed in
the PLC-Task only
The Mathematik-Task is calculated in the interruptfree processing time of the drive and has also
subset of the commands.
Profile value =
[Variable X]
THe command is allowed in
the Math only.
116
07-02-12-02-EN-V0608.doc / Type: 638
13
●
Software
Program layout
A BIAS program consists of 3 basic memory areas.
1. The program definition:
contains all definitions for starting and processing a BIAS program, the entries for defining a
unit for position presetting and the necessary configurations of the inputs and outputs.
2. The command memory:
contains up to 1500 BIAS commands.
3. The synchronous parameters:
contain the definitions for the 16 synchronous profile blocks and the 2048 supporting points.
The basic memory areas are part of the BIAS program.
In the EASYRIDER for Windows Software the extension is *.WBD.
●
Execute a BIAS program
The BIAS processing is started in operating mode 5 ”position control with BIAS processing”
after activating the output stage of the regulator.
The first BIAS block to be executed is determined in the BIAS program definition
(Parameter ”program start”).
After that, the regulator processes one BIAS command sequentially every trajectory cycle.
If the BIAS processing encounters a move command, it can be started with the Low-High slope
of the start input.
Serie
Input
Configuration
635/ 637/637+/637f/638: X10.11
”Start input BIAS” (Function 0)
631:
X10.9
“Start input ” (Function 3)
Alternatively, move commands are started when the start identifier is set before the move
command, via the BIAS command ”Start axis”.
The following blocks will be processed after a successful start.
If the command, ”Wait for “position reached”” follows a move command, block processing will
only be continued after the target position is reached.
Drive type:
631/635/637
637+/637f/638
Trajectory cycle:
1,899ms
0,844ms
07-02-12-02-EN-V0608.doc / Type: 638
117
13
●
Software
Execute a PLC program
A cyclic PLC program for supervisory monitoring tasks can be started parallel to the sequential
processing of a BIAS program
The PLC program is started by processing the BIAS command, ”PLC program”.
After the PLC program is activated the programmed PLC commands are processed as of the
specified block number.
The command ”end of program, mode = 0” within a PLC program causes a jump back to the start
of the PLC program.
The regulator processes one PLC command sequentially every trajectory cycle.
The reaction of the PLC program to the deactivation of the output stage can be adjusted in the
BIAS program definition (parameter ”program reaction PLC program”). Thus it is possible to allow
the PLC program to continue to process also during the deactivation of the regulator. Is in this
mode the first command of the BIAS execution the command “PLC program” the PLC task starts
automatically independently of the state (deactive/active) of the drive.
In the plc-loop not all of the BIAS commands are allowed.
In the 3 command overview the allowed commands are listed.
The check of allowed commands is done by the drive during run time!
Drive type
631/635/637
637+/637f/638
●
Trajectory cycle
1,899ms
0,844ms
Execute a Mathematics program
A 3 task as math program for supervisory calculation can be started parallel to the sequential
processing of a BIAS program and/or PLC program.
The mathematics-program is started by processing the BIAS command, ”Mathematics program”.
After the mathematics program is activated the programmed mathematics commands are
processed as of the specified block number.
The command ”end of program, mode =0” within a mathematic - program causes a jump back to
the start of the mathematics program.
The command ”end of program, mode =3” cancels the mathematics program.
The reaction of the mathematics program to the deactivation of the output stage can be adjusted in
the BIAS program definition (parameter ”program reaction mathematics program”).
Thus it is possible to allow the mathematics program to continue to process also during the
deactivation of the regulator.
In this mode the command „Mathematic program“ is executed at the first or second line
(if the PLC program is on line 1) of the BIAS progam or at line 0 , if the drive is not enabled.
The calculation of the mathematics commands is done in the interruptfree calculation time of the
drive. In a standard application approx. 10 commands are processed every 2ms
118
07-02-12-02-EN-V0608.doc / Type: 638
13
Software
13.3
BIAS - Commands
Position = const.
This command is only permitted
in the BIAS- task
0
[Variable X] = position
This command is only permitted
in the BIAS, PLC and MATHTask
1
2
BIAS-execution pointer
This command is only permitted
in the PLC and MATH-Task
3
[Variable X] =flag Y
This command is only permitted
in the BIAS and PLC -Task
4
5
Profile value = [variable X]
This command is only permitted in
the MATH-Task
6
Save table
This command is only
permitted in the MATH-Task
7
8
PLC-program
This command is only permitted in the
BIAS and MATH-Task
9
A
B
0
Move position
Move position +
parameter
Position = const.
Position =
[variable X]
[Variable X] =
position
NOP
Flag X = const.
If input X ? const.
[Variable X] =
const.
Mathematic
program
Table
[[variable X]] = const.
[D_Variable X] =
[D_Variable Y]+
[D_Variable Z]
1
Move
incremental
position
Move
incremental
position +
parameter
Speed = const.
Speed =
[variable X]
[Variable X] =
speed
End of program
If flag X ? const.
If output X ? const.
If [variable X] ?
const.
Profile initialization
= const.
Table
[[variable X]] =
[Y_Variable Z]
[D_Variable X] =
[D_Variable Y] [D_Variable Z]
2
Move datum
Move datum +
parameter
Acceleration = const.
Acceleration =
[Variable X]
[Variable X] =
acceleration
Sub- program
Flag X =
flag Y
Output X = const.
Profile cycle length
= [variable X]
[X_Variable Y]= Table
[[variable Z]]
3
Move infinite
positive
Deceleration = const.
Deceleration =
[variable X]
[Variable X] =
deceleration
End of Sub-program
Flag X =
input Y
Output X =
flag Y
[Variable X] =
profile value
[ W_Variable X] =
[ Y_Variable Z]
4
Move infinite
negative
Gear factor = const.
Gear factor =
[Variable X]
[Variable X] =
gear factor
PLC-program
Flag X =
output Y
_____________
[Variable X] =
[variable Y] * const.
Profile value =
[variable X]
[ X_ Variable Y] =
const.
If [D_Variable X] ?
[D_Variable Y]
5
Move
synchron
Move synchron
+ parameter
"Position reached"
window = const.
“Position reached“
window =[variable X]
[Variable X] =
block number
Jump const.
Flag X =
flag Y & flag Z
_____________
[Variable X] =
[variable Y] / const.
_____________
[Variable [X]] =
const.
[D_Variable X] =
SIN {[D_Variable Y]}
6
Move CAM
profile
Move analogue
value +
integrator
Remaining position =
const.
Remaining position =
[variable X]
[Variable X] =
actual position Y
Jump [variable X]
Flag X =
flag Y | flag Z
_____________
[Variable X] =
flag Y
_____________
[Variable [X]] =
[variable Y]
[D_Variable X] =
COS {[D_Variable Y]}
7
Synchronous
settings 1
Move speed +
integrator
Ramp filter = const.,
[variable X]
Maximal current =
[variable X]
[Variable X] =
analogue input Y
BIAS-Execution
pointer = const.
Flag X =
flag Y ^ flag Z
_____________
[Variable X] =
[variable Y].bit Z
number
Save table
[Variable [X]] =
[variable Y]
[D_Variable X] =
SQRT {[D_Variable Y]}
8
Synchronous
settings 2
Move speed +
variable
Actual position X =
const.
Actual position X =
[variable Y]
[Variable X] =
latch position Y
Wait for
”position reached”
Flag X =
! flag Y
IBT- mask number =
const.
[Variable X] =
[variable Y]
_____________
9
Move PID;
speed
_____________
If actual position X
? const.
Analogue output X =
[variable Y]
[Variable X] =
actual speed Y
Wait time = const.
Flag X = status Y
IBT- notification
number = const.
If [variable X] ?
[variable Y]
_____________
A
Move PID;
torque
Cycle length =
const.
If actual position X
? [variable Y]
PID scaling
[Variable X] =
latch status Y
Wait time =
[variable X]
If status X ? const.
CAN Command =
[variable X]
B
Set point
[axis no.] =
const.
Cycle length =
[variable X]
Sensor window =
const.
Sensor window =
[variable X]
[Variable X] =
position Y;
axis no.
BIAS-execution
pointer = [variable X]
Mode X = const.
IBT- data transfer
C
Set point
[axis no.] =
[variable X ]
Load parameter
set X =
[variable[Y]]
Sensor position =
const.
Sensor position =
[variable X]
[Variable X] =
value Y
Jump [var.[X]]; length
= const.; from
Flag X =
[variable Y]
CAN2 Command =
[variable X]
D
Move relative
_____________
Execute X commands
[Variable X]. bit[Y]
= const.
_____________
Start axis
_____________
Sensor
adjustment 1 =
[variable X]
Sensor
adjustment 2 =
[variable X]
[Variable X] =
axis status,
axis no. Y
E
Sensor
adjustment 1 =
const.
Sensor
adjustment 2 =
const.
_____________
_____________
If [var. X]. bit Y ==
const. then jump
_____________
F
Stop axis
Stop axis
+
parameter
Update parameter
PID parameter
_____________
Virtual program
Axis state, axis no.
X, bit Y = const.,
[flag Z]
_____________
Move infinite
positive +
parameter
Move infinite
negative +
parameter
Command group “Move commands“
Command group “Parameter commands“
Command group “Variable commands“
Command group “Flag commands“
Command group “Conditional jump commands“
07-02-12-02-EN-V0608.doc / Type: 638
Command group “Program control commands“
Command group “Mathematic commands“
Command group “Output commands“
Command group “CAN- Commands“
Command group “637f commands“
119
[Variable X] =
[variable Y] +
const.
[Variable X] =
[variable Y] –
const.
[Variable X]=
[variable Y] +
[variable Z]
[Variable X]=
[variable Y] [variable Z]
[Variable X]=
[variable Y] *
[variable Z]
[Variable X]=
[variable Y] /
[variable Z]
[Variable X] =
[variable Y] ?
[variable Z]
[Variable X] =
[variable Y] ?
const.
[D_Variable X] =
[D_Variable Y] *
[D_Variable Z]
[D_Variable X] =
[D_Variable Y] /
[D_Variable Z]
_____________
_____________
_____________
_____________
_____________
______________
____________
_____________
_____________
_____________
_____________
_____________
_____________
_____________
[Teachvariable X] =
[variable Y]
_____________
_____________
_____________
[Variable X] =
[teachvariable Y]
_____________
_____________
_____________
14
Appendix
14
Appendix
14.1
STO - Safety - Parameter - Report - Proposal
120
07-02-12-02-EN-V0608.doc / Type: 638
15
15
Memo
Memo
07-02-12-02-EN-V0608.doc / Type: 638
121
16
Modification Record
16
Modification Record
Version
Modification
Chapter
Date
Name
V0106
V0206
V0306
V0406
V0507
V0608
preliminary version
preliminary version
final version
STO - expansion
Intenal Version
complete 638B
-
07.04.2006
21.08.2006
28.09.2006
N. Dreilich
N. Dreilich
N. Dreilich
N. Dreilich
N. Dreilich
122
-
17.07.2008
07-02-12-02-EN-V0608.doc / Type: 638
Comment
New Photos
Phase
We reserve the right to make technical changes. The data correspond to the current status at the time of printing.
Parker Hannifin GmbH & Co. KG
Electromechanical & Drives
Automation Group
Im Sand 14
D-76669 Bad Schönborn
Tel. +49(0) 7253 / 9404-0
Fax +49(0) 7253 / 9404-99
[email protected]
www.parker-automation.com
Parker Hannifin GmbH & Co. KG
Electromechanical & Drives
Automation Group
Robert-Bosch-Straße 22
D-77656 Offenburg
Tel. +49(0) 781 / 509-0
Fax +49(0) 781 / 509-98176
[email protected]
Parker Hannifin GmbH & Co. KG
Electromechanical & Drives
Automation Group
Von-Humboldt-Straße 10
D-64646 Heppenheim
Tel. +49(0) 6252 / 7982-0
Fax +49(0) 6252 / 7982-05
[email protected]