1
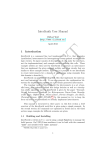
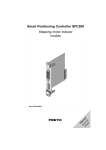
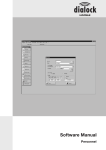
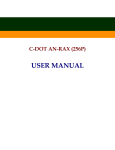
Compact performance
Manual
Electronics
CPV valve terminal
with direct connection
Type CPV..-GE-DN-8
Field bus protocol:
- DeviceNet
Manual
175 563
en 0009a
Contents and general instructions
Authors . . . . . . . . . H.-J. Drung, H. Breuer, H. Nguyen-Ngoc
Editors . . . . . . . . . . . . . . . . . . . . . . . . H.-J. Drung, M. Holder
Original . . . . . . . . . . . . . . . . . . . . . . . . . . . . . . . . . . . . . . . de
Translation . . . . . . . . . . . . . . . . . . . . . transline Deutschland
Layout . . . . . . . . . . . . . . . . . . . Festo AG & Co., Dept. KG-GD
Typesetting . . . . . . . . . . . . . . . . . . . . . . . . . . . . . . . . DUCOM
Edition . . . . . . . . . . . . . . . . . . . . . . . . . . . . . . . . . . en 0009a
Title . . . . . . . . . . . . . . . . . . . . . . . . . . . . . . . . . . MANUAL-EN
Designation . . . . . . . . . . . . . . . . . . . . . . . . . . P.BE-CP-DN-EN
Order-no. . . . . . . . . . . . . . . . . . . . . . . . . . . . . . . . . . 175 563
E (Festo AG & Co., D-73726 Esslingen, Federal Republic of Germany, 2000)
Internet: http://www.festo.com
E-mail: [email protected]
The copying, distribution and utilization of this document as
well as the communication of its contents to others without
expressed authorization is prohibited. Offenders will be held
liable for the payment of damages. All rights reserved, in particular the right to carry out patent, utility model or ornamental design registration.
Festo P.BE-CP-DN-EN en 0009a
I
Contents and general instructions
II
Festo P.BE-CP-DN-EN en 0009a
Contents and general instructions
Contents
Intended use . . . . . . . . . . . . . . . . . . . . . . . . . . . . . . . . . . . . . . . . . . . . . . . . . . . . . . . . . .
Target group . . . . . . . . . . . . . . . . . . . . . . . . . . . . . . . . . . . . . . . . . . . . . . . . . . . . . . . . . .
Service . . . . . . . . . . . . . . . . . . . . . . . . . . . . . . . . . . . . . . . . . . . . . . . . . . . . . . . . . . . . . . .
Notes on the use of this manual . . . . . . . . . . . . . . . . . . . . . . . . . . . . . . . . . . . . . . . . . . .
Important user instructions . . . . . . . . . . . . . . . . . . . . . . . . . . . . . . . . . . . . . . . . . . . . . .
V
V
VI
VI
VII
1.
Installation . . . . . . . . . . . . . . . . . . . . . . . . . . . . . . . . . . . . . . . . . . . . . . . . . . .
1-1
1.1
1.2
1.3
1.3.1
1.3.2
1.3.3
1.3.4
1.4
1.4.1
General instructions on installation . . . . . . . . . . . . . . . . . . . . . . . . . . . . . . . .
Setting the node address and the field bus baud rate . . . . . . . . . . . . . . . . . .
Connecting the CPV valve terminal . . . . . . . . . . . . . . . . . . . . . . . . . . . . . . . . .
Connecting cable . . . . . . . . . . . . . . . . . . . . . . . . . . . . . . . . . . . . . . . . . . . . . . .
Preparing the connecting cable . . . . . . . . . . . . . . . . . . . . . . . . . . . . . . . . . . . .
Selecting the power unit . . . . . . . . . . . . . . . . . . . . . . . . . . . . . . . . . . . . . . . . .
Connecting the load voltage for the CPV valves . . . . . . . . . . . . . . . . . . . . . . .
Connecting to the field bus . . . . . . . . . . . . . . . . . . . . . . . . . . . . . . . . . . . . . . .
Fit a terminating resistor . . . . . . . . . . . . . . . . . . . . . . . . . . . . . . . . . . . . . . . . .
1-3
1-5
1-9
1-9
1-10
1-12
1-13
1-17
1-22
2.
Commissioning . . . . . . . . . . . . . . . . . . . . . . . . . . . . . . . . . . . . . . . . . . . . . . . .
2-1
2.1
2.1.1
2.1.2
2.1.3
2.2
2.2.1
2.2.2
2.2.3
2.2.4
2.2.5
Preparing the CPV valve terminal for commissioning . . . . . . . . . . . . . . . . . .
2-3
Compiling the configuration list . . . . . . . . . . . . . . . . . . . . . . . . . . . . . . . . . . .
2-3
Address assignment of the CPV valve terminal . . . . . . . . . . . . . . . . . . . . . . . 2-4
Switching on the operating voltage . . . . . . . . . . . . . . . . . . . . . . . . . . . . . . . . .
2-6
Commissioning on the DeviceNet . . . . . . . . . . . . . . . . . . . . . . . . . . . . . . . . . .
2-7
General information . . . . . . . . . . . . . . . . . . . . . . . . . . . . . . . . . . . . . . . . . . . . .
2-7
Configuring DeviceNet slaves (EDS) . . . . . . . . . . . . . . . . . . . . . . . . . . . . . . . . 2-8
General instructions on parametrizing on the DeviceNet . . . . . . . . . . . . . . . 2-10
Instructions on parametrizing with RSNetWorx for DeviceNet . . . . . . . . . . . 2-11
Explicit messages . . . . . . . . . . . . . . . . . . . . . . . . . . . . . . . . . . . . . . . . . . . . . . . 2-17
Festo P.BE-CP-DN-EN en 0009a
III
Contents and general instructions
3.
Diagnosis . . . . . . . . . . . . . . . . . . . . . . . . . . . . . . . . . . . . . . . . . . . . . . . . . . . . .
3.1
3.2
3.2.1
3.2.2
3.2.3
3.3
3.3.1
3.3.2
3.4
3.5
Summary of diagnostic possibilities . . . . . . . . . . . . . . . . . . . . . . . . . . . . . . . .
3-3
Diagnosis with LEDs . . . . . . . . . . . . . . . . . . . . . . . . . . . . . . . . . . . . . . . . . . . . . 3-4
Normal operating status . . . . . . . . . . . . . . . . . . . . . . . . . . . . . . . . . . . . . . . . .
3-5
Error display of the module/network status LED . . . . . . . . . . . . . . . . . . . . . .
3-6
LED for the status display of the valve solenoid coils . . . . . . . . . . . . . . . . . . 3-7
Testing the valves . . . . . . . . . . . . . . . . . . . . . . . . . . . . . . . . . . . . . . . . . . . . . . .
3-8
Starting the test routine . . . . . . . . . . . . . . . . . . . . . . . . . . . . . . . . . . . . . . . . . .
3-9
Stopping the test routine . . . . . . . . . . . . . . . . . . . . . . . . . . . . . . . . . . . . . . . . .
3-9
Reaction to faults in the control system . . . . . . . . . . . . . . . . . . . . . . . . . . . . . 3-10
Diagnosis on the DeviceNet . . . . . . . . . . . . . . . . . . . . . . . . . . . . . . . . . . . . . . . 3-11
A.
Technical appendix . . . . . . . . . . . . . . . . . . . . . . . . . . . . . . . . . . . . . . . . . . . . .
A-1
A.1
A.2
A.2.1
A.2.2
A.2.3
A.2.4
A.2.5
A.3
Technical specifications of the CPV valve terminal type CPV..-GE-DN-8 . . . .
DeviceNet specifications of the CPV valve terminal . . . . . . . . . . . . . . . . . . . .
Identity object: Class code 01 (0x01) . . . . . . . . . . . . . . . . . . . . . . . . . . . . . . .
Router object: Class code: 02 (0x02) . . . . . . . . . . . . . . . . . . . . . . . . . . . . . . .
DeviceNet object: Class code: 03 (0x03) . . . . . . . . . . . . . . . . . . . . . . . . . . . .
Assembly object: Class code: 04 (0x04) . . . . . . . . . . . . . . . . . . . . . . . . . . . . .
Connection object: Class code: 05 (0x05) . . . . . . . . . . . . . . . . . . . . . . . . . . . .
Accessories . . . . . . . . . . . . . . . . . . . . . . . . . . . . . . . . . . . . . . . . . . . . . . . . . . . .
A-3
A-5
A-7
A-9
A-10
A-11
A-13
A-17
B.
Index . . . . . . . . . . . . . . . . . . . . . . . . . . . . . . . . . . . . . . . . . . . . . . . . . . . . . . . . .
B-1
IV
3-1
Festo P.BE-CP-DN-EN en 0009a
Contents and general instructions
Intended use
The CPV valve terminal type CPV-... with direct connection
type CPV...-GE-DN-8 described in this documentation has
been designed exclusuvely for use as a slave on the DeviceNet.
The valve terminal may only be used as follows:
–
as intended
–
in original condition
–
without any modifications
–
in faultless technical condition.
The maximum specified values for pressures, temperatures,
electrical data, torques, etc. must be observed.
Please comply with national and local safety laws and regulations.
If you wish to implement an emergency stop function, please
note the measures described in chapter 1.3.4.
Warning
If the valve terminal is used as an explosion-protected operating medium, do not disconnect the connections under
tension.
Target group
This manual is directed exclusively at personnel trained in
control and automation technology, who have experience in
installing, commissioning, programming and diagnosing
slaves on the DeviceNet.
Festo P.BE-CP-DN-EN en 0009a
V
Contents and general instructions
Service
If you have any technical problems, please contact your local
Festo Service.
Notes on the use of this manual
This manual contains specific information on installing,
commissioning, programming und diagnosing CPV valve
terminals with direct connection for DeviceNet.
Information on fitting and on the pneumatic components of
the CPV valve terminal can be found in the Pneumatics manual P.BE-CPV-... .
VI
Festo P.BE-CP-DN-EN en 0009a
Contents and general instructions
Important user instructions
Danger categories
This manual contains instructions on the dangers which may
occur if the product is not used correctly. These instructions
are marked with a heading (Warning, Caution, etc.), printed
on a shaded background and accompanied by a pictogram. A
distinction is made between the following danger categories:
Warning
This means that there is a danger of serious injury to
human beings and damage to property if these instructions are not observed.
Caution
This means that there is a danger of human injury and
damage to property if these instructions are not observed.
Please note
This means that there is a danger of damage to property if
these instructions are not observed.
In addition, the following pictogram marks passages in the
text which describe activities involving electrostatically sensitive components:
Electrostatically sensitive components: Incorrect handling
may result in damage to the components.
Festo P.BE-CP-DN-EN en 0009a
VII
Contents and general instructions
Marking special information
The following pictograms mark passages in the text containing special information.
Pictograms
Information:
Recommendations, tips and references to other sources of
information.
Accessories:
Information on necessary or useful accessories for the Festo
product.
Environment:
Information on the environment-friendly use of Festo products.
Text markings
S
The bullet denotes activities which can be carried out in
any sequence.
1. Figures denote activities which must be carried out in the
order specified.
–
VIII
Hyphens denote general activities.
Festo P.BE-CP-DN-EN en 0009a
Installation
Chapter 1
Festo P.BE-CP-DN-EN en 0009a
1-1
1. Installation
Contents
1.
Installation . . . . . . . . . . . . . . . . . . . . . . . . . . . . . . . . . . . . . . . . . . . . . . . . . . .
1-1
1.1
1.2
1.3
1.3.1
1.3.2
1.3.3
1.3.4
1.4
1.4.1
General instructions on installation . . . . . . . . . . . . . . . . . . . . . . . . . . . . . . . .
Setting the node address and the field bus baud rate . . . . . . . . . . . . . . . . . .
Connecting the CPV valve terminal . . . . . . . . . . . . . . . . . . . . . . . . . . . . . . . . .
Connecting cable . . . . . . . . . . . . . . . . . . . . . . . . . . . . . . . . . . . . . . . . . . . . . . .
Preparing the connecting cable . . . . . . . . . . . . . . . . . . . . . . . . . . . . . . . . . . . .
Selecting the power unit . . . . . . . . . . . . . . . . . . . . . . . . . . . . . . . . . . . . . . . . .
Connecting the load voltage for the CPV valves . . . . . . . . . . . . . . . . . . . . . . .
Connecting to the field bus . . . . . . . . . . . . . . . . . . . . . . . . . . . . . . . . . . . . . . .
Fit a terminating resistor . . . . . . . . . . . . . . . . . . . . . . . . . . . . . . . . . . . . . . . . .
1-3
1-5
1-9
1-9
1-10
1-12
1-13
1-17
1-22
1-2
Festo P.BE-CP-DN-EN en 0009a
1. Installation
1.1
General instructions on installation
Warning
Switch off the following before undertaking installation
and/or maintenance work:
S the compressed air supply
S the power supply for the bus interface/internal logic
S the load voltage supply to the valves.
You can thereby avoid:
–
sudden uncontrolled movements of loose tubing
–
unexpected movements of the connected actuators
–
non-defined switching states of the electronic components.
Caution
The CPV valve terminal contains electrostatically sensitive
components.
S Do not therefore touch any contacts.
S Please observe the regulations for handling electrostatically sensitive components.
In this way, you will avoid damaging the electronic components.
Festo P.BE-CP-DN-EN en 0009a
1-3
1. Installation
Electrical connecting and display elements
The following connecting and display elements can be found
on the CPV valve terminal with direct connection for DeviceNet:
3
4
5
2
6
1
7
8
1 Load voltage connection for the CPV
valves
2 Module/network status LED
5 Identification labels
6 Earth connection
(on right-hand end plate)
3 Field bus connection
7 Signal status display of pilot solenoids
4 Switch cover on the sub-base
8 Type plate
Fig. 1/1: Connecting and display elements
1-4
Festo P.BE-CP-DN-EN en 0009a
1. Installation
1.2
Setting the node address and the field bus baud rate
The following switches are situated under the switch cover on
the sub-base of the CPV valve terminal:
–
DIL-switch for setting the field bus baud rate
–
Address selector switch for selecting the node address
Open and close the cover as follows:
S
Opening Unscrew and remove the 4 screws in the switch
cover. Lift up the cover.
S
Closing Replace the cover. Tighten the 4 screws in
diagonally opposite sequence.
1 Address selector
1
switch (node
address)
2
2 DIL-switch for the
baud rate
Fig. 1/2: Setting elements
Festo P.BE-CP-DN-EN en 0009a
1-5
1. Installation
Setting the node address
You can set the node address of the CPV valve terminal with
the two address selector switches. The switches are numbered from 0 to 9. The arrow on the address selector switches
shows the tens or units figure of the set node address.
1 Address selector
switch for the
UNITS figure
1
2 Address selector
switch for the
TENS figure
2
Fig. 1/3: Address selector switch
Please note
Node addresses may only be assigned once per module/
scanner.
Recommendation:
Assign the node addresses in ascending order. Assign the
node addresses, if necessary, to suit the machine structure of
your system.
1-6
Festo P.BE-CP-DN-EN en 0009a
1. Installation
The following node addresses are permitted: 0...63
Proceed as follows:
1. Switch off the power supply to the bus interface/internal
logic as well as the load voltage supply for the CPV valves.
2. Assign an unused node address to the CPV valve terminal.
3. Use a screwdriver to set the arrow of the relevant address
selector switch to the tens or units figure of the desired
node address.
1
1
2
Setting with:
field bus address: 05
2
Setting with:
field bus address: 38
1 UNITS
1 UNITS
2 TENS
2 TENS
Fig. 1/4: Examples of address settings
Festo P.BE-CP-DN-EN en 0009a
1-7
1. Installation
Setting the field bus baud rate
Next to the address selector switches there is a DIL-switch
with two switch elements. These are numbered from 1 to 2.
The position “ON” is marked.
Please note
Set the field bus baud rate of the CPV valve terminal so
that it agrees with the setting of your module (scanner).
Field bus baud rate
125 kBaud
250 kBaud
500 kBaud
Fig. 1/5: Setting the field bus baud rate
1-8
Festo P.BE-CP-DN-EN en 0009a
1. Installation
1.3
Connecting the CPV valve terminal
1.3.1 Connecting cable
Field bus cable
Use a twisted screened 4-core cable for the field bus. The bus
interface and the internal logic of the CPV valve terminal are
supplied with power via the field bus cable.
Please note
S Please refer to the PLC manual or the manual for your
scanner for the correct type of cable. Take into account
the distance and the baud rate selected.
S Select the appropriate cable cross-sectional area.
Note the voltage drop:
– on the supply cable for the bus interface and
– the internal logic of the CPV valve terminal.
Bus length
The following table shows guide values for the maximum distance as a factor of the baud rate selected. Exact details can
be found in the manuals for your controller or scanner.
Baud rate
125 kBaud
Maximum trunk
b length
bus
l gth
Length of branch lines
maximum
500 m
cumulative
156 m
6m
Festo P.BE-CP-DN-EN en 0009a
250 kBaud
250 m
78 m
500 kBaud
100 m
39 m
1-9
1. Installation
Load voltage cable
S
Use a load voltage cable with sufficient cross-sectional
area.
S
Avoid long distances between the power unit and the CPV
valve terminal.
Long operating voltage cables reduce the voltage supplied by the power unit.
S
If necessary, ascertain the most suitable cross-sectional
area and the maximum permitted cable length.
1.3.2 Preparing the connecting cable
The connections for the field bus interface and the load voltage are in the form of plugs. The pin assignments of the field
bus interface and of the load voltage connection are shown
on the pages which follow.
Load voltage connection
Use plugs from the Festo sales range for the load voltage
connection. The plugs must match the outer diameter of the
cables used (see Appendix A, Accessories).
Field bus plug
Ready-to-use cables with plugs from various manufacturers
are available for the field bus connection (see Appendix A,
Accessories).
1-10
Festo P.BE-CP-DN-EN en 0009a
1. Installation
1 Cables
1
2 Housing
3 Connecting part
4 Strain relief
4
2
3
Fig. 1/6: Preparing the connecting cable
Preparing the cables
When you have selected suitable cables, connect them as
follows (Fig. 1/6):
1. Loosen the centre knurled nut in order to open the socket.
2. Open the strain relief on the rear of the housing. Then
pass the cable through.
3. Remove 5 mm of the insulation and fit end sleeves onto
the wires.
4. Connect the conductors.
5. Insert the connecting part into the housing of the plug
again. Pull the cable back so that there are no loops inside the housing.
6. Tighten the strain relief.
Festo P.BE-CP-DN-EN en 0009a
1-11
1. Installation
1.3.3 Selecting the power unit
Use only power units which guarantee reliable isolation in
accordance with IEC 742/EN 60742/ VDE 0551 with at least
4 kV isolation resistance (Protected Extra-Low Voltage, PELV).
Switch power packs are permitted providing they guarantee
reliable isolation in accordance with EN 60950/VDE 0805.
The current consumption of a CPV valve terminal depends on
the number of valve coils. Recommendation:
Total current
consumption
S
Use closed-circuit power units.
S
When selecting a power unit, make sure that it has sufficient power output. To do this, calculate the total current
requirements as shown in the following table:
S
Connect the load voltage for the CPV valve coils via the
EMERGENCY STOP circuit.
The following table shows you how to calculate the total
current consumption of a CP system. The values specified
have been rounded up.
Current consumption Bus interface and logic
Sums
CP valve terminal
50 mA
Current consumption of the valve supply
Current consumption of all simultaneously energized valve coils 1)
1)
1-12
__ x ____ mA
= ______ mA
Current consumption depends on valve type (see Technical
specifications of the valves)
Festo P.BE-CP-DN-EN en 0009a
1. Installation
1.3.4 Connecting the load voltage for the CPV valves
Warning
If the valve terminal is supplied with load voltage via an
output of a “fail-safe I/O module”, make-contact test
pulses of the “fail-safe I/O module” can cause the valve
terminal to react unexpectedly.
S Make sure that make-contact test pulses are reliably
suppressed or switched off.
Caution
Protect the load voltage of the CPV valve coils with an
external fuse max. 2 A.
With the external fuse you can avoid functional damage to
the CPV valve terminal in the event of a short circuit.
Power is supplied via the 4-pin M12 plug on the CPV valve
terminal.
1 Load voltage
connection
1
Fig. 1/7: 24 V DC load voltage supply
Festo P.BE-CP-DN-EN en 0009a
1-13
1. Installation
The current consumption depends on the type of valve coil.
Please refer to the Pneumatics manual P.BE-CPV-... for the
values.
Recommendation:
S
Connect the load voltage for the CPV valves (pin 2) via the
EMERGENCY STOP circuit.
Please note
Check within the framework of your EMERGENCY STOP
circuit to ascertain the measures which are required for
putting your machine/system in a safe state in the event
of an EMERGENCY STOP.
– Switching off the load voltage for the valves and output
modules in the secondary circuit of the power unit.
– Switching off the compressed air supply to the valve
terminal.
When the load voltage is switched off, there may be a
delay before the valves are also switched off. This is due
to energy being stored in the input circuitry of valve terminals.
Take this into consideration, e.g. as follows:
– By registering the switch-off moment of the load voltage
by means of an input signal in the controller.
– By blocking the control signal for the valves by locking
the output signal with the “Load voltage” input signal.
S
1-14
Check the 24 V load voltage while your system is operating. Make sure that the load voltage lies within the permitted tolerance even during operation at full load.
Festo P.BE-CP-DN-EN en 0009a
1. Installation
Pin assignment of the load voltage connection of
the CPV valve terminal
1
1 Pin assignment
1: n.c. (not connected)
2: 24 V DC load voltage for the CP valves
3: 0 V load voltage for the CP valves
4: n.c. (not connected)
Fig. 1/8: Pin assignment of the load voltage connection
(view of plugs on the valve terminal)
Earthing
The CPV valve terminal has an earth connection on the end
plate.
Please note
S Connect the earth connection of the end plate to the
earth potential with low impedance (short cable with
large cross-sectional area).
You thereby avoid faults caused by electromagnetic influences.
Remark:
By using PELV power units with Festo valve terminals, you can
ensure protection against electric shock (protection against
direct and indirect contact) in accordance with EN 60204-1 /
IEC 204. The SPC11 must be earthed in order to guarantee
the operation of certain functions (e.g. EMC).
Festo P.BE-CP-DN-EN en 0009a
1-15
1. Installation
Connection example
Please note the following when connecting the 24 V load voltage (pin 2):
S
Observe the tolerance (DC 21.0 V...26.4 V)
S
Connect the earth connection of the CPV valve terminal
with a cable with a suitable cross-sectional area.
0V
24 V
1
2
1 3
1 Potential equalization
2 The 24V load voltage supply for the valves can be
switched off separately. The bus interface and the
internal logic are supplied with power via the field bus
connection.
3 Earth connection on the end plate.
Fig. 1/9: Connecting the load voltage
1-16
Festo P.BE-CP-DN-EN en 0009a
1. Installation
1.4
Connecting to the field bus
There is a bus plug on the CPV valve terminal for connecting it
to the DeviceNet. The following is/are connected to this plug:
–
the two bus cables
–
the power supply (+ 24 V DC and 0 V) for the bus interface
and internal logic
–
the cable screening.
The hardware basis of the bus interface is the CAN bus. It is
typical for this bus that the bus interface is supplied with
power via the field bus plug.
Field bus socket
The bus is connected via a branch line with a 5-pin M12
socket with PG9 screw connector. You can order these from
Festo. (type FBSD-GD-9-5POL, part no. 18324).
Alternately, you can use ready-to-use bus cables fom various
manufacturers (see also Appendix A, Accessories).
Please note
Refer to the manual for your PLC or scanner, to ascertain
which T-adapter and which maximum branch line length
are permitted for your controller.
The summary below shows the structure of the bus interface
and the connection via a branch line.
Festo P.BE-CP-DN-EN en 0009a
1-17
1. Installation
1
2
3
4
5
8
7
6
1 Field bus
5 Branch line
2 Power supply
6 Bus
3 Screening
7 Microprocessor
4 T-adapter
8 Valve driver
Fig. 1/10: Structure and connection of the bus interface
1-18
Festo P.BE-CP-DN-EN en 0009a
1. Installation
Bus supply/logic supply
Avoid long distances between the bus interface supply/logic
supply and the CPV valve terminal.
Please note
Bus slaves of different manufacturers have different tolerances as regards the interface supply. Take this into consideration when planning the bus length and in locating
the power unit.
Recommendation:
Place the power unit approximately in the centre of the bus.
The following tolerance in the bus interface supply applies to
the Festo CPV valve terminals:
Vmax = 25.0 V
Vmax = 11.5 V
Pin assignment of
the field bus interface
Connect the field bus cable correctly to the pins of the bus
cable socket. When doing this, note also the following connection instructions, as well as the instructions in the manual for your controller or scanner.
Caution
S Make sure of the correct polarity when connecting the
field bus interface and the power supply for the bus interface/internal logic.
S Connect the screening.
Festo P.BE-CP-DN-EN en 0009a
1-19
1. Installation
1
3
220nF
1M9
2
1 Pin assignment
1:
2:
3:
4:
5:
Screening/shield (CAN_SHLD)
+ 24 V DC bus interface/logic (CAN_V+)
0 V bus interface/logic (CAN_GND)
Data+ (CAN_H)
Data- (CAN_L)
2 Node housing PE
3 Internal screening connection in the CP valve terminal
Fig. 1/11: Internal RC resistance network and pin assignment
of the field bus interface.
1-20
Festo P.BE-CP-DN-EN en 0009a
1. Installation
Connection instructions for DeviceNet
Please note
You must check the pin assignment of your scanner with
the relevant documentation.
Connect the field bus cable of your control system to the field
bus interface of the valve terminal as follows: The following
diagram shows the connections for the SLC scanner and the
SF60 valve terminals (integrated SLC scanner):
CPV valve terminal with direct connection for
DeviceNet
SLC scanner
SLC scanner from Allen-Bradley
RED
+24 V bus
Pin
2
WHITE
Data+
4
BARE
Screening
1
BLUE
Data-
5
BLACK
GND bus
3
SF60 from Festo with integrated
SLC scanner
Pin
Pin
2
+24 V bus
2
4
Data+
4
1
Screening
1
5
Data-
5
3
GND bus
3
Fig. 1/12: Connection diagram for DeviceNet
Festo P.BE-CP-DN-EN en 0009a
1-21
1. Installation
1.4.1 Fit a terminating resistor
Terminating resistor
If the CPV valve terminal to be connected is at the end of the
field bus, a terminating resistor(120 Ohm, 0.25 Watt) must be
fitted.
If you are using T-adapters, we recommend that you fit the
terminating resistor on the unused output of the T-adapter.
If you do not use a T-adapter, you must fit the terminating
resistor in the field bus socket. Crimp the wires of the resistor
together with those of the field bus cable between the cores
data+ (pin 4) and data- (pin 5) of the bus cable socket.
Please note
In order to guarantee reliable contact, we recommend that
you crimp together the wires of the resistor and those of
the incoming field bus cable in common end sleeves.
1
1 Terminating resistor 120 Ohm, 0.25 W
Fig. 1/13: Fitting a terminating resistor
1-22
Festo P.BE-CP-DN-EN en 0009a
Commissioning
Chapter 2
Festo P.BE-CP-DN-EN en 0009a
2-1
2. Commissioning
Contents
2.
Commissioning . . . . . . . . . . . . . . . . . . . . . . . . . . . . . . . . . . . . . . . . . . . . . . . .
2.1
2.1.1
2.1.2
2.1.3
2.2
2.2.1
2.2.2
2.2.3
2.2.4
2.2.5
Preparing the CPV valve terminal for commissioning . . . . . . . . . . . . . . . . . .
2-3
Compiling the configuration list . . . . . . . . . . . . . . . . . . . . . . . . . . . . . . . . . . .
2-3
Address assignment of the CPV valve terminal . . . . . . . . . . . . . . . . . . . . . . . 2-4
Switching on the operating voltage . . . . . . . . . . . . . . . . . . . . . . . . . . . . . . . . .
2-6
Commissioning on the DeviceNet . . . . . . . . . . . . . . . . . . . . . . . . . . . . . . . . . .
2-7
General information . . . . . . . . . . . . . . . . . . . . . . . . . . . . . . . . . . . . . . . . . . . . .
2-7
Configuring DeviceNet slaves (EDS) . . . . . . . . . . . . . . . . . . . . . . . . . . . . . . . . 2-8
General instructions on parametrizing on the DeviceNet . . . . . . . . . . . . . . . 2-10
Instructions on parametrizing with RSNetWorx for DeviceNet . . . . . . . . . . . 2-11
Explicit messages . . . . . . . . . . . . . . . . . . . . . . . . . . . . . . . . . . . . . . . . . . . . . . . 2-17
2-2
2-1
Festo P.BE-CP-DN-EN en 0009a
2. Commissioning
2.1
Preparing the CPV valve terminal for commissioning
Please note
Supply the valve terminal separately with load voltage.
The field bus interface of the CPV valve terminal is supplied with voltage via the field bus cable.
2.1.1 Compiling the configuration list
Configuration list
Festo P.BE-CP-DN-EN en 0009a
Before commissioning or programming, please compile a
configuration list of all the connected field bus slaves. On the
basis of this list you can:
–
Carry out a comparison between the NOMINAL and the
ACTUAL configurations in order to detect any connection
faults.
–
Access these specifications during the syntax check of a
program in order to avoid addressing errors.
2-3
2. Commissioning
2.1.2 Address assignment of the CPV valve terminal
The CPV valve terminal with direct connection for DeviceNet
always occupies 16 input addresses and 16 output addresses, irrespective of the number of valve coils fitted on it.
The current status of the outputs (valves) is copied internally
onto the input addresses. For further information on this see
Appendix A.
The diagram below shows the addressing sequence of the
individual CPV valve plates.
8-9
4-5
0-1
2-3
6-7
12-13
10-11
14-15
Fig. 2/1: Address assignment of a CPV valve terminal
2-4
Festo P.BE-CP-DN-EN en 0009a
2. Commissioning
–
Addresses are assigned on the CPV valve terminal from
left to right and on the individual valve locations from the
front to the rear.
aB Yellow LED row
for pilot solenoid
12
aD Yellow LED row
for pilot solenoid
14
aB
1
3
5
7
1
3
5
7
0
2
4
6
0
2
4
6
aD
Fig. 2/2: Address assignment of CPV valve terminal
–
Festo P.BE-CP-DN-EN en 0009a
A valve location on the CPV valve terminal always occupies 2 addresses, even if it is fitted with a reserve plate
or pressure isolation plate. If a valve location is fitted with
a double-solenoid valve, the following allocation applies:
–
pilot solenoid 14 occupies the lower-value address,
–
pilot solenoid 12 occupies the higher-value address.
The higher-value address remains unused with singlesolenoid valves.
2-5
2. Commissioning
2.1.3 Switching on the operating voltage
Please note
Please observe also the switching-on instructions in the
manual for your PLC.
When the controller is switched on, it automatically carries
out a comparison between the NOMINAL and ACTUAL configurations. For this configuration run it is important that:
–
the specifications for configuration are complete and correct
–
the power supplies for the PLC and the field bus slaves
are switched on either simultaneously or in the sequence
specified below.
Please note the following when switching on the power supply:
Common supply
If there is a common power supply for the control system and
all the field bus slaves, the power should be switched on via a
central power unit or switch.
Separate supply
If the control system and the field bus slaves have separate
power supplies, the power should be switched on in the following sequence:
1. the power supply for all the field bus slaves,
2. the power supply for the controller.
2-6
Festo P.BE-CP-DN-EN en 0009a
2. Commissioning
2.2
Commissioning on the DeviceNet
Please note
– The Festo valve terminal type CPV...-GE-DN-8 can be
used on all DeviceNet masters.
– This chapter describes the configuration and commissioning, using as an example the Allen-Bradley controllers.
2.2.1 General information
Please note the following special features if the CPV valve
terminal is used with the DeviceNet:
–
The addresses of all known DeviceNet slaves can be assigned freely as M-file addresses or as discrete I/Os in the
Scan list.
–
The address assignment of a network slave is made in
ascending order.
–
The input and output addresses can be assigned independently of each other.
Please note
Assign the addresses of the network slaves so that there is
sufficient reserve for later extensions.
The following sections contain general instructions on the
configuration of a valve terminal on the DeviceNet.
Detailed information can be found in the documentation or in
the helps for the configuration program used.
Festo P.BE-CP-DN-EN en 0009a
2-7
2. Commissioning
2.2.2 Configuring DeviceNet slaves (EDS)
If you are commissioning a DeviceNet slave for the first time,
you must inform your configuration program of certain features of the slave. The features of the different slaves are
usually managed by the configuration program in a list or
library e.g. “EDS library” (EDS = electronic data sheets).
You can extend an “EDS library” in one of the following ways:
–
by installing an EDS file
–
by entering the slave features manually
Installing an EDS file
A CD ROM
A CD ROM for extending an EDS library is included with this
manual. On this CD ROM you will find an EDS file and a picture file (Icon und Bitmap) for the valve terminal.
File type
File name
EDS file
DNDICP.EDS
ICO file (Icon)
DNDICP.ICO
BMP file (Bitmap)
DNDICP.BMP
Instructions on the directory structure of the CD ROM are
contained in the file README.TXT in the main directroy of the
CD ROM.
EDS file
The EDS file contains all the necessary features of valve terminal type CPV...-GE-DN-8. You can install this file with the aid
of your configuration program.
ICO/BMP file
Depending on the configuration program used, you can assign the Bitmap file or Icon file to the valve terminal. The
valve terminal will then be represented accordingly in the
configuration program.
2-8
Festo P.BE-CP-DN-EN en 0009a
2. Commissioning
Instructions on installing an EDS file and an ICO or BMP file
can be found in the manual or in the helps for your configuration program.
Entering the slave features manually
When an EDS file is installed, the following information on the
DeviceNet slave will be added to the EDS library. This information can also be entered manually.
Information
User manual
Vendor name
Festo Corporation
Device type
Valve terminal
Product code
8720
Major revision/Minor revision
2.0
Input size/Output size
2 bytes/2 bytes
Product name
CP valve terminal type 10
Catalog number
CPV-DNET-8
When the EDS library has been extended, the valve terminal
is entered in the slave list as a posssible DeviceNet slave. It
can now be added to a network.
Festo P.BE-CP-DN-EN en 0009a
2-9
2. Commissioning
2.2.3 General instructions on parametrizing on the DeviceNet
When the slave features have been configured (e.g. by the
installion of an EDS file), the following steps are required for
parametrizing, depending on the configuration program.
Please note
The CPV valve terminal with direct connection type
CPV...-GE-DN-8 only supports the transmission mode
Polled connection.
1. Insert slave into project/network (online or offline). If the
slave is inserted e.g. offline, it will be selected from the
slave list and added to the network.
2. Assigning the slave to a scanner A network can contain
several scanners. The slave must be assigned to a
scanner.
3. Determine the I/O parameters of the slave. The following
specifications are required here:
S
The number of I/O bytes to be transmitted. The following applies to valve terminal type CPV...-GE-DN-8:
- 2 input bytes defined firmly
- 2 output bytes defined firmly
S
Specifying the communication type The following
applies to valve terminal type CPV...-GE-DN-8:
Polled communication.
Strobed or Change of State files are not supported.
S
Assign the I/O addresses of the slave to the PLC
operands.
4. Load the configuration in the scanner.
2-10
Festo P.BE-CP-DN-EN en 0009a
2. Commissioning
2.2.4 Instructions on parametrizing with RSNetWorx for DeviceNet
This section gives instructions on parametrizing with
RSNetWorx for DeviceNet version 2.11.51 from Rockwell.
Please note
All the steps listed refer as an example to the Allen-Bradley
scanner 1747-SDN. They apply accordingly to other
masters.
Insert slave in project/network
RSNetWorx for DeviceNet contains an EDS assistant which
supports you in installing the EDS file. When the EDS file has
been installed, the valve terminal is included in the “Hardware” list. You can pull slaves over and insert them in the
network on the right-hand side.
Festo P.BE-CP-DN-EN en 0009a
2-11
2. Commissioning
1
1 Valve terminal type CPV...-GE-DN-8 in the “Hardware” list
Fig. 2/3: Hardware list and network in RSNetWorx for DeviceNet
2-12
Festo P.BE-CP-DN-EN en 0009a
2. Commissioning
Assigning the slave to a scanner
A double-click on the desired scanner in the network opens a
dialogue field, with which you can assign the available slaves
to the scanner.
1
1 Button for assigning the slave
Fig. 2/4: Register card “Scanlist” (example)
Festo P.BE-CP-DN-EN en 0009a
2-13
2. Commissioning
Parametrizing slaves
A double-click on the slave opens a dialogue field, with which
you can determine the I/O parameters of the slave.
Fig. 2/5: Dialogue field “Edit I/O parameters”
The following applies to valve terminal type CPV...-GE-DN-8:
2-14
–
Communication type: Polled Strobed or Change of State
files are not supported.
–
The number of I/O bytes to be transmitted is fixed at 2
input bytes and 2 output bytes.
Festo P.BE-CP-DN-EN en 0009a
2. Commissioning
Assigning the I/O addresses of the slave
With the register cards “Output” and “Input” you can assign
the I/O addresses of the valve terminal to the PLC operands.
Fig. 2/6: Address assignment of the inputs (example)
Festo P.BE-CP-DN-EN en 0009a
2-15
2. Commissioning
Fig. 2/7: Address assignment of the outputs (example)
2-16
Festo P.BE-CP-DN-EN en 0009a
2. Commissioning
Load the configuration in the scanner
Finally, load the configuration data in the scanner. Further
information on this can be found in the documentation for
your scanner.
2.2.5 Explicit messages
DeviceNet scanner 1771-SDN/B provides the “Explicit message program control feature”. With this function typical data
of the valve terminal, e.g. such as is output with the function
“Network Who”, are loaded into the user program where they
are processed.
The reading and writing of these data takes place via BTR 62
or BTW 62. Details on the sequence of this function can be
found in the manual for your scanner. The following data can
be read out of the valve terminal:
Object
class
Class ID
Instance
Attribute
Function
Value
Identity
1
1
1
Vendor ID
26D
1AH
2
Product type
25D
19H
3
Product code
8720D
2210H
4
Revision
V2.0
5
Status
0
6
Series number
Field bus node specific
7
Name
CPV-DNET-8
Festo P.BE-CP-DN-EN en 0009a
2-17
2. Commissioning
2-18
Festo P.BE-CP-DN-EN en 0009a
Diagnosis
Chapter 3
Festo P.BE-CP-DN-EN en 0009a
3-1
3. Diagnosis
Contents
3.
Diagnosis . . . . . . . . . . . . . . . . . . . . . . . . . . . . . . . . . . . . . . . . . . . . . . . . . . . . .
3.1
3.2
3.2.1
3.2.2
3.2.3
3.3
3.3.1
3.3.2
3.4
3.5
Summary of diagnostic possibilities . . . . . . . . . . . . . . . . . . . . . . . . . . . . . . . .
3-3
Diagnosis with LEDs . . . . . . . . . . . . . . . . . . . . . . . . . . . . . . . . . . . . . . . . . . . . . 3-4
Normal operating status . . . . . . . . . . . . . . . . . . . . . . . . . . . . . . . . . . . . . . . . .
3-5
Error display of the module/network status LED . . . . . . . . . . . . . . . . . . . . . .
3-6
LED for the status display of the valve solenoid coils . . . . . . . . . . . . . . . . . . 3-7
Testing the valves . . . . . . . . . . . . . . . . . . . . . . . . . . . . . . . . . . . . . . . . . . . . . . .
3-8
Starting the test routine . . . . . . . . . . . . . . . . . . . . . . . . . . . . . . . . . . . . . . . . . .
3-9
Stopping the test routine . . . . . . . . . . . . . . . . . . . . . . . . . . . . . . . . . . . . . . . . .
3-9
Reaction to faults in the control system . . . . . . . . . . . . . . . . . . . . . . . . . . . . . 3-10
Diagnosis on the DeviceNet . . . . . . . . . . . . . . . . . . . . . . . . . . . . . . . . . . . . . . . 3-11
3-2
3-1
Festo P.BE-CP-DN-EN en 0009a
3. Diagnosis
3.1
Summary of diagnostic possibilities
The CPV valve terminal offers the following possibilities of
diagnosis and error treatment:
–
Diagnosis via the integrated LEDs
–
Valve terminal status
–
Valve status display
–
Valve test
–
Diagnosis via the field bus
Module/
network status LED
The combination LED for the module/network status is a
two-colour LED. This lights up or flashes green or red, or
green and red together (orange), depending on the operating status of the valve terminal. It indicates the module
status and the network status.
Signal status display
There is a yellow LED for each valve solenoid coil. This indicates whether the relevant valve solenoid coil is energized.
Valve test
An integrated test routine permits automatic cyclic switching
of the valves.
Diagnosis via field bus
You can evaluate the Device Failure Table via the user program.
Festo P.BE-CP-DN-EN en 0009a
3-3
3. Diagnosis
3.2
Diagnosis with LEDs
The LEDs on the cover of the CPV valve terminal indicate the
operating status of the CPV valve terminal.
1 Module/network
1
status LED (red/
green)
aB Yellow LED row
for pilot solenoid
12
aD Yellow LED row
for pilot solenoid
14
aB
aD
Fig. 3/1: LEDs of the CPV valve terminal with DeviceNet
direct connection
LED test
3-4
When the communication part has been switched on, the
following LED test is carried out:
–
The module/network status LED lights up green for 250 ms
–
The module/network status LED lights up red for 250 ms
Festo P.BE-CP-DN-EN en 0009a
3. Diagnosis
3.2.1 Normal operating status
In normal operating status the module/network status LED
lights up green.
(
lights up;
LED
Festo P.BE-CP-DN-EN en 0009a
flashes;
out)
Colour
Operating status
Error
treatment
Green
Normal; the CPV valve terminal
is online and in contact with a
communication partner
None
3-5
3. Diagnosis
3.2.2 Error display of the module/network status LED
LED
3-6
Colour
Operating status
Error treatment
None
– The bus interface of the CPV
valve terminal is not supplied
with current
– The CPV valve terminal does not
recognize any communication
on the bus
S Check the power supply of the
bus interface/internal logic
S Check the set baud rate
S Check the physical connection
to the bus and the terminating
resistor.
Flashes
green
The CPV valve terminal is ready for S Complete the configuration.
data exchange and is online on the
Check/correct the scan list of
bus. But there is no communicathe appropriate master.
tion connection to a partner
(master). It is possible that the CPV
valve terminal is not yet assigned
to a master.
Flashes red,
fast
Non-permitted station number set.
S Set a station number between
0...63.
Flashes red,
slowly
Fault can be eliminated
– The CPV valve terminal has
recognized Communication
time-out.
– The CPV valve terminal has not
been addressed for a long
period (time-out time).
S Physical bus connection interrupted. Check master for communication ability.
S Reset time-out status of the CPV
valve terminal by re-allocation.
Switch on the CPV valve terminal
to the bus again.
Lights up
red
Serious communication fault
– The CPV valve terminal has
discovered too many faulty
telegrams on the bus and no
longer takes part in bus communication. The CPV valve
terminal is in the bus-off status.
or
– The node address of the CPV
has been assigned twice
S Bad physical bus connection;
check the connection.
S Bus has serious fault; eliminate
faults, check screening.
S The power supply to the bus has
been interrupted.
S Correct the incorrect polarity of
the data cables at one of the
slaves
S Check/correct baud rate
S Correct the node address
Lights up
orange
Load voltage for valves too low
S Eliminate undervoltage at the
load voltage connection
Festo P.BE-CP-DN-EN en 0009a
3. Diagnosis
3.2.3 LED for the status display of the valve solenoid coils
There is a yellow LED for each valve solenoid coil (see
Fig. 3/1). This LED indicates the switching status of the valve
solenoid coil.
LED
Colour
Switch position
Valve solenoid coil
Error treatment
None
Basic position
Logical 0 (no signal)
Yellow
lights up
– Switch position
or
– Basic position
Logical 1 (signal present)
Logical 1 but:
– Load voltage of the valves lies
below the permitted tolerance
range (< 20.4 V DC)
or
– Compressed air supply not
correct
or
– Pilot exhaust blocked
or
– Servicing required
Please note
If there is no valve coil, the assigned LED will not indicate
control of the output.
Festo P.BE-CP-DN-EN en 0009a
3-7
3. Diagnosis
3.3
Testing the valves
Warning
Before starting the test:
switch off the compressed air supply to the CPV valve
terminal.
You can thereby avoid unexpected or dangerous movements
of the actuators.
Caution
– This test function runs automatically in the CPV valve
terminal. All valves will be switched on/off cyclically.
– None of the programmed interlockings or further switching conditions will be taken into account.
The CPV valve terminal provides the following test routines:
3-8
Test routine
Meaning
Parallel
All the valves of a byte will be switched
on/off at the same time at 1-second
intervals. Switching takes place
continuously from byte 0 to byte 1 and
vice versa.
Serial
All the valves of a byte will be switched
on/off one after the other at 1-second
intervals.
Switch on all the valves
All the valves are switched on
Festo P.BE-CP-DN-EN en 0009a
3. Diagnosis
3.3.1 Starting the test routine
1. Switch off the power supply to the bus interface and the
internal logic.
2. Remove the cover (see also chapter 2, Configuration).
3. Note the settings of the address selector switch and the
DIL switch elements.
4. Set address 99 and DIL switch elements 1..2 to OFF.
5. Switch on the power supply to the bus interface and the
internal logic, as well as to the CPV valves.
6. Set the desired test routine on the address selector
switches as follows:
Test routine
Address to be set
Parallel
0
Serial
1
Switch on all the valves
2
7. Start: Set DIL switch elements 1 and 2 to ON.
If faults occur when the test routine is started, the red LED
on the node will flash fast. The procedure must then be repeated.
3.3.2 Stopping the test routine
1. Switch off the power supply to the bus interface and the
internal logic.
2. Set the address selector switch and the DIL switch
elements to their original positions.
Festo P.BE-CP-DN-EN en 0009a
3-9
3. Diagnosis
3.4
Reaction to faults in the control system
PLC/
protocol
DeviceNet
Reaction
to a PLC stop
to field bus faults
to field bus interruptions
Valves are reset
Valves are reset when
time out has expired
Valves are reset
immediately
Please note
If the outputs are reset after a PLC stop, field bus interruption or fault, please observe the following:
– Single-solenoid valves move to the basic position
– Double-solenoid valves remain in the current position
– Mid-position valves move to the mid-position (depending on valve type: pressurized, exhausted or blocked)
3-10
Festo P.BE-CP-DN-EN en 0009a
3. Diagnosis
3.5
Diagnosis on the DeviceNet
The following bus diagnoses are available:
–
Diagnosis via the DeviceNet scanner
–
Diagnosis via the user program
Diagnosis via the DeviceNet scanner
The CPV valve terminal with direct connection for DeviceNet
reacts on the DeviceNet in respect of the diagnosis like equivalent DeviceNet slaves. Special error messages are not output.
Diagnosis via the user program
You can evaluate the Device Failure Table via the user program. Die Device Failure Table is divided into several sections. The section Communications Failure Bitmap is interesting in conjunction with the valve terminal. In this section an
error bit is set for each DeviceNet slave, if communication
between the scanner and the slave is interrupted or faulty.
With the valve terminal, the error bit is set if:
Festo P.BE-CP-DN-EN en 0009a
–
The bus connection is interrupted (e.g. plug disconnected) or
–
If the bus interface is not supplied with power.
3-11
3. Diagnosis
3-12
Festo P.BE-CP-DN-EN en 0009a
Technical appendix
Appendix A
Festo P.BE-CP-DN-EN en 0009a
A-1
A. Technical appendix
Contents
A.
Technical appendix . . . . . . . . . . . . . . . . . . . . . . . . . . . . . . . . . . . . . . . . . . . . .
A-1
A.1
A.2
A.2.1
A.2.2
A.2.3
A.2.4
A.2.5
A.3
Technical specifications of the CPV valve terminal type CPV..-GE-DN-8 . . . .
DeviceNet specifications of the CPV valve terminal . . . . . . . . . . . . . . . . . . . .
Identity object: Class code 01 (0x01) . . . . . . . . . . . . . . . . . . . . . . . . . . . . . . .
Router object: Class code: 02 (0x02) . . . . . . . . . . . . . . . . . . . . . . . . . . . . . . .
DeviceNet object: Class code: 03 (0x03) . . . . . . . . . . . . . . . . . . . . . . . . . . . .
Assembly object: Class code: 04 (0x04) . . . . . . . . . . . . . . . . . . . . . . . . . . . . .
Connection object: Class code: 05 (0x05) . . . . . . . . . . . . . . . . . . . . . . . . . . . .
Accessories . . . . . . . . . . . . . . . . . . . . . . . . . . . . . . . . . . . . . . . . . . . . . . . . . . . .
A-3
A-5
A-7
A-9
A-10
A-11
A-13
A-17
A-2
Festo P.BE-CP-DN-EN en 0009a
A. Technical appendix
A.1
Technical specifications of the CPV valve terminal type CPV..-GE-DN-8
General
Temperature range:
– Operation
– Storage/transport
- 5 °C ... + 50 °C
Relative humidity
95 % non condensing
Protection class as per EN 60529
Plug connecter inserted or fitted with
protective cap
IP65
Protection against electric shock
Protection against electric shock
(protection against direct and indirect
contact as per EN 60204-1/IEC 204)
By PELV power unit
(Protected Extra-Low
Voltage)
Protection against explosion
(As per EU guideline 94/9/EG,
EN 50021 and EN 50281-1-1), do not
disconnect when under tension.
II 3 G/D EEx nA II
T5 -5 °C ≤ Ta ≤ +50 °C
T 80 °C
(year of manufacture
see Ex-marking on the
product)
Valves
See Pneumatics manual
P.BE-CPV-...
Load voltage for solenoid coils of CPV valve terminal
Pin 2
Load voltage connection
– Rated value
– Tolerance
Festo P.BE-CP-DN-EN en 0009a
24 V DC
21.0...26.4 V
Current consumption
– Pin 2
Sum of all switched-on CPV
solenoid valves; see manual
“CPV valve terminal”
Residual ripple
4 Vpp (within tolerance)
Bridging time during logic
voltage failure
20 ms
A-3
A. Technical appendix
Power supply for bus interface/internal electronics
Pins 2, 3; bus interface
– Rated value
– Tolerance
– Current consumption (at 24 V)
External fuse required
24 V DC (not protected against
incorrect polarity)
11.5...25 V
50 mA
Residual ripple
4 Vpp (within tolerance)
Bridging time during logic
voltage failure
20 ms
Electromagnetic compatibility
– Interference emission
– Immunity to interference
*)
Tested as per EN 55011
Limit value class A*)
Tested as per EN 50082-2
The CPV valve terminal with direct connection for DeviceNet
type CPV..-GE-DN-8 may also be used with individual authorization in residential areas (living, business and commercial
areas, small firms).
Technical specifications for the pneumatic components can
be found in the “Pneumatics manual, P.BE-CPV-...”.
A-4
Festo P.BE-CP-DN-EN en 0009a
A. Technical appendix
A.2
DeviceNet specifications of the CPV valve terminal
DeviceNet Release 1.3
The CPV valve terminal with direct connection type CPV...-GEDN-8 is operated as a slave on the DeviceNet network. As a
DeviceNet slave, the CPV valve terminal supports in the assigned master/slave connection:
S
explicit messages
S
polled I/O messages.
“Explicit Unconnected Message Manager” (UCMM) is not supported by the CPV valve terminal.
DeviceNet message types
As a slave device of group 2 the CPV valve terminal supports
the following message types:
Can identifier
GROUP 2 message type
10xxxxxx111
Duplicate MACID check message
10xxxxxx110
Unconnected explicit request
message
10xxxxxx101
Master I/O poll command
message
10xxxxxx100
Master explicit request message
xxxxxx = Node address
Festo P.BE-CP-DN-EN en 0009a
A-5
A. Technical appendix
DeviceNet class services
As a slave device of group 2 the CPV valve terminal supports
the following class services and instance services:
Service code
Service name
05 (0x05)
Reset
14 (0x0E)
Get attribute single
16 (0x10)
Set attribute single
75 (0x4B)
Allocate group 2 identifier set
76 (0x4C)
Release group 2 identifier set
DeviceNet object classes
Folgende DeviceNet object classes are supported:
A-6
Class code
Object type
# of instances
01 (0x01)
Identity
1
02 (0x02)
Router
1
03 (0x03)
DeviceNet
1
04 (0x04)
Assembly
2 (1 for OUTPUT, 1 for INPUT)
05 (0x05)
Connection
2 (explicit, polled I/O)
Festo P.BE-CP-DN-EN en 0009a
A. Technical appendix
A.2.1 Identity object: Class code 01 (0x01)
The Identity object provides information for identifying the
device as well as general information on the device.
Identity object class attributes
Attribute
Access
Name
Type
Value
1
Get
Revision
UINT
1
2
Get
Max object instance
UINT
1
6
Get
Max ID of class attribute
UINT
7
7
Get
Max ID of instance attribute
UINT
7
Identity object, instance 1 attributes
Attribute
Access
Name
Type
Value
1
Get
Vendor
UINT
0x1A
2
Get
Product type
UINT
0x19 /valve terminal
3
Get
Product code
UINT
0x2210 (type 10)
4
Get
Revision
STRUCT OF
Major revision
UINT
2
Minor revision
UINT
0
5
Get
Device status
UINT
(see under 1 )
6
Get
Serial number
UINT
(see under 2 )
7
Get
Product name
STRUCT OF
Length
UINT
10
Name
STRING [6]
CPV-DNET-8
Festo P.BE-CP-DN-EN en 0009a
A-7
A. Technical appendix
Common services
Service
code
Class
Instance
Service name
05 (0x05)
No
Yes
Reset
14 (0x0E)
Yes
Yes
Get_Attribute_Single
1 Slave status
bit 0
owned
bit 1
bit 2
bit 3
bit 4-7
bit 8
reserved
configured
reserved
vendor specific
minor cfg.fault
bit 9
minor dev.fault
bit 10
minor cfg.fault
bit 11
minor dev. fault
bit 12-15
reserved
0=not owned
1=owned (allocated)
0
0
0
0
0=no fault
1=minor fault
0=no fault
1=valve power is missing
0=no fault
1=major cfg. fault
0=no fault
1=major device fault
0
Please note
Only bits 0 and 9 are used.
2 Unique serial number
A-8
Festo P.BE-CP-DN-EN en 0009a
A. Technical appendix
A.2.2 Router object: Class code: 02 (0x02)
The Message router object represents a message connection,
by means of which a service to any object class in the physical device or instance can be addressed.
Router object class attributes
Attribute
Access
Name
Type
Value
1
Get
Revision
UINT
1
6
Get
Max ID of class
attribute
UINT
7
7
Get
Max ID of instance
attribute
UINT
2
Router object, instance 1 attributes
Attribute
Access
Name
Type
Value
2
Get
Number of
connections
UINT
2
Common services
Festo P.BE-CP-DN-EN en 0009a
Service code
Class
Instance
Service name
14 (0x0E)
Yes
Yes
Get_Attribute_Single
A-9
A. Technical appendix
A.2.3 DeviceNet object: Class code: 03 (0x03)
DeviceNet object class attributes
Attribute
Access
Name
Type
Value
1
Get
Revision
UINT
2
Router object, instance 1 attributes
Attribute
Access
Name
Type
Value
1
Get
MACID
UINT
Rotary switch
2
Get
Baud rate
UINT
DIP switch: 0=125,
1=250, 2=500
3
Get/Set
Bus off interrupt
BOOL
(see under 3 )
4
Get/Set
Bus off counter
UINT
0x00
(see under 4 )
5
Get/Set
Allocation information
STRUCT OF
Allocate service
(see under 5 )
Choice byte
BYTE
Master node address
UINT
Common services
Service
code
Class
Instance
Service name
14 (0x0E)
Yes
Yes
Get_Attribute_Single
16 (0x10)
No
Yes
Set_Attribute_Single
75 (0x4B)
No
Yes
Allocate master/slave
76 (0x4C)
No
Yes
Release master/slave
A-10
Festo P.BE-CP-DN-EN en 0009a
A. Technical appendix
3 Bus off interrupt (BOI) is triggered when the Bus off state
occurs. The following values are supported:
Bus off interrupt (BOI)
Action
0
Hold chip in OFF state (default)
1
If possible reset CAN chip
4 When the Bus off counter is set, it will be forced to 0,
irrespective of the data value supplied.
5 Allocation_byte
7
6
5
4
3
2
1
0
Reserve
Ack.
Suppress
Cyclic
Change of
state
Reserve
Bit strobe
Polled
Explicit
messages
A.2.4 Assembly object: Class code: 04 (0x04)
Two instances of the Assembly object are supported. Instance
1 is for input data and instance 2 is for output data. The only
Assembly instance attribute supported is the Value attribute
(#3). The Get service is supported for the Assembly instances. The Set service is supported for the Output assembly.
Assembly object class attributes
Class service is not supported.
Festo P.BE-CP-DN-EN en 0009a
A-11
A. Technical appendix
Assembly object, instance 1 attribute 3
The table below shows the I/O assembly data attribute format for the input data.
As the CPV valve terminal with direct connection type CPV..GE-DN-8 does not have any inputs, the input data are a copy
of the output data, but one (bus) cycle later. If the valve voltage is not applied, all input data will be set to 0.
Instance
Byte Bit 7
Bit 6
Bit 5
Bit 4
Bit 3
Bit 2
Bit 1
Bit 0
1
0
Valve
status 7
Valve
status 6
Valve
status 5
Valve
status 4
Valve
status 3
Valve
status 2
Valve
status 1
Valve
status 0
1
Valve
status
15
Valve
status
14
Valve
status
13
Valve
status
12
Valve
status
11
Valve
status
10
Valve
status
9
Valve
status
8
Instance 2 attribute 3
The table below shows the I/O assembly data attribute format for the output data which contain several pneumatic outputs.
InByte Bit 7
stance
Bit 6
Bit 5
Bit 4
Bit 3
Bit 2
Bit 1
Bit 0
2
0
Pneum.
O7
Pneum.
O6
Pneum.
O5
Pneum.
O4
Pneum.
O3
Pneum.
O2
Pneum.
O1
Pneum.
O0
1
Pneum.
O 15
Pneum.
O 14
Pneum.
O 13
Pneum.
O 12
Pneum.
O 11
Pneum.
O 10
Pneum.
O9
Pneum.
O8
O = Output
A-12
Festo P.BE-CP-DN-EN en 0009a
A. Technical appendix
Common services
Service code
Class
Instance
Service name
14 (0x0E)
Yes
Yes
Get_Attribute_Single
16 (0x10)
Yes
Yes
Set_Attribute_Single
A.2.5 Connection object: Class code: 05 (0x05)
The Connection objects manage the features of each communication connection. As slave of group II the CP valve terminal supports an explicit message connection as well as a
POLL message connection.
There are two instances of the Connection object in the device. Instance #1 is assigned to the Explicit message connection. Instance #2 is assigned to the Poll I/O connection.
Connection object class attribute
Festo P.BE-CP-DN-EN en 0009a
Attribute
Access
Name
Type
Value
1
Get
Revision
UINT
1
A-13
A. Technical appendix
Connection object, instance 1 attribute
(explicit message)
Attribute
Access
Name
Type
Value
1
Get
State
UINT
(see under 1 )
2
Get
Instance type
UINT
0 = Explicit message
3
Get
Transport class trigger
UINT
0x83
4
Get
Production connection
ID
UINT
(see under 2 )
5
Get
Consumed connection
ID
UINT
(see under 2 )
6
Get
Initial comm. Char.
UINT
0x21
7
Get
Production size
UINT
18
8
Get
Consumed size
UINT
18
9
Get/Set
Expected packet rate
UINT
Application dependent
12
Get/Set
Timeout action
UINT
(see under 3 )
13
Get
Prod. Path length
UINT
0
14
Get
Production path
15
Get
Cons. Path length
16
Get
Consumed path
A-14
(zero) (see under 4 )
UINT
0
(zero) (see under 4 )
Festo P.BE-CP-DN-EN en 0009a
A. Technical appendix
Connection object, instance 2 attributes
(POLL connection)
Attribute
Access
Name
Type
Value
1
Get
State
UINT
(see under 1 )
2
Get
Instance type
UINT
1 = I/O message
3
Get
Transport class trigger
UINT
0x82
4
Get
Production connection ID
UINT
(see under 2 )
5
Get
Consumed connection ID
UINT
(see under 2 )
6
Get
Initial comm. Char.
UINT
0x1
7
Get
Production size
UINT
2
8
Get
Consumed size
UINT
2
9
Get/Set
Expected packet rate
UINT
12
Get/Set
Timeout action
UINT
(see under 3 )
13
Get
Prod. Path length
UINT
6
14
Get
Production path
STRUCT OF
Log. seg., class
UINT
0x20
Class number
UINT
0x04 (assembly)
Log.seg., instance
UINT
0x24
Instance number
UINT
0x01 (input)
Log.seg., attribute
UINT
0x30
Attribute number
UINT
0x03
6
15
Get
Cons. Path length
UINT
16
Get
Consumed path
STRUCT OF
Log. seg., class
0x20
Class number
0x04 (assembly)
Log.seg., instance
Festo P.BE-CP-DN-EN en 0009a
UINT
0x24
A-15
A. Technical appendix
Attribute
17
Access
Name
Get
Type
Value
Instance number
UINT
0x02 (output)
Log.seg., attribute
UINT
0x30
Attribute number
UINT
0x03
UINT
0
Production inhibit
Common services
Service code
Class
Instance
Service name
05 (0x05)
Yes
Yes
Reset
14 (0x0E)
Yes
Yes
Get_Attribute_Single
16 (0x10)
No
Yes
Set_Attribute_Single
1 Connection states:
0 = non-existent
1 = configuring
3 = established
4 = timed out
2 Connection IDs:
Connection 1 produced connection ID:
Connection 1 consumed connection ID:
Connection 2 produced connection ID:
Connection 2 consumed connection ID:
xxxxxx = Node address
10xxxxxx011
10xxxxxx100
01111xxxxxx
10xxxxxx101
3 Watchdog time-out activity:
0 = Timeout (explicit messaging default)
1 = Auto delete
2 = Auto reset
4 If no data is available during the poll response a 0 length
(zero) packet is returned.
A-16
Festo P.BE-CP-DN-EN en 0009a
A. Technical appendix
A.3
Accessories
This chapter provides a summary of necessary and useful
accessories.
Please note
The following summaries do not claim to be complete. The
addresses of the firms mentioned can be found at the end
of this section.
CPV valve supply
connection
Bus connection
Festo P.BE-CP-DN-EN en 0009a
The power supply for the CP valves is provided via a 4-pin
M12 socket with PG7 or 9 screw connector. You can order
these from Festo.
Design
Type
Part no.
PG7 straight
FBSD-GD7
18497
PG9 straight
FBSD-GD9
18495
PG7 angled
FBSD-WD7
18524
PG9 angled
FBSD-WD9
18525
The bus is connected via a branch line with a 5-pin M12
socket with a PG9 screw connector. You can order these from
Festo.
Design
Type
Part no.
PG9 straight
BSD-GD9-5POL
18324
A-17
A. Technical appendix
Alternately you can use ready-to-use cables from the following manufacturers:
Manufacturer
Addresses
Woodhead
Industries Inc.
United States
Daniel Woodhead Company
3411 Woodhead Drive
Northbrook, Illinois 60062
Canada
Woodhead Canada Ltd.
1090 Brevik Place
Mississauga, Ontario
Canada L4W 3Y5
United Kingdom
Aero-Motive (U.K.) Ltd.
9, Rassau Industrial Estate
Ebbw Vale, Gwent,
NP3 5SD
Germany
H. F. Vogel GmbH
Tullastraße 9
D-75196 Remchingen
Lumberg
United States
Lumberg Inc.
11351 Business Center Drive
Richmond,
VA 23236
United Kingdom
Aero-Motive (U.K.) Ltd.
The Mount, Highclere
Newbury, Berkshire,
RG 20 9QZ
Germany
Lumberg GmbH & Co.
Hälverstraße 94
D-58579 Schalksmühle
A-18
Festo P.BE-CP-DN-EN en 0009a
A. Technical appendix
Manufacturer
Addresses
Turck
United States
Turck Inc.
3000 Campus Drive
Plymouth,
MN 55441-2656
United Kingdom
MTE Turck Ltd.
Stephenson Road
Leigh-on-Sea,
Essex SS9 5LS
Germany
Hans Turck Gmbh & Co. KG
Witzlebenstraße 7
D-45472 Mülheim an der Ruhr
Philips
Netherlands
PMA Nederland
Gebouw TQIII-4
Postbus 80025
NL-5600 JZ Eindhoven
Germany
Philips Industrial Electronics
Miramstraße 87
D-34123 Kassel
Selectron
Switzerland
Selectron Lyss AG
Industrielle Elektronik
Bernstraße 70
CH-3250 Lyss
Germany
Selectron System GmbH
Schupfer Straße 1
Postfach 31 02 62
D-90202 Nürnberg
Festo P.BE-CP-DN-EN en 0009a
A-19
A. Technical appendix
A-20
Festo P.BE-CP-DN-EN en 0009a
Index
Appendix B
Festo P.BE-CP-DN-EN en 0009a
B-1
B. Index
Contents
B.
B-2
Index . . . . . . . . . . . . . . . . . . . . . . . . . . . . . . . . . . . . . . . . . . . . . . . . . . . . . . . . .
B-1
Festo P.BE-CP-DN-EN en 0009a
B. Index
A
Accessories . . . . . . . . . . . . . . . . . . . . . . . . . . . . . . . . . . . . . A-17
Address selector switch . . . . . . . . . . . . . . . . . . . . . . . . . . . . 1-6
C
Connecting cable
Field bus cable . . . . . . . . . . . . . . . . . . . . . . . . . . . . . . . . . 1-9
Operating voltage cable . . . . . . . . . . . . . . . . . . . . . . . . . 1-10
Preparing the cables . . . . . . . . . . . . . . . . . . . . . . . . . . . 1-11
Connection instructions
DeviceNet . . . . . . . . . . . . . . . . . . . . . . . . . . . . . . . . . . . . 1-21
Current consumption . . . . . . . . . . . . . . . . . . . . . . . . . . . . . 1-12
D
DeviceNet
Specifications of the CPV valve terminal . . . . . . . . . . . . . A-5
Diagnosis on the DeviceNet . . . . . . . . . . . . . . . . . . . . . . . . 3-11
E
EDS library . . . . . . . . . . . . . . . . . . . . . . . . . . . . . . . . . . . . . . 2-8
Electrical connecting and display elements . . . . . . . . . . . . 1-4
Error
Error display of the diagnostic LED . . . . . . . . . . . . . . . . . 3-6
Reaction to faults in the control system . . . . . . . . . . . . 3-10
Status display of the valve solenoid coils . . . . . . . . . . . . 3-7
I
Intended use . . . . . . . . . . . . . . . . . . . . . . . . . . . . . . . . . . . . . . V
L
LEDs . . . . . . . . . . . . . . . . . . . . . . . . . . . . . . . . . . . . . . . . . . . 3-4
Festo P.BE-CP-DN-EN en 0009a
B-3
B. Index
N
Node address
Setting . . . . . . . . . . . . . . . . . . . . . . . . . . . . . . . . . . . . . . . . 1-6
Notes on the use of this manual . . . . . . . . . . . . . . . . . . . . . . VI
P
Pictograms . . . . . . . . . . . . . . . . . . . . . . . . . . . . . . . . . . . . . . VIII
Pin assignment
Field bus interface . . . . . . . . . . . . . . . . . . . . . . . . 1-19, 1-21
Load voltage connection . . . . . . . . . . . . . . . . . . . . . . . . 1-15
S
Service . . . . . . . . . . . . . . . . . . . . . . . . . . . . . . . . . . . . . . . . . . VI
Set baud rate . . . . . . . . . . . . . . . . . . . . . . . . . . . . . . . . . . . . 1-8
T
Target group . . . . . . . . . . . . . . . . . . . . . . . . . . . . . . . . . . . . . . . V
Technical specifications . . . . . . . . . . . . . . . . . . . . . . . . . . . . A-3
Terminating resistor . . . . . . . . . . . . . . . . . . . . . . . . . . . . . . 1-22
Text markings . . . . . . . . . . . . . . . . . . . . . . . . . . . . . . . . . . . . VIII
U
User instructions . . . . . . . . . . . . . . . . . . . . . . . . . . . . . . . . . VII
V
Valve test . . . . . . . . . . . . . . . . . . . . . . . . . . . . . . . . . . . . . . . 3-8
B-4
Festo P.BE-CP-DN-EN en 0009a