1
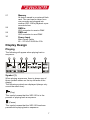
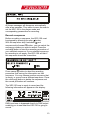
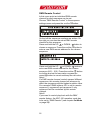
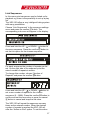
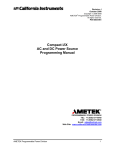
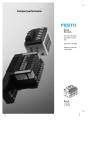
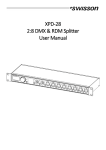
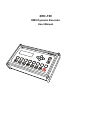
XRC-150
DMX Dynamic Recorder
User Manual
XRC-150 DMX Dynamic Recorder
User Manual
Issue 1 (2007-29-01)
Copyright © 2007 SWISSON AG
No part of this documentation may be reproduced
or transmitted in any form or by any means,
electronic or mechanical, including photocopying
and recording, without the prior written permission
of SWISSON AG.
The information in this documentation is supplied
without warranty of any kind, either directly or
indirectly, and is subject to change without prior
written notice. SWISSON its employees or
appointed representatives will not be held
responsible for any damages to software,
hardware, or data, arising as a direct or indirect
result of the product(s) mentioned herein.
Issued by
SWISSON AG
Fabrikstrasse 21
CH-3250 Lyss
Switzerland
E-Mail: [email protected]
2
Table of contents
Overview........................................................ 5
Display Design ............................................... 7
Playing........................................................ 7
Symbol .................................................... 7
Actual Sequence ..................................... 8
Actual Sequence / Next Sequence.......... 8
Mode ....................................................... 8
Time ........................................................ 8
DMX and AUX information ...................... 9
Recording ................................................... 9
Symbol .................................................... 9
Memory information............................... 10
Actual Sequence ................................... 10
Time ...................................................... 10
DMX and AUX information .................... 10
User Menu Construction ........................... 10
Actual Menu Item .................................. 11
Cursor.................................................... 11
Menu Point Items .................................. 11
Active..................................................... 11
Actual Value .......................................... 12
Main Operations .......................................... 12
Recording ................................................. 12
Recording terms .................................... 12
Record a sequence ............................... 13
Play Back a Sequence ............................. 14
3
The Main Menu ............................................ 12
Sequence Settings ................................... 15
DMX Remote Control ............................ 16
Link Sequences..................................... 17
Startup Sequence.................................. 19
Shutdown Sequence ............................. 19
Sequence Fade Time ............................ 20
Delete Sequence................................... 20
System Settings........................................ 22
Fast Access Buttons.............................. 22
Set Mode ............................................... 23
Choose Language ................................. 24
Lock Device........................................... 24
Change Password ................................. 25
External Devices....................................... 25
Options ..................................................... 25
Record Stop Scene ............................... 26
Restore Default ..................................... 26
Software Update.................................... 27
Format Flash Card ................................ 27
Overview................................................... 28
Special Instructions...................................... 29
Flash Card ................................................ 29
Daisy Chain .............................................. 30
Technical Data ............................................. 32
Safety notes ................................................. 33
4
Overview
1
2
3
4
5
6
7
8
16
24
1
9
10
17
25
18
19
26
11
12
20
27
13
21
22
28
14
15
23
29
30
Display
LCD display with LED backlight
2
NAVITGATE
Use to navigate to the left in the user
menu
3
Navigate / Increase
Use to navigate up in the user menu
or increase a value
4
Navigate / Decrease
Use to navigate down in the user
menu or decrease a value
5
NAVITGATE
Use to navigate to the right in the
user menu
6
OK, Confirm
Choose a menu point or confirm a
value
5
7
Cancel
Escape from a menu point
8
15
Fast Access Buttons
–
16
Fast access to sequences. Pressing
one of these buttons will play the
dedicated sequence. The fast
access buttons can be custom
configured.
Sequence skip backward
Skip backward through sequences
17
Spool – backward
Spool backward in a sequence
18
Play
Play sequence
19
Pause
Pause while playing sequence
20
Stop
Stop when playing or recording
21
Spool – forward
Spool forward in a sequence
22
Sequence Skip forward
Skip forward through sequences
23
Record
Start recording a sequence
24
AUX 1
Auxiliary Port 1
25
AUX 2
Auxiliary Port 2
26
USB
USB Port connector
6
27
Memory
All data is saved in an external flash
card. The card can be taken from
one recorder and plugged into
another XRC-150 to playback a prerecorded show
28
DMX in
XLR connector to receive DMX
29
DMX out
XLR connector to send DMX
30
Power Input
Main Power Cable
85 – 275 VAC 50/60 Hz 0.3A
Display Design
Playing
The following will appear when playing back a
sequence:
1
2
3
4
5
6
Symbol (1)
When playing sequences, there is always one of
three symbols shown on the top left area of the
display.
The following symbols are displayed (always only
one at the same time).
(Play)
This symbol means that the XRC-150 is in the
process of playing back a sequence.
(Pause)
This symbol means that the XRC-150 has been
paused while playing back a sequence.
7
(Stop)
This symbol means that the XRC-150 is stopped
and is no longer playing a sequence.
Actual Sequence (2)
This number shows the actual sequence playing
only while skipping backwards or forwards through
sequences. Please note that while skipping
backward or forward through sequences, the XRC150 will not play the chosen sequence. The
button has to be pressed first to play selected
sequence.
Actual Sequence / Next Sequence (3)
This number shows the actual sequence being
played (unless skipping forward or backwards
through sequences while the XRC-150 is currently
playing a sequence). As soon as there is sequence
skipping (forward or backward), this number will
show the sequence being skipped to (not the actual
sequence being played). Once the sequence has
been selected from skipping playback will occur by
button.
pressing
Mode (4)
This section of the display shows the current
operation mode of the XRC-150. These modes are
explained in chapter Set Mode on page 23.
Time (5)
This section of the display shows the actual time
relative to the running sequence. Time is shown the
following format:
Hours: Minutes: Seconds. Hundredth of a second
(see the example below)
When a sequence is fading in or the user is
spooling forward/backward, the time will be
displayed with inverted (highlighted) background:
(see the example below)
8
DMX and AUX information (6)
The right side of the display shows information
about the incoming signals (DMX and AUX).
If there is a valid incoming DMX signal, the DMX
symbol will be inverted (highlighted). If no valid
DMX signal is available, the DMX symbol will be not
inverted (highlighted):
Valid incoming DMX signal
No valid incoming DMX signal
There are 2 different auxiliary ports on the XRC150. Each time an auxiliary port receives a valid
command, the corresponding symbol is inverted
(highlighted) for a short time:
Valid Incoming command
No incoming command
Recording
When recording sequences, the following symbols
appear in the display:
Symbol (1)
When recording sequences, there is always one of
two symbols shown in the top left area of the
display.
Following symbols are displayed (one at the same
time).
(Record)
9
This symbol indicates that the XRC-150 is in the
process of recording a sequence.
(Pause while recording)
This symbol indicates that the record procedure on
the XRC-150 has been paused.
Memory/Data Information (2)
The XRC-150 does more than just record the raw
DMX data. Data is compressed in a very
sophisticated algorithm, thus there are always two
bars shown at the bottom of the display indicating
memory and data levels. The lower bar indicates
how much memory is left. The upper bar indicates
how much data is stored in the memory. This gives
an idea to the user of how long they are able to
record until the memory is full.
Actual Sequence (3)
This number indicates which sequence is being
recorded.
Time (4)
This section of the display shows how much time
on the sequence has been recorded. The format of
the time is as follows:
Hours : Minutes : Seconds . Hundredth of a second
DMX and AUX Information (5)
The right side of the display displays information
regarding the incoming DMX signals. If there is a
valid incoming DMX signal, the DMX symbol will be
inverted (highlighted). If no valid DMX signal is
available, the DMX symbol will be not inverted
(highlighted).
Valid incoming DMX signal
No valid incoming DMX signal
User Menu Construction
To enter the user menu, the XRC-150 must be
stopped and not be recording or playing back a
10
sequence. To stop those functions press the
button. It’s not possible to enter the user menu
when the XRC-150 is actually playing or recording.
To enter the user menu, press the select/confirm
button .
In the user menu, all parameters of the XRC-150
can be set or adjusted. The following image is an
example of what a “menu point” looks like. It is
followed by definitions of the sections that make it
up.
3
4
1
2
5
Actual Menu Item (1)
The current menu item is always shown at the top
of the display.
Cursor (2)
The cursor shows current position in the menu item.
The more items a menu point contains, the shorter
the cursor bar is.
Menu Point Items (3)
There are always two menu items shown in the
display. The user can navigate in the menu point by
and DOWN buttons.
pressing buttons UP The current menu item is inverted (highlighted).
Active – Indicator (4)
There are some menu points where the user can
set an option by selecting a menu point. In this
case, the active setting is always indicated by
having a symbol next to it.
11
Actual Value (5)
Whenever a parameter can be set to a specific
value, this value is always displayed to the right
side of the corresponding menu point. If there is no
value shown, this means that there is no adjustable
parameter.
Main Operations
Recording
Recording terms
To recording a sequence, the XRC-150 must be set
to normal mode (see chapter Set Mode on page
23) and the device must be unlocked (see chapter
Lock Device on Page 24).
Further, the DMX input of the XRC-150 must
receive a valid DMX value.
The XRC-150 will inform the user if any of these
points are not true.
If the XRC-150 is not in the normal mode and the
user wants to record, the following information will
appear on the display:
If the XRC-150 is in the normal mode but the device
is locked and the user wants to record, the following
information will appear on the display:
If the XRC-150 is in normal mode and the device is
unlocked, but there is no DMX available, the
following information will appear on the display if
the user wants to record:
12
All these messages will disappear automatically
after a few seconds. They serve to warn the user to
set the XRC-150 in the proper mode and
corresponding parameters for recording.
Record a sequence
Before recording a sequence, the XRC-150 must
be stopped by pressing the stop
button.
and
With the sequence skip- backward
button, you can select the
sequence skip forward
sequence number you wish to record. Press the
button to start the recording procedure of
record
your selected sequence. If your selected sequence
for recording is not empty, the XRC-150 will ask if
this sequence should be overwritten:
Press cancel
button to abort the recording
procedure thus saving the information on that
sequence. You may choose another sequence that
is empty, or record over a different sequence. Press
button to delete the sequence and
the confirm
the record procedure will continue.
The XRC-150 now is ready to record and the
following information will appear on the display:
DMX input now is bypassed directly to DMX output
enabling you to see what the XRC-150 is going to
record.
13
Press the play
or pause
button to begin
recording.
The XRC-150 can be paused while recording by
button. To continue
pressing the pause
recording, press play
or pause button.
To end your recording simply press the stop
button.
Play Back a Sequence
There are two possibilities to start play back of a
sequence:
to start playing a
Press a fast access button
sequence directly
OR
Choose a sequence with the sequence skip
or sequence skip forward
button
backward
and then press the play
button. This will also
start play back.
If an empty sequence is selected for play back, the
following information will appear on the display:
The message will disappear after a few seconds
and the XRC-150 will not play back a sequence.
While playing back a sequence, the sequence can
button. To
be paused by pressing the pause
continue the sequence, either press the play
or
pause
button.
With the XRC-150, there is also the possibility to
spool forward or backward in a sequence. To do so,
press the spool backward
or spool forward
button. When this is done, the dedicated sequence
is paused and the time is inverted (highlighted).
Press and hold the spool buttons to go to a
dedicated position in the sequence:
14
Once the dedicated position is reached, press play
button to continue.
Note:
It takes some time for the XRC-150 to start playing
at a chosen time after it has been spooled. The
longer the time spooled, the longer it takes the
XRC-150 to restart playing.
The Main Menu
Before entering the user menu, the XRC-150 must
be stopped by pressing the stop
button.
button and the XRC-150
Press the confirm/select
main menu will appear on the display:
At the top of the main menu, the software version of
the device is written (in this example it’s version
1.10).
The main menu contains the following items:
1. Sequence Settings
2. System Settings
3. External Devices
4. Options
Sequence Settings
Choose “Sequence Settings” in the main menu and
button. The sequence settings
press the confirm
menu will appear on the screen.
The sequence settings menu contains the following
submenu items:
1. DMX Remote Control
2. Link Sequences
3. Start-up Sequence
4. Shutdown Sequence
5. Sequence Fade Time
6. Delete Sequence
15
DMX Remote Control
In this menu point an individual DMX remote
channel for each sequence can be set.
Choose “DMX Remote Control” in the sequence
settings menu and press the confirm
button:
On the left the sequence numbers are written. On
the right you can see the actual DMX remote
channel for this sequence.
Press and hold the UPor DOWN button to
choose a sequence. Press the confirm
button to
enter a new DMX remote address for the chosen
sequence:
or DOWN button to
Press and hold the UP set a new DMX remote channel for the chosen
sequence (001 – 512). Press the confirm
button
to confirm and set the new value or press the
button to cancel and keep the old value.
cancel
Note1:
If a DMX remote channel controls several different
sequences, this remote channel will always only
affect the sequence with the highest numeric value.
For example if DMX address 001 is set for remote
sequence1, sequence2 and sequence3, only
sequence3 will be controlled by this remote
channel.
Note2:
If you want to control play back with the DMX
remote feature, the XRC-150 operation mode has
to be set to “DMX Remote” (see chapter Set Mode
on page 23).
16
Link Sequences
In this menu point sequences can be linked up for
playback e.g. there is the possibility to set up a play
list.
The XRC-150 offers a very intelligent linking system
with many possibilities.
Choose “Link Sequences” in the sequence settings
button. The
menu and press the confirm
corresponding sub menu will appear in the display:
Press and hold the UP - or DOWN button to
button to
choose a sequence. Press the confirm
set the link option for the chosen sequence:
For each sequence the number of repeats can be
set. On the right side of the submenu point the
actual number of repeats is written.
To change this number, choose “Number of
Repeats” and press the confirm
button.
or DOWN button to
Press and hold the UP set a new number of repeats for the chosen
sequence (0 – 9999). Press the confirm
button to
confirm and set the new value or press the cancel
button to cancel and keep the old value.
The XRC-150 will repeat the sequence as many
times as the entered number. When the desired
number of repeats is reached the XRC-150 will
offer the “Action on End” option. To set this action
17
on the XRC-150, select “Action on End” and press
button:
the confirm
or DOWN button to choose
Press the UP one out of three different options. Press the confirm
button to set the selected option. The active
action is marked with the active indicator . symbol
1. Stop:
After the number of repeats is reached,
the XRC-150 stops playing back.
2. Go to Sequence XX:
After the number of repeats is reached,
the XRC-150 will can be set to playback
different sequence allowing the user to set
up a play list of different sequences. The
next sequence number can be entered
easily:
or DOWN Press and hold the UP button to set a new “go to” sequence for
the chosen sequence (0 – 32). Press the
confirm
button to confirm and set the
button to
new value or press the cancel
cancel and keep the old value.
3. Go to Last Sequence:
If this option is set, the XRC-150 will go
back to the last sequence played before.
The links can be easily deleted by scrolling down to
the end in the “Link Sequences” menu point. The
last menu item is “Clear Links”. Choose “Clear
Links” and press the confirm
button to clear all
links. The XRC-150 will ask you if “sure”. Press the
button again to definitively clear all links.
confirm
This function sets all number of repeats to 1 and
sets the action on end to “Go to Sequence XX”. XX
18
will be 1 for sequence 1, 2 for sequence 2 and so
on. This means each sequence repeats itself.
Start-up Sequence
Choose “Start-up Sequence” in the sequence
settings menu and press the confirm
button. You
can choose now the sequence you want to set as
the start-up sequence:
or DOWN button to
Press and hold the UP choose a start-up sequence. If you don’t want to
have a start-up sequence, choose “No Start-up
button to set the
Sequence”. Press the confirm
dedicated start-up sequence (marked with the
active indicator symbol). Press the cancel
button to exit the menu point.
If the XRC-150 runs in auto start mode, the start-up
sequence will be played when power up.
Shutdown Sequence
Choose “Shutdown Sequence” in the sequence
button. You
settings menu and press the confirm
can now select the sequence you want to set as the
shutdown sequence:
Press and hold the UP or DOWN button to
choose a shutdown sequence. If you don’t want to
have a shutdown sequence, choose “No Shutdown
Sequence”. Press the confirm
button to set the
dedicated shutdown sequence (marked with the
active indicator symbol). Press the cancel
button to exit the menu point.
If the XRC-150 runs in auto start mode, the
shutdown sequence will be played when the stop
button is pressed.
19
Sequence Fade Time
Choose “Sequence Fade Time” in the sequence
settings menu and press the confirm
button. You
can now set a fade in time for each sequence:
or DOWN
button to
Press and hold the UP choose a sequence in which you want to change
the fade in time. The actual fade time is written at
the right side. Press the confirm
button to
change the fade in time:
or DOWN button to
Press and hold the UP change the fade in time. The format of the fade time
goes as follows: Minutes: Seconds. Hundredths of
a second. The fade time can be set between
00:00.00 and 54:36.75. The resolution is 50ms.
button to confirm and set the
Press the confirm
button to
new fade time or press the cancel
cancel and keep the old value.
If you want to set the same fade time for all
sequences, simply choose “All Sequences” in the
sequence fade time menu point. Set the fade time
and press the confirm
button. The fade time now
is equal on each sequence.
Delete Sequence
Choose “Delete Sequence” in the sequence
settings menu and press the confirm
button. You
can delete a specific sequence or delete all
sequences at one time:
20
The sequence status is written on the right side
(empty or not empty).
button to delete the selected
Press the confirm
sequence. The XRC-150 will ask you if “sure”.
Press the confirm
button again and the chosen
selected sequence will be definitively deleted.
21
System Settings
Choose “System Settings” in the main menu and
button. The system settings
press the confirm
menu will appear on the screen.
The system settings menu contains the following
submenu items:
1. Fast Access Buttons
2. Set Mode
3. Choose Language
4. Lock Device
5. Change Password
Fast Access Buttons
In this menu point you can link the 8 fast access
buttons
to the sequences you want to have
fast access to.
Choose “Fast Access Buttons” in the system
settings menu and press the confirm
button. The
sub menu will appear on the display:
On the left the sequence numbers are written. On
the right you can see the actual fast access buttons
linked.
Press and hold the UP or DOWN - button to
to link a new
choose a sequence. Press confirm
fast access button for the chosen sequence:
to link
Press one of the fast access buttons
them and confirm by pressing the confirm
button.
button if you don’t want to
Press the cancel
change.
Note:
22
It’s possible to link several buttons to the same
sequence. In this case only the button with the
highest numeric value will be written on the display.
Set Mode
In this menu point the operation mode of the XRC150 can be set.
Choose “Set Mode” in the system settings menu
button. The sub menu will
and press confirm
appear on the display:
Press the UP or DOWN button to choose a
to set the new mode. The
mode. Press confirm
active mode is always marked with active indicator
symbol.
There are 5 different modes:
1. Normal:
In this mode, the XRC-150 operates with
full access. It’s possible to record and for
playback, all buttons can be used.
2. Backup:
In this mode, you can plug the XRC-150
between a DMX desk and your running
light show. If the DMX signal from the desk
fails, the XRC-150 will detect the failure
and switch immediately to playback. If a
start-up sequence is defined, will run first.
The XRC-150 now operates like normal
mode, but cannot record.
As soon as the DMX signal from the desk
is ok again, the XRC-150 will stop playing
and the signal from the DMX desk will take
over again.
3. Auto start:
In this mode, the XRC-150 automatically
starts playing when powered up. If a startup sequence is defined, this will be run
first. When pressing stop, shutdown
sequence will be ran.
4. DMX Remote:
In this mode, the XRC-150 is remote
controlled through DMX signal, all buttons
23
5.
are locked so it’s only possible to control
the XRC-150 through DMX remote signal.
Setting a DMX value higher than 20% will
start playing the corresponding sequence
(see chapter DMX Remote Control on
page 16). Decreasing the DMX value
below 10% will stop playing.
Slave:
The XRC-150 has the possibility of being
daisy chained with several other XRC-150
for recording and playing back more than
512 channels. In this case, one XRC-150
has to be the master and all other XRC150 in the daisy chain have to run in slave
mode. For more details, see chapter
Fehler! Verweisquelle konnte nicht
gefunden werden. on page Fehler!
Textmarke nicht definiert..
Choose Language
On this menu point, the display language can be
set either to English or German.
Lock Device
Choose “Lock Device” in the system settings menu
and press the confirm
button. The XRC-150 now
can be locked:
button to select if
Press the UP - or DOWN you want to lock or unlock the device. Press
to set; a marker ( ) shows if the device
confirm
actually is locked or unlocked.
When “locked” is set, the device will lock as soon
as the user menu is quitted (e.g. when you will see
the normal play back display). In the case of the
device being locked, it’s not possible to record
sequences and for entering the user menu, a pass
code must be entered:
24
button to change the
Use the right - or left
button to
cursor position, UP - or DOWN
to confirm the pass
adjust the pass code. Press
code. If the code was correct, the XRC-150 will
enter the user menu.
If the password was wrong, a message will appear:
If now there is no action, the XRC-150 will reboot
or cancel
after a while. Press the confirm
button and the XRC-150 will reboot immediately.
Change Password
Choose “Change Password” in the system settings
menu and press confirm . You can now enter a
new password. Entering a new pass code is done
to
the same way as described above. Press
confirm and set the new pass code.
External Devices
This menu point will be used to configure the
external devices for the XRC-150. The instructions
for them will come with the corresponding devices.
Options
Choose “Options” in the main menu and press
confirm . The options menu will appear on the
screen.
The options menu contains the following submenu
items:
1. Record Stop Scene
2. Restore Default
3. Software Update
4. Format Flashcard
25
Record Stop Scene
Choosing this submenu will record the stop scene.
It’s a static record of all 512 DMX channels. When
the XRC-150 is actually stopped, this scene will be
set to the DMX output. This is very useful because
you can exactly define how your lights should react
in case of the XRC-150 being stopped.
To record stop scene, connect the XRC-150 to your
DMX desk and set up your stop scene on the desk.
Choose “Record Stop Scene” in the options menu
and press confirm :
again and the XRC-150 records
Press confirm
the input DMX to the stop scene.
Note:
Invalid DMX data will be saved as ‘0’. Therefore if
you record the stop scene without valid DMX input,
stop scene will be set completely to ‘0’.
Restore Default
Choose “Restore Default” in the options menu to
restore all default values and press confirm . The
XRC-150 will ask you if “sure”. Press confirm
again and the XRC-150 will set all parameters to
their default value:
1. DMX Remote control:
Sequence 1:
DMX address 001
Sequence 2:
DMX address 002
……………
Sequence 32:
DMX address 032
2. Link Sequences:
-Repeat all sequences 1 time
-Action on end = loop to same sequence
3. Start-up Sequence:
No start-up sequence
4. Shutdown Sequence:
No shutdown sequence
5. Sequence fade time:
Set all fade time to 1 second
6. Fast Access Buttons:
Button 1:
Sequence 1
26
Button 2:
Sequence 2
……………
Button 8:
Sequence 8
7. Operation Mode:
Set to normal mode
8. Language:
Set to English
9. Device Lock:
Unlock device
10. Password
Set to “0000”
Software Update
Choose “Software Update” in the options menu and
press the confirm
button. The XRC-150 will ask if
again and connect the XRCsure. Press confirm
150 over the USB port to your personal computer.
Start downloading the software upgrade.
If you entered here by mistake, simply disconnect
the XRC-150 from power and re-power, nothing will
be changed.
Note1:
The USB cable is not contained in delivery of the
XRC-150.
Note2:
After a software update, all parameters will be set
to their default values (see above).
Format Flash Card
Choose “Format Flash Card” in the options menu
button. The XRC-150 will
and press the confirm
again to format the
ask if “sure”. Press confirm
entire flash card. ATTENTION: All sequences data
will be deleted and all parameters will be set to their
default values (see chapter Restore Default on
page 26).
A bar graph will show you the progress of the
format procedure.
27
Overview
The following image gives you a brief overview of
the XRC-150 user menu:
Main Menu
Sequence Settings
DMX RemoteControl
Choose Sequence
Set DMX Remote Address
Link Sequences
Choose Sequence
Number of Repeats
Action on End
Stop
Go to Sequence
Go to Last Sequence
Set Number of Repeats
Set Sequence Number
Startup Sequence
Choose Sequence
Shutdown Sequence
Choose Sequence
Sequence Fade Time
Choose Sequence
Set Fade Time
Delete Sequence
Choose Sequence
System Settings
Fast Access Buttons
Choose Sequence
Set Mode
Set Lanugage
Lock Device
Change Password
External Devices
Set Fast Access Button
Choose Mode
Choose Language
Lock / Unlock
Enter new Password
See Device User Manual
Options
Record Stop Scene
Restore Default
Software Update
Format Flash Card
28
Get DMX Ready / Record
Special Instructions
Flash Card
All recorded data are saved in a flash card. Also all
parameters (fade time, sequence link etc.) are
saved in a flash card. This card can be removed
from the XRC-150 and inserted into another XRC150. The result would be to have exactly the same
sequences and settings on the XRC-150 where the
card was just inserted.
To protect the card from being removed from
unauthorized personal, the slot of the flash card is
protected by a cover. If you want to remove the
card, simply remove the two screws and take the
cover away:
Screws for cover
Now you can easily take the card out off the XRC150.
When there is no card inserted, the following
message will appear on the display:
Insert the flash card again and press the confirm
button. The XRC-150 will go back to normal
operation.
29
Daisy Chain
The XRC-150 can be daisy chained. This is very
useful if you want to record a show with several
DMX lines (more than 512 channels). For each
DMX universe one XRC-150 is required.
The connection is done over the AUX ports:
DMX Line1
CH 1 - 512
Mode = Slave
DMX Line2
CH 513 - 1024
Mode = Slave
DMX Line3
CH 1025 - 1536
Note1:
The number of XRC-150 to be daisy chained is
unlimited
Note2:
The first device MUSTN’T be in slave mode. All
other devices MUST be in slave mode. All
commands (play, pause, stop, record etc.) will be
sent from the master to the slaves. The slave will
do always the same as the master.
Note3:
The sequences MUST be recorded in daisy chain
to guarantee a correct operation when playing back
sequences.
Note4:
It doesn’t matter on which aux port the XRC-150 is
connected.
30
Note5:
For wiring you have to use a standard RJ45 8 pole
CROSS OVER network cable.
1
2
3
4
5
6
7
8
1
2
3
4
5
6
7
8
The communication runs on 250kBaud, therefore
you don’t need to have a high speed cable. The
cable is NOT included in the delivery.
31
Technical Data
Recorded Channels
512 channels
Storage Capacity
Due to a very sophisticated
DMX data compression
ther is no fixed storage
capacity. The more DMX
channels are changing
their value, the faster the
memory would be full
Number of
sequences
32 different sequences can
be recorded
Link up sequences
Number of repeats and
“action on end”
DMX termination
120Ohm built in
Input Power
50VAC – 276VAC
50/60Hz 0.3A
Operating
temperature
Dimensions / weight
-0°C to 45°C
32
184 mm x 111mm x 45mm /
1000g
Safety notes
Consider the following notes absolutely when you
set up, connect and use the XRC-150 DMX
Dynamic Recorder:
•
Connect the cables only with the proper plugs
and sockets.
•
Set the cables in an accident-proof fashion.
Connected cables mustn’t be stressed
mechanically too much.
•
Keep the device away from sources of
electrical interference.
•
Only connect accessories certified for this
device.
•
Never open the device yourself. Don’t touch
the plug contacts with metal or other pointed
objects.
•
Clean the XRC-150 DMX Dynamic Recorder
only with a soft, damp cloth. Don’t use
chemicals or other harsh scrubbing agents.
•
Protect the device against extreme dampness,
liquids, dust and dirt.
•
Don’t use the device in places with excessive
direct sunlight or heat.
•
Don’t use the device in highly combustible
areas.
33