1
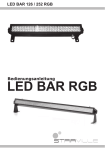
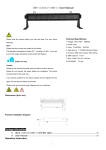
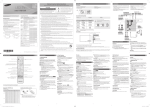
LED BAR 126 / 252 RGB
Owner‘s Manual
LED BAR RGB
Thank you for choosing one of our LED bars. Please read this user
manual carefully and follow the instructions to avoid danger or damage
to the unit due to mishandling. Keep this user guide for future reference.
If you give the unit to another user, be sure that he also receives this
instruction booklet.
Safety instruction
You have to carefully read the instruction, which includes important
information about the installation, usage and maintenance, BEFORE
operating this device.
XXThis device is exclusively meant to be used as a lighting device within
the limits given in this manual. Using it in any other way you risk electric
shock and warranty will become void.
XXPlease do not connect the power while the fixture is still in the box.
XXKeep children away from the device and mains cable! Children frequently
underestimate the dangers of electrical devices. Also keep the plastic
packaging well away from small children. There is a risk of suffocation!
XXUnpack and check carefully there is no transportation damage before
using the unit. Never put a damaged device into operation.
XXBefore operating, ensure that the voltage and frequency of power supply
match the power requirements of the unit as stated in this manual.
XXNever sever or manipulate any part of the mains connection. If a power
cord is provided with an earth lead, this is mandatory to ensure safe
operation! Otherwise a LIFE THREATENING situation exists!
XXNever submerse the device in water or any other liquid. Only wipe it
with a slightly damp cloth.
XXThe unit is for indoor use only. Use it only in a dry location. Exposing the
device to rain or moisture would cause the risk of electrical shock or fire.
XXYou have to ensure, that the mains cable never becomes wet during
operation.
XXUnder no circumstances may you open the housing of the device.
Should you do so your safety would not be assured and the warranty
will become void. There are no operational components whatsoever
inside, only dangerous voltages that can give you a deadly shock!
XXNEVER use the unit under the following conditions:
> In places subject to vibrations or bumps.
> In places with a temperature of over 45 °C or less than 2 °C.
> In places subject to excessive dryness or humidity (ideal conditions
are between 35% and 80%).
2
STAIRVILLE • LED BAR 126 / 252 RGB
XXDO NOT let any liquids or objects enter the unit. Should any liquid
be spilled on the unit, DISCONNECT the power supply to the unit
immediately and contact the service company.
XXNotice regarding power disconnection:
To disconnect the device from the power source the mains plug must
be removed from the power socket. For this reason the device must
be placed in a position where a constant unobstructed access to the
power socket is assured, thus in an emergency situation you are able
to immediately pull out the mains plug. To eliminate the risk of fire you
must completely disconnect the mains plug from the power socket after
the device has been used.
XXAlways grasp the plug of the mains cord. Do not pull on the mains cord
and never touch the mains cable with wet hands as this could result in
a short circuit or an electrical shock. Do not place the device, speaker
cabinets or anything else on the mains cord and make sure that it does
not become clamped. Place the mains cord in a position where it can
not be trod on. A damaged mains cable can cause a fire or an electrical
shock. Check the mains cable and plug from time to time. Should it
become damaged don’t operate the device. Contact our customer
service centre to have it replaced.
XXNever leave this device running unattended.
XXThe unit must only be installed in a location with adequate ventilation.
Be sure that no ventilation slots are blocked.
XXBefore a storm and/or a thunderstorm with a risk of lightning, disconnect
the device from the mains power supply.
XXIn the event of serious operating problems, stop using the unit
immediately. Never try to dismantle, repair or modify the unit by
yourself. Otherwise warranty becomes void. Repairs carried out by
unskilled people can lead to damage or malfunction. Please contact the
nearest authorized technical assistance centre.
Package information
XXSTAIRVILLE LED BAR RGB Light:
XXUser manual:
www.thomann.de
1x
1x
3
Dimensions
LED BAR 126 RGB
LED BAR 252 RGB
4
STAIRVILLE • LED BAR 126 / 252 RGB
Operation instruction
Product introduction
STAIRVILLE LED BAR RGB is a LED wall washer using 42 (model 126)
resp. 84 (model 252) RGB LEDs. The functions available are DMX, Audio,
Auto, and Master / Slave linking. The device offers changing colours,
dimming, strobe and fade effects. It’s an easy to operate, inexpensive, and
easy to install LED device, especially suitable for the wash of Home Party
and Entertainment place.
Rear view (model 126 RGB)
1. POWER LINK OUTPUT
2. DMX IN XLR mounting plug
3. DMX OUT XLR mounting socket
4. Audio sensitivity
5. MIC
6. LCD display
7. “MENU” switch
8. “UP” switch
9. “DOWN” switch
10. POWER INPUT with
FUSE holder
Rear view (model 252 RGB)
1. POWER LINK OUTPUT
2. DMX IN XLR mounting plug
3. DMX OUT XLR mounting socket
4. MIC
5. Audio sensitivity
6. LCD display
7. “MENU” switch
8. “UP” switch
9. “DOWN” switch
10. FUSE
11. POWER INPUT
www.thomann.de
5
Installation
Methods: This fixture can be set up on a flat surface or hanged on the wall
or under a ceiling. If you want to hang it, please be sure that you will fix
the screw to the wall or ceiling very carefully to avoid any problem.
a) Flat surface installation
b) Hanging installation
Functions
Back up
When the fixture is powered up, the system will revert to its
original settings. The display will show the information as
shown to the right. After 2 seconds, the fixture will return to
the working mode, that was active when powered off the last
time. E.g.: When you set up the unit for DMX mode and the
DMX address is “1” before the power was shut down, the unit
will show the same display when powered up next time.
Slave mode
a) DMX mode & address setting:
Hold the button “MENU” until the mode is changed to DMX
mode. Release the button, then the working mode will be
changed to DMX mode automatically. Also you can change
the DMX address by pressing “UP” or “DOWN” button. If you
keep the button “UP” or “DOWN” pressed, then the DMX
address will be changed rapidly. The address range goes from 001 to 512.
6
STAIRVILLE • LED BAR 126 / 252 RGB
b) DMX connector pin assignment:
Please note the pin assignment for DMX plug and socket connectors:
Pin1 = Ground
Pin2 = DMX–
Pin3 = DMX+
c) DMX linking method:
d) DMX function chart for . . .
. . . model 126 RGB
CH1
CH2 CH3
CH4
CH5 CH6 CH7
CH8 CH9 CH10 CH11
0~40 Black
NA
NA
NA
NA
NA
NA
NA
NA
NA
NA
Out
41~80
Shutter Red1 Green1 Blue1 Red2 Green2 Blue2 Red3 Green3 Blue3
Dimmer 1
81~120
All
All
Shutter All Red
NA
NA
NA
NA
NA
NA
Dimmer 2
Green Blue
121~160
Shutter Colour
NA
NA
NA
NA
NA
NA
NA
NA
Colour flash
161~200
Colour
Speed NA
NA
NA
NA
NA
NA
NA
NA
NA
change
200~240
Speed NA
NA
NA
NA
NA
NA
NA
NA
NA
Color flow
241~255
Speed Fade
NA
NA
NA
NA
NA
NA
NA
NA
Dream flow
. . . model 252 RGB
CH1
CH2 CH3 CH4
CH5 CH6
CH7
CH8 CH9 CH10 CH11
0~40 Black
NA
NA
NA
NA
NA
NA
NA
NA
NA
NA
Out
41~80
3 Segment Shutter Red1 Green1 Blue1 Red2 Green2 Blue2 Red3 Green3 Blue3
Mode
81~120
All
All
All
1 Segment Shutter
NA
NA
NA
NA
NA
NA
Red Green Blue
Mode
www.thomann.de
7
CH1
121~160
Color
Shutter
161~200
Color
Change
200~240
Color Flow
241~255
Dream Flow
CH2
CH3
CH4
CH5
CH6
CH7
CH8
CH9
CH10
CH11
Shutter Color
NA
NA
NA
NA
NA
NA
NA
NA
Speed
NA
NA
NA
NA
NA
NA
NA
NA
NA
Speed
NA
NA
NA
NA
NA
NA
NA
NA
NA
NA
NA
NA
NA
NA
NA
NA
NA
Speed Fade
DMX linking test: use a three-wire DMX linking cable to link the fixtures
accordingly. Each fixture will be setting up to DMX mode and the receipt
address will be set up in the same. (The address code range is 001512). When you link the fixtures in DMX mode, all devices will be working
synchronously.
Master mode
(I) Auto mode working:
Keep the button “MENU” pressed until the mode is changed to Auto mode.
Then release the button and the working mode will be changed to Auto
mode automatically. Press the “MENU” button to choose the different
code. Please see the picture below, then press “UP” or “DOWN” button
to change the code. If you keep the button “UP” or “DOWN” pressed, the
code will be changed rapidly.
Code specification:
Prg XX (01~08):
Spd XX (01~10):
Stb XX (01~10):
Fad XX (01~10):
8
Choose the internal program. There are 8 internal
programs available.
Choose the speed of the internal program. There
are 10 speed steps selectable. 01 offers the fastest
speed and 10 the slowest speed.
Choose the strobe steps of the internal program.
Choose the fade term of the internal program. There
are 10 fade steps selectable. 01 is the fastest
fade and 10 is the slowest fade.
STAIRVILLE • LED BAR 126 / 252 RGB
Note: If you set up the strobe and fade together, the flash will be in the
priority. If the strobe (Stb) is not 0, even fade (Fad) is not 0, the fixture will
run the flash program, not fade program.
(II) Audio mode working:
Keep the button “MENU” pressed until the mode is changed to Audio
mode. Then release the button and the working mode will be changed to
the Audio mode automatically. Press the “MENU” button to change the
code as shown below, then press “UP” or “DOWN” button to change the
code. If you keep the button “UP” or “DOWN” pressed the code will be
changed rapidly.
Code specification:
Prg XX (01~08):
Choose the internal program. There are 8 internal
programs available.
Spd XX (01~10):
Choose the speed of the internal program. There
are 10 speed steps selectable. 01 offers the fastest
speed and 10 the slowest speed.
Stb XX (01~10):
Choose the strobe steps of the internal program.
Fad XX (01~10):
Choose the fade term of the internal program. There
are 10 fade steps selectable. 01 is the fastest fade
and 10 is the slowest fade.
Note: If you set up the strobe and fade together, the flash will be in the
priority. If the strobe (Stb) is not 0, even fade (Fad) is not 0, the fixture
will run the flash program, not fade program. The audio sensitivity can
be adjusted using the “Audio Sensitivity” control (4). If you turn the knob
clockwise, the fixture will be more sensitivity for the audio.
Linking Function: The fixtures will work synchronously at Auto or Audio
mode.
www.thomann.de
9
Troubleshooting
Problem
The unit does not
work
Check list
1. Unit is not connected to
the mains.
2. Fuse has blown.
No audio control
1
2.
No DMX input
1.
2.
Trouble Shooting
1. Connect the unit to the mains.
2.
Unit is not in Audio mode. 1.
Audio sensitivity is weak. 2.
The polarity is opposite
1.
in the DMX controller.
Unit is not in DMX mode. 2.
Disconnect the unit from the
mains and replace the fuse.
Change to audio mode.
Adjust the sensitivity clockwise
to increase the audio signal
reception.
Correct the DMX polarity.
Change to the DMX mode.
If the procedures recommended above do not succeed, please contact our
Service Centre. You can find the contact information at “www.thomann.de”.
Technical specification
LED BAR 126 RGB
1. Operating voltage: AC 230 V / 50 Hz
2. Power consumption: 23 W
3. Fuse:
1 A / 250 V
4. Light Source:
126 RGB LEDs, Ø 10 mm
5. Function:
DMX, Auto, Sound, M/S Linking
6. DMX Channel:
11 CH
7. Size (LxWxH):
600 x 114 x 161 mm
8. Net Weight:
3.4 kg
LED BAR 252 RGB
1. Operating voltage: AC 230 V / 50HZ
2. Power consumption: 30 W
3. Fuse:
1 A / 250 V
4. Light Source:
252 RGB LEDs, Ø 10 mm
5. Function:
DMX, Auto, Sound, M/S Linking
6. DMX Channel:
11 CH
7. Size (LxWxH):
1100 x 114 x 161 mm
8. Net Weight:
4.5 kg
As we continuously strive to improve our products, all specifications and
appearance are subject to change without prior notice.
10
STAIRVILLE • LED BAR 126 / 252 RGB
Disposal
Do not dispose of the device at the end of his operating life in your
normal domestic waste. This device is subject to the European
Guidelines 2002/96/EC.
XXHave the product disposed of by a professional disposal company of by
your communal disposal facility.
XXObserve the currently applicable regulations. In case of doubt contact
your disposal facility.
XXDispose of packaging materials in an environmentally responsible
manner.
www.thomann.de
11
© 2011 • Musikhaus Thomann e. K. • Treppendorf 30 • 96138 Burgebrach • Germany • www.thomann.de