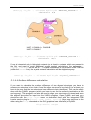
1
VASCo 1.0
Manual
Acknowledgments
Disclaimer
VASCo: Copyright © 2008, Institute of Molecular Biosciences, Karl-Franzens University
Graz (IMB-KFUG). All rights reserved. This software is provided "AS IS". IMB-KFUG
makes no warranties, express or implied, including no representation or warranty with
respect to the performance of the software and derivatives or their safety, effectiveness, or
commercial viability. IMB-KFUG does not warrant the merchantability or fitness of the
software and derivatives for any particular purpose, or that they may be exploited without
infringing the copyrights, patent rights or property rights of others. This software program
may not be sold, leased, transferred, exported or otherwise disclaimed to anyone, in whole
or in part, without the prior written consent of IMB-KFUG.
Credits
The VASCo software was written by Georg Steinkellner with scientific advice from Karl
Gruber and Christoph Kratky
This manual was written by Georg Steinkellner.
We would also like to thank Michel F. Sanner (MSMS) and Raquel Norel (DelPhi) for
allowing us to integrate and distribute there programs along with VASCo.
Manual Version: 2.2009 01 09
Karl-Franzens University Graz
Graz University of Technology
Structural Biology
Institute of Molecular Biosciences
Humboldtstraße 50
8010 Graz
Austria
Institute for Genomics and Bioinformatics
Petersgasse 14
8010 Graz
Austria
Phone:
Fax:
URL:
Phone:
Fax:
URL:
+43 (316) 380-1989
+43 (316) 380-9897
http://strubi.uni-graz.at/
+43 (316) 873-5331
+43 (316) 873-5340
http://genome.tugraz.at
Table of Content
ACKNOWLEDGMENTS ................................................................................................................................................2
TABLE OF CONTENT....................................................................................................................................................3
1
INTRODUCTION ...................................................................................................................................................4
2
INSTALLATION ....................................................................................................................................................4
2.1
WINDOWS .........................................................................................................................................................4
2.1.1
Package content ..........................................................................................................................................4
2.1.2
Requirements...............................................................................................................................................4
2.1.3
Setup............................................................................................................................................................5
2.2
LINUX ...............................................................................................................................................................5
2.2.1
Package content ..........................................................................................................................................5
2.2.2
Requirements...............................................................................................................................................5
2.2.3
Setup............................................................................................................................................................5
2.3
REMARKS .........................................................................................................................................................6
3
USER GUIDE ..........................................................................................................................................................7
3.1
GETTING STARTED ............................................................................................................................................8
3.1.1
General........................................................................................................................................................8
3.1.2
Testrun ........................................................................................................................................................8
3.1.3
Example filename input:..............................................................................................................................9
3.1.4
Preparation of the PDB Files: ....................................................................................................................9
3.1.4.1
3.1.4.2
3.1.4.3
3.1.4.4
3.1.5
Surface Property Calculation....................................................................................................................13
3.1.5.1
3.1.5.2
3.1.5.3
3.1.5.4
3.2
3.3
Crystal contact calculation..................................................................................................................................9
Surface patch calculation..................................................................................................................................10
Unit allocation example:...................................................................................................................................10
Surface difference calculation ..........................................................................................................................11
surface points (MSMS).....................................................................................................................................13
hydrophobicity (HydroCalc).............................................................................................................................13
electrostatic potential (DelPhi) .........................................................................................................................14
patch point distance (PatchCalc) ......................................................................................................................15
INPUT PARAMETERS:.......................................................................................................................................17
OUTPUT: .........................................................................................................................................................19
4
VISUALIZATION IN PYMOL............................................................................................................................21
5
EXAMPLES...........................................................................................................................................................23
5.1
6
ADVANCED EXAMPLE .....................................................................................................................................23
REFERENCES ......................................................................................................................................................26
VASCo manual
1
Introduction
VASCo is a program pipeline for the calculation of protein surface properties and the
visualization of annotated surfaces. Special emphasis is laid on protein-protein
interactions, which are calculated based on surface point distances. Molecular properties
such as electrostatic potential or hydrophobicity are mapped onto these surface points.
Molecular surfaces and the corresponding properties are calculated using existing well
established programs integrated into the package, as well as custom developed programs.
The modular pipeline can easily be extended to include new properties for annotation. The
output of the pipeline is most conveniently displayed in PyMOL [1] using a custom-made
plug-in.
2
Installation
The program is mainly written in Python. The modules include also programs and third
party software precompiled for different platforms. The software should run on unix based
platforms as well as on most windows environments. There are three main parts of the
software: The modules which have to be installed, the main program VASCo.py which
makes use of the modules and the visualization plug-in for viewing the results within
PyMOL.
2.1
Windows
The following steps will guide through the installation process of the windows distribution
of VASCo – Modules.
2.1.1 Package content
VASCo-Modules-x.win32.exe
VASCo.py
install.pdf
ppixplugin_vx.py
Vasco python modules
main program (command line)
short installation guide
visualization plug-in for PyMOL
(x stands for the version number)
2.1.2 Requirements
1. Python programming package version higher than 2.4.0. (available at
www.python.org)
2. PyMOL protein viewer. (available at http://pymol.sourceforge.net)
-4-
VASCo manual
2.1.3 Setup
This will install the modules into the python site-packages and the visualization plug-in into
the PyMOL program
1.
2.
3.
4.
Download and install Python version > 2.4.0
Download and install PyMOL
Execute VASCo-Modules-x.win32.exe
Select the Python distribution where you want to install the modules and follow
the on screen instructions
5. Run PyMOL and select “Plugin” -> “Install Plugin” at the drop down
menu and select the ppixplugin_vx.py. Restart PyMOL
2.2
Linux
The following steps will guide you through the installation process of the unix distribution of
VASCo –Modules.
2.2.1 Package content
VASCo-Modules-x.zip
VASCo.py
install.pdf
ppixplugin_vx.py
Vasco python modules
main program (command line)
short installation guide
visualization plug-in for PyMOL
(x stands for the version number)
2.2.2 Requirements
1. Python programming package version higher than 2.4.0. (available at
www.python.org)
2. PyMOL protein viewer. (available at http://pymol.sourceforge.net)
2.2.3 Setup
This will install the modules into the python site-packages and the visualization plug-in into
the PyMOL program
1.
2.
3.
4.
Download and install Python version > 2.4.0
Download and install PyMOL
Unzip VASCo-Modules-x.zip
within the unzipped directory VASCo-Modules-x type
python
setup_vasco_x.py
-5-
install
VASCo manual
5. Run PyMOL and select “Plugin” -> “Install Plugin” at the drop down
menu and select the ppixplugin_vx.py and restart PyMOL. Macintosh users
have to follow a different procedure1
2.3
Remarks
Write permission are needed for your Python installation path. If you do not have write
permissions please contact your administrator. If you still have permission problems you
can also copy the folder "ppix_modules" within the unzipped VASCo-Modules-x to
your working directory but the VASCo.py program has to be in the same directory as the
ppix_modules folder and the modules are not accessible from other python programs via
the import command. (This will also work for windows platforms using the linux
“ppix_modules” folder in VASCo-Modules-x.zip, if you encounter any installation problems
with the windows installation executable) The script runs different third party programs.
Therefore, at linux platforms the “PATH” variable has to be extended to "./" (current path)
within your .cshrc file (or other config file). e.g. set PATH = ( './' $PATH).
1
On Macintosh PyMOL has to be run with the X11/Hybrid mode to install external plug-ins.
(http://pymol.org/plugins.html) MacPyMOL for Tiger includes a hybrid X11 mode. Assuming that
X11 is already installed, simply duplicate MacPyMOL.app and rename it to
"PyMOLX11Hybrid.app". For further information see the PyMOL Wiki Forum
http://www.pymolwiki.org/index.php/MAC_Install
-6-
VASCo manual
3
User guide
The VASCo pipeline maps various properties onto calculated surface points of a protein. In
addition, it identifies contact patches between protein molecules based on a distance
cutoff, considering also symmetry equivalent molecules in a crystal. Thus, surface points
are separated into contact and non-contact areas allowing a separate analysis.
The program VASCo.py creates folders and files within your current working directory. The
minimum input is a PDB file and a file with standard run parameters (input.ppix)
located within your working directory. This file will be created automatically at the first run
of the program and contains already some standard input variables. The file can be used
to set standard parameters which can be overruled additionally by command line
parameters which can be set for each run separately.
Overview of the VASCo pipeline.
The chain, the unit and the partition sections are marked with corresponding colors (red for chain, yellow
for unit and green for partition sections). Gray boxes represent programs; green boxes indicate input and
output files. Blue arrows represent the flow of the different calculated properties. White arrows show the
main program path, whereas dotted arrows indicate “many-to-one” relationships within the pipeline.
-7-
VASCo manual
3.1
Getting started
3.1.1 General
At unix platforms an alias in the .cshrc file (or any other configuration file) can be set like:
alias vasco python <path>/VASCo.py
The program can be run within your working directory by typing the created alias with the
command line parameters.
vasco –in_dir ./ -filename <name>
Otherwise the program VASCo.py has to be located in the working directory.
python VASCo.py –in_dir ./ -filename <name>
where name is the code of the PDB file or the filename (without extension!) of the PDB file
which has to be located in the path specified with the –in_dir parameter. If no –in_dir
parameter is set the file has to be located at the folder <working_dir>/input.
3.1.2 Testrun
If the installation was successful and all programs are accessible a test run can be
performed by setting the –testrun parameter:
python VASCo.py –testrun
A ./test_out directory will be created with all output directories of a normal run. The
test_db.ppix.gz file located at the ./test_out/test/ppixdb_out/ directory can be
read into PyMOL using the provided PyMOL VASCo surface loader Plug-in.
-8-
VASCo manual
3.1.3 Example filename input:
The standard input folder is <working_dir>/input/ where your PDB input files are
located. You can change the input directory by using the –in_dir parameter to a different
directory.
VASCo.py –in_dir ./myinput -filename myfile.pdb
<working_dir>/input/
pdb177L.pdb
CODE.pdb
test.ent
something.pdb
For the example input files above the –filename parameter would have to be set as:
-filename
-filename
-filename
-filename
177L
CODE
test
something
If there are similar filenames like pdb177L.pdb and 177L.pdb or 177L.ent in your
input directory, only the first one which appears in the directory will be used as input file.
3.1.4 Preparation of the PDB Files:
3.1.4.1 Crystal contact calculation
The VASCo program uses the CRYST1 entry within the PDB file to interpret the HermannMauguin space-group symbol and the crystal cell parameters for the calculation of the
crystal contacts. If this line is not present in the PDB file (e.g. because it is a homology
model) the program runs without the crystal contact calculation providing contacts and
surface properties calculated only from the present coordinates and chain allocations.
~~~~truncated~~~~
TURN
1 T1 ASP A 20
TURN
2 T2 THR A 54
CRYST1
72.600
72.600
~~~~truncated~~~~
ATOM
1 N
MET A
ATOM
2 CA MET A
ATOM
3 C
MET A
ATOM
4 O
MET A
ATOM
5 CB MET A
~~~~truncated~~~~
GLY A 23
VAL A 57
82.200 90.00
1
1
1
1
1
55.368
54.986
54.231
53.565
54.130
90.00
64.575
64.356
63.073
62.723
65.527
Example of a CRYST entry in the PDB file (PDB Code 177L).
-9-
90.00 P 42 2 2
17.778
19.160
19.237
18.282
19.656
1.00
1.00
1.00
1.00
1.00
19.26
16.36
15.70
15.06
18.41
8
N
C
C
O
C
VASCo manual
3.1.4.2 Surface patch calculation
As the unit allocation uses the chain id within the PDB file to identify contact patches
based on a distance criterion it is important that this allocation is done properly depending
on the interfaces of interest. The patches are calculated between each unit. Chains can be
allocated to units by setting the “-chain2unit” parameter.
3.1.4.3 Unit allocation example:
This is an example of a standard unit allocation within a PDB file. The PDB file consist of
chain A, chain B and a hetero component which is in this example named as chain C.
These chains will become (with standard settings) automatically UNIT 1, UNIT 2 and
UNIT 3 respectively. The program calculates the contact patches between these 3 units
additional to its crystal contacts (if crystal information is provided and the crystal_contacts parameter is not set to “0”).
UNIT 1:
UNIT 2:
UNIT 3:
CHAIN A
CHAIN B
CHAIN C
To discard hetero components the -HETATOM_INCLUDE parameter should be set to 0
(which is the standard behavior). With that setting the hetero atoms are ignored for the
surface calculation and the surface patches are calculated exclusively between chain A
and chain B (and their crystal contacts).
Every chain will become one UNIT in the standard unit allocation settings. One can unite
chains to different units to get only contacts which are of special interest. For example if
the user is interested in surface contacts between the protein and the hetero component
but not in the contact between the two chains, one can use the -chain2unit parameter
to specify the units by hand. Each chain has to be stated at the –chain2unit parameter
(except the hetero component if it gets deleted as it is in this case) and the units are
divided by a semicolon.
- 10 -
VASCo manual
VASCo.py –in_dir ./ -filename myfile.pdb –HETATOM_INCLUDE 0
chain2unit A;B
-
UNIT 1: CHAIN A + CHAIN B
UNIT 2: CHAIN C
VASCo.py –in_dir ./ -filename myfile.pdb –HETATOM_INCLUDE 1 chain2unit AB;C
If one is interested only in biological contacts (or at least in contacts which are present in
the file) and want to avoid additional crystal contact calculations, the parameter crystal_contacts can be set to 0. If crystal information is not present in the PDB file
(within the CRYST1 line), the crystal contacts calculation will be skipped anyway.
VASCo.py –in_dir ./ -filename myfile.pdb –crystal_contacts 0
3.1.4.4 Surface difference calculation
If you want to calculate the surface difference of two aligned structures you have to
rename one structure to be chain A and the other structure to be chain B (or at least you
have to be sure that the two structures have different chain identifiers). This can be easily
done with the PyMOL program (which you have to use for the surface visualization at the
end anyway). This program can also be used to align your structures of interest and save
the aligned structures for input into the VASCo program. Open PyMOL and load your
structures with the File-->Open menu or download them with the integrated PDB
Loader service plug-in (Plugin-->PDB Loader service). Align one structure to the
other using the align command or the GUI (graphical user interface) of PyMOL.
align mobile, target
- 11 -
VASCo manual
where mobile and target are the names of the structures you loaded in. Delete all water
and hetero components using PyMOL. (e.g. remove solvent and remove hetatm ).
After that rename the chain ids of one of the structures with PyMOL’s alter command.
alter mobile and chain A, chain=”B”
followed by a sort command:
sort
where mobile is the name of one of your structures and A is its chain id. This will rename
the chain id A of the structure named mobile to chain id B . Combine the two structures
into one object (e.g. name it to mycompare ) by using the create command.
create mycompare, mobile or target
where mobile and target again are the names of your structures (don’t forget the “or” in
between of the two structure names). Now you can save (file-->save molecule and
select the created mycompare object) as mycompare.pdb which can be used as input for
the VASCo.py program.
To perform a surface comparison run you have to set the –patch_calc_dist parameter
to a high value (e.g. 1000.0 Å). As the two structures (with chain IDs A and B) were
saved without the CRYST1 info in the file we just have to set the –patch_calc_dist .
python VASCo.py –in_dir ./ -filename mycompare –patch_calc_dist
1000.0
The output path tree is located in /output/mycompare/ and the Vasco surface file is
located at /output/mycompare/ppixdb_out/ and is named mycompare_db.ppix
This file can be read into PyMOL using the VASCo Surface plug-in.
A description of the PyMOL program itself can be found at http://pymol.sourceforge.net/ .
- 12 -
VASCo manual
3.1.5 Surface Property Calculation
3.1.5.1 surface points (MSMS)
For calculation of the surface points we implemented the program MSMS (Michel Sanner’s
Molecular Surface) Version 2.5.5 developed by M. Sanner et al. [2]. The input of the
MSMS program is a sphere set file, which contains the center (x,y,z coordinates) and the
radius r of one sphere per line in free format. In addition, the radius can be followed by an
optional atom identification term. This identification in string format will be appended to the
vertices in the surface output files. The input file in form of x, y, z, r, and n (as identification
string) is generated automatically by the VASCo program which additionally runs the
MSMS program. The output of the MSMS program is a list of surface points including
normal vectors and a list of triangles with surface point allocations. These files will be
interpreted for generation of the surface input file. The MSMS parameters –density and
–probe_radius can be set. A detailed description of the MSMS program can be found at
Michel Sanner’s web site http://www.scripps.edu/~sanner/html/msms_home.html .
MSMS generated surface points and triangles of structure with PDB code 177l (lysozyme) visualized as
CGO (Compiled Graphics Object) with PyMOL– VASCo Surface Plug In.
3.1.5.2 hydrophobicity (HydroCalc)
The HydroCalc program requests two input files which are generated by the VASCo main
program automatically. One file contains the surface points, represented with an
identification number and the coordinates x, y, z separated by semicolons. The second file
contains the atom positions of the protein represented by the coordinates x, y, z and the
HC value (hydrophobic contribution), also separated by semicolons. The output is a file
with the calculated hydrophobic potential value next to the input identification number. This
file will be used to color the generated MSMS surface according to the hydrophobic
potential. The set of HC values which are used for the calculation can be set by the –
dic_type parameter (-dic_type 1,2 or 3) .
- 13 -
VASCo manual
Hydrophobic (lipophilic) potential annotated surface points of structure with PDB code 177l (lysozyme)
drawn with PyMOL –VASCo Surface Plug In
3.1.5.3 electrostatic potential (DelPhi)
For the implementation of an electrostatic potential calculation at the surface point
positions, we used the program DelPhi [3, 4]. DelPhi is able to calculate the electrostatic
potential in and around proteins or macromolecules. Therefore, it uses a finite difference
solution to the nonlinear Poisson-poltzmann equation. DelPhi requires as input a
coordinate file of the molecule, charge distributions, a radius file and an input file with
specified parameters. As most of the structure files deposited in the PDB do not have
hydrogen information stored, it is necessary to calculate the hydrogen positions
separately. This can be done at different levels, depending on the needs of the
investigation. We used a variation of the program “protonate”. For standard calculation, we
considered only backbone hydrogen’s (and N terminal hydrogen’s). In addition, a
simplifying step was applied on the charge input file, where only full charges of amino
acids and N and C - termini as well as backbone atoms were considered (at standard
settings). The output of the DelPhi run is interpreted and used to color the surface
according to electrostatic potential. The input files for the Delphi run are located at
[modul_path]/ppix_modules/cprogr/inputfiles/. Own input files can be
provided with the –chargefile, –sizefile and –parafile parameters. A detailed
description of these files and of the DelPhi program itself can be found at the honig lab
website http://wiki.c2b2.columbia.edu/honiglab_public/index.php/Software:DelPhi .
- 14 -
VASCo manual
Electrostatic potential annotated surface of PDB file 177l (lysozyme) visualized with PyMOL PPIX
Surface Plug In and ray traced within PyMOL
3.1.5.4 patch point distance (PatchCalc)
The program PatchCalc is used to calculate the patches of a unit, which includes surface
points between different units as well as surface points between symmetry related
surfaces. The program requires three input files which are all automatically provided by the
VASCo main program. The first input is a matrix file that contains the information to
calculate the fractional coordinates of the surface, in ppix – csv internal format. The
second file is a file with the surface points including unit allocation information and the third
file contains information about the corresponding symmetry matrices. This symmetry files
are located at [modul_path]/dict/symop/CCP4i_4/ and named like the space group
(e.g. symmetry file of space group P 21 21 21 is named p212121.sym ). This input
directory can be set by the -symop_in_dir parameter. By creating a new symmetry file
(e.g. myp1_symred.sym) and by setting the -H_M_space_group parameter to this
particular symmetry name (myp1_symred), it is possible to use own generated symmetry
files (e.g. for symmetry reduction) as it is explained in the advanced example section.
#Created with PPIX - Sympars from original CCP4i file
#
4 Symmetry Operations Spacegroup: P 21 21 21 IntTablNr: 19
1.00000
0.00000
0.00000
0.00000
1.00000
0.00000
0.00000
0.00000
1.00000
0.00000
0.00000
0.00000
-1.00000
0.00000
0.00000
0.00000
-1.00000
0.00000
0.00000
0.00000
1.00000
0.50000
0.00000
0.50000
-1.00000
0.00000
0.00000
0.00000
1.00000
0.00000
0.00000
0.00000
-1.00000
0.00000
0.50000
0.50000
1.00000
0.00000
0.00000
0.00000
-1.00000
0.00000
0.00000
0.00000
-1.00000
0.50000
0.50000
0.00000
Example of a symmetry matrix library file (p212121.sym)
- 15 -
VASCo manual
Scheme overview of patch calculation
The distance, within the surface points are considered to be in contact to each other, can
be set by the –patch_calc_dist parameter. This parameter should be set to a high
value if you want to perform a surface distance comparison of two aligned structures (e.g.
to 1000.0 Å) due to get all differences and not just differences within 1.5 Å (which is the
standard set for surface point to surface point contact distance).
- 16 -
VASCo manual
3.2
Input parameters:
All variables within this section can be put into the standard input.ppix file or set via
the command line.
variable
category
-opt_file
basic
-out_dir
basic
variable
type
Values
(internal)
string
filename
string
standard
directory
./input.ppix
basic input file for VASCo parameters
./output
output path for all the calculations
input of a file which contains PDB
codes to proceed
input of filename
None
input of PDB code (example)
PDB_FILE:filename
pdbCODE.ent
-filename
basic
string
CODE
CODE.pdb
CODE1;CODE2;COD
E3
-in_dir
basic
-testrun
optional
-h
optional
string
directory
[modul_path]/dict/symop/
CCP4i_4/
[CODE]
-subdir
basic
string
directory
log_dir
basic
string
directory
log_name
basic
string
filename
0
1
2
3
4
0
1
2
-set_verb_level
basic
integer
-set_write_log
basic
integer
basic
string
directory
basic
string
directory
basic
string
directory
basic
string
directory
basic
string
directory
basic
string
directory
conv_out_dir
hyd_out_dir
delphi_out_dir
patch_out_dir
ppixdb_out_dir
input of a list of PDB codes
./input/
basic
msms_out_dir
input of PDB code (example)
directory
-symop_in_dir
explanation
Input directory where the PDB input
files are located
run the testrun
show help message
path to the CCP4i- PPIX symmetry
files
sub- directory of [out_dir] for the run
(standard is the PDB code as
directory name for each run )
[out_dir]/[filenamedir]/logfi
not changeable
le/
[log_dir]/PPIXnot changeable
Convert.log"
show only error messages
show essential log messages
4
show more log messages
show all log messages
show all messages and values
write on standard output
0
write to log file and to standard output
write only to logfile
[out_dir]/[filenamedir]/ms not changeable internal directory tree
ms_out/
generation
[out_dir]/[filenamedir]/con not changeable internal directory tree
v_out/
generation
[out_dir]/[filenamedir]/hyd not changeable internal directory tree
_out/
generation
[out_dir]/[filenamedir]/del not changeable internal directory tree
phi_out/
generation
[out_dir]/[filenamedir]/pat not changeable internal directory tree
ch_out/
generation
[out_dir]/[filenamedir]/ppix not changeable internal directory tree
db_out/
generation
1
-dic_type
HydroCalc
integer
2
3
HC value type (column) in dictionary
for hydrophobic contribution
3
-H_M_space_group
PatchCalc
string
-HETATOM_INCLUDE
Structure
Integer
-ALTERNATE
Structure
Integer
-HYDROGENS
structure
integer
(e.g. P 21 21 21)
1
0
1
0
1
0
P1
1
0
0
- 17 -
set spacegroup by hand in form of
HM- Space group symbols, if not set it
is read from the CRYST1 entry in the
PDB file
include heteroatoms
delete heteroatoms
Include alternates
delete alternates
include hydrogens
delete hydrogens
VASCo manual
variable
-WATER
category
variable
type
(internal)
structure
integer
Values
standard
1
0
0
include water
delete water
None
combine chains into a unit, if it is
None or not set, automatic unit
creation based on PDB chain entry is
performed (each chain will become
one unit)
"ABCD" (=1 unit)
-chain2unit
structure
string
"AB;CD" (=2 units)
"A;BCD" (=2 units)
1
-chain_to_unit
structure
integer
1
0
1
convert
msms_xyzrn
integer
-probe_radius
MSMS
float
-density
MSMS
integer
-msms_components
MSMS
string
-surface_per_unit
1
0
1.4 - 10.0
1.4
1-10
1
all_components
all_components
None
-msms_delete
MSMS
integer
0
1
1
-hyd_verb_level
HydroCalc
integer
-hyd_cutoff_radius
HydroCalc
float
Delphi
perform chain to unit assignment (if
chain2unit is not specified), each
chain within the PDB will become one
unit
do not perform chain to unit
assignment. All entries are assigned
to unit “0”
create one surface file per unit for
MSMS input xyzrn
do not create one file per unit use
whole surface for MSMS
probe radius for MSMS input to
calculate Surface
2
density setting for MSMS vertex/Å
perform surface generation for all
components (hetero and cavity as
well as separated chains or units)
delete additional surface files for
cavities created from MSMS
don’t delete additional surface files
1
2
3
1
verbose level for external HydroCalc
0.1-X
9.0
cut-off for HydroCalc
(empirical cut-off)
1
-delphi_nolog
explanation
integer
calculation
do not write log for delphi
0
0
-chargefile
Delphi
string
Directory+file
-sizefile
Delphi
string
Directory+file
-parafile
Delphi
string
Directory+file
write delphi log file
[modul_path]/ppix_modul
es/cprogr/inputfiles/full_b
ackbone.crg
[modul_path]/
/ppix_modules/cprogr/inp
utfiles/neu.siz
[modul_path]/
/ppix_modules/cprogr/inp
utfiles/protein.prm
Delphi input size file
Delphi input parameter file
distance within surface points are
considered to be in contact, set it to a
high value for surface distance
comparison
of
two
aligned
structures(e.g. 1000)
-patch_calc_dist
PatchCalc
Integer
1.5-X
-patch_verb_level
PatchCalc
Integer
1
2
3
verbose level for external PatchCalc
1
Avoid "Press any key to continue"
statements, for background and
cluster runs
-no_press_key
basic
integer
1.5
Delphi input charge file
0
0
use “press any key to continue”
-analyse_dir
basic
string
directory
[out_dir]/__analyse/
-run_id
basic
string
e.g. “MYRUNID“
0
HydroCalc
integer
Delphi
integer
-skip_hydrocalc
-skip_delphi
1
0
1
"0
"0"
- 18 -
path to the output of general run
information for all runs
specify run ID, for multiple or cluster
runs
akip calculation of hydrophobicity
don’t skip hydrophobicity calculation
skip calculation of delphi
VASCo manual
variable
category
variable
type
(internal)
Values
standard
0
don’t skip delphi calculation
1
-skip_protonate
Delphi
integer
"0"
0
-all_log
-crystal_contacts
3.3
Log
string
PatchCalc
integer
filename
0
1
explanation
all.log
1
Skip calculation of protonate and
delphi
Don’t Skip calculation of protonate
and delphi
filename for run log file (for all runs)
do not calculate symmetry contacts
calculate crystal symmetry contacts
Output:
The program creates several folders and files during calculation.
The standard files and paths are:
<working_dir>/
output/
__analyse/
all.log
........ logfile for all runs
all_lock.txt
........ lock all.log
<name>/
........ dir created for each filename
conv_out/
........ conversion in/out files
<name>-<unit>_atoms.csv
<name>-<unit>_surface.csv
<name>-<unit>_surface.pdb
<name>-<unit>.xyzn
<name>-<chain>.pdb
<name>_surfaceunit.csv
delphi_out/
........ DelPhi and in/out files
<name>-<unit>_delphi.csv
<name>-<unit>.frc
<name>-<unit>.modpdb
<name>-<unit>.polH
<name>-<unit>.prm
<name>-<unit>_surface.pdb
<name>-<chain>.polH
hyd_out/
........ HydroCalc in/out files
<name>-<unit>_hyd.csv
logfile/
........ log files
<name>-<unit>_delphi.log
<name>_patch.log
PPIX-Convert.log
msms_out/
........ MSMS in/out files
<name>-<unit>.area
<name>-<unit>.face
<name>-<unit>.log
<name>-<unit>.vert
patch_out/
........ PatchCalc in/out files
<name>-<unit>_patch.csv
ppixdb_out/
........ surface file with properties
<name>_db.ppix.gz . file for visualization using
PyMOL Plug-in
- 19 -
the
VASCo manual
The conversion and calculation output files can be investigated or deleted after the run. An
additional run with the same filename will overwrite all created files in the directory. The
final file which is used for viewing within PyMOL using the VASCo PyMOL surface viewer
Plug-in is the compressed file <name>_db.ppix.gz located in the ppixdb_out directory
of each filename directory. This file can be read in as it is by loading the file with the
“Load file” menu within the VASCo PyMOL plug-in window.
Use the -h parameter to get additional input information for the VASCo Module.
python VASCo.py -h
Usage:
______
VASCo.py -arg1 value1 -arg2 value2 -argX
valueX
arguments:
__________________________________________________________________________________________
-h
:this help screen
-opt_file
<ppix option file>
:specify filename of PPIX options input file
if no file exists it will be written,change it
for your own settings and rerun program
-in_dir
<input directory>
:Directory of input pdb files
(pdbCODE.ent
files)
-out_dir
<output directory>
:main dir where output directories
will be created
-filename
<code>
:PDB code to proceed
<code;code;code>
:proceed some PDB CODES (4req;1crw;177l)
<PDB_FILE:filename>
:read in PDB-codes from given file
(PDB - codes in first column)
-testrun
:runs program with default test directories
and input files
__________________________________________________________________________________________
<variable>
<setting>
:You can set and change every variable if
you want here for available variables and
settings type -hv
-hv
:Help Screen for additional Variables and Settings
The standard parameters are specified in the file input.ppix. It can be changed and
additionally overruled by the command line input variables.
- 20 -
VASCo manual
4
Visualization in PyMOL
After the installation of the VASCo PyMOL Plug in (ppixplugin_vx.py) the surface
loader can be accessed by the PyMOL drop down menu Plugin ---> PPIX Surface
Loader. To load the output of the VASCo program (<name>_db.ppix.gz) located at
<name>/ppixdb_out/ after a VASCo run, use File --> Open file in the VASCo
Surface Loader window and select the test_db.ppix.gz file or any other VASCo
created surface file. Depending on the size of the surface file and the information provided
(and the system specifications) this may take some time.
After loading the surface is shown within PyMOL as CGO (Compiled Graphics Objects)
annotated with the first property which was read from the file (figure below section C). The
surface is separated into surface contact patches and non-contact surfaces and named in
PyMOL as *_p (p for patch) and *_np (np for nopatch), respectively. The different
units are indicated by a unit id after the surface name of the loaded surface file. (e.g.
177L_0_p and 177L_0_np) You can select the surface properties of interest by invoking
the checkbox next to the property (figure below section B) and set color and ramp
properties (figure below section D). You can load each property separately by clicking the
(RL) button located at the surface description (figure below section B) or select multiple
properties and click the RELOAD(RL) button on the bottom of the main window. As every
surface is loaded separately the loading time of the surface representations may take
some time. After loading you can easily switch between loaded surface representations
with the function keys without a loading delay. The Apply default settings button
will set the values of all checkboxes, ramps and color settings to the standard values.
Contact patch surfaces can be colored and viewed separately. (figure below section A)
The protein structure file which was used to create the surface can be loaded separately
into PyMOL using the normal PyMOL file PDB loading commands.
It is possible to choose color, color-ramp and transparency of the different surfaces and
surface properties. The minimal and maximal values for color ramp creation are calculated
automatically for each property. The ramp can be set manually as well, by replacing the
Calc entry by your own values. (figure below section D) If you want the ramp calculated
by the program again replace your values by Calc and hit the (RL) button again.
- 21 -
VASCo manual
(A)
(B)
(C)
(D)
PyMOL application and VASCo PyMOl plug-in window (extended view). The calculated PPIX surface file
of 1km4 is loaded
For the testfile surface (test_db.ppix.gz ) the output should look similar to the figure
below.
- 22 -
VASCo manual
Example of a test_run file (test_db_ppix.gz) loaded into PyMOL with the surface loader Plug-In
For more information about PyMOL commands, type help in the command line. For more
information about the PyMOL command line see:
http://pymol.sourceforge.net/newman/user/S0210start_cmds.html
5
5.1
Examples
Advanced example
The structure of a decarboxylase with the PDB code 1KM4 was chosen as an example
structure to show the unit allocation effects. The structure consists of an asymmetric unit
indicated as chain “A” with a hetero component indicated as chain “B” within the PDB file.
The orthogonal to fractional matrix is determined by the cell constants a,b,c and the cell
angles α, β and γ. The spacegroup of the structure is C2221 defined within the PDB file.
Without a specification of unit allocations, the chain “A” will became unit one and the
hetero component will became unit two. The orthogonal to fractional matrix is calculated
with the cell constants read from the PDB file. If the symmetry file is not specified by input
parameter settings, the Hermann-Mauguin space-group symbol is read from the CRYST1
entry of the PDB file and used to get the associated symmetry file from the symmetry
matrix library. The circumstance that the hetero component is defined as its own unit
implicates that the contacts between the hetero component and the protein will be
calculated as well as the contacts between the symmetry related molecules. (figure below
a) If one defines chain A and the hetero component to a single unit and if the structure is
- 23 -
VASCo manual
seen as monomer, you will obtain only the crystal contacts. (figure below b) Anyway, the
molecule is believed to form a homo-dimer with one of its symmetry related counter parts.
This is a special case. To calculate the crystal contacts of this unit e.g. without the
biological contact part, one has to generate the symmetry related molecule responsible for
the biological contact and save the coordinates of both molecules within a new PDB file
(e.g. as 1km4_biol.pdb).(this can be done by using the program PyMOL). Because the
second chain fits now to the symmetry related positions one has to reduce the symmetry
for the calculation. This can be done by eliminating the related symmetry matrix entries in
the library file named c2221.sym by insertion of a “#” sign in front of the corresponding
lines and save it as a new library file. (e.g. as 1km4_symred1_c2221.sym which can be
seen below) After that, one can specify the new reduced symmetry file for this special case
in the input settings. With the –chain2unit parameter one can combine the two chains with
its hetero-components into a single unit. (figure below d)
#Created with PPIX - Sympars from original CCP4i file
#
8 Symmetry Operations Spacegroup:
C 2 2 21 IntTablNr: 20
1.00000
0.00000
0.00000
0.00000
1.00000
0.00000
0.00000
0.00000
1.00000
0.00000
0.00000
0.00000
# -1.00000
0.00000
0.00000
#
0.00000
-1.00000
0.00000
#
0.00000
0.00000
1.00000
#
0.00000
0.00000
0.50000
-1.00000
0.00000
0.00000
0.00000
1.00000
0.00000
0.00000
0.00000
-1.00000
0.00000
0.00000
0.50000
#
1.00000
0.00000
0.00000
#
0.00000
-1.00000
0.00000
#
0.00000
0.00000
-1.00000
#
0.00000
0.00000
0.00000
1.00000
0.00000
0.00000
0.00000
1.00000
0.00000
0.00000
0.00000
1.00000
0.50000
0.50000
0.00000
-1.00000
0.00000
0.00000
0.00000
-1.00000
0.00000
0.00000
0.00000
1.00000
0.50000
0.50000
0.50000
-1.00000
0.00000
0.00000
0.00000
1.00000
0.00000
0.00000
0.00000
-1.00000
0.50000
0.50000
0.50000
1.00000
0.00000
0.00000
0.00000
-1.00000
0.00000
0.00000
0.00000
-1.00000
0.50000
0.50000
0.00000
User created file for symmetry reduction 1km4_symred1_c2221.sym (corresponding symmetry matrices
are commanded out)
- 24 -
VASCo manual
#Case (a)
#File 1km4.pdb
VASCo.py -filename 1km4
#Case (b)
#File 1km4.pdb with chain2unit specification (chain A + hetero)
VASCo.py -filename 1km4 –chain2unit AB
#Case (c)
#File 1km4_pqs.pdb with symmetry reduction and 2 units (AB and CD)
VASCo.py -filename 1km4_pqs -H_M_space_group 1km4_symred1_c2221
chain2unit AB;CD
–
#Case (d)
#File 1km4_pqs.pdb with symmetry reduction and all to one unit
VASCo.py
-filename
1km4_pqs
-chain2unit
ABCD
-H_M_space_group
1km4_symred1_c2221
The output can be loaded into PyMOL using the VASCo PyMOL Plug-in.
- 25 -
VASCo manual
Example of calculations for 1K4M for different unit allocations. a) the protein contains a hetero
component which is defined as a second unit. The green contact patch is generated because of this
allocation. The other colored patches are generated by applying symmetry operations. b) The same
calculation with the hetero component allocated to the same unit as the chain. The green hetero contact
patch is gone. c) The symmetry equivalent structure which formed the big blue patch is defined as
second chain and allocated as second unit within the calculation d) as the blue patch is believed to be a
biological one the two chains can be combined to one unit to calculate only the crystal patches.
For a standard run usually no changes have to be made within the PDB file.
6
1.
2.
3.
References
The PyMOL Molecular Graphics System [http://pymol.sourceforge.net/]
Sanner MF, Olson AJ, Spehner J-C: Reduced surface: an efficient way to
compute molecular surfaces. Biopolymers 1996, 38:305-320.
Honig B, Nicholls A: Classical electrostatics in biology and chemistry. Science
1995, 268:1144-1149.
- 26 -
VASCo manual
4.
Nicholls A, Honig B: A rapid finite difference algorithm, utilizing successive
over-relaxation to solve the Poisson-Boltzmann equation. J Comput Chem
1991, 12:435-445.
- 27 -