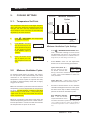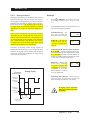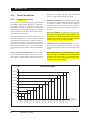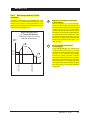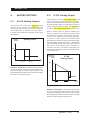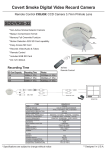
1
Temperature Controller EXPERT 21+ USER’S MANUAL 21+ MODIFY STATUS WIND / RAIN COMPENSATION DE-ICING DRYING ZONE C CURRENT CONDITION 8 CHIMNEY 1-2 1 SET POINTS 9 ZONE E / OUTPUTS 2 MINIMUM VENTILATION 10 DE-ICING 3 ZONE A 11 DRYING 4 ZONE B 12 MANUAL MODE 5 ZONE C 13 ALARM 6 ZONE D 14 USER SETUP 7 TUNNEL 15 TEST MODE OUTPUTS CHIMNEYS ALARMS MINIMUM VENTILATION DEFECTIVE PROBE DEFECTIVE POTENTIOMETER TEMPERATURE ALARM 1 CLOSE / OPEN 1 CALIBRATION 2 CLOSE / OPEN 2 CALIBRATION STIR FAN 0-10V OUTPUT MIST 8 TUNNEL FANS 7 6 5 4 3 2 HEATERS 1 1 2 3 9 SECTION 1 / BLOWER 1 17 CHIMNEY 1 - CLOSE SECTION 1 / BLOWER 2 10 SECTION 1 / BLOWER 2 18 CHIMNEY 1 - OPEN 3 SECTION 1 / BLOWER 3 or SECTION 2 /BLOWER 1 11 SECTION 1 / BLOWER 3 or SECTION 2 /BLOWER 1 19 CHIMNEY 2 - CLOSE 4 SECTION 1 / BLOWER 4 or SECTION 2 / BLOWER 2 12 SECTION 1 / BLOWER 4 or SECTION 2 / BLOWER 2 20 CHIMNEY 2 - OPEN 5 SECTION 1 / BLOWER 1 13 SECTION 1 / BLOWER 1 21 6 SECTION 1 / BLOWER 2 14 SECTION 1 / BLOWER 2 7 SECTION 1 / BLOWER 3 or SECTION 2 /BLOWER 1 15 SECTION 1 / BLOWER 3 or SECTION 2 /BLOWER 1 8 SECTION 1 / BLOWER 4 or SECTION 2 / BLOWER 2 16 SECTION 1 / BLOWER 4 or SECTION 2 / BLOWER 2 ZONE E / ON-OFF OUTPUTS ZONE D ZONE A ZONE B M 890-00509 rev. 00 CHIMNEYS SECTION 1 / BLOWER 1 2 ZONE C 1 22 23 24 REV. 00 EXPERT 21+ NOTICE Every effort has been made to ensure that this manual is complete, accurate and up-to-date. The information contained in it is however subject to change without notice due to further developments. 2 EXPERT 21+ rev.00 EXPERT 21+ TABLE OF CONTENTS 1. INTRODUCTION...............................................................5 1.1. 1.2. 1.3. 1.4. 2. Precautions.................................................................................. Symbols of the Manual.................................................................. Overview of the Controller............................................................. Overview of the Vent System........................................................ MOUNTING INSTRUCTIONS..............................................8 2.1. Installing the Controller on the Wall................................................. 2.2. Connections................................................................................. 2.2.1. Main Wiring ........................................................................... 2.2.2. Alarm Connection.................................................................... 2.2.3. Sensor Inputs......................................................................... 3. Location of the Controls................................................................ 9 Parameter Adjustment..................................................................10 LED Meaning...............................................................................10 LCD Contrast..............................................................................10 CONTROLLER SETUP......................................................11 4.1. 4.2. 4.3. 4.4. 4.5. 4.6. 4.7. 4.8. 5. 8 8 8 8 8 USER INTERFACE.............................................................9 3.1. 3.2. 3.3. 3.4. 4. 5 5 6 7 Setting the Time & Date...............................................................11 Password...................................................................................11 Enabling the Outputs....................................................................12 Probe Assignment........................................................................13 Zone Setup.................................................................................14 Measuring Units..........................................................................16 Relay Assignment........................................................................17 Version......................................................................................18 COOLING SETTINGS......................................................19 5.1. Temperature Set Point..................................................................19 5.2. Minimum Ventilation Cycles..........................................................19 5.3. Natural Ventilation.......................................................................20 5.3.1. Vent Zone Settings.................................................................20 5.3.1.1. Blower’s Principle of Operation................................................... 20 5.3.1.2. Wind & Rain Compensation in Natural Ventilation ......................... 21 5.3.2. De-icing the Vents..................................................................22 5.3.3. Drying the Vents....................................................................23 EXPERT 21+ rev.00 3 EXPERT 21+ 5.4. Tunnel Ventilation........................................................................24 5.4.1. Principle of Operation.............................................................24 5.4.2. Wind Compensation in Tunnel Ventilation..................................25 5.4.3. Tunnel Ventilation Settings......................................................26 5.5. Chimneys...................................................................................28 5.6. Stir Fans.....................................................................................30 5.7. Mist...........................................................................................32 5.8. 0-10V Ventilation Output..............................................................33 6. HEATING SETTINGS.......................................................35 6.1. On/Off Heating Outputs................................................................35 6.2. 0-10V Heating Output..................................................................35 6.3. Heating Output Settings...............................................................36 7. ALARMS.......................................................................37 7.1. Temperature Alarms.....................................................................37 7.2. Defective Probe Alarm..................................................................38 7.3. Defective Potentiometer...............................................................38 8. MONITORING FUNCTIONS..............................................38 8.1. 8.2. 8.3. 8.4. 8.5. 8.6. 8.7. 9. Room Temperature......................................................................38 Probe Temperature......................................................................39 Outside Temperature....................................................................39 Wind Speed................................................................................40 Wind Direction............................................................................40 Rain Sensor Status......................................................................40 Relative Humidity.........................................................................40 TEST MODE..................................................................41 10. MANUAL MODE.............................................................41 11. TECHNICAL SPECIFICATIONS.........................................42 12. MEMORY CARD.............................................................43 13. WORKSHEET.................................................................44 13.1. Relay Assignment Template..........................................................45 13.2. Probe Assignment Template..........................................................45 13.3. User Setup Menu.........................................................................46 Index..................................................................................47 4 EXPERT 21+ rev.00 EXPERT 21+ 1. INTRODUCTION 1.1. Precautions Although fuses at the input and outputs of the controller protect its circuits in case of an overload or overvoltage, we recommend installing an additional protection device on the controller’s supply circuit. 1.2. Symbols of the Manual Caution. Read the following text carefully. It contains important pieces of information which, if ignored, may cause the controller to operate improperly. Pay attention. The following text contains very useful information. The room temperature where the controller is located must always remain between 32°F and 104°F (0°C TO 40°C). Indoor use only! To avoid exposing the controller to harmful gases or excessive humidity, it is preferable to install it in a corridor. If the equipment is used in a manner not specified by the manufacturer, the protection provided by the equipment may be impaired. Do not spray water on the controller! In order to clean the control, wipe it with a damp cloth. EXPERT 21+ rev.00 5 EXPERT 21+ 1.3. Overview of the Controller Main Features The EXPERT 21+ is an electronic device used for environmental control in livestock buildings. It is mainly used to control the opening of multi-layer polyethylene vents in the different zones of the barn. It also combines natural ventilation and tunnel ventilation into one powerful system. LCD display — A LCD screen provides an efficient OUTPUTS: 24 built-in relays to control: 20 blowers; 2 chimneys; 2 tunnel fans (up to 8 tunnel fans can be used if an external Tunnel Fan Module is connected to the controller); 1 stir fan; 4 heaters; 1 mist; 1 alarm output 2 0-10V output to control fans or heaters INPUTS: 8 inside temperature sensors; 1 outside temperature sensor; 1 wind direction sensor; 1 rain sensor; 1 wind speed sensor; 2 chimney potentiometers; 1 relative humidity sensor. Refer to the wiring diagram enclosed at the end of this manual to connect sensors and loads. interface for displaying, monitoring and adjusting the parameters. 8 Temperature sensors — Up to eight temperature sensors can be connected to the controller to obtain an accurate reading of the average room temperature and a faster reaction time. Natural ventilation — The controller can control the opening of inflatable vents in 5 different zones (up to 4 blowers per zone). It controls the opening of these vents according to the ambient temperature their respective zone. De-icing & drying the vents — The controller can deflate the vents on a regular basis to prevent the membrane from freezing in winter; likewise, it can inflate the vents on a regular basis to prevent the accumulation of moisture on the membrane on warm weather. Wind compensation — If either the wind speed or wind direction are unfavorable for the current ventilation in the barn the EXPERT 21+ will reduce the vent opening to compensate. In addition, the controller can stop some fans whenever there is sufficient wind Tunnel ventilation — When the room temperature rises, tunnel ventilation effectively reduces the actual temperature perceived by the animals. Chimneys — The controllers can control up to 2 chimney dampers. Assignable outputs — The controller has 4 on/off outputs that can be used to control mist units, heaters, tunnel fans or stir fans. Histories — Histories allow monitoring the minimum and maximum reading of each sensor for the past 6 days. Alarm management — The controller provides alarms for high-low temperatures, defective sensors and other system failures. Password protection — A password can be enabled to restrict access to the controller setup functions. 6 EXPERT 21+ rev.00 EXPERT 21+ 1.4. Overview of the Vent System The EXPERT 21+ controls the opening of inflatable vents according to the temperature of their respective zone. In all, it can control up to 10 vent sections located in 5 different zones. Definition of a zone: A zone is an area of the building where an inflatable panel is located. Each zone uses its own temperature settings and its own selection of probes to control the opening of the vent. Possible vent setups: The graphs below show all possible vent setups: • Definition of a section: A section is an inflatable vent composed of 2, 3 or 4 blowers. A maximum of 2 vent sections can be superposed in a single zone. This is useful for tall sidewalls. All zones must have the same number of sections. 1 Section / Zone — When using 1 section per zone, the number of blowers per zone can be set separately for each zone. It ranges from 2 to 4 blowers. Zone A 1 section Zone B 1 section Zone C 1 section Zone D Zone E 1 section 1 section Blower 4 (opt.) Blower 4 (opt.) Blower 4 (opt.) Blower 4 (opt.) Blower 4 (opt.) Blower 3(opt.) Blower 3(opt.) Blower 3(opt.) Blower 3(opt.) Blower 3(opt.) Blower 2 Blower 2 Blower 2 Blower 2 Blower 2 Blower 1 Blower 1 Blower 1 Blower 1 Blower 1 Vent Setup : 1 Section / Zone 2 Sections / Zone — When using 2 sections per zone, the controller automatically enables 2 blowers per section; Blower 2 Blower 1 Blower 2 Blower 1 Blower 4 Blower 3 Blower 2 Blower 1 Zone E 2 sections SECTION 2 Blower 3 2 sections SECTION 2 Blower 4 Zone D SECTION 1 Blower 1 Blower 3 2 sections SECTION 1 Blower 2 Blower 4 Zone C SECTION 2 Blower 3 2 sections SECTION 1 Blower 4 Zone B SECTION 2 SECTION 2 2 sections SECTION 1 Zone A SECTION 1 • Blower 4 Blower 3 Blower 2 Blower 1 Vent Setup : 2 Sections / Zone EXPERT 21+ rev.00 7 EXPERT 21+ 2. MOUNTING INSTRUCTIONS 2.1. Installing the Controller on the Wall Fasten the two metal brackets on the mounting holes located behind the controller using six screws. Then, mount the enclosure on the wall using four other screws. Leave a clearance of at least 16” to the left of the enclosure to allow the cover to be removed for maintenance. 2.2.2. Alarm Connection There are two types of alarms on the market. One type activates when current is cut off at its input; the other type of alarm activates when current is supplied at its input. For an alarm of the first type, use the NC terminal as shown on the wiring diagram. For an alarm of the second type, use the NO terminal. 2.2.3. Sensor Inputs Sensors operate at low voltage and are isolated from the supply. Make sure that sensor cables remain isolated from all high voltage sources. In particular, do not route the sensor cables through the same electrical knockout as other cables. Do not connect the shield from the sensor cable to a terminal or a ground. Extending a sensor: Each sensor can be extended up to 500 feet (150 meters). To extend a sensor: Use a shielded cable of outside diameter between 0.245 and 0.260 in (6.22 and 6.60 mm) (the cable dimensions should not be under 18 AWG) to ensure the cable entry is liquid tight. Do not ground the shielding. It is preferable to solder the cable joint to ensure a proper contact between the two cables. 2.2. Connections 2.2.1. Main Wiring Refer to the wiring diagram enclosed with this user’s manual to connect the controller. Drill holes at the bottom of the enclosure to pass the wires and install watertight connectors to prevent water from entering in the enclosure. Do not make any holes at the side and top of the enclosure. All wiring must be done by an authorized electrician and must comply with applicable codes, laws and regulations. Make sure power is off before doing any wiring to avoid electrical shocks and equipment damage. 8 EXPERT 21+ rev.00 Do not run sensor cables next to other power cables. When crossing over other cables, cross at 90°. Defective sensors: An alarm is set off when a defective probe is detected. To identify the defective probe, press the CURRENT CONDITIONS button then press on the current condition’s down-arrow key. Probe readings are then displayed. Dashes are displayed instead of a reading when the probe is defective. In the case of room temperature probes, the controller will operate according to the temperature of the remaining probes. EXPERT 21+ 3. USER INTERFACE 3.1. Location of the Controls Status LEDs LED Display Current condition arrow keys LCD Display Modify button Arrow keys LED Display — The display on the top left corner of MODIFY button —The editing mode allows adjusting the faceplate shows the current room temperature averaged over all selected room temperature probes. the parameter with the adjustment buttons. To access this mode, press MODIFY once, the parameter value will flash on screen; it can now be adjusted with the adjustment buttons. Once it is adjusted, press MODIFY again to exit from the editing mode. LCD Display — The LCD display on the right shows the current readings and parameters to be adjusted when you select a function. The three keys on the right of this display are used to edit parameters and scroll through the menus. After 15 minutes of inactivity, the display shows the current room temperature. Adjustment & navigation arrow keys — The arrow keys located at the upper right corner are used to scroll the LCD display when all parameters cannot be presented all at once. These keys are also used to modify the value of a parameter after having pressed the MODIFY button. Current condition button — This button gives a quick access to the current conditions in the barn (temperature, wind speed, etc.). Current condition arrow keys — These arrows give access the sub-menus that are located into the CURRENT CONDITION menu. Status LEDs — The status pilot lights show the current status of the outputs. Refer to section 3.3 for further information about these LEDs. EXPERT 21+ rev.00 9 EXPERT 21+ 3.2. Parameter Adjustment 3.4. LCD Contrast To modify the value of a parameter, you must select the parameter then access the edit mode. To access this mode, press MODIFY once, the parameter value will flash on screen; it can now be adjusted with the adjustment buttons. Once the parameter is adjusted, press MODIFY again to exit from the edit mode. Follow these steps to modify the contrast of the LCD screen: • • 3.3. LED Meaning Status LED Status Press 14 – USER SETUP. If a password is enabled, enter the current password using the adjustment buttons. By default, it is set to 00-00-00. Contrast 100% The contrast of the LCD screen is displayed. Press MODIFY then use the adjustment buttons to set the contrast of the LCD screen to the desired intensity. It can be adjusted from 10 to 100 %. Meaning Wind & Rain Comp. Solid LED: A blower is running in order to close the vent due to a windy condition or because it is raining. De-icing Solid LED: A vent panel deflates to de-ice the polyehtylene membrane. Drying zone Solid LED: A vent section inflates to dry out the polyehtylene membrane. Minimum ventilation Solid LED: Minimum ventilation is enabled in a vent zone. Defective probe Solid LED: A defective probe is detected. Defective potentiometer Solid LED: A defective potentiometer is detected. Temperature alarm Solid LED: A temperature alarm is active. 1 Close/Open "Solid LED: Chimney 1 is opening. Flashing LED: Chimney 1 is closing." 1 Calibration Solid LED: Chimney 1 is being calibrated. 2 Close/Open "Solid LED: Chimney 2 is opening. Flashing LED: Chimney 2 is closing." 2 Calibration Solid LED: Chimney 2 is being calibrated. Stir Fan Solid LED: The stir fan output is running. 0-10V Output Solid LED: A 0-10V output is running. Mist Solid LED: The mist output is running. Tunnel 1-8 "Solid LED: Tunnel fan output #x is running. Flashing LED: A tunnel LED flashes during 1 minute at the startup of a tunnel fan stage. This minute is used to position the vents before activating tunnel fans." Heater 1 Solid LED: Heating stage 1 is running. 2 Solid LED: Heating stage 2 is running. 3 Solid LED: Heating stage 3 is running. Flashing LED: Heating stages 3 & 4 are running. Alarms Chimneys Outputs 10 EXPERT 21+ rev.00 EXPERT 21+ 4. CONTROLLER SETUP 4.1. Setting the Time & Date • Press • Use the current condition arrow key to select the time and date. • Press MODIFY. The hours start flashing. Use the arrow keys to set them to the desired value. • Press MODIFY. The minutes start flashing. Use the arrow keys to set them to the desired value. • C – CURRENT CONDITIONS. 12:00:00 PM 12/31/200X 4.2. Password You can enable a password to restrict access to certain functions of the controller: USER SETUP & TEST MODE. When it is used, the password must be entered each time one of these functions is selected. When the correct password is entered, it does not need to be reentered until the display times out (i.e. After 15 minutes of inactivity). The password is a sequence of three numbers from 00 to 99. By default, it is set to 00-00-00. The following procedure shows how to enable/disable the password and how to change the code. • Press 14 – USER SETUP. If a password is enabled, enter the current password using the adjustment buttons. By default, it is set to 00-00-00. • Press the down-arrow key to display the “Use Password” menu. • Press MODIFY then use the adjustment buttons to enable or to disable the password. • If the password is enabled, press the down-arrow key once. The password code is displayed. Proceed in similar fashion to adjust the whole time & date. • Press MODIFY then use the adjustment buttons to set each number of the password in turn. Use Password? Yes New Password? ** ** ** New Password? 00 ** ** IMPORTANT Choose an easy-to-remember password and write it down in a safe place! EXPERT 21+ rev.00 11 EXPERT 21+ . 4.3. Enabling the Outputs The controller comes with 24 built-in relays. Relays 1-16 relays are reserved to control blowers, relays 17-20 are used to open/close chimneys and relays 20-24 can either be used to activate blowers or to control different types of on/off outputs. In fact, if your controller does not use relays 1-4 of Zone E, these relays become available to control different types of outputs (such as mist units, heaters, tunnel fans or stir fans). In addition to its 24 built-in relays, the controller also comes with two 0-10V output which can be used for heating or cooling. The following steps shows how to enable the outputs that will be used by you controller. Before enabling the on/off outputs below, please refer to the relay assignment table in section 4.7 to see how many programmable relays are available to control them (the number of relays left depends on you particular system configuration). • Press 14 – USER SETUP. If a password is enabled, enter the current password using the adjustment buttons. By default, it is set to 00-00-00. • Press the down-arrow key to select the following menus. Note that on/off output menus won’t be displayed if there is no programmable relay left. • Set the status of each output in turn: Stir Fans — Select “Yes” EXPERT 21+ rev.00 #Onboard Tunnel Stages — #Onboard Tunnel Specify how many tunnel Stages 2 fans are connected to the controller (1 or 2). *This menu is accessible if you have answered “Yes” to the “Use Tunnel” question above. Tunnel Fan Module — Use Tunnel fan Select “Yes” if an extermodule? Yes nal tunnel fan module is used. When this module is used, all tunnel fans must be connected into it. This module allows using up to 8 tunnel fan stages. *If an external tunnel fan module is connected to the controller, all tunnel fans must be connected to it. # Tunnel Stages — If the #Tunnel Stages tunnel fan module is en 8 abled above, select the number of tunnel fan stages that will be connected to it (1 to 8). *Accessible if the “Tunnel Fan Module” is enabled above. Mist Stir Fan Yes if a programmable relay is used to control stir fans. *Accessible if an assignable relay is available to control this on/off outputs. Please refer to the relay assignment table in section 4.7 to see how many assignable relays are left 12 Use Tunnel — Select “Yes” Use Tunnel No if you want to use some of configurable on/off relays of the controller to control tunnel fans. Note that tunnel fans can also be connected to an external relay module instead of using the internal relays of the controller (see Tunnel Module below). *This parameter is accessible if the tunnel fan module is disabled below and if some assignable relays are available to control these on/off outputs. Please refer to the relay assignment table in section 4.7 to see how many assignable relays are left. (On/Off output) — Use Mist Select “Yes” if one internal No relay of the controller is used to control mist units. *Accessible if assignable relays are available to control on/off outputs. Please refer to the relay assignment table in section 4.7 to see how many assignable relays are left. EXPERT 21+ Chimneys — Select the number of chimneys that are connected to the controller (0 to 2 chimneys). # Chimney 1 Heaters — Select the # Heaters 2 number of heaters that are connected to internal relays of the controller (0 to 4 heaters). *Accessible if assignable relays are available to control on/off outputs. Please refer to the relay assignment table in section 4.7 to see how many assignable relays are left. 0-10V Outputs 1-2 — Select “Yes” to enable 0-10V outputs 1-2. 0-10V Outputs 1-2 Used for — If 0-10V outputs are used, specify their particular function (ventilation or heating). 0-10V Outputs 1-2 Mode — If 0-10V outputs are used, specify the type of signal they are using (0-10V or 10-0V). 0-10V 1 0-10V 2 Yes Yes 0-10V 1 used for Ventilation 0-10V 1 mode 0-10V 4.4. Probe Assignment Probe Activation & Assignment This procedure explains how to enable the probe inputs. It also shows how to assign temperature probes to the average room temperature reading. The average room temperature is used as a reference to control mist units and to detect temperature alarms. • Press 14 – USER SETUP. If a password is enabled, enter the current password using the adjustment buttons. By default, it is set to 00-00-00. • Press the down-arrow key to select the following menus: # T° in the room — Press #T° sensors in the room: 8 MODIFY then use the adjustment buttons to set the number of inside temperature probes that are connected to the controller (1 to 8 probes). Room Probes — The sensors that are used to measure the average room temperature are flashing on screen. To Room probes 12345678 Room probes 1 On change the probe selection, press MODIFY then use the arrow keys to set the status of each probe in turn. Use Out T° sensor — Press MODIFY then use the adjustment buttons to enable or disable the o u t s i d e te m p e r a t u re probe. Use Rain Sensor — Press MODIF Y then use the adjustment buttons to enable or disable the rain sensor. Use Out T° sensor? Yes Use Rain Sensor? Yes EXPERT 21+ rev.00 13 EXPERT 21+ • • Use Humdity Sensor — Press MODIFY then use the adjustment buttons to enable or disable the humidity sensor. Humidity Sensor? Yes Keep pressing the down-arrow key to reach the first probe assignment menu as shown below. Most outputs of the controller operate according to the average reading of chosen temperature probes. Select what probes are used to control/monitor the following outputs: - Tunnel Fans 1-2 - 0-10V Outputs 1-2 Tunnel 1 Probes 12345678 - Heaters 1-4 - Vent Zones A-E • Press 14 – USER SETUP. If a password is enabled, enter the current password using the adjustment buttons. By default, it is set to 00-00-00. • Press the down-arrow key to display the “Use Zone” menu then set the following parameters: Zones — Enable the prop- • The temperature sensors that are used to control the output are flashing on screen. • To change the probe selection, press MODIFY and then use the arrow keys to set the status of each probe in turn. • Press the down-arrow key to select the probe assignment menu of the next output. Tunnel 1 Probes 1 On Tunnel 2 Probes 12345678 Proceed in similar fashion to assign probes to each output in use. Use Zone ABCDE Min Vent? No er number of vent zones in use. Up to 5 zones can be activated (Zones A-E) (see graph in section 1.4). Press MODIFY to select the following parameter. Minimum ventilation — - Chimneys 1-2 • 4.5. Zone Setup Use Zone ABCDE To maintain good indoor Min Vent? Yes air quality, the controller can open the vents intermittently even when ventilation is not required to reduce the room temperature (i.e. when the temperature in a zone is lower than the set point). Minimum ventilation cycles allow reducing humidity levels and supplying oxygen to the room. Select “Yes” to enable this function then press the down-arrow key to select the next parameter. Number of sections per zone — Enable the desired # Sections per zone 1 number of inflatable vent sections per zone (1 or 2 sections). *This parameter is common to all the zones (see graph in section 1.4). Zones A-E) # of blowers per section — If there is A) #Blowers per section 3 only 1 section per zone, specify the number of blowers for each zone separately (2, 3 or 4 blowers / zone). *Accessible if the zones only use 1 vent section; if they use 2 sections, the controller automatically enables 2 blowers per section (see graph in section 1.4). 14 EXPERT 21+ rev.00 EXPERT 21+ Activation Delay — This Activation delay parameter represents the 30 sec amount of time it takes for a blower to inflate its vent. It can be adjusted from 15 to 300 seconds (5 minutes). • tained all along the “Start delay” for the wind compensation to start. Likewise, the wind condition which puts an end to the compensation (lower wind speed or change in the wind direction) has to be maintained all along the “Stop delay” for the compensation to end. Set the wind compensation start and stop delays to the desired values. *Accessible if the wind compensation is enabled above. Use De-ice — To prevent Use De-Ice i nfla ta b l e me mb ra n e s No from freezing in winter, the controller can stop some blower in turn to deflate the membranes. Enable or disable this function and then press the down-arrow key several times in order to reach the next parameter. *This menu is only available if an outside temperature probe is enabled (see “Probe Activation” in section 4.4). Yes The rain compensation allows closing some panels when there is wind and rain outside. Select “Yes” to enable this compensation. *Accessible if the wind compensation is enabled above and if a rain sensor is activated (see sec. 4.4). Press the down-arrow key several times to reach the following parameter: The rain compensation starts Drying the vents — The Use Drying drying function is used to Yes prevent moisture problems. With this function, the controller can activate some blowers on a regular basis to inflate the membranes and let them dry out. Press MODIFY and then use the adjustment buttons to enable or disable this function. Wind Compensation — Use Wind Comp Yes Press the down-arrow key until you reach the “Wind Comp.” menu. The wind compensation allows closing some panels and/or stopping some fans when the wind directly hits a zone. Select “Yes” to enable this compensation. Wind Speed Unit — Rain Compensation — Rain Compensation Delay — Use Rain Comp Compens. Delay Rain 0:30 min when it is raining outside and the wind blows fast enough in the direction of a specific zone. However, these 3 conditions (rain, wind speed & direction) must be maintained over a certain delay before the controller starts the rain compensation. Set the start delay for the rain compensation to the desired value. *Accessible if the rain compensation is enabled above. No Compensation above — If the room temperature No Comp. Above 82.0 gets higher than this temperature limit, the wind and rain compensation are disabled. *Accessible if the wind and/or rain compensation functions are enabled above. Wind Speed Unit Choose the desired wind kmh speed measuring units: kilometers per hour (kmh) or miles per hour (mph). *This menu is only available if the wind speed compensation function is enabled above. Start/Stop Delays (for Start 5:00 min Stop1:00 min Wind Compensation) — The wind compensation starts when the wind blows fast enough in the direction of the specific zone. However, the wind speed and direction must be main- EXPERT 21+ rev.00 15 EXPERT 21+ 4.6. Measuring Units • Press 14 – USER SETUP. If a password is enabled, enter the current password using the adjustment buttons. By default, it is set to 00-00-00. • Press the down-arrow key once. The time format is displayed. • Press MODIFY then use the adjustment buttons to choose the desired measuring units: Time Format — Choose Time format AM-PM the desired time format: AM-PM or 24 hours and then press the down-arrow key to select the next parameter. Temperature Units — Temp. units Choose the desired tem °F perature units: Celsius (°C) or Fahrenheit (°F) and then press the down-arrow key several times to reach the following parameter. 16 EXPERT 21+ rev.00 EXPERT 21+ 4.7. Relay Assignment The controller has 24 built-in relays: Relays 1-16: reserved for blowers; Relays 17-20: reserved for chimneys; Relays 21-24: Programmable relays: if they are not used to control blowers, these relays can be assigned to various types of On/Off outputs. Depending on your barn setup, some preassigned relays may no be used. Do not connect any loads to these unused relays unless the relay is a programmable relay (relay 21-24). Refer to the relay assignment table to see the relation between relays and outputs. Assigning Relays 21-24: It is possible to assign different types of outputs to relays 21-24: heaters, mist, stir fan or tunnel fan*. *No tunnel fan can be assigned to relay 21-24 if an external fan module is enabled in the User Setup menu (see section 4.3). • • • • Press 14 – USER SETUP. If a password is enabled, enter the current password using the adjustment buttons. By default, it is set to 00-00-00. Press the down-arrow key to display the first relay assignment menu. Relays are displayed as follows: 1=relay 21 / 2=relay 22, 3=relay 23 / 4=relay 24. *Accessible if at least 1 on/off output is enabled in section 4.3. If relays are already assigned to the selected output, they will flash on screen. To change the relay asHeater 1 Relay signment of the chosen 21 On output, press MODIFY then use the adjustment buttons to set the status of each relay in turn. *Make sure relays 21-24 are not assigned to more than 1 output each. Pre-defined Internal Relays 1 section / Zone 2 sections / Zone Relay 1 Zone A Blower 1 Zone A Sect.1 Blower 1 Relay 2 Zone A Blower 2 Zone A Sect.1 Blower 2 Relay 3 Zone A Blower 3 Zone A Sect.2 Blower 1 Relay 4 Zone A Blower 4 Zone A Sect.2 Blower 2 Relay 5 Zone B Blower 1 Zone B Sect.1 Blower 1 Relay 6 Zone B Blower 2 Zone B Sect.1 Blower 2 Relay 7 Zone B Blower 3 Zone B Sect.2 Blower 1 Relay 8 Zone B Blower 4 Zone B Sect.2 Blower 2 Relay 9 Zone C Blower 1 Zone C Sect.1 Blower 1 Relay 10 Zone C Blower 2 Zone C Sect.1 Blower 2 Relay 11 Zone C Blower 3 Zone C Sect.2 Blower 1 Relay 12 Zone C Blower 4 Zone C Sect.2 Blower 2 Relay 13 Zone D Blower 1 Zone D Sect.1 Blower 1 Relay 14 Zone D Blower 2 Zone D Sect.1 Blower 2 Relay 15 Zone D Blower 3 Zone D Sect.2 Blower 1 Relay 16 Zone D Blower 4 Zone D Sect.2 Blower 2 Relay 17 Chimney 1 — Close Relay 18 Chimney 1 — Open Relay 19 Chimney 2 — Close Relay 20 Chimney 2 — Open Programmable relays (if used as blowers) 1 section / Zone 2 sections / Zone Relay 21 Zone E Blower 1 Zone E Sect.1 Blower 1 Relay 22 Zone E Blower 2 Zone E Sect.1 Blower 2 Relay 23 Zone E Blower 3 Zone E Sect.2 Blower 1 Relay 24 Zone E Blower 4 Zone E Sect.2 Blower 2 Programmable relays (if not used as blowers) Relay 21 __Mist __Heat __Stir Fan __Tun1 ___Tun2 Relay 22 __Mist __Heat __Stir Fan __Tun1 ___Tun2 Relay 23 __Mist __Heat __Stir Fan __Tun1 ___Tun2 Relay 24 __Mist __Heat __Stir Fan __Tun1 ___Tun2 EXPERT 21+ rev.00 17 EXPERT 21+ 4.8. Version The version number of the controller is used to get technical support that is adapted to your specific controller. • Press 14 – USER SETUP. If a password is enabled, enter the current password using the adjustment buttons. By default, it is set to 00-00-00. • Press the down-arrow key to reach the “Version” display. 18 EXPERT 21+ rev.00 Expert-21+ Version X.X EXPERT 21+ 5. COOLING SETTINGS Zone Vents 5.1. Temperature Set Point The temperature set point is the target temperature in the zones. When the temperature set point changes, the start and stop temperatures of all on/off outputs of the controller are automatically adjusted by the same amount. • Press 1 – SET POINT. The temperature set point is displayed. • Press MODIFY and then use the arrow keys to set the temperature set point to the desired value. Press MODIFY again to validate. • Press the down-arrow key to display the current temperature of each zone. SetP Opened (Membrane is deflated) Minimum Ventilation Cycles Open Time Closed (Membrane is inflated) Avg T° Zone Set Point 70.0°F Minimum Ventilation Cycle Settings • Press 2 – MINIMUM VENTILATION. Minimum ventilation settings of vent zone A are displayed. *This menu is only available if the minimum ventilation feature is enabled in the User Setup menu (see Zone Setup in section 4.5). • Press MODIFY then use the adjustment buttons to set the following parameters: Average Temp Zone A: 65.8°F Open Time (Zone A) — 5.2. Minimum Ventilation Cycles To maintain good indoor air quality, the controller can open the vents intermittently even when ventilation is not required to reduce the room temperature. These cycles are optional and they are used to reduce humidity levels and to supply oxygen to the room. Minimum ventilation cycles start when the ambient temperature in a zone drops below the temperature set point. At that moment, 1 blower in the zone starts running in timer mode: it stops during the “Open time” and is then reactivated until the end of the “Cycle Time”. Minimum ventilation cycles either stop when the outside temperature gets too cold or when the ambient temperature in a zone increases and reaches the temperature set point of the zone. A)Open 30sec Set the amount of time Cycle 2min the blower remains OFF during a minimum ventilation cycle in order to open a vent. Press MODIFY to select the next parameter. Cycle (Zone A) — Select how much time separates the minimum ventilation cycles. • Proceed in similar fashion to set minimum ventilation settings for each zone. Then, press the down-arrow key to select the stop temperature of minimum ventilation cycles. Stop Minimum Ventilation — Set the outside Stop Min Vent. at: 40.0°F temperature below which minimum ventilation cycles stop. *This parameter is common to all zones and is only available if an outside temperature sensor is enabled (see sec. 4.4). EXPERT 21+ rev.00 19 EXPERT 21+ 5.3. Natural Ventilation Setting the Open/Close Temperatures 5.3.1. Vent Zone Settings • Press the desired ZONE button. The temperature at which the first blower of section 1 stops running to open the vent is displayed. • Press MODIFY then use the arrow keys to set the open temperature to the desired value. Press MODIFY once again to validate. • Press the down-arrow key once. The temperature at which the first blower of section 1 starts running in order to close the vent is displayed. • Press MODIFY then use the arrow keys to set the closing temperature to the desired value. Press MODIFY once again to validate. • Press the down-arrow key to select the next blower and then proceed in similar fashion to set the open / close temperatures of all consecutive blowers. 5.3.1.1. Blower’s Principle of Operation In natural ventilation, vent sections open or close according to temperature changes in their respective zones: when temperature increases in a zone, a blowers stops in order to deflate the membrane; likewise, a blower starts running in order to inflate the membrane when the zone temperature decreases. When the zone temperature increases and reaches the opening temperature of a blower, the controller stops the blower in order to deflate the membrane. Likewise, the controller activates a blower when the zone temperature decreases and reaches the blower’s closing temperature (the membrane inflates). The graph on the right illustrates this. Reference Temperature: Blowers’ operating temperatures are based on the average temperature of their respective zone. Refer to the Probe Assignment section of this manual to assign probes to each vent zone (section 4.4). In addition, operating temperatures of the blowers are also related to the temperature set point. This means that if the set point changes, all opening and closing temperatures are adjusted by the same amount. Blower #x Section #x Blower in Natural Ventilation OFF (the vent opens) ON (the vent closes) Close T° 20 Open T° EXPERT 21+ rev.00 Zone T° Section1 Blower1 Open 71.0 Section1 Blower1 Close 70.5 Section1 Blower2 Open 72.0 EXPERT 21+ 5.3.1.2. Wind & Rain Compensation in Natural Ventilation • Wind Compensation: The controller can inflate some panels when strong winds are hitting a vent zone. The wind compensation function is optional and only starts when all of these conditions are met: • • • The wind blows in the direction of a zone; The wind exceeds the speed associated with the wind compensation function; The wind speed and direction are maintained all along a user-defined delay. The wind compensation function is optional and must first be enabled in the User Setup menu. Refer to section 4.5 to enable this compensation and to set the time delay that is required to launch it. • Rain Compensation: The controller can close some panels when there is wind and rain outside. The rain compensation starts when all of the following conditions are met: • • • • It is raining outside. The wind blows in the direction of a zone; The wind exceeds the speed associated with the rain compensation function; The rain and wind conditions are maintained all along a user-defined delay. Refer to section 4.4 to enable the rain sensor and to section 4.5 to enable the rain compensation option and to set the time delay that is required to launch it Settings • Press the desired ZONE button. • Press the down-arrow key until you reach the wind direction menu. *Accessible if the wind compensation function is enabled (see Zone Setup in section 4.5). • Press adjust then use the arrow keys to set the following parameters: Wind Direction — Select Direction:North what wind direction hits Wind speed 10 the selected zone. Note that the wind compensation will also take place if the wind comes from the direction that immediately follows and precedes the chosen direction: i.e, if the direction is set to North-East (NE), a wind coming from North or from East would also enable the wind compensation. Once the wind direction is chosen, press MODIFY to select the next parameter. *Accessible if the wind compensation function is enabled in section 4.5. Wind Speed — Select the wind speed over which the wind compensation must be launched. This parameter is either expressed in kilometers per hour (km/h) or in miles per hour (mph) depending on the chosen measuring units (section 4.5). *Accessible if the wind compensation function is enabled in section 4.5. Close how many panels? — Select how many pan- Close how many Panels? 3 els must close when a strong wind hits the zone. Wind speed if it rains — Wind speed if it rains 30 Select the wind speed at which the rain compensation must be launched. *This menu is accessible if the rain compensation function is enabled (see Zone Setup in section 4.5). The wind speed at which rain compensation starts has priority over the speed at which wind compensation starts. Close how many panels? — Select how many Close how many Panels? 3 panels must close in the zone when it is raining outside and the wind speed exceeds the “Wind Speed if it rains” parameter value. *This menu is accessible if the rain compensation function is enabled (see Zone Setup in section 4.5). EXPERT 21+ rev.00 21 EXPERT 21+ Settings 5.3.2. De-icing the Vents During the cold season, the vents remain closed and motionless all the time. For this reason, the controller provides a de-icing function to prevent the formation of ice on the polyethylene membrane. To de-ice a membrane, the controller stops the blower of a vent section in order to make the membrane move; this movement prevents the formation of ice. • Press 10 – DE-ICING. *Accessible if the de-icing function is enabled (see Zone Setup in section 4.5). • Press MODIFY then use the arrow keys to set the following parameters: The de-icing process starts when all vents of a zone are closed and when the outside temperature is sufficiently low. When a de-icing cycle starts in a zone, the controller stops the 1st blower of a section and then waits for the “Wait Time” delay before restarting the blower. The controller then starts de-icing the 1st blower of the next section. This process is repeated up until all sections are de-iced. At that moment, the controller waits for the end of the De-icing Cycle Time before de-icing the vents once again. Start — Set the outside temperature below which the de-icing function starts. Press MODIFY to select the next parameter. Start Stop 32.0°F 34.0°F Stop — Set the outside temperature above which the de-icing function stops. Cycle — Select the interval of time that separates two de-icing cycles. Press MODIFY to select the next parameter. Cycle Wait 300min 60sec Wait — Specify how much time it takes for the membrane to deflate when a blower stops. De-icing Process Blowers Same for zones D & E (...) Blower 1 Zone C Section 2 (Deflated) Blower 1 Zone C Section 1 (Deflated) Blower 1 Zone B Section 2 Blower 1 Zone B Section 1 Blower 1 Zone A Section 2 Blower 1 Zone A Section 1 OFF ON (Inflated) OFF ON (Inflated) OFF (Deflated) ON (Inflated) OFF (Deflated) ON (Inflated) OFF (Deflated) ON (Inflated) OFF (Deflated) ON (Inflated) Wait Wait Wait Wait Wait Wait Wait Cycle Time 22 EXPERT 21+ rev.00 Time EXPERT 21+ Settings 5.3.3. Drying the Vents During the warm season, inflatable vents remain opened all the time. For this reason, the controller provides a drying function to prevent moisture problems that are likely to appear when the membrane remains fold. This drying function can only be used when the controller operates in natural ventilation (i.e., when no tunnel fan stage is active). • Press 11 – DRYING. *Accessible if the drying function is enabled (see Zone Setup in section 4.5). • Press MODIFY then use the arrow keys to set the following parameters: A) Enable Drying — Select “Yes” to enable the drying function in zone A. To dry out the membranes, the controller activates all blowers of the 1st vent section of the zone in order to inflate the membrane. The blowers keep on running during the Drying Run Time and then stop. If the zone has 2 vent sections, the controller repeats the same process right after having stopped the blowers of the 1st section. Contrarily to de-icing cycles, drying cycles are independent for each zone. You must specify time at which the drying cycle starts for each zone and must then specify the frequency at which these cycles are be performed. • A)Dry at 8:00A Enable Drying & Set Dry Times for Zones B, C, D & E — Press the down-arrow key. The same settings are displayed for zones B, C, D and E. Proceed in similar fashion to enable or disable drying cycles for all zones in use and to set their start times. Run Time — Specify how much time it takes for a blower to deflate the membrane (this parameter is common to all zones). Press MODIFY to select the next parameter. Drying Cycle Vent Section Status in Zone X A) Dry at — Set the time of day at which the drying cycle is performed in zone A. A)Enable Drying Yes Run Time 30min Every 1day Periodicity (Every X days) — Set the day fre- Section 2 Opened quency at which drying cycles are performed (this parameter is common to all zones). Section 2 Closed Section 1 Opened No drying cycle is performed when the controller is in tunnel ventilation ! Run Time Run Time Section 1 Closed Every Time (#x days) Drying Cycle Start Time EXPERT 21+ rev.00 23 EXPERT 21+ 5.4. Tunnel Ventilation beginning of a stage. The pilot light associated with the stage flashes during this delay. 5.4.1. Principle of Operation Reference Temperature: Operating temperatures of tunnel fan stages are based on the average temperature reading of chosen probes. Refer to the Probe Assignment section of this manual to assign probes to the tunnel ventilation mode (section 4.4). The controller can activate up to 8 On/Off tunnel fan stages. These stages operate in a sequence to increase the level of ventilation as the room temperature increases. The user must define the temperature at which each fan stage is enabled and the temperature at which each stage stops as the temperature decreases. Tunnel Fan Module: 2 tunnel fans can be connected to the internal relays of the controller. It is also possible to connect these fans to an external module to use more of them. The tunnel module allows using up to 8 tunnel fan stages. Start temperatures of tunnel fan stages are defined with respect to each other. This means that when the start temperature of a stage changes, all the consecutive values are adjusted by the same amount. For example, if the start temperature of stage 4 is increased by 1°F, start temperatures of all consecutive fan stages will be increased by 1°F. Inflatable Vents in Tunnel Ventilation: The controller allows specifying the number of panels that must close at the start-up of each tunnel fan stage. Wind Compensation in Tunnel Ventilation: In order to save energy, the EXPERT-21+ can switch back to natural ventilation when the wind blows fast enough. Refer to the following section for further information about this option. Startup of a Tunnel Stage: When the start temperature of a tunnel stage is reached, the controller waits 1 minute before starting the fans of that stage. This delay allows vents to close at the Ventilation Level Tunnel Fan Stages Stage 8 Stage 7 Stage 6 Stage 5 Stage 4 Stage 3 Stage 2 Stage 1 Off Stage 8 Start T° Stage 8 Stop T° Stage 7 Start T° Stage 7 Stop T° Stage 6 Start T° Stage 6 Stop T° Stage 5 Start T° Stage 5 Stop T° Stage 4 Start T° Stage 4 Stop T° EXPERT 21+ rev.00 Stage 3 Start T° Stage 3 Stop T° Stage 2 Start T° Stage 2 Stop T° Stage 1 Start T° Stage 1 Stop T° 24 Average Temperature EXPERT 21+ 5.4.2. Wind Compensation in Tunnel Ventilation In order to save energy, the EXPERT-21+ can switch back to natural ventilation when the wind blows in fast enough in the proper direction. The graph below shows how this compensation works when tunnel ventilation is on: Wind Speed A Beginning of the Wind Compensation in Tunnel Mode : When the controller is in tunnel ventilation, that the wind direction is appropriate and the wind speed reaches a certain speed (“Tunnel stops if wind speed>”), the controller automatically switches back to natural ventilation: it first opens all inflatable panels and then stops the tunnel fans. Note that the wind speed & direction must be maintained all along a user-defined delay for this compensation to take place (“Tunnel Stop Delay”). B End of the Wind Compensation in Tunnel Mode: If the wind speed falls to a certain point (“Tunnel restarts if wind speed <”) or if the wind direction changes while the compensation is on, the controller automatically goes back to tunnel ventilation: it restarts the proper tunnel fan stage and closes the inflatable panels. Note that the change in the wind direction or the reduction in the wind speed must be maintained all along the “Restart Delay” for the wind compensation to stop. Wind Compensation in Tunnel Ventilation (Transition from Tunnel to Natural Ventilation) A Stop speed B Restart speed Delay Delay Time Tunnel restarts if Wind. Spd < Tunnel stops if Wind. Spd > EXPERT 21+ rev.00 25 EXPERT 21+ 5.4.3. Tunnel Ventilation Settings a) Operating T° & Wind Compensation Settings • Press 7 – TUNNEL. *This menu is only available if at least 1 tunnel stage is used (see section 4.3). • Press MODIFY then use the arrow keys to set the following parameters: Stage 1) Start Temperature — Set the tempera- 1)Start 71.6°F Stop 70.7°F ture above which the first tunnel fan stage starts. Then, press MODIFY to select the following parameter Stage 1) Stop Temperature — Set the temperature below which the first tunnel stage stops. Note that the stop temperature of a stage must be at least 0.5°F (0.3°C) lower than its start temperature. Start/Stop Temperatures for other Tunnel Stages — Set the start and stop 2)Start Stop 72.6°F 72.1°F temperature for all tunnel fan stages in use. Stop Tunnel if Wind Spd is > — If the wind com- Stop Tunnel if Wind Spd is > 30 pensation is used, select the wind speed over which the controller must switch back to natural ventilation. This value is either expressed in miles or kilometers per hour depending on the chosen units (sec. 4.5). You can also decrease the value until the word “None” is displayed if to disable this function. *Accessible if the wind compensation function is enabled in section 4.5. Wind Direction — If the Wind Direction North wind compensation is used, select the wind direction that activates the compensation (go back in natural ventilation). Note that the wind compensation will also take place if the wind comes from the direction that immediately 26 EXPERT 21+ rev.00 follows and precedes the chosen direction: i.e, if the direction is set to North-East (NE), a wind coming from North or from East would also enable the wind compensation. *Accessible if the wind compensation function is enabled in section 4.5. Delay before stop — If Delay before the wind compensation is Stop 15:00min used, select during how much time the windy condition must be maintained for the controller to switch back to natural ventilation. *Accessible if “Stop Tunnel if Wind Spd is>” parameter is not set to “None”. Restart Tunnel Fans if Wind Speed is < — If the Restart Tun if Wind Spd is <15 wind compensation is used, select the wind speed below which the controller must switch back to tunnel ventilation when the compensation is active (refer to previous graph). This parameter must be at least 3 kmh (or mph) lower than the speed at which the compensation starts (“Stop Tunnel if Wind spd is >”). Delay before restart — If Delay before restart15:00min the wind compensation is used, select during how much time the low wind condition must be maintained for the controller to go back in tunnel mode. EXPERT 21+ b) Closing the Panels in Tunnel Ventilation: 1. If using 1 section per zone: • Press the desired ZONE button. • Press the down-arrow #Stop at tunnel key to select the “#Stop Stage1: 1 at tunnel Stage 1” parameter. This parameter represents the number of panels that must close (# of blowers to activate) at the start-up of tunnel stage 1. *This menu is only available if at least 1 tunnel stage is used (see section 4.3). • Press MODIFY then use the adjustment buttons to specify how many panels must close, in the chosen zone, at the start-up of the first tunnel stage. • Press MODIFY to vali#Stop at tunnel Stage2: 3 date and then press the down-arrow key to select the following parameter. If your controller uses more than 1 tunnel stage, specify the number of panels to close at the start-up of each tunnel stage. 2. If using 2 sections per zone: • Press the desired ZONE button. • Press the down-arrow Section 1 Closes key to select the “Secat Tunnel1 1 tion 1 Closes at Tunnel 1” parameter. This parameter represents the number of panels that must close in section 1 at the start-up of the 1st tunnel stage. *This menu is only available if at least 1 tunnel stage is used (see section 4.3). • Press MODIFY then use the adjustment buttons to specify the number of panels that must close at the start-up of tunnel stage 1. • If the controller uses Section 1 Closes at Tunnel2 1 2 tunnel stages and the tunnels fans are connected directly into the unit (i.e., they are not connected to an external tunnel module), you must specify how many panels must close in section 1 at the start-up of tunnel stage 2. NB. If tunnel fans are connected to an external tunnel module, the controller allows selecting the number of panels to close at the start-up of the first tunnel stage only. • Press MODIFY to validate then press the downarrow key to select the following vent section. • Proceed in similar fashion to set the number of panels to close in section 2 at the start-up of tunnel stages 1 & 2 (if applicable). Section 2 Closes at Tunnel1 2 EXPERT 21+ rev.00 27 EXPERT 21+ 5.5. Chimneys Chimney Calibration The controller can adjust the position of 2 chimney dampers. The damper position is defined as a function of temperature: at the chimney set point, the damper is at its minimum opening position (#1 on the graph). At the set point + differential, the damper is open at 100% (#2 on the graph). The opening of the chimney damper is automatically adjusted in linear fashion between these 2 temperature limits. • Press 8 – CHIMNEY 1-2. *Accessible if a chimney is enabled (see section 4.3). • Press the down-arrow key to select the calibration display of chimney 1 or chimney 2. In addition, if temperature falls below the set point and reaches the security offset value (#3 on the graph), the damper closes further to its security opening. A fix hysteresis of 0.5°F is used to reopen the chimney when the temperature rises again. Reference Temperature: Operating temperatures of chimneys are based on the average temperature reading of chosen probes. Refer to the Probe Assignment section of this manual to assign probes to each chimney output (section 4.4). Chimneys in Tunnel Ventilation: In tunnel ventilation, both chimneys position themselves to their respective tunnel ventilation position. This position is defined by the user. Chimney Opening Chimney's Operating Diagram 100% Before setting chimney parameters, you must calibrate each one of them. This calibration tells the controller where the actuators’ limit switches are located. To start the calibration, press MODIFY then press the up-arrow key. Press MODIFY once more to validate. The controller will fully close the actuator of the selected chimney; once it reaches the minimum limit switch, the controller opens the actuator until the actuator reaches the maximum limit switch. • The message “done” is displayed when the calibration is over. Chimney Settings • Press 8 – CHIMNEY 1-2. *Accessible if a chimney is enabled (see section 4.3). • Press MODIFY then use the arrow keys to set the following parameters: minimum opening of the chimney; the chimney is at this minimum position when the temperature is at the chimney’s set point. Security Opening 0% 28 Chimney Set Point — The Security Offset Differential Set Point EXPERT 21+ rev.00 Avg Temp. 2)Calib Chimney No • Minimum — This is the Min Opening 1)Calib Chimney No 1)Pos. Min 0% 1)SetP 0% 70.0°F Diff 2.0°F set point is the temperature over which the chimney starts opening as a function of temperature. Adjust the set point then press MODIFY to select the next parameter. EXPERT 21+ Differential — The differential is the normal operating interval of the chimney. The value ranges from 0.5 to 20°F (0.3 to 11.1°C). Security Offset — The 1)Secur. Offset 2.0°F security offset is the number of degrees below the set point at which the chimney goes into security mode and closes to the security position. The value ranges from 0.5 to 20°F (0.3 to 11.1°C). Security Opening — The 1)Secur. Opening security opening is the 0% position of the chimney when the security mode is enabled. The value ranges from 0 to 100%. Open in Tunnel Mode — 1)Open in tunnel Mode: 0% The chimney can reach a user-defined position when tunnel ventilation starts. Specify what is the position of the chimney in tunnel mode. The value ranges from 0 to 100%. • Proceed in similar fashion to adjust these parameter for chimney 2 (if applicable). EXPERT 21+ rev.00 29 EXPERT 21+ 2) Stir Fans In Hot Temperature Conditions 5.6. Stir Fans The controller can operate 1 stir fans output in 3 different ways: the output can be used on cold and/or hot temperature conditions and/or can be used to reduce temperature differences between temperature sensors. Each operating mode is explained below. Refer to section 4.3 to enable the stir fan output. Wind Compensation on Stir Fans: In order to save energy, the EXPERT-21+ can stop all stir fans whenever there is sufficient wind. Stir fans can be used to create a wind chill sensation when the room temperature is warm. When they are used in HOT temperature conditions, stir fans start running in timer mode when the room temperature rises and reaches the output’s start temperature; they stops when the room temperature falls to the stop temperature. Stir Fan Output Stir Fans in Hot T° Conditions ON 1) Stir Fans to Reduce T° Differences Between Sensors Stir fans can be used to standardize the room temperature. In order to this, the stir fans start running in timer mode when the temperature difference between two sensors exceeds a user-defined value; a fix hysteresis of 0.5°F (0.3°C) is used to stop them when the temperature difference between the sensors gets lower. Stir Fan Output Stir Fans to Reduce T° Differences ON OFF Stir Fan Stop T° Stir fans can be used to stir the warm air of the heaters when the room temperature is cold. When they are used in COLD temperature conditions, stir fans start running in timer mode when the room temperature falls to the output’s start temperature; they stop when the room temperature rises to the output’s stop temperature. OFF Max T° Difference T° Difference between 2 probes Room T° 3) Stir Fans in Cold Temperature Conditions Stir Fan Output 0.5°F Stir Fan Start T° Stir Fans in Cold T° Conditions ON OFF Stir Fan Start T° 30 EXPERT 21+ rev.00 Stir Fan Stop T° Room T° EXPERT 21+ Settings • Press • Press the down-arrow key to select the Stir Fan Probe Diff menu. *Accessible if the stir fan output is enabled (see section 4.3). • 9 – OUTPUTS. Press MODIFY then use the arrow keys to set the following parameters: Stir Fan Probe Diff. — Se- Stir Fan Probe Diff 5.0°F lect the maximum allowable temperature difference between two sensors. Whenever the temperature difference between two sensors exceeds this value, the stir fan output starts running in timer mode. Start Stir Fan if HOT? — Start S.Fan if Select “Yes” to use the stir HOT ? Yes fan output in hot temperature conditions (see previous page for further information on this function). Start T° — If the stir fan Start 80.0°F output is used in hot temStop 79.5°F perature conditions, select the temperature over which it must start running in timer mode. *Accessible if the “HOT T° condition” is enabled above. Stop T° — If the stir fan output is used in hot temperature conditions, select the temperature below which it must stop running. *Accessible if the “HOT T° condition” is enabled above. Start Stir Fan if COLD? — Select “Yes” to use the Start S.Fan if COLD? Yes stir fan output in cold temperature conditions (see previous page for further information on this function). Start T° — If the stir fan Start 60.0°F Stop 60.5°F output is used in cold temperature conditions, select the temperature below which it must start running in timer mode. *Accessible if the “COLD T° condition” is enabled above. Stop T° — If the stir fan output is used in cold temperature conditions, select the temperature over which it must stop running. *Accessible if the “HOT T° condition” is enabled above. Stir Fan Timer (On/Off) — Set the on time and the On Off 0:30min 1:00min off time of the stir fan timer. No Stir Fans if Wind Speed > — If the wind compen- No S.F. if wind Speed is > 30 sation is used, select the wind speed at which the controller must stop the stir fan output. This value is either expressed in miles or kilometers per hour depending on the chosen units (sec. 4.5). You can also decrease the value until the word “None” is displayed if to disable this function. *Accessible if the wind compensation function is enabled in section 4.5.. Restart stir fans if Wind Speed is < — If the wind Rest.StirFan if Wind Spd < 15 compensation is used, select the wind speed below which the controller must restart the stir fans. This parameter must be at least 3 kmh (or mph) lower than the speed at which the compensation starts (“Stop stir fans if Wind spd is >”). *Accessible if the wind speed at which the output stops is not set to “None” above.) Direction — If wind com- Direction: North pensation is used, select what wind direction causes the stir fan output to stop when the wind speed is sufficient. Note that the wind compensation will also take place if the wind comes from the direction that immediately follows and precedes the chosen direction: i.e, if the direction is set to North-East (NE), a wind coming from North or from East would also requires the stir fan output to stop. Delay before Stop — If the Delay before Stop 15:00min wind compensation is used, select during how much time the high wind condition must be maintained for the controller to stop the stir fans. EXPERT 21+ rev.00 31 EXPERT 21+ 5.7. Mist Settings The controller can control one misting output. Misters are used to cool down the temperature in the room. They are activated in timer mode when the room temperature is too high and are stopped when the average room temperature drops to their stop temperature. • Press • Press the down-arrow key to select Mist Start menu. *Accessible if the mist output is enabled (see section 4.3). • Press MODIFY then use the arrow keys to set the following parameters: Reference temperature: Operating temperatures of the mist output are based on the average temperature in the room. Refer to the Probe Assignment section of this manual to assign room temperature probes (section 4.4). Mist Output Mist Output The mist output runs in timer mode ON - OUTPUTS. Mist Start Temperature — Set the room tempera- Mist Stop Temperature — Set the room tempera- 32 Start T° EXPERT 21+ rev.00 Room T° Mist Stop 87.0°F On Off 0:00min 0:00min ture below which the mist output stops. Mist Timer (On Time) — Stop T° 88.0°F ture above which the mist output starts running in timer mode. Set the on time and the off time of the misting timer. OFF Mist Start EXPERT 21+ 5.8. 0-10V Ventilation Output The controller can control two 0-10V outputs. This type of outputs can either be used as a supplementary and independent ventilation stages or as an heating stages. Refer to the Outputs Activation section of this manual to enable 0-10V outputs and to specify their respective function (section 4.3). When a 0-10V output is used for ventilation, the output is enabled at its minimum intensity when the temperature reaches the output’s start temperature. The intensity of the output gradually increases in a linear fashion as the temperature increases; the maximum intensity is reached when the temperature reaches the Start T° + Bandwidth (the bandwidth defines the temperature interval over which the output goes from minimum to maximum intensity). The output stops when the temperature decreases of 0.5°F (0.3°C) below the start temperature. Intensity of the 0-10V output 0-10V Fan Output Settings • Press 9 – OUTPUTS. The temperature at which the first 0-10V starts is displayed. *Accessible if a 0-10V output is enabled (sec. 4.3). • Select the start temperature menu of a 0-10V output that is used for ventilation and then press MODIFY to set the following parameters: Start Temperature — Set the temperature at which the 0-10V starts running at minimum speed. Bandwidth — Set the temperature interval over which the output goes from minimum to full speed. Min Intensity — Set the minimum intensity of the output. M a x I nte n s i t y — S e t the maximum intensity of the output. Max Stop 0-10V if wind speed > — If the wind compen- Min 0% Start T° Bandwidth Avg Temp. Wind Compensation on 0-10V Fans: In order to save energy, the EXPERT-21+ can stop the 0-10V fans whenever there is sufficient wind. Output1 0-10V BandW 2.0°F Output1 0-10V Min 15% Output1 0-10V Max 100% Stop 0-10V 1 if Wind. Spd > 30 sation is used, select the wind speed at which the controller must stop the 0-10V fan. This value is either expressed in miles or kilometers per hour depending on the chosen units (sec. 4.5). You can also decrease the value until the word “None” is displayed if to disable this function. *Accessible if the wind compensation function is enabled in section 4.5.. Restart 0-10V if Wind Speed is < — If the wind Reference temperature: Operating temperatures of the 0-10V outputs are based on the average temperature reading of chosen probes. Refer to the Probe Assignment section of this manual to assign probes to these outputs (section 4.4). Output1 0-10V Start 70.0°F Rest. 0-10V 1 if Wind Spd < 15 compensation is used, select the wind speed below which the controller must restart the 0-10V fan. This parameter must be at least 3 kmh (or mph) lower than the speed at which the compensation starts (“Stop 0-10V if Wind spd is >”). *Accessible if the wind speed at which the output stops is not set to “None” above.) EXPERT 21+ rev.00 33 EXPERT 21+ Direction — If wind com- Direction: North pensation is used, select what wind direction causes the 0-10V output to stop when the wind speed is sufficient. Note that the wind compensation will also take place if the wind comes from the direction that immediately follows and precedes the chosen direction: i.e, if the direction is set to North-East (NE), a wind coming from North or from East would also requires the 0-10V output to stop. Delay before Stop — If Delay before the wind compensation is Stop 15:00min used, select during how much time the high wind condition must be maintained for the controller to stop the 0-10V fan. • 34 If the second 0-10V output is used for ventilation, proceed in similar fashion to set its parameters. EXPERT 21+ rev.00 EXPERT 21+ 6. HEATING SETTINGS 6.2. 0-10V Heating Output 6.1. On/Off Heating Outputs The controller can control up to 4 on/off heating outputs. These outputs are independent from one another and each start when their respective start temperature is reached; they stop operating when the temperature increases to their stop temperature. Heating Output Heating Output ON The controller can control two 0-10V outputs. This type of outputs can either be used as a supplementary and independent ventilation stages or as an heating stages. Refer to the Outputs Activation section of this manual to enable 0-10V outputs and to specify their respective function (section 4.3). When a 0-10V output is used for heating, the output is enabled at its minimum intensity when the temperature reaches the output’s start temperature. The intensity of the output gradually increases in a linear fashion as the temperature decreases; the maximum intensity is reached when the temperature reaches the Start T° – Bandwidth (the bandwidth defines the temperature interval over which the output goes from minimum to maximum intensity). The output stops when the temperature increases of 0.5°F (0.3°C) above the start temperature. Intensity of the 0-10V output OFF Start T° Stop T° 0-10V Heating Output Avg T° Max Reference Temperature: Operating temperatures of heating outputs are based on the average temperature reading of chosen probes. Refer to the Probe Assignment chapter of this manual to assign probes to each heating output. Min 0% Bandwidth Start T° Avg Temp. Reference temperature: Operating temperatures of the 0-10V outputs are based on the average temperature reading of chosen probes. Refer to the Probe Assignment section of this manual to assign probes to these outputs (section 4.4). EXPERT 21+ rev.00 35 EXPERT 21+ 6.3. Heating Output Settings On/Off Output Settings 0-10V Heating Output Settings • Press • • Press the down-arrow key to select Heater 1 Start Temperature menu. *Accessible if an heating output is enabled (see section 4.3). Press 9 – OUTPUTS. The temperature at which the first 0-10V starts is displayed. *Accessible if a 0-10V output is enabled (sec. 4.3). • Select the start temperature menu of a 0-10V output that is used for heating and then press MODIFY to set the following parameters: • 9 – OUTPUTS. Press MODIFY then use the arrow keys to set the following parameters: Heater 1 Start Temperature — Set the temperature Heater 1 Start 70.0°F Before adjusting the following parameters, make sure the 0-10V function is set to “Heating” in the User Setup menu (sec. 4.3). below which heater 1 starts running. Heater 1 Stop Temperature — Set the tempera- Heater 1 Stop Start Temperature — Set the temperature at which the 0-10V starts running at minimum speed. 70.5°F ture above which heater 1 stops. Note that the stop temperature of an heating output must be at least 0.5 °F (0.3°C) greater than its start temperature. Bandwidth — Set the tem- Heater 2-4 Start/Stop Temperatures — perature interval over which the output goes from minimum to full speed. Proceed in similar fashion to set the start and stop temperatures of all on/off heating outputs in use. Minimum Intensity — Set the minimum intensity of the output. Maximum Intensity — Set the maximum intensity of the output. • 36 EXPERT 21+ rev.00 Output1 0-10V Start 70.0°F Output1 0-10V BandW 2.0°F Output1 0-10V Min 15% Output1 0-10V Max 100% If the second 0-10V output is used for heating, proceed in similar fashion to set its parameters. EXPERT 21+ 7. ALARMS The alarm output is set off when an alarm condition is detected: when the room temperature is too high or too low, for instance. When an alarm is active, the pilot light (LED) corresponding to the alarm condition is lit on the faceplate of the controller. The table on the right gives all possible alarm conditions. Another alarm situation occurs in case of a power failure. In this case, the alarm relay is activated. When the alarm relay is activated, the ) closes. normally open contact ( 7.1. Temperature Alarms High / Low Temperature Alarms: A high temperature alarm is set off when the average room temperature exceeds the high temperature alarm limit; likewise, a low temperature alarm is set off when the room temperature decreases below the low temperature alarm limit. Influence of the Outside Temperature on the Alarm Limits: The influence of the outside temperature avoids false alarms due to warm weather. When the outside temperature is greater than the high alarm limit + 5°F (2.8°C), the outside temperature becomes the high alarm limit. This means an alarm is set off when the room temperature is higher than the outside temperature. The graphic on the right illustrates this situation. Critical Temperature: The critical temperature is the absolute maximum temperature allowed in the room. An alarm is set off if the room temperature reaches the critical temperature limit, without considering the outside temperature. Alarm Conditions High / Low Temperature Alarm Sensor #x is defective Outside T° sensor is defective Potentiometer is defective/ Room T° High alarm limit High/Low Temperature Alarms Alarm Low alarm limit T° Time Influence of the Outside T° on the Alarm Limits Critical alarm Hi T° Alarm Limit Hi T° Alarm Limit Outside T° Lo T° Alarm Limit Time Temperature = Out of range (T° alarm) Temperature = OK EXPERT 21+ rev.00 37 EXPERT 21+ 8. Setting the Alarm Limits • Press 13 – ALARM. The high and low temperature limits are displayed. • Press MODIFY then use the arrow keys to set the following parameters: Low Alarm Limit — Set the Low: 60.0°F High: 80.0°F room temperature below which the low temperature alarm is set off. Press MODIFY to select the following parameter. High Alarm Limit — Set the room temperature above which the high temperature alarm is set off. Critical Alarm Limit — Set the absolute room temperature above which a critical temperature alarm is set off. 8.1. Room Temperature The room temperature is the average temperature reading of chosen probes. Refer to the Probe Assignment section of this manual to assign these probes (section 4.4). The controller displays the room temperature in the current condition menu. This menu also gives the minimum and maximum room temperature readings that were recorded everyday for the past 6 days (temperature histories are updated at midnight everyday). Critical high: 95.0°F Current Reading • 7.2. Defective Probe Alarm To identify the defective temperature probe, press the C – CURRENT CONDITIONS button then press the current condition’s down-arrow key. Probe readings are then displayed. Dashes are displayed instead of a reading when the probe is defective. In the case of room temperature probes, the controller will operate according to the temperature of the remaining probes. 7.3. Defective Potentiometer • Press the navigation Room T°12/31/XX down-arrow key once. Min 76.7 4:29A The controller displays today’s minimum room temperature along with the time and date. • Room T°12/31/XX Press the navigation Max 79.2 3:57P down-arrow key once again. The controller displays today’s maximum room temperature along with the time and date. When the temperature is 2°F (1.1°C) above the set point of the defective chimney, the actuator opens according to the following cycle: - 8 seconds ON - 60 seconds OFF. When the room temperature is 2°F (1.1°C) below the set point of the defective chimney, the actuator closes according to the same cycle. 38 EXPERT 21+ rev.00 Press C – CURRENT Room T° 78.2°F CONDITIONS. The curPr.Act:12345678 rent room temperature is displayed. Probes that are used to calculate the average room temperature are flashing on screen. Min / Max Values If a chimney potentiometer is defective, the controller will enable the security mode: MONITORING FUNCTIONS History • Keep pressing the navRoom T°12/30/XX Min 75.9 3:51A igation down-arrow to scroll down through the room temperature history. The controller will display minimum and maximum room temperature readings of the past 6 days. EXPERT 21+ 8.2. Probe Temperature 8.3. Outside Temperature The controller displays the current temperature reading of each sensor in the current condition menu. This menu also gives the minimum and maximum temperature readings that were recorded everyday by each sensor for the past 6 days (temperature histories are updated at midnight everyday). The controller displays the outside temperature in the current condition menu. This menu also gives the minimum and maximum readings that were recorded everyday by the outside temperature sensor for the past 6 days (temperature histories are updated at midnight everyday). Current Reading • Press C – CURRENT CONDITIONS. • Press the current condi1:78.2 1:78.0 tion down-arrow key once 3:78.3 4:78.1 . Current temperature readings of probes 1-4 are displayed. • P re s s t h e n av i g a 5:78.5 6:78.1 tion down-arrow key 7:78.0 8:78.2 once. Current temperature readings of probes 5-8 are displayed. *Available if more than 4 probes are enabled (see Probe Activation in sec. 4.4). Current Reading • Press • Press the current con dition down-arrow key twice . The current outside temperature is displayed. *Accessible if the outside temperature sensor is enabled (see Probe Activation in section 4.4). Press the navigation Probe1 12/31/XX down-arrow key once Min 77.4 3:27A again. The minimum temperature reading of probe 1 is displayed along with the time and date. • Press the navigation Probe1 12/31/XX Max 79.3 4:16P down-arrow key once again. The maximum temperature reading of probe 1 is displayed along with the time and date. History • – CURRENT CONDITIONS. Out T° 64.2°F Min / Max Values • Press the navigation Out T° 12/31/XX down-arrow key once. Min 53.4 3:02A The controller displays today’s minimum outside temperature along with the time and date. . • Press the navigation Max 69.5 4:29P down-arrow key once again. The controller displays today’s maximum outside temperature along with the time and date. Min / Max Values • C Out T° 12/31/XX History • Keep pressing the navOut T° 12/30/XX Min 58.9 3:45A igation down-arrow to scroll down through the outside temperature history. The controller will display minimum and maximum outside temperature readings of the past 6 days. Keep pressing the navProbe1 12/30/XX Min78.7 5:47P igation down-arrow to scroll down through probe temperature histories. The controller will display minimum and maximum temperature readings of each probe of the past 6 days. EXPERT 21+ rev.00 39 EXPERT 21+ 8.4. Wind Speed 8.5. Wind Direction The controller displays the wind speed in the current condition menu. This menu also gives the minimum and maximum speeds that were recorded everyday for the past 6 days (this wind speed history is updated at midnight everyday). The controller displays the current wind direction in the current condition menu. Current Reading • Press • Press the current condition down-arrow key to display the wind speed menu . C – CURRENT CONDITIONS. WindSpd • • Press • Press the current condition down-arrow key to display the wind direction menu . 0mph Min / Max Values • Current Reading Press the navigation WindSpd12/31/XX down-arrow key once. Min 0 12:00A The controller displays today’s minimum wind speed along with the time and date. . Press the navigation WindSpd12/31/XX down-arrow key once. Max 32 6:30A The controller displays today’s maximum wind speed along with the time and date. C – CURRENT CONDITIONS. Direction: North 8.6. Rain Sensor Status Select the following menu to see if the rain sensor currently detects rain or not. Current Reading • Press • Press the current condition down-arrow key to display the rain sensor menu . C – CURRENT CONDITIONS. Rain: Yes 8.7. Relative Humidity If a humidity sensor is connected to the unit, the EXPERT 21+ displays the current humidity level in the Current Condition menu. Current Reading 40 EXPERT 21+ rev.00 • Press • Press the current condition down-arrow key to display the humidity level . C – CURRENT CONDITIONS. Humidity: 50% EXPERT 21+ 9. TEST MODE 10. The test mode is used to simulate temperature changes and to verify the controller’s performances. When the test is enabled, all outputs of the controller operate according to the simulated temperature. • • • • Press 15 –TEST MODE. If a password is enabled, enter the current password using the adjustment buttons. By default, it is set to 00-00-00. The test mode status will then be displayed. Press MODIFY then use the arrow keys to change the test mode status. Test mode If the test mode is enabled, press the down-arrow key once. The simulated room temperature is displayed. Room T° bypass: -40.0°F MANUAL MODE The controller allows you to set the status of each blower or the position of each chimney damper manually. In order to activate or deactivate a blower, please refer to the relay assignment table to see on which relay the blower is connected (section 13.1). The manual mode pilot light flashes while an output is controlled manually. • Press • Use the navigation buttons to select the proper vent section or the proper chimney. Relay 10 Relay 11 On Auto • Press MODIFY then use the adjustment buttons to select the desired status for the selected output: Chimney 1 OFF 12 –MANUAL MODE. On Press MODIFY then use the arrow keys to select the desired simulated room temperature. The test automatically ends after 15 minutes of inactivity. It can also end sooner by switching the test mode status back to “Off”. Status of blower relays (relays 1-16) & programmable relays (relays 21-24): Auto : On : Off : the blower is controlled by the controller; the blower is on; the blower is off. Status of chimney dampers (relays 17-20): the chimney is controlled by the controller; Close: the chimney closes; Open : the chimney opens; Off : the chimney stays still. Auto : EXPERT 21+ rev.00 41 EXPERT 21+ 11. TECHNICAL SPECIFICATIONS Type..........................................................EXPERT 21+ Mains supply fuse F1.................................. 4A, slow-blow Mains supply/frequency...............................85-250V, 50/60Hz 0-10V output 1-2........................................0-10Vdc, 30mA source max. Precision on the 0-10V outputs....................±1 % 14Vdc output.............................................14 Vdc ±10%, regulated, 250mA max. Alarm contact............................................10mA to 2A, 24 Vac or dc max. Pot + output..............................................3.0V, 20mA max. Potentiometer inputs...................................1-20K pot., linear Wind direction sensor..................................10K Potentiometer Rain Sensor................................................Dry contact Relative Humidity Sensor.............................4-20mA Wind speed sensor.....................................Square wave from open collector transistor Temperature inputs.....................................1K @ 77°F (25°C), NTC Relays 1-24................................................Dry contact, 10A resistive, 120VAC (1/4HP) / 240VAC (1/2HP) Tungsten (Light Bulb): 8.3A max at 120VAC Housing.....................................................ABS, moisture and dust-tight. Operating temperature................................32 to 104°F (0 to 40°C) Storage temperature...................................5 to 122 °F (-15 to 50°C) Ambient relative humidity............................max. 95% 42 EXPERT 21+ rev.00 EXPERT 21+ 12. MEMORY CARD 6.Use the up- and down-arrow keys to select the proper type of transfer: The memory card is used to create a backup copy of your controller’s configuration. The card is also useful to transfer the configuration of one controller to another controller of the same type. The switch at the bottom of the card is used to lock or to unlock the card ( = locked, = unlocked). Turn off power each time you open the controller’s enclosure. This prevents accidental exposure to areas of high voltage. TO TRANSFER A CONFIGURATION: 1.Turn off power to the controller. Memory Card 2.Unscrew the screws located on the controller’s front panel then open the panel. 3.If you are about to copy the controller’s configuration on the memory card, make sure the card’s switch is at the unlocked position. Card Switch Connector Electronic Board Front plate Front cover 4. Insert the card in the J10 connector located on the electronic board inside the controller. Components of the memory card must face down as illustrated. 5.C lose the cover then reapply power to the controller. The transfer menu should be shown on screen (if this is not the case, simultaneously press the CURRENT CONDITION’S up and down-arrow keys for 3 seconds to display this menu). MEMORY CARD to CONMem.Card –> Ctrl TROLLER: +/- to start To transfer the memory card’s content into the controller, select the “Mem.Card –> Ctrl” with the ADJUSTMENT buttons. Once it is selected, simultaneously press the ADJUSTMENT buttons’ up- and down-arrow keys to start the transfer. CONTROLLER to MEMORY CARD: To save the controller’s Ctrl > Mem. Card configuration into the +/- to start memory card, select the “Ctrl –> Mem. Card” menu with the ADJUSTMENT buttons. Once this menu is selected, simultaneously press the ADJUSTMENT buttons’ up- and down-arrow keys to start the transfer. 7.Once the transfer is over, simultaneously press and hold the up- and down-arrow keys for 5 seconds to exit the transfer menu, then remove the memory card from the connector as follows: - - - - Turn off power to the controller; Open the controller’s cover; Remove the card from the connector; Close the cover then reapply power to the controller. 8.Lock the card’s switch if required. Transfer Error The controller will not warn you if the transfer is incorrect. Respect the following rules to make sure the transfer works properly: • Make sure the card switch is at the unlocked position before transferring a configuration on the card. • Do not move or hold the card while a transfer is ongoing. EXPERT 21+ rev.00 43 EXPERT 21+ 13. WORKSHEET CLIENT Name: __________________________________________________ Address: __________________________________________________ __________________________________________________ __________________________________________________ City: __________________________________________________ Tel.: __________________________________________________ Fax: __________________________________________________ E-mail: __________________________________________________ INSTALLER Name: __________________________________________________ Address: __________________________________________________ __________________________________________________ __________________________________________________ City: __________________________________________________ Tel.: __________________________________________________ Fax: __________________________________________________ E-mail: __________________________________________________ 44 EXPERT 21+ rev.00 EXPERT 21+ 13.1. Relay Assignment Template 13.2. Probe Assignment Template Selection of Sensors OUTPUTS Pre-defined Internal Relays 1 2 1 section / Zone 2 sections / Zone Relay 1 Zone A Blower 1 Zone A Sect.1 Blower 1 0-10V Output 1 Relay 2 Zone A Blower 2 Zone A Sect.1 Blower 2 0-10V Output 2 Relay 3 Zone A Blower 3 Zone A Sect.2 Blower 1 Relay 4 Zone A Blower 4 Zone A Sect.2 Blower 2 Relay 5 Zone B Blower 1 Zone B Sect.1 Blower 1 Heater 4 Relay 6 Zone B Blower 2 Zone B Sect.1 Blower 2 Vent Zone A Relay 7 Zone B Blower 3 Zone B Sect.2 Blower 1 Relay 8 Zone B Blower 4 Zone B Sect.2 Blower 2 Vent Zone D Relay 9 Zone C Blower 1 Zone C Sect.1 Blower 1 Vent Zone E Relay 10 Zone C Blower 2 Zone C Sect.1 Blower 2 Chimney 1 Relay 11 Zone C Blower 3 Zone C Sect.2 Blower 1 Relay 12 Zone C Blower 4 Zone C Sect.2 Blower 2 Relay 13 Zone D Blower 1 Zone D Sect.1 Blower 1 Relay 14 Zone D Blower 2 Zone D Sect.1 Blower 2 Relay 15 Zone D Blower 3 Zone D Sect.2 Blower 1 Relay 16 Zone D Blower 4 Zone D Sect.2 Blower 2 Relay 17 Chimney 1 — Close Relay 18 Chimney 1 — Open Relay 19 Chimney 2 — Close Relay 20 Chimney 2 — Open 3 4 5 6 7 8 Tunnel Fan 1 Tunnel Fan 2 Heater 1 Heater 2 Heater 3 Vent Zone B Vent Zone C Chimney 2 Average Room T° Programmable relays (if used as blowers) 1 section / Zone 2 sections / Zone Relay 21 Zone E Blower 1 Zone E Sect.1 Blower 1 Relay 22 Zone E Blower 2 Zone E Sect.1 Blower 2 Relay 23 Zone E Blower 3 Zone E Sect.2 Blower 1 Relay 24 Zone E Blower 4 Zone E Sect.2 Blower 2 Programmable relays (if not used as blowers) Relay 21 __Mist __Heat __Stir Fan __Tun1 ___Tun2 Relay 22 __Mist __Heat __Stir Fan __Tun1 ___Tun2 Relay 23 __Mist __Heat __Stir Fan __Tun1 ___Tun2 Relay 24 __Mist __Heat __Stir Fan __Tun1 ___Tun2 EXPERT 21+ rev.00 45 EXPERT 21+ 13.3. User Setup Menu Parameter Range Contrast 10-100% Time format AM/PM / 24h Temperature units °F / °C # of T° sensors in the room 1-8 Room probes 1-6 Outside Temperature sensor Yes / No Rain sensor Yes / No Humidity sensor Yes / No Zones A; A-B; A-B-C; A-B-C-D; A-B-C-D-E Minimum ventilation Yes / No # Sections per zone 1-2 Zone A) # Blowers per section 2-4 Zone B) # Blowers per section 2-4 Zone C) # Blowers per section 2-4 Zone D) # Blowers per section 2-4 Zone E) # Blowers per section 2-4 Activation delay 15-300 seconds De-icing Yes / No Drying Yes / No Stir Fans Yes / No Use Tunnel (internal relays) Yes / No # Onboard tunnel stages 1-2 Use tunnel module Yes / No # Tunnel stages (on T.Module) 1-8 Mist Yes / No Chimneys Yes / No Heaters 1-4 # 0-10V Output 1-2 0-10V Output 1 used for Heat / Ventil. 0-10V Output 1 mode 0-10V / 10-0V 0-10V Output 2 used for Heat / Ventil. 0-10V Output 2 mode 0-10V / 10-0V Wind compensation Yes / No Wind speed units mph / kmh Rain compensation Yes / No No compensation above ______° Use Password Yes / No Password _____ _____ _____ 46 EXPERT 21+ rev.00 Your setting EXPERT 21+ Index E Electrical specifications 42 A Actuator. See Chimney Error (transfer) 43 F Alarms 37–38 Fans. See Ventilation B H Blowers. See Vent blowers Buttons 9 C Card (memory) 43 Chimneys Activation 13 Calibration 28 Manual mode 41 Potentiometer alarm 38 Principle of operation 28 Probe assignment 14 Relay assignment 17 Settings 28 Heaters 0-10V heating output Activation 13 Operation & Settings 35 Probe assignment 14 On/Off heating outputs Activation 13 Operation & settings 35 Probe assignment 14 Relay assignment 17 History Outside temperature sensor 39 Room temperature 38 Temperature sensors 39 Wind speed 40 Clock Setting the time and date 11 Time display: AM/PM or 24H 16 Humidity. See Relative humidity (RH) Compensation. See Wind & rain compensation Inflatable vents. See Vents Connections 8 Inputs 6 Contrast of the LCD screen 10 Controller Features 6 Location of the controls 9 Manual mode 41 Mounting instructions 8 Program version 18 Technical specifications 42 Critical temperature 37 Current condition buttons 9 D Date & time 11 Degrees (°C or °F) 16 De-icing. See Vents Drying vents. See Vents I K Keys 9 L LCD display Adjusting the screen contrast 10 Location 9 LED display 9 M Manual mode 41 Measurement units 16 Memory card 43 Minimum ventilation Activation 14 Operation & settings 19 EXPERT 21+ rev.00 47 EXPERT 21+ Mist Activation 12 Operation & settings 32 Relay assignment 17 Mounting instructions 8 N Natural ventilation De-icing the panels 22 Drying the panels 23 Operation & settings 20 Wind & rain compensation 21 O Outputs List of available outputs 6 Output status LEDs 9 Outside temperature. See Temperature Overview Overview of the controller 6 Overview of the vent system 7 P Parameter adjustment 10 Password 11 Potentiometer. See Chimney Probes Connection 8 Extension 8 Identify a defective probe 38 Individual probe readings 39 Outside temperature probe. See Temperature Probe history. See History Room T° probes 13 Program version (controller’s) 18 R Rain Compensation to close vents Activation 15 Operation & settings 21 Current conditions 40 Rain sensor 13 Relative humidity (RH) Activate humidity sensor 14 Current humidity level 40 48 EXPERT 21+ rev.00 Relay Assignment 17 Room temperature. See Temperature S Sections. See Vent sections Sensors Humidity sensor Activation 14 Current reading 40 Outside temperature sensor Activation 13 Current reading 39 Rain sensor Activation 13 Current status 40 Temperature sensors Activation 13 Current reading 39 Wind Current wind direction 40 Current wind speed 40 Set points Chimney set point 28 Temperature set point 19 Simulation. See Test mode Stir fans Activation 12 Operation & settings 30 Relay assignment 17 Symbols of the manual 5 T Technical specifications 42 Temperature Critical temperature 37 Outside temperature Current outside temperature 39 Outside influence on T° alarms 37 Outside temperature history 39 Probe activation 13 Room temperature Current temperature 38 Probe activation & assignment 13 Temperature history 38 Temperature alarms Principle of operation 37 Settings 38 EXPERT 21+ Temperature set point 19 Temperature set points Chimney set point 28 Temperature simulation 41 Temperature units (°C or °F) 16 Test mode 41 Time Setting the time and date 11 Time display: AM/PM or 24H 16 Transfer error 43 Tunnel fans Activation 12 External module 12 Principle of operation 24 Relay assignment 17 Settings 26 V Ventilation 0-10V ventilation output Activation 13 Operation & settings 33 Probe assignment 14 On/Off fan outputs. See Tunnel or Stir Fans Vents (inflatable membrane) Blowers Manual mode 41 Operation & settings 14, 20 Overview 7 Relay assignment 17 De-icing vents Activation 15 Settings 22 Drying vents Activation 15 Settings 23 Minimum ventilation Activation 14 Operation & settings 19 Opening compensation. See Wind & Rain Compensation Set point 19 Vent sections Activation 14 Definition & overview 7 Vent zones Activation 14 Blowers 7, 14, 20 Current temperature 19 Description & overview 7 Probe assignment 14 Sections 14 Wind & Rain comp.. See Wind & Rain Compensation Version 18 W Weather. See Temperature Wind Wind direction 40 Wind speed Current speed 40 History 40 Speed units 15 Wind & rain compensation Activation 15 Wind comp. of 0-10V fans 30, 33 Wind comp. of tunnel fans 25, 26 Wind & rain comp. on vent. opening 21 Wiring 8 Worksheets 44 Z Zones. See Vent zones see Vent zones EXPERT 21+ rev.00 49