1
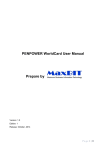
Mida Remote VC Commander Administration and User Guide Document Revision: 1.0 ADMINISTRATION AND USER GUIDE D > 3 / 16 www.midasolutions.com Document Information File MidaSolutions_RemoteVCcommander Manual.docx Version 1.0 Part Number DVCC0200UM00EN0001 - Revision Date Description 1.0 25/03/2012 Remote VC Commander Mida Solution srl – Administration and User Guide Administration & User Updates Version 1.0 ADMINISTRATION AND USER GUIDE D www.midasolutions.com > 4 / 16 Table of Contents 1 Introduction ....................................................................................................................... 5 1.1 Legal statements......................................................................................................... 5 1.2 Preface ...................................................................................................................... 5 1.3 Audience ................................................................................................................... 5 1.4 Notations ................................................................................................................... 5 1.5 References ................................................................................................................. 5 2 Mida Remote VC Commander User Guide ....................................................................................... 6 2.1 Manage Rooms ............................................................................................................. 7 2.2 Make a video call ........................................................................................................... 9 2.3 Multi Room Mode ......................................................................................................... 11 2.4 One Room Mode .......................................................................................................... 11 2.5 Settings .................................................................................................................... 12 2.5.1 using a Mida Application Server ..................................................................................... 13 3 Mida Remote VC Commander Administrator Guide .......................................................................... 14 3.1 First Setup ................................................................................................................. 14 3.2 Network Configuration ................................................................................................... 14 3.3 Codec Configuration ...................................................................................................... 15 Mida Solution srl – Administration and User Guide Version 1.0 ADMINISTRATION AND USER GUIDE D > 5 / 16 www.midasolutions.com 1 Introduction 1.1 Legal statements THE SPECIFICATIONS AND INFORMATION REGARDING THE PRODUCTS IN THIS MANUAL ARE SUBJECT TO CHANGE WITHOUT NOTICE. ALL STATEMENTS, INFORMATION, AND RECOMMENDATIONS IN THIS MANUAL ARE BELIEVED TO BE ACCURATE BUT ARE PRESENTED WITHOUT WARRANTY OF ANY KIND, EXPRESS OR IMPLIED. USERS MUST TAKE FULL RESPONSIBILITY FOR THEIR APPLICATION OF ANY PRODUCTS. ACCESS TO THE SOFTWARE REQUIRES PURCHASE OF A VALID LICENSE. MIDA SOLUTIONS OFFERS SUPPORT AND SOFTWARE BUG FIXES IF THE CUSTOMER IS UNDER A VALID SUPPORT AND MAINTENANCE CONTRACT. IF YOU ARE UNABLE TO LOCATE THE SOFTWARE LICENSE OR LIMITED WARRANTY, CONTACT YOUR MIDA REPRESENTATIVE FOR FURHER INFORMATION. NOTWITHSTANDING ANY OTHER WARRANTY HEREIN, ALL DOCUMENT FILES AND SOFTWARE OF THESE SUPPLIERS ARE PROVIDED “AS IS” WITH ALL FAULTS. MIDA SOLUTIONS DISCLAIMS ALL WARRANTIES, EXPRESSED OR IMPLIED, INCLUDING, WITHOUT LIMITATION, THOSE OF MERCHANTABILITY, FITNESS FOR A PARTICULAR PURPOSE AND NONINFRINGEMENT OR ARISING FROM A COURSE OF DEALING, USAGE, OR TRADE PRACTICE. IN NO EVENT SHALL MIDA SOLUTIONS OR ITS SUPPLIERS BE LIABLE FOR ANY INDIRECT, SPECIAL, CONSEQUENTIAL, OR INCIDENTAL DAMAGES, INCLUDING, WITHOUT LIMITATION, LOST PROFITS OR LOSS OR DAMAGE TO DATA ARISING OUT OF THE USE OR INABILITY TO USE THIS MANUAL, EVEN IF MIDA SOLUTIONS OR ITS SUPPLIERS HAVE BEEN ADVISED OF THE POSSIBILITY OF SUCH DAMAGES. All trademarks mentioned in this document are the property of their respective owners. Any Internet Protocol (IP) addresses and phone/fax numbers used in this document are not intended to be actual addresses and phone numbers. Any examples, command display output, network topology diagrams, and other figures included in the document are shown for illustrative purposes only. Any use of actual IP addresses or phone numbers in illustrative content is unintentional and coincidental. 1.2 Preface This document is part of the official documentation of Mida Solutions products and details functionalities, user interface, options and working modes in detail. The system allows the user to configure all system functions using a simple and intuitive WEB interface. Please refer to the reference table for a complete list of documents relevant for system configuration. 1.3 Audience The present document addresses both end users and system administrators of Mida products. 1.4 Notations This document highlights, where possible, the main parameters and operations through bold or italics text and all parts that might be critical during system configuration or use. Critical parts are also marked with the Warning symbol reported here on the left. 1.5 References This manual includes references to the following list of documents: [1] Mida_Unified_Portal-Administration_&_User_Manual [2] Mida_Appliance-Administration_Manual Mida Solution srl – Administration and User Guide Version 1.0 ADMINISTRATION AND USER GUIDE D www.midasolutions.com > 6 / 16 2 Mida Remote VC Commander User Guide This app allow you to manage video conferences directly from your personal tablet or smartphone. Main features are: "one button to push" feature, strictly related to the user (greater safety and rooms control) extend to control the environments with mixed rooms (i.e. Tandberg/Cisco, Polycom, Aethra etc.) available on Cisco CIUS, Android Froyo (and later release) and also on iOS (i.e. Apple iPAD or iPhone) touch interface compatible with more devices, including Tandberg legacy and only for CIUS devices connected to a Mida Application Server: provide also a “speech recognition” feature running local on Mida Application Server and therefore does not require internet access. Alternatively, if internet access is available, it’s possible to offer a cloud service of "voice recognition"; integrate a “text to speech” capabilities in order to guide the user in a more “user friendly” mode. WORKING MODE The app can work in two modes: One room mode (commands a preselected codec) Multi room mode (the user can select the room to command) DIRECTORY AND CONTACS The app uses the contacts exported from the codec. In detail: Directory: from codec/TMS (if enabled, you may merge also the contacts of the device or show only the contacts of the device) Favorites: from the app (set by Mida app) History: from app call history (i.e. device call history) and then the user's personal call history Dial: Number or URI that you may insert from the tablet VIDOE CALL FEATURES When the videoconference is active, it's possible: see the room and the involved participants; add a participant; put on hold the video call; close the video call; adjust audio volume; mute/unmute the call; select a camera preset if available. Mida Solution srl – Administration and User Guide Version 1.0 ADMINISTRATION AND USER GUIDE D www.midasolutions.com > 7 / 16 2.1 Manage Rooms When you start the app the system show you the list of configured rooms. ADD NEW ROOM 1. Push on add button (depending on the model of your device, it may be “+” button on top of the page for iOS or “add” button selecting menu for Android) 2. Insert room’s parameter: Name: this is the name used by app in order to identify the room IP: ip address or host name of the codec Username: enter the administrative user that system use to access to the codec Password: enter the password of the user that system use to access to the codec 3. click on “save” button in order to perform your change (depending on the model of your device, it may be named “Done” or “Save”) MODIFY EXISTING ROOM If you have a long list you may search the one that you want to modify by using the search tool bar (or search button depending on the model of your device). Hence 1. 2. 3. you found the room you must: select the room modify the parameters configured for the room click on “done/save” button in order to perform your change Figure 1: manage rooms – android device Mida Solution srl – Administration and User Guide Version 1.0 ADMINISTRATION AND USER GUIDE D www.midasolutions.com > 8 / 16 Figure 2: manage rooms – iOS device Note: depending on device type you may choose/manage also the camera preset. Figure 3: manage rooms – preset example Mida Solution srl – Administration and User Guide Version 1.0 ADMINISTRATION AND USER GUIDE D www.midasolutions.com > 9 / 16 2.2 Make a video call When you start the app, it displays the list of configured rooms (codecs). In order to start the video call you must select the room and start the video conference. Then you can add the participant selecting their contacts from: favourites call history addressbook dial command inserting the number Otherwise, if you have planned the video conference by TSM, you can also start a video only by selecting the room. When the videoconference is active, it's possible: see the room and the involved participants; add a participant; put on hold the video call; close the video call; adjust audio volume; mute/unmute the call; select a camera preset if available. Figure 4: make call – Android device Mida Solution srl – Administration and User Guide Version 1.0 ADMINISTRATION AND USER GUIDE D www.midasolutions.com > 10 / 16 Figure 5: make call – iOS device Figure 6: audio settings examples Mida Solution srl – Administration and User Guide Version 1.0 ADMINISTRATION AND USER GUIDE D www.midasolutions.com > 11 / 16 2.3 Multi Room Mode If you want to use this mode, ensure in main settings area that “One Room Mode” checkbox is disabled and then you can select the desired room (codec) in two ways: touch interface: press on the room name to select the desired room (or the “one button to push” red bullet for the given room) or search a data room by name (useful if the list is very long) voice command, just pressing the microphone button (only for CIUS with Mida Application Server); Word spotting: you can say a sentence, the solution automatically detects the name of the room, eg. "I’m in Galileo room" or “This room is Galileo” Once you select the room (codec), the system: checks if there are meetings scheduled via TMS in that room at that time perform the intersection of such scheduled meetings with those reported in the user's calendar (only if "Use mobile device calendar" is enabled) If at least one meeting is planned this will be started automatically. NOTE: you must keep disabled "Use mobile device calendar" if you do not want to use the user’s calendar. Example: 1. schedule a meeting via TMS on “Galileo room” 2. activate the application and say: "I’m in Galileo room" 3. ensure that the video conference is automatically activated 2.4 One Room Mode If you want to use this mode, ensure (in main settings area) that: “One Room Mode” checkbox is enabled “Use mobile device calendar” checkbox is disabled In this mode the user can start the planned videoconference simply by activating the app. The mode is similar to the previous mode described above but the room and the codecs are already selected and the user cannot change them (the app is similar to the codec's remote commander). Example: 1. schedule a meeting vis TMS on “Galileo room”; 2. make sure that the mode is set to "one room"; 3. activate the app and confirm the start of the videoconference; 4. ensure that the video conference is started automatically. Otherwise you can also start a video conference in a specific room by selecting a contact in address book or a favorite (this is also supported in multi-room mode). Mida Solution srl – Administration and User Guide Version 1.0 ADMINISTRATION AND USER GUIDE D > 12 / 16 www.midasolutions.com 2.5 Settings At startup of the app, you may also choose how you want to use: Multy Room Mode: the app shows all the room (codec) available and the user can select the desired room with voice command or touch interface; One Room Mode: when you select this mode, you must select also the room (codec) to use and the app works only on that room without asking the user for input. Default settings is Multi room Mode; if you want to enable the One Room Mode flag “One Room Mode” check box and select the room (codec) to use, pressing “Select Room” key. Another available option is “Use mobile device calendar”. If this option is active when you start the app it will check any meetings scheduled in the app user's personal calendar and verify the names of planned meetings with those planned on TMS. Figure 7: room mode Mida Solution srl – Administration and User Guide Version 1.0 ADMINISTRATION AND USER GUIDE D > 13 / 16 www.midasolutions.com 2.5.1 using a Mida Application Server If you are using a Mida Application Server, the first time that you access to the app you must configure connection parameters and settings in this way: Ensure that the mobile device (tablet or smartphone) can access to the Mida Application Server and to the codec that you want to control. Make sure that the Mida Application Server has been properly configured and activated and contains codec’s list with names and credentials required. [Refer the administrator section for further details]. Configure the Mida Application Server hostname or IP address in app: 1. start the app and select Settings 2. enter the Mida Application Server <IP_Address> in the format xxx.xxx.xxx.xxxx (3) 3. Only for CIUS: enter the ASR (voice recognition) server <IP_Address>: 8091 (4) REMEMBER TO PUT THE NUMBER OF PORT 8091! 4. push Save button NOTE: for on premises system, the Mida Application Server IP address and ASR Server IP address are usually the same. Figure 8: settings Mida Solution srl – Administration and User Guide Version 1.0 ADMINISTRATION AND USER GUIDE D www.midasolutions.com > 14 / 16 3 Mida Remote VC Commander Administrator Guide Mida Remote VC Commander app can use an application server (Mida Application Server) as the master source of data and: includes speech recognition (ASR) engine (only for CIUS version) provides the codec list (set as rooms in the app) that the app can use is completely web based This application service is a part of the Mida applications suites MCC and eFramework and is available as a vmware virtual appliance. 3.1 First Setup The Mida application Server is provided as a preinstalled vmware virtual appliance running on Linux OS. The virtual appliance setup requires a virtualization environment (i.e. hypervisor ESXi 4.x or 5.x or other vmware compliant software). The first setup requires: 1. Mida Application Server network configuration 2. list of codecs configuration 3.2 Network Configuration The virtual appliance is usually provided with the static ip address 10.0.0.100; dynamic IP (i.e. DHCP) are not supported. If uploading the virtual appliance on a vSphere system the virtual machine shall be properly loaded using vCenter converter. After uploading the machine a standard static IP address is assigned. Please refer to the following details on how to set the first server IP configuration. Once the Mida Virtual appliance is loaded, the first IP address of the server can be configured from the console by pressing ALT+F5. Figure 9: network configuration -1 Type enter to get the virtual machine IP address or type reset to reset the network settings. Figure 10: network configuration -2 Type config to configure the IP settings of the virtual machine. Mida Solution srl – Administration and User Guide Version 1.0 ADMINISTRATION AND USER GUIDE D www.midasolutions.com > 15 / 16 After typing config the following network information shall be properly inserted: IP address: the virtual machine static IP address, e.g. 192.168.0.67 NetMask: netmask to be used, e.g. 255.255.255.0 Default gateway: the default gateway to be used by the application server, e.g. 192.168.0.1 First DNS: first Domain Name Server IP address to use Second DNS: second Domain Name Server IP address to use Make sure that all parameters are properly typed, if not please perform a reset action. Once the script is completed the server will be available under the new IP address. In case reboot the server. From now on the server can be managed through a standard web browser by accessing the system control panel (PDC). It’s also possible to modify the network settings through web portal (if the MidaApplication Server is reachable). In this case you may: 1. access to the system control panel (PDC) (Errore. Riferimento a collegamento ipertestuale non valido.); 2. login with administrator credentials; 3. enter the network tab and set the new IP configuration. For more details please refer to [2] (Mida_Appliance-Administration_Manual). 3.3 Codec Configuration In order to configure the codecs list you may access to Mida Application Server web portal. You must select a browser and go to web address http://<IP_ADDRESS> or http://<HOST_NAME> (where <IP_ADDRESS> and <HOST_NAME> is the ip assigned to Mida Application Server). Access to the system with this credentials: Username: admin Password: admin From the left toolbar choose Application vcManager Rooms In this page (see Figure 11) you can see the list of codecs already configured, modify or remove them and add a new one. For each codec the page provides the following information/option: Add codec Link - Add new codec. Delete codec. A warning dialog box will open to ask for confirmation. Mida Solution srl – Administration and User Guide Version 1.0 ADMINISTRATION AND USER GUIDE D > 16 / 16 www.midasolutions.com ADD NEW CODEC In order to add a new codec you must select “Add codec” link and type this parameters: Name: this is the name used by app in order to identify the room (also in case of speech recognition) IP Address: ip address or host name of the codec Username: enter the administrative user that system use to access to the codec Password: enter the password of the user that system use to access to the codec Hence you have configured this parameters click Save button. Figure 11: codec list Mida Solution srl – Administration and User Guide Version 1.0