1
TdC 8000 plus
T I M I N G
English
TdC 8000
T I M I N G
1
2
start number
3
Page 2
4 5 6
7
group
hour
min.
8
sec.
1/100
start number
group
lap
ext. supply
F1
F2
F3
F4
man.
c0 c1 c2 c3 c4 c5 c6 c7 c8 c9
STARTCLEARBLOCK
YES
F1
STOP CLEARBLOCK
7
8
9
NO
F2
4
5
6
PRINT
F3
1
2
3
TEST
F4 CLASS
INPUT
0
ENTER
7
8
9
4
5
6
1
2
3
INPUT
0
ENTER
*
MENUE ALT MEMO
Timedata Computer
TdC 8000
9
16
multi channel
10 11 12
13 14
25
18 20 22
17 19 21
23 24 26
extern
supply
A`
Version: 021206
RS 232
RS 485
photocell
A
B
C
RS 232
RS 485
display
board
supply
on
15
28
27
c0
c3
c6
c9
c2
c5
c8
c1
c4
c7
display
board
Page 2
T I M I N G
TdC 8000
Page 3
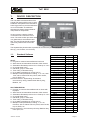
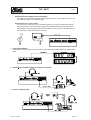
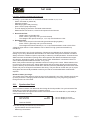
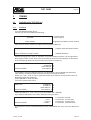
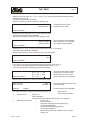
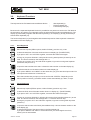
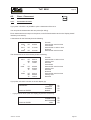
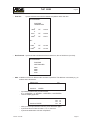
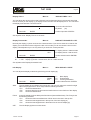
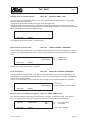
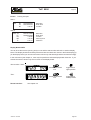
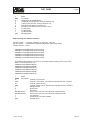
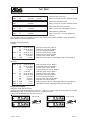
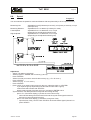
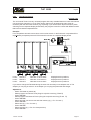
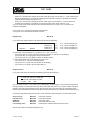
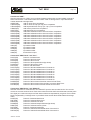
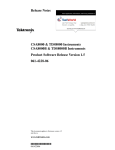
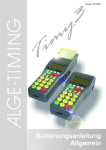
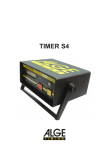
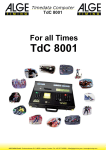
Operation elements and connectors
1
2
3
4
5
6
7
8
9
10
11
12
13
14
¦
Switch for start number input with three
positions:
up: increment up automatically as each racer
starts
middle: manual input of start numbers with
keyboard (9)
down: increment down automatically as each
racer starts
Display for the start
External supply LED status light
Meter for monitoring power supply, alignment
of the photocell (c1 to c9)
View port to examine paper supply
Info-display 4 x 40 alphanumeric characters
Display that shows the running and net time
that corresponds with the start number input
on the finish keyboard (15)
Display that show the start number input for
finish
Start keyboard:
START
manual start impulse
CLEAR clear false start
BLOCK blocks start impulses for as long as
you press it
INPUT
edit start times
ENTER confirm input
0 to 9
numeric keys to input start numbers
for the start or editing start times
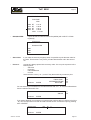
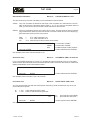
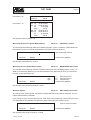
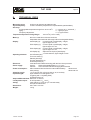
paper advance wheel
cover release button to open the printer cover
(13) to change the paper
paper cutter
printer cover (open with cover release
button 11)
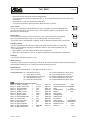
Function keyboard:
YES key to confirm YES/NO questions
NO
key to deny YES/NO questions
PRINT to switch the printer on and off
PRINT:
Buffer mode on or off
+ PRINT: Printer on or off
TEST info-display (6) shows the device test
^
key to go up
key to go down
*
key for special functions
CLASS key to make a classement
MEMO to activate the memo function if more
competitors reach the finish at the
same time
MENU press this key first, followed by another
to activate a special function: With
<ALT> and <MENU> you get into the
main menu
press this key first, followed by another
to activate a special function: With
<ALT> and <PRINT> you toggle the
Version: 021206
printer on
‘
’
“
”
15 Finish
STOP
CLEAR
BLOCK
and off.
function key 1 on info-display
function key 2 on info-display
function key 3 on info-display
function key 4 on info-display
keyboard:
manual stop impulse
clear false finish
blocks finish impulses for as long as
you press it
INPUT
edit of finish times
ENTER confirm input
0 to 9
numeric keys to input start numbers for
the finish or editing finish times
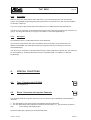
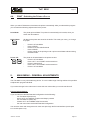
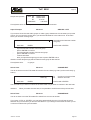
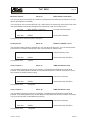
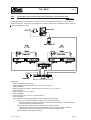
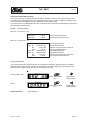
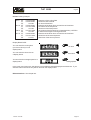
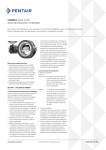
16 Connection for Extender and Multi Channel
(channel 0 to 9)
17 Volume for headset
18 Jack for the headset
19 DIN-jack mainly used to connect the finish
photocell (inputs c0, c1, c2). Connection of
power supply is possible. Identical with DINjack (20)
20 DIN-jack mainly used to connect the finish
photocell (inputs c0, c1, c2). Connection of
power supply is possible. Identical with DINjack (19)
21 DIN-jack mainly used to connect the a
intermediate photocell (inputs c3, c4, c5).
Connection of power supply is possible.
22 DIN-jack mainly used to connect the a
intermediate photocell (inputs c6, c7, c8).
Connection of power supply is possible.
23 Two identical DIN-jacks with RS-232 and RS485 interface.
24 DIN-jack to connect a ALGE display board.
25 DIN-jack to connect a speaker
(e.g. show jumping)
26 On / Off - switch
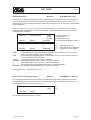
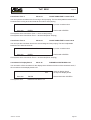
27 banana socket for all 10 timing channels. The
four black jacks are common grounds for all
channels.
c0
Start channel
c1
finish channel
c2
intermediate time 1
c3
intermediate time 2
c4
intermediate time 3
c5
intermediate time 4
c6
intermediate time 5
c7
intermediate time 6
c8
intermediate time 7
c9
intermediate time 8
28 Banana socket for RS-485
Page 3
T I M I N G
TdC 8000
Page 4
Table of Contents
1.
1.1.
2.
2.1.
2.1.1.
2.1.2.
2.1.3.
2.1.4.
2.2.
2.3.
2.4.
2.5.
2.5.1.
2.5.2.
2.6.
2.7.
2.8.
2.9.
2.10.
2.11.
3.
3.1.
3.1.1.
3.1.2.
3.1.3.
3.2.
3.2.1.
3.2.2.
3.2.3.
3.3.
3.3.1.
3.3.1.1.
3.3.1.2.
3.3.2.
3.3.3.
4.
4.1.
4.2.
4.2.1.
4.2.2.
4.2.3.
4.3.
4.3.1.
4.3.1.1.
4.3.1.2.
4.3.1.3.
4.3.1.4.
4.3.2.
4.3.2.1.
4.3.1.2.
4.3.2.3.
DEVICE DESCRIPTION ..................................................................................................... 6
Standard Software .............................................................................................................. 6
OPERATING ...................................................................................................................... 8
Power Supply ..................................................................................................................... 8
Net-Charging-Set NLG8 ...................................................................................................... 8
External Battery (12 V car battery) ..................................................................................... 8
Working Time ..................................................................................................................... 9
Condition of the Rechargeable-Battery ............................................................................... 9
Printer ................................................................................................................................ 9
How to Connect other Devices with the TdC 8000 ............................................................. 11
Language selection .......................................................................................................... 13
Memory ........................................................................................................................... 13
Memory Organisation ....................................................................................................... 14
Clear Memory .................................................................................................................. 14
Select a Race .................................................................................................................. 14
Precision ......................................................................................................................... 15
Timing Modes .................................................................................................................. 15
Input of Groups ................................................................................................................ 16
Test-Function - Checking the TdC 8000 ............................................................................ 16
Synchronize Start ............................................................................................................ 17
TIMING ............................................................................................................................ 19
Switching the TdC 8000 on .............................................................................................. 19
First Heat ......................................................................................................................... 19
Continue to Work in the First Heat after you Switch on .................................................... 21
Second Heat (Next Heat) ................................................................................................. 22
Keyboard Functions ......................................................................................................... 24
Start-Keyboard ................................................................................................................. 24
Finish-Keyboard ............................................................................................................... 24
Function-Keyboard (14) .................................................................................................... 25
Start-Mode ....................................................................................................................... 26
Single Start ...................................................................................................................... 26
Start Mode for the First Heat ............................................................................................ 26
Start Mode for the Second Heat ....................................................................................... 27
Group Start ...................................................................................................................... 28
Mass Start ....................................................................................................................... 28
SPECIAL FUNCTIONS ..................................................................................................... 28
Test - Checking the TdC 8000 .......................................................................................... 28
Block - Deactivate the Impulse-Channels ......................................................................... 28
Blocking the Start ............................................................................................................ 29
Blocking the finish ............................................................................................................ 29
Individual adjustment of the channels ............................................................................... 29
Editing of Times ............................................................................................................... 30
Editing of Start Times ....................................................................................................... 30
Clear Start Times ............................................................................................................. 30
Restoring a Cleared Start Time ......................................................................................... 30
Changing Start Times ....................................................................................................... 30
Input Start Times (Start Intervals) ...................................................................................... 31
Editing of Finish Times ..................................................................................................... 32
Clear Finish Times ........................................................................................................... 32
Restoring a Cleared Finish Time ...................................................................................... 32
Changing Finish Times ..................................................................................................... 32
Version: 021206
Page 4
T I M I N G
TdC 8000
Page 5
4.3.2.4. Editing Run times, Memory Times, and Intermediate Times ............................................. 33
4.3.2.4.1. Editing a Run time ........................................................................................................... 33
4.3.2.4.2. Editing a Memory Time .................................................................................................... 34
4.3.2.4.3. Changing a Intermediate Time .......................................................................................... 35
4.4.
MEMO - Time Buffer for Mass-Finish-Arrivals ................................................................... 36
4.5.
Class - Classement ......................................................................................................... 38
4.5.1.
Classement in Heat 1 ...................................................................................................... 38
4.5.2.
Classement in Heat 2 ...................................................................................................... 43
4.5.3.
Race Points ..................................................................................................................... 43
4.6.
PRINT - Switching the Printer off or on ............................................................................. 44
5.
MAIN MENU - GENERAL ADJUSTMENTS ...................................................................... 44
6.
PROGRAMS .................................................................................................................... 59
6.1.
Split ................................................................................................................................. 60
6.3.
Split-Sequential ................................................................................................................ 63
6.2.
Parallel Slalom ................................................................................................................. 66
6.2.1.
Parallel Diff. (Parallel Slalom with Finish-Difference-Time) ................................................ 66
6.4.2.
Parallel Net (Parallel Slalom with Finish Difference Time and Net Time) ........................... 70
6.5.
Dual Timer ....................................................................................................................... 76
6.6.
Speed .............................................................................................................................. 80
6.7.
Speed Skiing .................................................................................................................... 83
6.8.
Carving ............................................................................................................................. 85
6.9.
10-Channel-Timer ............................................................................................................. 88
6.9.1.
10-Channel-Timer 1 .......................................................................................................... 88
6.9.2.
10-Channel-Timer 2 .......................................................................................................... 91
6.10.
Show Jumping (Equestrian) .............................................................................................. 94
6.11.
Cycling ............................................................................................................................ 95
6.11.1. Cycle-Road ...................................................................................................................... 95
6.12.
Agility .............................................................................................................................. 98
6.12.1. Examine .......................................................................................................................... 98
6.13.
TdC Test .......................................................................................................................... 98
7.
DESCRIPTION OF ADDITIONAL DEVICES .................................................................... 100
7.1.
Multi Channel MC18 ....................................................................................................... 100
7.2.
Opto Channel OC18 ....................................................................................................... 100
8.
TECHNICAL DATA ......................................................................................................... 101
8.1.
Connection System ....................................................................................................... 102
8.1.1.
Photocell jacks and external supply ............................................................................... 102
8.1.2.
Headset Jack (18) .......................................................................................................... 102
8.1.3.
Speaker Jack (25) .......................................................................................................... 102
8.1.4.
Display Board Jack (24) ................................................................................................. 102
8.1.5.
RS 232 / RS 485 (23) ..................................................................................................... 103
8.1.6.
Display Board (28) ......................................................................................................... 103
8.1.7.
Banana Socket for Channel 0 to 9 (27) ........................................................................... 103
8.1.8.
Multi Channel (16) .......................................................................................................... 103
8.2.
RS 232 Interface (16, 23) ............................................................................................... 104
8.2.1.
Checking the TdC 8000 adjustments through the RS 232 interface: ............................... 105
8.2.2.
Adjustment of the Main Menu through the RS 232 interface ........................................... 106
8.3.
RS 485 Interface (16, 23, 28) .......................................................................................... 111
8.4.
Display Board Interface (24) ............................................................................................ 111
Version: 021206
Page 5
T I M I N G
1.
TdC 8000
Page 6
DEVICE DESCRIPTION
The TdC 8000 is the descendent of the
popular TdC 4000 used for over 14 years
worldwide. Compared to the TdC 4000 it
has a bigger memory and the software is
much more flexible. An additional
alphanumeric display shows whatever
is important for the operator.
It has a memory capacity of about
18.000 times for a maximum of four
races. The most modern processor 80C
167 guarantees to work effective and
fast. The new RS 485 interface holds
open many feature uses for the TdC
8000.
The separated keyboard makes it possible to work with two persons on the TdC 8000 at the same
time (e.g. one for start, one for finish)
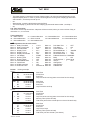
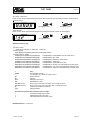
1.1.
Standard Software
SPLIT:
! Program to measure intermediate and run times
! Start channel, 8 intermediate channels, finish channel
! Selectable calculated precision from 1/1000 up to 1 sec.
! Up to 256 heats (runs)
! Individual, group, or mass start
! Time of day, or absolute timing
! Up to 9999 competitors on course at once
! Multiple results possibilities including; 1st, 2nd run, total
time, with or without FIS race points, team results,
top 10, DNFs, etc.
Recommended for: Alpine skiing, Snowboard,
Cross Country skiing, Road and Mt. Bike Cycling,
Biathlon, etc.
SPLIT SEQUENTIAL:
! Program to measure intermediate and run times with
lap splits
! Start channel, 8 intermediate channels, finish channel
! Selectable calculated precision from 1/1000 up to 1 sec.
! Up to 256 heats (runs)
! Individual, group, or mass start
! Time of day, or absolute timing
! Up to 9999 competitors on course at once
! Multiple results possibilities including; 1st, 2nd run,
total time, with or without FIS race points, team results,
top 10, DNFs, etc
Recommended for: Cross Country ski relay, Biathlon relay,
motor sport, etc.
Version: 021206
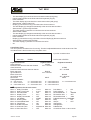
Programm
Split
Split Sequential
Parallel Diff
Parallel Net
Dual Timer
Speed
Speed Skiing
Carving
10-Channel-Timer
10-Channel-Timer 1
10-Channel-Timer 2
Show Jumping
Table A 1
Table A 2
Table AM 3
Table AM 4
Table AM 5
Table AM 6
Table AM 7
Table AM 8
Table C
Two Stage Jumping
American Stage F
American Stage / Time
Standard / Time
Cycling
Cycle-Road
Agility
Examine
TdC Test
Prog. No. Page
Program 1
60
Program 3
63
Program 4
66
Program 5
70
Program 6
76
Program 7
80
Program 8
83
Program 9
85
Program 10 88
Program 101 88
Program 102 91
Program 11 94
Program 111 94
Program 112 94
Program 113 94
Program 114 94
Program 115 94
Program 116 94
Program 117 94
Program 118 94
Program 120 94
Program 121 94
Program 122 94
Program 123 94
Program 124 94
Program 13 95
Program 131 95
Program 14 98
Program 141 98
Program 15 98
Page 6
T I M I N G
TdC 8000
PARALLEL SLALOM:
Parallel Slalom with finish differential only:
! Red and Blue course identification
! Differential time between both courses
Recommended for: Alpine Skiing and
Snowboard
PARALLEL SLALOM WITH NET TIME AND
DIFFERENTIAL TIME:
! Common start for both courses
! Run time for both courses
! Differential time between both courses
! Red and blue course identification
! Total time after switching course
! Total differential time after switching course
Recommended for: Alpine Skiing, Snowboard,
Dual Mountainbike Slalom, Pursuit Track
Cycling, etc.
DUAL TIMER:
! Timing of two courses simultaneously
! Measuring of intermediate and run times
! Calculation of total time after reversal of
courses
! Separate or combined start
! Only one racer on each course
! Selectable calculated precision from 1/1000
up to 1 sec.
! Results for each course individual or
combined
Recommended for: Alpine Skiing, Snowboard,
Dual Mountainbike Slalom , Pursuit Track
Cycling, Kilometre Time Trial, Olympic
Sprint, etc.
SPEED:
! Adjustable measuring distance between 1
and 9999 Meter
! Display and printout in km/h, m/s, and mph
! Bi-directional trap
Recommended for: any speed measuring
requirement
SPEED SKIING:
! Fixed 100 m trap length
! Display and printout in km/h only
! Display and printout of start, finish, and
run time
! Multiple results possibilities
Recommended for: Speed Skiing, Speed
Mountainbike, Street Luge
Page 7
CARVING:
!
Countdown from the selected maximum
course time
!
Horn at zero
!
Count up after zero
!
Selectable calculated precision from 1/
1000 up to 1 sec.
!
Individual, group, or mass start
!
Time of day, or absolute timing
Recommended for: Carving
10-CHANNEL-TIMER:
10-Channel-Timer 1:
!
Program to measure intermediate and run
times
!
Start channel, 8 intermediate channels,
finish channel
!
Selectable calculated precision from
1/1000 up to 1 sec
!
Up to 256 heats (runs)
!
Individual, group, or mass start
!
Time of day, or absolute timing
!
Up to 9999 competitors on course at once
!
Up to 9 lanes of finish input with memory
for each lane and easy to input order of
finish
!
Multiple results possibilities
Recommended for: Marathon, Triathlon,
Duathlon, 10k Run, Athletic, Training
10-Channel-Timer 2:
!
Like 10 Channel-Timer 1 but it shows
times of each channel on separate
display boards.
SHOW JUMPING:
!
Show Jumping software for international
and national competitions.
!
Please order your separate manual for
show jumping.
CYCLING:
Cycle-Road:
!
For road cycling competitions to control
the display board (run time, delay time,
average speed)
AGILITY:
Examine:
!
Program for Dog-Agility
!
Please order your separate manual for
Agility
TDC TEST
Test program to check all of the components of the TdC including printer, LCD displays, inputs
Version: 021206
Page 7
T I M I N G
2.
OPERATING
2.1.
Power Supply
TdC 8000
Page 8
The TdC 8000 has a built in rechargeable-NiCad-battery-pack (4.5 Ah).
Charge the NiCad-battery-pack with the NLG8 or a 12 Volt car-battery. The charging voltage must be
between 11 and 16 Volts. To load the TdC 8000 you need to turn it on.
2.1.1.
Net-Charging-Set NLG8
With the net-charging-device NLG8 you can load the TdC 8000 direct form the mains:
- Plug NLG8 at the mains.
- Plug NLG8 at the socket „extern. supply“ (19) or „photocell (20, 21 or 22).
- Turn TdC 8000 on (switch 26).
- The read LED (3) must burn.
o
o
o
o
o
The TdC 8000 must be switched on during the charging process (internal charging electronic)
You can load the TdC 8000 also during the normal timing operation.
The charging process with the NLG8 need about 12 hours.
The no-load-voltage is about 15 VDC.
The charging voltage of the NLG8 is about 11.7 VDC
ALGE has two types of NLG8. One is with 230V/50Hz, the other with 115V/60 Hz. The voltage is
printed on the NLG8 case. Please make sure that you use the NLG8 with the correct voltage for your
mains.
Attention: You cannot load the TdC 8000 when switched off!
2.1.2.
External Battery (12 V car battery)
You can use any 12 Volt battery with a capacity of 5 Ah to charge or supply the TdC 8000.
-
Connect cable 005-02 at socket "extern supply" (19) of the TdC 8000.
Connect clips that says (+) at the plus pole of the battery.
Connect clips that says (-) at the minus pole of the battery.
Red LED (3) of the TdC 8000 must burn.
Version: 021206
Page 8
TdC 8000
T I M I N G
2.1.3.
Page 9
Working Time
The voltage is shown on the info-display (6) if you press <TEST>. Further it shows the battery
condition always on the meter (4). As long as you have the needle of the meter in the green section
you can operate the TdC 8000.
2.1.4.
Condition of the Rechargeable-Battery
The TdC 8000 has six NiCad rechargeable batteries each with 1.2 V and 4.5 Ah.
You can check the voltage by pressing <TEST>. It shows in the info-display the voltage.
The TdC 8000 measures always the voltage of the batteries and shows a message as soon as they
get empty.
Early warning:
The info-display (6) shows: "Almost empty battery!"
The voltage is 6,2 Volt
You can continue to work until the voltage is 5,8 Volt. If possible plug a NLG8 or
12 Volt battery to charge (supply) the TdC 8000.
Turn off:
The info-display (6) shows: "Empty battery!"
The voltage is 5,8 Volt
If the voltage is 5.8 Volt it switches the TdC 8000 in a power down mode. This is
necessary to save the memory. As soon as you supply the TdC 8000 with the
NLG8 or a 12 Volt Battery you can continue to work. The machine is still
synchronised.
2.2.
Printer
When you switch TdC 8000 on it activates the printer automatically. After you selected the program
you can make the following adjustments for the printer:
Print-Mode:
The printer prints all data. The printer is automatically in this mode, when you
switch the TdC 8000 on.
Buffer-Mode:
All data for the printer are stored in the buffer. This mode you use e.g. to change
the paper.
-
Printer Off:
Version: 021206
Printer is in Print-Mode
Press <PRINT>
Printer is now in the Buffer-Mode
Press <PRINT>
Printer is again in the printing mode. It prints now all data collected during
the buffer mode.
The printer is off and all data for the printer are lost.
Printer is in Print-Mode
Press <ALT> and <PRINT> at the same time
Printer is switched off
Press <ALT> and <PRINT> at the same time
Printer is in Print-Mode
Page 9
TdC 8000
T I M I N G
o Paper Check
-
Page 10
Push cover release button (11).
Remove the cover.
Check the paper.
A black strip will become visible on the edge of paper, when the
paper roll is about to run out.
o Changing the Paper:
-
Push cover release button (11) .
-
Remove the cover.
-
Remove the rest of the paper from the holder.
-
Press the black lever forward and pull the paper out.
-
Put the axle into the paper holder.
-
Put the now roll on the paper holder.
-
Insert the beginning of the paper into the paper feed of the printer.
Make sure it is cleanly out.
-
If necessary correct the paper path through pressing the black
lever forward and adjusting the paper manually.
-
Put the cover back and press the button until they stay in the
lower position.
Attention: Please take care that the paper goes through the paper slotted hole of the cover when you
put the cover back on.
Clearing Jammed Paper:
- Press the black lever forward and pull back the remaining paper.
- Remove the serrated cutter by holding the black lever forward and sliding the cutter towards the
lever and lifting upwards.
- Pull the print head back with your fingernail and remove any stuck paper with tweezers or small
needlenose pliers.
- If the paper has jammed under the roller it will be necessary to remove it by sliding a piece of
35 mm film through the paper path and rocking it to and for until the stuck paper is expelled.
Use a piece of film about 20 cm long to have something to hold onto.
The printer is a very rugged device but needs regular maintenance for a long service life. Call your
ALGE agent if you have further questions.
Printer-Paper:
Electrosensitive paper 60 mm width, 40 mm diameter with about 25 m paper length (about 6000
lines). The electrosensitive paper is available at your ALGE representative.
A black strip will become visible on the edge of paper, when a paper roll is about to run out.
Attention: Do not pull on the paper when printing. Press the black lever forward and pull the paper
carefully out, if the paper is repressed. The printer-paper has to stay dry!
Version: 021206
Page 10
T I M I N G
2.3.
TdC 8000
Page 11
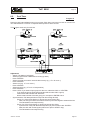
How to Connect other Devices with the TdC 8000
o Net-Charging-Set NLG8:
o External 12 Volt Battery:
o Startgate STSc with a Headset:
o Photocell RLS1n:
-
Finish Photocell:
If you have one photocell for the finish you must use socket (19). If you make a race with three
different start and finish, use socket (19) for finish 1, socket (20) for finish 2 and socket (21) for
finish 3.
Version: 021206
Page 11
T I M I N G
TdC 8000
Page 12
-
Intermediate time (supply from the TdC 8000):
The cable you have to use depends on the program you use. For program SPLIT you can
use cable 003 (up to 100 m cable length).
-
Intermediate time (2-wire cable):
For each timing channel you have a banana socket. If you connect a photocell with the
banana socket you need a external supply for the photocell (battery into the photocell)
Plug cable 027-02 at the photocell. From this cable you can go to the TdC 8000 with a 2wire cable (e.g. cable real KT 500 or KT 300).
o Display Board GAZ4:
For distances over 10 Meter you can use any 2-wire cable with banana plugs (e.g. cable real KT
500).
o Startmicrophone SM8 with Speech Amplifier SV4/SM:
o Photocell Adapter LA4:
Version: 021206
Page 12
TdC 8000
T I M I N G
Page 13
o Handswitch:
o Speaker DL:
o Personal Computer:
2.4.
Language selection
You can select the language of the
TdC 8000 plus. The machine starts
always with the last language that
you selected.
!
!
!
!
!
!
German:
English:
France:
Italian:
Spanish:
Finnish:
when turning the device on press <1>
when turning the device on press <2>
when turning the device on press <3>
when turning the device on press <4>
when turning the device on press <5>
when turning the device on press <6>
How to choose the English language
Before you turn the TdC 8000 plus on press key <2> (keyboard 15) and keep it pressed. Turn the
device on. Release the <2> key when you can choose the program. From now on it will start the TdC
8000 with the English program version.
2.5.
Memory
The memory function in the TdC 8000 is designed to allow you to have up to four races with the same
number range. Therefore you could have a race for man with start numbers form 1 to 100 and a race
for women with the same start numbers. If you have a race with different start numbers for each
category, the groups function should be used. Make sure that the organising committee clearly lists
the number range of the groups and how they should be run. The TdC 8000 is designed to allow the
orderly transfer of time keeping from one race to another. It is not designed to allow the switching of
races on the spur of the moment.
The TdC 8000 has memory which will store approximately 18,000 times. Per race you can store a
maximum of 9,999 times. Together race 1 and 2 have a capacity to store 9,999 times. For instance, if
you have stored 1000 times in race 1 already you have 8,999 times available in race 2. For race 3 and
4 you have a capacity to store a total of 8067 times.
For each race a maximum of 256 heats (runs) can be stored. You can clear the memory each time
you turn the TdC 8000 on, or if you change a race in the main menu.
Version: 021206
Page 13
T I M I N G
TdC 8000
Page 14
For the actual heat the TdC 8000 always stores the start time (time of day), finish time (time of day),
and run time, if you use the difference time mode. For the previous heat it always stores the memory
time (total time from all previous heats).
Times stored in the first heat:
start time (difference time)
finish time (difference time)
intermediate time (each interm. time)
run time
Times stored in the second (third, etc.) heat:
memory time
start time (difference time)
finish time (difference time)
intermediate time (each interm. time)
total time
2.5.1.
Memory Organisation
There is a limited amount of memory capacity for each race
Race 1:
Race 2:
Race 3:
Race 4:
about 8,600 times, if race 2 has no data stored
about 8,600 times, if race 1 has no data stored
about 8,600 times, if race 4 has no data stored
about 8,600 times, if race 3 has no data stored
2.5.2.
Clear Memory
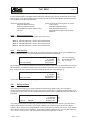
After turning the TdC 8000 on (switch 26) you have to select the program. Then you are asked if you
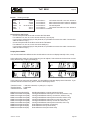
want to clear the memory. The info-display (6) shows the following message:
Clear race:
Continue: ENTER
9746/ 253 R1
0/ 253 R2
651/ 6473 R3
943/ 6473 R4
F1
F2
F3
F4
You can clear each
race individually with
the <F> keys.
By pressing the <F> key you select the race that you want to clear. You can select different races at
the same time. It clears the memory when you press the <ENTER> key of the finish keyboard (15).
E.g.: If you clear race 1 and 3 it shows the following figures on the info-display (6):
Clear race:
9046/ 253 R1<
F1
0/ 253 R2
F2
651/6473 R3<
F3
Continue: ENTER
943/6473 R4
F4
If you press <ENTER> without pressing an <F> key it will not clear the memory.
2.6.
Select a Race
After clearing the memory you have to select the race that you want to use. You can keep a
maximum of four races at the same time in the memory. Each race is completely independent. This
means that for each race you can use the same bib numbers from 1 to 9999 and you can make up to
256 heats.
Select race:
7012/ 2987 R1< F1
0/ 2987 R2
F2
651/ 6473 R3
F3
Continue:
ENTER
943/ 6473 R4
F4
Two numbers are shown for each race. The first number shows how much memory you have used,
and the second how much memory you have available. For a cleared race it shows zero as first
number. When "select race" is displayed the cursor will be placed on the previous race. If you want to
select that race again press <ENTER>. If you want to select a different race you can select with key
<F1>, <F2>, <F3>, or <F4>. The race selected is always marked with an arrow.
Version: 021206
Page 14
T I M I N G
TdC 8000
Page 15
Memory was not cleared:
If you select a race that is not cleared it will show the following message in the info-display (6):
Select Heat:
SAME (1)<
NEXT (2)
F1 (1) means first heat
F2 (2) means second heat
Continue: ENTER
If you select the same heat, you can continue to work in that same heat as you worked before.
If you select the next heat, then a new heat is started.
If you select a new heat:
- All valid run times (or total times) will be stored as memory time
- All other times will be cleared (e.g. start-, finish- ,intermediate time)
2.7.
Precision
You have to select the degree of precision that you want for the run time, intermediate time, and total
time. The Timer itself always uses 1/10,000 resolution, which is especially important if you use the
difference timing mode.
Use the <F> key to select. The cursor will always be on the position used previously.
Select precision:
2.8.
1s
1/10 s
1/100 s<
1/1000 s
F1
F2
F3
F4
Timing Modes
We use two different timing modes: difference timing and absolute timing. You must select the timing
mode before you start a race:
Select timing:
ABSOLUTE F1
DIFFERENCE< F2
select with <F1>
select with <F2>
Continue: ENTER
Absolute:
Time starts form 0:00.00
The run time (and intermediate times) are stored for each competitor.
This mode should be used for races with mass start.
Advantage:
For each competitor only one memory place during the first heat (if you have no
intermediate times)
Disadvantage:
If you do not have a mass start, it will be impossible to make time corrections.
Selection:
Press <F1> and <ENTER>
Difference:
The time of day is stored for each start- and finish impulse. Therefore you have to input the time of
day first. From the difference between finish time and start time it calculates the run time.
This mode should be used for single start and group start races.
Advantage:
You can correct times.
Disadvantage:
For each competitor it needs at least three memory places (start-, finish-, run
time)
Selection:
Press <F2 > and <ENTER>
Version: 021206
Page 15
TdC 8000
T I M I N G
2.9.
Page 16
Input of Groups
You can input up to 99 groups. A group must consist out of competitors with continues start
numbers. If you input groups it shows always the rank within the group, and you can make a groupstart and group -classement.
Input groups?
YES F1 If you do not want to input
NO< F2 a group, then press <NO>
or <F2> and <ENTER>.
Continue: ENTER
If you want to input a group,
then press <YES> or <F1>
and <ENTER>.
GROUPS:
Gr 1: 1 > 0
Input the last start number of
each group. The TdC selects
automatically as first start
Save with: ENTER
number of the next group the
next higher start number.
GROUPS:
Gr
Gr
Gr
Gr
Save with: ENTER
Attention:
2.10.
1: 1 > 60
2: 61 > 90
3: 91 > 120
4: 121 >
0
1st group from StNo. 1 to 60
2nd group from StNo. 61 to 90
3rd group from StNo. 91 to 120
No input yet
You should always input the groups, that you have some empty start numbers in every
group. This start numbers you can use in case of late entries.
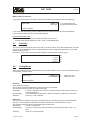
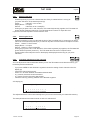
Test-Function - Checking the TdC 8000
When you press <TEST> the Info-Display (6) shows the following:
C0 = 4.9V
C3 = 4.9V
C6 = 4.9V
# # #
battery
photocell
extender
# # #
=
=
=
# #
7.3V
4.9V
0.00A
# #
c0 c1 c2 c3 c4 c5 c6 c7 c8 c9
The Test-Function shows the condition of the device. The condition of all ten channels are monitored
(line 4). If one channel blinks, it means that it has a short-circuit. For channel c0, c3 and c6 the
voltage is shown.
In addition it shows the voltage of the NiCad battery, the photocell, and the current for the extender.
Channel c0, c3, and c6 should normally have about 5 V (open). When an impulse is reached the
voltage must go down to 0 V.
When fully loaded the battery has about 7.4 V. The empty battery has a voltage of about 5.5 V. At
this voltage the device switches off. A battery warning appears on the info-display (6) when the power
is 6.2 V or lower.
The stabilised voltage "photocell" supplies the photocells and must be about 5 V.
The current for extender-devices must be less then 1 A (interface RS 485 (23)). If the current reaches
1 A it switches the supply for the extender off.
Version: 021206
Page 16
T I M I N G
TdC 8000
Page 17
Line Test - Checking the Start and Finish Line:
Checking a 1 pair cable which is connected at banana socket c0, c3, or c6.
- Switch TdC 8000 on (switch 26)
- Select the program
- Make the program ready for timing
- press <TEST> (keep it pressed)
- The info-display (6) shows the TdC 8000 measurements
- Measurement of channel c0, c3 and c6 is important for the line test
o Short-Circuit-Test:
Cable is open on the start side
Press <TEST> (press key until you finish the test)
The voltage of the open channel (c0 , c3, or c6) must be about 4.9 Volt
o Resistance-Test:
Short circuit the pair on the start side (press banana plug together)
Press <TEST> (press key until you finish the test)
The voltage with shorted channel (c0, c3, or c6) must be between 0 and 0.9 Volt. If the
voltage is higher than 0.9 V the resistance of the cable is too high (maximum 2000 W loop
resistance).
The line test meter is only for quick reference. Please use a multitester set on Ohms for accurate
testing of your wiring. Remember that resistance on the line will change due to weather conditions.
Always check the condition of splices, especially in extremely cold temperatures. Scotchlocks and
AMP locks have a bad habit of opening due to the expansion rate differences between the copper
wire and the steel splicing plate. You should use the older "White Bean" connectors if there is a
chance that temperatures will fall to below -10 F (-15°C).
Most of the problems with timing installations are due to wiring on the course. Please take the time
to review your wiring early in the season. Bad splices and connections will only get worse as time
goes on and they are a lot easier to deal with in the Fall before the pedestals get covered with snow.
Please call your ALGE agent for assistance with wiring. They are able to consult with you on proper
wiring plans and are usually available to travel to your site for more detailed work at reasonable
expense.
Needle of meter (3) swings:
The needle of the meter starts to swing as soon as the photocell is out of line. Please check the set
up of the photocell. A swinging needle could also be caused during a very long timing impulse or
through a short-cut of the cable.
2.11.
Synchronize Start
Synchronization between TdC 8000 and other timing devices is possible. You synchronize the TdC
8000 after you adjust the time before you start the timing.
Connect other timers through banana socket of channel c0 of the TdC 8000 with a 1 pair cable (or
cable 004 at socket 19 or 20).
Time: 10:15:23
Date: 96-02-28
OK<
WRONG
F1
F2
time on display is correct
time on display is not correct
Continue: ENTER
There are two ways to make the synchronization:
- Synchronization from the internal clock
- Manual synchronization
Version: 021206
Page 17
TdC 8000
T I M I N G
Page 18
Synchronization from the internal clock:
-
Press <F1>
Press <ENTER>
The info-display (6) shows:
Time:
Date:
10:15:45
96-02-28
Synchronize: on minute change
-
At the next sharp minute the TdC 8000 gives the synchronise impulse through channel c0.
At the synchronization it gives a beep form the TdC 8000.
The time of day disappears in the info-display (6).
The TdC 8000 is ready for timing.
Manual synchronization:
-
Press <F2>
Press <ENTER>
The info-display (6) shows:
Time:
Date:
10:15:34
96-01-16
Save with: ENTER
-
Input (correct) the time of day with the finish keyboard (15) and confirm with <ENTER>.
Input (correct) the date with the finish keyboard (15) and confirm with <ENTER>.
Time:
Date:
10:16:00
96-03-28
Synchronize: START-key / channel C0
-
Start the timers by pressing the <START> key or through an external impulse of channel c0.
The TdC 8000 is ready for timing.
Version: 021206
Page 18
TdC 8000
T I M I N G
3.
TIMING
3.1.
Switching the TdC 8000 on
3.1.1.
First Heat
-
-
Page 19
Turn TdC 8000 with switch (26) on.
It shows you on the info-display the following:
ALGE TIMING
TdC 8000
company name
name of device
ENG V98.B2
language and software version number
After some seconds it shows the program that was used the last time
Program 1: SPLIT
V 97.B1
program name and version number
Select: YES/NO or program number
-
Select the program with <YES> or <ENTER>. If you want another program, you can input direct
the program number, or use <N0> or the cursor until you have the correct program on the screen.
The info-display (6) shows the used memory (see point 2.5 on page 13):
Clear race:
Continue: ENTER
-
Continue: ENTER
F1
F2
F3
F4
0/ 9999 R1< F1
0/ 9999 R2 F2
1250/ 6283 R3 F3
534/ 6283 R4 F4
Select race with <F1>, <F2>, <F3> or <F4> and confirm with <ENTER>
If you select a cleared race you have to select the timing precision:
Select precision:
Continue: ENTER
-
1345/ 8654 R1
0/ 8654 R2
1250/ 6283 R3
534/ 6283 R4
It is possible to store four different races (R1, R2, R3 and R4). The info-display (6) shows how
many memory is used (first number) and how many is free (second number)
Press <F1>, <F2>, <F3> or <F4> to mark the races that you want to clear (it shows a arrow in
the display at the end of the line).
Press <ENTER> to clear the races.
You have to select now the race:
Select race:
-
possible selections
1s
1/10 s
1/100 s<
1/1000 s
F1 Precision: seconds
F2 Precision: 1/10 seconds
F3 Precision: 1/100 seconds
F4 Precision: 1/1000 seconds
The precision is only for calculated times (run time, intermediate time, etc.), but not for the time of
day.
Version: 021206
Page 19
TdC 8000
T I M I N G
-
Page 20
Select the precision with <F1>, <F2>, <F3> or <F4>. It will pre-select automatically the last
precision that you used.
Confirm the precision with <ENTER>.
After the precision you have to select the timing mode:
Select timing:
ABSOLUTE F1
DIFFERENCE< F2
Timing without time of day
Timing with time of day
Continue: ENTER
-
Select the timing mode with <F1> or <F2> (see point 2.8).
Confirm the timing mode with <ENTER>.
After the timing mode you have to select the start mode:
Select start mode:
SINGLE START< F1
GROUP START F2
MASS START F3
each competitor starts separate
within the group is a mass start
all competitors start together
Continue: ENTER
-
Select with <F1>, <F2> or <F3> the start mode (see point 3.3 on page 26).
Confirm the start mode with <ENTER>
After the start mode you have to select if you want to use groups:
Input groups?
YES F1
NO< F2
Continue: ENTER
-
If you want to use groups (ranking within the group) press <YES> or <F1>.
If you want no groups (ranking of all competitors) press <NO> or <F2>.
If you input groups the info-display (6) shows the following:
GROUPS:
Save with: ENTER
-
1: 1
2: 51
3: 101
4: 231
> 50
> 100
> 230
> 0
Input always the last bib number
of a group. If you want to input
this tree groups, press for the
fourth group two times <ENTER>.
After the group selection you have to input the time of day:
Time: 10:15:23
Date: 96-02-28
Continue:
-
Gr
Gr
Gr
Gr
OK< F1
WRONG F2
ENTER
You can input the time of day in two ways (see point 2.11):
o
o
synchronization from internal clock
input time of day
Confirm selection with <ENTER>
-
internal clock
manual synchronization
Internal Clock: Press <F1>
Press <ENTER>
wait for synchronise impulse (time of day runs in display 7)
Manual Synchronizing:
Press <F2>
Press <ENTER>
Input time of day with finish keyboard (15)
Confirm with <ENTER>
Input date with finish keyboard (15)
Confirm with <ENTER>
Make start impulse with <START>-key or through
channel c0.
Version: 021206
Page 20
TdC 8000
T I M I N G
-
Page 21
TdC 8000 is ready
The printer prints the following times (time of day mode / first heat):
0001 ST 10:07:04.640
FT 10:08:35.150
RT
1:30.50
3.1.2.
-
Continue to Work in the First Heat after you Switch on
The process to switch the device on is as described for the first heat.
Since you want to continue a race, it is not allowed to clear the memory.
Select the correct race.
The info-display (6) shows:
Select heat:
Continue:
-
SAME (1) F1 The number stands for 1st heat
NEXT (2)< F2 The number stands for 2nd heat
ENTER
Press <F1> to select the same heat.
Press <ENTER> to confirm the selection
You have to synchronize the clock again or you take the internal time of the TdC 8000.
The timer is ready.
Version: 021206
Page 21
TdC 8000
T I M I N G
3.1.3.
Page 22
Second Heat (Next Heat)
You can make up to 256 heats. For the heat(s) before it stores always a memory time (total time).
There are two possibilities to get into the second heat:
!
In the main menu you can change the heat (see page 52)
!
Turn the TdC 8000 off and again on.
If you use the time of day it will print you the following results for each competitor:
0012 ST
FT
RT
MT
TT
10:07:04.640
10:08:35.150
1:30.50
1:32.38
3:02.88
Start time (time of day)
Finish time (time of day)
Run time
Memory time
Total time
Adjust in the main menu (menu 8), if you want the time started from zero, or from the total time of the
previous heat (see point 5 menu 8 - running time).
When a competitor finish it will show in the display (7) first the run time, then the total time, or first
the total time, then the run time, and again the total time. The display time you set in the main menu
in point 4 and 5 (see point 5 menu 4 and 5). It shows each time for the duration of the display times.
Change Heat in Main Menu:
Advantage:
You do not have to synchronize the device again. All adjustments stay as before.
Disadvantage:
If you have a long break between the heats you have the device always running. This
means, as longer as the race and the break, as more time difference you get between
synchronized devices. If you have no external supply it will empty also the battery in the
break between the heats.
How can you Change the Heat in the Main Menu:
- Press <ALT> and <MENU> at the same time.
- Select with cursor-key into menu 24 "CHANGE HEAT":
Menu 24:
CHANGE HEAT
Select:
-
Press <YES>
Select Heat::
Continue:
-
-
-
SAME (1)< F1
NEXT (2) F2
continue in same heat
continue in the next heat
ENTER
With <F2> and then <ENTER> you select the next heat. The number in the brackets shows
always the heat number (2 = second heat).
Start order:
-
YES/NO or menu number: 24
START NUMBER< F1
BIBO WITHOUT GROUPS F2
BIBO WITH GROUPS
F3
Continue:
ENTER
Select with <F1>, <F2> or <F3> the start mode and confirm it with <ENTER>:
Start number:
The start order is after the bib numbers. With the switch (1) you can select
it you want to count up, manual or down.
Bibo without groups: All competitors start after the BIBO rule. You have to input the amount of
competitors that you want to reverse and confirm it with <ENTER>.
Bibo with groups:
In each group the competitors start after the BIBO rule. You have to input
the amount of competitors that you want to reverse for each group and
confirm it with <ENTER>.
The TdC 8000 is ready for the new heat.
Version: 021206
Page 22
TdC 8000
T I M I N G
Page 23
Changing a Heat by Turning the TdC 8000 off:
Advantage:
If you have a long break it does not use battery power if you switch it off.
If you have the TdC 8000 synchronized with other devices it is exactly
synchronized for the second heat again.
Disadvantage:
You have to synchronize the TdC 8000 again for the new heat (with Startclock,
backup timer, etc.)
You have to go through the same start procedure for the second heat as for the first heat.
If you change from one heat to the next heat you have to switch the TdC 8000 with switch (26) off and
again on. Be careful that you do not clear the memory of the first heat.
-
Switch the TdC 8000 with switch (26) on and select the program as in the previous heat.
Do not clear the memory of the race.
Select the correct race
The info-display (6) shows:
Select Heat::
Continue:
-
SAME (1)<
NEXT (2)
With <F2> and then <ENTER> you select the next heat. The number in the brackets shows
always the heat number (2 = second heat).
Continue:
-
-
continue in same heat
continue in the next heat
ENTER
Start order:
-
F1
F2
START NUMBER< F1
BIBO WITHOUT GROUPS F2
BIBO WITH GROUPS
F3
ENTER
Select with <F1>, <F2> or <F3> the start mode and confirm it with <ENTER>:
Start number:
The start order is after the bib numbers. With the switch (1) you can select
it you want to count up, manual or down.
Bibo without groups: All competitors start after the BIBO rule. You have to input the amount of
competitors that you want to reverse and confirm it with <ENTER>.
Bibo with groups:
In each group the competitors start after the BIBO rule. You have to input
the amount of competitors that you want to reverse for each group and
confirm it with <ENTER>.
Synchronize of the TdC 8000:
Time: 10:15:23
Date: 96-02-28
OK< F1
WRONG F2
Continue: ENTER
-
Synchronize TdC with other timing devices (see chapter 2.11)
The TdC 8000 is ready for the new heat.
Version: 021206
Page 23
T I M I N G
3.2.
TdC 8000
Page 24
Keyboard Functions
The keyboard of the TdC 8000 has three different blocks:
-
Start-keyboard (9)
Finish-keyboard (15)
Function-keyboard (14)
Because of the separated keyboard blocks it is possible for two persons to work on the TdC 8000 at
the same time. One person can manage the start, the other the finish (and intermediate times). The
display (2) works always together with the start-keyboard (9). The display (7) and (8) works always
with the finish-keyboard (15).
The function-keyboard (14) works together with the start-keyboard or finish-keyboard. It shows the
information on the info-display (6)
3.2.1.
Start-Keyboard
Manual start-impulse (SZM on printer, C0M on RS232), precision only 1/100
It clears the start time of the start number shown on display (2). (FALSE START)
If you press <ALT> and <CLEAR> together, it restores the cleared time again.
As long as you press <BLOCK> it will print all incoming start impulses (channel 0) as not
valid. The time is marked on the first digit with a ?.
As long as you press <ALT> and <BLOCK> together, it ignores incoming start impulses
(channel 0; see point 4.2.3)
to input the start number at the start. It shows the start number on the start-display (2).
To edit the start time of the start number in the start display (2).
If you press <MENU> and <INPUT> at the same time you get to start time input mode. You
can input times individual or in intervals, etc.
Each start number that you input you must confirm with <ENTER>. Depending on the
switch position of switch (1) the start number counts automatically up, down, or stays.
3.2.2.
Finish-Keyboard
Manual stop-impulse (ZZM on printer, C1M on RS232), precision only 1/100
It clears the finish time of the start number shown on display (2). (FALSE FINISH)
If you press <ALT> and <CLEAR> together, it restores the cleared time again.
As long as you press <BLOCK> it will print all incoming finish impulses (channel 1) as not
valid. The time is marked on the first digit with a ?. The time does not stop.
As long as you press <ALT> and <BLOCK> together, it ignores incoming finish impulses
(channel 1).
to input the start number at the finish (intermediate time). It shows the start number on the
finish-display (8).
To edit the finish time of the start number in the finish display (8).
if you press <MENU> and <INPUT> at the same time you can change the run time,
memory time or intermediate
Version: 021206
Page 24
T I M I N G
TdC 8000
Page 25
To edit the finish time of the start number in the finish display (8).
if you press <MENU> and <INPUT> at the same time you can change the run time,
memory time or intermediate time.
Each start number that you input, you must confirm with <ENTER>.
Increment start number:
up:
press <ENTER>
down: press <ALT> and <ENTER> together
3.2.3.
Function-Keyboard (14)
To confirm a YES/NO question
If you do not confirm a YES/NO question
If you press <PRINT> it switches the printer into the buffer mode. This means that all
information for the printer will be stored in the buffer. If you press again <PRINT> it will print
all the data from the buffer. This function is manly to use when you change the paper.
If you press <ALT> and <PRINT> together it switches the printer off. All printer information
is now lost. If you press <PRINT> or <ALT> and <PRINT> again it switches the printer on.
If you press <MENU> and <PRINT> together it prints all adjustments of the main menu.
To test the TdC 8000 (see chapter 2.10).
Key has no function yet.
To print the Classement (see chapter 4.5 on page 38).
Cursor-key up
Cursor-key down
It goes always together with another key. You have to press first <ALT> and then the
second key. Do not release <ALT> before you pressed the second key. <ALT> has a
function together with <CLEAR>, <BLOCK> , <MENU>, and <PRINT>.
It goes always together with another key. You have to press first <MENU> and then the
second key. Do not release <MENU> before you pressed the second key. <MENU> has a
function with <ALT>, <INPUT>, <PRINT>, and <BLOCK>.
Function key 1: To select in a menu of the info-display (6) when the text is placed at the
right side in line 1.
Function key 2: To select in a menu of the info-display (6) when the text is placed at the
right side in line 2.
Function key 3: To select in a menu of the info-display (6) when the text is placed at the
right side in line 3.
Function key 4: To select in a menu of the info-display (6) when the text is placed at the
right side in line 4.
Memory for mass arrivals at the finish or intermediate time (see chapter 4.4).
Version: 021206
Page 25
T I M I N G
3.3.
TdC 8000
Page 26
Start-Mode
You can choose between tree different start-modes:
Single Start: each competitor starts separate
Group Start: all competitors within a group start together
Mass Start:
all competitors start together
With the switch (1) you control the start automatic for singles start and group start. This switch has
three position. It shows the switch position on the start-display (2).
-
upper position: after each start it changes the start number to the next free higher start number.
middle position: manual mode, the start number stays until you change it with the keyboard.
lower position: after each start it changes the start number to the next free lower start number.
3.3.1.
Single Start
Each competitor has a separate start time. In this mode you can select the output mode of the infodisplay (6) (see point 5 Menu 7: INFO-DISPLAY).
3.3.1.1. Start Mode for the First Heat
If the start number increases e.g. from 1, to 2, to 3, to 4, etc. after each start you can use the
automatic start mode (switch 2 in upper position).
Start number goes up automatically after each start:
- Switch (1) in upper position (it shows the switch position in the start display 2).
- It shows 1 as start number in the start display (2).
- After the start of number 1 it increases the start number automatically to 2.
- After each further start it increases the start number again (automatically to the next start number
that is not started yet).
- A manual correction of the start number is possible at any time (keyboard 9). If you press
<ENTER> it increases the start number to the next start number that is not started yet.
- The display (2) shows for a start number with a start time a "u" in the display (u stands for used).
Start number goes down automatically after each start:
- Switch (1) in lower position (it shows the switch position in the start display 2).
- It shows 1 as start number in the start display (2).
- Input with keyboard (9) the start number that starts first (e.g. 48) and confirm it with <ENTER>.
- After the start of number 48 it decreases the start number automatically to 47.
- After each further start it decreases the start number again (automatically to the next lower start
number that is not started yet).
- A manual correction of the start number is possible at any time (keyboard 9). If you press
<ENTER> it increases the start number to the next start number that is not started yet.
- The display (2) shows for a start number with a start time a "u" in the display (stands for used).
Manual start input:
- Switch (1) in middle position (it shows the switch position in the start display 2).
- It shows 1 as start number in the start display (2).
- Input with keyboard (9) the start number that starts (e.g. 12) and confirm it with <ENTER>.
- After the start it shows a "u" in the display (2) . It stands for used and mans that this start
number is already started.
- Input with keyboard (9) the next start number that starts (e.g. 25) and confirm it with <ENTER>.
- After the start it shows a "u" in the display (2) . It stands for used and mans that this start
number is already started.
Version: 021206
Page 26
TdC 8000
T I M I N G
Page 27
3.3.1.2. Start Mode for the Second Heat
The start procedure for the third, fourth, etc. heat works like in the second heat. The switch (1) has
the same function as in the first heat. If you use the BIBO mode for the second heat it is important
that you have the upper position selected.
For the second heat you have the following text on the info-display (6):
Start order:
Continue:
ENTER
START NUMBER< F1
BIBO WITHOUT GROUPS F2
BIBO WITH GROUPS F3
F4
Select the start order with <F1>, <F2> or <F3>.
"
o Start number:
The start order works like for the first heat, depending on the switch position of switch (1).
!
o Bibo with groups:
The bibo rule is used in alpine skiing. Bibo does the following:
For races with two or more heats it takes the as start order the ranking of the first
(previous) heat, except of the first places as start order for the 2nd heat. You have to input
how man places you have to reverse. If you input e.g. 15 it does the following.
rank 15 starts 1st
rank 1 starts 15th
rank 14 starts 2nd
rank 16 starts 16th
rank 13 starts 3rd
rank 17 starts 17th
etc..
etc.
You are asked how many competitors you have to invert. The FIS value of 15 is requested.
Invert:
15
Amount of inverted competitors
Save with:
ENTER
Confirm your selection with
<ENTER>
Attention:Switch (1) must be in the upper position!
#
o Bibo with groups:
You have to input the amount of competitors to invert for each group. For the Bibo rule it
takes the classement of the previous heat.
e.g.: You have a race with three groups:
INVERT:
Save with:
Attention:
Gr 1: 15
Gr 2: 15
Gr 3: 15
Input the amount of competitors
that you want to invert and
with <ENTER>.
ENTER
"Bibo with groups" works only in the second heat if you worked in the first heat
with groups. The switch (1) must be in the upper position!
Version: 021206
Page 27
T I M I N G
3.3.2.
TdC 8000
Page 28
Group Start
Within a group they start with the same start time. If you use the group start, you should input
groups. It is possible to input the groups during the switch on procedure or in the main menu (Menu
23: Groups; chapter 5).
If you do not input a group it will start all numbers (from 1 to 9999) with the first start impulse.
You can not use <CLEAR> of the start-keyboard (9) to clear a start time (it stores only one time for a
group). To change the start time of a group, use <INPUT> of the start keyboard (9).
3.3.3.
Mass Start
All competitors from 1 to 9999 start with the same start time.
If you want to make a race with many competitors and a mass start, we recommend to use
ABSOLUTE TIMING. This mode gives stores per competitor only the run time (if you have no
intermediate time).
You can not use <CLEAR> of the start-keyboard (9) to clear a start time (it stores only one start time
for all competitors). To change the start time of the competitor field, use <INPUT> of the start
keyboard (9).
4.
SPECIAL FUNCTIONS
4.1.
Test - Checking the TdC 8000
see chapter 6.13.
4.2.
Block - Deactivate the Impulse-Channels
You can deactivate each impulse channel (c0 to c9). There are two possibilities to deactivate the
channels.
o The TdC 8000 ignores each impulse of a selected channel (channel off)
o The TdC 8000 marks each impulse of a selected channel (with "?") . The time does not start or
stop
on the display and display board.
Channel 0 (start) and 1 (finish) you can deactivate direct.
Version: 021206
Page 28
TdC 8000
T I M I N G
4.2.1.
Page 29
Blocking the Start
-
All start impulses (c0) are not valid and the time of day is marked with a ? as long as
you press <BLOCK> of the start-keyboard (9).
Printer:
?0043 ST 10:34:13.384
Display Board: no output
RS 232:
?0043 C0 10:34:13.384(CR)
- As long as you press <ALT> and <BLOCK> of the start-keyboard (9) together, the TdC 8000 will
ignore all start impulses (channel 0). The TdC 8000 does not store or output this time.
If you block the start impulse it will not start the clock.
4.2.2.
-
-
Blocking the finish
All finish impulses (c1) are not valid and the time of day is marked with a ? as long as you press
<BLOCK> of the finish-keyboard (15). It does not stop the clock and it does not output a run time.
Printer: ?0043 FT 10:34:13.384
Display Board: no output
RS 232: ?0043 C1 10:34:13.384(CR)
As long as you press <ALT> and <BLOCK> of the finish-keyboard (15) together, the TdC 8000 will
ignore all finish impulses (channel 1). The TdC 8000 does not store or output this time.
A stop impulse never stops the time on the display and display board as long as you press
<BLOCK>.
4.2.3.
Individual adjustment of the channels
You can adjust each channel individual. When you turn the TdC 8000 on and clear the memory you
have always all channels active.
-
If you press <MENU> and <BLOCK> together it shows the setting of each channel in the infodisplay (6).
Select the channel with ¢ and £ .
Press <F1> to switch between activated and deactivated
A (+) means, that the channel is activated.
A (-) means, that the channel is deactivated.
Leave the menu by pressing <MENU> and <BLOCK> together.
Info-display (6):
Channels on (+)/off (-):
CHANGE
F1
+ + + + + + + + + +
c0 c1 c2 c3 c4 c5 c6 c7 c8 c9
The adjustment above comes automatically when you turn the device after you cleared the memory:
The example bellow shows that channel c3 and c4 is switched off:
Channels on (+)/off (-):
CHANGE
F1
+ + + - - + + + + +
c0 c1 c2 c3 c4 c5 c6 c7 c8 c9
Version: 021206
Page 29
TdC 8000
T I M I N G
4.3.
Editing of Times
4.3.1.
Editing of Start Times
Page 30
4.3.1.1. Clear Start Times
-
<CLEAR> of the start keyboard (9) clears the start time of the start number shown in the display (2).
The cleared time is now marked with a c (c= cleared).
The printer prints the time with the c prefix.
The output of RS 232 interface looks like: c0043 C0 10:34:13.384
4.3.1.2. Restoring a Cleared Start Time
-
The correct start number must be shown in the start display (2). Then, press <ALT> and
<CLEAR> on the start keyboard (9) together, it makes a valid time out of the cleared time.
- It stores the time as valid start time.
- The printer prints a valid start time.
- The RS 232 interface sends the valid start time.
- You can only restore the last start that was cleared.
Especially useful if a time is accidentally cleared.
4.3.1.3. Changing Start Times
This function is used at any time to edit start times. If you press the <INPUT> of the start keyboard
(9) it is possible to edit the start time. The following editing is possible:
over write a start time with keyboard (9)
copy the start time of a start number to another start number (if a racer loses their
original number).
identify the correct start time from many recorded impulses.
Input functions:
-
Press <INPUT> of the start keyboard (9)
The info-display (6) shows the valid start time of the start number you wish to edit.
Input:
-
13:15:35.486
NEW No
F1 e.g. start number 15,
the last digit of the start number
blinks, you can confirm or
over write the start number
You can increment through the start list with the cursor keys (¢ and £) or over write the start
number with the start keyboard (9).
Confirm your choice with <ENTER>
The cursor is now at the first digit of the time:
Input:
-
0015 C0
0015 C0
c0015 C0
?0015 C0
13:15:35.486
13:10:12.498
13:17:28.938
NEW No
F1 valid time
time cleared with <CLEAR>
time not valid (e.g. from <BLOCK>)
You can select the correct time with the cursor key (¢ and £). When you press <ENTER> it
makes the selected time valid.
Version: 021206
Page 30
TdC 8000
T I M I N G
-
Page 31
You can also over write the valid time (first line) with the numbers of the start keyboard (9) (manual
input of the start time).
You can assign the selected time to another start number by pressing <F1> and input the new
start number.
Exit the input menu by pressing <INPUT> of the start keyboard (9) again.
Attention:
-
Group start:
If it shows 00:00:00.000 as start time it means, that you have no start time for
this start number.
If you make another start time valid, it stores the old start time with a c (clear).
e.g.: c 0009 ST 12:13.21.115
If you work with group start, you can change the start time like for the single start.
In the input menu it shows instead of the start number the group number. You can
change only the start time of the complete group, but not from a single
competitor.
4.3.1.4. Input Start Times (Start Intervals)
Use this function to enter regular interval starts or group mass starts. The concept is that you will be
a timing at the finish line, and that all starts will be manually input.
-
Press <MENU> and <INPUT> together
The info-display (6) shows the following:
Start interval from No:
start time:
interval:
Save with: ENTER
-
0001 to No: 0002
00:00:00.000
00:00:00.000
Input the first and last start number of that category.
Input the start time of the first start number
Input the interval time (time between two starts). If you input 00:00:00.000 as interval time it
means a mass start for the start numbers that you have input.
Attention:
-
e.g.:
If you input the start times before the start and there is a start delay, it is
necessary to input the start times again.
If you input the same start numbers for different groups it takes always the last
input as valid.
Input start number 1 to 10, start time is 10 o clock, interval time is one minute.
Start interval from No:
start time:
interval:
Continue with: ENTER
0001 to No: 0010
10:00:00.000
00:01:00.000
This input gives the following starting times:
start number 1
start number 2
start number 3
etc...
start number 9
start number 10
at 10:00
at 10:01
at 10:02
at 10:08
at 10:09
Attention:
Use the <INPUT> key of the start keyboard (9) to input the start times, if you do not have regular
intervals between the competitors (e.g. Nordic combination - Gunderson start).
Version: 021206
Page 31
TdC 8000
T I M I N G
4.3.2.
Page 32
Editing of Finish Times
4.3.2.1. Clear Finish Times
-
<CLEAR> of the finish keyboard (15) clears the finish time of the start number shown in display (8).
The run time gets replaced by the running time in the finish display (7).
The cleared time is now marked with a c (c= cleared).
The printer prints the time with a c prefix.
The output of RS 232 interface looks like: c0043 C1 10:35:33.854
4.3.1.2. Restoring a Cleared Finish Time
-
The correct start number must be shown in the finish display (8). Then, press <ALT> and
<CLEAR> on the finish keyboard (15) together, it makes a valid time out of the cleared time.
- The finish display (7) resumes the running time.
- It stores the time as valid finish time.
- The printer prints a valid finish time.
- The RS 232 interface sends the valid finish time.
- You can only restore the last finish that was cleared.
Especially useful if a time is accidentally cleared.
4.3.2.3. Changing Finish Times
This function is used at any time to edit finish times. If you press the <INPUT> of the finish keyboard
(15) it is possible to edit the finish time of the start number shown on the finish display (8). The
following editing is possible:
over write a finish time with keyboard (15)
copy the finish time of a start number to another start number (if you fail to identify the
racer correctly when he cross the line).
identify the correct finish time from many recorded impulses.
Disqualification of a competitor (start number)
Input functions:
- Press <INPUT> of the finish keyboard (15)
- The info-display (6) shows the valid finish time of the start number you wish to edit.
Input:
-
F1 e.g. start number 15,
F2 the last digit of the start number
blinks, you can over write the start
number or change it with the
cursor keys (¢ and £)
You can increment through the finish list with the cursor keys (¢ and £) or input the start number
with the finish keyboard (15).
Confirm the start number with <ENTER>
The cursor is now on the first digit of the time:
Input:
-
0015 C1
0015 C1
c0015 C1
?0015 C1
13:15:35.486
NEW No
DISQU.
13:15:35.486
13:10:12.498
13:17:28.938
NEW No
DISQU.
F1
F2
valid finish time
time cleared with <CLEAR>
time not valid (e.g. from
<BLOCK>
You can select the correct finish time with the cursor key (¢ and £). When you press <ENTER> it
makes the selected time valid.
Version: 021206
Page 32
TdC 8000
T I M I N G
-
Page 33
You can also over write the valid finish time (first line) with the numbers of the finish keyboard (15)
(manual input of the finish time).
If you want to give the selected time to another start number press <F1> and input the new start
number.
To disqualify the competitor (start number) press <F2>. The disqualified time is marked with a d.
For a disqualification it clears the start time, finish time, and run time.
Exit the input menu by pressing <INPUT> of the finish keyboard (15) again.
Attention:
-
If it shows 00:00:00.000 as finish time, it means that you have no finish time for
this start number.
If you make another finish time valid, it stores the old finish time with a c (clear).
E.g.: c 0009 FT 12:15.22.157
4.3.2.4. Editing Run times, Memory Times, and Intermediate Times
If you press <MENU> and <INPUT> of the finish keyboard (15) together you get into the menu to edit
run times, memory times, and intermediate times.
-
Press <MENU> and <INPUT> at the same time.
The info-display (6) shows the following:
Input times:
Continue: ENTER
-
RUN TIME<
MEMORY TIME
INTERMEDIATE TIME
F1 <F1> to change the run time
F2 <F2> to change the memory time
F3 <F3> to change the intermediate
time
Select the time you want to change with <F1>, <F2> or <F3> or ¢ and £.
Changes are made like described in following three chapters.
Exit the menu by pressing <MENU> and <INPUT> together.
4.3.2.4.1. Editing a Run time
You can edit the following:
over write a run time with keyboard (15)
copy the run time of a start number to another start number.
Disqualification of a competitor (start number)
Changing a run time:
- Press <MENU> and <INPUT> together
- Press <F1>
- Press <ENTER>
- The info-display (6) shows the valid run time of the start number shown in the finish display (8):
Input:
-
0015 RT
00:01:35.139
NEW No
DISQU.
F1 e.g. start number 15
F2
You can change the start number with the cursor keys ($ and %) or input the start number with
the finish keyboard (15).
Confirm the start number with <ENTER>
Version: 021206
Page 33
TdC 8000
T I M I N G
-
The cursor is now on the first digit of the time:
Input:
-
Page 34
0015 C1
00:01:35.486
NEW No
DISQU.
F1 valid finish time that you can
F2 over write
You can over write the valid run time with the numbers of the finish keyboard (15) (manual input of
the run time).
If you want to copy the selected time to another start number press <F1> and assign it.
To disqualify the competitor press <F2>. The disqualified time is marked with a d. For a
disqualification it clears the start time, finish time, and run time.
Exit by pressing <MENU> and <INPUT> of the finish keyboard (15) together.
Attention:
-
If it shows 00:00:00.000 as run time, it means that you have no run time for this
start number.
If you make another run time valid, it stores the old run time with a c (clear).
e.g.: c 0009 RT 00:01:35.486
4.3.2.4.2. Editing a Memory Time
You can edit the following:
- over write a memory time with keyboard (15)
- you can copy the memory time to another start number.
- disqualification of a competitor (start number)
Changing a memory time:
- Press <MENU> and <INPUT> together
- Press <F2>
- Press <ENTER>
- The info-display (6) shows the valid memory time of the start number shown in the finish display
(8):
Input:
0015
MT
00:01:35.139 NEW No F1 e.g. start number 15
DISQU. F2
-
You can change the start number with the cursor keys (¢ and £) or input the start number with the
finish keyboard (15).
Confirm the start number with <ENTER>
The cursor is now on the first digit of the time:
Input:
-
0015 C1
00:01:32.446
NEW No
DISQU.
F1 valid finish time that you can
F2 over write
You can over write the valid memory time with the finish keyboard (15) (manual input of the finish
time).
If you want to copy the selected time to another start number press <F1> and assign it.
To disqualify the competitor press <F2>. The disqualified time is marked with the prefix d. For a
disqualification it clears the start time, finish time, and run time.
Exit the menu by pressing <MENU> and <INPUT> of the finish keyboard (15) together.
Version: 021206
Page 34
TdC 8000
T I M I N G
Attention:
-
Page 35
If it shows 00:00:00.000 as memory time, it means that you have no memory time
for this start number.
If you make another memory time valid, it stores the old memory time with a c
(clear).
E.g.: c 0009 MT 00:01:32.446
4.3.2.4.3. Changing a Intermediate Time
You can edit the following:
over write a memory time with keyboard (15)
you can copy the memory time to another start number.
Changing a intermediate time:
- Press <MENU> and <INPUT> (finish keyboard 15) together
- Press <F2> (1st heat) or <F3> (2nd heat)
- Press <ENTER>
- Input the channel number that you want to edit:
Input channel number:
Save with:
-
-
ENTER
0015 C2
00:00:34.557
NEW No
CLEAR
F1 e.g. start number 15
F2 to clear the intermediate time
You can change the start number with the cursor keys (¢ and £) or input the start number with the
finish keyboard (15).
Confirm the start number with <ENTER> (finish keyboard 15).
The cursor is now on the first digit of the time:
Input:
-
e.g. channel 2
Input the channel number with the finish keyboard (15). Input from 2 to 9 is possible.
Confirm with <ENTER>.
The info-display (6) shows the intermediate time of the start number shown in the display (8):
Input:
-
#
0015 C1
00:00:34.557
NEW No
CLEAR
F1 valid intermediate time that you
F2 can over write
You can over write the valid intermediate time with the finish keyboard (15) (manual input ).
If you want to copy the selected time to another start number press <F1> and assign it.
Exit the menu by pressing <MENU> and <INPUT> of the finish keyboard (15) together.
Attention:
-
Version: 021206
If it shows 00:00:00.000 as memory time, it means that you have no memory time
for this start number.
If you make another intermediate time valid, it stores the old intermediate time
with a c (clear).
E.g.: c0009 C2 00:01:32.446
Page 35
TdC 8000
T I M I N G
4.4.
Page 36
MEMO - Time Buffer for Mass-Finish-Arrivals
This function allows you to record and identify groups of racers that come to the line at the same
time. You can enter and exit the MEMO-function at any time without danger of losing any time.
If two or more competitors reach the finish at the same time, it is usually not possible to input the
start number as fast as the finish impulses arrive. In this case we use <MEMO>. After the arrival of
the racer group you can input their start numbers, which will then create a valid run time for each.
-
Group of competitors arrives at the finish.
Press <MEMO>
Write the start numbers of the group in order on paper or use a tape recorder.
All times are stored in chronological order with a continuous ID-number.
The printer prints every time marked with the prefix m.
RS 232 output:
Printer output:
m
####
CCC
HH:MM:SS.zhtq
HH:MM:SS.zht
GR
x
(CR)
m####xCCCxHH:MM:SS.zhtqxGR(CR)
m####xCCCxHH:MM:SS.zht
identification a memory time
every memo time gets continuous ID-number
timing channel (e.g. C1 for finish time, C1M for manual finish time)
time with 1/10.000 seconds
time with 1/1000 seconds
group
blank
carriage return
Assign the correct start number to the times in memory:
As soon as the first competitor goes through the finish you can input the start number and confirm it
with <ENTER> of the finish keyboard (8). The channel ID is shown for each time and identifies the
score of the impulse. Remember that C1 is the finish channel.
-
The info-display (6) shows the following:
Memory:
4
-
1
2
3
4
C1
C1
C2
C1
13:05:11.3451
13:05:12.3892
13:05:15.9848
13:05:15.4566
No:
_
first time in memory, channel 1
second time in memory, channel 1
third time in memory, channel 2
fourth time in memory, channel 1
The four in the lower left corner shows that you have four times stored in the memory.
The cursor is in the upper right corner, ready to input the start number
Input the start number (finish keyboard 15), e.g. start number 34
Confirm the start number with <ENTER>
The time and start number disappears and each line moves up.
Memory:
2
3
4
C1
C2
C1
13:05:12.3892
13:05:15.9848
13:05:15.4566
No:
_
second time in memory, channel 1
third time in memory, channel 2
fourth time in memory, channel 1
3
-
Input the start number (finish keyboard 15), e.g. start number 12
Confirm the start number with <ENTER>
The time and start number disappears and each line moves up.
Version: 021206
Page 36
TdC 8000
T I M I N G
-
Page 37
With $&and %&it is possible to move the times up and down.
Input all start number as before.
Press <MEMO> to exit the MEMO-menu
Assigning the same time to two or more competitors:
You can assign the same time to two or more competitors, if you only receive one impulse from a
sensor.
Memory:
1
C1
13:05:11.3453
No:
_
Only one time for two
competitors
1
-
Input the first start number with finish keyboard (15), e.g. start number 55
Confirm the start number with <INPUT>
It stores and prints the time and the start number
The same time is still on the info-display (6)
Memory:
1
C1
13:05:11.3453
No:
_
The same time is in the
display
1
-
Input the start number with the finish keyboard (15), e.g. start number 10
Confirm the start number with <INPUT> if you have more numbers to assign, or <ENTER> for the
final entry.
The time and start number disappears, the Memo-memory is empty.
Press <MEMO> to exit the MEMO-menu
Attention:
-
You can delete a false time in the memo-mode by pressing <CLEAR> on the
finish keyboard (15).
You can enter and exit the MEMO-function at any time without danger of losing
any time.
Each Memo-Time is shown with a continues ID-number. This number can help you to find the time
again later.
If you clear a time in the MEMO mode with <CLEAR>, you can find it again when pressing <INPUT>
and enter start number zero.
Memo-times cleared with <CLEAR> are marked with a capital C.
Run-times cleared with <CLEAR> are marked with a small c.
Version: 021206
Page 37
TdC 8000
T I M I N G
4.5.
Class - Classement
4.5.1.
Classement in Heat 1
Page 38
If you press <CLASS> it is possible to print a classement of the race.
You can print the Classement with race points (for skiing).
Each classement has an output on the printer, on the RS 232 interface and on the "display-board"
interface (on channel 2).
A classement for the first heat prints the following:
1.
0003
2.
0011.
3.
0008
RT
0:49.52
RT
0:49.69
RT
0:50.02
first rank
start number 3 and run time
second rank
start number 11 and run time
third rank
start number 8 and run time
The classement for the second heat prints the following:
1.
0011
2.
0003.
3.
0008
RT
MT
TT
0:50.12
0:49.69
1:39.81
RT
MT
TT
0:50.69
0:49.52
1:40.21
RT
MT
TT
0:50.72
0:50.02
1:40.74
first rank
start number 11 and run time
memory time
total time
second rank
start number 3 and run time
memory time
total time
third rank
start number 8 and run time
memory time
total time
If you press <CLASS> it shows on the info-display (6):
Classement:
Continue: ENTER
-
ALL <
GROUPS
CLASSES
SINGLE
F1
F2
F3
F4
If you press six times ¢ the info-display (6) shows the following:
Classement:
Continue: ENTER
Version: 021206
SINGLE
LEADING TEN
NOT FINISHED
ADD<
F1
F2
F3
F4
Page 38
TdC 8000
T I M I N G
-
If you press three times ¢ the info-display (6) shows the following:
Classement:
Continue:
-
ADD<
DISQUALIFIED
START ORDER
PROTOCOL
ENTER
F1
F2
F3
F4
You can choose between ten different classifications
Select with ¢ and £ or <F1>, <F2, <F3>, <F4>
If you have selected the classement press <ENTER>
You can select, if you want to make a classement of the run times, or intermediate times.
Classement:
Continue:
-
Page 39
RUN TIME<
INTERMEDIATE TIME
F1
F2
ENTER
If you press <F1> it prints a result list of the run times.
If you press <F2> it prints a result list of the intermediate times.
You can choose, if you want to calculate race points (for Alpine-Ski or Nordic-Ski):
Classement:
Continue:
NO RACE POINTS<
RACE POINT BEST TIME
RACE POINT START NUMBER
ENTER
F1
F2
F3
-
If you press <F1> and <ENTER> it calculates no race points
If you press <F2> and <ENTER> it calculates race points related to the best time
If you press <F3> and <ENTER> it calculates race points related to the start number that you
input.
-
All:
-
Groups: For a group classement need to work with groups. Groups you have to input before the
race starts or later in the main menu (see page 52). If you select groups, than you have
to select if you want to print all groups (<F1>) or a single group (<F2>).
It prints the actual result list of all finished competitors, this means each who has a valid
run time.
Classement:
Continue:
ALL:
ALL<
SINGLE
F1
F2
ENTER
Classement of each group
SINGLE: Classement of a selected group. Input the group number and confirm it with
<ENTER>. When you have selected the last group press twice <ENTER>.
Classement:
Gr: 0
Select: ENTER
Version: 021206
Page 39
TdC 8000
T I M I N G
-
Page 40
Classes: If you use "Classes" to make the ranking, it offers you a wide variety to make different
ranking lists. You can create you own classes, independent from the groups that you
have input. You can make e.g. a classement including some groups, or you can make a
classement within a group. It is also possible to add late entries to a group, that have
start numbers which are not within the group range.
You must make all input for Classes with the finish keyboard (15).
Classement:
Save with:
No:
0>
0
ENTER
Input always the first and last start number of a class and confirm with <ENTER>. It is also
possible to add different start number section together to a classes classement:
Classement:
No: 4>
No: 21>
No: 51>
10
25
55
Save with: ENTER
If you want to execute the classement of the numbers that you input, press two times
<ENTER>.
The classement of the above example would include the following start numbers:
4, 5, 6, 7, 8, 9, 10, 21, 22, 23, 24, 25, 51, 52, 53, 54, 55
-
Single: A classement of individual single start numbers is possible. This is e.g. necessary to
make a classement within a team.
Classement:
Continue:
-
No:
ENTER
Input all start numbers that you want in the classement.
E.g. 12 <ENTER>, 24 <ENTER>, 134 <ENTER>, 53 <ENTER>
The info-display (6) shows the following:
Classement:
Continue:
-
_
ENTER
No: 12
No: 24
No: 134
No: 53
Press <ENTER> again after you have input all start numbers.
Select if you want to calculate race points.
It prints the classement (e.g. form start number 12, 24, 53, and 134).
Output of the same classement through the RS 232 interface.
Version: 021206
Page 40
TdC 8000
T I M I N G
-
First Ten:
Page 41
It prints a classement with the fastest competitors within the race.
CLASSEMENT:
RUN TIME
LEADING TEN
1.
0009
2.
0014
3.
0008
RT
1:30.45
RT
1:30.56
RT
1:30.71
RT
1:31.69
RT
1:31.99
etc..
9.
0002
10.
0020
-
Not Finished: It prints all start numbers that have a start time, but no finish time (run time).
CLASSEMENT:
RUN TIME
NOT FINISHED
0004
0028
0052
0109
-
Add: A addition of times of different start numbers is possible. The add time is necessary e.g. to
make a team classement.
Classement:
Continue:
-
No:
ENTER
Input start numbers that you want to add.
E.g.: 9 <ENTER>, 14 <ENTER>, 72<ENTER>, 102<ENTER>
The info-display (6) shows:
Classement:
Continue: ENTER
-
_
No: 9
No: 14
No: 72
No: 102
After you have input all start numbers, press <ENTER> again.
It prints the times of start number 9, 14, 72, and 102.
It prints the added time of these competitors.
Version: 021206
Page 41
TdC 8000
T I M I N G
Page 42
CLASSEMENT:
RUN TIME
ADD
0009
0014
0072
0102
-
DISQUALIFIED:
RT
RT
RT
RT
ADD
1:31.45
1:30.09
1:33.41
1:35.69
6:10.64
It prints all start numbers that were disqualified (with <INPUT> of finish
keyboard)
Classement:
DISQUALIFIED
0007
0024
0107
-
Start Order:
If you make the second (or higher) head, it is possible to print the start order for
the heat. This function is very nice if you start after the bibo rule in the second
run.
-
Protocol:
A protocol is always printed in the memory order. You can print a protocol of the
following times:
start time
finish time
intermediate time
run time
Select with the cursor (< or >) or the F-key the times that you want to print:
Classement:
Continue:
START TIME<
FINISH TIME
INTERMEDIATE TIME
RUN TIME
ENTER
F1
F2
F3
F4
You can select to print all data from the selected time with <F1>, or only the selected data
from the selected time with <F2>.
Classement:
Continue:
ALL<
SINGLE
F1
F2
ENTER
If you select SINGLE, it is necessary to input the start numbers that you want to print (from
- to). You can input also more than one start number blocks. Confirm the input by pressing
twice <ENTER>.
Classement:
Continue:
Version: 021206
No:
0>
0
ENTER
Page 42
TdC 8000
T I M I N G
4.5.2.
Page 43
Classement in Heat 2
If you make a classement for the second (or higher) heat you can choose between the following
classements:
Classement:
TOTAL TIME< F1
RUN TIME
F2
MEMORY TIME
F3
Continue:
ENTER
INTERMEDIATE TIME
F4
-
Total Time:
Run Time:
Memory Time:
Intermediate Time:
It prints a classement sorted by the total time.
It prints a classement to the actual run times (e.g. second run).
It prints a classement of the previous heat(s) (e.g. first heat).
It prints a classement of the actual intermediate times (you must select the
intermediate time channel).
Select with <F1>, <F2>, <F3>, or <F4>.
4.5.3.
Race Points
If you make a classement for SPLIT it is possible to calculate the race points for Alpine Skiing or
Nordic Skiing. You can calculate race points only if the race time is over 30 seconds.
Classement:
-
NO RACE POINTS<
F1
RACE POINT BEST TIME
F2
RACE POINT START NUMBER
F3
Continue:
ENTER
Press <F2> to calculate the race points related to the best time.
Press <F3> to calculate the race points related to a certain start number.
Classement:
Save with:
-
No:
ENTER
0
If you want to calculate the race
points for Groups or classes, it is
necessary to input first the
related fastest time.
Input the F-value for the race. Each FIS race has a F-value. The Technical Delegated must know
this value.
Classement:
F-Value: _
Continue:
ENTER
Example of a classement with race point calculation:
1.
0003
2.
0011.
3.
0017.
Version: 021206
RT
RP
1:49.52
00000.00
RT
RP
1:49.69
00012.34
RT
RP
1:50.69
00032.34
first rank
start number 3 and run time
race points for start number 3
second rank
start number 11 and run time
race points for start number 11
third rank
start number 17 and run time
race points for start number 17
Page 43
TdC 8000
T I M I N G
4.6.
Page 44
PRINT - Switching the Printer off or on
When you switch TdC 8000 on it activates the printer automatically. After you selected the program
you can make the following adjustments for the printer:
Print-Mode:
The printer prints all data. The printer is automatically in this mode, when you
switch the TdC 8000 on.
Buffer-Mode:
All data for the printer are stored in the buffer. This mode you use e.g. to change
the paper.
-
Printer Off:
5.
Printer is in Print-Mode
Press <PRINT>
Printer is now in the Buffer-Mode
Press <PRINT>
Printer is again in the printing mode. It prints now all data collected during
the buffer mode.
The printer is off and all data for the printer are lost.
Printer is in Print-Mode
Press <ALT> and <PRINT> at the same time
Printer is switched off
Press <ALT> and <PRINT> at the same time
Printer is in Print-Mode
MAIN MENU - GENERAL ADJUSTMENTS
The TdC 8000 is a very universal timing device. To cover a wide range of timing solutions it is possible
to adjust each program individual.
If you make changes in the main menu it stores this new values after you turn the machine off.
Factory Default Setting:
If you want the have the ALGE standard configuration do the following:
turn TdC 8000 off (switch 26)
press <ALT> and <MENU> together and keep it pressed
turn TdC 8000 on (switch 26)
release <ALT> and <MENU> after five seconds
the main menu has now the ALGE standard configuration
You can also check and change the main menu set up through the RS 232 interface (see chapter
8.2.1 and chapter 8.2.2).
Version: 021206
Page 44
T I M I N G
TdC 8000
Page 45
How do you get into the main menu:
- Select program
- press <ALT> and <MENU> together
- Press $&and % to go through the menu. With the numeric keys of the finish keyboard (15) you
can select a menu direct.
- Select the chosen menu with <YES>
Main Menu Selections:
Menu 1: Delay Time Start = 1.00 s
Menu 2: Delay Time Finish = 0.30 s
Menu 3: Seconds Mode = OFF
Menu 4: Display Time 1 = 03 s
Menu 5: Display Time 2 = 03 s
Menu 6: Display Thousandth = OFF
Menu 7: Info-Display = START
Menu 8: Running Time = RUN
Menu 9: Running Tenth = OFF
Menu 10: Intermediate Rank = ON
Menu 11: Finish Rank = ON
Menu 12: STNO Automatic = OFF
Menu 13: Automatic Time = 00:00:00.00
Menu 14 Print Start Time = OFF
Menu 15: Print Menus = ON
Menu 16: Print Linefeed = 0
Menu 17: RS-232 Baudrate = 9600 Bd
Menu 18: RS-232 Run time = OFF
Menu 19: D-Board Baudrate = 2400 Bd
Menu 20: D-Board Channel 2 = RUNNING
Menu 21: Beep = ON
Menu 22: Handicap time = 00:00:00.00
Menu 23: Groups = OFF
Menu 24: Change Run
Menu 25: Change Race
Menu 26: D-Board-Test
Menu 27: ID channel 4 = b (blue)
Menu 28: Penalty Time = 1.500 s
Menu 29: Start Channel = separate
Menu 30: Rank Calculation = separate
Menu 31: Print Times = OFF
Menu 32: Distance = 0100 m
Menu 33: Measuring Unit = km/h
Menu 34: Min. Speed = 0010 km/h
Menu 35: Max. Speed = 0200 km/h
Menu 36: Penalty Points = 4.00
Menu 37: Time Violation 1 = 0.25
Menu 38: Time Violation 2 = 1
Menu 39: Parcour Time 1 = 000.00
Menu 40: Parcour Time 1 = 000.00
Menu 41: Block Time 1 = 000.00
Menu 42: Block Time 2 = 000.00
Menu 43: Count Down Time = 1 min.
Menu 45: D-Board Count Down = ON
Version: 021206
Adjustable: from 0.01 to 9.99 seconds
Adjustable: from 0.01 to 9.99 seconds
Adjustable: ON or OFF
Adjustable: from 0 to 99 seconds
Adjustable: from 0 to 99 seconds
Adjustable: ON or OFF
Adjustable: START, FINISH, or OFF
Adjustable: RUN or TOTAL
Adjustable: ON or OFF
Adjustable: ON or OFF
Adjustable: ON or OFF
Adjustable: START, FINISH, or OFF
Adjustable: any time
Adjustable: ON or OFF
Adjustable: ON or OFF
Adjustable from 0 to 9
Adjustable 2400, 4800, or 9600 Baud
Adjustable: ON or OFF
Adjustable: only 2400 Baud
Adjustable: RUNNING or STANDING
Adjustable: ON or OFF
Input handicap time (no function yet)
Depending of the amount of groups
Adjustable: SAME or NEXT run
You can select another race
Test program for the display board
Adjustable: b (blue) or L (left)
Adjustable: form 0.000 to 9.999
Adjustable: SEPARATE or COMMON
Adjustable: SEPARATE or COMMON
Adjustable: ON or OFF
Adjustable: 1 to 9999 m
Adjustable: km/h, m/s, or mph
Adjustable: 1 to 9999 (km/h, m/s, or mph)
Adjustable: 1 to 9999 (km/h, m/s, or mph)
Adjustable: 0.01to 99.99
Adjustable: 0 to 99.99
Adjustable: 0 to 99.99
Adjustable: 0 to 999.99
Adjustable: 0 to 999.99
Adjustable: 0 to 999.99
Adjustable: 0 to 999.99
Adjustable: 0 to 23:59:59.99 or 0 to 6399.99
Adjustable: ON or OFF
Page 45
TdC 8000
T I M I N G
Start Delay Time:
Menu 1:
Page 46
DELAY TIME START = 1.00 s
You can adjust the start delay time between 0.00 to 9.99 seconds.
To input the start delay time use the finish keyboard (15). Confirm the adjusted time with <ENTER>.
Pre adjusted value: 1,00 s
Menu 1: DELAY TIME START = 1.00 s
input delay time
Save with:
confirm delay time with <ENTER>
ENTER
Finish Delay Time:
Menu 2:
DELAY TIME FINISH = 0,30 s
You can adjust the finish delay time between 0.00 and 9,99 seconds.
To input the finish delay time use the finish keyboard (15). Confirm the adjusted time with <ENTER>.
Pre adjusted value: 0,30 s
Menu 2: DELAY TIME FINISH = 0.30 s
input delay time
Save with:
confirm delay time with <ENTER>
ENTER
Seconds Mode
Menu 3:
SECONDS MODE = OFF
Normally is the seconds mode off. If you use the seconds mode you have no minutes. This means
the clock jumps at 60 seconds not to 1 minute, but continues to count 61, 62, 63, etc. This mode is
necessary for some sports.
Menu 3: SECONDS MODE
Save with:
Pre adjusted value:
ON
OFF<
F1
F2
Seconds mode activated
Normal time
ENTER
Seconds mode off
Display Time 1:
Menu 4:
DISPLAY TIME 1 = 03 s
You can adjust the amount of time that it shows a stopped time on the display (7) or display board.
This time we call display time 1. You can select the display time between 0 and 99 seconds.
Menu 4: DISPLAY Time 1 = 03 s
input seconds with finish
keyboard (15)
Save with:
Confirm input with <ENTER>
ENTER
Pre adjusted value: Display Time 1 = 3 seconds
Version: 021206
Page 46
TdC 8000
T I M I N G
Display Time 2:
Menu 5:
Page 47
DISPLAY TIME 2 = 03 s
You can adjust the amount of time that it shows the second stopped time in the second heat (total
time or run time) on the display (7) or display board. This time we call display time 2. You can select
the display time between 0 and 99 seconds.
Menu 5: DISPLAY Time 2 = 03 s
input seconds with finish
keyboard
(15)
Save with:
Confirm input with <ENTER>
ENTER
Pre adjusted value: Display Time 2 = 3 seconds
Display Thousandth:
Menu 6:
DISPLAY THOUSANDTH = OFF
Normally the display (7) does not show the 1/1000 seconds. If you want to show the 1/1000 on the
display, it must shift the time two digit to the left. In this mode you can not show the hours on the
display. This adjustment you can only select if you work with 1/1000 precision.
Menu 6: DISPLAY THOUSANDTH
on
off
OFF
ON<
F1 display shows 1/1000 seconds
F2 display shows 1/100 seconds
Save with:
ENTER
confirm selection with <ENTER>
= <F1> display (7) shows 1/1000 seconds, but no hours
= <F2> display (7) shows 1/100 seconds, but no 1/1000 seconds
Pre adjusted value: Display thousandth is off
Info-Display:
Menu 7:
INFO-DISPLAY = START
You can adjust the display mode during the timing for info-display (6).
Menu 7: INFO-DISPLAY
Save with:
ENTER
START<
FINISH
OFF
F1
Start display
F2
Finish display
F3
no timing information
Confirm selection with <ENTER>
Start:
The info-display shows always the running time. You can only select this mode for single
start in the program SPLIT. The F-keys have the following functions:
<F1>
shows first started time
<F2>
shows actual time, that means the last finish time in the first line of the display
<F3>
shows last started time
Finish:
In the info-display it shows always the finish times (intermediate times). The F-keys have
the following functions:
<F1>
shows the first intermediate time of finish time in the race in the top line
<F2>
shows the last stopped time in the top line of the info-display (6)
<F3>
shows the last stopped time in the bottom line of the info-display (6)
OFF:
The info-display (6) does not show times.
Version: 021206
Page 47
TdC 8000
T I M I N G
Running Time:
Menu 8:
Page 48
RUNNING TIME = RUN
You can select if you want to show for the second heat (third, etc.) in the display (7) and on the
display board the running run time or the running total time.
E.g.:
the run time for the first run of start number 5 is 1:30.45
For heat: Time starts in the second heat form 0:00.00
For total: Time starts in the second heat from 1:30.45
Menu 8: RUNNING TIME
Save with:
Pre adjusted value:
RUN<
TOTAL
ENTER
F1
F2
shows the run time
shows the total time
Confirm with <ENTER>
Run time
Running Tenth:
Menu 9:
RUNNING TENTH = ON
The finish display (7) and the interface "display board" (24) can output the running tenth second (the
ALGE-display-board cannot show the running tenth second). The running tenth second is important to
feed a video generator (for TV).
on
= <F1> running tenth second is on
off
= <F2> running tenth second is off
Menu 9: RUNNING TENTH
Save with:
ON
OFF<
ENTER
F1
F2
running tenth second is on
running tenth seconds is off
confirm with <ENTER>
Pre adjusted value: running tenth seconds are on
Rank for Intermediate Time:
Menu 10:
INTERMEDIATE RANK = ON
You can show the rank for the intermediate time on the display (7) and display board. It shows the
rank as long as you have the display time adjusted (see menu 4). If you use more than one
intermediate times, then you must use for each intermediate time a separate channel (c2 to c9).
Menu 10:
INTERMEDIATE RANK
Save with:
ENTER
ON<
OFF
F1
F2
shows rank
no rank is shown
confirm with <ENTER>
Pre adjusted value: intermediate time rank is on
Rank for Finish Time:
Menu 11:
FINISH RANK = ON
For each run time (or total time) it shows the rank on display (7) and on the display board. It shows
the rank as long as you have the display time adjusted (see menu 4).
Menu 11:
FINISH RANK
Save with:
ENTER
ON<
OFF
F1
F2
shows rank
no rank shown
confirm with <ENTER>
Pre adjusted value: rank for finish time is on
Version: 021206
Page 48
TdC 8000
T I M I N G
Start Number Automatic:
Menu 12:
Page 49
STNO AUTOMATIC = OFF
The start number input for the TdC 8000 you can automate for start and finish.
START:
Only one competitor is allowed on the slope. If the competitor is in the finish the next can
start. As long as the competitors start in order (1, 2, 3, 4, etc.) and no competitor does not
finish you do not have to input a start number manual for start or finish.
FINISH: As many competitors can be on the slope as you want. The start number shown in display
(2) goes after each start up to the next number. The start number shown in the display (7)
goes after each finish up to the next number.
Start
Finish
off =
=
<F1> start automatic is on
=
<F2> finish automatic is on
<F3> manual input of start numbers is necessary
Menu 12:
STNO AUTOMATIC
START<
FINISH
OFF
F1 Automatic "START"
F2 Automatic "FINISH"
F3 Manual input of start numbers
Confirm selection with <ENTER>
Menu 13:
AUTOMATIC TIME = 00:00:00.00
Save with: ENTER
Pre adjusted value: start number automatic is off
Automatic Time:
If you use the StNo Automatic on "Finish" it is possible to adjust a Automatic Time. If a competitor
does not reach the finish before the end of the automatic time it moves the start number of the finish
display automatically to the next started number.
Menu 13:
AUTOMATIC TIME = 00:00:00.00
Save with:
ENTER
Confirm selection with <ENTER>
Pre adjusted value: Automatic Time = 00:00:00.00
Print Start time:
Menu 14:
PRINT START TIME = OFF
You can print the start time with the start impulse. Normally it prints the start time only when you
receive the finish impulse.
on
off
= <F1>
= <F2>
Menu 14:
prints start time with the start
prints no start time during the start
PRINT START TIME
ON<
OFF
Save with:
ENTER
Pre adjusted value: it prints no start time during the start (OFF)
Version: 021206
F1
F2
print start time immediately
print start time with finish
confirm selection with <ENTER>
Page 49
TdC 8000
T I M I N G
Print Menus:
Menu 15:
Page 50
PRINT MENUS = ON
Whenever you change an ALGE adjustment in the menus it prints the new adjustment (e.g. during the
switch on procedure). If you select "PRINT MENUS = OFF" it will not print the menu adjustments.
Also changes made in the main menu wont be printed.
on
off
= <F1>
= <F2>
it prints the menu adjustments
it does not print the menus adjustments
Menu 15:
PRINT MENUS
ON<
OFF
F1 print menu adjustments
F2 do not print menu adjustments
Save with:
ENTER
Pre adjusted value: print menu adjustments
confirm selection with <ENTER>
Printer Linefeed:
PRINTER LINEFEED = 0
Menu 16:
The printer can print after each paragraph linefeed (e.g. two linefeed to have the printed lines above
the cuter). You can adjust between 1 and 9 linefeeds. If you use zero (ALGE adjustment) it prints in
every line.
Menu 16:
PRINTER LINEFEED = 0
input amount of linefeed
Save with:
ENTER
confirm selection with <ENTER>
Pre adjusted value: Printer prints in every line (printer linefeed = 0)
RS 232 Baudrate:
Menu 17:
RS-232 BAUDRATE = 9600 Bd
You can adjust the baud rate of the RS 232 interface (23): 2400, 4800, 9600, or 19200 baud.
Menu 17:
RS-232 BAUDRATE
Save with:
ENTER
Pre adjusted value:
2400 Bd
4800 Bd
9600 Bd
19200 Bd
F1 Select with <F1>
F2 Select with <F2>
F3 Select with <F3>
F4 Confirm selection with <ENTER>
9600 Baud
RS 232 Run Time:
Menu 18:
RS-232 RUN TIME = OFF
The RS 232 interface (23) outputs always in the difference-timing mode the time of day. Additional
you can output the run time.
output time of day and run time
= <F1>
output time of day
= <F2>
Menu 18:
RS-232 RUN TIME
Save with:
ENTER
ON
OFF<
F1 output run time and time of day
F2 output time of day
Confirm selection with <ENTER>
Pre adjusted value: RS-232 output is time of day
Version: 021206
Page 50
TdC 8000
T I M I N G
Display Board Baudrate:
Menu 19:
Page 51
D-Board Baudrate = 2400 Bd
You can adjust the baud rate for the display board (24, 28): 2400, 4800, 9600, or 19200 baud.
When using the ALGE display board you must use 2400 baud.
Menu 19:
D-BOARD BAUDRATE
Save with:
ENTER
2400 Bd
4800 Bd
9600 Bd
19200 Bd
F1 Select with <F1>
F2 Select with <F2>
F3 Select with <F3>
F4 Confirm selection with <ENTER>
Pre adjusted value: D-Board Baudrate = 2400 Baud
Display Board Channel 2:
Menu 20:
D-BOARD CHANNEL2 = RUNNING
You can adjust the channel 2 of the display board interface (24). If you have channel two on
STANDING, it outputs no running time (only run times). It outputs the classement always on channel
2. You can select between channel 1 and channel 2 by turning the plug of the display board cable
180°.
Menu 20:
D-BOARD CHANNEL 2 RUNNING
STANDING<
F1
F2
Save with:
ENTER
Confirm selection with <ENTER>
RUNNING
STANDING
= <F1>
= <F2>
Pre adjusted value:
output of running time
output of run times
running time and classement
run time and classement
D-Board Channel 2 is running
Beep:
Menu 21:
BEEP = ON
The beep makes a sound for each timing impulse. The length of the beep depends on the adjusted
delay time. If the beep bothers people in the timing shack it is possible to turn it off. The beep goes
automatically on, as soon as you turn the TdC 8000 on.
Menu 21:
BEEP
Save with:
ENTER
ON
OFF<
F1
F2
Beep is on
Beep is off
Confirm selection with <ENTER>
Pre adjusted value: Beep is on
Handicap Time:
Menu 22:
HANDICAP TIME = 00:00:00.00
Information that tell the percentage advantage or disadvantage compared to the handicap time. The
handicap time is activated as soon as you input a time.
Menu 22:
HANDICAP TIME = 00:00:00.00
Input handicap time with
keyboard (15)
Save with:
ENTER
Confirm with <ENTER>
Version: 021206
Page 51
TdC 8000
T I M I N G
Output on the printer:
Page 52
0012 SZ
10:58:11.320
ZZ
10:58:41.693
RT
0:30.37
HANDICAP:
+001.60%
Pre adjusted value: no handicap calculation, Handicap = 00:00:00.000
Input of Groups:
Menu 23:
GROUPS = OFF
If you want to show the rank within groups or make a group classement it is necessary to input the
groups. You can input the groups when you start the TdC 8000 or in the main menu. In the main
menu you can also correct groups.
Menu 23:
GROUPS
Save with:
ENTER
Gr 1:
1>
0
Input always the last start number
of a group
Confirm with <ENTER>
input the last start number of the first group
press <ENTER> to confirm
input the last start number of the second group
press <ENTER> to confirm
continue as before
after you input the last group you have to press <ENTER> twice
Attention:Leave always empty start numbers for each group for late entries!
Pre adjusted value:
no groups
Select Heat:
Menu 24:
CHANGE HEAT
You do not have to turn the TdC 8000 off to switch form one heat (e.g. heat 1) to the next heat (e.g.
heat 2).
Menu 24:
Select Heat
Save with:
ENTER
SAME (1)<
NEXT (2)
F1
F2
Continue in the same heat
Select a new heat
Confirm with <ENTER>
You can select if you want to continue in the same heat or if you want to continue in the next heat.
Attention:
When you select the next heat, it is impossible to switch back to the previous heat.
Select Race:
Menu 25:
CHANGE RACE
You do not have to turn the TdC 8000 off to switch form one race to another.
If you press <YES> or <ENTER> you can select automatically the race. You will see the same
selection as you have when you turn the TdC 8000 on. If you change a race within the menu you do
not have to make a new synchronisation.
Version: 021206
Page 52
TdC 8000
T I M I N G
Display Board Test:
Page 53
Menu 26:
D-BOARD-TEST = OFF
In this menu you can check the display board or write on the board the time of day, ALGE or blank. If
you have digits that do not work as they should, use this test to check them. Use the test <F4>
especially if you use the display board the first time after a long time or if you have very could weather
(frozen segments).
With <F1>, <F2>, <F3>, or <F4> you can select the test mode. The arrow at the right end of the
display shows the selected test. There are all together 7 display possibilities. To leave the display
board test press <ENTER>.
Menu 26:
D-BOARD-TEST
Continue:
ENTER
Menu 26:
D-BOARD-TEST
Continue:
ENTER
TIME<
ALGE
BLANK
123456789
F1 Shows time of day
F2 Shows ALGE
F3 Blanks the board
F4 All 9 possible digit get a number
123456789<
0
8
888888888
F1
F2
F3
F4
Each digit counts up
Each digit shows 8 and blank
All digits show 8 and blank
TIME
It shows the time of day on the display board. With the arrow-keys you can move the
time to the correct position. Exit with <ENTER>.
ALGE
It shows ALGE on the display board. With the arrow-keys you can move the time to the
correct position. Exit with <ENTER>.
BLANK
It blanks the display board. Exit with <ENTER>.
123456789 Each digit shows its position number. Exit with <ENTER>.
0
Each single digit counts form 0 to 9. Exit with <ENTER>.
8
Each single digit switch between blank and 8. Exit with <ENTER>.
888888888 All digits switch between blank and 8. Exit with <ENTER>.
Pre adjusted value:
GAZ-Test is not active
ID for Channel 4 in Parallel Slalom:
Menu 27:
ID CHANNEL 4 = b (blue)
You can select the ID for winner on channel 4 in parallel slalom (for printer, display board, and RS
232). Depending on what you want to output for the winner course, red and blue, or right and left you
can select the output of channel 4 with "b" or "L".
Menu 27:
ID CHANNEL 4
Save with:
ENTER
b (blue)<
l (left)
F1
F2
Pre adjusted value: ID channel 4 = b (blue)
Version: 021206
Page 53
TdC 8000
T I M I N G
Penalty Time for Parallel Slalom:
Menu 28:
Page 54
PENALTY TIME = 1.500 s
If a competitor does not finish the first run, he gets a penalty time for the second run. This penalty
time you can input in this menu.
If you want to work without penalty time input 0.000 as penalty time.
The finish difference time starts to run, when the first competitor reaches the finish. If the second
competitor does not reach the finish before the time reaches the penalty time, it will show the penalty
time on the display (7) and on the display board.
Menu 28:
PENALTY TIME = 1.500 s
Save with:
ENTER
Pre adjusted value: Penalty Time = 1.500 seconds
Start Channel for Dual Timer:
Menu 29:
START CHANNEL = SEPARATE
You can select for the Dual Timer, if you want the start channel for both courses separate, or for both
together. If you select both start courses common, it will start with an impulse of channel 0 or 3 both
times.
Menu 29:
START CHANNEL
Save with:
ENTER
COMMON
SEPARATE<
F1
F2
parallel start
separate start
Pre adjusted value: Start Channel = separate
Rank Calculation :
Menu 30:
RANK CALCULATION = SEPARATE
You can select for the Dual Timer, if you want the rank calculation for both courses separate, or for
both together. If you select the rank calculation common, it will calculate the total rank, otherwise the
rank for each course separate.
For the 10-channel-timer you can select the rank calculation for all channels together or separate.
Menu 30:
RANK CALCULATION COMMON
SEPARATE<
F1 total rank
F2 rank for each course separate
Save with:
ENTER
Pre adjusted value: Rank Calculation = separate
Printing Times when Measuring Speed:
Menu 31: PRINT TIMES = OFF
You can print the times of the speed measurement in program 7 "SPEED" as well. If you put this
menu on it will the time of day of the photocells, and the run time additional to the speed.
Menu 31:
PRINT TIMES
Save with:
ENTER
Version: 021206
ON
OFF<
F1
F2
times and speed
only speed
Confirm with <ENTER>
Page 54
TdC 8000
T I M I N G
Print times = off:
0001 km/h
0002 km/h
Print times = on:
0001 C0
0001 C1
RT
km/h
0002 C0
0002 C1
RT
km/h
Page 55
144.23
120.08
13:49:41.8501
13:49:42.1001
0:00.2490
144.23
13:59:45.2413
13:59:45.5413
0:00.2990
120.08
Pre adjusted value: Print time = off
Measuring Distance for Speed Measurement:
Menu 32:
DISTANCE = 0100 m
You can adjust the measuring distance for SPEED (program 7) form 1 to 9999 m. Independent from
the measuring unit you must use always Meter to input the measuring distance.
Menu 32:
DISTANCE = 0100 m
input measuring distance
Save with:
ENTER
Confirm with <ENTER>
Pre adjusted value: Distance = 0100 m
Measuring Unit for Speed Measurement:
Menu 33:
MEASURING UNIT = km/h
You can select the measuring unit for the speed measurement in the SPEED (program 7) form 1 to
9999 m. As measuring distance you can select between km/h (kilometre per hour), m/s (meter per
second), or mph (miles per hour).
Menu 33:
MEASURING UNIT
Save with:
ENTER
km/h<
mps
mph
F1
kilometre per hour
F2
meter per second
F3
miles per hour
Confirm with <ENTER>
Pre adjusted value: measuring distance = km/h
Minimum Speed:
Menu 34:
MIN. SPEED = 0010 km/h
You can input the minimal speed, this means no speed below this value will be measured. You can
input a value between 1 and 9999.
If you change in menu 33 the measuring unit, it will use this new measuring unit as well in this menu.
The speed will be automatically changed to the equal value of the new measuring unit.
Menu 34:
MIN. SPEED = 0010 km/h
Save with:
ENTER
input the minimum speed
Confirm with <ENTER>
Pre adjusted value: minimum speed = 10 km/h
Version: 021206
Page 55
TdC 8000
T I M I N G
Maximum Speed:
Menu 35
Page 56
MAX. SPEED = 0200 km/h
You can input the maximal speed, this means no speed above this value will be measured. You can
input a value between 1 and 9999.
If you change in menu 33 the measuring unit, it will use this new measuring unit as well in this menu.
The speed will be automatically changed to the equal value of the new measuring unit.
Menu 35:
MAX. SPEED = 0200 km/h
input the maximum speed
Save with:
ENTER
Confirm with <ENTER>
Pre adjusted value: maximum speed = 200 km/h
Penalty Points:
Menu 36
PENALTY POINTS = 04.00
The standard penalty points for obstacle drop you can adjust in this menu. You can set the penalty
points from 0.01 to 99.99. Normally there is a 4 point penalty for obstacle drop.
Menu 36:
PENALTY POINTS = 04.00
Adjusted penalty points
Save with:
ENTER
Save and exit with <ENTER>
Pre adjusted value:
4 points
Time Violation 1:
Menu 37
TIME VIOLATION = 0,25
You can adjust the penalty points for time violation. The adjustment is between 0.00 and 99.99
possible. The penalty points are added for each started second time violation. Normally it is a 0.25
time violation for standard show jumping.
Menu 37:
TIME VIOLATION 1 = 00.25
Adjusted time penalty
Save with:
ENTER
Save and exit with <ENTER>
Pre adjusted value:
0,25 points
Time Violation 1:
Menu 38
TIME VIOLATION = 0,25
You can adjust the penalty points for time violation. The adjustment is between 0.00 and 99.99
possible. The penalty points for jump off are added for each started second time violation. Normally it
is a 1 point time violation for standard show jumping.
Menu 38:
TIME VIOLATION 2 = 01.00
Adjusted time penalty
Save with:
ENTER
Save and exit with <ENTER>
Pre adjusted value:
Version: 021206
1.00 points
Page 56
TdC 8000
T I M I N G
Parcour Time 1:
Menu 39
Page 57
PARCOUR TIME 1 = 000.00
It is very important that you adjust the parcour time (the maximum allowed time). If you do not input
the parcour time it will not add penalty points for time violation.
Menu 39:
PARCOUR TIME 1 = 000.00
Input the maximum allowed time
Save with:
ENTER
Save and exit with <ENTER>
Pre adjusted value:
no parcour time is pre adjusted!
Parcour Time 2:
Menu 40
PARCOUR TIME 2 = 000.00
It is very important that you adjust the parcour time (the maximum allowed time). If you do not input
the parcour time it will not add penalty points for time violation in the second stage.
Menu 40:
PARCOUR TIME 2 = 000.00
Input the maximum allowed time
Save with:
ENTER
Save and exit with <ENTER>
Pre adjusted value:
no parcour time is pre adjusted!
Block Time 1:
Menu 41
BLOCK TIME 1 = 000.00
As long as the block time is running, it will take every impulse of the finish photocell as a not valid
impulse. This time will be printed only as time of day with a question mark. The time will not be
stopped on the display (7) or display board. Use the block time for events where the rider passes the
finish photocell before he reaches the finish.
Menu 41:
BLOCK TIME 1 = 000.00
Input the block time
Save with:
ENTER
Save and exit with <ENTER>
Pre adjusted value:
no block time is pre adjusted!
Block Time 2:
Menu 42
BLOCK TIME 2 = 000.00
As long as the block time is running, it will take every impulse of the finish photocell as a not valid
impulse. This time will be printed only as time of day with a question mark. The time will not be
stopped on the display (7) or display board. Use the block time for events where the rider passes the
finish photocell before he reaches the finish. Block Time 2 is only for the second stage.
Menu 42:
BLOCK TIME 1 = 000.00
Input the block time
Save with:
ENTER
Save and exit with <ENTER>
Pre adjusted value:
Version: 021206
no block time is pre adjusted!
Page 57
TdC 8000
T I M I N G
Count Down Time 1:
Menu 43:
Page 58
COUNT DOWN TIME 1 = 00:01:00.00
You can input the countdown time for carving or show jumping. The time is adjustable between 0 and
23:59:59.99 for carving and 0 and 6399.99 seconds for show jumping.
Menu 43:
Count Down Time 1 = 00:01:00.00
input the countdown time
Save with:
ENTER
Confirm with <ENTER>
Pre adjusted value: Count Down Time 1 = 00:01:00.00 (Carving)
Pre adjusted value: Count Down Time 1 = 60 seconds (Show Jumping)
Count Down Time 2:
Menu 44:
COUNT DOWN TIME 2 = 00:01:00.00
You can input the countdown time for the second stage of show jumping. The time is adjustable
between 0 and 6399.99 seconds.
Menu 44:
Count Down Time 2 = 000030.00
input the countdown time
Save with:
ENTER
Confirm with <ENTER>
Pre adjusted value: Count Down Time 2 = 30 seconds (Show Jumping)
Countdown for Display Board
Menu 45
D-BOARD COUNT DOWN = ON
You can switch off the countdown for the display board. All other functions of the countdown work, if
the countdown for the display board is off.
Menu 45:
D-Board Count Down
Save with:
ENTER
Pre adjusted value:
Version: 021206
ON<
OFF
output on display board
no output on display board
Save and exit with <ENTER>
D-Board Count Down = on
Page 58
TdC 8000
T I M I N G
6.
Page 59
PROGRAMS
The TdC 8000 has a very flexible software that suits for most timing problems.
To can select between the programs when you turn the TdC 8000 on. After about 5 seconds it shows
the program that you used last time. Press <ENTER>, if you want to select this program.
Use the cursor keys (¢ and £) to select another program. When it shows the correct program in the
info-display (6) press <ENTER>.
You can also input the program number direct with the finish keyboard (15). Confirm the number with
<ENTER>.
You can select the following programs:
Programm
Split
Split Sequential
Parallel Diff
Parallel Net
Dual Timer
Speed
Speed Skiing
Carving
10-Channel-Timer
10-Channel-Timer 1
10-Channel-Timer 2
Show Jumping
Table A 1
Table A 2
Table AM 3
Table AM 4
Table AM 5
Table AM 6
Table AM 7
Table AM 8
Table C
Two Stage Jumping
American Stage F
American Stage / Time
Standard / Time
Cycling
Cycle-Road
Agility
Examine
TdC Test
Version: 021206
Prog. No. Page
Program 1
60
Program 3
63
Program 4
66
Program 5
70
Program 6
76
Program 7
80
Program 8
83
Program 9
85
Program 10 88
Program 101 88
Program 102 91
Program 11 94
Program 111 94
Program 112 94
Program 113 94
Program 114 94
Program 115 94
Program 116 94
Program 117 94
Program 118 94
Program 120 94
Program 121 94
Program 122 94
Program 123 94
Program 124 94
Program 13 95
Program 131 95
Program 14 98
Program 141 98
Program 15 98
Page 59
T I M I N G
Version: 021206
TdC 8000
Page 60
Page 60
TdC 8000
T I M I N G
-
Page 61
Synchronize the TdC 8000 (with time of day and other timing devices)
press <F1> if the finish display (7) shows the correct time of day
- wait until TdC 8000 gives at the next full minute the synchronize signal to external
devices (you are now ready for timing)
press <F2> if the finish display (7) shows the wrong time of day
- input the time of day, confirm it with <ENTER> and make a start signal (channel 0 or
press <START>
Race operation:
-
Switch (1) in upper position
Input the start number for the start with start keyboard (9) (#1)
Press <ENTER>
The start-display (2) must show the correct start number (and group)
Input the start number for the finish with finish keyboard (15) (#1)
Press <ENTER>
The finish-display (8) must show the correct start number (and group)
Start number 1 starts
Display (7) shows the running time of start number 1
The start display (2) changes automatically to the next free start number 2
Start number 2 starts
The start display (2) changes automatically to the next free start number 3
Start number 1 goes through the finish
The finish display (7) shows the run time of start number 1
Start number 3 start
The start display (2) changes automatically to the next free start number 4
Press <ENTER> of the finish keyboard (15)
Display (7) shows the running time and display (8) the start number 2
Start number 2 goes through the finish
The finish display (7) shows the run time of #2
etc.
Timing Channels: c0
c1
c2
c3
c4
=
=
=
=
=
start channel
c5
finish channel
c6
intermediate time channel c7
intermediate time channel c8
intermediate time channel c9
ALGE adjustment for the main menu:
Menu 1: Delay Time Start
=
1.00 s
Menu 2: Delay Time Finish
=
0.30 s
Menu 3: Seconds Mode
=
OFF
Menu 4: Display Time1
=
03 s
Menu 5: Display Time 2
=
03 s
Menu 6: Display Thousandth =
OFF
Menu 7: Info-Display
=
START
Menu 8: Running Time
=
RUN
Menu 9: Running Tenth
=
OFF
Menu 10: Intermediate Rank
=
ON
Menu 11: Finish Rank
=
ON
Menu 12: STNO Automatic
=
OFF
Menu 13. Automatic Time = 00:00:00.00
Version: 021206
Menu 14:
Menu 15:
Menu 16:
Menu 17:
Menu 18:
Menu 19:
Menu 20:
Menu 21:
Menu 22:
Menu 23:
Menu 24:
Menu 25:
Menu 26:
=
=
=
=
=
intermediate time channel
intermediate time channel
intermediate time channel
intermediate time channel
intermediate time channel
Print Start Time
Print Menus
Print Linefeeds
RS-232 Baudrate
RS-232 Run time
RS-232 Baud rate
D-Board Channel 2
Beep
Handicap time =
Groups
Change Run
Change Race
D-Board-Test
=
=
OFF
ON
=
0
=
9600 Bd
=
OFF
=
2400
= RUNNING
=
ON
00:00:00.00
=
OFF
Page 61
TdC 8000
T I M I N G
Printer:
Page 62
Printing example
Heat 1:
0001
ST
FT
RT
10:05:58.9904
10:07:20.2344
1:21.24
start time
finish time
run time
10:07:01.4855
10:08:22.3855
1:20.90
1:21.24
2:42.14
start time
finish time
run time
memory time
total time
Heat 2:
0001 ST
FT
RT
MT
TT
Display Board GAZ4:
You can show the net time (running time) on one and the start number and rank on another display
board. The display board shows always the actual start number that is shown in the finish display (8)
(on the display board you can show the start number only with three digit and the rank with two digit).
In the main menu (see chapter 5, menu 20) it is possible to activate display board channel 2 . If you
activate channel 2 it shows only the run times on the display board.
Start number / Rank:
thumb wheel switch
on 0
toggle switch
upper position
thumb wheel switch
on 0
toggle switch
middle position
Time:
RS 232 interface:
Version: 021206
see chapter 8.2
Page 62
T I M I N G
6.3.
TdC 8000
Page 63
Split-Sequential
Program 3
Net timing and lap timing for events with single starts, or mass start. You can have as many
competitors on the course as you want. This program is used e.g. for relay in Nordic Skiing. You can
use a start channel, an intermediate channel, and up to 8 intermediate channels.
If you select the Split-Sequential program you must input the amount of laps prior to the race. The
time stops for each a competitor on the display and display board for the adjusted display time 1 and
starts then to run again.
You can make up to 256 heats with this program. If you start a new heat, it takes the total times of
the previous heats.
You can adjust, if you want to start the time in the second heat (or higher) from zero, or as total time.
The Split-Sequential program has no Group-Function!
Adjustment:
- Switch TdC 8000 on (switch 26)
- Select program 3 SPLIT-SEQU. with cursor key (¢ and £)
- Press <ENTER>
- Select race that you want to use and clear memory (e.g. <F1> for race 1)
- Press <ENTER>
- Select race (e.g. <F1> for race 1)
- Press <ENTER>
- Input the amount of laps, e.g. 3, and confirm it with <ENTER>.
- Select precision (e.g. <F3> for 1/10 precision)
- Press <ENTER>
- Select the timing mode (e.g. <F2> for difference timing
- Press <ENTER>
- Select start mode (e.g. <F2> for mass start
- Press <ENTER>
- Synchronize the TdC 8000 (with time of day and other timing devices)
press <F1> if the finish display (7) shows the correct time of day
- wait until TdC 8000 gives at the next full minute the synchronize signal to external
devices (you are now ready for timing)
press <F2> if the finish display (7) shows the wrong time of day
- input the time of day, confirm it with <ENTER> and make a start signal (channel 0 or
press <START>
Race operation e.g. with mass start and three laps:
- Switch (1) in upper position
- For mass start you do not have to input the start number for the start.
- The start display (2) shows "1" in the group field.
- Input the start number for the finish with finish keyboard (15) (e.g. #1)
- Press <ENTER>
- The display (8) must show the correct start number and the display (7) must show the time zero.
- You get a start impulse that starts all competitors (mass start).
- Display (2) shows now 1u (u = used, which means that the start is done).
- Display (7) shows the running time, and display (8) shows start number 1 and at the group
position 1 for first lap.
- Start number 1 goes the first time through the finish.
- The finish display (7) shows the run time of start number 1 for a few seconds (depending on the
adjusted display time 1 in menu 4), then it shows again the running time. Display (8) shows still
start number 1, but the lap counts up to 2.
- etc.
- Start number 1 goes the second time through the finish.
Version: 021206
Page 63
TdC 8000
T I M I N G
Page 64
-
The finish display (7) shows the run time of start number 1 for a few seconds (depending on the
adjusted display time 1 in menu 4), then it shows again the running time. Display (8) shows still
start number 1, but the lap counts up to 3.
- etc.
- Start number 1 goes the third time through the finish.
- The finish display (7) shows the run time. Display (8) shows still start number 1, and lap 3.
- etc.
Lap Time Correction:
You cannot correct a lap time direct. A lap time will be corrected, when you correct a time of day of
channel 0 or 1, or a run time.
Timing Channels:
c0 = start channel
c8 = intermediate time
c7 = intermediate time
c2 = intermediate time
c1 = finish channel
c9 = intermediate time
ALGE adjustment for the main menu:
Menu 1: Delay Time Start
=
1.00 s
Menu 2: Delay Time Finish
=
0.30 s
Menu 3: Seconds Mode
=
OFF
Menu 4: Display Time1
=
03 s
Menu 5: Display Time 2
=
03 s
Menu 6: Display Thousandth =
OFF
Menu 7: Info-Display
=
START
Menu 8: Running Time
=
RUN
Menu 9: Running Tenth
=
OFF
Menu 10: Intermediate Rank
=
ON
Menu 11: Finish Rank
=
ON
Menu 12: STNO Automatic
=
OFF
Menu 13. Automatic Time
=
00:00:00.00
Printer: Printing example
Heat 1:
0001 ST
10:00:00.0000
FT
10:10:20.2341
RT
10:20.2
1 SQ
10:20.2
c4 = intermediate time
c3= intermediate time
Menu 14:
Menu 15:
Menu 16:
Menu 17:
Menu 18:
Menu 19:
Menu 20:
Menu 21:
Menu 22:
Menu 23:
Menu 24:
Menu 25:
Menu 26:
c6 = intermediate time
c5 = intermediate time
Print Start Time
Print Menus
Print Linefeeds
RS-232 Baudrate
RS-232 Run time
RS-232 Baud rate
D-Board Channel 2
Beep
Handicap time =
Groups
Change Run
Change Race
D-Board-Test
=
OFF
=
ON
=
0
=
9600 Bd
=
OFF
=
2400
= RUNNING
=
ON
00:00:00.00
=
OFF
Start Time
Finish Time
Run Time
Lap Time of the 1st Lap (same as run time for the 1st lap)
0001 ST
FT
RT
2 SQ
10:00:00.0000
10:20:39.3340
20:39.3
10:19.1
Start Time
Finish Time
Run Time
Lap Time of the 2nd Lap
Heat 2:
0001 ST
FT
RT
1 SQ
MT
TT
14:00:00.0000
14:11:20.5410
11:20.5
11:20.5
20:39.3
31:59.8
Start Time
Finish Time
Run Time
Lap Time of the 1st Lap (same as run time for the 1st lap)
Memory Time (of the 1st heat)
Total Time (time of the 1st heat plus run time of the 2nd heat)
0001 ST
FT
RT
2 SQ
MT
TT
14:00:00.0000
14:22:00.4011
22:00.4
10:49.9
20:39.3
42:39.7
Start Time
Finish Time
Run Time
Lap Time of lap 2
Memory Time (of the 1st heat)
Total Time (run time of heat 1 plus heat 2)
Version: 021206
Page 64
TdC 8000
T I M I N G
Page 65
Display Board GAZ4:
You can show on different display boards:
start number and rank, running time and run time, and lap time (sequential time)
In the main menu (menu 20, see page 51) it is possible to activate display board channel 2 . If you
activate channel 2 it shows only the run times, but not the running time on the display board.
start number / rank:
thumb wheel switch
on 0
toggle switch
upper position
thumb wheel switch
on 0
toggle switch
middle position
thumb wheel switch
on 1
toggle switch
middle position
time:
lap time (sequential):
RS 232 interface:
see chapter 8.2
Output of all time of day, like for the SPLIT program. If you want the output of the calculated times as
well you have to select it in the Menu " RS232 Run Time = on"
Version: 021206
Page 65
T I M I N G
TdC 8000
6.2.
Parallel Slalom
6.2.1.
Parallel Diff. (Parallel Slalom with Finish-Difference-Time)
-
Page 66
Program 4
Each competitor pair gets a run number (counts automatic up from 1 to 9999).
In the finish you need two photocells, one for the red course, one for the blue.
The first photocell impulse starts the timing, the second stops the time.
The display (7) shows the finish difference time and the winner course (b = blue, r = red).
A cable from the start to the finish is for this timing mode not necessary.
Connect the photocell of the red course on channel 1 (cable 001-10 on socket 19 or 20).
Connect the photocell of the blue course on channel 4 (cable 001-10 on socket 21).
Adjustment:
- Switch TdC 8000 on (switch 26)
- Select program PARALLEL SLALOM WITH FINISH-DIFFERENCE-TIME with cursor key
(¢ and £)
- Press <ENTER>
- Select race that you want to use and clear memory (e.g. <F1> for race 1)
- Press <ENTER>
- Select race (e.g. <F1> for race 1)
- Press <ENTER>
- Synchronize the TdC 8000 (with time of day and other timing devices)
Press <F1> if the finish display (7) shows the correct time of day
- Wait until TdC gives at the next full minute the synchronize signal to external devices
- The TdC 8000 is now ready for timing
Press <F2> if the finish display (7) shows the wrong time of day
- Input the time of day with the finish keyboard (15), and confirm it with <ENTER>
- Start the clock with a start signal (channel 0 or press <START> key)
- The TdC 8000 is now ready for timing
Race operation:
- Switch (1) in upper position.
- Display (2) and (8) show automatically run number 1.
- If you want to input another run number input it with keyboard (9) or (15) and confirm it with
<ENTER>.
- Display (2) and (8) must show the correct run number
.- Display (7) shows the time 0:000
- Press <ALT> and <MENU> together to get into the main menu.
Version: 021206
Page 66
T I M I N G
-
-
TdC 8000
Page 67
Input 28 with finish keyboard (15).
It shows now menu 28 and you can check the penalty time.
If the penalty time is correct, press <ALT> and <MENU> together to leave the main menu.
If the penalty time is not correct press <YES>
- Input the penalty time with the finish keyboard (15).
Confirm the penalty time with <ENTER>
Leave the main menu by pressing <ALT> and <MENU> together.
The TdC 8000 is not connected to the start and therefore does not get a start signal.
Display (7) shows the running finish-difference-time and the identification of the winning course,
when the first competitor goes through the finish.
Display (7) shows the finish-difference-time and the identification of the winning course.
Press <ENTER> to increase the run number for the next race.
Display (2) and (8) must show the next run number.
Display (7) shows the time 0:000
etc.
Penalty Time:
The penalty time is used as finish difference time, if somebody fails to finish the first heat. If you want
to work without penalty time input 0.000 as penalty time.
If one competitor comes through the finish it shows the running time in the display (7) and on the
display board until the second competitor comes through the finish. If the second competitor does not
reach the finish or reaches the finish after the penalty time is over, it shows on the display (7) and
display board the penalty time. It marks the penalty time on the printer with "P".
You can input the penalty time in the main menu in menu 28 (see page 54).
Clear Finish Times:
If you press the key <CLEAR> of the start keyboard (9) or finish keyboard (15), it clears
the finish impulses. I clears the finish impulse of the red and blue course, if both finished
before you press <CLEAR>.
Deactivate the Impulse Channels (<BLOCK>):
You can deactivate each course separate.
If you press <BLOCK> of the start keyboard (9), it prints the time of the blue course (c4)
as a non valid time.
If you press <BLOCK> of the finish keyboard (15), it prints the time of the red course (c1) as a non
valid time.
If you press <ALT> and <BLOCK> at the same time, it does not take the time of that impulse.
Timing Channels:
c0 = no function
c2 = no function
c4 = finish channel blue
c1 = finish channel red
c3 = no function
c5 = no function
c6 = no function
c7= no function
ALGE adjustment for the main
Menu 2: Delay Time Finish
Menu 3: Seconds Mode
Menu 4: Display Time1
Menu 9: Running Tenth
Menu 12: STNO Automatic
Menu 13. Automatic Time
Menu 15: Print Menus
Menu 16: Print Linefeeds
Menu 17: RS-232 Baudrate
RS-232 Run time =
OFF
RS-232 Baud rate =
2400
D-Board Channel 2 = RUNNING
Beep
=
ON
Change Race
D-Board-Test
ID channel = b (blue)
Penalty Time
=
OFF
menu:
=
0.30 s
=
OFF
=
03 s
=
OFF
=
OFF
=
00:00:00.00
=
ON
=
0
=
9600 Bd
Menu 18:
Menu 19:
Menu 20:
Menu 21:
Menu 25:
Menu 26:
Menu 27:
Menu 28:
c8 = no function
c9 = no function
Display:
- Display (2) and (8) shows the run number.
- Display (7) shows the finish difference time and winners course
- The Info-Display (6) has no function for the parallel slalom timing.
Version: 021206
Page 67
TdC 8000
T I M I N G
Printer:
0001
0002
P0003
?0003
0004
c0004
Page 68
Printing example
r
b
b
C1
r
r
- 1.231
- 0.429
- 1.500
10:15:34.2373
- 0.217
- 0.217
run number 1:
red course wins with 1.231 sec. advance
run number 2:
blue course wins with 0.429 sec. advance
run number 3:
blue course wins with 1.500 sec. advance
run number 3:
not valid impulse
run number 4:
red course wins with 0.217 sec. advance
run number 4 is cleared
Photocells for the Finish:
- Connect the photocell for the red course at the TdC 8000:
For cable 001-10, 001-20, or 001-30 use socket A´(19) or A (20).
If you have an external supply for the photocell, it is possible to use a 2-wire cable. Connect this
cable at channel c1 (27).
- Connect the photocell for the blue course at the TdC 8000:
For cable 001-10, 001-20, or 001-30 use socket B (21).
If you have an external supply for the photocell, it is possible to use a 2-wire cable. Connect this
cable at channel c4 (27).
Display Board GAZ4:
You can show the finish-difference-time and the winner course on a display board (b= blue, r=red).
In the main menu (menu 27, see on page 53) you can adjust, if it should show for the winner course
red (r) and blue (b), or right (r) and left (L).
In the main menu (menu 20, see chapter 5) it is possible to activate display board channel 2. If you
activate channel 2 it shows only the run times on the display board.
Transfer Format: 1 start bit, 8 data bit, no parity bit, 1 stop bit
Transfer Speed:
2.400 Baud
Transfer Protocol: ASCII
NNNPxxxxxxxxx:Sz:ht(CR)
NNNPxxxxxxxbS:Sxxxx(CR)
NNNPxxxxxxx§S:Sxxxx(CR)
NNNPxxxxxxx$S:Sxxxx(CR)
NNNPxxxxxxxbS:Szxxx(CR)
NNNPxxxxxxx§S:Szxxx(CR)
NNNPxxxxxxx$S:Szxxx(CR)
NNNPxxxxxxxbS:Sz ht(CR)
NNNPxxxxxxx§S:Sz ht(CR)
NNNPxxxxxxx$S:Sz ht(CR)
Version: 021206
standing time before a runner reaches the finish
running finish difference time (blue course wins, without 1/10)
running finish difference time (r course wins, without 1/10)
running finish difference time (left course wins, without 1/10)
running finish difference time (blue course wins, with 1/10)
running finish difference time (r course wins, with 1/10)
running finish difference time (left course wins, with 1/10)
finish difference time (blue course wins)
finish difference time (r course wins)
finish difference time (left course wins)
Page 68
TdC 8000
T I M I N G
x
NNN
P
§
$
b
S
z
h
t
(CR)
Page 69
blank
run number
identification for parallel slalom
r (red/right) course (0A Hex.; always character 12)
L (left) course (0C Hex.; always character 12)
b (blue) course (always character 12)
seconds (on ten digit it does not show a zero)
1/10 seconds
1/100 seconds
1/1000 seconds
Carriage Return
Output through the RS 232c interface:
Transfer Format: 1 start bit, 8 data bit, no parity bit, 1 stop bit
Transfer Speed:
9.600 Baud pre adjusted (adjustable: 2400, 4800, 9600)
Transfer Protocol: ASCII
xNNNNxC4xxHH:MM:SS.zhtqxxxxxxxx(CR)
xNNNNxC1xxHH:MM:SS.zhtqxxxxxxxx(CR)
?NNNNxC4xxHH:MM:SS.zhtqxxxxxxxx(CR)
?NNNNxC1xxHH:MM:SS.zhtqxxxxxxxx(CR)
cNNNNxC4xxHH:MM:SS.zhtqxxxxxxxx(CR)
cNNNNxC1xxHH:MM:SS.zhtqxxxxxxxx(CR)
The following string will be only sent if you have the following setting in the main menu:
Menu 18: RS 232 run time = on
xNNNNxrxxxHH:MM:SS.zht(CR)
xNNNNxbxxxHH:MM:SS.zht(CR)
xNNNNxlxxxHH:MM:SS.zht(CR)
cNNNNxrxxxHH:MM:SS.zht(CR)
cNNNNxbxxxHH:MM:SS.zht(CR)
cNNNNxlxxxHH:MM:SS.zht(CR)
x
blank
NNNN
run number
c1
C1M
C4
C0M
r
b
l
HH:MM:SS.zht
HH:MM:SS.zhtq
?
c
(CR)
Version: 021206
channel 1 (red course)
channel 1 (red course, manual finish impulse from key <STOP>)
channel 4 (blue course)
channel 0 (blue course, manual finish impulse from key <START>
red/right course
blue course
left course
time in hours, minutes, seconds and 1/1000 seconds
time in hours, minutes, seconds and 1/10000 seconds
not valid time
time with key <CLEAR> cleared
carriage return
Page 69
T I M I N G
6.4.2.
TdC 8000
Page 70
Parallel Net (Parallel Slalom with Finish Difference Time and Net Time)
Program 5
Parallelslalom with the possibility to measure the run times and difference time. It is possible to
measure both runs. In this case you will get the run times, total times, the difference time of the run,
and the total difference time.
Adjustment:
- Switch TdC 8000 on (switch 26)
- Select program PARALLEL NET with cursor key ($&and&%)
- Press <ENTER>
- Select race that you want to use and clear memory (e.g. <F1> for race 1)
- Press <ENTER>
- Select race (e.g. <F1> for race 1)
- Press <ENTER>
- Select precision (e.g. <F4> for 1/1000 precision)
- Press <ENTER>
- Synchronize the TdC 8000 (with time of day and other timing devices)
Press <F1> if the finish display (7) shows the correct time of day
- Wait until TdC gives at the next full minute the synchronize signal to external devices
- The TdC 8000 is now ready for timing
Press <F2> if the finish display (7) shows the wrong time of day
- Input the time of day with the finish keyboard (15), and confirm it with <ENTER>
- Start the clock with a start signal (channel 0 or press <START> key)
The TdC 8000 is now ready for timing
Version: 021206
Page 70
T I M I N G
TdC 8000
Page 71
Race operation:
- Input start number for the blue (left) course with keyboard (9), e.g. StNo. 1.
- Press <ENTER>.
- Display (2) must show the start number of the blue (left) course.
- Input start number for the red (right) course with keyboard (15), e.g. StNo. 2.
- Press <ENTER>.
- Display (8) must show the start number of the red (right) course.
- The Info-Display (6) shows the start number and time of the blue (left) and red (right) course.
- Start the first pair of competitors (channel c0 or c1, the start key does not work).
- Display (2) and (8) shows the start number and "u" (= used).
- The info display (6) shows the start number of the blue (left) and red (right) course as well as the
running times.
- Finish impulse for start number 1.
- Finish impulse for start number 2.
- The info-display (6) shows the start number and run time of the blue (left) and red (right) course, as
well as the difference time next to the winners time.
- You can input the start numbers of the next competitors as before.
- etc.
Race operation for the 2nd heat:
Change Race:
- All races for the 1st heat must be finished.
- Press <ALT> and <MENU> at the same time.
- Input number 23 with finish keyboard (15).
- The info-display (6) shows now "CHANGE HEAT".
- Press <YES> to confirm.
- Press <F2> to select the next heat.
- Press <ENTER> to confirm, now it changes to the new heat.
In the 2nd heat you have the same start numbers competing each other, but they change the course.
The racer that had in the first heat the red course takes for the 2nd heat the blue course, and the
vice versa.
If you input a start number for the correct slope it shows you automatically the right second start
number.
Make sure that you have set menu 8 on "RUNNING TIME = RUN".
-
Input start number for the blue (left) course with keyboard (9), e.g. StNo. 2.
Press <ENTER>.
It shows the correct start number for the red (right) course automatically, e.g. StNo. 1.
Display (2) shows the start number of the blue (left) course.
Display (8) shows the start number of the red (right) course.
The Info-Display (6) shows the start number and time of the blue (left) and red (right) course.
Nest to the winner of the first heat it shows the difference time form the first heat.
Start the first pair of competitors (channel c0 or c1, the start key does not work).
Display (2) and (8) shows the start number and "u" (= used).
The info display (6) shows the start number of the blue (left) and red (right) course as well as the
running times.
Finish impulse for start number 1.
Finish impulse for start number 2.
The info-display (6) shows the start number and run time of the blue (left) and red (right) course, as
well as the difference time next to the winners time.
When the display time 1 finish it shows the total time of each competitor and the total difference
time.
You can input the start numbers of the next competitors as before.
etc.
Version: 021206
Page 71
TdC 8000
T I M I N G
Page 72
Further Laps:
Each time when a competitor meets another competitor it is considered as a new lap.
This means in the fist lap e.g. number 1 meets number 8, and number 5 meets
number 4. After the second heat reaches the competitor with the faster total run time
the next lap.
Before you start a new lap, it is necessary to confirm it with the TdC 8000. Change
to menu 24 and confirm "CHANGE HEAT" and "NEXT".
Key Functions:
clear finish time:
recall finish time:
not valid finish times:
ignore finish times:
no function
no function
no function
no function
no function
change between run time and total time
no function
blue (left)
red (right)
(keyboard 9 or 14) (keyboard 15 or 14)
CLEAR
CLEAR
ALT + CLEAR
ALT + CLEAR
BLOCK
BLOCK
ALT + BLOCK
ALT + BLOCK
INPUT
INPUT
MENU + INPUT
MENU + INPUT
F1
F1
F2
F2
F3
F3
F4
CLASS.
CLASS.
Penalty Time:
The penalty time is used as finish difference time, if somebody fails to finish the first heat. If you want
to work without penalty time input 0.000 as penalty time.
If one competitor comes through the finish the difference time starts to run, until the second
competitor comes through the finish. If the second competitor does not reach the finish or reaches
the finish after the penalty time is over, it shows on the display (7) and on the display board the
penalty time. It marks the penalty time on the printer with "P".
You can input the penalty time in the main menu in menu 28 (see page 54).
Clear Finish Times:
Each course has a <CLEAR> key.
<CLEAR> from keyboard (9) blue (left) course
<CLEAR> from keyboard (15)
red (right) course
With <CLEAR> you clear the last impulse of the time of appropriate course. This means if you press
<CLEAR> after the start, it will set the time back to zero. If you press <CLEAR> after the racer
reaches the finish, it will show the running time again. If you press again <CLEAR> it will clear also
the start time.
By pressing <ALT> and <CLEAR> it makes the last cleared time valued.
If you use a penalty time (menu 28) it shows you automatically after clearing a finish time a new time
calculated with the penalty time (when the other course has already a finish time).
Block Finish Times:
You can block the finish time of each course separate.
If you press <BLOCK> of keyboard (9) it prints the finish time (c1) of the blue (left) course as a not
valid time with a question-mark ("?").
If you press <BLOCK> of keyboard (15) it prints the finish time (c4) of the red (right) course as a not
valid time with a question-mark ("?").
If you press <ALT> and <BLOCK> together, it will not take the finish impulse of the course at all.
Changing Times:
<INPUT> has no function!
Classement:
<CLASS> has no function!
Version: 021206
Page 72
TdC 8000
T I M I N G
Page 73
Course Identification:
It identifies the courses with b (= blue) and r (= red), or l (= left) and r (= right). You can select in the
main menu if you want the identification b or L (Menu 27: ID CHANNEL 4).
Photocells for the Finish:
- the red (right) course must be connected with channel 1 (cable 001-10 at socket 20)
- the blue (left) course must be connected with channel 4 (cable 001-10 at socket 21)
Photocells for the First Intermediate Time:
- the red (right) course must be connected with channel 2.
- the blue (left) course must be connected with channel 5.
Photocells for the Second Intermediate Time:
- the red (right) course must be connected with channel 6.
- the blue (left) course must be connected with channel 7.
Photocells for the Third Intermediate Time:
- the red (right) course must be connected with channel 8.
- the blue (left) course must be connected with channel 9.
Timing Channels:
c0 = Start (= C3)
c1 = Finish, red
c2 = Intermed. 1 red c4 = Finish, blue
c6 = Intermed. 2 red c8 = Intermed. 3 red
c3= Start (= C0)
c5 = Intermed. 1 blue c7= Intermed. 2 blue c9 = Intermed. 3 blue
ALGE adjustments for the main menu:
Menu 1: Delay Time Start =
1.00 s
Menu 2: Delay Time Finish =
0.30 s
Menu 3: Seconds Mode
=
OFF
Menu 4: Display Time1
=
03 s
Menu 5: Display Time 2
=
03 s
Menu 8: Running Time
=
RUN
Menu 9: Running Tenth
=
OFF
Menu 14: Print Start Time
=
OFF
Menu 15: Print Menus
=
ON
Menu 16: Print Linefeeds
=
0
Menu 17:
Menu 18:
Menu 19:
Menu 20:
Menu 21:
Menu 24:
Menu 25:
Menu 26:
Menu 27:
Menu 28:
RS-232 Baudrate =
9600 Bd
RS-232 Run time =
OFF
RS-232 Baud rate =
2400
D-Board Channel 2 = RUNNING
Beep
=
ON
Change Run
Change Race
D-Board-Test
ID channel = b (blue)
Penalty Time = off
Display (2):
Shows the start number of the blue (left) course. Additional it shows the position of switch (1) and the
condition of the competitor (no identification = not started, "u" = used or started, r = run time,
t = total time (only in the 2nd heat)).
Display (8):
Shows the start number of the red (right) course. Additional it shows the position of switch (1) and the
condition of the competitor (no identification = not started, "u" = used or started, r = run time,
t = total time (only in the 2nd heat)).
Info-Display (6):
The info-display shows the actual start numbers and the times. After the racer finish their race it
shows as well the difference time.
0001 b
0002 r
0:00.000
0:00.000
before the start:
StNo, course (b = blue, r= red), time
0001 b
0002 r
0:03
0:03
after the start:
StNo, course (b = blue, r= red), running
time
Version: 021206
Page 73
TdC 8000
T I M I N G
Page 74
0001 b RT
0002 r RT
0:44.206
0:44.160
0002 b
0001 r
0:00.000
0:00.000
-0.046
Before the start (2nd heat):
StNo, course, RT, run time, difference time
0002 b RT
0001 r RT
0:44.298
0:44.323
-0.025
Before the start of the 2nd heat:
StNo, course , time, advantage from run 1
0002 b TT
0001 r TT
1:28.458
1:28.529
-0.071
-0.046
After the finish (1st heat):
StNo, course, RT, run time, difference time
After the finish (2nd heat):
StNo, course, RT, run time•, difference
time run
You can switch with <F4> between run time and total time in the 2nd heat after a racer reached the
finish and the end of the display time.
Printer: Printing examples
1st heat:
0002 r
ST
FT
RT
0001 b ST
FT
RT
0002 r DTR
10:00:00.1213
10:00:44.2813
0:44.160
10:00:00.1213
10:00:44.3274
0:44.206
- 0.046
start time, red course, StNo 2
finish time, red course, StNo2
run time, red course, StNo2
start time, blue course, StNo1
finish time, blue course, StNo1
run time, blue course, StNo1
difference time of the run, advantage of red course (StNo. 2)
10:30:10.0014
10:30:54.2992
0:44.298
0:44.160
1:28.458
10:30:10.0014
10:30:54.3345
0:44.323
0:44.206
1:28.529
- 0.025
- 0.071
start time, blue course, StNo 2
finish time, blue course, StNo2
run time, blue course, StNo2
memory time, blue course, StNo 2
total time, blue course, StNo 2
start time, red course, StNo1
finish time, red course, StNo1
run time, red course, StNo1
memory time, red course, StNo 1
total time, red course, StNo 1
difference time of the run, advantage of blue course (StNo 2)
total difference time, advantage of blue course (StNo 2)
2nd heat:
0002 b ST
FT
RT
MT
TT
0001 r ST
FT
RT
MT
TT
0002 b DTR
0002 b DTT
Display Board GAZ4:
Difference Time (Run and Total):
It shows the course identification b (= blue or L = left) or r (= red or right) on the first digit of a six digit
ALGE display board. Then it shows the time in 1/1000 of seconds.
The course identification you can set in menu 27.
Menu 27: ID channel 4 = b
Version: 021206
red course
right course
blue course
left course
Menu 28: ID Channel 4 = L
Page 74
TdC 8000
T I M I N G
Page 75
Run time / Total time:
Each course needs a separate display board. Each board shows the time in minutes, seconds, and
1/100 seconds.
red (right) course
blue (left) course
Start Number:
Each course needs a separate display board. It shows the start number on three digits.
red (right) course
blue (left) course
RS 232c Interface (23):
Transfer Format:
1 Start Bit, 8 Data-Bit, no Parity-Bit, 1 Stop Bit
Transfer Speed:
9.600 Baud pre adjusted (adjustable: 2400, 4800, 9600)
Transfer Protocol: ASCII
xNNNNiCCxxHH:MM:SS.zhtqx##(CR)
Parallelslalom, Intermediate Time or Finish Time
xNNNNiRTxxHH:MM:SS.zhtqx##(CR)
Parallelslalom, Run Time
xNNNNiDTRxHH:MM:SS.zhtxx##(CR)
Parallelslalom, Difference Time of Run
xNNNNiTTxxHH:MM:SS.zhtqx##(CR)
Parallelslalom, Total Time
xNNNNiDTTxHH:MM:SS.zhtxx##(CR)
Parallelslalom, Total Difference Time
pNNNNiCCxxHH:MM:SS.zhtqx##(CR)
Parallelslalom, Finish Time calculated fr. Penalty Time
pNNNNiRTxxHH:MM:SS.zhtqx##(CR)
Parallelslalom, Run Time calculated from Penalty Time
pNNNNiTTxxHH:MM:SS.zhtqx##(CR)
Parallelslalom, Total Time calculated from Penalty Time
x
NNNN
i
CC
RT
DTR
DTT
HH:MM:SS.zht
HH:MM:SS:zhtq
##
(CR)
blank
start number (4-digit)
r (= red/right), b (= blue) or l (left) course
timing channel
run time
difference time of run
total difference time
time in hours, minutes, seconds, and 1/1000 seconds
time in hours, minutes, seconds, and 1/10.000 seconds
continuous number for each lap
Carriage Return
The following characters could be the first digit:
?
time without valid start number
c
cleared time (with <CLEAR>
p
calculated time from Penalty Time
RS 485 Interface: no function
Version: 021206
Page 75
T I M I N G
6.5.
TdC 8000
Page 76
Dual Timer
Program 6
Net timing with intermediate times on two courses. Each slope can have one racer on course. You
can select between a common or separate start impulse for both courses.
This program works only for one heat.
Adjustment:
- Switch TdC 8000 on (switch 26)
- Select program DUAL TIMER with cursor key (¢ and £)
- Press <ENTER>
- Select race that you want to use and clear memory (e.g. <F1> for race 1)
- Press <ENTER>
- Select race (e.g. <F1> for race 1)
- Press <ENTER>
- Select precision (e.g. <F3> for 1/100 precision)
- Press <ENTER>
- Press <YES> if you want to input groups for the race, otherwise <NO> or <ENTER>
if you input the groups input always the last start number within a group
confirm each start number with <ENTER>
after the start number of the last group you must press <ENTER> twice
- Synchronize the TdC 8000 (with time of day and other timing devices)
Press <F1> if the finish display (7) shows the correct time of day
- Wait until TdC gives at the next full minute the synchronize signal to external devices
- The TdC 8000 is now ready for timing
Press <F2> if the finish display (7) shows the wrong time of day
- Input the time of day with the finish keyboard (15), and confirm it with <ENTER>
- Start the clock with a start signal (channel 0 or press <START> key)
- The TdC 8000 is now ready for timing
Version: 021206
Page 76
T I M I N G
TdC 8000
Page 77
Race operation during the first run:
- Switch (1) has no function.
- Input start number for the blue (left) course with keyboard (9), e.g. StNo. 1.
- Press <ENTER>.
- Display (2) must show the start number (and group) of the blue (left) course.
- Input start number for the red (right) course with keyboard (15), e.g. StNo. 2.
- Press <ENTER>.
- Display (8) must show the start number (and group) of the red (right) course.
- The Info-Display (6) shows the start number and time of the blue (left) and red (right) course.
- If you press <ALT> and <MENU> together, you can select in Menu 29, if the start is separate for
both courses, or if you have only one start impulse to start both courses
(e.g. Menu 29: Start Channel = separate).
- Start impulse for start number 1.
- Start impulse for start number 2.
- The info-display (6) shows the start number and running time of both courses.
- Finish impulse for start number 1.
- Finish impulse for start number 2.
- The info-display (6) shows the start number and run time of the blue (left) and red (right) course.
- You can input the start numbers of the next competitors as before.
- etc.
Race operation during the second run:
Change Heat:
- All racers must be finished with the first heat.
- Press key <ALT> and <MENU> at the same time.
- Input "23" with the finish keyboard (15).
- Info Display (6) shows now "Change Heat".
- Press key <YES>.
- Press <F2> to select the next heat.
- Press <ENTER> to confirm.
In the second heat you must input always the same pair of competitors, but they must change the
slope.
You cannot input racers that started in the first head on the blue slope for the second head again on
the blue slope. The must start now on the red slope. The same is true for the red course.
-
Input start number for the blue (left) course with keyboard (9), e.g. StNo. 2.
Press <ENTER>.
Display (2) must show the start number (and group) of the blue (left) course.
Input start number for the red (right) course with keyboard (15), e.g. StNo. 1.
Press <ENTER>
Display (8) must show the start number (and group) of the red (right) course.
The Info-Display (6) shows the start number and time of the blue (left) and red (right) course.
Start impulse for start number 1.
Start impulse for start number 2.
The info-display (6) shows the start number and running time of both courses.
Finish impulse for start number 1.
Finish impulse for start number 2.
The info-display (6) shows the start number and run time of the blue (left) and red (right) course
After the end of the display time 1 it shows the total time for both courses..
You can input the start numbers of the next competitors as before.
etc.
Version: 021206
Page 77
T I M I N G
TdC 8000
Page 78
Clear Finish Times:
By pressing <CLEAR> of keyboard (9) it clears the finish impulse of the blue (left) course.
If you press <ALT> and <CLEAR> together it gives you the cleared time back.
By pressing <CLEAR> of keyboard (15) it clears the finish impulse of the red (right) course.
If you press <ALT> and <CLEAR> together it gives you the cleared time back.
Block Finish Times:
You can block the finish time of each course separate.
If you press <BLOCK> of keyboard (9) it prints the finish time (c1) of the blue (left) course
as a not valid time with a question-mark (?).
If you press <BLOCK> of keyboard (15) it prints the finish time (c4) of the red (right) course
as a not valid time with a question-mark (?).
If you press <ALT> and <BLOCK> together, it will not take the finish impulse of the course at all.
Changing Times:
You can copy a time from one start number to another, you can make a not valid time
valid, or you can input a manual time. With the <INPUT> key of the keyboard (9) you
change times of the blue course, with the <INPUT> key of the keyboard (15) you
change times of the red course.
- Change the finish times with <INPUT>.
- Change the start times with <ALT> and <INPUT>.
- Change the run times and intermediate times with <MENU> and <INPUT>.
Classement:
You can print a classement for both courses together, or only for the blue (left) or
red (right) course.
Ranking:
You can make the ranking for both courses together or separate. The adjustment for that features are
in the main menu (menu 30: rank calculation).
Start Channel:
You can use one start channel (c1 or c3) for both courses together (parallel start) or separate c1 for
the red (right) course and c3 for the blue (left) course. The adjustment for that features are in the main
menu (menu 29: start channel).
Course Identification:
You can select if you want as course identification r (= red) and b (= blue) or r (= right) and l (= left).
The adjustment for that features are in the main menu (menu 27: ID channel).
Timing Channels: c0 = Start channel red (right)
c1= Finish channel red (right)
c2 = Intermediate channel 1 red (right)
c3 = Start channel blue (left)
c4 = Finish channel blue (left)
Version: 021206
c5 = Intermediate channel 1 blue (left)
c2 = Intermediate channel 2 red (right)
c7 = Intermediate channel 2 blue (left)
c2 = Intermediate channel 3 red (right)
c9 = Intermediate channel 3 blue (left)
Page 78
TdC 8000
T I M I N G
ALGE adjustment for the main menu:
Menu 1: Delay Time Start
=
1.00 s
Menu 2: Delay Time Finish
=
0.30 s
Menu 3: Seconds Mode
=
OFF
Menu 4: Display Time1
=
03 s
Menu 5: Display Time 2
=
03 s
Menu 8: Running Time
=
RUN
Menu 9: Running Tenth
=
OFF
Menu 10: Intermediate Rank
=
ON
Menu 11: Finish Rank
=
ON
Menu 14: Print Start Time
=
OFF
Menu 15: Print Menus
=
ON
Menu 16: Print Linefeeds
=
0
Menu 17: RS-232 Baudrate
=
9600 Bd
Menu 18:
Menu 19:
Menu 20:
Menu 21:
Menu 22:
Menu 23:
Menu 24:
Menu 25:
Menu 26:
Menu 27:
Menu 29:
Menu 30:
Page 79
RS-232 Run time
RS-232 Baud rate
D-Board Channel 2
Beep
Handicap time
Groups
Change Run
Change Race
D-Board-Test
ID channel
Start Channel
Rank Calculation
=
OFF
=
2400
= RUNNING
=
ON
= 00:00:00.00
=
OFF
=
4
= SEPARATE
= SEPARATE
Printer: Printing example
0001b ST
FT
RT
0002r ST
FT
RT
10:05:58.9901
10:07:20.2342
1:21.24
10:07:01.4851
10:08:22.3854
1:20.90
start time of blue course
finish time of blue course
run time of blue course
start time of red (right) course
finish time of red (right) course
run time of red (right) course
0001l ST
FT
RT
10:05:58.9907
10:07:20.2347
1:21.24
start time of left course (menu 27 set on left)
finish time of left course
run time of left course
Display Board GAZ4:
For each course you need separate display
boards. You can show the both net times on
display boards as well as start number and
rank. You must set code switch of the display
boards for the red (right) course on 1, for the
blue (left) on 2.
In the main menu (menu 20, see chapter 5)
it is possible to activate display board
channel 2 . If you activate channel 2 it shows
only the run times on the display board.
RS 232 Interface:
See chapter 8.2.
Version: 021206
Page 79
T I M I N G
6.6.
TdC 8000
Page 80
Speed
Program 7
You can measure the speed for a selected distance with two photocells (or other impulse devices).
Measuring Unit:
Measuring Distance:
Lowest Speed:
Highest Speed:
Adjustable in km/h (kilometre per second), m/s (meter pro second), or mph
(miles per hour)
Adjustable form 1 to 9999 m (it is always in meter)
Adjustable form 1 to 9999 km/h, m/s, or mph
(depending on the adjusted measuring unit)
Adjustable form 1 to 9999 km/h, m/s, or mph
(depending on the adjusted measuring unit)
Adjustment:
- Switch TdC 8000 on (switch 26)
- Select program 7 "SPEED² with cursor key (¢ and £)
- Press <ENTER>
- Select race that you want to use and clear memory (e.g. <F1> for race 1)
- Press <ENTER>
- Select race (e.g. <F1> for race 1)
- Press <ENTER>
- Press <YES> if you want to input groups for the race, otherwise <NO> or <ENTER>
if you input the groups input always the last start number within a group
confirm each start number with <ENTER>
after the start number of the last group you must press <ENTER> twice
Synchronize the TdC 8000 (with time of day and other timing devices)
press <F1> if the finish display (7) shows the correct time of day
- wait until TdC 8000 gives at the next full minute the synchronize signal to external
devices (you are now ready for timing)
press <F2> if the finish display (7) shows the wrong time of day
- input the time of day, confirm it with <ENTER> and make a start signal (channel 0 or
press <START>
Version: 021206
Page 80
TdC 8000
T I M I N G
Page 81
Race operation:
- Switch (1) in upper position
- Press together <ALT> and <MENU>
- Go into menu 32 (Distance) to adjust the measuring distance (e.g. 10 m)
- Go into menu 33 (Measuring Unit) to select the measuring unit (km/h, m/s, or mph)
- Go into menu 34 (min. Speed) to adjust the lowest speed that you want to measure
- Go into menu 35 (max. Speed) to adjust the highest speed that you want to measure
- Adjust in menu 4 (Display Time 1) the time that the speed is shown if you use "StNo Automatic"
- Turn in menu 12 (StNo Automatic) the Start number Automatic on START or FINISH, if you want to
show the speed only for a limited time.
- Input the start number for the first measurement with keyboard (9) or 15 (e.g. #1)
- Press <ENTER>
- The display (2) and (8) must show the correct start number (and group)
- Display (7) shows 000.00 as speed
- The TdC 8000 receives a impulse form channel C0
- Display (2) shows a r next to the start number; the r indicates an impulse form channel C0
- The TdC 8000 receives a impulse form channel C1
- Display (8) shows a r next to the start number; the r indicates an impulse form channel C1
- Display (7) shows the rank and speed
- If you use the Start number Automatic it will increase automatically the start number, when the
Display Time 1 is over.
Timing Channels:
c0 = speed channel
c1 = speed channel
c2 = no function
c3 = no function
c4 = no function
c5 = no function
ALGE adjustment for the main menu:
Menu 4: Display Time1
=
03 s
Menu 11: Finish Rank
=
ON
Menu 12: STNO Automatic =
OFF
Menu 15: Print Menus
=
ON
Menu 16: Print Linefeeds
=
0
Menu 17: RS-232 Baudrate =
9600 Bd
Menu 18: RS-232 Run time =
OFF
Menu 19: RS-232 Baud rate =
2400
Menu 21: Beep
=
ON
Menu 23:
Menu 25:
Menu 26:
Menu 31:
Menu 32:
Menu 33:
Menu 34:
Menu 35:
c6 = no function
c7 = no function
c8 = no function
c9 = no function
Groups
Change Race
D-Board-Test
Print Times
Distance
Measuring Unit
min. Speed
max. Speed
=
OFF
=
=
=
=
=
OFF
100 m
km/h
10 km/h
200 km/h
Measuring Distance:
You can select the distance of two photocells (or other impulse devices) between 1 and 9999 m. You
must input the measuring distance always in Meter, no matter what measuring unit you use. Adjust
the measuring distance in menu 32.
Measuring Unit:
You can select from the following measuring units: km/h kilometre per hour
mps meter per second
mph miles per hour
You select the measuring unit in menu 33. If you select a new measuring unit, it changes
automatically the minimum and maximum speed to the new unit, and makes the correct speed
adjustment.
Printing Times:
Additional to the speed you can print the time If you select in menu 31 "PRINT TIMES" it will print
you the time of first impulse, the time of second impulse, and the net time.
Attention: the TdC 8000 measures the time with a precision of 1/10,000 sec., although it prints only
the 1/1000th.
Version: 021206
Page 81
TdC 8000
T I M I N G
Page 82
Automatic Speed Measurement:
If you select in menu 12 "StNo Automatic" START or FINISH, it will show every measured speed on
the display (7) and display board for the adjusted "Display Time 1" (menu 4). When the Display Time
is over, it shows on the display (7) zero, and blank on the display board.
If you select menu 12 "StNo Automatic" OFF, it will show every measured speed until the beginning of
the next speed measurement.
Printer: Printing example
Menu 31: Print Times = off:
0001 km/h
0002 km/h
144.23
120.08
first speed measurement
second speed measurement
Menu 31: Print Times = on:
0001 C0
0001 C1
RT
km/h
0002 C0
0002 C1
RT
km/h
13:49:41.8505
13:49:42.1005
0:00.2490
144.23
13:59:45.2415
13:59:45.5416
0:00.1951
120.08
1st photocell impulse
2st photocell impulse
run time from photocell to photocell
first speed measurement
1st photocell impulse
2st photocell impulse
run time from photocell to photocell
second speed measurement
Display Board GAZ4:
You can show the start number and rank, and the speed on different display boards. The display
board shows the start number and rank, that is shown in the finish display (8). The display board
shows only three digits of start number, and two digits of the rank.
start number / rank:
thumb wheel switch
on 0
toggle switch
upper position
thumb wheel switch
on 0
toggle switch
middle position
speed:
RS 232 interface:
Version: 021206
see chapter 8.2
Page 82
T I M I N G
6.7.
TdC 8000
Page 83
Speed Skiing
Program 8
The Speed Skiing program
measures the time and speed for
skiers passing two photocells set
up in a distance of 100 m. The
Speed Skiing program works only
for one heat.
Measuring Distance:
100 m
(fix adjustment)
Speed:
km/h
(fix adjustment)
Timing Channels: C0 Start Channel
C1 Finish Channel
Adjustment:
- Switch TdC 8000 on (switch 26)
- Select program SPEED SKIING with cursor key (¢ and £)
- Press <ENTER>
- Select race that you want to use and clear memory (e.g. <F1> for race 1)
- Press <ENTER>
- Select race (e.g. <F1> for race 1)
- Press <ENTER>
- Press <YES> if you want to input groups for the race, otherwise <NO> or <ENTER>
if you input the groups input always the last start number within a group
confirm each start number with <ENTER>
after the start number of the last group you must press <ENTER> twice
Synchronize the TdC 8000 (with time of day and other timing devices)
press <F1> if the finish display (7) shows the correct time of day
- wait until TdC 8000 gives at the next full minute the synchronize signal to external
devices (you are now ready for timing)
press <F2> if the finish display (7) shows the wrong time of day
- input the time of day, confirm it with <ENTER> and make a start signal (channel 0 or
press <START>
Race operation:
- Switch (1) in upper position
- Press together <ALT> and <MENU>
- Go into Menu 12 (Start Number Automatic) and select START
- Input the start number for the start with start keyboard (9) (#1)
- Press <ENTER>
- The start-display (2) must show the correct start number (and group)
- Start number 1 starts
- Display (7) shows the running time, display (8) the start number 1
- The start display (2) changes automatically to the next free start number 2
- When the competitor crosses the finish photocell it shows the run time in display (7), and prints
the time of days, run time, and speed.
- Start number 2 starts
- Display (7) shows the running time, display (8) the start number 2
- The start display (2) changes automatically to the next free start number 3
- When the competitor crosses the finish photocell it shows the run time in display (7), and prints
the time of days, run time, and speed.
- etc.
Version: 021206
Page 83
TdC 8000
T I M I N G
Page 84
Timing Channels:
c0 = start channel c2 = no function
c1 = finish channel c3 = no function
c4 = no function
c5 = no function
ALGE adjustment for the main menu:
Menu 1: Delay Time Start
=
1.00 s
Menu 2: Delay Time Finish
=
0.30 s
Menu 3: Seconds Mode
=
OFF
Menu 4: Display Time1
=
03 s
Menu 6: Display Thousandth =
OFF
Menu 7: Info-Display
=
START
Menu 9: Running Tenth
=
OFF
Menu 11: Finish Rank
=
ON
Menu 12: STNO Automatic
=
OFF
Menu 13. Automatic Time
= 00:00:00.00
Menu 14: Print Start Time
=
OFF
Printer:
c6 = no function
c7 = no function
Menu 15:
Menu 16:
Menu 17:
Menu 18:
Menu 19:
Menu 20:
Menu 21:
Menu 23:
Menu 25:
Menu 26:
c8 = no function
c9 = no function
Print Menus
Print Linefeeds
RS-232 Baudrate
RS-232 Run time
RS-232 Baud rate
D-Board Channel 2
Beep =
ON
Groups
=
Change Race
D-Board-Test
=
ON
=
0
=
9600 Bd
=
OFF
=
2400
= RUNNING
OFF
Printing example
0001 ST
FT
RT
SP
0002 ST
FT
RT
SP
11:47:59.9965
11:48:02.0775
0:02.081
km/h 172.99
11:48:07.1017
11:48:09.2666
0:02.165
km/h 166.28
Start Time (photocell 1)
Finish Time (photocell 2)
Run Time
Speed in km/h
Start Time (photocell 1)
Finish Time (photocell 2)
Run Time
Speed in km/h
Display Board GAZ4:
You can show the net time (running time), the start number and rank, and the speed on different
display boards. The display board shows always the start number that is shown in the finish display
(8) (on the display board you can show the start number only with three digit and the rank with two
digit).
In the main menu (menu 20, see chapter 5) it is possible to activate display board channel 2 . If you
activate channel 2 it shows only the run times on the display board.
start number / rank:
thumb wheel switch
on 0
toggle switch
upper position
thumb wheel switch
on 0
toggle switch
middle position
thumb wheel switch
on 1
toggle switch
middle position
time:
speed:
RS 232 interface:
Version: 021206
see chapter 8.2
Page 84
T I M I N G
6.8.
TdC 8000
Page 85
Carving
Program 9
Countdown which honks at zero time. Time continue to
run from zero up.
The countdown time is adjustable in the main menu.
Each start number counts after the start from this time
down. You can have as many competitors as necessary
on the course. You can measure up to 8 intermediate
times (c2 to c9).
This program you can only run for one heat.
A classement is not possible, since the points are
not input.
Adjustment:
- Switch TdC 8000 on (switch 26)
- Select program CARVING (Prog.No.9) with cursor
key ($&and %)
- Press <ENTER>
- Select race that you want to use and clear memory
(e.g. <F1> for race 1)
- Press <ENTER>
- Select race (e.g. <F1> for race 1)
- Press <ENTER>
- Select precision (e.g. <F3> for 1/100 precision)
- Press <ENTER>
- Select the timing mode (e.g. <F2> for difference timing
- Press <ENTER>
- Select start mode (e.g. <F1> for single start
- Press <ENTER>
- Press <YES> if you want to input groups for the race, otherwise <NO> or <ENTER>
if you input the groups input always the last start number within a group
confirm each start number with <ENTER>
after the start number of the last group you must press <ENTER> twice
- Synchronize the TdC 8000 (with time of day and other timing devices)
press <F1> if the finish display (7) shows the correct time of day
- wait until TdC 8000 gives at the next full minute the synchronize signal to external
devices (you are now ready for timing)
press <F2> if the finish display (7) shows the wrong time of day
- input the time of day, confirm it with <ENTER> and make a start signal (channel 0 or
press <START>
Race operation:
- Switch (1) in upper position
- Press key <MENU> and <ALT> at the same time
- Select Menu 43: Count Down Time
- Select Menu 43 with <YES>
- Input the correct Count Down Time with keyboard (15)
- Confirm count down time with <ENTER>
- Leaf the menu by pressing <NO>
- Input the start number for the start with start keyboard (9) (#1)
- Press <ENTER>
Version: 021206
Page 85
TdC 8000
T I M I N G
-
Page 86
The start-display (2) must show the correct start number (and group)
Input the start number for the finish with finish keyboard (15) (#1)
Press <ENTER>
The finish-display (8) must show the correct start number (and group)
Start number 1 starts (channel 0)
Display (7) shows the running count down time of start number 1
The start display (2) changes automatically to the next free start number 2
Start number 1 goes through the finish
The finish display (7) shows the count down time of start number 1
Start number 2 starts
The start display (2) changes automatically to the next free start number 3
Input the start number for the finish with finish keyboard (15) (#2)
Press <ENTER>
Display (7) shows the running count down time and display (8) the start number 2
Start number 2 goes through the finish
The finish display (7) shows the count down time of #2
etc.
Count Down Time:
You can input the countdown time for carving. The time is adjustable between 0 and 23:59:59.99. This
countdown time is the time that every competitor uses.
Menu 43:
Count Down Time = 00:01:00.00
input the countdown time
Save with:
ENTER
Confirm with <ENTER>
Keyboard functions:
Clear start time
Recall the last start time that was cleared
Clear finish time
Recall the last finish time that was cleared
Block start time
Ignore start time
Block finish time
Ignore finish time
No function
Timing Channels:
c0 = start channel
c1 = finish channel
c2 = intermediate time
Keyboard 9 and 14
CLEAR
ALT + CLEAR
CLEAR
ALT + CLEAR
BLOCK
ALT + BLOCK
c3 = intermediate time
c4 = intermediate time
c5 = intermediate time
ALGE adjustment for the main menu:
Menu 1: Delay Time Start
=
1.00 s
Menu 2: Delay Time Finish
=
0.30 s
Menu 3: Seconds Mode
=
OFF
Menu 4: Display Time1
=
03 s
Menu 6: Display Thousandth =
OFF
Menu 7: Info-Display
=
START
Menu 9: Running Tenth
=
OFF
Menu 10: Intermediate Rank
=
ON
Menu 11: Finish Rank
=
ON
Menu 12: STNO Automatic
=
OFF
Menu 13. Automatic Time
=
00:00:00.00
Menu 14: Print Start Time
=
OFF
Version: 021206
Keyboard 15 and 14
BLOCK
ALT + BLOCK
INPUT
INPUT
c6 = intermediate time
c7 = intermediate time
c8 = intermediate time
Menu 15:
Menu 16:
Menu 17:
Menu 18:
Menu 19:
Menu 20:
Menu 21:
Menu 23:
Menu 24:
Menu 25:
Menu 26:
Menu 43:
c9 = intermediate time
Print Menus
=
ON
Print Linefeeds
=
0
RS-232 Baudrate =
9600 Bd
RS-232 Run time =
OFF
RS-232 Baud rate =
2400
D-Board Channel 2 = RUNNING
Beep
=
ON
Groups
=
OFF
Change Run
Change Race
D-Board-Test
Count Down Time 1= 00:01:00.00
Page 86
TdC 8000
T I M I N G
Printer:
Page 87
Printing example
0001 ST
FT
RT
0002 ST
FT
RT
10:30:17.0210
10:30:45.8578
+1.17
10:31:01.5791
10:31:32.9280
-1.33
start time
finish time
allowed Count Down Time
start time
finish time
allowed Count Down Time
Display Board GAZ4:
You can show the count down time (running count down time) on one and the start number and rank
on another display board. The display board shows always the actual start number that is shown in
the finish display (8) (on the display board you can show the start number only with three digit and
the rank with two digit).
In the main menu (menu 20, see chapter 5) it is possible to activate display board channel 2 . If you
activate channel 2 it shows only the run times on the display board.
Start number / Rank:
thumb wheel switch
on 0
toggle switch
upper position
thumb wheel switch
on 0
toggle switch
middle position
Count Down Time:
RS 232 interface:
Transfer Format:
1 start bit, 8 data-bit, no parity-bit, 1 stop bit
Transfer Speed:
9.600 Baud pre adjusted (adjustable: 2400, 4800, 9600. 19200)
Transfer Protocol: ASCII
xNNNNxC0xxHH:MM:SS.zhtqxGR(CR) Start Time
xNNNNxC1xxHH:MM:SS.zhtqxGR(CR) Finish Time
xNNNNxRTx+HH:MM:SS.zhtxxGR(CR) stopped Countdown-Time (allowed)
xNNNNxRTx-HH:MM:SS.zhtxxGR(CR)
stopped Countdown-Time (bellow zero)
nNNNN(CR)
x
blank
NNNN
start number (4-digits)
C0
start channel
C1
finish channel
RT
countdown-time
+
countdown was stopped before it reached zero
countdown was stopped after it reached zero
GR
group (from 01 to 99; 00 if no group)
n
new start number is shown on finish display (8)
(CR)
Carriage Return
The following characters could be on the first digit:
?
time without valid start number
c
cleared time (with <CLEAR>
RS 485 interface:
Version: 021206
no function
Page 87
TdC 8000
T I M I N G
6.9.
Page 88
10-Channel-Timer
Program 10
There are two 10-Channel Timer programs. The difference is the output for the display board.
10-Channel Timer 1:
output of all times of all channels to one display board
10-Channel Timer 1:
output of each channels to a different display board
6.9.1.
10-Channel-Timer 1
Program 101
The 10-channel Timer 1 is a very universal program with many useable features. It has a start channel
(c0) and 9 finish channels (c1 to c9). Each timing channel can be stopped as many times as
necessary with the same start number (e.g. lap timing if you need for each lap the total time).
Adjustment:
- Switch TdC 8000 on (switch 26)
- Select program 10-Channel-Timer (Prog.No.10) with cursor key (¢ and £)
- Press <ENTER>
- Select program 101-Channel-Timer 1 (Prog.No.101) with cursor key (¢ and £)
- Press <ENTER>
- Select race that you want to use and clear memory (e.g. <F1> for race 1)
- Press <ENTER>
- Select race (e.g. <F1> for race 1)
- Press <ENTER>
- Select precision (e.g. <F3> for 1/100 precision)
- Press <ENTER>
- Select the timing mode (e.g. <F2> for difference timing
- Press <ENTER>
- Select start mode (e.g. <F1> for single start
- Press <ENTER>
- Press <YES> if you want to input groups for the race, otherwise <NO> or <ENTER>
if you input the groups input always the last start number within a group
confirm each start number with <ENTER>
after the start number of the last group you must press <ENTER> twice
- Synchronize the TdC 8000 (with time of day and other timing devices)
press <F1> if the finish display (7) shows the correct time of day
- wait until TdC 8000 gives at the next full minute the synchronize signal to external
devices (you are now ready for timing)
press <F2> if the finish display (7) shows the wrong time of day
- input the time of day, confirm it with <ENTER> and make a start signal (channel 0 or
press <START>
Race operation:
- Switch (1) in upper position
- Input the start number for the start with start keyboard (9) (#1)
- Press <ENTER>
- The start-display (2) must show the correct start number (and group)
- Input the start number for the finish with finish keyboard (15) (#1)
- Press <ENTER>
- The finish-display (8) must show the correct start number (and group)
- Start number 1 starts (channel 0)
- Display (7) shows the running time of start number 1
Version: 021206
Page 88
TdC 8000
T I M I N G
-
Page 89
The start display (2) changes automatically to the next free start number 2
Impulse from Channel 1 (c1) for start number 1
Display (7) shows the run time (c1) of start number 1
Impulse from Channel 2 (c2) for start number 1
Display (7) shows the run time (c2) of start number 1
Impulse from Channel 1 (c1) for start number 1
Display (7) shows the new run time (c1) of start number 1
Impulse from Channel 2 (c2) for start number 1
Display (7) shows the new run time (c2) of start number 1
etc..
You can use as many started competitors as necessary in the race.
Each competitor (start number) can get as many impulses from the same channel (c1 to c9) as
necessary.
You can show the rank separate for each channel or for all channels together.
Keyboard functions:
Keyboard 9 and 14
Clear start time
CLEAR
Recall the last start time that was cleared
ALT + CLEAR
Clear finish time c1
Recall the last finish time c1 that was cleared
Block start time
BLOCK
Ignore start time
ALT + BLOCK
Block finish time c1
Ignore finish time c1
No function
INPUT
Timing Channels: c0
c1
c2
c3
c4
=
=
=
=
=
start channel
finish channel
finish channel
finish channel
finish channel
ALGE adjustment for the main menu:
Menu 1: Delay Time Start
=
1.00 s
Menu 2: Delay Time Finish
=
0.30 s
Menu 3: Seconds Mode
=
OFF
Menu 4: Display Time1
=
03 s
Menu 6: Display Thousandth =
OFF
Menu 7: Info-Display
=
START
Menu 9: Running Tenth
=
OFF
Menu 11: Finish Rank
=
ON
Menu 12: STNO Automatic
=
OFF
Menu 13. Automatic Time
=
00:00:00.00
Menu 14: Print Start Time
=
OFF
Printer:
c5
c6
c7
c8
c9
=
=
=
=
=
Menu 15:
Menu 16:
Menu 17:
Menu 18:
Menu 19:
Menu 20:
Menu 21:
Menu 23:
Menu 25:
Menu 26:
Menu 30:
Keyboard 15 and 14
CLEAR
ALT + CLEAR
BLOCK
ALT + BLOCK
INPUT
finish channel
finish channel
finish channel
finish channel
finish channel
Print Menus
Print Linefeeds
RS-232 Baudrate
RS-232 Run time
RS-232 Baud rate
D-Board Channel 2
Beep
Groups
Change Race
D-Board-Test
Rank calculation
=
ON
=
0
=
9600 Bd
=
OFF
=
2400
= RUNNING
=
ON
=
OFF
=
separate
Printing example
0001 ST
C1
RT
0001 ST
C2
RT
0001 ST
C1
RT
Version: 021206
10:52:04.9900
10:52:49.8958
0:44.90
10:52:04.9900
10:52:50.4672
0:45.47
10:52:04.9900
10:52:51.5165
0:46.52
start time
finish time
run time from channel 1 (first time of StNo.1 of channel 1)
start time
finish time
run time from channel 2
start time
finish time
run time from channel 1 (second time of StNo.1 of channel 1)
Page 89
TdC 8000
T I M I N G
Page 90
Display Board GAZ4:
You can show the net time (running time) on one and the start number and rank on another display
board. The display board shows always the actual start number that is shown in the finish display (8)
(on the display board you can show the start number only with three digit and the rank with two digit).
In the main menu (menu 20, see page 51) it is possible to activate display board channel 2 . If you
activate channel 2 it shows only the run times on the display board.
Start number / Rank:
thumb wheel switch
on 0
toggle switch
upper position
thumb wheel switch
on 0
toggle switch
middle position
Run Time and
Running Time:
RS 232 interface:
see chapter 8.2
RS 485 interface:
no function
Version: 021206
Page 90
TdC 8000
T I M I N G
6.9.2.
Page 91
10-Channel-Timer 2
Program 102
The 10-channel Timer 2 is a very universal program with many useable features. It has a start channel
(c0) and 9 finish channels (c1 to c9). Each timing channel can be stopped as many times as
necessary with the same start number (e.g. lap timing if you need for each lap the total time). Each
channel goes to a separate display board. Manly this porgram is used for a event with different tracks
that have one start but separate finish.
Example:
Four competitors start at the same time, each one has a track. In the finish each competiter will be
registrated by a separate photocell. Each time will be shown on a separate display board.
Lane 1:
Lane 2:
Lane 3:
Lane 4:
channel 1
channel 4
channel 7
channel 2
cable 001-xx at socket A
cable 001-xx at socket B
cable 001-xx at socket C
cable 003-xx at socket A
display board on position 1
display board on position 4
display board on position 7
display board on position 2
If you want to charge the TdC 8000 during the event it is necessary to use adapter 018--5. The
adapter you can plug in socket A. In the adaper you can plug the photocells and charger.
Adjustment:
- Switch TdC 8000 on (switch 26)
- Select program 10-Channel-Timer (Prog.No.10) with cursor key ($ and %)
- Press <ENTER>
- Select program 102-Channel-Timer 2 (Prog.No.102) with cursor key ($ and&%)
- Press <ENTER>
- Select race that you want to use and clear memory (e.g. <F1> for race 1)
- Press <ENTER>
- Select race (e.g. <F1> for race 1)
- Press <ENTER>
- Select precision (e.g. <F3> for 1/100 precision)
- Press <ENTER>
Version: 021206
Page 91
TdC 8000
T I M I N G
-
-
Page 92
Select the timing mode (e.g. <F2> for difference timing
Press <ENTER>
Select start mode (e.g. <F1> for single start
Press <ENTER>
Press <YES> if you want to input groups for the race, otherwise <NO> or <ENTER>
if you input the groups input always the last start number within a group
confirm each start number with <ENTER>
after the start number of the last group you must press <ENTER> twice
Synchronize the TdC 8000 (with time of day and other timing devices)
press <F1> if the finish display (7) shows the correct time of day
- wait until TdC 8000 gives at the next full minute the synchronize signal to external
devices (you are now ready for timing)
press <F2> if the finish display (7) shows the wrong time of day
- input the time of day, confirm it with <ENTER> and make a start signal (channel 0 or
press <START>
Race operation:
- Switch (1) in upper position
- Input the race number for the start with start keyboard (9) (#1)
- Press <ENTER>
- The start-display (2) must show the correct race number
- Input the race number for the finish with finish keyboard (15) (#1)
- Press <ENTER>
- The finish-display (8) must show the correct race number
- Start impulse for first race (channel 0)
- Display (7) shows the running time of the race
- The start display (2) changes automatically to the next free start number 2
- Impulse from Channel 1 (c1) for track 1
- Impulse from Channel 4 (c1) for track 2
- Impulse from Channel 7 (c1) for track 3
- Impulse from Channel 2 (c1) for track 4
- All times are shown on the info display (6) if you have adjusted on finish (menu 7)
- Each track can receive as many impulses as necessary
- It shows the time always for the time adjusted in menu 5 (display time 2). The display time 2
starts to run with every impulse. If you set the display time 2 on zero it will show the time until a
new impulse comes or until you reset the time.
Keyboard functions:
Keyboard 9 and 14
Clear start time
CLEAR
Recall the last start time that was cleared
ALT + CLEAR
Clear finish time c1
Recall the last finish time c1 that was cleared
Block start time
BLOCK
Ignore start time
ALT + BLOCK
Block finish time c1
Ignore finish time c1
No function
INPUT
Timing Channels: c0
c1
c2
c3
c4
Version: 021206
=
=
=
=
=
start channel
finish channel
finish channel
finish channel
finish channel
c5
c6
c7
c8
c9
=
=
=
=
=
Keyboard 15 and 14
CLEAR
ALT + CLEAR
BLOCK
ALT + BLOCK
INPUT
finish channel
finish channel
finish channel
finish channel
finish channel
Page 92
TdC 8000
T I M I N G
ALGE adjustment for the main menu:
Menu 1: Delay Time Start
=
1.00 s
Menu 2: Delay Time Finish
=
0.30 s
Menu 3: Seconds Mode =
OFF
Menu 4: Display Time1 =
03 s
Menu 5: Display Time2 =
03 s
Menu 6: Display Thousandth =
OFF
Menu 7: Info-Display
=
START
Menu 9: Running Tenth =
OFF
Menu 11: Finish Rank
=
ON
Menu 12: STNO Automatic
=
OFF
Menu 13: Automatic Time =
00:00:00.00
Printer:
Page 93
Menu 14:
Menu 15:
Menu 16:
Menu 17:
Menu 18:
Menu 19:
Menu 20:
Menu 21:
Menu 23:
Menu 25:
Menu 26:
Menu 30:
Print Start Time
Print Menus =
Print Linefeeds
RS-232 Baudrate
RS-232 Run time
RS-232 Baud rate
D-Board Channel 2
Beep =
ON
Groups
=
Change Race
D-Board-Test
Rank calculation
=
OFF
ON
=
0
=
9600 Bd
=
OFF
=
2400
= RUNNING
OFF
Printing example
0001 ST
C1
RT
0001 ST
C2
RT
0001 ST
C1
RT
10:52:04.9900
10:52:49.8958
0:44.90
10:52:04.9900
10:52:50.4672
0:45.47
10:52:04.9900
10:52:51.5165
0:46.52
start time
finish time
run time from channel 1 (first time of StNo.1 of channel 1)
start time
finish time
run time from channel 2
start time
finish time
run time from channel 1 (second time of StNo.1 of channel 1)
Display Board GAZ4:
You can connect up to 9 display boards for up to 9 tracks. Each display boards needs to have a
different address (thoumb wheel switch). The display board with the address 1 shows the running
time. All other boards show only the run time of the suiting track.
In the main menu (menu 20, see chapter 5) it is possible to activate display board channel 2 . If you
activate channel 2 it shows only the run times on the display board.
Run Time and
Running Time:
thumb wheel switch
on 0
toggle switch
middle position
It shows the time always for the time adjusted in menu 5 (display time 2). The display time 2 starts to
run with every impulse. If you set the display time 2 on zero it will show the time until a new impulse
comes or until you reset the time.
RS 232 interface:
see chapter 8.2
RS 485 interface:
no function
Version: 021206
Page 93
TdC 8000
T I M I N G
6.10.
Page 94
Show Jumping (Equestrian)
Program 11
Show Jumping has different events. Those show jumping that are normally used are included in the
TdC 8000 software
!
!
!
!
!
!
!
!
!
!
!
!
!
Standard Show Jumping - A1 Program 111
Standard Show Jumping - A2 Program 112
Standard Show Jumping - AM3
Program 113
Standard Show Jumping - AM4
Program 114
Standard Show Jumping - AM5
Program 115
Standard Show Jumping - AM6
Program 116
Standard Show Jumping - AM7
Program 117
Standard Show Jumping - AM8
Program 118
Show Jumping with Time Penalty (Bareme C)
Program 120
Two Stage Show Jumping (Bareme Integre)
Program 121
American Stage F
Program 122
American Stage (Time)Program 123
Standard / Time Program 124
The manual for show jumping is not discribed here. You get a separate manual for show jumping at
your ALGE TIMING agent.
Example for the setup of the timing equipment for show jumping
e.g. Standard Show Jumping:
DISPLAY BOARD GAZ 4
start number
time
points
and rank
Example for timing at a show jumping event:
TELEDATA TED-TX
Transmitter Start
Photocell RLS1c or RLS1cd
TELEDATA TED-RX
Receiver
TdC 8000
TELEDATA TED-TX
Transmitter Finish
Speaker DL
Photocell RLS1c or RLS1cd
Handswitch
Version: 021206
Page 94
T I M I N G
6.11.
TdC 8000
Page 95
Cycling
Program 13
6.11.1.
Cycle-Road
The program Dual-Timer is modified for road cycle races. After the start it shows the running time for
all competitors. When the first competitor reaches the finish it shows the run time of the winner. On
the display boards it shows the winners time and average speed of the winner. Additional it starts a
time (time behind the winner) on another display board.
This program you can use as well for running competitions, cross country, triathlon, etc.
Attention:
It is necessary to shortcut
channel c1 and c3 or c4 and
c0 with banana cable.
Adjustment:
- Switch TdC 8000 on (switch 26)
- Select program CYCLING (program 13) with cursor key (¢ and £)
- Press <ENTER>
- Select program CYCLE-ROAD (program 131) with cursor key (¢ and £)
- Press <ENTER>
- Select race that you want to use and clear memory (e.g. <F1> for race 1)
- Press <ENTER>
- Select race (e.g. <F1> for race 1)
- Press <ENTER>
- Select precision (e.g. <F3> for 1/100 precision)
- Press <ENTER>
- Press <YES> if you want to input groups for the race, otherwise <NO> or <ENTER>
if you input the groups input always the last start number within a group
confirm each start number with <ENTER>
after the start number of the last group you must press <ENTER> twice
- Synchronize the TdC 8000 (with time of day and other timing devices)
Press <F1> if the finish display (7) shows the correct time of day
- Wait until TdC gives at the next full minute the synchronize signal to external devices
- The TdC 8000 is now ready for timing
Press <F2> if the finish display (7) shows the wrong time of day
- Input the time of day with the finish keyboard (15), and confirm it with <ENTER>
- Start the clock with a start signal (channel 0 or press <START> key)
- The TdC 8000 is now ready for timing
Race operation during the first run:
- Switch (1) has no function
- Shortcut channel c1 and c3 (e.g. with banana cable)
- Press <ALT> and <MENU> together
- Select menu 32 "DISTANCE"
- Press <YES>
- Input the race distance (for average speed calculation)
- Press <ENTER>
- Input number at finish keyboard (15), e.g. StNo. 1
- Press <ENTER>
- Input number at start keyboard (9), e.g. StNo. 2
- Press <ENTER>
- Start race (channel 0)
- The lower time (No. 1) runs in the info-display (6)
- The finish impulse for the winner must come through channel c1 or c3.
- The lower time in the info-display stops (run time of the winner).
Version: 021206
Page 95
T I M I N G
-
TdC 8000
Page 96
Next to the winner time it shows the average speed
At the same time it starts the upper time (No. 2). This shows the down time of the rest of the
competitors.
With channel c4 you can stopped the down time.
If you press <CLEAR> (start keyboard 9) the down time continuos
Clear Times:
If you press <CLEAR> of the keyboard (9 or 15) it is possible to clear the stopped time
(run time or down time). If you press <ALT> and <CLEAR> together you can get the last
time that you cleared again.
Block Times:
You can block the time (run time or down time). If you press <BLOCK> of keyboard
(9 or 15) it printes the time of day as a not valid time with a question-mark (?)..
If you press <ALT> and <BLOCK> together, it will not take the impulse of the course at all.
Changing Times:
You can copy a time from one start number to another, you can make a not valid time
valid, or you can input a manual time. With the <INPUT> key of the keyboard (9 or 15)
you change times.
- With <INPUT> you can change the finish time or down time
- With <ALT> and <INPUT> you can change the start time of the finish time or down time.
Ranking:
You must turn the ranking (menu 11) off.
Start Channel:
The start for the running time is through channel c0. The down time starts automatically through the
finish impulse (channel 1 or 3). This two channels need to be shortcut.
Identification:
The run time is marked with a "r", the down time with "b" (or "L").
Timing Channels: c0 = start time (run time)
c1 = finish timel( run time)
c2 = intermediate time (run time)
c3 = start time (down time)
c4 = finish time (down time))
ALGE adjustment for the main menu:
Menu 1: Delay Time Start
=
1.00 s
Menu 2: Delay Time Finish
=
0.30 s
Menu 3: Seconds Mode
=
OFF
Menu 4: Display Time1
=
03 s
Menu 5: Display Time 2
=
03 s
Menu 8: Running Time
=
RUN
Menu 9: Running Tenth
=
OFF
Menu 10: Intermediate Rank
=
ON
Menu 11: Finish Rank
=
ON
Menu 14: Print Start Time
=
OFF
Menu 15: Print Menus
=
ON
Menu 16: Print Linefeeds
=
0
Menu 17: RS-232 Baudrate
=
9600 Bd
Menu 18: RS-232 Run time
=
OFF
Version: 021206
c5 = Intermediate time 1 (down time)
c2 = Intermediate time 2 (run time
c7 = Intermediate time 2 (down time)
c2 = Intermediate time 3 (run time)
c9 = Intermediate time 3 (down time)
Menu 19:
Menu 20:
Menu 21:
Menu 22:
Menu 23:
Menu 24:
Menu 25:
Menu 26:
Menu 27:
Menu 29:
Menu 30:
Menu 33:
Menu 47:
RS-232 Baud rate
D-Board Channel 2
Beep
Handicap time
Groups
Change Run
Change Race
D-Board-Test
ID channel
Start Channel
Rank Calculation
Measuring Unit
Distance
=
2400
= RUNNING
=
ON
= 00:00:00.00
=
OFF
=
4
= SEPARATE
= SEPARATE
=
km/h
=
100 m
Page 96
TdC 8000
T I M I N G
Page 97
Printer: Printing example
0002 r
ST
FT
RT
0001 b ST
FT
RT
c0001 b FT
RT
0001 b ST
FT
RT
15:00:00.0000
15:09:53.6657
9:53.66
15:09:53.6657
15:10:01.3638
0:07.69
15:10:01.3638
0:07.69
15:09:53.6657
15:10:11.9762
0:18:31
start time of the cycling field
arrival time of the winner
run time of the winner
start time of the down time = arrival time of the winner
arrival time of the fist pursuer
down time of the first pursuer
arrival time of the first pursuer is cleared with key <CLEAR>
in order to have again a running down time
start time of the down time = arrival time of the winner
arrival time of the second pursuer
down time of the second pursuer
Display Board GAZ4:
You can show the running time
(run time of winner) on one
display board.
You can sohw the down time on
a display board.
You can show the average speed on a
display board.
run time
down time
average speed
In the main menu (menu 20, see page 51) it is possible to activate display board channel 2 . If you
activate channel 2 it shows only the run times on the display board.
RS 232 Interface: See chapter 8.2.
Version: 021206
Page 97
TdC 8000
T I M I N G
6.12.
Page 98
Agility
Program 14
There are different event at the dog Agility. The standard program "Examin" is usable in the TdC 8000.
6.12.1.
Examine
The manual for agility is not discribed here. You get a separate manual for agility at your ALGE TIMING
agent.
6.13.
TdC Test
Program 15
Test program for TdC 8000. It is possible to make measurements of the device, as well as tests with
the displays and keyboard. This test is used for the producer to check some functions of the TdC
8000 after the production. It has no function for the normal operation.
Starting the TdC Test:
- Switch TdC 8000 on (switch 26)
- Select program TdC TEST with the cursor keys ¢ and £
- Press <ENTER>
- The info-display (6) shows:
Menu 48: COMMON MEASUREMENTS
Select:
-
-
YES/NO or menu number: 48
Select program with the cursor keys ¢ and £:
o
Common Measurements
Menu 48
o
Display Test
Menu 49
o
Keyboard Test
Menu 50
Confirm selection with <ENTER>
Common Measurements:
Menu 48
If you select the common measurements the info-display (6) shows the following:
Menu 48: COMMON MEASUREMENTS
UB= 8.5V IB=+0.00A TB=+23.9°
UE= 5.0V IE=+0.00A TL=-69.5°
Continue:
ENTER
BATT
CLOCK
PRINTER
SPEAKER
F1
F2
F3
F4
<F1> checking battery
<F2> clock of RS-485
<F3> printer test
<F4> speaker test
The info-display (6) shows in the second line the battery voltage (UB), the battery current (IB), and the
battery temperature (TB).
The third line shows the stabilized external voltage (UE) which should be about 5 V, the current
output IE for extender devices, which must be below 1 A, and the TL measurement. The TL
measurement is not activated yet and can show any figure.
Press <F1> to check the battery:
The second line of the info-display shows the battery voltage (UB), the battery current (IB), and the
battery temperature (TB).
Version: 021206
Page 98
TdC 8000
T I M I N G
Page 99
-
Press <F1> until the info-display (6) shows at the right upper corner BATT L<. This means that it
loads now the battery, if you have the charging device NLG8 connected. The battery current IB
must show now a amount of about +2 A.
- Press <F1> until the info-display (6) shows at the upper corner BATT E<. This means that it
unloads now the battery. The battery current must have now a value of about -1,6 A.
You can check the CLOCK impulse for the RS-485 interface if you press <F2>. Therefore you
need an oscillograph.
If you press <F3> it prints all characters of the printer.
If you press <F4> the external speaker will honk.
Display Test:
Menu 49
If you select the display test the info-display (6) shows the following:
Menu 49:
DISPLAY TEST
Continue:
ENTER
DISPLAY 1
DISPLAY 2
DISPLAY 3
DISPLAY 4
F1
F2
F3
F4
<F1>: check of display (2)
<F2>: check of display (7)
<F3>: check of display (8)
<F4>: check of display (6)
To check the numeric display (2, 7, 8) press <F1>, <F2>, and <F3>:
- if you press the <F>-key the first time it writes segment by segment of the display.
- if you press the <F>-key again it shows all segments
- if you press the <F>-key again it makes the display blank.
To check the alphanumeric info-display (6) press <F4>:
- if you press <F4> it shows the display blank
- if you press <F4> again it shows all dots of the display
- if you press <F4> again it shows again Menu 2
Keyboard Test:
Menu 50
If you select the keyboard test the info-display (6) shows the following:
Menu 50:
KEYBOARD TEST
U SCB 123 YFU TFC SCB 123
M 789 I0E NFD MAM 789 I0E
D 456
PE*
456
You can check all keys. If you press a key it disappears on the display. If you press the keyboard in
the right order the cursor jumps form key to key. Start with the switch (1) in upper, middle, and down
position, then the start keyboard (9) from the left upper key to the right until you reached the right
bottom key. Afterwards do the same test with the function keyboard (14) and the finish keyboard (15).
Leave the keyboard test by pressing <ALT> and <ENTER> (finish keyboard 15) at the same time.
Channel Test:
Interface Test:
RAM Test:
RTC Test:
Low Voltage Test:
Menu 51
Menu 52
Menu 53
Menu 54
Menu 45
to test the channels
to test the interface
to test the RAM
to test the real time clock
to test the low voltage barriers for power down
Exit the TdC TEST by switching the device off.
Version: 021206
Page 99
T I M I N G
TdC 8000
7.
DESCRIPTION OF ADDITIONAL DEVICES
7.1.
Multi Channel MC18
Page 100
You can use the MC18 if you want to connect many channels. The MC18 has all 10 TdC 8000
channels on banana sockets (c0 to c9). For the TdC 8000 is channel c10 to c17 not active. Connect
the MC18 at the TdC socket "multi channel" (16).
7.2.
Opto Channel OC18
Use the OC18 if you need potential free contacts. The OC18 prevents the TdC 8000 from damage
through high voltage coming through the impulse cables.
The OC18 has all 10 TdC 8000 channels on banana sockets (channel c0 to c9). Channel c10 to c17
is not activated. Connect the OC18 at the socket "multi channel" (16) of the TdC 8000.
The Opto Channel OC18 has a 9 V battery built in. To change the battery you have to unscrew the
cover.
Version: 021206
Page 100
T I M I N G
8.
TdC 8000
Page 101
TECHNICAL DATA
Measuring range:
23 hours, 59 minutes, 59,9999 seconds
Crystal frequency:
TCXO 11.520 MHz (Temperature Compensated Crystal Oscillator)
Accuracy:
at changeable temperature range from -25 to +50oC:
+/- 2,5 ppm at (+/- 0,009 s/h.)
Aging:
+/- 1 ppm per year
Frequency adjustment:
+/- 0,1 ppm at 25oC
o
Temperature Operative Timing Range::
-25 to 50 C (-10F to 122F)
Memory:
about 2 x 8.600 times with start numbers;
keeps data when switched off through internal rechargeable battery
Display:
start display (2): numeric liquid crystal display, 8 digits,
figure height 12.7 mm,
finish display (7): numeric liquid crystal display, 8 digits,
figure height 12.7 mm,
finish display (8): numeric liquid crystal display, 8 digits,
figure height 12.7 mm,
info-display (6):
alphanumeric liquid crystal display
4 x 40 characters, figure height 4.8 mm
Operating elements:
On-/Off-switch (26)
Turn over switch (1)
Start Keyboard (9)
Function Keyboard (14)
Finish Keyboard (15)
Electronic:
most advanced C-MOS technology with 80C167 microprocessor
Power supply:
internal:
NiCd rechargeable battery 7.2 V / 4.5 A
external:
210 to 240 VAC with Net-Charging-Device NLG8
Power consumption:
without external devices from the internal NiCd battery:
about 80 mA
when printing:
about 500 mA
Charging supply:
+11 to 16 VDC (Pin 4 from socket 19, 20, 21 and 22)
Impulse length:
Input resistance 10 kW against +5V
Triggering with < 1V (falling flank)
Hysteresis about 2V
Output 5VDC stabilized: total max. of 120 mA
Loudspeaker output:
for 8 W speaker, Umax= 24 Vpp
Casing:
case with key to lock, top you can take away
front panel of aluminium
Dimensions:
450 x 320 x 150 mm
Weight:
7.5 kg
Version: 021206
Page 101
TdC 8000
T I M I N G
8.1.
Connection System
8.1.1.
Photocell jacks and external supply
A´
Jack A and A´ (20 and 19):
1 input channel 0 (start)
2 input channel 1 (stop)
3 common ground
4 input external supply (6 to 15 VDC)
5 output +5 VDC stabilized
6 input channel 2 (intermediate time)
A
B
Page 102
C
Jack B (21):
1
input channel 3 (start)
2
input channel 4 (stop)
3
common ground
4
input external supply (6 to 15 VDC)
5
output +5 VDC stabilized
6
input channel 5 (intermediate time)
Jack C (22):
1 input channel 6 (start)
2 input channel 7 (stop)
3 common ground
4 input external supply (6 to 15 VDC)
5 output +5 VDC stabilized
6 input channel 8 (intermediate time)
8.1.2.
1
2
3
4
5
Headset Jack (18)
microphone of headset
common ground
loud speaker of headset
common ground
input channel 9
8.1.3.
Speaker Jack (25)
1 speaker signal
2 common ground
8.1.4.
1
2
3
4
5
Display Board Jack (24)
common ground
output supply (6 to 15 VDC)
output data channel 1
output supply (6 to 15 VDC)
output data channel 1 or 2
Version: 021206
Page 102
TdC 8000
T I M I N G
8.1.5.
1
2
3
4
5
6
7
8
Page 103
RS 232 / RS 485 (23)
RS 232, Data TXD (transmit)
RS 232, common ground
RS 232, Data RXD (receive)
RS 232, CTS
RS 232, RTS
RS 485, line a
RS 232, output external supply (6 to 15 VDC)
RS 485, line b
8.1.6.
Display Board (28)
Display board interface with data output channel 2 (yellow (or white) banana socket) and
ground (black (or blue) banana socket).
8.1.7.
Banana Socket for Channel 0 to 9 (27)
All channels you can connect on the banana sockets. For all 9 channel you have four ground
connections.
8.1.8.
1
2
3
4
5
6
7
8
9
10
11
12
Multi Channel (16)
channel 9
channel 0 (start)
channel 2
channel 3
channel 7
data output (like channel 2 from
"display board" (24)
RS 485 B
RS 485 A
Clock A
Clock B
empty
common ground
Version: 021206
13
14
15
16
17
18
19
20
21
22
23
24
25
output +5 VDC stabilized
channel 1
channel 5
channel 8
channel 6
channel 4
empty
empty
empty
empty
output external supply (5.3 to 14.3 VDC)
common ground
external supply (+6 to 15 VDC)
Page 103
TdC 8000
T I M I N G
8.2.
Page 104
RS 232 Interface (16, 23)
Transfer Format: 1 start bit, 8 data bit, no parity bit, 1 stop bit
Transfer Speed: 9.600 Baud pre adjusted (adjustable: 2400, 4800, 19200)
Transfer Protocol: ASCII
xNNNNxCCxxHH:MM:SS.zhtqxGR(CR)
xNNNNxCCMxHH:MM:SS.zhtqxGR(CR)
xNNNNxRTxxHH:MM:SS.zhtxxGR(CR)
xNNNNxTTxxHH:MM:SS.zhtxxGR(CR)
xNNNNxSQxxHH:MM:SS.zhtxxGR(CR)
xNNNNICCxxHH:MM:SS.zhtxxGR(CR)
xNNNNIRTxxHH:MM:SS.zhtxxGR(CR)
xNNNNiCCxxHH:MM:SS.zhtqx##(CR)
xNNNNiRTxxHH:MM:SS.zhtqx##(CR)
xNNNNiDTRxHH:MM:SS.zhtxx##(CR)
xNNNNiTTxxHH:MM:SS.zhtqx##(CR)
xNNNNiDTTxHH:MM:SS.zhtxx##(CR)
pNNNNiCCxxHH:MM:SS.zhtqx##(CR)
pNNNNiRTxxHH:MM:SS.zhtqx##(CR)
pNNNNiTTxxHH:MM:SS.zhtqx##(CR)
xNNNNxkmhxxxxsssss.ssxxxGR(CR)
xNNNNxkmhxxxxsssss.ssxxxxx(CR)
?NNNNxCCxxHH:MM:SS.zhtqxGR(CR)
m0000xCCxxHH:MM:SS.zhtqxGR(CR)
cNNNNxCCxxHH:MM:SS.zhtqxGR(CR)
dNNNNxCCxxHH:MM:SS.zhtqxGR(CR)
iNNNNxCCxxHH:MM:SS.zhtxxGR(CR)
xxxxxxC0xxHH:MM:SS.zhtqxGR(CR)
xNNNNxRTx+HH:MM:SS.zhtxxGR(CR)
xNNNNxRTx-HH:MM:SS.zhtxxGR(CR)
nNNNN(CR)
x
NNNN
0000
i
CC
CCM
C0 channel 0 (start)
C1 channel 1 (finish)
C2 channel 2
C3 channel 3
C4 channel 4
RT
TT
SQ
DTR
DTT
kmh
+
HH:MM:SS.zht
HH:MM:SS.zhtq
sssss.ss
GR
##
(CR)
Version: 021206
time from C0 to C9
manual time from <START> or <STOP> button
run time
total time
sequential time (lap time)
Dual Timer, times form C0 to C9
Dual Timer, run time
Parallelslalom, Intermediate Time or Finish Time
Parallelslalom, Run Time
Parallelslalom, Difference Time of Run
Parallelslalom, Total Time
Parallelslalom, Total Difference Time
Parallelslalom, Finish Time calculated form Penalty Time
Parallelslalom, Run Time calculated form Penalty Time
Parallelslalom, Total Time calculated form Penalty Time
speed measurement
speed measurement for speed skiing
illegal time
times stopped with <MEMO>
cleared time
disqualified time
manipulated time (<INPUT>)
start time after a group start
stopped countdown-time (allowed)
stopped countdown-time (bellow the zero value)
new start number shown in finish display (8)
blank
start number (four digits)
start number 0 for times stopped with <MEMO>
Identification of the course; r (= red/right), b (= blue) or l (left) course
timing channels (c0 to c9)
manual impulse (with <START> or <STOP> from keyboard 9 or 15)
C5
channel 5
C6
channel 6
C7
channel 7
C8
channel 8
C9
channel 9
run Time
total Time
sequential Time (lap time)
difference time of run
total difference time
speed (possible output depending on unit used: kmh, mps, mph)
countdown was stopped before it reached zero
countdown was stopped after zero
time in hours, minutes, seconds, and 1/1000 seconds
time in hours, minutes, seconds, and 1/10000 seconds
speed for 0.00 up to 99999.99 measured in km/h in speed skiing
group (from 01 to 99, no input for groups = 00)
continuous number for each lap
Carriage Return
Page 104
TdC 8000
T I M I N G
Page 105
The following characters could be the first digit:
x
blank
?
time without valid start number
m
time from memo (memory)
c
cleared time (with <CLEAR>)
d
times cleared through disqualification
i
times input manual: <INPUT>
n
new start number shown in finish display (8)
p
calculated time from Penalty Time
Pin arrangement:
see page 103
Cable form TdC 8000 to PC (9-Pin):
Cable form TdC 8000 to PC (25-Pin):
067-02
066-03
In the main menu you can adjust the following:
RS 232 Baudrate:
Menu 17:
You can adjust the baud rate of the RS 232 interface (23):
Pre adjusted value:
RS 232 Run Time:
RS-232 BAUDRATE = 9600 Bd
2400, 4800, 9600 or 19200 baud.
9600 Baud
Menu 18:
RS-232 RUN TIME = OFF
The RS 232 interface (23) outputs always in the difference-timing mode the time of day. Additional
you can output the run time.
output time of day and run time
= <F1>
output time of day
= <F2>
Pre adjusted value: RS-232 output is time of day
8.2.1.
Checking the TdC 8000 adjustments through the RS 232 interface:
You can check the following adjustments through the RS 232 interface:
Precision:
RS232 question:
PRE=?
TdC 8000 answer:
PRE = 1 s
precision is 1 second
PRE = 1/10 s
precision is 1/10 seconds
PRE = 1/100 s
precision is 1/100 seconds
PRE = 1/1000 s
precision is 1/1000 seconds
Timing Mode:
RS232 question:
TI=?
TdC 8000 answer:
TI = DIFFERENC
difference timing
TI = ABSOLUT
absolute timing
Laps for the Split-Sequential program:
RS232 question:
LAPS = ?
TdC 8000 answer:
LAPS = 4
Adjusted amount of laps (1 to 99)
Version: 021206
Page 105
T I M I N G
8.2.2.
TdC 8000
Page 106
Adjustment of the Main Menu through the RS 232 interface
You can adjust the main menu direct from a PC through the RS 232 interface.
Delay Time Start:
Menu 1
Print Start Time:
Menu 14
RS232 question:
DTS?
RS232 question: PST?
RS232 order:
DTS=0.30
RS232 order:
PST=OFF
Adjustable:
0,00 to 9,99 seconds
Adjustable:
ON or OFF
Delay Time Finish:
Menu 2
Print Menus:
Menu 15
RS232 question:
DTF?
RS232 question: PM?
RS232 order:
DTS=0.30
RS232 order:
PM=ON
Adjustable:
0,00 to 9,99 seconds
Adjustable:
ON or OFF
Seconds Mode:
Menu 3
Print Linefeed:
Menu 16
RS232 question:
SM?
RS232 question: PLF?
RS232 order:
SM=ON
RS232 order:
PLF=ON
Adjustable:
ON or OFF
Adjustable:
ON or OFF
Display Time 1:
Menu 4
RS 232 Baudrate:
Menu 17
RS232 question:
DIT1?
RS232 question: BDRS?
RS232 order:
DIT1=03
RS232 order:
BDRS=9600
Adjustable:
0 to 99 seconds
Adjustable:
2400, 4800, 9600 Bd
Display Time 2:
Menu 5
RS 232 Run Time:
Menu 18
RS232 question:
DIT2?
RS232 question: RSRT?
RS232 order:
DIT2=03
RS232 order:
RSRT=OFF
Adjustable:
0 to 99 seconds
Adjustable:
ON or OFF
Display Thousandth:
Menu 6
Display Board Baud Rate:
Menu 19
RS232 question:
DI1/1000?
RS232 question: BDDB?
RS232 order:
DI1/1000=ON
RS232 order:
RTRS=OFF
Adjustable:
ON or OFF
Adjustable:
ON or OFF
Info-Display:
Menu 7
Display Board Channel 2:
Menu 20
RS232 question:
IDIS?
RS232 question: DBC2?
RS232 order:
IDIS=START
RS232 order:
DBC2=RUNNING
Adjustable:
START, FINISH, or OFF
Adjustable:
RUNNING; STANDING
Running Time:
Menu 8
Beep:
Menu 21
RS232 question:
RT?
RS232 question: BEEP?
RS232 order:
RT=RUN
RS232 order:
BEEP=ON
Adjustable:
RUN or Total
Adjustable:
ON or OFF
Running Tenth:
Menu 9
Handicap Time:
Menu 22
RS232 question:
R1/10?
RS232 question: HT?
RS232 order:
R1/10=OFF
RS232 order:
HT=00:01:12.34
Adjustable:
ON or OFF
Adjustable:
time in 1/100 seconds
Intermediate Rank:
Menu 10
Handicap off:
HT=00:00:00.000
RS232 question:
RNKIT?
Input of Groups:
Menu 23
RS232 order:
RNKIT=ON
RS232 question: not possible
Adjustable:
ON or OFF
RS232 order:
not possible
Finish Rank:
Menu 11
Change Run:
Menu 24
RS232 question:
RNKFT?
RS232 question: not possible
RS232 order:
RNKFT=ON
RS232 order:
not possible
Adjustable:
ON or OFF
Change Race:
Menu 25
Start Number Automatic:
Menu 12
RS232 question: not possible
RS232 question:
STNOA?
RS232 order:
not possible
RS232 order:
STNOA=OFF
Display Board Test:
Menu 26
Adjustable:
OFF, START, or FINISH
RS232 question: not possible
Automatic Time:
Menu 13
RS232 order:
not possible
RS232 question:
AT?
Penalty Time for Parallel Slalom: Menu 27
RS232 order:
AT=XX:XX:XX.XX
RS232 question: PT?
Adjustable:
time in h, min, sec, 1/100
RS232 order:
PT=1.500
Adjustable: seconds and 1/1000 sec
Version: 021206
Page 106
T I M I N G
TdC 8000
ID for Channel 4 in Parallel Slalom: Menu 28
RS232 question:
IDC4?
RS232 order:
IDC4=BLUE
Adjustable:
B or L (blue or left)
Start Channel for Dual Timer:
Menu 29
RS232 question:
STS?
RS232 order:
STS=SEPARATE
Adjustable:
SEPARATE;COMMON
Ranking:
Menu 30
RS232 question:
RNKC?
RS232 order:
RNKC=SEPARATE
Adjustable:
SEPARATE;COMMON
Printing Times:
Menu 31
RS232 question:
PRT?
RS232 order:
PRT=OFF
Adjustable:
OFF or ON
Measuring Distance Speed:
Menu 32
RS232 question:
DST?
RS232 order:
DST=0100
Adjustable:
1 to 9999
Measuring Unit:
Menu 33
RS232 question:
SPU?
RS232 order:
SPU=kmh
Adjustable:
kmh, m/s or mph
Min. Speed:
Menu 34
RS232 question:
MINSP?
RS232 order:
MINSP=0010
Adjustable:
1 to 9999
Min. Speed:
Menu 35
RS232 question:
MAXSP?
RS232 order:
MAXSP=0200
Adjustable:
1 to 9999
Penalty Points
Menu 36
RS232 question:
PP?
RS232 order:
PP = 04.00
Adjustable:
0.1 to 99.99
Page 107
Time Violation 1:
Menu 37
RS232 question: TV1?
RS232 order:
TV1 = 00.25
Adjustable:
0 to 99.99
Time Violation 2:
Menu 38
RS232 question: TV2?
RS232 order:
TV2 = 01.00
Adjustable:
0 to 99.99
Parcour Time 1:
Menu 39
RS232 question: PAT1?
RS232 order:
PAT1 = 000.00
Adjustable:
0 to 999.99
Parcour Time 2:
Menu 40
RS232 question: PAT2?
RS232 order:
PAT2 = 000.00
Adjustable:
0 to 999.99
Block Time 1:
Menu 41
RS232 question: BT1?
RS232 order:
BT1 = 000.00
Adjustable:
0 to 999.99
Block Time 2:
Menu 42
RS232 question: BT2?
RS232 order:
BT2 = 000.00
Adjustable:
0 to 999.99
Countdown Time:
Menu 43
RS232 question: CDT?
RS232 order:
CDT=00:01:00.00
Adjustable: 00:00:00.00 to 23:59:59.99
D-Board Count Down: Menu 45
RS232 question: DBCD?
RS232 order:
DBCD=ON
Adjustable.
ON or OFF
8.2.3.Call Data through the RS 232 Interface:
Through the RS 232 interface you can call all date of the memory of the TdC 8000 e.g. from a PC.
Each command is closed with a Carriage Return (in the following examples it is listed as (CR). If you
want a classement of intermediate times, you must identify the channel number (C2 to C9). If you
want a "SINGLE" classement, you need to input also the data that you want transferred (e.g. start
numbers, start number blocks, groups.)
Classement "NOT FINISHED": NOF (CR)
Classement "DISQUALIFIED": DIS (CR)
Classement "START ORDER": STO (CR)
all competitors that did not finished the race
all disqualified competitors
Start order for the 2nd heat (for BIBO)
Classement "ALL":
CALRT (CR)
Classement of the run time from all competitiors
CAL01RT (CR)
Classement of all run times of a lap (01 = lap 1)
CAL01SQ (CR)
Classement of all sequential times of a lap (01 = lap 1)
CALMT (CR)
Classement of the memory time from all competitors
CALTT (CR)
Classement of the total time from all competitors
CALITC2 (CR)
Classement of the intermediate time C2 from all competitors
Version: 021206
Page 107
T I M I N G
CALITC3(CR)
CALITC4(CR)
CALITC5(CR)
CALITC6(CR)
CALITC7(CR)
CALITC8(CR)
CALITC9(CR)
CALBRT(CR)
CALRRT(CR)
CALLRT(CR)
TdC 8000
Page 108
Classement of the intermediate time C3 from all competitors
Classement of the intermediate time C4 from all competitors
Classement of the intermediate time C5 from all competitors
Classement of the intermediate time C6 from all competitors
Classement of the intermediate time C7 from all competitors
Classement of the intermediate time C8 from all competitors
Classement of the intermediate time C9 from all competitors
Classement of all competitor of the BLUE course for Dual Timer
Classement of all competitor of the RED (right) course for Dual Timer
Classement of all competitor of the left course for Dual Timer
Classement "GROUPS" and "ALL"
CGRALRT(CR)
Group classement of the run time from all groups
CGRALMT(CR)
Group classement of the memory time from all groups
CGRALTT(CR)
Group classement of the total time from all groups
CGRALITC2(CR) Group classement of the intermediate time C2 from all groups
CGRALITC3(CR) Group classement of the intermediate time C3 from all groups
CGRALITC4(CR) Group classement of the intermediate time C4 from all groups
CGRALITC5(CR) Group classement of the intermediate time C5 from all groups
CGRALITC6(CR) Group classement of the intermediate time C6 from all groups
CGRALITC7(CR) Group classement of the intermediate time C7 from all groups
CGRALITC8(CR) Group classement of the intermediate time C8 from all groups
CGRALITC9(CR) Group classement of the intermediate time C9 from all groups
CGRALLBRT(CR) Group classement of the BLUE course for Dual Timer
CGRALLRRT(CR) Group classement of the RED (right) course for Dual Timer
CGRALLLRT(CR) Group classement of the left course for Dual Timer
Classement "GROUPS" and "SINGLE":
After the instruction for "GROUPS" and "SINGLE" you must input the groups. Input each group with a
2 character number and confirm it with a carriage return. Input after the last group 00 and a carriage
return.
CGRSIRT(CR)
Group classement of the run time from selected groups
CGRSIMT(CR)
Group classement of the memory time from selected groups
CGRSITT(CR)
Group classement of the total time from selected groups
CGRSIITC2(CR)
Group classement of the intermediate time C2 from selected groups
CGRSIITC3(CR)
Group classement of the intermediate time C3 from selected groups
CGRSIITC4(CR)
Group classement of the intermediate time C4 from selected groups
CGRSIITC5(CR)
Group classement of the intermediate time C5 from selected groups
CGRSIITC6(CR)
Group classement of the intermediate time C6 from selected groups
CGRSIITC7(CR)
Group classement of the intermediate time C7 from selected groups
CGRSIITC8(CR)
Group classement of the intermediate time C8 from selected groups
CGRSIITC9(CR)
Group classement of the intermediate time C9 from selected groups
CGRSILBRT(CR) Group classement of the BLUE course for Dual Timer from selected groups
CGRSILRRT(CR) Group classement of red (right) course from selected groups (Dual Timer)
CGRSILLRT(CR) Group classement of the left course for Dual Timer from selected groups
01(CR)
e.g. group 1
04(CR)
e.g. group 4
07(CR)
e.g. group 7
00(CR)
finish with this input
Version: 021206
Page 108
T I M I N G
TdC 8000
Page 109
Classement "CLASS":
After the instruction for "CLASSES" input the classes. You can make a class out of different start
number blocks. Each start number block has the first and last start number (each four digits) of a
continues sequence. Both start numbers are separated by a hyphen. Each number block is
separated by a carriage return. Input after the last number block 0000-0000 and carriage return.
CCLRT(CR)
Classement of the run time from start number blocks (classes)
CCL01RT(CR)
Classement of run times of a lap (01=lap) from start number blocks (classes)
CCL01SQ(CR)
Classement of sequential times of a lap (01 = lap 1) from start number blocks
CCLMT(CR)
Classement of the memory time from start number blocks (classes)
CCLTT(CR)
Classement of the total time from start number blocks (classes)
CCLITC2(CR)
Classement of the intermediate time C2 from start number blocks (classes)
CCLITC3(CR)
Classement of the intermediate time C3 from start number blocks (classes)
CCLITC4(CR)
Classement of the intermediate time C4 from start number blocks (classes)
CCLITC5(CR)
Classement of the intermediate time C5 from start number blocks (classes)
CCLITC6(CR)
Classement of the intermediate time C6 from start number blocks (classes)
CCLITC7(CR)
Classement of the intermediate time C7 from start number blocks (classes)
CCLITC8(CR)
Classement of the intermediate time C8 from start number blocks (classes)
CCLITC9(CR)
Classement of the intermediate time C9 from start number blocks (classes)
CCLBRT(CR)
Classement of the run time from blocks (classes) from the blue course (Dual Timer)
CCLRRT(CR)
Classement of the run time from blocks (classes) from the red (right) course (Dual Timer)
CCLLRT(CR)
Classement of the run time from blocks (classes) from the left course (Dual Timer)
0001-0024(CR)
Start number block, e.g. form StNo. 1 to StNo. 24
0065-0073(CR)
Start number block, e.g. form StNo. 65 to StNo. 73
0105-0124(CR)
Start number block, e.g. form StNo. 105 to StNo. 124
0000-0000(CR)
Finish with this input
Classement "LEADING TEN":
CFTRT(CR)
Classement of the leading ten run times
CFT01RT(CR)
Classement of the leading ten run times of a lap (01=lap)
CFT01SQ(CR)
Classement of the leading ten sequential times of a lap (01 = lap 1)
CFTMT(CR)
Classement of the leading ten memory times
CFTTT(CR)
Classement of the leading ten total times
CFTITC2(CR)
Classement of the leading ten intermediate times from channel C2
CFTITC3(CR)
Classement of the leading ten intermediate times from channel C3
CFTITC4(CR)
Classement of the leading ten intermediate times from channel C4
CFTITC5(CR)
Classement of the leading ten intermediate times from channel C5
CFTITC6(CR)
Classement of the leading ten intermediate times from channel C6
CFTITC7(CR)
Classement of the leading ten intermediate times from channel C7
CFTITC8(CR)
Classement of the leading ten intermediate times from channel C8
CFTITC9(CR)
Classement of the leading ten intermediate times from channel C9
CFTBRT(CR)
Classement of the leading ten of the BLUE course for Dual Timer
CFTRRT(CR)
Classement of the leading ten of the RED (right) course for Dual Timer
CFTLRT(CR)
Classement of the leading ten of the left course for Dual Timer
Classement "SINGLE":
After the instruction for "SINGLE" you must input the start numbers. Input each start number with a 4
character number and confirm it with a carriage return. Input after the last number 0000 and a carriage
return.
CSIRT(CR)
Classement of the run time of individual start numbers
CSI01RT(CR)
Classement of the run time of a lap (01=lap) with individual start numbers
CSI01SQ(CR)
Classement of the sequential times of a lap with individual start numbers
CSIMT(CR)
Classement of the memory time of individual start numbers
CSITT(CR)
Classement of the total time of individual start numbers
0001(CR)
input start number
0005(CR)
input start number
0012(CR)
input start number
0000(CR)
finish with this input
Version: 021206
Page 109
T I M I N G
TdC 8000
Page 110
Classement "ADD":
After the instruction for "ADD" you must input the start numbers that you want added. Input each
start number with a 4 character number and confirm it with a carriage return. Input after the last
number 0000 and a carriage return.
CADRT(CR)
Add run times from competitors
CAD01RT(CR)
Add run times of a lap (01=lap) from competitors
CAD01SQ(CR)
Add sequential times of a lap (01 = lap 1) from competitors
CADMT(CR)
Add memory times from competitors
CADTT(CR)
Add total times from competitors
CADITC2(CR)
Add intermediate times from channel C2 from competitors
CADITC3(CR)
Add intermediate times from channel C3 from competitors
CADITC4(CR)
Add intermediate times from channel C4 from competitors
CADITC5(CR)
Add intermediate times from channel C5 from competitors
CADITC6(CR)
Add intermediate times from channel C6 from competitors
CADITC7(CR)
Add intermediate times from channel C7 from competitors
CADITC8(CR)
Add intermediate times from channel C8 from competitors
CADITC9(CR)
Add intermediate times from channel C9 from competitors
0001(CR)
input start number
0005(CR)
input start number
0012(CR)
input start number
0025(CR)
input start number
0000(CR)
finish with this input
Classement "PROTOCOL" and "ALL":
PALST(CR)
Protocol of all start times
PALFT(CR)
Protocol of all finish times
PALRT(CR)
Protocol of all run times
PALSQ(CR)
Protocol of all sequential times (lap times)
PALMT(CR)
Protocol of all memory times
PALTT(CR)
Protocol of all total times
PALITC2(CR)
Protocol of all intermediate times of channel C2
PALITC3(CR)
Protocol of all intermediate times of channel C3
PALITC4(CR)
Protocol of all intermediate times of channel C4
PALITC5(CR)
Protocol of all intermediate times of channel C5
PALITC6(CR)
Protocol of all intermediate times of channel C6
PALITC7(CR)
Protocol of all intermediate times of channel C7
PALITC8(CR)
Protocol of all intermediate times of channel C8
PALITC9(CR)
Protocol of all intermediate times of channel C9
PALBRT(CR)
Protocol of all run times of the blue course for Dual Timer
PALRRT(CR)
Protocol of all run times of the red (right) course for Dual Timer
PALLRT(CR)
Protocol of all run times of the left course for Dual Timer
Classement "PROTOCOL" and "SINGLE":
After the instruction for "PROTOCOL" and "SINGLE" input the start number blocks. You can use
more than one start number block. Each start number block has the first and last start number (each
four digits) of a continuous sequence. Both start numbers are separated by a hyphen. Each number
block is separated by a carriage return. Input after the last number block 0000-0000 and carriage
return.
PSIST(CR)
Protocol of selected start times
PSIFT(CR)
Protocol of selected finish times
PSIRT(CR)
Protocol of selected run times
PSISQ(CR)
Protocol of selected sequential times (lap times)
PSIMT(CR)
Protocol of selected memory times
PSITT(CR)
Protocol of selected total times
PSIITC2(CR)
Protocol of selected intermediate times of channel C2
PSIITC3(CR)
Protocol of selected intermediate times of channel C3
Version: 021206
Page 110
TdC 8000
T I M I N G
PSIITC4(CR)
PSIITC5(CR)
PSIITC6(CR)
PSIITC7(CR)
PSIITC8(CR)
PSIITC9(CR)
PSIBRT(CR)
PSIRRT(CR)
PSILRT(CR)
0001-0024(CR)
0065-0073(CR)
0105-0124(CR)
0000-0000(CR)
8.3.
Page 111
Protocol of selected intermediate times of channel C4
Protocol of selected intermediate times of channel C5
Protocol of selected intermediate times of channel C6
Protocol of selected intermediate times of channel C7
Protocol of selected intermediate times of channel C8
Protocol of selected intermediate times of channel C9
Protocol of selected run times of the blue course for Dual Timer
Protocol of selected run times of the red (right) course for Dual Timer
Protocol of selected run times of the left course for Dual Timer
Start number block, e.g. form StNo. 1 to StNo. 24
Start number block, e.g. form StNo. 65 to StNo. 73
Start number block, e.g. form StNo. 105 to StNo. 124
Finish with this input
RS 485 Interface (16, 23, 28)
no function
Transfer Speed:
Pin Arrangement:
8.4.
30 kBaud
see page 103
Display Board Interface (24)
Transfer Format: 1 start bit, 8 data bit, no parity bit, 1 stop bit
Transfer Speed: 2.400 Baud (adjustable 4.800, 9600, 19200 Baud)
Transfer Protocol:ASCII
The display board interface has two different channels:
Channel 1:
running time
Channel 2:
running time and classement or run time and classement
Attention:
Switch between channel 1 and channel 2 by turning the plug of socket (24) 180°.
Channel 1 has always the same output as shown in display 7 and 8. The adjusted display time (see
menu 4 on page 46) is always valid for display 7 and 8 and channel 1 of the display board interface
(24). Channel 1 does not output a classement.
You can switch channel 2 in the main menu (menu 20 on page 51) between running and standing
time (run time). On channel 2 you have always an output of the classement.
NNN.xxxxxxxxM:SSxxxx(CR)
running time (without 1/10 seconds)
NNN.xxxxHH:MM:SSxxxx(CR)
running time (without 1/10 seconds)
NNN.xxxxHH:MM:SS.zxx(CR)
running time (with 1/10 seconds)
NNNCxxxxHH:MM:SS.zhtRR(CR)
channel C1, run time with rank
NNNCxxxxHH:MM:SS.zhtxx(CR)
channel C1, run time without rank
NNNDxxxxHH:MM:SS.zhtRR(CR)
channel C1, total time with rank
NNNDxxxxHH:MM:SS.zhtxx(CR)
channel C1, total time without rank
NNNAxxxxHH:MM:SS.zhtRR(CR)
channel C2, intermediate time 1
NNNBxxxxHH:MM:SS.zhtRR(CR)
channel C3, intermediate time 2
NNNExxxxHH:MM:SS.zhtRR(CR)
channel C4, intermediate time 3
NNNFxxxxHH:MM:SS.zhtRR(CR)
channel C5, intermediate time 4
NNNGxxxxHH:MM:SS.zhtRR(CR)
channel C6, intermediate time 5
NNNHxxxxHH:MM:SS.zhtRR(CR)
channel C7, intermediate time 6
NNNIxxxxHH:MM:SS.zhtRR(CR)
channel C8, intermediate time 7
NNNJxxxxHH:MM:SS.zhtRR(CR)
channel C9, intermediate time 8
NNNSxxx©xxxxsxss.ssxRR(CR)
Speed
ANNNxxxxxHH:MM:SS.zhtRR(CR)
sequential time for program Split-Sequential
Version: 021206
Page 111
TdC 8000
T I M I N G
NNN
.
A,B,C, ...,H,I,J
A,B,C, ...,H,I,J
HH:MM:SS.zht
©
RR
x
(CR)
Page 112
start number (3 digit)
a point on the fourth digit is the identification for a running time
address for display board (digit 1)
identification of the channel (digit 4)
time in hours, minutes, seconds, and 1/1000 seconds
speed measurement: output of the following ASCII characters
01 Hex. for km/h, 02 Hex. for m/s, 03 Hex. for mph
rank
blank
carriage return
Pin Arrangement:
see on page 102
Cable from TdC 8000 to display board GAZ4:
Cable form TdC 8000 to Teledata TED-TX with supply:
010-10
107-10
In the main menu you can do the following adjustment for the display board interface (24):
Display Time 1:
Menu 4:
DISPLAY TIME 1 = 03 s
You can adjust the amount of time that it shows a stopped time on the display (7) or display board.
This time we call display time 1. You can select the display time between 0 and 99 seconds.
Menu 4: DISPLAY Time 1 = 03 s
Save with:
input seconds with finish keyboard (15)
ENTER
Confirm input with <ENTER>
Pre adjusted value: Display Time 1 = 3 seconds
Display Time 2:
Menu 5:
DISPLAY TIME 2 = 03 s
You can adjust the amount of time that it shows the second stopped time in the second heat (total
time or run time) on the display (7) or display board. This time we call display time 2. You can select
the display time between 0 and 99 seconds.
Menu 5: DISPLAY Time 2 = 03 s
Save with:
input seconds with finish keyboard (15)
ENTER
Confirm input with <ENTER>
Pre adjusted value: Display Time 2 = 3 seconds
Display Board Baudrate:
Menu 19:
D-Board Baudrate = 2400 Bd
You can adjust the baud rate for the display board (24, 28): 2400, 4800, 9600, or 19200 baud.
When using the ALGE display board you must use 2400 baud.
Menu 19:
D-BOARD BAUDRATE
Save with:
ENTER
2400 Bd
4800 Bd
9600 Bd
19200 Bd
F1
Select with <F1>
F2
Select with <F2>
F3
Select with <F3>
F4 Confirm selection with <ENTER>
Pre adjusted value: D-Board Baudrate = 2400 Baud
Version: 021206
Page 112
TdC 8000
T I M I N G
Display Board Channel 2:
Menu 20:
Page 113
D-BOARD CHANNEL 2 = OFF
You can adjust the channel 2 of the display board interface (24). If you have channel two on it outputs
no running time (only run times). It outputs the classement always on channel 2. You can select
between channel 1 and channel 2 by turning the plug of the display board cable 180°.
Menu 20:
D-BOARD CHANNEL 2
Save with:
ENTER
ON
OFF
Pre adjusted value:
Version: 021206
= <F1>
= <F2>
ON
OFF<
F1
F2
output of run times
output of running time
Confirm selection with <ENTER>
run time and classement
running time and classement
D-Board Channel 2 is off (running time)
Page 113