1
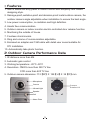
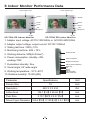
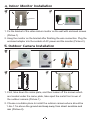
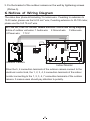
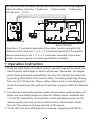
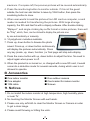
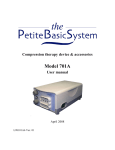
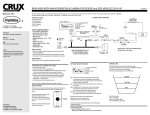
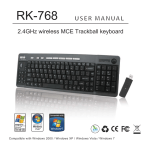
Instruction Manual
□ VP-701A SD
□ VP-703A SD
COLOR VIDEO DOOR PHONE KITS
CONTENT
PAGE
1. Features
2
2. Outdoor Camera Performance Data
2
3. Indoor Monitor Performance Data
3
4. Indoor Monitor Installation
4
5. Outdoor Camera Installation
4
6. Notices of Wiring Diagram
5
7. Operation Instruction
6
8. Accessories
7
9. Notices
7
1.Features
1. Slim fit aluminum alloy panel of indoor monitor with simplicity and classic
designing style.
2. Damage-proof,oxidation-proof and abrasion-proof metal outdoor camera, the
outdoor camera angle adjustable when installation to ensure the best angle.
3. Low power consumption, no radiation and high definition.
4. Hands free communication.
5. Outdoor camera or indoor monitor electric-controlled door release function.
6. Monitoring the outside of house.
7. Fourteen chord musics.
8. Ring and volume of communication adjustable.
9. Enclosed an adapter and 15M cable with detail user munal suitable for
DIY Installation.
10. Automatically take photo function.
2.Outdoor Camera Performance Data
1. IR distance more than 4M
2. Automatic gain control
3. Working temperature: -20°C~50°C
4. Resolution: CMOS more than 380 TV line
CCD more than 420 TV line
5. Outdoor camera dimension: 112【W】X 158【H】X 38【D】mm
Microphone
Camera
Infrared Light
Speaker
Call
Name Plate
Camera
Rotation Hit
3.Indoor Monitor Performance Data
Power Indicator Light
Power Indicator Light
Speaker
Speaker
Monitor
Monitor
Unlock
Unlock
Talk
Microphone
Talk
Microphone
SD Slot
SD Slot
VP-701A SD Indoor Monitor
VP-703A SD Indoor Monitor
1. Adapter input voltage: AC110-120V/60Hz or AC220V-240V/50Hz
2. Adapter output voltage, output current: DC13V 1200mA
3. Talking last time: 120S±10%
4. Monitoring last time: 40S±10%
Power Socket
5. Working distance: 50M(5×0.5mm2)
6. Power consumption: standby <4W,
Chroma Adjuster
working<10W
Brightness Adjuster
7. Illumination intensity: 2lux
8. Visual angle: 92° wide-angle
DEL
9. Working temperature: -10°C~40°C
10. Relative humidity: 10-90%(RH)
Talking Volume Adjuster
Mode key
UP
Down
Delete
Volume Button
Music Selection
Specifications
Unit
7.0
Inch
Resolution
480 X 3 X 234
Dot
Active Area
154.1【H】X 86.58【V】
mm
Pixel Size
0.107【W】X 0.37【H】
mm
Parameter
Screen Size
Screen Figure Dimension 169.4【W】X 100【H】X 5.7【D】
mm
4.Indoor Monitor Installation
1
2
Bracket
1. Fix the bracket of the video indoor monitor on the wall with enclosed screws
. (Pictrue 1)
2. Hang the monitor on the bracket after finishing the wire connection. Plug the
enclosed adapter into the sockets of AC power and the monitor (Picture 2).
5.Outdoor Camera Installation
1
3
call within 30cm
140~170CM
2
30.0CM
1. First, take down the name plate, and then loosen off the screws which
are located under the name plate, take apart the metal front cover of
the outdoor camera (Picture 1).
2. Choose a suitable place to install the outdoor camera where should be
1.4m-1.7m above the ground and keep away from direct sunshine and
rain (Pictrue 2).
3. Fix the bracket of the outdoor camera on the wall by tightening screws
(Pictrue 3).
6.Notices of Wiring Diagram
The video door phone kit including 15 meters wire. If wanting to extension to
15-50 meter, please use the 5×0.5 mm2 wire; If wanting extension to 50-100 meter,
please use the 5×0.75 mm2 wire.
VP-701A SD/703A SD outdoor camera electronic control lock wiring diagram.
Notice of outdoor unit wires: 1.Audio wire
4.Power wire 7.12 V
2.Ground wire
3.Video wire
DC
13V
Lock
12345 678
1234567
Outdoor Camera
Indoor Monitor
When the 5, 6 connection terminals of the outdoor camera connect to the
electronic control lock, the 1, 2, 3, 4, 5 connection terminals of the indoor
monitor connecting to the 1, 2, 3, 4, 7 connection terminals of the outdoor
camera. It means users should pay attention to polarity.
VP-701A SD/703A SD indoor monitor electronic control lock wiring diagram.
Notice of outdoor unit wires: 1.Audio wire
4.Power wire 7.12 V
2.Ground wire
3.Video wire
DC
13V
123456 78
1234567
Lock
Outdoor Camera
Indoor Monitor
When the 6, 7 connection terminals of the indoor monitor connect to the
electronic control lock, the 1, 2, 3, 4, 7 connection terminals of the outdoor
camera connecting to the 1, 2, 3, 4, 5 connection terminals of the indoor
monitor. It means users do not need pay attention to polarity.
7.Operation Instruction
1. Press the CALL button of outdoor camera, graceful rings will be heard from
indoor monitor and images of visitors will be seen. Meanwhile, the images
will be taken and saved automatically. The host can talk with the visitor just
by pressing TALK button of the indoor monitor. The talking and image showing
time can last 120 seconds. When outdoor station turns to auto-taking-photo
mode, the camera will take pictures of anything or anyone within the detection
area.
2. Considering checking the pictures easily, pictures taken under pressing call
button and auto-taking modes are stored in different areas, remarked with
" D" and "M" respectively. Pictures taken under auto-taking mode can’t be
deleted one by one. Only press the delete button continuously to delete
them all. The maximum storage capacity is 200 pieces.
3. 1G SD card can store 20000 pieces of pictures, supporting 16G SD at a
maximum. If no space left, the previous pictures will be covered automatically.
4. Press the monitoring button to monitor outside. If it is not the guest
outside, the host can ask him/her to leave by TALK button, then press the
monitoring button to close.
5. When user wants to read the pictures from SD card on computer, a card
reader is needed for transferring the pictures. With large storage
capacity, the SD card itself is with a dispaly software. After double-clicking
"Mplayer", and single-clicking tay-suffix format or index pictures, there will
be "Play", which, then, can be clicked to display the pictures one
by one automatically or manually.
6. 14 polyphonic melodies available.
7. Press up, down button to browse the photo
saved. Press up, or down button continuously
will display the pictures automatically. Press
any key (mode, up, down, function ) or final page will stop auto-display.
8. Press the menu button with up, down button to adjust the time. No need to
adjust again when power is off.
9. When the product is re-turned on, or changed with a new SD card, it would
come into a detection mode for several seconds, during which user is not
allowed to operate.
8.Accessories
■ One indoor monitor
■ One adapter
■ 15M cable
■ One outdoor camera
.
■ One bracket for indoor monitor
■ Screws
9.Notices
1. Do not install the indoor monitor at high temperature, high humidity place
or near TV.
2. No touching the Monitor Screen with wet hands.
3. Please use only softcloth to clear the Monitor Screen or Camera in order
to get a clear image.
4. Please avoid throwing or hitting the units.
5. Image could be illegible if the camera is shined by the strong sunlight.
6. If host uses the internal wireless communication systems, image may be
fuzzy because of interference from radio waves.
7. If there is a problem in saving images of checking picture occasionally, please
check whether SD card is installed correctly, or re-install the SD card.
8. Please choose SPI agreement mode, common low speed SD card.
9. Turning on the product or plugging in SD card will have a reading procedure,
and reading last time depends on the pictures' quantity saved
10. SD card should not be used with other appliances