1
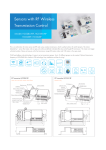
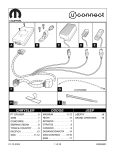
INTERFACING SOLUTIONS
REAR-VIEW WITH VIM INTEGRATION & CAMERA FOR DODGE and JEEP VEHICLES 2014-UP
Rev. 080215
RVCCH-75C
CONNECTIONS OVERVIEW
PARTS INCLUDED:
U-CONNECT 8.4” SCREEN
U-CONNECT 5” 6-BUTTON/ 2 KNOB
CHRYSLER:
2015 -2015 300 (See note below)
DODGE:
2014 -2015 Durango
JEEP:
2014 -2016 Grand Cherokee
NOTE:
2015 Chrysler 300 must NOT have a
separate CD slot. If a separate CD slot
is present (2-Piece radio), use Part#
RVCCH-75K.
(1) Camera (CH-75C)
(1) 20 ft. Extension
(1) CH-75C Interface
(1) CH-75C Harness
(1) Instruction
4-PIN BARREL
CONNECT FOR CAMERA
POWER AND SIGNAL
CAN-BUS INTERFACE
1. On = Enable VIM (PERMANENT)
2. On = Enable RVC
3. Not Used
4. On = Enable Force RVC
5. May Vary
6. May Vary
ON
1
- Lens Angle 170 Degrees
- Resolution 420 TV Lines
- Min. Illumination 0.2Lux
- Voltage 12V
- Operating Temp. -22˚F - 176˚F
- NTSC
- Reference Lines
- Shutter Speed 1/60s - 20us
- Waterproof
- Pixels 656 x 492
2
3
4
5
6
12V
OPTIONAL /
TOGGLE SWITCH
NOT INCLUDED
20 FT .
EXTENTION
FUSE
(NOT INCLUDED)
GREEN / 12V POWER SWITCH
(SAME FUNCTION AS DIP 1)
NON-PERMANENT
RED /
12V POWER
WHITE / 12V OUTPUT
TO FACTORY
DISPLAY
BLACK
BLACK /
GROUND
8-PIN
YELLOW RCA /
VIDEO SIGNAL
VIDEO-IN
(male plug)
(male plug)
RED BARREL /
12V CAM POWER
52-PIN
52-PIN
(male plug)
PRECAUTIONS:
- Remove the negative side of the battery to avoid any short circuits
during the installation.
- Do not install the interface near any major components or near the
HVAC system. This may cause damage or overheating to the vehicle.
(female plug)
DOES NOT REQUIRE YOU TO
TAP FOR REVERSE SIGNAL
(SIGNAL IS FROM MODULE)
MAKE SURE TO TEST THE CAMERA BEFORE
RE-INSTALLING THE RADIO
TO FACTORY
HARNESS
PRELIMINARY:
Please read the entire manual before installing this interface.
SETTING THE DIP SWITCHES
INSTALLING THE CAMERA AND CABLE
1. Remove the rear lip panel.
2. Drill a 5/8 size hole in the available location
3. Fish the wires thought the drilled hole and through the pass through
into the trunk/cargo area. Make video and power connection.
5. Remove the factory radio to gain access to the factory connectors.
5. Route the wires towards the radio and make the power and video
connections. For powering up the camera, use the 12V OUTPUT
(White Wire). (See Overview)
6. Test the camera before re-installing the radio.
Note: The camera is defaulted to power down after 10 seconds.
FORCE REVERSE
The force reverse is used to view the back-up camera when the vehicle
is not in reverse gear. Allows you to view what is in the back while
driving.
SEEK UP
To activate this feature make sure the
dip switch settings are correct.
Then simply press the center button
once on the Left Hand steering wheel
control.
IMPORTANT:
Compatible Radio Type:
U-CONNECT 8.4” SCREEN
U-CONNECT 5” 6-BUTTON/ 2 KNOB
Note: The camera is defaulted to power
down after 10 seconds.
PRESS
ON
1
2
3
4
5
6
1. On = Enable VIM (PERMANENT)
2. On = Enable
3. Not Used
4. On = Enable Force RVC
5. May Vary
6. May Vary
Dip 1: Activates the Video In-Motion feature. The DIP switch
is the permanent solution for keeping the VIM unlocked.
Use the Green wire with a toggle switch for a non-permanent
solution. (Switch not included)
Dip 2: Activates the Rear-View Camera image when the vehicle is in
reverse gear.
Dip 4: Activates the “Force Rear-View Camera” while driving.
Force Rear-View Camera allows the driver to view the
rear-view camera when not in the Reverse gear.
Dip 5 & 6: Varies, these switches are defaulted to OFF.
If the radio is having turn-on issues please try the following:
Attempt One: Set both 5 & 6 to the ON position.
Attempt Two: Set 5 to On and 6 to OFF.
Attempt Three: Set 5 to OFF and 6 to ON.
If none of the above solutions work out for your vehicle please
contact tech support.
SEEK DN
TROUBLE SHOOTING
1. No video display while in reverse.
- Make sure the DIP switches are in the correct position.
PARKING LINE
The parking lines are there to assist you while reversing.
To activate the parking lines simply connect the GREEN wires located
near the 4 pin camera connector in the back
To invert the image simply connect the WHITE wires.
GREEN
YELLOW
RED
What the lines mean:
Green Line: CLEAR
Yellow Line: GETTING CLOSE
Red Line: WARNING - VERY CLOSE
REAR-VIEW WITH VIM INTEGRATION & CAMERA FOR DODGE and JEEP VEHICLES 2014-UP
INTERFACING SOLUTIONS
RVCCH-75C
U-CONNECT 8.4” SCREEN
U-CONNECT 5” 6-BUTTON/ 2 KNOB
COMPATIBLE RADIOS:
8.4” SCREEN
(SEPARATE KNOBS)
5” SCREEN
6-BUTTON
(SEPARATE
KNOBS)
CHRYSLER:
2015 -2015 300 (See note below)
DODGE:
2014 -2015 Durango
JEEP:
2014 -2016 Grand Cherokee
NOTE:
2015 Chrysler 300 must NOT have a
separate CD slot. If a separate CD slot
is present (2-Piece radio), use Part#
RVCCH-75K.
CONNECTOR VIEW:
Here is a Pin View of the RED 52-Pin Connector.
4.3” SCREEN
4-BUTTON
(2 KNOBS)
NOT COMPATIBLE RADIO
DOES NOT SUPPORT COLOR
IMPORTANT:
Compatible Radio Type:
U-CONNECT 8.4” SCREEN
U-CONNECT 5” 6-BUTTON/ 2 KNOB
Rev. 080215