1
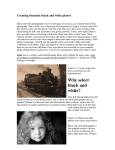
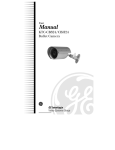
Photography Techniques from HP
You don't have to be a professional photographer to take pictures like one. To achieve outstanding
photos, you just need to know what professionals know! With recent technological advances in digital
photography, taking more professional-looking photos is easier than ever. By identifying the timehonored techniques that pros use, you can produce engaging photographs with your own digital
camera. Each lesson in this course will guide you through some essential photographic principles as
you learn tips to improve your photography skills.
You'll begin by learning how to take better
photos of people by controlling lighting,
backgrounds, composition, and poses. Next,
you'll discover the secrets of landscape and
architecture photography as you explore
principles such as framing, vantage point, and
the rule of thirds. The principles of achieving
dramatic black and white photography and
extreme close-ups will be revealed as you
learn how to shoot like a pro.
After each lesson, be sure to complete the assignments and quizzes. When you have completed those,
visit the Message Board. It's the perfect place to discuss course topics and swap questions, comments,
and tips with other students and your instructor.
What you'll need for this class
•
•
•
A digital camera
The user manual for your camera
Photo editing software (optional)
If you can't locate the user manual for your camera, check the camera manufacturer's Web site.
Photographing people
Perhaps more than any other type of photography, photos of people evoke emotion and create human
interest. Portraits capture a moment in an ever-changing world, recording that memory for the future.
When you're photographing a graduate, a newly engaged couple, a gathering of family members, or a
newborn baby, you want to achieve the best photo possible.
Technology has made taking great photos easier than ever, but photography is still a creative art -- and
every photographer has his or her own style of expression. So what makes some portraits more
appealing than others? Professional photographers understand the fundamentals of selecting good
locations, controlling lighting, and engaging the subjects, as well as composing a good shot, finding
flattering camera angles, and avoiding red-eye. You can use those fundamentals to improve your own
photos as well.
The piece of sound real estate advice you always hear -- "Location, location, location!" -- is critical in
portrait photography as well. Cluttered, distracting backgrounds can ruin technically perfect
photographs by drawing attention away from the most important element of your photo: the people. A
busy background competes for attention, reducing the impact of your photo.
When selecting the background, professional photographers strive for simple scenes with a minimum
of pattern, shape, and color variation. To achieve professional results, try looking for a location with
the eyes of a pro.
Tips for selecting a good location
•
If you can shoot outdoors, a spot with simple mid-tones such as foliage, a wall, or the beach is
ideal. Try to find a shady spot if it's a sunny day. The location in Figure 1-1 works well
because the leaves of the trees provide both shade and a wash of green color.
Figure 1-1: Foliage provides a pleasing
backdrop for outdoor portraits.
•
When shooting indoors, pose your
subjects against a blank wall, a
curtained window, or a sheet or
blanket hanging on the wall. This
allows your subjects to take center
stage. The neutral background in
Figure 1-2 allows your eyes to be
drawn to the mother and daughter.
Figure 1-2: A neutral wall provides a nice backdrop for indoor
portraits.
•
•
If your subjects have darker skin, select a background
that is similar in tone. This helps you achieve correct
exposure and keeps the focus on the subject.
Shoot photos where the professionals do. Research
photographers in your area to find out where they like to
take photographs. Are the botanical gardens a popular
spot? How about scheduling some time in a local park,
historical home, or museum? Local magazines and Web
sites are good sources for location cues.
When busy backgrounds
can't be avoided
Remind yourself to look for background elements that might merge with your photo, such as trees,
lamp posts, and poles. Background elements like this might cause unfortunate results such as
appearing to be growing out of a person's head when the photograph is viewed. When this type of
element cannot be avoided, change the angle from which you are shooting so that the effect is
eliminated or minimized.
For instance, look at Figure 1-3. The tree is coming almost directly out of the top of the young boy's
head. If the photographer had shifted to the right, the tree would be on the right side of the frame
instead.
Figure 1-3: Reposition the shot to eliminate
distracting background details.
When a busy background cannot be avoided,
you can correct the photograph by using your
camera settings to blur the background. Select
Portrait mode or use Aperture Priority mode
with a low f-stop such as 4.0 to create a
shallow depth of field, which keeps the
subject in focus but blurs the surroundings.
To get more information about depth of field,
read these tips.
Meaningful locations
One way to add significance to your photograph is to choose a location that is meaningful to your
subject. If your subject is a handyman, try photographing him in his workshop. If your subject is a
teacher, choosing her classroom for the photo shoot adds interest and relevance to the photo. If you
live near a famous landmark, use the landmark as a backdrop. When you're taking a family picture, the
family home might be the perfect location. Photographing people in their own environment gives
character to the picture and relaxes the subjects so that a more flattering photograph can be captured.
Figure 1-4 shows how photographing the gardener in her greenhouse produced a relaxed, natural
expression.
Figure 1-4: Photographing people in a
meaningful location relaxes them and adds
meaning to the portrait.
Once you have selected a good location, the
next step is to control the lighting in the
environment. Up next: learn to solve lighting
challenges both indoors and outdoors.
Because all photos capture the effect of light
on a subject, lighting is one of the most
important factors in photography.
Professional photographers understand the effect of light on the shadows, color, and quality of their
photos. By learning what professionals know about light, you can make informed lighting choices
when shooting your own portrait pictures.
Natural light
Most professional photographers feel that natural light is the most flattering lighting environment for
portraits because natural light captures the full color range, visually warming the skin. Natural light
can be used both outdoors and indoors.
Using natural light outdoors
When you are shooting photos outdoors during the day, using natural light makes sense. To use
sunlight in your outdoor portrait shoot, a classic technique is to position yourself so that the sun is
behind you and to one side. This allows sun to shine on the subject's face, but not directly in their eyes.
The photographer in Figure 1-5 forgot to stand to the side, causing the children to squint at the camera.
Figure 1-5: The kids in this photo are squinting at the sun behind
the photographer.
Arrange your subject carefully, paying attention to the shadows
that the light is casting. Make sure that the light is
complimentary to your subject's features, not casting
unflattering shadows. Try taking shots from several different
points, then review the pictures on your camera's LCD screen to
determine the most pleasing shooting arrangement.
On a bright day without cloud cover, position your subject in a
shady area, then use the camera's on-board flash to fill in
shadows and brighten your subject's face. A white poster board
or car dashboard sun reflector can also be used to bounce
sunlight. Arrange the reflector so that it catches the light, then
fills the shadows in shady areas.
Be aware of backlit scenes. When a subject is illuminated from
behind, the light causes a soft, glowing halo and a silhouetted figure. Backlit scenes can also cause
your subject's facial features to be obscured by shadows. When your location is backlit to the point
that your subject is silhouetted, use the fill flash or reflector to cast light on your subject's face. Figure
1-6 shows a great example of this kind of
photo.
Figure 1-6: The fill flash was used to
illuminate the subject's face in this backlit
photo.
Overcast days are ideal for outdoor portrait
photography because the soft light is diffused
through the clouds, creating a pleasant,
flattering light that's perfect for portrait
photography.
Time Matters
It's important to understand how the time of the day will affect natural light. Most professional
photographers prefer to shoot portraits in the early morning or late afternoon. Here's why:
•
•
•
Midday light is the brightest light of the day, producing the clearest, sharpest photos. At
midday, the light casts a cool, blue cast which is so bright it can blow out the color in your
photos. Direct sunlight is not ideal for portraits because it casts harsh shadows under the eyes
and chin -- this accentuates wrinkles and exaggerates facial features. Midday light can also
cause your subjects to squint.
Professionals call late afternoon the "golden hour" because afternoon light is soft and gives a
warm, golden glow with soft contrasts. The sun is shining from an angle at this time of day -the angled light gives depth to photographic subjects, enhancing features.
Early morning is also a great time to capture photos with natural light. Like the golden hour,
sunrise light shines at an angle, accentuating your subject's features while casting a flattering
glow.
Figure 1-7: Morning light casts a warm, golden glow.
It's usually easier to photograph a large group outside. It can be
difficult to find a well-lit space inside a home or building that is
large enough to accommodate a large group photograph. Also,
moving a group outdoors makes finding a uniform background
easier.
While natural light is most plentiful outdoors, it can also be used
to shoot indoor portraits during bad weather, high winds, or
temperature extremes that would prevent you from shooting
outside.
Using natural light indoors
You've learned that professional photographers consider natural
lighting to be one of the most flattering ways to light a portrait.
But what if you are shooting a portrait indoors? You can still
use natural light by positioning your subject near a large window. Conventional wisdom dictates that
north-facing windows with plenty of indirect sunlight are the best choice. But any window or sliding
glass door that admits soft, diffused light through blinds or window coverings will allow you to
capture the beauty of your subject without a flash. Photographers call this ambient light or available
light. Like outdoor photography, the warm tones of sunrise and sunset light will light up your subject's
face with a soft, flattering glow. Figure 1-8 illustrates the beautiful effect that can be achieved when
natural light is used.
Figure 1-8: Ambient light illuminates a
subject with a soft, flattering effect.
When using sunlight through a window, you
can position your subject to achieve the effect
you desire:
•
Front lighting: Create front lighting
by having your subject face the
window so that the light source is
illuminating the subject's features. The
light source will be behind you while
you take the photo. If more light is
needed, ask the subject to hold a piece
of white poster board in his or her lap,
slightly curving the ends upward. This
will bounce more soft, natural light
onto your subject.
•
•
Side lighting: Create side lighting by turning your subject to the side. Use the soft light to
illuminate your subject from an angle for a pleasing effect. Use the reflective poster board to
fill any harsh shadows with light. Because you rarely see anyone in real life who is illuminated
from a light source directly in front of them, side
lighting creates a more believable effect.
Figure 1-9: Side lighting gives a pleasing, believable effect.
When selecting a window for ambient lighting, remember to
keep the fundamentals of choosing a location in mind. Living
areas and dining areas with large windows and a minimum of
background clutter are good choices for indoor portraits. Busy
game rooms and kitchens might include too many distracting
background elements.
Why shoot natural light portraits indoors?
In extreme climates or bad weather, indoor natural lighting is a
good choice. It allows you to capture beautiful portraits of
people who would be uncomfortable outside, like the elderly or
infants.
Indoor natural lighting is especially helpful when photographing
babies who tend to squint when out of doors. Arrange a pile of blankets on the floor next to a large
window. Position the baby on the blankets to take advantage of the light while the baby remains happy
and comfortable, like the baby in Figure 1-10.
Figure 1-10: Indoor photography keeps
subjects happy and comfortable.
On occasion, you will find yourself shooting
portraits when the ambient lighting is too poor
or doesn't exist at all. When this occurs, you
will need to find other sources of light to
illuminate the scene.
Photos shot without enough light appear
grainy, washed out, and dark. When
circumstances call for shooting inside a
poorly lit room, look for alternate sources of light. Although your first instinct may be to use your
camera's on-board fill flash to light a darkly lit room, it's a good idea to search for additional light
sources instead. Shooting in dark rooms where the main light source is your flash will not give you
good quality exposures.
Straight-on flash photography often flattens facial features, producing a dull photo. Fill flashes usually
produce a harsh, unflattering light. Manufactured to work within a short range, your subjects may be
too far away for the fill flash to reach.
An on-board flash is designed for (and does a good job of) filling in dark shadows caused by other
light sources, but isn't the best choice for creating flattering portrait lighting. Many professional
photographers use expensive lighting equipment for shooting portraits indoors -- but with a little
ingenuity, you can achieve bright and interesting effects with lights around your home.
Do-it-yourself studio lighting
Instead of using the fill flash, gather floor lamps, table lamps, and spotlights from your home.
Handyman types may have several hanging or clip-on lights you can use to direct light at pleasing
angles. Arrange them so that they are outside of the range of your photo while illuminating the scene.
Positioning the lights to the left and right of your subject allows the light to flood the area without
interfering with the light metering of your camera. A light within the camera viewfinder will trick the
camera into creating an underexposed photo.
Try bouncing light off of light-reflective surfaces such as walls and ceilings, keeping in mind that it is
easiest to bounce light in small rooms and hallways. Bounced light produces more natural, pleasing
effects because the light is diffused, adding depth and subtle shadows to the face of your subject.
To avoid unsightly shadows on the backdrop behind your subject, shine one light on the background
behind your subject.
Get creative with alternate sources of light. Try using candles, holiday tree lights, a bonfire, strings of
patio lights, fireworks, a fireplace, or other interesting light sources to achieve interesting effects.
Figure 1-11 shows how candles can illuminate a subject's face with soft light.
Figure 1-11: Find creative sources of lighting
such as candles on a birthday cake.
When using these alternate light sources, be
aware that using home lighting can give
photos a color cast. Incandescent lighting
(light bulbs) might cast a yellow or orange
color, while florescent lighting can cast a blue
or green tint. Learning how to use white
balance settings will help you achieve color
accuracy in your photos.
White balance
Light sources emit light at different color temperatures causing a color cast. Digital cameras use white
balance settings to compensate for this color shift and to achieve color accuracy. When using home
lighting, set the proper white balance on your camera. Doing so programs the camera to take into
account the color temperature of your light source. In Figure 1-12, the photo on the left is what the
photo looked without white balance settings; the photo on the right shows how white balance settings
read the light and adjusts colors accordingly.
Figure 1-12: Adjusting white balance corrects
color casts.
Enlarge image
Common digital camera white
balance settings
You'll need to explore your camera's user manual to discover your camera's exact white balance
settings. Here are some typical settings:
•
•
•
•
•
•
•
AWB or Auto: The default setting.
Manual or Custom: Lets you set the white balance yourself.
Tungsten: Corrects the color cast of incandescent or halogen lighting. Choose this setting if
you are using household lamps for your portrait shoot.
Fluorescent: Corrects cool or warm fluorescent lighting situations. Choose this setting if your
photo shoot is lit with fluorescent bulbs.
Sun or Daylight: Use in full sun.
Cloudy or Shade: Corrects photos taken at dusk or when your subject is positioned in the
shade.
Flash: This setting performs more satisfactorily than Auto White Balance when using the fill
flash.
Selecting the appropriate preset on your digital camera helps you to achieve more accurate,
professional-looking exposures.
You have learned several ways to photograph your subject without using the fill flash. On the
occasions when fill flash is necessary to achieve exposure, there are several things you can do to
optimize your photo, as you'll explore next.
Once you've made the decision to use the flash, the first thing you need to do is make sure that your
subjects are within the flash range. Most flashes emit a burst of light that extends six to 12 feet. Your
camera's user manual will contain this information.
If you're photographing a group of people, position the subjects so that they are all approximately the
same distance from the camera so that no one remains in dark shadows. Figure 1-13 shows a good
arrangement for flash photography.
Figure 1-13: A good arrangement where all subjects are within
range of the flash.
Remove any reflective surfaces, such as glass, that will cause
hot spots or flares in your photo. If your subject wears glasses,
ask him to turn his head slightly. This creates an angle,
preventing unwanted flash reflections. The angle of the subject's
head in Figure 1-14 prevented a flare in his glasses.
Figure 1-14: Avoid
unwanted flash
reflections by
asking the subject
to turn their head
slightly.
Avoid deep
shadows on the background behind your subjects by
positioning them a good distance away from the
backdrop. Taking a few test shots will help you determine
the optimum distance.
Try turning your digital camera upside down before
taking the photo so that the flash fills your subject's face
with light from below instead of above. This change
positions the flash below the lens, bouncing light at a
more flattering angle.
Using a flash can have the added benefit of adding a spark or glint to your subject's eyes. Professionals
call this highlight a "catch light" which draws attention to the eyes in the photograph. Pros feel that the
eyes are the most important part of a portrait and work hard to make sure they are clear. The next
section gives you tips for photographing your subject's eyes -- and avoiding red-eye.
If your subject is facing the camera, it is a rule of portrait photography that the subject's eyes must be
in focus. Even if other parts of the photo are out of focus, the eyes must remain clear.
Because eyes are so important, you want to take the time to ensure that you avoid the common red-eye
phenomenon. When light from a flash hits your subject's retina, the camera captures the redness of the
blood vessels found there, causing red-eye. In a compact camera, the flash unit is located close to the
lens which makes photos taken with a flash very susceptible to this phenomenon.
Fortunately, there are several things you can do to avoid the red-eye phenomenon in your portraits.
•
Use in-camera red-eye removal: This feature processes the red-eye after you have taken the
photo. You can access this tool in many cameras within the Playback Menu. The software in
your camera analyzes and corrects the photo, removing the red-eye for you. Figure 1-15 shows
before and after red-eye photos.
Figure 1-15: Remove red-eye with the red-eye
reduction setting.
•
•
•
Find supplementary sources of
light: Because red-eye occurs in lowlight situations, increasing the
available light will help prevent redeye from happening.
Scatter the light from the flash:
Diffusing the light from the flash with
a thin, white cloth or tissue is a trick
that photographers use to create a
softer burst of light. This may be just
enough to avoid red-eye in your
portrait and create the soft, flattering
lighting you want.
Change the camera angle: Move
closer to your subject or ask the
subject to look slightly away from the
lens, creating a different angle.
Sometimes this subtle change
eliminates the red-eye cycle.
It's a good idea to experiment with changing
the camera angle for other reasons as well.
Next, learn how altering your vantage point
can produce a more interesting and flattering
portrait.
Don't hesitate to change your vantage point when shooting a portrait. With your digital camera in
hand, you have very little to lose by experimenting. You can take as many photos as you like, deleting
the unsuccessful ones.
Many traditional portraits are shot at eye-level. You may have to lie down on the floor to achieve eyelevel with a baby, or stand on a ladder to achieve eye-level with your basketball-star nephew.
Changing your vantage point using these same shooting positions can also help you eliminate
distractions from the background and achieve a more flattering portrait.
Shooting from above alters the backdrop of the photo, causing what is below your subject to become
the background -- like the sofa in Figure 1-16. Try this technique when photographing babies on
blankets or your children in a field of flowers.
Figure 1-16: Shooting from above makes an interesting photo.
Shooting from below eliminates distracting elements on the
ground, making the sky or ceiling the photo's neutral
background, as shown in Figure 1-17.
Figure 1-17: This photo
shot from below makes
the sky the background.
Photographers choose
extreme angles to add
energy, interest, and the
element of surprise, but
they are careful to make
sure that the shot is still
complimentary to their
subject.
Review your exposures to make
not distorting the features of your
way.
sure that your angles are
subject in an unflattering
As you are shooting, you may need
to reposition your subject
as you alter your camera angle in order to achieve the best portrait. Next, find out how professional
photographers position their subjects to maximize attractiveness.
You want your subjects to feel comfortable and look natural while you are photographing them, but
you also want them to look attractive and interesting. Professional photographers know a few secrets
to maximize attractiveness and maintain interest in the photo.
Putting your subject at ease
If at all possible, set up your camera equipment and be ready to shoot before your subjects arrive to
minimize the waiting time. If you are shooting portraits at an event or outing, get ready before you ask
the subjects to begin posing. As they arrive and get in place, put them at ease by complimenting them,
asking them questions about themselves, or reminding them of a silly event. Try to get your subjects to
warm up, relax, and show their true character so their sincere personality shows in their face. Children
can often be entertained with toys and jokes. Relaxed subjects will also work with you longer, which
is an added benefit to putting them at ease.
Posing your subject
One of the ways you can get an individual to relax is to put her in a comfortable position.
Photographing a subject with shoulders squared, fully-facing the camera makes a football player look
bulkier and more menacing, but it is rarely flattering for a portrait of a woman. By slightly turning
your subject's shoulders or asking them to lean in toward you, as in Figure 1-18, a more
complimentary angle is achieved. This also keeps your subjects from appearing two-dimensional or
flat.
Figure 1-18: Turn people so they don't look
flat on film.
Another way to make your subject feel at ease
is to let them pose with a prop that reflects
their individuality, interest, or hobby. The
photos will be more personal and interesting
and your subject will feel less self-conscious.
This not only relaxes your subject, it also
gives them something to do with their hands.
Does your subject quilt? Lay a quilt, pattern,
and thread on her lap. Is your subject an avid
reader? Suggest bringing a few favorite books. A child will feel comfortable with his or her favorite
toy -- and the memory of that toy will last a lifetime when captured in a photograph. Ask questions
about the prop to engage the subject in conversation about what they love. Their enthusiasm will
reflect in their facial expression, resulting in a more sincere portrait, like the soccer player in Figure 119.
Figure 1-19: Props add interest and help put your subjects at
ease.
Act naturally
Remember that your subject doesn't always have to be looking
at the camera. Take a few posed shots, but then observe them as
you continue to engage them in conversation. Photos that reveal
a person's character are more often captured when they aren't
performing for the camera.
Posing a group
Arranging a group in a visually pleasing way has its own
challenges. By paying attention to height, position,
relationships, and clothing, you will view the group like a pro
and capture more engaging exposures.
The long and short of it: staggering height and position
When photographing a large group of people, stagger their heights by arranging them in short, loose
rows. A trick that photographers use is to look at the eyes of the subjects. If the eyes are in a straight
line, rearrange the group. Find props such as stairs, chairs, or ladders that you can use to create
variation in height and position. Make sure that everyone is comfortably posed. You don't want
anyone struggling to be seen or awkwardly positioned.
If you are photographing a tall person and a short person together, ask the tall person to squat or sit so
that the two heads are close in height, but not exactly level. You don't want a large separation of their
heads.
Take a look at Figure 1-20. The photo at the top left shows eyes in a straight line which causes your
eye to focus on the girl in the middle. By staggering the subjects as in the top-right photo, the eye
travels through the photo, allowing the viewer to take time to view each girl individually.
The lower-left photo shows the unfortunate results of a large separation of subjects. By reducing the
distance as in the lower-right photo, a more pleasing and personal photo is achieved.
Figure 1-20: Varying positions affect the
overall feel of a photo.
Like height, it is a good idea to vary the poses
that group members assume. For example,
you might have someone cross her arms, have
another place his hands in his pockets, have
some subjects seated while others stand. To
keep the focus on the group, turn members on
the left and right toward the center of the
composition.
Keep in mind that when you add depth to the
subjects, you will need to add depth of field.
You don't want the people on the back row to
be out of focus.
The rule of circles and triangles
The human eye finds circles and triangles
pleasing. Knowing this, portrait
photographers often arrange groups so that
their faces form triangles and circles in the
picture. The advantage to this arrangement is
that the viewer's eye will be drawn around the
circle or triangle of faces, instead of stopping
on only one subject in the photograph. In
Figure 1-21, the photo on the left shows a
group arranged in a triangle. The photo on the
right illustrates a pleasing circle of subjects.
Figure 1-21: Arranging your subjects in a
triangle or circle keeps your eyes from
focusing on any one person.
We are family: honoring relationships
When you photograph people together, pose them in ways that show the closeness. In extended family
groupings, for example, try to position each smaller family grouping in close proximity. Couples can
be photographed hugging while siblings might sit arm-in-arm. Try to position honored members of the
family in a prominent spot, such as the front or center of the group.
Figure 1-22: Showing the relationship through the pose.
Include yourself
Don't forget to include yourself in group shots. When you want
to join the crowd, using a self-timer can help. Position the
group, focus the lens and select the delayed-action timer. The
delayed-action timer is often activated by pressing a self-timer
button, then pressing the Shutter button. You will usually have
at least 10 seconds to position yourself before the photo is
snapped. Be sure to safely anchor your camera when using this
technique. Either use a tripod or balance the camera on a level
surface to keep the shot steady and avoid an accident.
Fashion sense: paying
attention to clothing
When you have input ahead of time, ask your group to dress in clothes that are complementary to each
other. Neutral colors, subtle patterns, or dressing exactly alike are clothing schemes that work well for
group shots. Wearing matching outfits keeps the focus on the people and their faces. Figure 1-23
shows a well-coordinated range of clothing
colors.
Figure 1-23: Keep clothing simple so it
doesn't compete with the people.
Strength in numbers
One of the best things about digital
photography is that it is no more expensive to
take hundreds of pictures than it is to take
one! One of the first rules of photography is
that it's better to take too many pictures than
too few. By taking plenty of pictures, your chances of getting some satisfactory shots are greatly
increased. This is especially true with group photography where someone might shut their eyes or
have a silly expression.