1
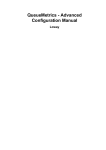
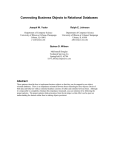
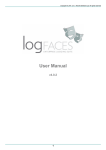
-1-
vtiger CRM 4.2
Installation Manual for Windows
(Revision 4.2)
Copyright 2003-2005 vtiger.com. All rights reserved.
vtiger is a trademark of vtiger.com. All other trademarks are the property of their
respective owners.
-2Table of Contents
1. System Requirements .......................................................................3
2. Installation Prerequisites ...................................................................4
3. Installing vtiger CRM in Apache ..........................................................5
Installing Combined vtiger CRM, Apache, and MySQL.................................... 5
Installing vtiger CRM without Apache and MySQL ......................................... 7
Installing Only vtiger CRM ........................................................................ 8
4. Installing vtiger CRM in Microsoft IIS................................................. 10
5. Starting and Stopping the vtiger CRM Server...................................... 12
6. Configuring the vtiger CRM Server .................................................... 13
7. Starting the vtiger CRM in Web Browser ............................................ 15
8. Configuring phpSysInfo in Windows OS ............................................. 16
9. Troubleshooting Tips ....................................................................... 18
10. Known Issues............................................................................... 20
11. Related Documents ....................................................................... 21
12. Customer Support......................................................................... 22
Copyright 2003-2005 vtiger.com. All rights reserved.
vtiger is a trademark of vtiger.com. All other trademarks are the property of their
respective owners.
-3-
1. System Requirements
•
Hardware: x486 with 256 MB RAM or higher with a minimum of 100 MB
disk space.
•
Operating System: Windows 2000/NT/XP/2003.
•
Web Server: Apache version 2.0.40 and higher or Microsoft version IIS 5
and higher.
•
Database: MySQL version 4.0.X or higher.
•
PHP: 4.2.X through 4.3.X.
•
Web Browser: IE 5.5/6.0, Netscape version 7.0 and higher, Mozilla
version 1.4 and higher, or Opera version 7.21 and higher.
Copyright 2003-2005 vtiger.com. All rights reserved.
vtiger is a trademark of vtiger.com. All other trademarks are the property of their
respective owners.
-4-
2. Installation Prerequisites
•
You must have "Administrator privileges" on the system. If you are
installing with any other privileges, the vtiger CRM software will not be
installed properly.
•
Before installing the vtiger CRM software, stop the Apache and MySQL
services (If running in your system).
•
The vtiger CRM software is compatible with Apache 2.0.40 and MySQL
4.0.20 and above. If these software are already installed in your machine,
you can use the same. Otherwise use the Apache and MySQL bundled with
the vtiger CRM software.
Copyright 2003-2005 vtiger.com. All rights reserved.
vtiger is a trademark of vtiger.com. All other trademarks are the property of their
respective owners.
-5-
3. Installing vtiger CRM in Apache
To install vtiger CRM, Apache, MySQL, and PHP are very essential. You can install
vtiger CRM according to your software requirements:
•
Install complete package of vtiger CRM - vtiger_CRM_4_2.exe.
Note: Use this package if you have not installed Apache, MySQL, and PHP
packages in your machine.
•
Install vtiger CRM without Apache and MySQL - vtiger_CRM_4_2.exe.
Note: This package is same as above except that you may not install
Apache and MySQL. But PHP package will be installed even though it is
available in your machine. Use this package if you have already installed
Apache and MySQL, packages in your machine.
•
Install only vtiger CRM source - vtiger_CRM_4_2_Source.zip.
Note: Use this package if you have already installed Apache or Microsoft
IIS, MySQL, and PHP in your machine.
Warning: vtiger CRM by default installs PHP even though it is already installed in
your machine. If you are already using PHP, as a precautionary measure take a
backup of php.ini file.
Installing Combined vtiger CRM, Apache, and MySQL
For the convenience of first time users, vtiger CRM is bundled with compatible
versions of Apache, MySQL, and PHP.
To install the complete package of vtiger CRM:
1. Download vtiger_CRM_4_2.exe from
http://www.sourceforge.net/projects/vtigercrm/.
2. Run the vtiger_CRM_4_2.exe. Installation process starts within a few
seconds.
3. In the Welcome to the InstallShield Wizard for vtiger CRM dialog, click the
Next button.
4. In the vtiger CRM Software License Agreement dialog, read the license
agreement and click the Yes button if you accept the license agreement.
5. Follow the steps given below to install Apache Web server bundled with
vtiger CRM:
Copyright 2003-2005 vtiger.com. All rights reserved.
vtiger is a trademark of vtiger.com. All other trademarks are the property of their
respective owners.
-6i.
In the Install Apache Options dialog, select the Install Apache
option and click the Next button.
ii.
In the Install Apache Web Server Port Selection dialog, enter the
port number in which Apache Web server must be started and click
the Next button.
Note: If you are not sure, you can use the default port number
"80".
iii.
In the Apache Service Option dialog, select the Start the apache
as a service check box to automatically start the vtiger CRM as a
service during startup.
6. Follow the steps given below to install MySQL bundled with vtiger CRM:
i.
In the Install MySQL Options dialog, select the Install MySQL
option and click the Next button.
ii.
In the MySQL Connection Parameters Configuration dialog, enter
the following MySQL connection parameters and click the Next
button:
Port Number: The port at which MySQL database server to
must be started.
User Name: The user name to login in to the MySQL
database.
Password: The password for the user.
Note: If you are not sure, use the default Port as 3306,
and User Name as root. Keep the Password field empty.
7. In the Chose Destination Location dialog, either use the default directory
C:\Program Files\vtigerCRM4_Beta or select a new directory. After
selecting the destination directory, click the Next button.
8. In the Select Program Folder dialog, either use the default program folder
vtiger CRM 4 Beta or enter a new folder. Now click the Next button.
9. In the Start Copying Files dialog, review Apache, MySQL, and PHP
configuration settings. Click the Next button to start the installation or
click the Cancel button to abort the installation. It will take approximately
five minutes to complete the installation.
Note: During the vtiger CRM software installation, <Apache
Home>/conf/httpd.conf and %SystemRoot%/php.ini files will be modified.
Also a backup copy of these files will be taken. Please proceed further if
you accept these changes.
Copyright 2003-2005 vtiger.com. All rights reserved.
vtiger is a trademark of vtiger.com. All other trademarks are the property of their
respective owners.
-710. In the Installation Wizard Complete dialog, select the Yes I want to start
the server option if you want to start the vtiger CRM server immediately.
Also select the Yes, I want vtiger CRM icon on desktop option if you
want a desktop shortcut. Click the Finish button. It will take a few
minutes to start the vtiger CRM server.
Installing vtiger CRM without Apache and MySQL
Use the existing Apache and MySQL if already installed in your machine provided
these versions are compatible with vtiger CRM.
Follow the procedure given below to install only vtiger CRM:
1. Download vtiger_CRM_4_2.exe from
http://www.sourceforge.net/projects/vtigercrm/.
2. Run the vtiger_CRM_4_2.exe. Installation process starts within a few
seconds.
3. In the Welcome to the InstallShield Wizard for vtiger CRM dialog, click the
Next button.
4. In the vtiger CRM Software License Agreement dialog, read the license
agreement and click the Yes button, if you accept the license agreement.
5. Follow the steps given below to use the existing Apache Web server:
i.
In the Install Apache Options dialog, select the Use Installed
Apache option and click the Next button.
ii.
In the Apache Web Server Home Selection, browse the directory
where the Apache is installed. (Note: If you give wrong directory,
installation will not proceed further)
iii.
The Apache configuration file httpd.conf present under the
<Apache Home>/conf directory, will be modified during vtiger CRM
installation. Click Yes if you accept the “This selection will take
backup and modify the httpd.conf file of the Apache installed in
your machine. Do you want to continue?” message.
iv.
In the Apache Web Server Home Selection dialog, click the Next
button.
6. Follow the steps given below to use the existing MySQL:
i.
In the Install MySQL Options dialog, select the Use Installed
MySQL option and click the Next button.
Copyright 2003-2005 vtiger.com. All rights reserved.
vtiger is a trademark of vtiger.com. All other trademarks are the property of their
respective owners.
-8ii.
In the MySQL Path Selection dialog, browse the directory where
MySQL is installed and click the Next button.
Note: If you give a wrong directory, installation will not proceed
further.
iii.
In the MySQL Connection Parameters Configuration dialog, enter
the following MySQL connection parameters and click the Next
button:
Port Number: The port at which MySQL database server is
running.
User Name: The user name to log in to the MySQL
database.
Password: The password for the user.
Note: If you are not sure, you can use the default Port –
3306, User Name – root. Keep the Password field empty.
7. In the Choose Destination Location dialog, either use the default program
folder or enter a new folder. Now click the Next button.
8. In the Start Copying Files dialog, review the Apache, MySQL, and PHP
configuration settings. Click the Next button to start the installation or
click the Cancel button to abort the installation. It takes approximately
five minutes to complete the installation.
Note: During the vtiger CRM software installation, the <Apache
Home>/conf/httpd.conf and %SystemRoot%/php.ini files will be modified.
Also a backup copy of these files will be stored with file extension as
vtigercrm.backup. Please proceed further if you accept the changes.
9. In the Installation Wizard Complete dialog, select the Yes I want to start
the server check box if you want to start the vtiger CRM server
immediately. Also select the Yes, I want vtiger CRM icon on desktop
check box if you want a desktop shortcut. Click the Finish button.
Installing Only vtiger CRM
If you have already installed Apache, MySQL, and PHP, follow the procedure given
below:
1. Download vtiger_CRM_4_2_Source.zip from
http://www.sourceforge.net/projects/vtigercrm/.
2. Extract the vtiger_CRM_4_2_Source.zip file into Apache root directory
(For example, C:\Program Files\Apache Group\Apache2\htdocs)
Copyright 2003-2005 vtiger.com. All rights reserved.
vtiger is a trademark of vtiger.com. All other trademarks are the property of their
respective owners.
-93. Set up the vtiger CRM database as given below:
4. Start the MySQL database and create a database for vtiger CRM. The
default database name is “vtigercrm4_2”. If you want to use different
database then modify the 2setConfig.php file present under <vtiger CRM
Home>/install/ directory as given below in all the places.
$db_name = 'vtigercrm4_2'; to
$db_name = '<your database name>';
In the connection.php file present under <vtiger CRM Home> directory,
enter the values for the following variables:
$mysql_username
$mysql_password
$mysql_port
$apache_port
Example:
$mysql_username = 'root';
$mysql_password = 'public';
$mysql_port = '3306';
$apache_port = '0.0.0.0:80';
5. Start Web Browser and follow the procedure given in the "Configuring
vtiger CRM Server" section for completing the vtiger CRM installation.
Note: You must increase the value for max_execution_time in php.ini file as it
takes about 300 seconds to execute the vtiger CRM installation script. By default
the value is set as 30 seconds.
Copyright 2003-2005 vtiger.com. All rights reserved.
vtiger is a trademark of vtiger.com. All other trademarks are the property of their
respective owners.
- 10 -
4. Installing vtiger CRM in Microsoft IIS
The vtiger CRM source ZIP can be installed in Microsoft IIS. You must have already
installed the Microsoft IIS 5 or above, MySQL, and PHP before installing vtiger CRM.
Configuring Microsoft IIS to work with PHP-based application
Please follow the procedure given below to execute PHP scripts in Microsoft
IIS:
1. Configuring the php.ini file:
Download the Windows binary for the latest version of PHP
(vtiger CRM supports PHP version 4). Once you've downloaded
it, unzip it to a C:\ and rename the folder to "php". Open the
PHP.INI-DIST file from the C:\PHP folder and locate the
following line:
;cgi.force_redirect = 1
Remove comment in the above line and change the setting to 0
as shown below to run PHP under IIS. Make the necessary
changes and save the file as php.ini in your Windows folder
(C:\WINNT on my computer):
cgi.force_redirect = 0
2. Configuring PHP in Microsoft IIS. Please refer to the following sites for more
details:
• http://in.php.net/manual/en/install.windows.iis.php
• http://www.phpbuddy.com/category.php?cat_id=INST
Note: All the directories under vtigerCRM should have READ access
permission. Otherwise, some of the images/files cannot be executed.
To install vtiger CRM in Microsoft IIS, follow the procedure given below:
1. Download vtiger_CRM_4_2_Source.zip from
http://www.sourceforge.com/projects/vtigercrm.
2. Extract the vtiger_CRM_4_2_Source.zip file into Apache root directory
(For example, C:\Inetpub\wwwroot\).
3. Set up vtiger CRM database as given below:
Copyright 2003-2005 vtiger.com. All rights reserved.
vtiger is a trademark of vtiger.com. All other trademarks are the property of their
respective owners.
- 11 4. Start the MySQL database and create a database for vtiger CRM. The
default database name is “vtigercrm4_2”. If you want to use different
database then modify the 2setConfig.php file present under the <vtiger
CRM Home>/install/ directory as given below in all the places.
$db_name = 'vtigercrm4_2'; to
$db_name = '<your database name>';
In connection.php file present under <vtiger CRM Home> directory,
enter the values for the following variables:
$mysql_username
$mysql_password
$mysql_port
$apache_port
Example:
$mysql_username = 'root';
$mysql_password = 'public';
$mysql_port = '3306';
$apache_port = '0.0.0.0:80';
5. Start Web Browser and follow the procedure given in the "Configuring
vtiger CRM Server" section for completing the vtiger CRM installation.
Note: You must increase the value for max_execute_time in php.ini file as it
takes about 300 seconds to execute the vtiger CRM installation script. By default
the value is set as 30 seconds.
Copyright 2003-2005 vtiger.com. All rights reserved.
vtiger is a trademark of vtiger.com. All other trademarks are the property of their
respective owners.
- 12 -
5. Starting and Stopping the vtiger CRM Server
The vtiger CRM can be started or stopped according to the type of distribution used.
To start the vtiger CRM Server
•
If you installed the Apache and MySQL that are bundled with vtiger CRM,
start the vtiger CRM server as given below:
1. Select Start
or
Program Files
vtiger CRM
Start vtiger CRM
2. Click the vtiger CRM desktop shortcut.
•
If you are using the existing Apache/Microsoft IIS and MySQL, start the
Apache/Microsoft IIS manually and connect to the vtiger CRM from
http://<host Name>:<port number>/<vtigerCRM Home>/index.php.
To stop vtiger CRM Server
•
If you installed the Apache and MySQL that are bundled with vtiger CRM,
select Start
Program Files
vtiger CRM
Stop vtiger CRM.
•
If you are using the existing Apache/Microsoft IIS and MySQL, stop the
Apache/Microsoft IIS and MySQL manually.
Copyright 2003-2005 vtiger.com. All rights reserved.
vtiger is a trademark of vtiger.com. All other trademarks are the property of their
respective owners.
- 13 -
6. Configuring the vtiger CRM Server
After installing the vtiger CRM, you must configure the vtiger CRM server with details
such as database, site details and create database.
To configure vtiger CRM server
1. Start the Web Browser and enter <localhost>/vtiger/index.php in location
bar.
2. In the Registration page, complete the product registration (Optional).
Click the Next button.
3. In the System Check page, PHP, MySQL database, config.php, directories
that have read/write permissions, and GD graphics library version status
are displayed. Click the Next button.
Note: Please ensure that all the directories have the read/write
permission, otherwise you cannot work with features that require file
upload and download.
4. In the Database Configuration page, enter the appropriate values for
Database and Site Configuration sections.
Database Configuration
•
Host Name (mandatory) – By default, Host Name is set as
<Machine Name>:<port number>. Please do not change the
port number as it is added during installation.
•
User Name (mandatory)– vtiger (Non-editable).
•
Password (optional)– currently Non-editable.
•
Database Name (mandatory)– vtiger (Non-editable).
Site Configuration
•
URL (mandatory) – Enter the host name. By default, it is
http://<machine name>.
•
path (mandatory) – By default, this is the path where vtiger CRM
is installed.
•
Path to Cache Directory (must be writable) - By default, this is
cache/. This folder is used to store the files, such as attachments,
and import/export related files temporarily.
Admin Configuration
Copyright 2003-2005 vtiger.com. All rights reserved.
vtiger is a trademark of vtiger.com. All other trademarks are the property of their
respective owners.
- 14 •
username – By default, the user name is set as “admin”. If
required, you can change the user name after installation.
•
admin password (mandatory) – By default, the password is set
as “admin”. You can change the password after logging in to the
vtiger CRM.
5. In the Confirm System Configuration page, review the configuration
information. If you want to change the details, click the Change button. If
you want to populate some data select the Also populate demo data?
check box. Now click the Create button.
6. In the Create Config File page, click the Next button.
7. In the Create Database Tables page, the created database tables are
displayed. Click the Finish button to complete the installation process.
8. In the Login page, by default the User Name field is set as “admin”. In
the Password field, enter the admin password you have set during
installation process. Once you logged in successfully, your vtiger CRM
launches as given below:
Copyright 2003-2005 vtiger.com. All rights reserved.
vtiger is a trademark of vtiger.com. All other trademarks are the property of their
respective owners.
- 15 -
7. Starting the vtiger CRM in Web Browser
•
If you installed the Apache and MySQL that are bundled with vtiger CRM,
select Start
Program Files
vtiger CRM
vtiger CRM Client
•
If you installed without Apache or/and MySQL that are bundled with vtiger
CRM, open the http://<host-name/<vtiger CRM Home>/index.php in Web
browser.
Copyright 2003-2005 vtiger.com. All rights reserved.
vtiger is a trademark of vtiger.com. All other trademarks are the property of their
respective owners.
- 16 -
8. Configuring phpSysInfo
To display the vtiger CRM server details in Window OS you have to start phpSysInfo
as a Windows service.
To install phpSysInfo as a windows service
<vtiger CRM Home>\modules>phpsysinfo_service.exe -install
To uninstall as a windows service
<vtiger CRM Home>\modules>phpsysinfo_service.exe -uninstall
To start the service
<vtiger CRM Home>\modules>net start "phpsysinfo"
To stop the service
<vtiger CRM Home>\modules>net stop "phpsysinfo"
The PHPSysInfo Service V1.2 service is starting.
The PHPSysInfo Service V1.2 service was started successfully.
To test the service
<vtiger CRM Home>\modules>telnet 127.0.0.1 1337
Trying 127.0.0.1...
Connected to 127.0.0.1.
Escape character is '^]'.
GET kernel
5.0.2195 Service Pack 4
Copyright 2003-2005 vtiger.com. All rights reserved.
vtiger is a trademark of vtiger.com. All other trademarks are the property of their
respective owners.
- 17 -
9. Fetching E-mail Messages as RSS Feeds
You can fetch incoming E-mail messages as RSS feed in RSS module by specifying
appropriate values in mailfeed.php file present under <vtiger CRM
Home>/modules/squirrelmail-1.4.4 directory as given below:
Line 33 through 61
POP3/IMAP/NNTP server to connect to, with optional port.
$server = "test.com:143";
Protocol specification (optional)
$protocol = "/notls";
Name of the mailbox to open
$mailbox = "INBOX";
Your username
$username = "user-name";
Your password
$password = "password";
Copyright 2003-2005 vtiger.com. All rights reserved.
vtiger is a trademark of vtiger.com. All other trademarks are the property of their
respective owners.
- 18 -
10. Troubleshooting Tips
1. I am unable to complete the initial configuration process and the following error
message is displayed in Web browser:
Warning: mysql_connect(): Host <'Server Name'> is not allowed to connect to this
MySQL server in C:\Program
Files\vtigerCRM\apache\htdocs\vtigerCRM\database\DatabaseConnection.php on line
42
Could not connect to server <Server Name>:<port no> as vtigercrm.Host <'Server
Name'> is not allowed to connect to this MySQL server
Solution: This error message is displayed when you have not uninstalled the older
version of vtiger CRM fully. Follow the procedure given below to overcome this issue:
1. Stop the vtiger CRM server from Start
Stop vtiger CRM.
Program Files
vtiger CRM
2. Start the Command Prompt and enter the following command:
:\mysql –u root –port
3. Drop the existing vtigercrm database from MySQL as given below:
mysql>drop database vtigercrm;
4. Start the vtiger CRM server from Start --> Program Files -->vtiger CRM ->Start vtiger CRM.
2. After completing the installation I am not sure, how to start the vtiger CRM.
•
If you are using bundled Apache and MySQL with the vtiger CRM
Start the vtiger CRM server from Start
Program Files
vtiger CRM
Start vtiger CRM. After a few seconds, start the vtiger CRM client from
Start
Program Files
vtiger CRM
Start vtiger CRM.
•
If are using the existing Apache and MySQL
Start the Apache Web server manually from the <Apache Home>/bin
directory then start Web browser and enter the following URL:
http://<Host-name>/<vtiger Home>index.php
3. By default, the value for log4php.rootLogger is set as “debug” in
log4php.properties file present under <vtiger CRM Home> directory. If you
experience any problems, change the logging level to “fatal” or “warning”
Copyright 2003-2005 vtiger.com. All rights reserved.
vtiger is a trademark of vtiger.com. All other trademarks are the property of their
respective owners.
- 19 Line: 10
log4php.rootLogger=debug, A2
Copyright 2003-2005 vtiger.com. All rights reserved.
vtiger is a trademark of vtiger.com. All other trademarks are the property of their
respective owners.
- 20 -
11. Known Issues
•
If you select Start
Program Files
vtiger CRM
start vtiger CRM. First
you have to start Apache manually then use Start
Program Files
vtiger CRM --> start vtiger CRM to start the vtiger CRM.
•
If you select to use the existing Apache and (or) MySQL options during
installation, stopping the vtiger CRM using Start -->Program Files -->
vtiger CRM -->stop vtiger CRM will not work. You have to stop Apache and
MySQL manually.
Note: vtiger CRM does not stop the Apache and MySQL as you may be
also using Apache and MySQL software for some other applications.
•
While uninstalling the vtiger CRM, some of the files are not deleted. You
have to delete those files manually.
•
If the user-specific Apache is selected and PHP is already associated with
the existing Apache (conf/httpd.conf), bundled PHP cannot be associated
with the existing Apache. To overcome this issue, you have to install
another instance of Apache and associate the bundled PHP with this
instance.
•
In case of user Apache, if the entry "ScriptAlias /cgi-bin/ <cgi-bin
directory path>” is not present in <Apache Home>/conf/httpd.conf then
the httpd.conf file will not be updated to associate PHP with Apache. The
user has to manually edit the httpd.conf file.
•
If you create a new role with space in the name (for example, Sales User),
then you will have issues allocating permissions.
•
You cannot change the user’s role once specific role is assigned to the
user.
•
If you are migrating from older version (v2.1, v3.0, v3.2, v4.0, or v4.0.1)
to vtiger CRM 4.2, immediately after logging in as “admin” user, assign
roles to all the other users. Otherwise users cannot be able to log in and
“UserInfoUtil at line 10” error message is displayed in browser.
Copyright 2003-2005 vtiger.com. All rights reserved.
vtiger is a trademark of vtiger.com. All other trademarks are the property of their
respective owners.
- 21 -
12. Related Documents
You can refer to the following documents to use the vtiger Outlook Plug-in software
with vtiger CRM:
•
vtiger Outlook Plug-in User Manual: (Refer to:
http://vtiger.com/products/crm/help/vtiger_Outlook_Plugin_User_Guide.pdf).
•
vtiger Office Plug-in User Manual: (Refer to:
http://vtiger.com/products/crm/help/vtiger_Office_Plugin_User_Guide.pdf).
•
vtiger Thunderbird Extension User Manual: (Refer to:
http://vtiger.com/products/crm/help/vtiger_Thunderbird_Extension_User_Gui
de.pdf)
•
vtiger Customer Portal User Manual: (Refer to:
http://vtiger.com/products/crm/help/vtiger_CRM_Customer_Portal_User_Gui
de.pdf)
Note: The vtiger Outlook Plug-in, vtiger Office Plug-in, and vtiger
Thunderbird/Mozilla Extension are browser-side software and work only with
Microsoft Outlook, Microsoft Office, and Thunderbird/Mozilla respectively.
Copyright 2003-2005 vtiger.com. All rights reserved.
vtiger is a trademark of vtiger.com. All other trademarks are the property of their
respective owners.
- 22 -
13. Customer Support
Please post your valuable comments, feature requests, and issues in vtiger CRM
Discussions (http://www.vtiger.com/discussions/) so that we can provide technical
support for you.
Copyright 2003-2005 vtiger.com. All rights reserved.
vtiger is a trademark of vtiger.com. All other trademarks are the property of their
respective owners.