1
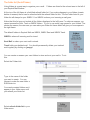
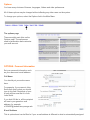
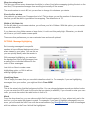
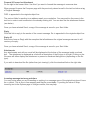
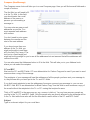
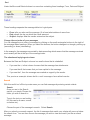
Squirrel Mail
User’s Manual
SquirrelMail 1.4.0
Login to SquirrelMail E-mail
Each user logs on to Squirrel Mail with a user id and password.
•
Note: user ids and passwords are case sensitive remember to turn caps lock
off and log on in LOWER CASE.
1. Enter your user id in the Name field.
2. Enter your password in the Password field.
3.
Select Login (click on the Login button).
The right frame
At the top of the Squirrel Mail page is a menu bar. This menu bar is always visible wherever you are.
Current Folder displays which of the folders listed in the left frame you are currently in.
Under the top bar is a row of links:
Compose - Make and send an e-mail (which may include attachments).
Addresses - Holds a list of addresses that are contained in your personal address book.
Folders - All folder manipulation takes place under this. You can create, delete, rename, subscribe to
and unsubscribe from folders.
Options - Change settings of how Squirrel Mail responds and looks.
Search - With this tool, you can search through a mailbox for given criteria.
Help - Squirrel Mail help files.
Calendar – An optional personnel calendar.
The folder list (the left frame)
Using folders is a great way to organize your e-mail.
your Squirrel Mail window.
Folders are listed in the colored area to the left of
At the top of the left frame is a link titled refresh folder list. If you make changes to your folders (create,
delete or rename) the list can be refreshed with the refresh folder list link. The first folder listed in your
folder list will always be your INBOX. Your INBOX is where your incoming e-mail goes.
Notice that this list may not include all the folders displayed in the left frame. For obvious reasons, you
cannot rename the Sent, Trash or INBOX folders. Try not to use really long names for your folders. The
shorter the names, the narrower you can make your folder list frame which will give you more space in
the right frame.
The default folders in Squirrel Mail are INBOX, INBOX Sent and INBOX Trash.
INBOX is where all incoming mail is stored.
Sent Mail is where your sent mail is stored.
Trash holds your deleted mail. You should permanently delete your trashed
mail regularly by clicking on (purge).
You can create or rename your own folders to store and sort your mail in. To do
this:
Select the Folders link
Type in the name of the folder
you want to create. You can
choose to make the new folder a
SUB-folder too
Your newly created folders won’t
appear in your folder menu until
you refresh your folder list.
Select refresh folder list in your
folder menu.
Options
You have many choices of themes, languages, folders and other preferences.
All of these options may be changed without affecting any other users on the system.
To change your options, select the Options link in the Main Menu.
The options page
There are eight main links on the
Options page. The options are
used to personalize and customize
your mail account.
OPTIONS: Personal Information
Set your personal information such
as your name and e-mail address.
Full Name
You should put your entire name
here.
For example, if your name is John
Smith then that is what you should
type in this field. Recipients of your
e-mail will then see that it is from
John Smith.
If you don’t fill this in, all the recipient
will see is your generic e-mail
address, for example,
[email protected]
E-mail Address
This is optional and can be filled in if your e-mail address is different to what is automatically assigned.
Reply To
This too is optional.
This is the e-mail address that people will reply to if they reply to your message. If your Reply To e-mail
address is different to the e-mail address you are sending from, you can enter it here.
Use this if you don’t want people replying to your Squirrel Mail address.
Signature
Optional - Signatures are attached at the bottom of all messages you send out. A signature is a piece of
text with, say, your name and business name.
If you want to use a signature on every e-mail you send, make sure that the YES option is enabled
beside the Signature Option on the bottom of this screen.
Signatures are usually prefixed with two dashes (--). If you want the two dashes to appear above your
signature, enable the YES option beside Prefix Signature with '-- ' Line ?
Note: Be careful what you put in your signature & we suggest avoid putting your home phone number or
home address in your signature.
OPTIONS: Display
Preferences
Set the colors you want Mail to
use, what language you want
to use and how your
messages display on your
screen.
Theme
Mail offers different color
themes so you can jazz up
your windows. You can choose
between the listed themes.
Language
Squirrel mail supports
languages other than English.
Number of Messages to Index
This is the number of messages you will see at once (ie, on one page) in a folder. If there are more
messages in the folder than this number, you will see a Previous and next link on the page which will
take you to the previous or next page of messages. The lower the number of messages, the faster each
folder will load. The trade off is that you may have to move between pages to see all of your mail.
Wrap incoming text at
This lets you set how many characters should be in a line of text before wrapping (putting the text on the
next line). This prevents messages from scrolling horizontally off the screen.
The usual number to use is 86, but you are free to change it to whatever you desire.
Size of editor window
How wide do you want your Compose box to be? This is where you set the number of characters per
line that you will be able to type before line wrapping. The default size is 76.
Width of left folder list
On the left side of your browser window, you will see your list of folders. With this option, you can select
how wide that will be.
If you have very long folder names or large fonts, it is ok to set this pretty high. Otherwise, you should
set it low so you don’t waste screen space.
There are other preferences you can customize here and are all optional.
OPTIONS: Message Highlighting
Set incoming messages from specific
senders to have different background colors
when viewed in your inbox. You use this so
you can quickly identify who the sender is.
With message highlighting, you can have
the background color of all messages from
a mailing list or individual different to the
color of other messages.
Just click on New to create a new
highlighting option, or Edit to edit an
existing highlight option.
Identifying Name
This is simply the name that you see which describes what it is. For example, if you are highlighting
messages from your mother, you might set this to From MOM.
Color
This is the actual color that the background will be. You can choose between several pre-defined colors
or you can enter the HEX code for the color that you desire (ie a6b492). If you choose to enter your own
color, you must also select the radio button in front of it.
Match
From the drop-down box, you can choose which field to match against (to, from, subject etc) and in the
text box, you can enter the phrase to match. For example, if you want to highlight messages from your
mum, you will match the field From: with her e-mail address (eg, [email protected]) so that all messages
with her address in the From: field will be highlighted.
OPTIONS: Folder Preferences
Change the way your folders are displayed. You don’t create, rename or delete folders here (you do that
in the Folders section which you get to from the Main Menu). Some options here include:
Trash Folder -You can choose which folder your messages will be sent to when you delete them.
Sent Folder- You can choose which folder your sent messages will be stored in.
Drafts Folder- You can choose which folder your drafts would be saved in.
Unseen message notification
This option specifies how to display new, unread messages in the folder listing. If you set this to No
Notification, you will not be notified of new messages.
If you set it to INBOX, when you have new messages, the INBOX will become bold and a number will
appear to the right of it to say how many new messages are in it.
If you set it to All Folders, this behavior will happen on all folders. There is a trade off if you use the All
Folders option & the folder list might load very slowly. If this happens you can set it back to INBOX or
None to speed things up again.
Unseen message notification type
When new messages are in a folder, this option lets you define how you want to be notified.
OPTIONS: Index Order
The index order option allows you to change the order of your columns in your message index. You
can also decide which columns you want to see in your message index.
Use the up and down links to change the order of the columns.
Use the remove link to remove a column and the Add button to add a column.
OPTIONS: Vacation Messages
The Vacation program automatically returns a message to anyone who sends you email. Typically, this
message informs the sender that you are not available to read your email. There are several reasons
you may choose to use a vacation message, such as you are on vacation or out of the office. An
example vacation message might be:
Subject: On vacation from June 20-25
I will be away this week as I am on vacation. I will respond to your email as soon as I am back in town.
John
The vacation program is smart enough to keep track of what email addresses sent you mail so it will
not keep responding over and over to their email address. When the vacation option is turned on it
responds to every incoming email in the same manner. This means that if you are on a mailing list, the
list server will get your vacation message when it sends out its normal mailing list.
Remember, when you create a vacation message every email that gets sent to your mailbox will send
your prepared vacation message to the sender. So if a spammer sends you email, they could receive
your vacation message. We recommend not putting too personal of information (private telephone
numbers/names/addresses) in these messages since there is no telling who may end up with the
message.
Simply check “Send auto-reply to
sender?” and type a subject in the
Vacation Subject field. Type a short
message in the Vacation Message
field (remember anyone who sends you
email will see this once the plug-in is
turned on) and click Change Settings
at the bottom of the screen.
Mail Forwarding
The most common reasons for
forwarding your Squirrel mail
would be, you are on vacation, on
military duty at sea or simply want to
check all your email from a different
address.
Put a check next to Forward incoming
message to another email address?
Now type the name(s) in the
Forwarding E-Mail Addresses (One Address Per Line) field. Example:
[email protected]
[email protected]
Click Change Settings at the bottom of the screen and the email will be forwarded to the addresses
you typed (make sure spelling is correct). NOTE: To deliver email to both your local Squirrelmail
account AND another account add your email address to the forward list. Example:
[email protected]
[email protected]
[email protected]
OPTIONS: Change of Password
You have the ability to change your password. Just fill in the fields and click on Change Password.
If you change your
password and can not
remember it. You must
call to have
technical support reset
your password and then
you can log in to change it
again.
OPTIONS: Spellchecker Options
The spellchecker options screen allows you to edit your personal dictionary and setup international
libraries if needed.
Read, Forward or Reply to an E-Mail Message
1. Open your INBOX folder by clicking on the heading INBOX in the folder list.
You will see the INBOX message index. Unread messages will be bold.
2. Click on the subject of a message and it will be displayed in the right frame.
When you are viewing a message, another menu bar is presented below the main menu choices above
the message you are currently viewing.
Message and Delete
The Message list link will take you back to the list of messages in the current folder, ie the folder you are
in.
The Delete link will delete the message being viewed. If a message contains an attachment, it will be
deleted as well. You can prevent the loss of attachments by downloading them first (see below).
Navigation - Previous and Next
In the middle of the bar are the navigation links Next and Previous.
Previous will take you to the previous message in the folder (if there is one). The Next link will take you
to the next message in the folder (if there is one).
Forward & Forward as Attachment
On the right is the forward links. Use this if you want to forward the message to someone else.
When pressed it opens the Compose page with the previously viewed e-mail in the text box below a tag
of Original Message.
FWD: is appended to the original subject line.
The various fields for sending to an address await your completion. You may position the curser in the
text box in order to add comments to the already existing text. You can also use the attachment feature
(see below).
Once you have selected Send, a copy of the message is saved in your Sent folder.
Reply
Click this link to reply to the sender of the current message. Re: is appended to the original subject line.
Reply All
Same story here as Reply with the exception that all addresses the original message was sent to will
receive your reply.
Once you have selected Send, a copy of the message is saved in your Sent folder.
Attachments
Any attachments sent with an e-mail will be displayed at the bottom of the message inside a colored
box. The attachment is displayed as a link with a description of the file type to its right. Clicking on the
file name will either display the attachment or present a download dialogue box (depending on the file
type).
If you wish to download the file (rather than just viewing it), click the download link on the right side.
Incoming message text wrap problems
You may notice when you are forwarding or replying to a message some of the original text doesn’t have
the > symbol. This is due to line wrapping and may be unavoidable. Try setting the value of Wrap
incoming text in the Options page to a larger number, this may help.
Compose (New Message)
The Compose menu choice will take you to a new Compose page. Here you will find several fields and a
couple of buttons.
The first field you will need to fill
in is the To: field. In this field
you should enter the e-mail
address of the person or
persons you are sending a
message to.
You may enter as many e-mail
addresses as you like. You
must separate each address
with comma.
You don’t need to put a space
between the comma and the
start of the next address
If you do put more than one
address in the To: field, you
might not be able to see them
all in the field. Don’t worry! The
text box is a fixed length and
might not be big enough for you to see all the addresses but rest assured that all the addresses will
receive the e-mail.
You can also press the Addresses button to fill in the field. This will take you to your Address book
where you can select the recipient.
CC and BCC
Next are the CC: and BCC fields. CC is an abbreviation for Carbon Copy and is used if you want to send
someone else a copy of the message.
The recipients of your message will see the addresses of all the people you have sent your message to,
ie, they will see who you have put in the To: and CC: fields.
If you don't want recipients to see the addresses of everyone you sent your message to, you can use
the BCC: field. BCC is an abbreviation for Blind Carbon Copy. Use this field to send someone a copy of
the e-mail without the recipients in the To: or CC: seeing that recipient's name.
Think of CC and BCC in the same way as, say, a memo is laid out. You can have as many people as
you like in the To: CC: and BCC: fields. Only the people who are directly affected by the message will be
in the To: field while those who will find the information useful will be in the CC: and BCC: fields.
Subject
Type in a relevant subject for you e-mail here.
Addresses Button
This button will open the address book after a search box is presented. You can enter an address
search box to retrieve a
result or simply place a
check in one of all the
recipients you wish to send
an e-mail to.
Then click Use Addresses to
continue your e-mail.
Message Body
The large empty box is for whatever you want to put there, ie this is where you type your message! If a
signature file has been saved it will appear here as well.
Attach
The attach feature allows you to include a file with your e-mail. A browse button is present so you may
search through your directories and select the file to include.
Once you have located the file, simply press the Add button to include the selected file as an
attachment.
Once a file is added for attachment another button is revealed which allows you to delete the
attachment. You can delete one or more attached files by selecting the offending file or files and
pressing the Delete Selected Attachments button.
Move, Delete and Sort Messages
After you click on a folder, you will see (in the right frame) the message index. The message index is the
list of messages in the selected folder.
Move and delete
At the top of your message index is a menu bar containing a drop down list containing all of your folders
and a Move button and a Delete button.
To move a message
1. Select a folder from the drop down list
2. Select the message you want to move to that folder (using the check box to the left of each
message)
3. Press the Move button
To delete a message
1. Select the message you want to delete (using the check box to the left of each message)
2. Press the delete button
Sort
Under the Move and Delete buttons is a menu bar containing three headings, From, Date and Subject.
These headings separate the message table into logical parts.
•
•
•
From: tells you who sent the message. Or at least what address it came from.
Date: shows the day on which the e-mail was sent.
Subject: displays what the sender entered as the subject.
Change the sort order of your messages
You can change the sort order of messages by clicking on the small rectangular buttons to the right of
the message index headings. When you select the buttons, the button changes to a triangle, pointing up
(ascending) or down (descending).
In the example, the messages are sorted by date ascending which means that the message received
most recently will be at the top of the message index.
The attachment/reply/urgent column
Between the Date and Subject columns is a small column that is unlabelled.
•
If you see the +, in that column it means that the message has attachments.
•
If you see the A, that means that you have replied to the message.
If you see the !, then the message was marked as urgent by the sender.
The previous example shows both e-mail messages have attachments.
Search
With this useful tool off the top main menu you can find messages by entering certain criteria.
Search
Once you are in the Search
section, you simply Choose the
folder you wish to search in.
Type in the text you are looking
for (this can be a name, a word,
a number etc).
Choose the part of the message to search. Select Search.
After you submit your search request, the list of messages that match your criteria will come up below
the search form. You can then choose the message you wish to view and read it just like a normal
message.
Address Book
The address book link, in the main menu, is a great function that lets you store your e-mail addresses.
Add to personal address book
You add new addresses by filling in the
section. Fill in every field so that you have a
belongs to.
Once you have added the first entry, a list
address book section with your addresses.
Nickname - Put a familiar name here to help jog your memory. Put anything in this field that will help you
recall who this address belongs to.
E-mail Address - This must be the person’s fully qualified e-mail address.
Guessing the e-mail address here just won’t work! If this is not correct you will either get your mail
returned without being delivered or it will get sent to the wrong person!
First name & Last name - The first and last name of the person to whom the e-mail address belongs to.
Info - This is another field where you can put something to remind you about who this person is. This is
made to be longer than the nickname
Edit or Delete - These two buttons allow you to select a single address and then change any of the
above fields or delete the entry entirely. You are only allowed to select one entry at a time for the edit
button.
Groups in your address book
The address book also allows you to store your group e-mail addresses. The address book link is in the
Squirrel Mail main menu. You add new groups by filling in the fields in the 'Add to Personal address
book' section. Fill in every field so that you have a good record of who is in the group. Once you have
completed creating your group the new group will appear above the 'Add to Personal address book'
section with your existing addresses, both individual and groups.
Nickname - You MUST use a nickname for your group here, otherwise the group mailing feature will not
work. You CANNOT have any spaces in the nickname.
E-mail Address - This is where you type the members of your groups fully qualified e-mail addresses.
After you type each e-mail then insert a semi-colon and simply type the next e-mail address.
Alternatively you may copy the actual e-mail addresses one at a time from your address book list at the
top of the page and paste it into the 'e-mail' field. Remember to insert a semi-colon between each
address.
First name & Last Name - You MUST enter details in these fields for the group to be valid.
Saving Sent Messages
Once you have sent a message in Squirrel Mail you can go back and retrieve it from your 'INBOX Sent'
folder.
However in Squirrel Mail you are not able to go back to your message when a sending error occurs. If you
have composed a long message it is a good idea to highlight the message you have written and press
'Ctrl+C' to copy it to your clipboard before clicking 'send'.
That way if there is a sending error, you can simply open a new 'compose' window and paste the
clipboard message back in by pressing 'Ctrl+V'. It saves you having to retype your message again.
Alternatively you can type up your message in a word processor and copy from that document into
Squirrel Mail.