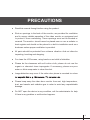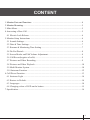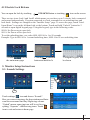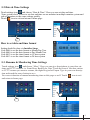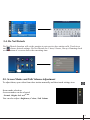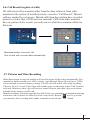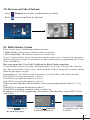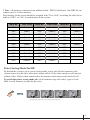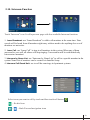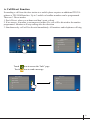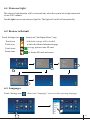
1
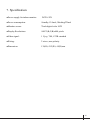
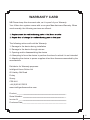
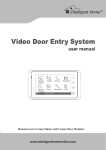
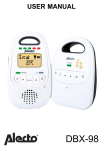
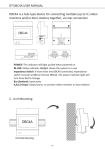
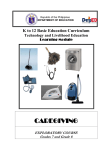
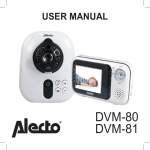
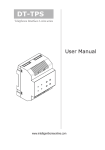
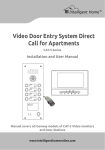
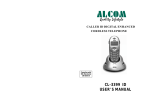
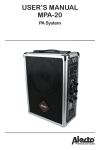
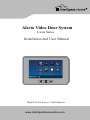
Alecto Video Door System 2-wire Series Installation and User Manual Digital Touch Screen 7 inch Monitor www.intelligenthomeonline.com -1- PRECAUTIONS ● Read this manual through before using the product. ● Slots or openings in the back of the monitor, are provided for ventilation and to ensure reliable operation of the video monitor or equipment and to protect if from overheating. These openings must not be blocked or covered. The monitor should never be placed near or over a radiator or heat register and should not be placed in a built-in installation such as a bookcase unless proper ventilation is provided. ● All parts should be protected from violence vibration. And not allow be impacting, knocking and dropping. ● For clean the LCD screen, using hands or wet cloth is forbidden. ● Please do the cleanness with soft cotton cloth, please do not use the organic or chemical clean impregnate. If necessary, please use pure water or dilute soap water to clean the dust. ● Image distortion may occur if the video door phone is mounted too close ● Please keep away the video door monitor from wet, high temperature, dust, and caustic and oxidation gas in order to avoid any unpredictable damage. ● Do NOT open the device in any condition, call the administrator for help if there is any problem or mulfunction happens. -2- CONTENT 1.Monitor Parts and Functions . ..........................................................................................4 2.Monitor Mounting...............................................................................................................5 3.Main Menu..........................................................................................................................5 4.Answering a Door Call.......................................................................................................5 4.1 Electric Lock Release...................................................................................................6 5.Monitor Setup Instructions.................................................................................................6 5.1 Sounds Settings.............................................................................................................6 5.2 Date & Time Settings....................................................................................................7 5.3 Rename & Monitoring Time Setting............................................................................7 5.4 Do Not Disturb..............................................................................................................8 5.5 Screen Modes and Talk Volume Adjustment................................................................8 5.6 Call Record(register of calls)........................................................................................9 5.7 Pictures and Video Recording.......................................................................................9 5.8 Pictures and Video Playback.........................................................................................10 5.9 Multi Monitor System...................................................................................................10 5.10 Intercom Function.......................................................................................................12 6.Call Divert Function...........................................................................................................13 6.1 Staircase Light..............................................................................................................14 6.2 Restore to Default.........................................................................................................14 6.3 Languages.....................................................................................................................14 6.4 Changing colour of LED on the button.........................................................................15 7.Specification........................................................................................................................16 -3- 1. Monitor Parts and Functions Digital TFT LCD Screen Talk/MON Button Menu Button Unlock Button Microphone Mounting Hooks Additional call button connection port Cable Connection Port DIPS ON 1 2 3 L1 L2 Speaker Additional Call Button Additional call button can be connected to a monitor according to the diagram. Please note: There will be no video on the monitor when somebody rings this call button DIP switches Settings There are 3 x DIP switches on the back of the monitor. Only DIP-3 should be set On or Off depending on the location of the monitor, and the connection method used Set DIP-3 On for a single monitor system DIP DIP1&2 DIP State 1 2 3 Description Reserved ON Set OFF if monitor is in the middle of the line (daisy chain connection) 1 2 3 DIP3 ON Set ON if monitor is at the end of the line (daisy chain) or connected to a DBC4S (star) 1 2 3 ON -4- 145~160 cm 2. Monitor Mounting 1. Use the screws to fix the mounting bracket on the wall 2. Hang the Monitor on the mounting bracket firmly 3. Main Menu Touch the screen anywhere while instandby mode. The main menu page will be shown as pictured 4. Answering a Door Call 00:30 Front Door When door station is rung, the monitor comes On with video. To start conversation touch Talk/Monitor on the button or Talk icon on the screen To end conversation touch Talk/Monitor button once again. Monitor will shut down automatically after 40 seconds -5- 4.1 Electric Lock Release UNLOCK Button or touching You can open the lock by touching icon on the screen There are two icons Lock1 and Lock2 which means you can have up to 2 electric locks connected and opened independently. If system connected to a lock, remember to set unlocking time and lock mode. Settings are changed on the “Installer Setup” page. To access the page, touch “Intelligent Home” icon on the left hand side, at the bottom. Touch and hold “Unlock” button for 2 seconds to open digital keypad page. Using the keypad, type in the following codes: 8010 # for Power-on-to open lock 8011 # for Power-off-to open lock To set the unlocking time, use codes 8401-8499 # for 1 to 99 seconds Example: Type in 8401 # for 1 second unlocking time, 8499 # for 99 secs unlocking time INSTALLER SETUP About Local Address 1.Touch icon on the main menu page 123 _ 00.00 Video Standard AUTO System Verson 00.01.00 Display Driver 1.0 Front 1.0 UI 1.0 2.Touch UNLOCK button and hold for 2s 3.A digital keypad will be shown 5. Monitor Setup Instructions 5.1. Sounds Settings Touch settings icon and choose “Sounds”. Here you can set ringtones for door stations and Intercom between rooms and Day/Night ring volume. “United” means same ring tone will be set for everything, “Separate”- different ring tones. Touch icon to exit and return to home page -6- 5.2.Date & Time Settings Touch settings icon and choose “Date & Time”. Here you can set date and time. “Sync system clock” allows to set date and time on one monitor in multiple monitor system and sync all monitors to the same settings quickly. Touch icon to exit and return to home page. How to set date and time format Setting should be done via Installer Setup Code 8008 to set the date format as Month/Day/Year Code 8009 to set the date format as Day/Month/Year Code 8012 to set the time format as 12 hour system Code 8013 to set the time format as 24 hour system 5.3. Rename & Monitoring Time Settings Touch settings icon and choose “More”. Here you can give descriptions to your door stations and CCTV cameras i.e. Front Door, Back Door, Gate. Touch the icon of the door station or CCTV camera you want to rename, the digital keypad will open. Type in your new description and touch the arrow button to save. You can set duration of manual monitoring time on this page as well. Touch icon to exit and return to home page -7- DOOR3 RENAME abc DS-3_ 5.4. Do Not Disturb Do Not Disturb function will set the monitor to not react to door station calls. Touch icon and choose desired settings: Do Not Disturb for 1 hour, 8 hours, Always. Running clock on the bottom of a screen shows the remaining time. Do Not Disturb Normal For 1 Hour For 8 Hours Always Time remaining: 00:58:32 5.5. Screen Modes and Talk Volume Adjustment To adjust them, open video from door station manually and then touch settings icon Scene mode selection: 4 screen modes can be selected: Normal, Bright, Soft and User You can also adjust Brightness, Colour, Talk Volume -8- 5.6. Call Record (register of calls) All calls received by monitors either from the door station or from other monitors in the system (if installed) can be viewed in “Call Record”. Missed calls are marked by red arrows. Missed calls from door station have viewable pictures or video clips (if SD card was inserted). Calls from other monitors have no picture/video record; you only can see what time someone called via Intercom Call Record Maximum number of records: 100 New records will overwrite oldest automatically 01/05 06-23 15:22 Bedroom 06-18 20:54 Front Door 06-12 11:06 Back Door 05-29 08:39 AlKitchen 05-27 21:43 Front Door 04-20 13:16 Gate Call Record 01/05 06-23 15:22 Bedroom 06-18 20:54 Front Door 06-12 11:06 Back Door 05-29 08:39 Kitchen 05-27 21:43 Front Door 04-20 13:16 Gate 5.7. Pictures and Video Recording When door station is rung, the monitor will record a picture of the visitor automatically. The monitor has built-in memory for 1000+ pictures. An additional Micro SD card (up to 32GB) can be inserted to increase memory storage. The SD card will enable video clips recording. Clips are 10s or 15 s each. Video clips with sound can be recorded only when “Talk” button is activated. Otherwise video clips will not have sound. Pictures and video clips can be downloaded fom the monitor via SD card. Manual recording: if nobody rings the door bell but you see something via manual monitoring and want to take a picture or video clip of the event, touch “Record” icon. If you want your manual video recording with sounds, remember to also hit the “Talk” button -9- 5.8. Pictures and Video Playback Touch Playback icon to play recorded pictures or videos Touch icon to Start/Pause the playback Image:008/020 2014/06/23 14:36:55 5.9. Multi Monitor System There are two ways of connecting multiple monitors: 1. Daisy Chain - each monitor connects to the next monitor 2. Star Connection - all monitors connect to a central point Up to 16 video monitors can be connected in a house system. Up to 4 monitors in each apartment for Apartment systems. Each monitor in either system must be programmed with a“User Code”- the address. How to program the “User Code” (address) for Daisy Chain connection Go into Installer Setup by touching “Intelligent Home” icon on the left hand side, at the bottom. This will open the “About” page. Touch and hold “Unlock” button for 2 seconds, and the digital keypad page will open. Programming of code 8000# for the first monitor in a chain makes it the Master monitor Code 8001# to program the monitor as Slave 1 Code 8002# to program the monitor as Slave 2 Code 8003# to program the monitor as Slave 3 If there are more than three Slave monitors in the system, program them as Slave 1, 2, 3 as well. Code 8001 # to program the monitor as Slave 4 Code 8002 # to program a monitor as Slave 5 and so on In addition to User Code programming, last monitor in the chain have to have DIP-3 set On (end of line) INSTALLER SETUP About Local Address Video Standard AUTO System Verson 00.01.00 Display Driver Front UI 1.Touch icon on the main menu page 123 _ 00.00 1.0 1.0 1.0 2.Touch UNLOCK button and hold for 2s 3.A digital keypad will be shown -10- 2. Star - all monitors connected to an additional hub - DBC4A distributor. One DBC4A can connect up to a 4 video monitors Each monitor in the system should be assigned with “User Code” according the table below and have DIP-3 set “On” in each monitor in the system Input No. User Code Input No. User Code Input No. User Code 8200 Code=0 8211 Code=11 8222 Code=22 8201 Code=1 8212 Code=12 8223 Code=23 8202 Code=2 8213 Code=13 8224 Code=24 8203 Code=3 8214 Code=14 8225 Code=25 8204 Code=4 8215 Code=15 8226 Code=26 8205 Code=5 8216 Code=16 8227 Code=27 8206 Code=6 8217 Code=17 8228 Code=28 8207 Code=7 8218 Code=18 8229 Code=29 8208 Code=8 8219 Code=19 8230 Code=30 8209 Code=9 8220 Code=20 8231 Code=31 8210 Code=10 8221 Code=21 Power Saving Mode On/Off By default the system is set to power saving mode, where only the first monitor in the system comes on with video when door station called. All the other monitors will ring but without video. Video is then transferred to the monitor which answers the doorbell call. To switch the power saving mode off: (so all monitors ring with video), type in Code 8006 # on all monitors (except the first one) All monitors ring with Video - power saving mode is turned Off -11- 5.10. Intercom Function Touch “Intercom” icon. It will open new page with four available Intercom functions. 1. Inner Broadcast: use “Inner Broadcast” to talk to all monitors at the same time. Your speech will be heard from all monitors right away with no need to do anything else even if monitors are not active 2. Inner Call: use “Inner Call” to ring to all monitors in the system. When one of them answered to your call, all others will stop ringing. Conversation will be established only between two monitors 3. Intercom by Name List: use “Intercom by Name List” to call to a specific monitor in the system. Name list of monitors can be created via Installer Setup 4. Intercom Call Guard Unit: use to call the concierge in Apartment systems Name List [ 01 ] Bedroom [ 02 ] Lounge [ 03 ] [ 04 ] [ 05 ] Kitchen Hallway Ground floor [ 06 ] Study Select room you want to call by touch and then touch call button - Re-dial icon / - Back/Forward navigation icons -12- 6. Call Divert Function Forwarding a call from the door station to a mobile phone requires an additional TPS Telephone or TPS GSM Interface. Up to 3 mobile or landline numbers can be programmed. There are 3 Divert modes: 1. Don’t Divert: when you at home and don’t want a divert 2. If no answer: if monitor is not answered within 30s, call will be diverted to the number programmed. Monitors will stop calling after the diversion 3. Simultaneously: call will be diverted immediately. All monitors and telephones will ring Divert Options Don’t Divert If No Answer Simutaneously 1) 2) 3) Touch icon to access the “Info” page Touch icon to send a message Device Info Divert Options Don’t Divert Device If No Answer Simutaneously SIM - Network - 1) Signal Level - 2) 3) -13- 6.1. Staircase Light The staircase light function will be activated only when the system has a light connected via an SC6V module. Touch Light icon to turn staircase light On. The light will switch off automatically 6.2. Restore to Default then touch “Intelligent Home” logo Touch Settings icon Touch icon all default settings will be loaded to enter the Memo Information page Touch icon Touch icons to copy pictures onto SD card Touch icons to format SD card and restart Memo Information About Local Address Video Standard System Verson Display Driver Front UI 00.00 SD Card -- AUTO Video Capacity 00.01.00 Video Usage 1.0 ---- ----Flash 1.0 Image Capacity 0118 1.0 Image Usage 0000 Memo Information SD Card Video Capacity ----- Video Usage Format SD Card And Restart ? Copy Pictures To SD ? ----Flash Image Capacity 0118 Image Usage 0000 6.3. Languages Touch Settings icon then touch “Language” icon to set the operating language -14- 6.4. Changing colour of LED on the button Default: Standby: Green; Call Waiting: Red flashing Available colours to choose and codes for setting: Standby Call Waiting 8051 red 8045 red flashing 8052 green 8046 green flashing 8053 blue 8047 blue flashing 8054 yellow 8048 yellow flashing 8055 purple 8049 purple flashing 8056 white 8050 white flashing 8057 Off -15- 7. Specification ●Power supply for indoor monitor: DC20~28V ●Power consumption: Standby 12.4mA; Working270mA ●Monitor screen: 7Inch digital color LCD ●Display Resolutions: 800*3(R,G,B)x480 pixels ●Video signal: 1 Vp-p, 75Ω, CCIR standard ●Wiring: 2 wires, non-polarity ●Dimension: 139(H)×212(W)×15(D)mm -16- WARRANTY CARD NB Please keep this document safe, as it is proof of your Warranty Your Video door system comes with a one year Manufacturers Warranty. When used normally, the following services are offered: The following actions will void the Warranty: 1. Damage to the device during installation 2. Damage to the device through misuse 3. Opening and/or disassembling the device 4. Attempting to force the device to perform functions for which it is not intended 5. Attaching the device to power supplies other than thoserecommended by the manufacturer Distributor for Warranty purposes: Intelligent Home Online Ltd 62 Hartley Old Road Purley Surrey CR8 4HJ +44 (0)20 86170015 www.intelligenthomeonline.com Product:_____________________________________________ ______________________________________ Serial Number: ______________________________________ ______________________________________ Invoice N: ____________________________________________ ______________________________________ Purchase Date_________________________________________ -17- Alecto 2-wire series Right to interpret and copyright of this manual are preserved. www.intelligenthomeonline.com -18-