1
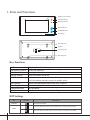
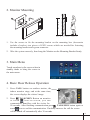
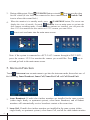
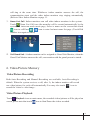
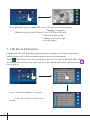
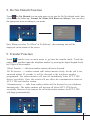
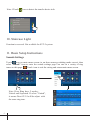
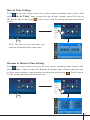
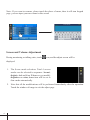
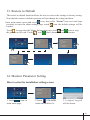
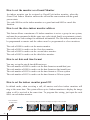
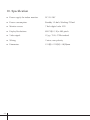
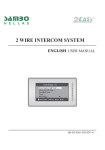
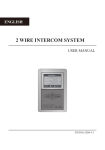
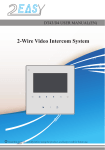
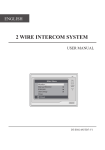
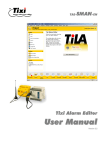
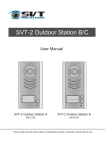
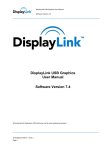
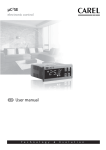
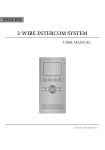
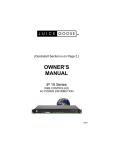
SVT-2 7" Indoor Monitor A & B User Manual Please read this user manual prior to installing the system, and keep it well for future use. 1. Parts and Functions Digital TFT LCD Screen Emergency Button Message Indicator UNLOCK Button TALK/MON Button Microphone Mounting Hook Speaker 123 L2 ON DIPS L1 Connection Port Mounting Hook Key functions LCD screen Emergency button Message indicator Unlock button Talk/Mon button Display the visitors' image Reserved function It will light when the monitor receives a call from the outdoor station Microphone Mounting hook Connection port Speaker Sends out communication from user to guest Use to hang up the monitor Bus terminal Sends out communication from the guest to the user Press to release the door Press to communicate hand-free with visitor or press to view the outdoor station's camera in standby mode DIP Settings Bit DIP1&2 DIP3 Bit State 1 2 3 Reserved. left to default. ON 1 2 3 Set to OFF. When the monitor is in the middle of the line in daisy chain connection. 1 2 3 Set to ON. When the montior is at the end of the line or connected to a SVT-DBC4. ON ON -1- Description 145~160 cm 2. Monitor Mounting 1. Use the screws to fix the mounting bracket on the mounting box (Accesories include a bracket, two pieces of 4X25 screws which are needed for fastening the mounting bracket and a green connector. 2. Wire the system correctly, then hang the Monitor on the Mounting Bracket firmly. 3. Main Menu Touch anywhere in the screen when in standby mode to bring the screen to the main menu. 4. Basic Door Release Operation 1. Press CALL button on outdoor station, the indoor monitor rings, and at the same time, the screen displays the visitors' image. It will display the call source string 00:30 Front Door 2. Press TALK/MON Button on monitor icon on screen, you can or touch communicate hand-free with the visitor for 90 seconds. After finishing communication,press TALK/MON button again or touch icon to end the communication. If nobody answers the call the screen will be turned off automatically after 30 seconds. -2- 3. 1. During talking state, Press UNLOCK Button or touch icon to open the door for the visitor.(if two locks are connected to door camera,touch unlock 2nd icon to release the second lock ) 2. 4. When the monitor is in standby mode, press TALK/MON button, The screen can display the view of outside. Or touch Monitor icon on main menu to get into the door camera switching mode, if multi outdoor stations are installed, you can press the door 1/2/3/4 to monitor the door station or CCTV camera you want. Press icon to exit and enter into the main menu screen. Note: if the system is connected to a SVT-2 AC31 camera throught a SVT-2 SCU , press the camera 1/2/3/4 to monitor the camera you would like. Press icon to exit and go back to the main menu screen. 5. Intercom Function Touch Intercom icon on main menu to get into the intercom mode, then select one of the following: Inner Broadcast, Inner Call, Name List Call and Call Guard Unit. 1. Inner Broadcast: If multi slave indoor monitors are installed in the same system, (either single family or apartment system), select Inner Broadcast, and all indoor monitors will automatically receive broadcast content at the same time. 2. Inner Call: If multi slave indoor monitors are installed in the same system (either single family or apartment system), select Inner Call, and all the other indoor monitor -3- will ring at the same time. Whichever indoor monitor answers the call, the communication starts and the other indoor monitors stop ringing automatically (Refer to Slave Indoor Monitor on page 11. 3. Name List Call: Indoor monitors can call other indoor monitors in the system. Touch Name List Call icon (the namelist will be created automatically by the system) on intercom mode menu page, Select a name on the screen then touch icon to call.Press / icon to enter last/next name list page. (Touch Dial Number icon again to redial) 4. 5. 6. 7. [ 01 ] [ 02 ] [ 03 ] [ 04 ] [ 05 ] [ 06 ] Name List Jim. Zhang Calo. Liu Jacko. Zhang Philips. Chen Hebe. Zhang Tony. Li 8. 9. Call Guard Unit: A indoor monitor can be assigned as Guard Unit Monitor; when the 4. Guard Unit Monitor answers the call, conversation with the guard person is started.. 6. Video/Picture Memory Video/Picture Recording Both Auto-Recording and Manual-Recording are available. Auto-Recording is default. When the system receives a call, after 3s, the indoor monitor will record one video/picture for each call automatically.You may also touch icon to record the visitor's video/image . Video/Picture Playback Touch Playback icon on main menu, the recorded videos/pictures will be played on screen, please note that touch icon to Start/Pause the videos recorded. -4- Image:008/020 2014/06/23 14:36:55 Note: When the system without SD card: 1.118 pictures in inner memory 2.Manage each picture. When the system with SD card:1.Up to 32G Micro SD card 2.Video & Audio record 3.Manage each video clips 4.Can be copied 7. Call Record Function Call Record: All calls including Outdoor station-to-monitor call, indoor monitor-toindoor monitor call, will be recorded and can be reviewed afterwards. Touch Call Record icon on main menu to get into the call record mode.When there are unread call records, arrow color red. Press the unread call record, and then touch icon to play it. Call Record Note: 1.Limited number of records. 2.Do not need to delete any a record. -5- 01/05 06-23 15:22 Calo.Liu 06-18 20:54 Smith 06-12 11:06 Vincent.Yang 05-29 08:39 Allen.Chen 05-27 21:43 Hebe.Zhang 04-20 13:16 Ben.Wu Call Record 01/05 06-23 15:22 Calo.Liu 06-18 20:54 Smith 06-12 11:06 Vincent.Yang 05-29 08:39 Allen.Chen 05-27 21:43 Hebe.Zhang 04-20 13:16 Ben.Wu 8. Do Not Disturb Function Touch Do Not Disturb icon on main menu to get into the Do Not disturb mode, then select of the the following: Normal, In 1 Hour, In 8 Hours and Always. You can select the appropriate item according to your needs. Do Not Disturb Normal In 1 Hour In 8 Hours Always Refuse Call In: 00:58:32 Note: When you select "In 1 Hour" or "In 8 Hours", the remaining time will be displayed on the bottom of the screen. 9. Transfer Function Touch Transfer icon on main menu to get into the transfer mode. Touch the empty place ,and then input the telephone number by pressing the digital keypad.And it has 3 types of divert modes: 1:Don't Transfer ---- calls from outdoor station will not be diverted. 2:If No Answer ---- outdoor station calls indoor monitor firstly, the the call is not answered within 30 seconds, it will be diverted to the telephone number programmed. The indoor monitor will turn off immediately when SVT-2 TPS diverts sucessfully. Note, this action will not affect the communication between SVT-2 TPS and outdoor station. 3:Simutaneously ---- calls from outdoor station will be diverted to your telephone simutaneously. The indoor monitor will not turn off when SVT-2 TPS diverts sucessfully, however if one answers the call at the indoor monitor, the SVT-2 TPS will hang up automatically. Transfer Options Don't Transfer If No Answer Simutaneously 1) 2) 3) -6- Note:1.Touch icon to detect the transfer device info. Transfer Options Don't Transfer If No Answer Simutaneously 1) 2) 3) 10. Staircase Light Function is reserved. Not available for SVT-2 system. 11. Basic Setup Instructions Sounds Settings Touch icon on main menu screen (or on door camera switching mode screen), then select "Sounds" item to enter the sounds settings page.You can set a variety of ring tones on this page. Touch icon to exit the setting and return main menu screen. Note: Door Ring have 2 modes: United and Seperated. If select "United", it means Door1/2/3/4 will be adjust with the same ring tone. -7- Date & Time Settings Touch icon on main menu screen (or on door camera switching mode screen), then select "Date & Time" item to enter the date & time settings screen.You can set the date & time on this page. Touch icon to exit the setting and return main menu screen. Note: You can set your own time, you can also synchronize the system time. Rename & Monitor Time Settings Touch icon on main menu screen (or on door camera switching mode screen), then select "More..." item to enter the Rename & monitor time settings page.You can set door station rename, camera rename, monitor time on this page. Touch icon to exit the setting and return main menu screen. -8- Note: If you want to rename, please touch the place of name, then it will turn keypad page ,you can input your new name in this screen DOOR3 RENAME abc DS-3_ Screen and Volume Adjustment During monitoring or talking state, touch icon, and the adjust screen will be displayed. 1. The Scene mode selection: Total 4 screen modes can be selected in sequence: Normal, Brightly, Soft and User. Whenever you modify Brightness or colour, Scene item will be set to User mode automatically. 2. Note that all the modifications will be performed immediately after the operation. Touch the window of image to exit the adjust page. -9- 13. Restore to Default The restore to default function allows the user to recover the settings to factory setting. Note that the restore to default operation will not change the setting and datas. icon, then select "About" item (or touch logo Enter main menu screen,and touch position) to enter the about settings page, touch icon, the default settings will be loaded. Touch icon to enter the Memo Information page, touch and icon to copy the pictures to SD card. Touch and icon to format SD card and restart. About Memo Information Local Address 00.00 Video Standard AUTO SD Card Video Capacity System Verson 00.01.00 Video Usage -- Display Driver 1.0 Front 1.0 Image Capacity 0118 UI 1.0 Image Usage 0000 ---- ---- Flash Memo Information SD Card -- Video Capacity ---- Video Usage ---- Copy Pictures To SD ? Format SD Card And Restart ? Flash Image Capacity 0118 Image Usage 0000 14. Monitor Parameter Setting How to enter the installation setting screen INSTALLER SETUP About Local Address 1.Touch icon on main menu page. 123 _ 00.00 Video Standard AUTO System Verson 00.01.00 Display Driver 1.0 Front 1.0 UI 1.0 2.Touch UNLOCK button and hold for 2s. 3.A digital keypad will be shown. -10- How to set the monitor as a Guard Monitor An indoor monitor can be assigned as Guard Unit indoor monitor; when the Guard Unit Indoor Monitor answers the call and the conversation with the guard person starts. Use code 8004 to set the indoor monitor as a guard unit and 8005 to cancel this function. How to set the slave indoor monitor address This feature allows a maximum of 4 indoor monitors to act as a group in one system, and must be programmed with the same user code (single family or apartment system); refer to the user code settings for additional information. The first indoor monitor must be programmed as master and the others must be programmed as slave monitors: The code of 8000 is used to set the master monitor. The code of 8001 is used to set the first slave monitor . The code of 8002 is used to set the second slave monitor . The code of 8003 is used to set the third slave monitor . How to set date and time format You may set up the sate & time different ways: The code number of 8008 is used to set the date format as month/date/year The code number of 8009 is used to set the date format as date/month/year The code number of 8012 is used to set the time format as 12 hour system The code number of 8013 is used to set the time format as 24 hour system How to set the indoor monitor panel ON In default mode, when receiving a call, all masters and slave indoor monitors will ring at the same time. The system allows up to 4 indoor monitors to display the image when a call is received at the same time. To program this setting, just input the code 8006 on each indoor monitor. -11- How to set the unlock parameter Unlock mode: There are two unlock modes: 1.power-on- to-unlock type:unlock mode=0(by default) 2.power-off-to-unlock:unlock mode=1. The code number of 8010 is used to set the unlock mode to 0 The code number of 8011 is used to set the unlock mode to 1 Unlock time: The unlock time can be changed by at any time. It can be set from 1 to 9 seconds. The code number from 8021 to 8029 are used to set the unlock time to 1~ 9 seconds. How to set the user code for the monitor There are 3 DIP switches in total. Bits 1 and 2 are reserved and must be on the default position. The Bit 3 is used to configure the position of each indoor monitor in the connection line. It must be set to ON if the indoor monitor is in the end of the line, parallel connection, or connected to a DBC-4 module. It must be set to OFF if the indoor monitor is in the middle of the line (daisy chain connection) 31. Please refer to the following table. Input No. User Code Input No. User Code Input No. User Code 8200 Code=0 8211 Code=11 8222 Code=22 8201 Code=1 8212 Code=12 8223 Code=23 8202 Code=2 8213 Code=13 8224 Code=24 8203 Code=3 8214 Code=14 8225 Code=25 8204 Code=4 8215 Code=15 8226 Code=26 8205 Code=5 8216 Code=16 8227 Code=27 8206 Code=6 8217 Code=17 8228 Code=28 8207 Code=7 8218 Code=18 8229 Code=29 8208 Code=8 8219 Code=19 8230 Code=30 8209 Code=9 8220 Code=20 8231 Code=31 8210 Code=10 8221 Code=21 -12- 10. Specification -13- ●● Power supply for indoor monitor: DC 20~28V ●● Power consumption: Standby 12.4mA; Working 270mA ●● Monitor screen: 7 Inch digital color LCD ●● Display Resolutions: 800*3(R, G, B) x 480 pixels ●● Video signal: 1Vp-p, 75Ω, CCIR standard ●● Wiring: 2 wires, non-polarity ●● Dimension: 131(H)×225(W)×18(D)mm The design and specifications of this user manual can be changed without any notification to the user. All copyright and interpretation rights are reserved to SVT Innovations Inc.