1
RAPID
DIGITAL CINEMA MASTERING STATION
User Manual
Version 1.4
RAP.OM.000960.DRM
Page 1
Doremi Cinema LLC
Version 1.4
Table of Contents
1 Introduction..............................................................................................6
1.1 PURPOSE..................................................................................................................................6
1.2 RAPID ENCODER PRESENTATION .............................................................................................7
1.3 RAPID GUI VERSION.............................................................................................................7
1.4 CONTACT..................................................................................................................................8
2 System Overview.....................................................................................9
2.1 RAPID SETUP.........................................................................................................................9
3 Launching the RAPID ...........................................................................11
4 Encoding Overview...............................................................................12
4.1
ENCODING FROM A FILE SOURCE..........................................................................................13
4.1.1 File Naming and Numbering Convention.....................................................................13
4.1.2 Audio Files...................................................................................................................14
4.2 ENCODING FROM A FILE SOURCE..............................................................................................14
4.2.1 To Edit the Default Settings..........................................................................................14
4.3 STOPPING THE ENCODING JOB...................................................................................................16
4.4 ENCODING FROM HD-SDI......................................................................................................20
4.4.1 Supported Formats......................................................................................................20
4.4.2 Default and Custom File Names...................................................................................20
4.4.2.1 Video HD-SDI Captures........................................................................................20
4.4.2.2 Audio HD-SDI Captures........................................................................................21
4.5 ENCODING FROM A HD-SDI SOURCE.......................................................................................22
4.6 HD-SDI TIMECODE................................................................................................................24
4.6.1 Timecode for Video Streamer.......................................................................................26
4.7 REAL-TIME AND NON-REAL TIME CAPTURE ..............................................................................27
4.7.1 RAPID ..........................................................................................................................27
4.7.2 RAPID 2X.....................................................................................................................27
4.8 COLOR SPACE CONVERSION FOR FILE AND HD-SDI CAPTURE......................................................28
4.8.1 Default Profiles for Color Space ................................................................................29
4.9 SAMPLE SPACE CONVERSION FOR HD-SDI CAPTURE...................................................................29
4.9.1 Obtaining a 4:4:4 Signal From HD-SDI Capture........................................................30
5 Output Tab.............................................................................................32
5.1 DESTINATION DIRECTORY.........................................................................................................32
5.2 NUMBER OF FRAMES................................................................................................................33
5.3 VIDEO STANDARD ..................................................................................................................33
5.3.1 How to Form and Crop the Image's "active area" ......................................................34
5.3.1.1 How to Format and Crop an Image At 4k (4096x2160)........................................35
5.3.1.2 How to Format and Crop an Image At 4k ("active area").....................................35
RAP.OM.000960.DRM
Page 2
Doremi Cinema LLC
Version 1.4
5.3.1.3 How to Upscale HD Scope Image (1920 pixels x 804 lines to 2048 pixels x 858
lines):..................................................................................................................................35
5.3.1.4 How to Upscale HD Flat Image (1920 pixels x 1038 lines to 1998 pixels x 1080
lines):..................................................................................................................................35
5.4 CUSTOMIZABLE LABEL FOR HD-SDI CAPTURE ..........................................................................37
5.4.1 Default Label ...............................................................................................................37
5.4.2 Custom Label................................................................................................................37
5.5 EMBEDDED LOGO ...................................................................................................................37
6 Compression Tab..................................................................................38
6.1 COARSE STEPSIZE OPTION.........................................................................................................40
7 VTR Control Tab....................................................................................41
7.1 EXTERNAL DEVICE CONTROL BUTTON........................................................................................41
7.2 AUTOMATIC CONTROL OF VTR BUTTON...................................................................................42
7.2.1 Main Function..............................................................................................................42
7.2.2 Automatic Commands Sent To Server..........................................................................43
7.2.3 VTR Shuttle Button.......................................................................................................44
8 Job Manager Tab...................................................................................45
8.1 HOW TO SCHEDULE MULTIPLE JOBS (FILE SOURCE ONLY)...........................................................45
8.2 HOW TO REORDER AND DELETE JOBS .......................................................................................46
9 Report Tab..............................................................................................48
9.1 HEADING TAB FUNCTIONS........................................................................................................48
9.2 SAVING SETTINGS....................................................................................................................51
9.3 PREFERENCES MENU................................................................................................................51
9.3.1 How to Change the Default Settings from the Preferences Window............................51
10 RAPID Player ......................................................................................53
10.1 OVERVIEW ...........................................................................................................................53
10.2 PRESENTATION ......................................................................................................................53
10.3 SUPPORTED FORMATS.............................................................................................................53
10.4 LAUNCHING THE RAPID PLAYER GUI....................................................................................54
10.5 EDITOR TAB..........................................................................................................................54
10.5.1 Reel Composition........................................................................................................54
10.5.2 Reel Manager.............................................................................................................55
10.6 PLAYBACK TAB.....................................................................................................................58
10.6.1 Playback Functions ...................................................................................................58
10.7 REPORT TAB.........................................................................................................................60
11 Software and Firmware Upgrades....................................................61
11.1 HOW TO PERFORM A SOFTWARE OR FIRMWARE UPGRADE FROM A USB.......................................61
12 File Transfer Protocol (FTP) .............................................................67
RAP.OM.000960.DRM
Page 3
Doremi Cinema LLC
Version 1.4
12.1 FTP SERVER ON RAPID.......................................................................................................67
12.2 FTP CLIENT ON RAPID........................................................................................................67
12.3 GFTP SERVER ON RAPID.....................................................................................................70
12.3.1 How To Access a "gFTP" Client From the RAPID....................................................70
13 Network File System (NFS)................................................................72
13.1 SETTING AN NFS SERVER.......................................................................................................72
13.1.1 How To Access NFS From a Linux Desktop .............................................................72
13.2 SETTING AN NFS SERVER ON THE CLIENT.................................................................................76
14 Samba Directory for Windows..........................................................77
14.1 SETTING A SERVER.................................................................................................................77
14.1.1 How To Create A Samba Shared Directory For Windows Users..............................77
14.1.2 How To Create A New Samba Share Directory ........................................................81
14.2 CONNECTING TO A SAMBA NETWORK........................................................................................84
15 Useful Commands..............................................................................85
15.1 LS.......................................................................................................................................85
15.2 DU......................................................................................................................................85
15.3 DF......................................................................................................................................85
15.4 MOUNT.............................................................................................................................86
15.5 FDISK................................................................................................................................86
16 Trouble Shooting................................................................................88
17 Acronyms............................................................................................90
18 Document Revision History...............................................................91
RAP.OM.000960.DRM
Page 4
Doremi Cinema LLC
Version 1.4
Software License Agreement
The software license agreement can be found at the following location:
http://www.doremilabs.com/warranties.html
Hardware Warranty
The hardware warranty can be found at the following location:
http://www.doremilabs.com/warranties.html
RAP.OM.000960.DRM
Page 5
Doremi Cinema LLC
Version 1.4
1 Introduction
1.1 Purpose
The RAPID is a Digital Cinema Mastering Station compliant with DCI specifications. Mastering
and Generation, of a DCP package, is made in two steps:
•
Compressing/Encoding video content into JPEG-2000 files following DCI specified
standards using the RAPID Encoder.
•
Generating a DCP package using the JPEG-2000 compressed video content and the
audio, subtitle and projector configuration files.
Note: This user manual describes the Encoding Process, refer to the MXF Wrapping User
Manual for information on how to generate a DCP package.
This User Manual also describes the RAPID Player (see Section “RAPID Player” below). It is
recommended that the RAPID Player be used to preview the encoded files to ensure the quality
of the images.
The RAPID Player serves two functions:
1) It can be used to playback compressed and uncompressed files.
2) It can be used to preview the encoded files to ensure their quality (i.e., color, resolution,
sharpness, etc).
Note: This user manual describes the encoding process, refer to the MXF Wrapping User Guide
for information on how to generate a DCP package.
RAP.OM.000960.DRM
Page 6
Doremi Cinema LLC
Version 1.4
1.2 RAPID Encoder Presentation
The RAPID is a hardware accelerated JPEG-2000 compressor. It allows the encoding of
uncompressed files, typically, but not restricted to tiff files and JPEG-2000 files compliant with
the DCI specification.
The RAPID Encoder GUI is laid out in six tabs:
Source Tab
Use this tab to encode frames from a File or HD-SDI (High DefinitionSerial Digital Interface) device. User must choose the source from
this tab.
Output Tab
Use this tab to view and change the properties of the source for
encoding. Properties such as number of frames, video standard (i.e.,
pixels and lines), color space, etc.
Compression Tab
Use this tab to control the rate at which encoding occurs. The default
rate is set to VBR (Variable Bit Rate) at 250Mb/s (DCI Specified),
however, these options can be changed.
VTR Control
Use this tab to send commands to the HD-SDI device, either
manually or automatically. The VTR control uses the standard Sony
9Pin protocol to send commands to the device.
Job Manager
Use this tab to view, schedule, add, or delete encoding jobs (primarily
available when encoding from a file source).
Report Tab
Use this tab to view the various messages encountered by the server
while encoding (i.e.,encoding job started/finished, duration of the job,
number of frames encoded, missing frames, etc).
1.3 RAPID GUI Version
This document is referenced with “RAPID Encoding GUI” version 3.2.0 and with “RAPID Player”
GUI version 3.2.0.
RAP.OM.000960.DRM
Page 7
Doremi Cinema LLC
Version 1.4
1.4 Contact
If in need of help or assistance, please contact your nearest Doremi Labs Technical Support at:
USA
•
•
24/7 Technical Support Line: +1-866-484-4004
Technical Support Email: [email protected]
Europe
• 24/7 Technical Support Line: +33 (0) 492-952-847
• Technical Support Link: http://support.doremitechno.org/ticketing
Japan
• Technical Support Line: +044-966-4855
• Technical Support Email: [email protected]
Australia ~ China ~ India ~ Indonesia ~ Korea ~ Malaysia ~ New Zealand ~ Philippines ~
Singapore ~ Taiwan ~ Thailand
• Technical Support Email: [email protected]
RAP.OM.000960.DRM
Page 8
Doremi Cinema LLC
Version 1.4
2 System Overview
The RAPID runs the Linux OS, 64 bit kernel revision 2.6.18. A RAID5 of six 1TB drives provides
5 TB of storage accessible (mounted) on directory “/data”.
There are two username setups by default:
•
“root”: Used only for administration of the unit. The password is “doremi.” It is
recommended to change the root password at the customer site.
•
“dms2000”: For the encoding sessions and other operations related to encoding
including use of the RAPID Player. The password is “doremi”.
Note: It is highly recommended that users be logged in as “root” only when absolutely
necessary. Being logged in as “root” increases the risk of fatally damaging the system in case of
a wrong operation (i.e., involuntary delete of the system). It might also modify the system
permission on some necessary files making the use of the application for the normal RAPID
user partial or impossible.
2.1 RAPID Setup
The RAPID has only one Dolphin DCI board with one license installed on it. The RAPID 2x has
two Dolphin DCI boards. Currently, all RAPID 2x units are produced and shipped with licenses
for both Dolphin DCI boards. However, in the past, RAPID 2x units were shipped with only one
license installed on one board only.
Note: Initially, RAPID 2x units were shipped with only one license installed (on the Dol-Enc 2
board). If the Dolphin DCI Dol-Enc 2 board failed then only the first Dolphin card would be
detected and the license would have to be re-installed.
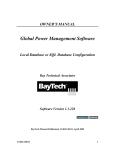
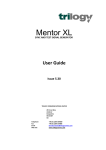
Description
The RAPID2x has two Dolphin Encoder (Dol-Enc) cards. Each card has
dual link HD-SDI video inputs and outputs. Each Dol-Enc requires 2
bracket spaces. See illustration below on how to connect.
RAP.OM.000960.DRM
•
Connect the video source to the HD-SDI input Dol-Enc 1
•
Connect the output of Dol-Enc 1 to the input of Dol-Enc 2
Page 9
Doremi Cinema LLC
Version 1.4
Dol-Enc 1
input A
Dol-Enc 1
input B
Dol-Enc 1
output A
Dol-Enc 1
output B
RAP.OM.000960.DRM
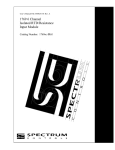
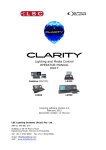
•
(optional) Connect output of Dol-Enc 2 to a display.
Dol-Enc 2
input A
Dol-Enc 2
input B
Dol-Enc 2
output A
Dol-Enc 2
output B
Page 10
Doremi Cinema LLC
Version 1.4
3 Launching the RAPID
•
Launch the RAPID GUI by double-clicking on the “RAPID Encoder GUI” icon on the
desktop (see Figure 1 below).
•
The "Rapid Encoder GUI" will appear as illustrated below:
Rapid
Encoder
GUI icon
Figure 1: RAPID Encoding GUI Icon
RAP.OM.000960.DRM
Page 11
Doremi Cinema LLC
Version 1.4
4 Encoding Overview
The user can encode data from a file source or an HD-SDI source. Each source will be
described in full detail below.
•
General encoding LCD color schemes when encoding:
•
Orange: The server is idle (not encoding anything) or has already finished encoding a
job (see Figure 2 below).
•
Green: Encoding in progress (see Figure 3 below).
•
Red: Server is preparing encoding job (see Figure 4 below).
Figure 2: Server Is Idle
Figure 3: Encoding In Progress
Figure 4: Server Is Preparing Encoding Job
RAP.OM.000960.DRM
Page 12
Doremi Cinema LLC
Version 1.4
4.1
Encoding From a File Source
When encoding from a file source (most recommended are TIFF files, although other formats
are supported), the user will choose the folder that contains the files to be compressed. The
software application will automatically detect the number of frames with a consecutive
incrementing index in a file and include it in the extension file name.
4.1.1 File Naming and Numbering Convention
By default the server will keep the same base name and number identifier as the original
uncompressed file. The server will automatically convert the .”tif” file name extension to a “.j2c”
extension.
It is assumed that SPMTE recommended standards were followed when creating the original
image sequence files. The basic recommended standards are as follows:
•
Each image is in a separate file.
•
An image sequence consists of a series of files in a directory structure.
•
The file name will end with the extension: “.tif” (delimited by the period character).
•
Immediately before the file extension is the frame number identifier.
•
Leading zeros are used to maintain a constant number of digits.
•
The “base name” (also known as the “pre-number identifier”) is preceded by
alphanumeric text and characters (delimited by another period character).
•
Example: “My_Movie.00192.tif” where “My_Movie.” is the base name, “00192” is the
number identifier and “.tif” is the file name extension. When the server has finished
compressing the file, the end result will be “My_Movie.00192.j2c”.
The frame number identifiers are in ascending order (i.e.,1, 2, 3, 4, 5, 6...) with no gaps in the
sequence for a given image sequence. Zeros are used to keep a constant number of digits.
Post-production reel names and abbreviations may be used. Any alphanumeric text used in the
file name will remain constant for all image files intended for the same image sequence. The
only characters that will change in a sequence are the frame number identifiers.
When the user(s) selects a file to encode that file will be the first image in that image sequence.
By default the server will automatically encode the remaining images in the sequence after it.
•
Example: If the user(2) has 10,200 frames in an image sequence and you wish to start
from frame “002567,” the server will automatically encode the remaining frames until it
reaches the last frame in the sequence, i.e., “010200”. If the user(s) does not want to
encode all of the remaining frames in the image sequence, then it is possible to change
it from the “Output Tab.” See Section “Output Tab” below:
RAP.OM.000960.DRM
Page 13
Doremi Cinema LLC
Version 1.4
4.1.2
Audio Files
Audio and “TIFF” files are named in the same manner. The only difference is that audio files are
created using “.wav” instead of “.tif”.
•
Example: “My_Movie.00192.wav” will be compressed to “My_Movie.00192.j2c”
4.2 Encoding From a File Source
•
To launch the RAPID GUI, double-click on the “RAPID Encoder GUI” on the desktop.
•
From the “Source” tab select the check-box immediately to the left of the “File Encoding”
option.
•
Choose a file from the “Browse Directory”.
•
This file will be the first image in the image sequence (see Figure 5 below).
•
To keep the default settings click the “Apply” button.
•
Click “Encode” to begin the encoding process.
“Browse
Directory”
Field
Figure 5: Browse Directory Button
4.2.1 To Edit the Default Settings
•
Use the “Common Settings” option to change the “framerate” or to convert from “RGB to
XYZ” (see Figure 6 below).
Note: A license is needed to use the “RGB to XYZ” conversion feature. To receive the license
contact Doremi Technical Support at [email protected]
RAP.OM.000960.DRM
Page 14
Doremi Cinema LLC
Version 1.4
•
If the file is a 3D sequence (48fps) select the “48fps” option from the “FrameRate” dropdown list (see Figure 6 below).
•
The user can convert the color of the frames from RGB to XYZ (see Figure 6 below) . It
is very important that the user understand the implications of using this option because it
will effect the resolution and quality of the images that are generated.
•
Click the “Apply” button.
•
Click the “Encode” button to begin the encoding process.
Note: The duration of the encoding process depends on which station is being used (i.e., Rapid
1x or 2x) and how many frames to encode. The RAPID encodes in “Real-Time” (i.e.,1 hour,
which equals to 086400 frames, will take approximately 1 hour to encode). The RAPID 2x is half
of “Real-Time” (i.e.,1 hour, which equals to 086400 frames, will take approximately 30 minutes).
“File
Encoding”
Field
“RGB to XYZ”
Option
Figure 6: RAPID Encoder GUI - File Encoding Option
RAP.OM.000960.DRM
Page 15
Doremi Cinema LLC
Version 1.4
4.3 Stopping the Encoding Job
•
To stop encoding job, click the “Stop” button.
•
The “Stopping Video Compression” window will appear (see Figure 9 below).
•
When the user clicks on “Stop”, the server will begin finalizing the frames in the buffer.
•
This process takes less than one minute to complete.
•
To immediately end the encoding job click on the “Terminate Now” button.
Note: The "Terminate Now" option terminates the encoding process without waiting for the
server to finalize the frames in the buffer. It is highly recommended that the user allow the
server to finalize the frames in the buffer and to use the “Terminate Now” option only when
absolutely necessary. The “Terminate Now” option the will still do a quick check of the frames to
detect any possible issues (i.e., missing frames, corrupt input files, etc). This check takes
approximately 20-30 seconds.
“Stop”
Button
“Encoding
started”
Message
Figure 7: Rapid Encoder GUI - Source Tab
RAP.OM.000960.DRM
Page 16
Doremi Cinema LLC
Version 1.4
Encoding in
progress - this
reflects the
number of
frames
“Stop”
Button
Figure 8: Source Tab - File Encoding In Progress
Figure 9: Stopping Video Compression Message
Figure 10: RAPID Encoder GUI - File Encoding Option
RAP.OM.000960.DRM
Page 17
Doremi Cinema LLC
Version 1.4
Figure 11: RAPID Encoder GUI - Encoding Missing Frames
•
After the server is done encoding a “job”(an image sequence), go to the “Report” tab and
view the status of that particular encoding job (see Figure 12 below).
“Report”
Tab
Figure 12: RAPID Encoder GUI - Report Tab
•
The "Job Manager” tab displays information about the “Job” including its source, bit rate,
and frame number (see Figure 13 below).
Note: To schedule several “jobs” and to choose which order the server will encode them go to
the “Job Manager” tab and enable the “Multiple Jobs”option by clicking “Add Job”. The server
will automatically highlight the new job. Go back to the “Source” tab and continue with the
instructions as laid out under Section 4.1.
RAP.OM.000960.DRM
Page 18
Doremi Cinema LLC
Version 1.4
“Job
Manager”
Tab
The job
number and
its source are
displayed in
the “Job
Manager” tab
Figure 13: RAPID Encoder GUI - Job Manager Tab
“Job
Manager”
Tab
Scroll all the
way to the right
to view the
“Source”
information
Figure 14: Job Manager Tab - Viewing the Source Information
RAP.OM.000960.DRM
Page 19
Doremi Cinema LLC
Version 1.4
4.4 Encoding From HD-SDI
HD-SDI (“High-Definition Serial Digital Interface”) is a standard used for transmission of
uncompressed and unencrypted digital video signals. When encoding from a HD-SDI source the
RAPID unit will automatically detect the HD-SDI unit connected to it and display the
corresponding information in the “Source" tab.
The RAPID will automatically extract the format and the time code from the ancillary data for
both single and dual link HD-SDI video inputs. However, the user must manually set the
appropriate frame rate to correspond to the HD-SDI input (see Figure 15 below).
4.4.1
Supported Formats
Supported in Real-Time Capture Mode HD-SDI format for the RAPID and RAPID 2x:
•
2Ksf 24fps and 25fps
•
2Kp 24fps and 25fps
•
1080i 24fps and 25fps
•
1080p 24fps and 25fps
Supported only in Non-Real Time Capture Mode on the RAPID (less than 50% speed):
•
2Ksf 30fps
•
2Kp 30fps
•
1080i 30fps
•
1080p 30fps
Formats not supported:
•
23.98fps
•
29.97fps
•
720p
4.4.2 Default and Custom File Names
4.4.2.1
Video HD-SDI Captures
The RAPID uses the HD-SDI embedded time code and converts each frame to a “j2c” file using
an incrementing index. See Section 4.6 for more information on how this works.
•
The default name of the compressed files will be “hdsdi_capture_0000254.j2c”.
•
Example: One j2c file per image: hdsdi_capture_nnnnnnn.j2c” where 'nnnnnnn' is the
index corresponding to the time code of the image. See Section 4.6 for more
information.
RAP.OM.000960.DRM
Page 20
Doremi Cinema LLC
Version 1.4
•
4.4.2.2
To customize the “hdsdi_capture” base name to a user defined string use the “Label”
field from the “Output" tab. See Section 5 for more information.
Audio HD-SDI Captures
Audio is embedded in the HD-SDI stream. Each channel is captured into a specific file.
•
Audio files are created in the following way:
•
One wave file per audio channel: “hdsdi_capture_chnn.wav” where 'nn' is the channel
number.
FrameRate
Menu
Figure 15: Encoding From HD-SDI
RAP.OM.000960.DRM
Page 21
Doremi Cinema LLC
Time code field
when encoding
from HD-SDI
source
Version 1.4
4.5 Encoding From a HD-SDI Source
•
Double-click on the “RAPID Encoder GUI” from the desktop to launch the RAPID GUI.
•
From the “Source” tab select the check-box immediately to the left of the “HD-SDI
Capture” (see Figure 16 below).
•
Enter the Time-In (time-code of the first image to capture) and the Time-Out (time-code
of the last image to capture).
Note: It is highly recommended to enter a “Time-In” and “Time-Out” before encoding, otherwise
the server will encode the entire duration of the video which may be up to 24 hours. See
Section 4.6 below for more information.
•
To keep all of the server's default settings, click “Apply” and then click “Encode”.
•
If the “Video Format” or “Audio Channels” fields are blank click the “Reset SDI Detection”
button and the server will search for the SDI connection and display the corresponding
information (see Figure 16 below).
Note: The HD-SDI device must be properly connected.
•
The “Video Format” can only be changed from the source not from the server.
•
By default, the server will automatically enable the number of audio channels the device
has (usually 4 or 8). However, the user can manually select the channels to encode by
checking or unchecking the boxes (see Figure 16 below). If the user does not wish to
encode any audio, then make sure none of the channels are selected. The server
supports up to 8 audio channels (see Figure 16 below).
Note: If the user wishes to encode only audio files, then select at least one audio channel and
check the “Audio Only” box. If the user does not select any audio channel, then the user will be
prompted to an error message (see Figure 17 below).
RAP.OM.000960.DRM
Page 22
Doremi Cinema LLC
Version 1.4
“Video
Format” and
“Audio
Channels”
“Reset SDI
Detection”
Button
Figure 16: Source Tab and the Reset SDI Detection Button
Figure 17: Error Message - “No Audio Channel Selected”
•
The number of Audio Channels detected by the server will be represented by “A”
characters on the source tab in the “Audio Channels” field (see Figure 17 above).
•
Example: “AAAA____” represents four channels detected (see Figure 18 below) “AAAA
AAAA” represents eight channels (see Figure 17 above).
RAP.OM.000960.DRM
Page 23
Doremi Cinema LLC
Version 1.4
"Source"
Tab
“Audio
channels:
AAAA__"
Time code
field for HDSDI devices
Figure 18: Source Tab - Time Code Field
4.6 HD-SDI Timecode
By default, the RAPID uses the HD-SDI embedded time code detected from the device and
converts the compressed files with a incrementing frame index. The time code will be in the
following format 15:41:18:17. This reflects Hours, Minutes, Seconds, and the Frame Number
(see Figure 18 above).
Depending on the frame rate and format, the HD-SDI device is set at (i.e., 24, 25 or 30fps). The
server will automatically capture the time code of the frames and embed them with an
incrementing frame index. See the Section 4.4.1 above for all supported formats.
•
Example: If the frame is captured at time code “00:00:10:04” (this indicates the frame at
10 Seconds and Frame Number 4), and the source's frame rate is at 25fps the server
will automatically compress this file to “hdsdi_capture_0000254.j2c.
•
If the video encoding does not have its own time code, the server will generate an
internal time code for the video starting at 00:00:00:00 using the RAPID's “Internal Sync”
feature.
Note: The user must manually adjust the video/tape start from the first frame (the beginning of
the video). To command the server to apply an internal time code check the “Internal Sync” box
and click “Apply” and then click “Encode.”
RAP.OM.000960.DRM
Page 24
Doremi Cinema LLC
Version 1.4
Note: It is highly recommended to enter a “Time-In” and “Time-Out” before beginning encoding,
otherwise the server will encode the entire duration of the video which may be up to 24 hours.
The user cannot exceed more than 24 hours of encoding at a time. If entering a “Time-In” or
“Time-Out” value that exceeds a value greater than 23 hours (i.e.,23hr:59min:59sec), the server
will not allow it. If entering a value that exceeds 20 hours (i.e., 30 , 31, 32, 40...), the Timecode
field will turn red (see Figure 20 below).
Timecode
Values
Figure 19: HD-SDI Capture Field
Timecode
Value
exceeds
24 hours
Figure 20: Time Code For Video Streamer
RAP.OM.000960.DRM
Page 25
Doremi Cinema LLC
Version 1.4
4.6.1 Timecode for Video Streamer
When encoding from a Video Streamer (i.e., satellite reception or camera feed), the RAPID
detects the streaming video from the source and the frames will begin to “roll” automatically.
The main RAPID Encoder GUI will therefore always show the time code field as “rolling”. The
user must set the “Time-In” and “Time-Out” values. Begin encoding by selecting the preferred
settings and then clicking on “Apply”. Click on “Encode” to begin the encoding process.
Note: When the server has finished encoding the user specified frames (time-in and time-out),
the time code field will still continue to be “rolling” (see Figure 21 below). Notice that the “TimeOut” value set on the server has been passed, however, the server will still continue to “roll” the
video.
"Timeout"
Value
Streaming
Video
Figure 21: Time Code For Video Streamer
RAP.OM.000960.DRM
Page 26
Doremi Cinema LLC
Version 1.4
4.7 Real-Time and Non-Real Time Capture
4.7.1 RAPID
When in Real-Time capture mode, a very high bandwidth of data in the hardware compressor
accelerator can be generated. Some frames that are extremely difficult to encode, such as
random noise, will overflow the hardware accelerator causing it to possibly crash. To avoid
crashes, a filtering process is done in real-time capture mode. This filtering might cause a
degradation of the quality of the resulting picture.
To keep the best quality possible, encode in “Non-Real Time” capture mode (see Figure 22
below). In this mode, the source must be set to run at less than 50% speed. If the “VTR
Control” (Video Tape Recorder) is selected, the application will automatically set the source at
48%. This will cause the RAPID-1X encoding process to be approximately half of “Real-Time”.
Audio cannot be captured in “Non-Real Time” Mode. The “Non-Real Time” capture mode has
been tested with HDCAM-SR. Test the equipment first to ensure that it will output proper
progressive frames in this mode and not repeat fields or interpolate (alter) frames.
4.7.2 RAPID 2X
“Non-Real Time” capture mode on the RAPID-2X is not necessary. The RAPID-2X encodes with
the best quality possible at “Real-Time” speed without having to slow down. This is possible due
to the fact that the RAPID-2X has an additional Dolphin DCI Card.
Note: The “Non-Real Time” capture mode on a RAPID 2X will be viewable, as well as, on the
RAPID. However, it is only usable on the RAPID.
“Non-Real
Time”
Encoding
Capture
Figure 22: Source Tab - HD-SDI Capture Field
RAP.OM.000960.DRM
Page 27
Doremi Cinema LLC
Version 1.4
4.8 Color Space Conversion for File and HD-SDI Capture
To be consistent with DCI color and sample space specifications, the RAPID automatically
assumes that the frames are encoded to “XYZ” color space. If the frames are not “XYZ”, then
convert the frames from “RGB to XYZ” from the “Source Tab” (see Figure 23 below).
Note: A license is needed to use the “RGB to XYZ” conversion feature. To receive the license
contact Doremi Technical Support at [email protected].
Note: If the files are already “XYZ”, then selecting the“RGB to XYZ” setting will result in a blurry
resolution. At the same time if the user is unsure whether the files are “XYZ” and files have not
been converted from “RGB to XYZ”, the compressed files will result in a lower quality resolution.
The user must be sure that the frames are actually “RGB” or “XYZ” before encoding. The user
should receive this information from the administrator or creator of the files. If the user is unsure
what color space the frames are (“RGB” or “XYZ”) then do an encoding test with a small number
of frames first to check the resolution of the compressed files.
To convert
images from
“RGB to XYZ”
check this box
Figure 23: Source Tab - Converting Images From RGB to XYZ
RAP.OM.000960.DRM
Page 28
Doremi Cinema LLC
Version 1.4
4.8.1 Default Profiles for Color Space
The objective is to obtain a “4:4:4” (sample space) and “XYZ” (color space) signal in all cases.
Change the default settings if required.
•
If the files are “RGB”, then select the appropriate settings to convert to “XYZ” (See
Figure 24 below).
•
“BT 709”, to convert from “RGB” compliant with ITU-BT Rec. 709 color space with 2.2
gamma to DCI X’Y’Z’.
•
“P3 DCI D65”, to convert from P3 D65 “RGB” with 2.6 gamma to DCI X’Y’Z’.
•
“Custom” allows user to define, save and load a new profile. For each profile user can
select values for the inverse gamma used on the “RGB” in the “Gamma In” area.
Note: For more information on the “Custom” feature contact Doremi Cinema Technical Support
at [email protected]
4.9 Sample Space Conversion for HD-SDI Capture
To be consistent with DCI color and sample space specifications, the RAPID automatically
assumes that the frames are set to “XYZ” (color) and “4:4:4” (sample) space. “4:4:4” specifies
the size of each sample (i.e., what range was used). If the user knows the frames are not
“XYZ,” then the user can convert the frames from “RGB to XYZ” from the “Source" tab (see
Figure 24 below).
RAP.OM.000960.DRM
Page 29
Doremi Cinema LLC
Version 1.4
"Color
Conversions"
Settings
“RGB to XYZ”
must be checked
before changing
the default
settings
Default
Profiles for
Color
Settings
Figure 24: Source Tab - Color Conversions and "RGB to XYZ" Field
4.9.1 Obtaining a 4:4:4 Signal From HD-SDI Capture
•
Default Settings for sample space:
Note: The “RGB to XYZ” box must be checked first before changing any of the default settings
(see Figure 24 above).
•
Single link: When user is connected to the RAPID from a single link, it is assumed that
the signal is a YUV signal. To convert the signals and to obtain a 4:4:4 XYZ signal,
choose from one of the following settings that have been created (see Figure 24 above).
•
4:2:2 to 4:4:4
•
YUV to RGB
•
RGB Range Ext (In case the YPbPr signal follows Rec. 709, select the “RGB Range
Ext” option to enable the conversion to full range in order to keep true colors).
RAP.OM.000960.DRM
Page 30
Doremi Cinema LLC
Version 1.4
•
Dual link: When the user is connected to the RAPID from a dual link it is assumed that
the signal is a 4:4:4 RGB signal.
•
To convert to a 4:4:4 XYZ signal use the “RGB to XYZ” setting (see Figure 24
above).
Note: This section is on sample space (i.e., 4:4:4). For information on how to obtain “XYZ” color
space see Section Color Space Conversion for File and HD-SDI Capture above.
RAP.OM.000960.DRM
Page 31
Doremi Cinema LLC
Version 1.4
5 Output Tab
The purpose of the “Output" tab is to create the desired value outputs of the compressed “j2c”
files. Output fields consist of the following:
•
Destination Directory
•
Number of Frames
•
Video Standard
•
Label
•
Embedded Logo
5.1 Destination Directory
When compressing files by default, the compressed files will keep the same base name (name
without the extension) including the same index number as the original uncompressed file. The
compressed file will be converted to contain a “.j2c” extension.
•
•
Example: If the first file is named “perfect_movie.00001.tif” the compressed file will be
named “perfect_movie.00001.j2c”.
If the user wants to create a different or new directory to put the compressed files into
select the "Browse" button (see Figure 25 below).
“Browse”
Button
"Destination
Directory"
Field
"Number of
Frames" Field
Figure 25: Output Tab - Destination Directory and Browse Button Window
RAP.OM.000960.DRM
Page 32
Doremi Cinema LLC
Version 1.4
5.2 Number of Frames
The “Number of Frames” field on the “Output" tab will automatically reflect the number of
consecutive images detected from the source. If the user wants to reduce the number of frames,
then adjust the number from this field (see Figure 26 below).
Note: The user can only adjust the number of frames when the source is coming from a file.
Every time the user changes the file source, it becomes possible to change the number of
frames to encode.
“Number of
Frames” Field
Figure 26: Output Tab - "Number of Frames" Field
5.3 Video Standard
The selection of the video standard is valid for both file and HD-SDI encoding. The default
format is 2048 pixels x 1080 lines. This option is available form the “Output" tab (see Figure 27
below). The illustration of ratio aspects is below.
When encoding from File and HD-SDI Source, "Default Setting" formats the entire image area.
•
Full 2K Container (2048 pixels x 1080 lines).
RAP.OM.000960.DRM
Page 33
Doremi Cinema LLC
Version 1.4
•
The input frame will be cropped or padded with black strips to center the image.
5.3.1 How to Form and Crop the Image's "active area"
•
Select “Video Standard 2K ("active area").
•
Define the size of the frame (number of pixels and number of lines) to be generated.
•
The input frame will be cropped or padded with black strips to center the image.
“Video
Standard”
Field
Figure 27: Output Tab - Selection of the "Video Standard" Field
Note: For the File Source of 4k (4096x2160) and 4k (active area) images, user will need a
license.
RAP.OM.000960.DRM
Page 34
Doremi Cinema LLC
Version 1.4
5.3.1.1
How to Format and Crop an Image At 4k (4096x2160)
•
From the “Output" tab in the “Video Standard” field select 4k (4096x2160).
•
This will capture the image at 4096 pixels x 2160 lines.
•
The input frame will be cropped (centered) or padded with black strips (centered).
5.3.1.2
How to Format and Crop an Image At 4k ("active area")
•
If the user wants to capture the image's “active area”, select 4k (active area) from the
“Video Standard” field (see Figure 27 above).
•
Define the size of the frame (number of pixels and number of lines) to be generated (see
Figure 27 above).
•
The input frame will be cropped (centered) or padded with black strips (centered).
Note: 4K Video Standard is only supported when encoding from a File Source. If the user
selects a 4K Video Standard format when encoding from a HD-SDI device, an error message
will appear.
5.3.1.3
How to Upscale HD Scope Image (1920 pixels x 804 lines to 2048 pixels x 858
lines):
•
From the “Output" tab in the “Video Standard” field, select "Upscale HD Scope" (1920
pixels x 804 lines to 2048 pixels x 858 lines).
•
This will upscale the HD Scope image (1920 pixels x 804 lines) to 2K scope (2048 pixels
x 858 lines) before compression.
•
The input frame will be cropped (centered) to 1920 pixels x 804 lines if the image is
larger than HD scope, or padded with black strips (centered) to 1920 pixels x 804 lines if
the image is smaller than HD scope, before up-scaling it to 2K scope.
5.3.1.4
How to Upscale HD Flat Image (1920 pixels x 1038 lines to 1998 pixels x 1080
lines):
•
From the “Output" tab in the “Video Standard” field select "Upscale HD Flat" (1920 pixels
x 1038 lines to 1998 pixels x 1080 lines).
•
This will upscale the HD Flat image (1920 pixels x 1038 lines) to 2K flat (1998 pixels x
1080 lines) before compression.
•
The input frame will be cropped (centered) to 1920 pixels x 1038 lines if the image is
larger than HD flat, or padded with black strips (centered) to 1920 pixels x 1038 lines if
the image is smaller than HD flat, before up-scaling it to 2K flat.
RAP.OM.000960.DRM
Page 35
Doremi Cinema LLC
Version 1.4
Figure 28: Presentation Aspect Ratio Description
RAP.OM.000960.DRM
Page 36
Doremi Cinema LLC
Version 1.4
5.4 Customizable Label for HD-SDI Capture
The user can choose to change the default name of the compressed files when encoding from
an HD-SDI Source. The “Label” field on the “Output Source” allows the user to change the
default “hdsdi_capture” base name to a user-defined string (see Figure 29 below).
5.4.1 Default Label
•
“hdsdi_capture_0000000.j2c” (for video files)
•
“hdsdi_capture_chXX.wav (for audio files)
5.4.2 Custom Label
•
From the “Output" tab, click in the “Label” field and enter the desired label for the file.
5.5 Embedded Logo
By selecting the “Embedded Logo” option, the user can add a logo on the bottom-left corner of
the compressed frames (see Figure 29 below). The RAPID will automatically convert the frames
to satisfy the color and size dimensions for the logo.
•
If the user wants to change the default “Doremi” logo, click on the “Browse” button and
choose a new logo.
•
When the user chooses a new logo, the RAPID will automatically convert the logo to
satisfy the required color and size specifications.
“Label”
Field
”Browse”
Button
“Embedded
Logo” Field
Figure 29: Output Tab - "Embedded Logo" Field
RAP.OM.000960.DRM
Page 37
Doremi Cinema LLC
Version 1.4
6 Compression Tab
The Compression tab is used to control the rate at which encoding occurs. DCI specifications
require that the image stream bit rate be set at 250 Mb/s, therefore the default values on the
RAPID are set to “VBR” (Variable Bit Rate) at 250 Mb/s (see Figure 30 below). When in “VBR”
mode, 250 Mb/s is the maximum rate at which to encode. However, these values can be
changed to reflect the desired user output.
Note: The first series of RAPID units using a Linux 2.4 kernel have a disk access limitation.
Encoding from HD-SDI at high bit rate will force the encoder to skip video frame. Select the
“Automatic control of VTR” in the “VTR control” tab to have the application redo the skipped
frame automatically. The “Expected Average” value (see Figure 30 below) corresponds to the
average targeted rate that each frame will be encoded at (i.e., from 75-150 Mb/s). The difficulty
of encoding each image depends on the degree of its details. This will vary the size of the image
and the level of quality at which the images are encoded. The default level of quality is 75-150
Mb/s.
The expected average applies only to VBR, not CBR (Constant Bit Rate). The default value is
set at 75-150 Mb/s. The drop-down menu lists the different levels of quality in descending order
(i.e.,120-250 Mb/s is the highest quality and 40-100 Mb/s is the lowest quality). It is
recommended that the user keep the default value at 75-150 Mb/s. See the next section for
further explanation on “RC Profile” and “Coarse Stepsize”.
“Expected
Average”
Menu
“Bitrate
Values”
Figure 30: Compression Tab
RAP.OM.000960.DRM
Page 38
Doremi Cinema LLC
Version 1.4
“RC Profile” (Rate Control) contains three predefined settings: “Live Action” (default),
“Animation", and “Low Grain”.
If the user chooses the “Custom” option, the “Rate Control” window will appear where the user
will be able to change the predefined values (see Figure 31 below). These settings are
contingent on the type of film.
•
Apply the “Live Action” setting to images that have live characters (i.e., not animated).
•
Apply the “Animation” (CGI) setting to images that are animated (i.e., cartoon, caricature,
etc).
•
Apply the “Low Grain” setting to images that are used in advertising, music videos, and
drama. Mismatches of grain, color cast, and so forth between shots are often deliberate
and added in post-production.
“Rate
Control"
Profile
“Coarse
Stepsize”
“RC Profile”
Menu
Figure 31: Compression Tab - Predefined Settings Set To "Live Action"
The figure above is an example of the predefined settings when set to “Live Action” which is
also the default setting. If the user wants to change the settings, click on “Custom” from the “RC
Profile” menu (see Figure 31 above).
RAP.OM.000960.DRM
Page 39
Doremi Cinema LLC
Version 1.4
6.1 Coarse Stepsize Option
Selecting the “Coarse Stepsize” option when encoding will reduce the amount of compressed
generated data. The coarseness is usually due to the harshness/graininess of the images.
Therefore, selecting this option will reduce the harshness/graininess which will result in a
significantly smaller frame size with a minimum loss of quality.
RAP.OM.000960.DRM
Page 40
Doremi Cinema LLC
Version 1.4
7 VTR Control Tab
The “VTR Control” tab (Video Tape Recorder) has the settings and transport buttons to control
VTR devices. It uses the serial port to control a playback device using the “Sony 9 Pin Control”
protocol. The "VTR Control" tab allows the operator full control of an external VTR device that
will be used as a HD-SDI source for an encoding job.
The “VTR Control" tab applies only when encoding from an HD-SDI source not a file source.
The “Sony 9 Pin Control” standard protocol allows the user to send commands to the HD-SDI
device manually or automatically. It is important to remember that the “VTR Control” is not
enabled when encoding from a HD-SDI device that does not support the “Sony 9 Pin Control”
protocol.
Note: The user cannot use the VTR control buttons (i.e., play, stop, pause, fast-forward, rewind)
during the encoding job.
7.1 External Device Control Button
Selecting the "External Device Control" button will enable control of any VTR device connected
to the RAPID using remote communication.
•
When the LCD is green a connection is established and all of the navigation buttons will
be enabled (see Figure 32 below).
•
When the LCD is red a connection is not established and the HD-SDI device does not
support the “Sony 9 Pin Control” protocol.
•
Use the “Go to Time Code” option to enter a specific frame and then press the “Locate”
button, the frame time code will be reflected in the green LCD (see Figure 32 below).
RAP.OM.000960.DRM
Page 41
Doremi Cinema LLC
Version 1.4
LCD green
meaning
connection is
established
“External
device
control”
“Automatic
control of
VTR” button
"Go to
timecode:"
Field
"Locate"
Button
Figure 32: VTR Control Tab - External Control Device Button
7.2 Automatic Control of VTR Button
The "Automatic control of VTR" button will automate the encoding process from a VTR (see
Figure 32 above). The RAPID will take full control of the VTR device using the Sony 9Pin
commands. It will position the device at the specified “Time-In” point. Issue the proper file to
initiate playback. It will stop the device once the job is completed. In case the encoding process
failed to capture certain images, the automatic control mode will automatically recapture the
failed images in a second pass.
7.2.1 Main Function
The “Automatic control of VTR” button will automatically enable the RAPID to re-encode images
that failed during the encoding job. When selecting this button after the encoding job has
finished, all the images that failed during encoding will be encoded again.
Note: The first series RAPID units used a Linux 2.4 kernel that had a disk access limitation.
Encoding from HD-SDI at high bit rate will force the encoder to skip video frame. Select the
"Automatic control of VTR" button in the VTR Control tab to have the application redo the
skipped frame automatically.
RAP.OM.000960.DRM
Page 42
Doremi Cinema LLC
Version 1.4
7.2.2 Automatic Commands Sent To Server
The “Automatic control of the VTR” button sends commands to the server as part of the
encoding process. The important commands that the user should be aware of and can edit with
are as follows:
•
“VTR Pre-Roll” (see Figure 34 below): This option will automatically locate the first
frame/”time-in” of the image sequence to be encoded. The Pre-roll is set at 5 seconds by
default. This means that the server will automatically locate 5 seconds before the first
frame to be encoded and sync the server with the source.
•
To change the default setting, go to the file menu in the RAPID Encoder GUI.
•
Select “Preferences” and uncheck the box associated with the “VTR Pre-roll” option.
•
Use the up and down arrows to change the seconds (see Figure 34 below).
•
“Non-Real Time” Capture Mode is available only on the RAPID not the RAPID 2X.
•
Selecting the “Non-Real Time Capture” mode from the “Source” tab will automatically
command the RAPID to encode at 48% speed (approximately half of real-time speed).
“Automatic
control of
VTR”
“VTR
Shuttle”
Button
Figure 33: VTR Control Button Showing Real - Time Speed
RAP.OM.000960.DRM
Page 43
Doremi Cinema LLC
Version 1.4
“VTR Preroll” Field
Figure 34: RAPID Encoder GUI Preferences Menu
7.2.3 VTR Shuttle Button
The "VTR Shuttle" button allows the user to manually select the encoding speed for testing and
viewing of compressed images to ensure full user satisfaction. There are three speeds
available:
•
100%: Real-Time Speed.
•
48%: Approximately half Real-Time Speed (i.e. “Non-Real Time Capture Mode).
•
20%: The purpose of this option is to encode at a much slower speed (i.e., compressed
images are blurry, etc).
Note: The “VTR Shuttle” and “Automatic control of VTR” buttons are exclusive. This means that
the user cannot select both buttons at the same time. “Automatic control of VTR” will encode at
48% speed. The “VTR Shuttle” allows the user to manually choose from one of the three
speeds.
RAP.OM.000960.DRM
Page 44
Doremi Cinema LLC
Version 1.4
8 Job Manager Tab
The “Job Manager” tab allows the user to view, schedule, and reorder encoding jobs.
Scheduling and reordering encoding jobs apply only when encoding from a file source. Use the
Job Manager tab to view all relevant information pertaining to the encoding job. This applies to
“jobs” from File Source and HD-SDI Sources. Scroll to the right side of the window to see all the
information pertaining to a job (see Figure 35 below).
8.1 How to Schedule Multiple Jobs (File Source Only)
•
From the “Job Manager” tab check the “Multiple Jobs” box (See Figure 35 below).
•
Click the “Add Job” button - the new job will automatically be highlighted.
•
Go to the “Source” tab and select the file to encode from.
•
Select all the properties to apply to the job - usually all of the parameters that would
normally apply (see Section 4.1) .
•
Go to the “Job Manager” tab to view the information of the newly added job - the job will
be assigned a number (i.e.,“Job 2”).
•
Repeat the steps above to continue adding jobs.
“Multiple
Jobs”
Check-box
“Add Job”
Button
Scroll to the
right of the
tab to view
all
information
Figure 35: Job Manager Tab
RAP.OM.000960.DRM
Page 45
Doremi Cinema LLC
Version 1.4
“Delete Job”
and “Delete
All” Buttons
“Frame
Number”
“Move Up"
and "Move
Down"
Buttons
Figure 36: Job Manager Tab - Frame Numbers
Note: The “Frame Nr.”(see Figure 36 above) reflects the value of the “time-out” minus “time-in”.
In other words, the number of frames included in the job to be encoded.
8.2 How to Reorder and Delete Jobs
•
To reorder a job in the list click on the job and use the “Move Up” and “Move Down”
arrows accordingly.
•
The job will still keep the same number that was originally assigned to it (i.e., if
reordering “job 3” to encode before “job 2”).
•
The numbers assigned to the jobs will not change (see Figure 37 below).
•
To delete a scheduled job click on the job to delete - it will be highlighted.
•
Click the “Delete Job” button (see Figure 37 below).
•
A window asking to delete the job will appear click “Yes”.
Note: This action cannot be undone.
•
To delete all scheduled jobs click “Delete All”.
•
A window asking to delete all the jobs will appear click “Yes” (see Figure 38 below).
Note: This action cannot be undone.
RAP.OM.000960.DRM
Page 46
Doremi Cinema LLC
Version 1.4
“Job 3” to
be encoded
before “Job
2”
Figure 37: Job Manager Tab - Jobs Field
Figure 38: Window Asking User To Delete All Jobs
RAP.OM.000960.DRM
Page 47
Doremi Cinema LLC
Version 1.4
9 Report Tab
The primary purpose of the “Report" tab is to view all commands sent to the RAPID prior to,
during, or after the encoding job. The “Report" tab is accessed from the RAPID Encoder GUI
(see Figure 39 below). The parameters that are applied to the “job” will be displayed in the
“Report" tab.
9.1 Heading Tab Functions
•
Select the parameters to apply to the encoding job and click the “Apply” button.
•
The “Destination Filename” will appear in the "Report" tab and the “Encode” button
becomes enabled (see Figure 39 below).
•
When modifying the parameters the “Encode” button is disabled and the “Apply” button
is enabled again.
“Report”
Tab
“Error”
“Destination
Filename”
Pre and Post
Processing
Encoding
Commands
Issued
“Terminating
PreProcessing"
“Encoding
stopped by
user"
“Missing
frames”
“Encode”
Button
“Apply”
Button
Figure 39: Report Tab
RAP.OM.000960.DRM
Page 48
Doremi Cinema LLC
Version 1.4
•
The “Destination Filename” field displays the targeted file and its corresponding
parameters (see Figure 39 above).
•
If any error occurs prior, during, or after the encoding job the “Report" tab will list the
error (see Figure 39 above).
•
Pre and Post processing encoding commands issued to the RAPID will be displayed in
the “Report" tab (see Figure 39 above).
•
If user clicks the “Stop” button when the RAPID is encoding a “Terminating
PreProcessing” message will appear. An “Encoder Stopped by User” message will
appear afterward (see Figure 39 above).
•
The RAPID will automatically check for any missing frames once a job is finished or
interrupted while encoding. The “Report" tab will display a message stating “Missing
frames from (i.e., 205-10999)” (see Figure 39 above).
RAP.OM.000960.DRM
Page 49
Doremi Cinema LLC
Version 1.4
Figure 40: Report Tab
RAP.OM.000960.DRM
Page 50
Doremi Cinema LLC
Version 1.4
9.2 Saving Settings
Use the File Menu to "Save" or "Save As" the current settings into a file or to open a file with a
saved setting.
The setting file contains all the settings for each job including the bitrate, video standard, source
type (file or HD) and color space conversion. It contains all the jobs that were defined when the
settings are saved.
9.3 Preferences Menu
The server automatically sends commands to the RAPID during the encoding process. These
commands can be changed from the “Preferences” window (see Figure 42 below). It is not
recommended to change these default settings unless the user understands the implications.
9.3.1 How to Change the Default Settings from the Preferences Window
•
From the “RAPID Encoder GUI”, go to the “File” menu and select “Preferences” (see
Figure 41 below).
•
The “Preferences” window will appear (see Figure 42 below).
•
Important default commands are as follows:
•
“Src I/O Timeout” (source): This command applies only when encoding from a File
Source. The default is set at 5 seconds. This command automatically tells the server
to look for another file to encode for only 5 seconds after the last frame in the image
sequence.
•
To change the default settings, un-check the box next to the “Scr I/O Timeout” option
and use the up and down arrows to change to the desired seconds.
•
“VTR Pre-Roll”: This command will automatically locate the first frame/”time-in” of the
image sequence to be encoded. The Pre-roll is set at 5 seconds by default. This means
that the server will automatically locate 5 seconds before the first frame to be encoded
and sync the server with the source.
•
To change the default setting un-check the box associated with the “VTR Pre-roll” option
and use the up and down arrows to change to the desired seconds.
RAP.OM.000960.DRM
Page 51
Doremi Cinema LLC
Version 1.4
File Menu
Figure 41: RAPID Encoder GUI - File Menu
Note: It is recommended to leave the other automatic commands at their default settings. If the
user chooses to change these settings then follow the steps above.
Figure 42: Preferences Menu
RAP.OM.000960.DRM
Page 52
Doremi Cinema LLC
Version 1.4
10 RAPID Player
10.1 Overview
The RAPID Player is meant to be used as playback of compressed (“j2c”) and uncompressed
(“tiff”) files. However, the RAPID Player is also useful to preview what the images look like on
screen (resolution, color, sharpness, etc.) The RAPID Player and Encoder serve different
functions. The user must use one to the exclusion of the other (i.e. neither the Encoder or
Player can be launched at the same time).
10.2 Presentation
The RAPID Player consists of three tabs: Editor, Playback, and Report.
•
Editor tab: Use this tab to define the source parameters of each playback. Each reel
consists of one "j2c" file and may consist of some or no audio files. The "Editor" tab is
made up of two sections, "Reel Manager" and "Reel Composition".
•
Playback tab: Use this tab to playback the reels that were created in the "Editor" tab.
•
Report tab: Use this tab to view all information that is relevant to the status of the
playback (reel parameters, warning messages, and errors).
10.3 Supported Formats
The RAPID Player outputs video on its HD-SDI dual link output and embeds audio in the HDSDI stream. To view the content for playback, the user must have the RAPID connected to a
monitor screen.
The RAPID supports real-time playback of unencrypted/compressed DCI-compliant JPEG-2000
files and audio WAV files. Playback of uncompressed files is also supported (e.g. TIFF, DPX,
etc.). Real-Time or Non Real-Time playback of uncompressed files depends on whether the
files are coming from an external drive (i.e., a usb) or a RAID. If the files are on an external drive
playback in Real-Time is not available. If the files are on a RAID with 6 drives playback in RealTime is available (not available on a RAID with 3 drives).
RAP.OM.000960.DRM
Page 53
Doremi Cinema LLC
Version 1.4
10.4 Launching the RAPID Player GUI
•
Launch the RAPID Player GUI by double-clicking on the icon on the desktop (see Figure
43 below).
RAPID
Player GUI
Icon
Figure 43: RAPID Player GUI Icon
10.5 Editor Tab
Use this tab to define the source parameters of each reel. Each reel consists of one “j2c” file
and some or no audio files. The “Editor" tab is made up of two sections, the “Reel Manager” and
“Reel Composition” (see Figure 44 below). The user must connect the RAPID to a monitor in
order to view the contents for playback.
10.5.1
Reel Composition
•
For each reel select the first video file of the sequence in the 'Video' field.
•
User can choose up to 8 audio files (up to 16 audio channels).
•
Click the “browse” button and select the first frame of the video (see Figure 44 below).
•
The “Audio Entry Point” box is used to synchronize audio and video frames.
RAP.OM.000960.DRM
Page 54
Doremi Cinema LLC
Version 1.4
•
The user must determine the point at which the audio first begins to come in.
•
This is done by actually playing the files first and listening to detect the “2popleader”.
•
The “2popleader” is a precursor to the first audio frame. User will hear a beep noise,
usually two seconds prior to the first audio frame. Once the first audio frame is
detected the user must set this “audio entry point” to sync with the first video frame.
•
For example: if the first audio file begins at frame number 8, the “entry point” has to
be set to 8 (see Figure 44 below).
•
When playing back “j2c” files the framerate must be set at: 24fps, 25fps, or 30fps.
•
Set the appropriate setting for each reel from the drop-down menu (see Figure 44
below).
•
When playing back “tiff” files the frame rate settings are irrelevant.
•
To allow a seamless transition between reels all reels must have the same
characteristics: i.e., the same number of audio channels, same type of video file
(compressed/uncompressed), same video characteristics, etc.
Note: The user may still create reels with different characteristics. The difference is that the
transition in playback mode will not be as smooth going from one reel to another reel. If the user
try's to play these types of reels, then the user will get an “incompatible settings” error message
(see Figure 45 below). The message will say that the user created a playlist with several reels
with different settings. The user will then be asked to continue. Click yes to continue (optional).
10.5.2
Reel Manager
•
To edit the contents of any reel click anywhere on that particular reel from the “Reel
Manager” field (i.e., click on “Reel 1”).
•
The contents of that reel will be displayed in the “Composition Reel” field - any
modifications will be applied immediately.
•
From the “Reel Manager” field the user can "Add", "Delete Reel", or "Delete All" reels
(see Figure 44 below).
Note: Deleting a reel cannot be undone.
•
Scroll all the way to the right of the “Reel Manager” window to see the file name and
entry points of each file in the reel (see Figure 44 below).
RAP.OM.000960.DRM
Page 55
Doremi Cinema LLC
Version 1.4
•
When the user is playing back a reel the "Editor" tab will be gray and the reel that is
being played back will be highlighted in blue (see Figure 46 below).
“Add Reel”
Button
“Delete
Reel”
Button
“Reel
Manager”
Field
“Delete All”
Button
“Video"
Field
“Reel
Composition
” Field
Figure 44: Reel Manager Field With Video and Audio Files
RAP.OM.000960.DRM
Page 56
Doremi Cinema LLC
Version 1.4
Figure 45:"Incompatible settings" Error Message
Reel
Highlighted
In Blue
Figure 46: Reel Manager Field - Video Highlighted In Blue
RAP.OM.000960.DRM
Page 57
Doremi Cinema LLC
Version 1.4
10.6 Playback Tab
Use the "Playback" tab to play and preview reels.
10.6.1
Playback Functions
•
Once the user has created the reels in the “Editor" tab, go to the “Playback” tab.
•
The reels ready for playback will be listed in the white box on the right part of the window
(see Figure 47 below).
• An orange circle indicates that the reel has already been played back.
• A green circle indicates that the reel is currently being played back.
• If there is nothing next to a reel it means that the reel is waiting to be played.
•
Use the navigation buttons: Play, Stop, Pause, Fast Forward, and Rewind to control the
playback (see Figure 47 below).
•
To skip to the next or previous reel, click the Pause button and then select “Go to next
Reel” or “Go to previous Reel” buttons (see Figure 47 below).
•
To go to the next frame click the "Previous Frame" or "Next Frame" buttons (see Figure
47 below).
•
Use the “Locate” button to skip to the exact frame.
•
Enter the frame number or use the up and down arrows and then click the “Locate”
button.
•
There is a “Display Mode” button in the “Playback" tab This feature allows the user to
choose to see the frames that are being played (i.e., either by frame number or by
timecode).
•
There is a “RGB to XYZ” conversion box in the “Playback" tab. The user must have a
license to use this feature during the encoding process. For more information on this
feature and how to obtain a license contact Doremi Tech Support at
[email protected]
•
This feature reproduces the conversion of RGB to XYZ during the encoding process and
is useful to have during playback to ensure the quality of the files.
•
Audio playback is disabled when video files are uncompressed and playback of
audio/video on MXF files is not supported.
RAP.OM.000960.DRM
Page 58
Doremi Cinema LLC
Version 1.4
Reels
Ready For
Playback
“Go to
Previous or
Next Reel”
“Previous
Frame” or
“Next Frame"
Figure 47: Playback Functions For Reels
RAP.OM.000960.DRM
Page 59
Doremi Cinema LLC
Version 1.4
10.7 Report Tab
Use this tab to view all information that is relevant to the status of the playback such as: reel
parameters, warning messages, errors encountered during playback, etc.
"Report"
Tab
Figure 48: RAPID Player GUI - Report Tab
RAP.OM.000960.DRM
Page 60
Doremi Cinema LLC
Version 1.4
11 Software and Firmware Upgrades
Software and Firmware upgrades are provided by Doremi Labs. There are several ways that the
user can perform the upgrade which includes, but is not limited to; USB, DVD, and FTP. The
upgrade package has to be copied into the directory “/doremi/etc/rc.once” and the user must
then reboot. The most common way to upgrade the software and firmware is from a USB.
11.1 How to Perform a Software or Firmware Upgrade From a
USB
•
Once the user has received the upgrade package from Doremi Labs, copy the package
onto a USB drive.
•
Plug the USB drive into the RAPID USB port.
•
From the Linux desktop double-click on the “dms2000's Home” icon (see Figure 49
below).
"dms2000's
Home" Icon
Figure 49: Linux Desktop - "dms2000's Home" Icon
RAP.OM.000960.DRM
Page 61
Doremi Cinema LLC
Version 1.4
•
User will be prompted to the “Home Folder” (see Figure 50 below).
•
Double-click on “File System” (see Figure 51 below) and scroll all the way to the right
until the "doremi" folder appears.
•
Double-click on the “doremi” folder (see Figure 52 below).
•
User will be prompted to the “etc” folder and then double-click on this folder (see Figure
53 below).
•
Double-click on the “rc.once” folder (see Figure 54 below).
•
User must drag and drop or copy and paste the upgrade package into the “rc.once”
folder.
•
After the update is copied into the “rc.once” folder reboot the unit.
“Home
Folder”
Figure 50: File Browser - "Home Folder"
RAP.OM.000960.DRM
Page 62
Doremi Cinema LLC
Version 1.4
“File
System”
Folder
Figure 51: File Browser - File System Folder
RAP.OM.000960.DRM
Page 63
Doremi Cinema LLC
Version 1.4
“doremi”
Folder
Figure 52: File Browser - “doremi” Folder
RAP.OM.000960.DRM
Page 64
Doremi Cinema LLC
Version 1.4
”etc”
Folder
Figure 53: File Browser - “etc” Folder
RAP.OM.000960.DRM
Page 65
Doremi Cinema LLC
Version 1.4
”rc.once”
Folder
Figure 54: File Browser - “rc.once” Folder
RAP.OM.000960.DRM
Page 66
Doremi Cinema LLC
Version 1.4
12 File Transfer Protocol (FTP)
12.1 FTP Server on RAPID
Use the FTP (File Transfer Protocol) client on the RAPID to transfer information and data to
and from any unit. The user can connect to the FTP directory from any computer on the
same network using the FTP client with the following username and password:
•
Username : dms2000
•
Password : doremi
•
The default ftp directory is “ /home/dms2000”.
12.2 FTP Client on RAPID
Another way to connect to a FTP server is with the Nautilus application.
•
Click on "dms2000's home icon (see Figure 49 above) and type the following address:
•
•
ftp://username:password@IP address
The username and password are the same that are used for the FTP server.
•
Example: If user wants to connect to a DCP-2000 unit to ingest, the username would
be "ingest" and the password would be "ingest" and then the IP Address of that unit.
•
Example: ftp://ingest:[email protected] (see Figure 56 below).
There is a link to the “/data” directory in the dms2000 home folder. Double-clicking on the
“dms2000's Home” icon from the desktop will prompt the user to the dms2000 home folder (see
Figure 55 below).
•
Some FTP clients like Filezilla under Windows recognize this and allow access to
“/data”. Some FTP clients like Internet Explorer under Windows do not recognize this
and will not allow user to access “/data”.
•
Another way of accessing the “/data” directory is by double-clicking on “Computer” from
the desktop and then entering the “username:password@IpAddress” in the “Location”
field.
Note: The easiest way to connect to the FTP directory is by using “gFTP”. See Section gFTP
Server on RAPID below on using a gFTP client on the RAPID.
RAP.OM.000960.DRM
Page 67
Doremi Cinema LLC
Version 1.4
Home Folder
for "dms2000"
Figure 55: Home Folder - "dms2000"
RAP.OM.000960.DRM
Page 68
Doremi Cinema LLC
Version 1.4
Location of
Username
and Password
Figure 56: Example of Username and Password Ingest
RAP.OM.000960.DRM
Page 69
Doremi Cinema LLC
Version 1.4
12.3 gFTP Server on RAPID
The "gFTP" is a free and open source multi-threaded FTP client. It is most used on Unix-like
systems like Linux and Mac OS X. It includes both a GUI (which utilizes the GTK+ (GIMP
Toolkit) and a command-line interface.
12.3.1
How To Access a "gFTP" Client From the RAPID
•
From the Linus desktop go to “Applications”.
•
Click “Internet” and then select “gFTP” (see Figure 57 below).
•
User will be prompted to the “gFTP” GUI (see Figure 58 below).
•
Enter the IP address of the unit in the “Host” field (see Figure 58 below).
•
Enter the "Username" and "Password" that corresponds to the unit.
•
This will allow the user to access and transfer data from the director.
Figure 57: gFTP Location
RAP.OM.000960.DRM
Page 70
Doremi Cinema LLC
Version 1.4
"Host" Field
"Username"
Field
"Password"
Field
Figure 58: "gFTP" GUI Window
RAP.OM.000960.DRM
Page 71
Doremi Cinema LLC
Version 1.4
13 Network File System (NFS)
13.1 Setting an NFS Server
If the user wants to share a directory from the RAPID with NFS, the user will need to allow
access to that directory for a specific machine. The RAPID should have the NFS support
enabled and running.
13.1.1
How To Access NFS From a Linux Desktop
•
From the “System” tab go to “Administrator”.
•
Click “Server Settings” (see Figure 59 below).
•
Click on “NFS”.
•
User will be prompted to the “NFS Server Configuration” window (see Figure 60 below).
•
If user wants to edit an existing NFS directory click on the directory to edit.
•
Click “Properties”.
•
User will be prompted to the “Edit NFS Share” window (see Figure 61 below).
RAP.OM.000960.DRM
Page 72
Doremi Cinema LLC
Version 1.4
Figure 59: Linux Desktop - System Tab
RAP.OM.000960.DRM
Page 73
Doremi Cinema LLC
Version 1.4
"Directory"
Field
Figure 60: NFS Server Configuration Window
Note: It is recommended that the user use only the “Basic” tab for editing purposes and leave
the default settings on the “General Options” and “User Access” tabs as they are. If necessary,
see the figures below for a list of the options that can be selected from these tabs.
•
From the “Basic” tab the user can change the IP Address (i.e. host).
•
Change user permissions (i.e., read only or read and write).
•
Change the directory path or create a new directory path from the “browse” button.
Note: The user can have more than one host/IP Address.
RAP.OM.000960.DRM
Page 74
Doremi Cinema LLC
Version 1.4
"Basic
Permissions
" Field
Figure 61: Edit NFS Share Window - Basic Tab
•
The following are the default settings on the “General Options" tab:
•
“Sync write operations on request”.
•
“Hide filesysetems beneath”.
"General
Options"
Tab
Figure 62: Edit NFS Share Window - General Options Tab
•
From the “User Access” tab the user can change any of the following settings (see
Figure 63 below).
•
By default none of the options are selected.
RAP.OM.000960.DRM
Page 75
Doremi Cinema LLC
Version 1.4
"User
Access"
Tab
Figure 63: Edit NFS Share Window - User Access Tab
13.2
Setting an NFS Server on the Client
On the client machine, the user needs to mount the NFS shared directory. On a command line
while logged in as "root", do the following to mount the NFS shared directory:
•
Type: mount 192.168.100.001:/data/dcp <space> /mnt/nfs and then press "Enter".
Note: The above is only an example, where:
•
The number characters represent the IP Address of the RAPID.
•
The “/data/dcp” represents the directory path in the RAPID.
•
The “/mnt/nfs” is the path to the shared directory.
•
To unmount the NFS shared directory do the following:
•
Type: unmount <space> /mnt/nfs and then press "Enter".
Note: If the /mnt/nfs directory does not exist then the user needs to create it first. Refer to
http://nfs.sourceforge.net/nfs-howto/ for more information on setting up NFS shares.
RAP.OM.000960.DRM
Page 76
Doremi Cinema LLC
Version 1.4
14 Samba Directory for Windows
14.1 Setting a Server
14.1.1
How To Create A Samba Shared Directory For Windows Users
•
From the Linux desktop go to “System”.
•
Click on “Administration”.
•
Click on “Server Settings” and then choose “Samba” from the list.
•
User will be prompted to the “Samba Server Configuration” window (see Figure 65
below).
•
To generate a new "Samba User" click on “Preferences” (see Figure 65 below).
•
Click on “Samba Users” and then click “Add User” (see Figure 66 below).
•
User will be prompted to the “Create New Samba User” window (see Figure 67 below).
•
Select “dms2000” as the Unix and Windows username is "doremi" and the Samba
Password is “doremi” (see Figure 67 below).
RAP.OM.000960.DRM
Page 77
Doremi Cinema LLC
Version 1.4
Figure 64: Linux Desktop - Samba List
RAP.OM.000960.DRM
Page 78
Doremi Cinema LLC
Version 1.4
"Preferences"
Menu
"Add
Share"
Button
Figure 65: Samba Server Configuration Window
"Add User"
Button
Figure 66: Samba Users Window
RAP.OM.000960.DRM
Page 79
Doremi Cinema LLC
Version 1.4
Figure 67: Create New Samba Users Window
RAP.OM.000960.DRM
Page 80
Doremi Cinema LLC
Version 1.4
14.1.2
How To Create A New Samba Share Directory
•
Click on the “Add Share” button from the “Samba Server Configuration” window (see
Figure 65 above).
•
User will be prompted to the “Create Samba Share” window (see Figure 68 below).
•
From the “Basic” tab choose the “Directory”, “Share name”, "Description", and whether
the directory is “Writable or “Visible” (see Figure 68 below).
•
From the “Access” tab choose to “allow access to everyone” or “only allow access to
specific users” (see Figure 69 below).
Figure 68: Create Samba Share Window - Basic Tab
Figure 69: Create Samba Share Window - Access Tab
RAP.OM.000960.DRM
Page 81
Doremi Cinema LLC
Version 1.4
•
By default the share directory is accessible on the “Mygroup” domain under the Windows
network.
•
To modify any of the basic settings and security options for the default server, do the
following:
•
From the "Samba Server Configuration" window go to “Preferences”.
•
Click “Server Settings” (see Figure 70 below).
•
User will be prompted to the “Server Settings” where necessary modifications
from the“Basic” and “Security” tabs are made (see Figure 71 below).
"Server
Settings"
Figure 70: Samba Server Configuration Window
RAP.OM.000960.DRM
Page 82
Doremi Cinema LLC
Version 1.4
"Basic"
Tab
Figure 71: Server Settings Window - Basic Tab
"Security"
Tab
Figure 72: Server Settings Window - Security Tab
RAP.OM.000960.DRM
Page 83
Doremi Cinema LLC
Version 1.4
14.2 Connecting to a Samba Network
•
To mount a Samba share directory type the following commands:
•
Type: su and then press "Enter".
•
Password: The password will be the one that corresponds to the “root” username
and login.
•
Type: mount <space>t<space>cifs<space>//“ipaddress”/data/mntsamba<space>-o
<space>username=login and then press "Enter".
•
Where the IP address can be replaced by the hostname of the computer.
•
“/data” is the name of the directory shared on this unit.
•
“login” is a username used to connect to the Samba share.
Note: Another way to access a Samba network is to go to the RedHat menu “Network Servers”
and follow the network and computer found.
RAP.OM.000960.DRM
Page 84
Doremi Cinema LLC
Version 1.4
15 Useful Commands
15.1 LS
This command lists the content of the directory:
• Type: ls –l and then press "Enter"
• total 0
drwxrwxr-x 2 dms2000 capture
6 Aug 25 2005 backup
drwxrwxr-x 2 dms2000 capture
53 Aug 28 11:05 db
drwxrwxr-x 2 dms2000 capture
6 Aug 25 2005 dcdm
drwxrwxr-x 3 dms2000 capture
21 Aug 28 10:50 dcp
drwxrwxr-x 3 dms2000 capture
21 Aug 25 17:11 j2c
drwxrwxr-x 2 dms2000 capture
6 Aug 25 2005 kdm
drwxrwxr-x 2 dms2000 capture
6 Aug 25 2005 pcf
15.2 DU
This command indicates the disk space used by the content of a directory:
• Type: du -sh * and then press "Enter"
• 0
backup
4.0K db
0
dcdm
11G dcp
11G j2c
0
kdm
0
pcf
15.3 DF
This command indicates the available disk space of the different partitions currently mounted:
• Type: df –h and then press "Enter"
Filesystem
Size Used Avail Use% Mounted on
/dev/hda2
9.7G 5.4G 3.9G
59% /
/dev/hda1
99M 13M 82M
14% /boot
none
314M 0 314M
0% /dev/shm
/dev/hda4
357G 114G 225G
34% /datalocal
/dev/md0
1.1T 21G 1.1T
2% /data
/dev/sdd1
276G 258G 4.1G
99% /mnt/usb
RAP.OM.000960.DRM
Page 85
Doremi Cinema LLC
Version 1.4
15.4 MOUNT
This command indicates the currently mounted partitions:
• Type: mount and then press "Enter"
/dev/hda2 on / type ext3 (rw)
none on /proc type proc (rw)
usbdevfs on /proc/bus/usb type usbdevfs (rw)
/dev/hda1 on /boot type ext3 (rw)
none on /dev/pts type devpts (rw,gid=5,mode=620)
none on /dev/shm type tmpfs (rw)
/dev/hda4 on /datalocal type ext3 (rw)
/dev/md0 on /data type xfs (rw)
/dev/sdd1 on /mnt/usb type ext3 (rw)
15.5 FDISK
This command lists the different drives and partitions connected on the DMS2000:
• Type: su and then press "Enter"
• Password: "enter the root password"
• Type: /sbin/fdisk –l and then press "Enter"
Disk /dev/sda: 400.0 GB, 400088457216 bytes
255 heads, 63 sectors/track, 48641 cylinders
Units = cylinders of 16065 * 512 = 8225280 bytes
Device Boot
/dev/sda1
Start
1
End
Blocks
Id System
48641 390708801 83 Linux
Disk /dev/sdb: 400.0 GB, 400088457216 bytes
255 heads, 63 sectors/track, 48641 cylinders
Units = cylinders of 16065 * 512 = 8225280 bytes
Device Boot
/dev/sdb1
Start
End
Blocks
Id System
1 48641 390708801 83 Linux
Disk /dev/sdc: 400.0 GB, 400088457216 bytes
255 heads, 63 sectors/track, 48641 cylinders
Units = cylinders of 16065 * 512 = 8225280 bytes
Device Boot
/dev/sdc1
Start
End
1 48641
Blocks
Id System
390708801 83 Linux
Disk /dev/sdd: 300.0 GB, 300090728448 bytes
255 heads, 63 sectors/track, 36483 cylinders
RAP.OM.000960.DRM
Page 86
Doremi Cinema LLC
Version 1.4
Units = cylinders of 16065 * 512 = 8225280 bytes
Device Boot
/dev/sdd1
Start
End Blocks
1 36483 293049666
Id System
83 Linux
Disk /dev/hda: 400.0 GB, 400088457216 bytes
255 heads, 63 sectors/track, 48641 cylinders
Units = cylinders of 16065 * 512 = 8225280 bytes
Device Boot Start
End Blocks
/dev/hda1 *
1
13
104391
/dev/hda2
14
1287 10233405
/dev/hda3
1288 1417 1044225
/dev/hda4
1418 48641 379326780
•
Type: exit
Id System
83 Linux
83 Linux
82 Linux swap
83 Linux
and then press "Enter"
exit
RAP.OM.000960.DRM
Page 87
Doremi Cinema LLC
Version 1.4
16 Trouble Shooting
The following is a list of bugs/problems that the user might encounter and the possible solutions.
If the user has encountered a bug/problem that is not listed, check the user manual first. If the
particular issue is not addressed contact Doremi Technical Support at:
[email protected]
•
Issue: If user receives the following error messages:
•
“ JPEG-2000 Encoder is not ready;”
•
“hardware licensing module not responding”
•
Other similar type of error message at login.
•
Solution: If the user gets an error message, the JPEG-2000 hardware encoder has been
left powered off for a few hours or more and is causing a problem at start-up. Shut down
the unit (do not just reboot) and power it back up after a few seconds. The error
message should disappear.
•
Issue: If user has the following problems:
•
User loses a lot of frames at the end of each encoding job.
•
The audio is poor (i.e., a lot of audio glitches).
•
User is playing content with a VTR (Video Tape Recorder) at 24fps but it was originally
recorded at a different frame rate (i.e., 25fps).
•
Solution: The VTR is sending the audio and video signals at 24fps but the timcode setup
is still at 25fps. There is a glitch of data once per second. Set up the VTR to use the
correct time code (i.e., at 24fps).
•
Issue:
•
User begins an encoding job but the encoder skips that job and goes to the next job. In
the “Report" tab a message appears saying that it “could not open destination file”.
•
User begins an encoding job and the server does not start to encode and user gets the
same message “could not open destination file” in the “Report" tab.
•
Solution:
•
The encoder can not write to the destination folder. The disk may be full, or the folder
may not exist. The encoder may not have sufficient permissions to write to the folder.
•
Issue:
RAP.OM.000960.DRM
Page 88
Doremi Cinema LLC
Version 1.4
•
During a live HD-SDI capture the encoder drops a lot of frames. In the 'Report' tab there
are numerous warnings stating that the encoder is too slow.
•
If user opens a terminal and the “top -d 1” command shows processes taking a lot of
CPU time (nautilus, gam_server, etc.).
•
System-monitoring processes require a lot of processing power and the RAPID is no
longer able to encode at real-time.
•
Solution:
•
Close all the file browser windows that are open on the desktops and only leave the
RAPID Encoder GUI open.
•
Issue:
•
The “display” command interacts badly with the JPEG-2000 display utility and causes
the images to become saturated. In other words, using the “display” utility command to
view “j2c” files causes the images to be corrupted (i.e., the white regions of the frames
are replaced with yellow, purple, and or blue pixels).
•
Solution:
•
Use Kakadu or the command line utility “/doremi/bin/displayj2c” to view the ”j2c” files.
There is a bug in the “display” tool that shows the white pixels in the “j2c” files
incorrectly. The frames are in fact correct.
RAP.OM.000960.DRM
Page 89
Doremi Cinema LLC
Version 1.4
17 Acronyms
Term
Definition
GUI
Graphical User Interface
CBR
Constant Bit Rate
DCI
Digital Cinema Initiatives, LLC
VBR
Variable Bit rate
MXF
Material eXchange Format
VTR
Video Tape Recorder
FTP
File Transfer Protocol
NFS
Network File Systems
RAP.OM.000960.DRM
Page 90
Doremi Cinema LLC
Version 1.4
18 Document Revision History
Date
Version
12/22/2009
1.0
First version.
08/26/2010
1.1
Revised to include license page. All sections updated and
modified.
11/09/2010
1.2
Revised to include updated software version 3.0.3.
Sections 5.3.1.3 and 5.3.1.4 added.
01/11/2010
1.3
All sections revised. Sections 1.3 and 4.5 modified. New
Section 1.4 added.
07/20/2012
1.4
Logo updated and contact information added.
RAP.OM.000960.DRM
Description
Page 91
Doremi Cinema LLC
Version 1.4