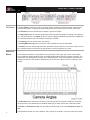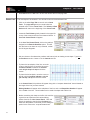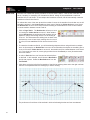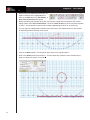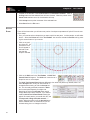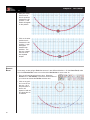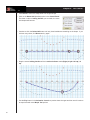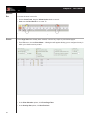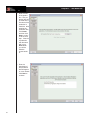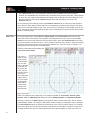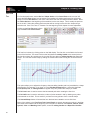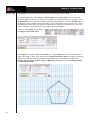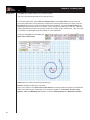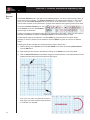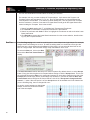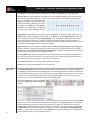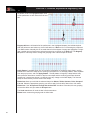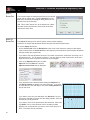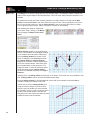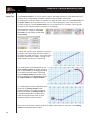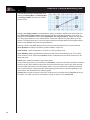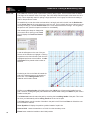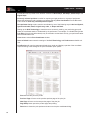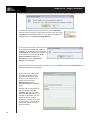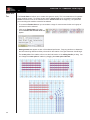
1
Pyware™ 3D
Version 5
User Manual
1
Table of Contents
CHAPTER 1
CHAPTER 2
2
STARTUP
1
Where to Start....................................................................
1
Installation.............................................................................
2
Starting 3D............................................................................
2
3D’s Main Windows..............................................................
3
Field Display Window ..........................................................
3
Count Track..........................................................................
4
Page Tabs..........................................................................
6
Animation Controls............................................................
7
Console.............................................................................
8
Performer ID Panel.............................................................
8
Tool Palette .......................................................................
9
Perspective Window..........................................................
9
Production Sheet (Interactive and Professional only)....
10
Backup Drill.......................................................................
11
TUTORIAL
12
New Drill...............................................................................
12
Page Tabs.........................................................................
12
Drawing Lines.......................................................................
13
Line Tool (Take 2).................................................................
17
Drawing Arcs.........................................................................
18
Drawing Circles.....................................................................
20
Circle Tool (Take 2)...............................................................
22
Moving Lines........................................................................
23
Splitting Shapes....................................................................
25
Mirroring Motion...................................................................
26
Expanding Circle..................................................................
28
Creating Set #3.....................................................................
30
Gluing Lines..........................................................................
33
Morphine Line.......................................................................
35
Pass Through Example........................................................
39
Creating Set #4.....................................................................
43
Matching Positions................................................................
46
Reviewing Sets.....................................................................
48
Table of Contents
CHAPTER 3
3
Printing..................................................................................
48
Finish....................................................................................
49
THE MENU BAR
50
New File (File Menu)............................................................
50
Open File (File Menu)...........................................................
51
Production Files (File Menu) .............................................
52
New Production (File Menu)................................................
52
Open Production (File Menu)..............................................
56
Close Production (File Menu)..............................................
56
Production Options (File Menu).........................................
56
Add/Remove Drills in Production (File Menu)......................
56
Save File & Save As File (File Menu)...................................
57
Backup (File Menu)...............................................................
58
Revert To Saved (File Menu).............................................
59
Printing (File Menu)..............................................................
59
Document Options (File Menu).............................................
60
Properties Tab.............................................................
60
External Files Tab...........................................................
61
Preferences Tab.............................................................
61
Application Options (File Menu)...........................................
62
Ease of Access.............................................................
62
Display Tab.....................................................................
63
Plug-Ins Tab...................................................................
64
Backups Tab................................................................
64
Installation Tab...............................................................
65
System Info Tab..............................................................
65
Undo (Edit Menu)..................................................................
66
Delete (Edit Menu)................................................................
66
Copy (Edit Menu)..................................................................
66
Paste (Edit Menu).................................................................
66
Select Recent (Edit Menu)..................................................
67
Select All (Edit Menu)...........................................................
67
Snap To (Edit Menu)...........................................................
67
Adjust To (Edit Menu)...........................................................
67
Table of Contents
CHAPTER 4
4
Tools Menu..........................................................................
67
Display Menu........................................................................
68
Drill Rewriter (Utilities Menu)................................................
68
Count Editor (Utilities Menu)................................................
69
Cast List Editor (Utilities Menu)..........................................
69
Grid Designer (Utilities Menu)..............................................
69
Page Tab Editor (Utilities Menu)..........................................
69
Production Sheet (Interactive and Professional only)....
69
Shortcut Editor (Utilities Menu).............................................
69
Helper Editor (Utilities Menu) .............................................
70
Figurine Editor (Utilities Menu)............................................
70
Interactive Menu...................................................................
70
Online File Manager (Interactive Menu)...............................
70
Unlock This Drill (Interactive Menu)......................................
70
Online User File Access & Passwords (Interactive Menu)...
70
Drill Lock Decoder (Interactive Menu).................................
70
Check for Messages... (Interactive Menu)..........................
70
Pyware WEB Site (Interactive Menu).................................
70
Frequently Asked Questions (Interactive Menu)...............
71
Deauthorize This Computer (Interactive Menu).................
71
Get Plug-Ins & Accessories (Interactive Menu)..................
71
Instantly Upgrade My 3d (Interactive Menu)......................
71
Contact Pygraphics (Reference Menu)...............................
71
About 3D (Reference Menu)................................................
71
DRAWING TOOLS
72
“First Time” or “Transition”...................................................
72
Line Tool..............................................................................
72
Matching Lines.....................................................................
75
Circle Tool.............................................................................
79
Point Tool.............................................................................
80
Arc Tool.................................................... .........................
81
Curve Tool...........................................................................
82
Free Form Tool.....................................................................
83
Fill Tool................................................................................
84
Table of Contents
Block Tool............................................................................
85
Bezier Curve Tool.................................................................
86
Polygon Tool.......................................................................
87
Spiral Tool .........................................................................
88
SELECTION ADJUSTMENT & REGROUPING TOOLS
90
Pointer Selection Tool...........................................................
91
Box Selection Tool................................................................
92
Lasso Selection Tool............................................................
93
Spotlight Tool.....................................................................
94
Profile Selection Tool............................................................
95
Glue Tool..............................................................................
96
Knife Tool..............................................................................
97
Snap To Editing Tool............................................................
99
Adjust To Editing Tool...........................................................
99
Pace Tool..............................................................................
100
Facing Tool .........................................................................
101
Set Reference Tool..............................................................
101
EDITING & MANEUVERING TOOLS
102
Push Tool.............................................................................
102
Rotate Tool...........................................................................
104
Morph Tool...........................................................................
105
Follow the Leader Tool.........................................................
107
Resize Tool...........................................................................
108
Track Tool.............................................................................
110
PERFORMER LABELING & SPECIAL MARKINGS
111
Performer Labeling...............................................................
111
Text Tool..............................................................................
113
Arrow Tool...........................................................................
115
Prop Tool..............................................................................
116
CHAPTER 8
PRINTING
119
5
Printing Charts.....................................................................
119
CHAPTER 5
CHAPTER 6
CHAPTER 7
Table of Contents
CHAPTER 9
CHAPTER 10
CHAPTER 11
6
Printing Coordinates ............................................................
122
Printing a Cast Sheet............................................................
125
Import Cast List Info.............................................................
127
Printing a Cover Sheet.........................................................
128
UTILITIES
129
Drilll Rewriter.....................................................................
129
Count Editor ........................................................................
132
Cast List Editor...................................................................
133
Grid Designer ....................................................................
134
Page Tab Editor..................................................................
136
Production Sheet (Interactive and Professional Only)...
137
Shortcut Edtior....................................................................
138
Figurine Editor...................................................................
139
Helper Editor......................................................................
139
DESIGN TECHNIQUES
140
Writing Drill Backwards.........................................................
140
Sync Music to Drill................................................................
141
INTERACTIVE FEATURES
144
Online File Manager (Only Interactive and Pro)................
144
Unlock this Drill (Only Interactive and Pro)........................
148
Online User File Access & Passwords.................................
149
Performer’s Tools Menu.....................................................
152
Leader Board Manager......................................................
153
Drill Lock Decoder................................................................
153
Check for Updates................................................................
154
Check for Messages..........................................................
154
Pyware WEB Site...............................................................
155
Frequently Asked Questions .............................................
155
Deauthorize This Computer................................................
155
Get Plug-ins And Accessories..............................................
156
Instantly Upgade My 3D Now .............................................
156
Table of Contents
CHAPTER 12
CHAPTER 13
CHAPTER 14
CHAPTER 15
7
TRADITIONAL TOOLS PLUG-IN
157
Installation...........................................................................
158
Sequential Push Tool............................................................
159
Counter March Tool............................................................
160
Parade Gate Tool ...............................................................
161
Traditional Tool.....................................................................
163
FLOOR COVERS PLUG-IN
165
Installation...........................................................................
166
Designing a Floor Cover in a Grid Layout.........................
167
Adding a School Logo to a Grid Layout...............................
168
Transferring Floor Covers...................................................
168
PERSONAL DRILL BOOK PRINTER PLUG-IN
169
Installation ..........................................................................
170
Printing a Drill Book ...........................................................
171
Print Preview .....................................................................
172
SPIRAL DRAWING TOOL PLUG-IN
173
Installation ..........................................................................
174
Spiral Tool ...........................................................................
174
CHAPTER 1 - Basic Concepts
Welcome to Pyware™ 3D - the complete drill designing tool. We at Pygraphics wish to express our
gratitude to you who have supported our products and company by allowing us to serve your software
needs for more than two decades. Our hope is that this program will become an invaluable tool in
your drill designing efforts.
Adjusting to the many innovative concepts of 3D will take a minimum of time, however, we do urge that
you work through Chapter 2 - Tutorial in order to better understand the concepts behind 3D.
Pyware™ 3D was inspired by video animators and a "wish list" of input from "end users”. You will
begin to create, evaluate, and instruct drill never thought possible. In short...you'll soon be wondering
how you got along without it.
WHERE TO
START
• In this chapter you will learn the main windows of Pyware 3D and many of the terms that are to be
used throughout the application and manual.
• Chapter 2 - The Tutorial. This is probably the most important chapter for learning the fundamentals
of 3D. It guides you through the design of a short drill. During the “off-season” develop your skill
with Pyware 3D. After you have created the Tutorial drill, take an old drill and practice inputting a
few pages. Learning a computer and its applications is similar to learning how to play a musical
instrument. “You must learn the fundamentals and practice before performing in the recital.”
The remaining portion of the manual is to be used as a reference material.
• Chapter 3 - The Menu Bar. Describes the functions of the application menu bar.
• Chapter 4 - Drawing Tools. Describes how to enter shapes using the drawing tools as well as
details of special options common to most drawing tools such as “clone” and shape adjustment handles.
• Chapter 5 - Selection and Performer Regrouping Tools. Before using the editing tools in 3D, a
group of performers must first be selected. This chapter shows how to select an individual or group
of performers.
• Chapter 6 - Editing /Maneuvering Tools. This chapter describes how to edit and maneuver performers in a drill.
• Chapter 7 - Special Tools. This chapter covers special items important to the presentation and
instruction of drill such as performer labeling, text boxes and arrow indicators.
• Chapter 8 - Printing. This chapter describes how to print charts, coordinates and other reports.
• Chapter 9 - Utilities. This chapter covers the Utilities menu.
• Drill Rewriter utility for editing number of performers in a drill.
• Count Editor utility for inserting or removing counts from a drill.
• Grid Designer utility for creating custom field grid layouts such as soccer fields, winter
guard, parades etc.
• Page Tab Editor utility for adding and removing page tabs and entering page tab titles.
1
CHAPTER 1 - Basic Concepts
• Chapter 10 - Special Designing Techniques
• Writing drill backwards
• Synchronizing drill to music
• Chapter 11 - Interactive Utilities - This chapter covers the procedure of sharing your drill with your
students, other designers, and/or drill design customers.
• Chapter 12 - Traditional Tools Plug-in (purchased separately) - This chapter presents procedures
of creating drill comprised of traditional maneuvers performed by both military and show bands.
• Chapter 13 - Floor Covers Plug-in (purchased separately) - This chapter offers ways of creating
floor (or field) layouts for Winter Guard, Indoor Drum Line, and Stage presentations.
INSTALLATION
Pyware™ 3D requires that it be installed on the computer’s hard drive. You will find detailed instructions for installing and de-installing your program on the Installation Card included with your package.
STARTING 3D
3D is always started by choosing the 3D application on your computer from your group of programs.
3D will not start by selecting a 3D drill file directly. You must launch 3D first, then choose New or
Open from 3D’s File menu.
In Windows, you will find 3D in the Programs group of the Start button. In Macintosh, you will find the
application icon initially on your desktop or dock.
• While Pyware 3D is loading the 3D cover screen will display.
• A new file will display using the default field grid with a maximum of 300 counts of drill for you to start
immediately. This file has a maximum of 300 counts of drill. If you need to increase the maximum
number of counts later, you will use the Count Editor of the Utilities menu. Should you want to
start a drill file with more counts, or a different field display layout see the next step.
• You can create another new file with a different maximum number of counts or a different Field
Display grid by selecting New from the File menu. When determining the number of counts in a
drill we recommend that you do not make a drill file with more than one song per file.
• You can also choose to open an existing file by selecting Open from the File menu.
It’s important that you save often. You can always revert to an early “backup” of the file if, after writing, you realize an earlier version of the file is better. Also, power surges and file corruptions are a
fact of life. Having backups of the file are extremely important. In addition, backing up files on CD is
beneficial. See Backup Drill at the end of this chapter for more details on backup techniques.
2
CHAPTER 1 - Basic Concepts
3D’S MAIN
WINDOWS
Once you have opened a file, several windows, menus, palettes and control panels will appear on the
screen. All of which will be explained in this chapter. Items addressed in this chapter:
• The Field Display Window
• The Count Track and Animation Controls
• The Console
• The Tool Palette
• The Perspective Window
• The Production Sheet
FIELD DISPLAY
WINDOW
3
This is the main area where the drill design is created. The upper left corner of the field display window contains display tools which control the way drill is displayed on the field.
The Edit Handle Resize Slider - Adjusting this slide bar will either increase or deacrease the size of
the tool Edit Handles.
CHAPTER 1 - Basic Concepts
The Stride Zone Switch - turns the display of the Strize Zone on or off. The Stride Zone can be
adjusted under Document Options in the file menu.
The Props Switch - turns the display of props on or off. No props will be shown until they are
entered.
The Label Switch - turns the display of labels (numbers) that appear beside each performer on or
off. No labels will be displayed until the labels are entered.
The Text Switch - turns the display of the text and arrows on the field display on or off.
The Facing Switch - turns the display of performer(s) facing on or off.
The Measure Tool is used to measure the distance between two points. Click on the tool and then
click on two points on the field to measure. The measurement is displayed in the Console. A quick
way to turn off the measure tool is double-click anywhere on the field while the tool is active.
The Field Move Tool is used to move the actual field grid within the field display. Click on the tool to
activate it and then move the cursor to the field display. Drag the field to move it. Click the tool again
to turn it off. <Alt> click (<Option>-click for Mac) directly on the tool to revert to the default field location.
The Field Zoom Tool is used to zoom the actual field grid within the field display. Click on the tool
and click on the field grid to zoom in. <Alt> click on the field grid to zoom out. (<Option>-click for
Mac). <Alt>-click directly on the tool to revert back to the default field view.
COUNT TRACK
The Count Track is typically located along the bottom of
the screen. Its main component looks like a ruler with a
tick drawn for every count in the drill. A Red and Yellow
Anchor can be dragged along the ruler which determine
the count of the drill that will be displayed and edited on
the screen. The Count Track is very important and is fundamental for the proper operation of Pyware 3D.
During typical use, sliding left-right above the counts of the Count Track is a Red and Yellow Anchor.
Directly to the left of the ruler in the Count Track is an area that displays the Red and Yellow Anchor
values. When writing forward the top number represents the count of drill where the Yellow Anchor is
located. The next number represents the count of drill where the Red Anchor is located and the last
number represents the number of counts between the
Red Anchor and the Yellow Anchor.
4
The space between the two anchors determines the count
range of a transition. The Red Anchor is the ending count
of a transition. It is the count where a shape can be edited. At this count, the positions in the formations are displayed on the field in symbols. For example X’s, T’s, flag
symbols . The Yellow Anchor is the beginning count of a
transition and is used as a reference or background chart.
The positions at this count are displayed in black dots (the
default setting). In the “old days” when designing on
paper or using a light board, the Red Anchor could be
compared to the actual sheet you would be drawing on.
The Yellow Anchor is the underlying sheet of paper with a formation from the previous set to be used
as a reference.
CHAPTER 1 - Basic Concepts
When you start a drill, you will typically first create an opening formation at count 0. You will set both
Red and Yellow Anchors to count 0.
After you have created the opening formation you will create your transitions to the next set by “morphing” or reshaping your opening formation. To indicate the count of the next set and the number of
counts in the transition from the last set, you will spread the anchors over those counts. For example,
setting the Yellow Anchor at count 0 and the Red Anchor at count 16 will start the next set at count
16 and create a 16 count transition between counts 0 and 16.
Often when moving your anchors forward the locations of the performers on the field do not appear to
change even though we are now looking at count 16. That is because no editing has been done at
count 16, therefore the performers at count 16
are marking time from count 0.
To design the formations of the next set, you will
select shapes and use the edit tools to reshape
them. In the example, our Red Anchor is at count
16 and therefore the formations (or shapes) we
are editing are at count 16. Since the Yellow
Anchor is at count 0, the transitions between
count 0 and 16 are automatically created for you.
Again, for example, if you wish the next transition to be between counts 16 and 40, you would move
your anchors where the Yellow Anchor is at count 16 and the Red Anchor is at count 40. Now, you
are looking at count 40 on the field. Since count 40 is currently marking time from count 16, the secondary (background) chart at count 16 that is normally displayed is directly under the primary chart
(count 40). You will now reshape the formations at count 40 and the transition counts between 16 and
40 will be automatically created for you.
The great thing about the Count Track is that transitions can begin and end on ANY count. You are
also not restricted to beginning and ending EVERY transition at the same counts in the drill. Some
transitions may span over several printed charts. In our example we created a set of transitions that
span from 0-16 and from 16-40, so typically we would print a chart at 0, 16 and 40. But what if you
also wanted a group of performers (let’s say the guard) to travel from 0 to 40 in a single transition?
That is easy! Set the Yellow Anchor to 0 and your Red Anchor to 40. Reshape the formations that
make up the guard and you’re done. The placement of the guard at count 16 (as with the other transition counts) are automatically created for you.
Another great thing about the Count Track is that with this approach you do not re-create a chart from
scratch at each set. With 3D, you are usually re-shaping the formations of a count (at the Red
Anchor) based on a formation’s shape at a previous count (at the Yellow Anchor). Since transitions
are evolutionary, it is almost always easier to build a chart from its predecessor than to create it from
scratch. The Tutorial that follows will help you better understand how this concept works.
NOTE: Dragging the Yellow Anchor through the count of the Red Anchor will leap frog the anchors.
This time saving feature allows you to continue on to the next set by moving just one anchor instead of
two.
TIP: <Ctrl> click to move your anchors to a bounding set skipping over any sub-tabs. <Alt> (<option>
for Mac) click to move your anchors to a single count.
5
CHAPTER 1 - Basic Concepts
TRACK
RESOLUTION
BUTTON
This multi-function button zooms the Count Track when the button appears in green.
Single clicking the button zooms IN. <Shift> click the button zooms OUT.
<Ctrl> (<option> for Mac) click the button zooms to its default size. Default size can be set in the
Display section of Application Options, listed in the File Menu.
PAGE TABS
User determined page tabs are markers placed on the Count Track ruler for making it easier to jump
to counts in the drill. Clicking on a page tab jumps the Red Anchor to that count and the Yellow
Anchor to the previous page tab. In printouts, page tabs are considered Sets in the drill. Page Tabs
can be entered multiple ways. One way is visually using the Page Tab Lock button located on the
Count Track. and the other is using the Page Tab Editor in the Utilities menu. The Page Tab Editor
on the Utilities menu is covered in Chapter 9 - Utilities. The procedure of implementing the Page Tab
Editor button on the count track is outlined below.
Clicking on the Page Tab Lock button enables the entering and editing of page tabs directly on the
Count Track.
When the Page Tab Lock button is unlocked, the bottom of the Count Track will turn yellow to indicate that page tabs can be entered or edited.
Page tabs can be added to the Count Track simply by clicking on the count track at the location you
want the tab to be entered.
Page Tabs are removed from the Count Track by dragging a page tab from the ruler horizontally off
the Count Track or by holding the <alt> (<option> for mac users) key and clicking on the page tab to
be removed.
While the Page Tab Lock button is unlocked, any page tabs on the Count Track can be dragged to
any location on the ruler.
Locking the Page Tab Lock button will set the mode of the Count Track back to normal use. The
Page Tab Lock button must be LOCKED in order to access any tools.
Page Tabs can also be used to indicate sub-sets. Often a page tab is useful to create a complex transition, however, you only want to print a chart at the beginning and end of the transition. In previous
versions of 3D you had to add page tabs to make it convenient to create the transition and then
remove the page tab before printing. Now you can create a sub-tab. This will prevent the set numbers from incrementing thru the sub-tabs because the sub tabs are label A,B,C. For example, with two
sub-tabs between set 2 and 3 the numbering sequence would be 1, 2, 2A, 2B, 3, 4, etc. You also can
choose to print the sub-tabs or not from the Print Charts function.
To enter a sub-tab:
• Enter a page tab on the Count Track as usual.
6
CHAPTER 1 - Basic Concepts
• After the tab appears on the Count Track, double-click on it and a Page Tab Options dialog will
appear. Choose whether the tab is a Standard Page Tab or Sub-Page Tab and click Okay.
TIP - You don’t have to set page tabs before you start designing. Tabs can be set as you progress
through the drill. Tabs also can be inserted in the middle of a transition which will force subsequent
page tabs already entered to be renumbered.
ANIMATION
CONTROLS
Animation Controls are found on the left side of the Count Track.
The Play button starts drill animation from the beginning of the drill or from the Yellow Anchor
depending on the setting of the All Counts switch found along the bottom of the animation controls.
The Pause button pauses the animation.
The Stop button stops the animation.
The Jog Tool is used to jog the animation forward and backward for a quick review. Releasing the jog
returns the display to its previous condition.
The Continuous Loop option causes animation to loop continuously between the Yellow Anchor and
Red Anchor.
The All Counts options starts animation at beginning of the drill file and continues to the end of the
drill, regardless of the placement of both Red and Yellow Anchors. If All Counts is turned off, then the
animation will start at the Yellow Anchor and end at the Red Anchor.
When the Sound option is selected, you can choose and play a MIDI, OGG, or WAV file to play along
with your drill.
When Step Animation is selected, after clicking Play, animation will advance one step per <spacebar> or <right arrow> keypress. The <left arrow> keypress will reverse the drill one step.
The Fast Animation option will play animation at a fast tempo for quicker review of transitions.
TIP - A combination of both Loop and Fast Animation is a great way to preview the interaction of
maneuvers of shapes to other shapes.
7
CHAPTER 1 - Basic Concepts
CONSOLE
The Console is the location for finding detailed information about a function you are currently using.
The top line of the Console is called the Location Indicator. It provides information regarding “cursor
placement” relating to steps from vertical (division) lines and horizontal reference points from either
back side line, front side line, or middle of field.
Information in the Console changes depending on the function currently being used. Typically the console shows information such as: number of positions selected, average interval of selected or new
shape, average length, maximum stride of transition, etc.
The five buttons in the top right corner of the Console control the step resolution of the location indicator and the cursor on the field. The choices are whole (1) step, half (1/2) step, quarter (1/4) step,
eighth (1/8), and sixteenth (1/16) step. For more control of placement of points on a field select sixteenth step resolution. This is valuable when implementing tools such as the Free Form Tool where
many points are required to create a smooth shape. When your points are basically endpoints then
you would usually choose whole step resolution so your endpoints will fall on whole steps.
PERFORMER ID
PANEL
The Performer ID Panel is available in Interactive and Professional Edtions only.
The Performer ID Panel is a tab that is found on your console. This Panel allows you to quickly
manipulate the positioning of Performer Labels. The picture above breask the panel into three sections for easier comprehension.
The Directional arrows shift the selected performer label(s) in a specific direction. All selected performer labels will shift this direction.
The Contour buttons contour the label(s) to the characteristic of the shape.
The Distance buttons adjust the performer label(s) closer or further to the performer(s).
Tip: If you have a large number of performers but only need to adjust a few labels, try the Box
Selection or Lasso Selection tools. These two tools ignore any grouping that the performers might be
in and only highlight what you have selected.
8
CHAPTER 1 - Basic Concepts
TOOL PALETTE
The Tool Palette contains the tools for entering shapes, selecting and editing shapes, selecting and
maneuvering shapes, changing information about performers, and items such as text and arrows.
The Selection tools are used to select a shape or groups of shapes.
The Regrouping tools are used to combine performers into different groups for editing and maneuvering. Also in this group is an Adjust To tool for quickly adjusting individual placements and a Pace tool
for controlling the pace (such as double-time) during a transition.
The Drawing tools are used to draw new shapes.
The Editing/Maneuvering tools are used to create transitions as well as edit shapes.
The Extras tools are used to add and modify information about performers such as their label (or number). Also these tools are used to draw special items such as instructions or arrows.
PERSPECTIVE
WINDOW
The Perspective Window is manipulated by using the tools in the upper right corner of the window.
The Perspective Window defaults to the minimized (hidden) status when the program is opened. The
Perspective view will appear by clicking on the Minimize button. After the perspective view has been
restored you will NOT see positions entered until you click on the main area of the Perspective View
window.
The Minimize button reduces the window to show only the title bar. When the window is minimized,
the perspective view calculations are disabled allowing for a faster refresh rate of the field window.
To Resize the Perspective View, click and drag the bottom right corner of the Perspective View window.
9
The Tilt button tilts the view in the window. After clicking on the button, move the mouse into the per-
CHAPTER 1 - Basic Concepts
spective view window, click and drag in the direction that you want the display to tilt.
The Shift button moves the field into view. After selecting the button, move the mouse into the perspective view window. Click and drag to shift the display. <Alt> click on the Shift button returns the
window to its default view
The Zoom button zooms the view in or out. After clicking on the button, move the mouse into the perspective view and click again to zoom IN. Hold down the <Control> key and click to zoom OUT. <Alt>
click on the Zoom button returns the window to its default view.
Cameras (Interactive and Professional Editions only): There are 6 Camera radio buttons available
for you to quickly jump to different viewing angles when watching the animation or previewing a chart.
To set specific angles to a preset button, change the view point in the perspective view to your desired
angle, then press the Set button. A new window will appear which prompts you to select a camera
number for this specific angle. Once you create a camera angle through this process, you may instantly jump to that view in the Perspective View anytime during the design or previewing animation
process.
To remove all saved camera angles, press the Set button then choose Clear All.
PRODUCTION
SHEET
(Interactive and Professional Editions
only)
The Production Sheet is a helpful tool that
allows you to develop your show ideas within 3D, before any charting begins. Think of
the Production Sheet as a “map” to your
drill. Within this tool, you are able to notate
which measures of a piece will be the transition between Page Tabs, along with adding
any notes, such as “Big Hit” or “Winds face
back field.”
Set indicates the set (page tab) number you
are working on.
Placing a checkmark in the Sub column
would indicate that the current Set is a Subset.
The Count column displays which count a
set is on.
Transition shows how many counts there are to get to a particular set.
Selecting a row under the Measures column would allow you to input which measures the set is referring to.
Title works much like the Measures column. If you click on a row under the Title column, you would
be able to input a title for that particular set.
Notes columns are there for any quick instructions or notes the ensemble (or you) might need. These
notes can be quickly imported into a Text Box and displayed on the field through the Text Box Tool.
10
Tip: Selecting a set on your Production Sheet is like selecting a page tab on the count track. This is
another quick way to preview a set.
CHAPTER 1 - Basic Concepts
To pull the Production Sheet away so you may view the field and Production Sheet at the same
time, press the “Detach” button in the upper right corner of the Production Sheet window. You will
now be able to drag the Production Sheet anywhere on your screen. To pin the window back to 3D,
press the “Pin” button.
BACKUP DRILL
With a computer, bad disks, damaged files, computer lock-ups and hard disk crashes are a fact of life.
Although these occurrences are few and far between, they inevitably seem to happen to everyone at
least once. Take the precautions mentioned below and your drill designing days will be virtually trouble
free.
• To prevent losing large amounts of work, it is advisable to create a separate file for each drill segment (opener, production, closer). Smaller files will also speed up animation and at times, solve certain printing problems.
• Your time and effort is very valuable. We suggest saving every fifteen minutes when working on a
file. Nothing is more frustrating than losing drill all because you did not save your work. It is easy
and takes very little time. Just select Save from the File menu.
• Work from the drill files that you have stored on your hard drive, however, also put your drill files on
disk (or CD) and store them. Keep copies on both hard disk and floppy disk (or CD). Hard drive
crashes can completely wipe out your entire drill, design library as well as other important files
stored on the computer. Floppy disks and CDs can get damaged too. Never keep your files at only
one location.
• Make quick hard drive backups by choosing Save As from the File menu and changing the name of
the file. One common method of making backups is by ending a file name with a number such as 01
and then incrementing the number for each backup. For example: Name your opener “Opener01”.
Then after an hour of work, choose Save As and change the name to “Opener02” and so on. The
name with the largest number is the most current and all others are older at one hour increments.
This makes it easy to go back to earlier versions. After you have collected several copies, start deleting the oldest ones, and occasionally move copies to floppy or CD.
• Use the Backups section of the Application Options found in the File menu. Check “Always
backup after using Save.” See the Backup section of Chapter 3 - Menu Bar for details.
11
Chapter 2 - The Tutorial
Perhaps the best way to learn Pyware™ 3D is to progress through the development of a simple drill.
Please read the previous chapter before beginning this tutorial to understand some of the terminology.
We strongly urge you to complete this tutorial. It will introduce you to the basic functions and options of
the program.
NEW DRILL
• Start the 3D program.
• After a few moments, the 3D cover page will appear. A new file will be created and displayed using
the default field grid layout. A Count Track will appear at the bottom of the screen. The Count
Track determines which count of the drill will be displayed.
• To name our file, choose Save As under the File menu.
• Click in the Save As box, type Tutor and click Save.
PAGE TABS
• First, we will set four page tabs on the Count Track to designate specific counts as “Hit” points for
our drill. Page tabs will allow you to to jump to various parts of your drill quickly and easily.
• Click on the Page Tab Lock button to the right of the
Count Track.
• Click on count 0 of the Count Track. The page tab will
appear as a small white box on the track at count 0. Make
sure that you have added the page tab on count 0 and not
count 1. If the page tab was added on count 1, simply click
and drag the page tab over to count 0. You may drag page
tabs to any count on the count track.
• Click on count 16 of the Count Track. The page tab will
appear as a small white box with the number 2 on the track
at count 16.
• Click on count 48 on the Count Track. The page tab will
appear as a small white box with the number 3 on the track
at count 48.
• Click on count 72 on the Count track. The page tab will
appear as a small white box with the number 4 will on the
track at count 72.
• Finally, to complete adding page tabs, click on the Page
Tab Lock button at the right of the count track. This will
lock the Page Tab Lock and lock the new page tabs in
place.
12
Chapter 2 - The Tutorial
• Select Save from the File menu to save the drill file with its new page tabs.
DRAWING LINES
The first shapes to be entered in our drill will be two mirrored horizontal lines.
• Click on the white Page Tab at count 0 on the Count
Track. The page tab appears as a small white box
beneath count 0 of the Count Track. The Yellow and Red
Anchors will return to the beginning of the Count Track.
• Locate the Tool Palette typically located in the upper left
corner of the screen and click on the Line tool button. A
Line Tool Control Panel will appear.
• In the Line Tool Control Panel, click on the padlock
assigned to the Restrict Horz/Vert option. This will
lock the lines to be drawn as only horizontal, vertical
and 45 degree diagonals.
• We can choose to first determine positions and interval prior to drawing a new shape. Type 24 in
the Positions text box. Leave a 0 in the Interval text box.
• To place the 1st endpoint of the line, move the
cursor to the left of the 50 yard line where the
Location Indicator located in the Console
reads 45 yds 6 stp l 42 stp and click the
mouse.
• To place the 2nd endpoint, move the cursor to
the left until the Location Indicator reads 20
yds 4.00 stp l 42 stp and click the mouse.
In the Control Panel, 22 positions will appear along with a “computer determined” interval based on
the length of the line you have entered.
Editing Handles will appear at the endpoints of the line, and a red Reposition Handle will appear
in the middle of the line. These handles can be used to reshape and edit the line.
• Before committing this shape to the file, this would be
a good time to experiment with various editing
options found in the Line Control Panel. Click and
unlock the padlock to the left of the Positions box.
Whenever the padlock is unlocked you are setting the
option for the value to be “computer determined”.
13
Chapter 2 - The Tutorial
• Enter 2 (steps) in the Interval text box. The padlock
to the left of the interval text box will automatically
“lock”. This lock indicates that the interval will not
change when you manipulate the shape. Since we
have locked the interval, the number of positions
change as you manipulate the length of the line while
the interval stays the same.
• While leaving the value 2 in the Interval text box, enter 28 in the Positions text box. The padlock is
now locked on both the interval and positions. Since we have locked the interval and the number of
positions, the shape automatically scales to keep the defined interval and number of positions.
• Unlock the padlock to the left of the Positions text box.
• Drag the red edit handle assigned to
the LEFT endpoint of the line until
the Location Indicator reads 15
yds 4 stp l 42 stp and release the
mouse button. As you drag the edit
handle, positions are added or
removed to accommodate the
locked interval.
• Unlock the padlock assigned to
the Restrict
Horz/Vert option.
When restrict is
unchecked, line
endpoints can be
placed at any
point on the field.
• Drag the red edit
handle assigned
to the LEFT endpoint of the line
until the Location
Indicator reads
15 yds 4 stps |
28 stps.
• (Re)Lock the padlock assigned to Restrict Horz/Vert option. The shape will return to its horizontal
placement.
• In the Control Panel, enter Positions = 20 and Interval = 2 in text boxes.
14
Chapter 2 - The Tutorial
•
Also, in the Control Panel, enter 1 in the Clone text
box. The Clone option is used to duplicate a shape
across an axis. The next few steps will experiment
with the Clone option.
• Change value in the Clone text box to 2. When more than one clone is entered the shapes multiply
around a point indicated by the clone handle.
15
Chapter 2 - The Tutorial
• Now, change
value in Clone
text box to 3.
Click and drag the
clone handle until
all four lines form
into a box.
• The next few steps will experiment with changing the placement
of the shape. This can be done with the Reposition Handle
located in the middle of the top line. To move the shape to a
different location on the field, drag the center of the Reposition
Handle.
• You can also use the Reposition Handle to reposition the
shape by rotating it. The center of the Relocation Handle is
the Point of Rotation. You can change the Point of Rotation
by dragging the outer ring of the Reposition Handle.
• Rotate the placement of the shape
by dragging the
Rotator Arm of
the Reposition
Handle.
16
Chapter 2 - The Tutorial
• It’s time to stop experimenting and to actually enter a shape. Let’s cancel the shape we have been
working with and start again. Clicking on any tool in the Tool Palette will exit from any tool you are
currently using. If the tool you click on is the same tool you are currently using, it is like starting over
with the tool. So, click on Line tool in the Tool Palette to deselect it and therefore cancel the creation of the new shape.
LINE TOOL
(TAKE 2)
• Click on the Line tool to select if it is not already selected. A Line Tool Control Panel will appear.
• Click on the padlock assigned to Restrict Horz/Vert option in order to restrict line to either horizontal, vertical, or 45 degree alignment.
• If not already done, enter these values into the Control Panel: Positions = 20 and Interval = 2.
• On the field, place the 1st endpoint of the line to the LEFT of the 50 yard line where the Location
Indicator reads 45 yds 6 stp l 42 stp and click the mouse button.
• Place the 2nd endpoint of the line to the LEFT of the 50 yard line where the Location Indicator
reads 20 yds 4 stp l 42 stp and click the mouse button. Twenty positions will appear in a line at a 2
step interval.
• Change the value in the Clone text box to 1. There are now two horizontal lines on either side of the
50 yard line.
• Before accepting the shapes designed you can assign the positions of the shapes a Symbol and
Color. The default symbol and color is currently show in the Control Panel. The symbol should be
an “X” and the color should be blue. If not, enter them now.
• Click Accept in the Control Panel. You should see 40 positions divided into two lines on count 0.
The Console is showing the number of Performers as 40.
17
Chapter 2 - The Tutorial
DRAWING ARCS
The next shape we are to design will be a simple arc of 30 positions. Both endpoints of the arc will
connect to the outside endpoints of the two lines.
• Click on the Arc tool in the Tool Palette. An Arc Tool
Control Panel will appear.
• In the Control Panel, enter 32 in the Positions text
box.
• To place the 1st
arc endpoint,
move the cursor
to the RIGHT of
the 50 yard line
where Location
Indicator reads:
25 yds 0 stp l 42
stp and click the
mouse button.
THIS IS THE
CORRECT
LOCATION! WE ARE LOCATING IT DIRECTLY ON TOP OF THE LAST POSITION OF THE LINE.
• To place the 2nd
arc endpoint,
move the cursor
to the LEFT of the
50 yard line until
the Location
Indicator reads
25 yds 0 stp l 42
stp and click the
mouse button.
• To assign the arcs
peak, move the
mouse until the
Location
Indicator reads
50 yds 0 stp l 20
stp and click the
mouse button.
18
Chapter 2 - The Tutorial
• Before committing this shape to the file, this would be
a good time to experiment with various editing
options in the Arc Control Panel. Change the value
in the Data Point text box to 3. Three data points
create a 2 sided V shape.
• Now, change the value in the Data Point text box to
4. Four data points create a 3 sided shape.
• Finally, change the value in the Data Point text box to 20 to return to the original arc shape.
• Click on the Omit Overlaps option in the Control
Panel. When we created the arc, the two endpoints
of the arc were entered on top of existing positions.
The endpoints were entered as “pic” points and not
intended to be filled with a performer because we
have already placed performers at those points. Omit
overlaps removed the overlapping endpoints thus
preventing two performers from being on top of each
other.
• Click the Accept button in the Control Panel. The Console has updated performers to 70.
• Select Save from the File menu.
19
Chapter 2 - The Tutorial
DRAWING
CIRCLES
The third shape to be entered in our drill will be a circle.
• Click on the Circle tool in the Tool Palette. A Circle Tool
Control Panel will appear.
• In the Control Panel, enter Positions = 24 and
Interval = 2.
• If not already checked, check the Lock to Circle
option.
• To place the center point of the
circle, use
Location
Indicator in the
Console to move
the cursor to 50
yds 0 stp l 56
stp and click the
mouse button.
• To place the circumference point
of the circle,
move the cursor
on the field until
the Location
Indicator reads
45 yds 4 stp l 48
stp and click the
mouse button.
20
Chapter 2 - The Tutorial
• Before committing
this shape to the
file, this is a good
time to experiment with various
editing options in
the Circle
Control Panel.
Select the Offset
Spacing option.
This will attempt
to equally distribute the positions
of the circle
across the point
entered as the circumference.
• Unlock the
Interval padlock
and remove the
check in the Lock
to Circle option.
This creates an
oval shape. The
two red square
editing handles
can be used to
shape the oval.
You could also
use the
Reposition
Handles to shift
and rotate the
oval.
• Recheck the
Lock to Circle
option. The circle
will snap back
into place.
• Change the value
in the Data
Points text box to
3. Notice this
procedure creates
an “outlined” triangle. Similarly
you could create
an enclosed
shape with any
number of sides.
21
Chapter 2 - The Tutorial
• Click on the Circle Tool in the Tool Palette to de-select the Circle Tool and cancel the creation of
the circle.
CIRCLE TOOL
(TAKE 2)
Now let’s re-enter the circle.
• Click on the Circle tool in the Tool Palette. A Circle Tool Control Panel will appear.
• If not already entered, in the Control Panel, enter Positions = 24 and Interval = 2.
• If not already checked, check the Lock to Circle option.
• If not already checked, check the Offset Spacing option.
• To place the center point of the circle, use Location Indicator in the Console to move the cursor to
50 yds 0 stp l 56 stp and click the mouse button.
• To place the circumference point of the circle, move the cursor on the field until the Location
Indicator reads 45 yds 4 stp l 48 stp and click the mouse button.
• In the Control Panel, change the Symbol to G for Guard and the Color to a shade of red.
• Click Accept button to enter the circle.
• Select Save from the File menu.
22
Chapter 2 - The Tutorial
MOVING LINES
We have now created the opening formation at count 0 which is Set #1. Now we will create the next
set by “morphing” or reshaping your formations at Set #2. Initially 3D has established a mark time
between Set #1 and Set #2. As we reshape the formations at Set #2, 3D will automatically create the
transitions to Set #2 from Set #1.
To indicate the count of the next set and the number of counts in the transition from the last set, we will
spread the anchors in the Count Track over those counts. Setting the Yellow Anchor at count 0 and
the Red Anchor at count 16 will setup the field for editing of the formations at count 16 and create a
16 count transition between counts 0 and 16.
• Click on Page Tab #2. The Red Anchor will snap to count
16, leaving the Yellow Anchor at count 0. When advancing the Red Anchor, the performers field locations will not
appear to change even though we are now be looking at
count 16. This is because since editing has not been done,
performers at count 16 are simply marking time from count
0. In fact, 3D has established a mark time to the end of the
drill.
• To create the formation at Set #2, you will be selecting shapes and then using edit tools to reshape
them. In this example, our Red Anchor is at count 16 and therefore the shapes we are editing are at
count 16. Since the Yellow Anchor is at count 0, the transitions will be created between count 0 and
16. From count 0 to count 16, we are going to have the two lines Push (or move) forward towards
the home sideline.
• In order to Push the lines, we first need to select the lines
on the field. In this example, we will choose a Box Select
tool for that purpose. Select the Box Select tool from the
Tool Palette.
• Click above and to the left of the first position of the left line and drag down and to the right until both
lines are encompassed within the rectangle you will be creating.
The performers of both lines will be outlined in bold red indicating that the two lines are selected.
23
Chapter 2 - The Tutorial
• Now that we have selected the two lines, we
need to choose a tool to manipulate them.
Click on the Push tool in the Tool Palette. A
Push Tool Control Panel will appear.
• Before committing this transition to the file, this would be a good time to experiment with various
editing options of the Push Control Panel. Press the <down arrow> key of the computer keyboard
16 times. This procedure is used to push a shape implementing the down or up arrow keys.
• You can drag any editing handle located on each performer in the selected lines to a new location.
All selected places will similarly move as well.
• Click on the Revert button. The shape will return back to the original location.
• Enter in the Stride text box the number 8. This will cause each position to move a distance at a
stride of 8 steps to 5 yards in 16 counts.
24
Chapter 2 - The Tutorial
• Located on the left side of the Count Track are the Animation Controls. Click on
the Play button and the selected lines will move forward. When the pointer of the
Count Track reaches count 16, the animation will stop.
• Click Accept to accept the movement of the selected lines.
• Select Save from the File menu.
SPLITTING
SHAPES
There will be times when you will want one portion of a shape to separate and "split off" from the rest
of the shape.
• First, you need to select a shape that you want to split into two parts. In this example, we will select
the arc. Select the Pointer tool of the Tool Palette. You can also activate the Pointer tool by pressing the second button of your mouse.
• Click on any position of the arc. All
performers in the
arc will appear in
bold red to indicate that the
shape is selected.
• Click on the Knife tool in the Tool Palette. A Knife Tool
Control Panel will appear. The Knife tool is used to cut a
shape into two or more shapes.
The Knife Tool Control Panel behaves differently from other tool panels. By default, there is no
active Accept button. Every cut with the knife is
accepted without having to click the Accept button. This is usually preferred because the Knife
tool is used quite frequently for single cuts.
Requiring the click of the Accept button would
simply add an extra step. However, if you want to
make the Knife Tool Control Panel behave like
typical 3D control panels, you would click OFF the
“Accept each change and stick around.....”
option. When the option is off, the Accept button
will be available and if not clicked when you are
finished cutting, then no changes will occur.
25
Chapter 2 - The Tutorial
• With your cursor,
click on one of
the two positions
closest to the 50
yard line. A red
bubble will appear
on the position.
• Click on the other
position that is
closest to the 50
yard line. A gap
will appear
between both
positions. The
two arcs created
will now act as
two separate
shapes.
MIRRORING
MOTION
In one step, we are going to Push the two arcs in two different directions. On the Count Track, make
sure the Yellow Anchor is set to count 0 and the Red Anchor is set to count 16.
• First, we will need to select the two arcs. Select the
Pointer tool in Tool Palette, or press the second button of
your mouse to activate the Pointer selection tool.
• Click on any position in one of the
two arcs. All of
the performers in
the arc will
appear in bold red
to indicate the arc
is selected.
26
Chapter 2 - The Tutorial
• Press and hold
the <Shift> key
while clicking on
any position in the
other arc. It will
also display in
bold red. Holding
the <Shift> key
while selecting a
shape will add
that shape to any
previously selected shapes or
positions.
• The two arcs are selected. We will choose
the Push tool to move these selected arcs to
a new location. Select the Push tool in the
Tools Palette.
• Click on the Left/Right Mirroring option in the Push Tool
Control Panel.
• Click on the inside position of the RIGHT arc. Click and drag position until the Location Indicator
reads 40 yds 0.00 stp | 8.00 stp. Both arcs will move in motion mirroring left/right to each other.
Light gray lines indicating each selected performer’s path will appear as you move the cursor.
27
Chapter 2 - The Tutorial
• If adjustment needs to be done, simply click and drag the shapes to desired location. The maneuver
will not be committed to the drill until you click the Accept button.
• On the left side of the Count Track are the
Animation Controls. Click on the Play
button to preview the moving arc with the
moving lines.
• Click on the Accept button to commit the new move to the drill.
• Select Save from the File menu to save the changes to file.
EXPANDING
CIRCLE
From Counts 0 through 16, we will expand the (color guard) circle.
• On the Count Track, make sure the Yellow Anchor is set to count 0 and the Red Anchor is set to
count 16. Clicking on the page tab on count 16 will set both anchors at one time.
• First, we need to use a selection tool to select the circle. Click on the Pointer tool in the Tool
Palette, or press the second button of your mouse.
• Click on any position in the circle and all of the performers in the circle will be highlighted in red indicating that they are selected.
• Click on the Resize Tool in the Tool Palette.
A Resize Tool Control Panel will appear.
• In the Control Panel, if not already clicked,
click on the Scale option.
• Let’s experiment with options in the
Control Panel. Click and drag the lower
left (red) handle until the Location
Indicator reads 40 yds. 0.00 stp | 40
stp. The circle will expand away from
the center. The outside edge should
touch both 40 yard lines.
28
Chapter 2 - The Tutorial
• Click directly in the center
of the Reposition
Handle and drag until the
Location Indicator reads
50 yds 0.00 stp | 36 stp.
Now, the circle will not
only expand, but it will
also move towards the
home sideline.
• On the left side of the Count Track are the Animation Controls. Click on the
Play button to preview the expanding circle with the movement of the other shapes
in the formation.
• Click the Revert button in the Control Panel so the circle will return back to its original shape.
• Click and drag the lower left
(red) editing handle until the
Location Indicator reads
35 yds. 4.00 stp | 36 stp.
The circle will expand away
from the center.
• Click on the Accept button to commit the change to the drill.
• Select Save from the File menu.
29
Chapter 2 - The Tutorial
CREATING
SET #3
You have completed the first 16 counts of drill. To continue to the next set, you must move the Red
and Yellow Anchors on the Count Track. From counts 16 through 48, we will reshape the two arcs
using a Follow the Leader maneuver.
• Click on Page Tab #3. The Yellow Anchor
will jump to count 16 and the Red Anchor will
jump to count 48.
• First we need to select the two arcs. In this
example we will choose the Lasso Selection
Tool. Select the Lasso Selection Tool from
the Tool Palette.
• Using the cursor drag a lasso around both arcs. Once selected, both arcs will be shown in bold red
to indicate they are selected. Since the Lasso Tool select only places that are inside the lasso, it is
possible to miss some positions. So make sure all of the performers in the arcs are selected.
• Click on the Follow the Leader Tool in the
Tool Palette.
30
Chapter 2 - The Tutorial
• Red “Leader” dots highlighting the end performers on each arc indicate the performer that will be the
leader for the follow the leader movement. Depending on your application, the correct leaders may
already be chosen, and this step is not necessary.
We need both of the leaders to be the outer most performers of the arcs. If both red “Leader” dots
are not on the proper position of one or both of the arcs, you will move the “Leader” dots to the
proper endpoint by clicking on the incorrect “Leader” dot. The red “Leader” dot will automatically
move from one end of the arc to the other.
The picture above is a sample of leaders where the leader in the left arc is on the incorrect endpoint.
The picture above is a sample of leaders who are correct.
• In the Follow the Leader Control Panel, click on the Left/Right
Mirror option.
31
Chapter 2 - The Tutorial
• Click the mouse on the RIGHT side of the field at the location where the Location Indicator reads
35 yds 0.00 stp | 44.00 stp to start a path. A straight path for both shapes will appear. A red editing
handle (square) will appear at the point where you clicked.
• Press and hold the <Shift> key while clicking the mouse approximately halfway up one of the pathways of one of the arcs. A new editing handle (red square) will appear on the RIGHT path.
32
Chapter 2 - The Tutorial
• Click and drag the new editing handle until the Location Indicator reads 15 yds 5.00 stp | 41 stp.
• Using the Play button in the Animation Controls of the Count Track preview the animation.
• Click Accept to commit the change.
• Save your work.
GLUING LINES
There will be times when you will want to connect (or reconnect) one shape to another. This function
is most important when maneuvering two (or more) shapes into one large formation.
• For this example, make sure the Count Track’s Yellow Anchor is at count 16 and the Red Anchor
is set to count 48.
• Select the Box Select tool from the Tool
Palette.
• On the field, select both lines.
33
Chapter 2 - The Tutorial
• Select the Glue Tool in the Tool Palette. A
Glue Tool Control Panel will appear.
• With your cursor, click on one of the two positions closest to the 50 yard line. A red bubble will
appear.
• Click on the other position closest to the 50 yard line. A red line connecting both positions will
appear. The two lines will now behave as one line when selecting it.
• Save your work.
34
Chapter 2 - The Tutorial
MORPHING LINE
In this exercise we will “reshape” the lines into a new shape.
• For this example, make sure the Count Track’s Yellow Anchor is at count 16 and the Red Anchor
is set to count 48.
• If not already selected, select the line with one of these selection tools: Pointer Tool, Box Tool, or
Lasso Tool.
• Click on the Morph Tool in the Tool Palette.
A Morph Tool Control Panel and red editing
handles will appear over each performer of
the selected line.
• In this exercise, let’s experiment with some of the options in the Morph Tool and its Control Panel.
• Drag any of the editing handles to any position on the field. When one handle is adjusted, pathways for each position of the selected shape will be altered in order that equal spacing is maintained
in the new shape.
35
Chapter 2 - The Tutorial
• Click Revert to return the shape back to its original shape.
• Click on the Delete Half (handles) option in the Control Panel.
The fewer number of editing handles you work with, the more
fluid shapes will become.
• Continue to click the Delete Half button until only three handles are remaining on the shape. If you
click too many times, click Revert and try again.
• Drag the second editing handle until the Location Indicator reads (Right) 40 yds 0.00 stp | 12
stp.
• Use the Play button in the Animation Controls to preview these changes and then we will continue
to experiment with more Morph Tool options.
36
Chapter 2 - The Tutorial
• Now we are going to put an editing handle back in the shape. Press and Hold <Shift> key while
clicking the mouse to the left of the second editing handle. A new editing handle will appear on the
shape.
• Click and drag the new editing handle to the location indicated by the Location Indicator
(Left) 40 yds 0.00 stp | 40 stp.
• Use the Play button in the Animation Controls to preview these changes and then we will continue
to experiment with more Morph Tool options.
37
Chapter 2 - The Tutorial
• Now let’s remove a single editing handle. Press and hold the <Shift> key, and click directly on the
second editing handle to the left of the 50 yard line. The handle will vanish and the shape will
change accordingly.
• Click and drag the next to last editing handle until the Location Indicator reads 50 yds 0.00 stp |
0.00 stp.
38
Chapter 2 - The Tutorial
• Click and drag BOTH outside editing handles (the endpoints) until the Location Indicator reads 15
yds 6.00 stp | 24.00 stp. If necessary, re-adjust the endpoints to connect with curvilinear forms on
either side of the circle.
• Use the Play button in the Animation Controls to preview these changes.
• Click Accept to commit the morphed shape to the drill.
• Save your work.
PASS THROUGH
EXAMPLE
In the next exercise we will transform the circle into a meshed vertical line. To achieve this, we will use
Knife Tool, Glue Tool, and the Morph Tool.
• For this example, make sure the Count Track’s Yellow Anchor is at count 16 and the Red Anchor
is set to count 48.
• If not already selected, select the circle on the field using either the Pointer Tool, Box Select Tool,
or Lasso Tool.
• Click on the Glue Tool in the Tool
Palette. A Knife/Glue Control Panel
will appear.
• Click the Regroup All button in the
Control Panel. Observe that the circle
shape will segment into individual positions. Next, we will “reorder” the positions in a pattern to achieve our “X/O”
grouping.
39
Chapter 2 - The Tutorial
• With the cursor, click on the position at
the top of the circle and to the left of
the 50 yard line. A red dot will appear
on that position.
• Move the cursor across the 50 yard
line and click on the position at the top
of the circle and to the right of the 50
yard line.
• Move the cursor to the left and select
the next position left of the 50 yard line.
40
Chapter 2 - The Tutorial
• Continue selecting each position of the
circle in the same “zig/zag” pattern until
all positions of the circle have been
selected. If you mess up, simply click
Undo Last or Regroup All and start
again.
• Once all positions in the circle have
been regrouped, use a selection tool
such as the Pointer Tool to select the
circle. Notice that the blue lines in the
selected circle have now been
rearranged to indicate the new grouping order.
• Now that we have regrouped the circle into a
zig-zag pattern, if we morph the circle into a
line, it will make the circle positions mesh.
Click on the Morph Tool in the Tools Palette.
• Click on the Delete
Half button to
remove editing
handles in the
Morph Tool
Control Panel until
all but the handles
at the end points of
the shape remain.
41
Chapter 2 - The Tutorial
• Click and drag the upper editing handle until the Location Indicator reads
50 yds 0.00 stp | 72 stps.
• Click and drag the lower editing handle until the Location Indicator reads
50 yds 0.00 stp | 12 stps. The red
line drawn from one of the positions
designates the performer who is traveling the furthest distance during the
transition. The Step Length and
Distance Traveled by this performer is
displayed (in red) in the Console.
• Use the Play button in the Animation Controls to preview these changes.
• Click Accept to commit the changes to the drill.
• Save your work.
42
Chapter 2 - The Tutorial
CREATING
SET #4
You have completed the first 48 counts of drill. Let’s move on to the next set. In the final set of the drill
we will:
1 Segment the large arc into two smaller arcs.
2 Draw two new mirrored shapes on count 72 with performers coming from two pre-existing arcs
located on count 48.
3 Match the positions of the pre-existing arcs on count 48 to positions of the two new mirrored
shapes on count 72.
• Click on Page Tab #4. The Yellow
Anchor will jump to count 48 and the
Red Anchor will jump to count 72.
• Select the large arc using Pointer Tool, Box Select Tool, or Lasso Tool.
• Click on the Knife Tool in the Tool Palette.
A Knife/Glue Control Panel will appear.
• We will cut the arc into two smaller arcs. With your cursor, click on one of the two positions closest
to the left of the 50 yard line. A red bubble will appear.
43
Chapter 2 - The Tutorial
• Now click on the other position closest to the 50 yard line. A gap will appear between the two positions indicating the large arc is now two smaller arcs.
• Select both arcs again using either Pointer Tool, Box Select Tool, or Lasso Tool.
• Click on the Curve Tool in the Tool Palette.
A Curve Tool Control Panel will appear.
• In the Curve Tool Control Panel,
enter 20 in the Positions text box.
• Click OFF the Omit Overlaps option.
• Click ON the Predict Next option.
44
Chapter 2 - The Tutorial
• On the field click on the following points to create the shape of the curved form.
LEFT 45 yds 6.00 stp | 16.00 stp
LEFT 35 yds 4.00 stp | 4.00 stp
LEFT 25 yds 0.00 stp | 20.00 stp
LEFT 10 yds 0.00 Stp | 12 stp
While entering these points, the red editing handles will appear at each point. These editing handles can be dragged to adjust the shape. We are creating this curve with only four points because
the fewer the number of editing handles the smoother the curves of the shape.
• Enter in the Clone text box 1. Two mirrored shapes of 20 positions will appear.
45
Chapter 2 - The Tutorial
MATCHING
POSITIONS
Currently displayed are gray matching lines “criss-crossing” connecting some of the performers of the
pre-existing arcs to the places in the newly designed curves. The matching lines indicate which performers in the pre-existing arcs will move into the places in the new curved shapes. These gray
matching lines display the current “matching order.” Obviously, the crisscrossing lines are indicating a
matching order that is not the matching order we want. We will enter a new matching order by rearranging the matching lines to connect “or move” the performers from their current positions in the
arcs to their new places in the curves.
• Since the matching lines are indicating the incorrect matching order, click on the Clear button in the
Curve Tool Control Panel and all of the gray matching lines will vanish and a red bubble will
appear on the endpoint of one of the new curves. The red bubble indicates the new place that we
will be matching first.
• 3D has a matching prediction function that will attempt to complete the matching order based on
your first few matches. In the Control Panel, click the Predict Next option ON in order to enable
this feature.
• To get the matching prediction function started, you will
need to make the first match. The new position inside
the red bubble needs to be matched with one of the
performers of the arc. To do that, click on the performer
at the endpoint of the LEFT pre-existing arc. This is the
performer that we want to be moved into the new place
highlighted by the red bubble.
As shown here, the red bubble advanced to the next
place in the new curve after the first match was made.
46
Chapter 2 - The Tutorial
• Click on the next performer of the pre-existing arc. Again, this will move the performer currently
located in the arc to the new place in the curve highlighted by the red bubble. After this match, the
Predict Next function will take over and attempt to correctly match the remaining positions of the
first shape according to your initial matches as shown here.
• Move to the opposite shape and repeat the same process.
• Animate the drill if you want to preview your matches. Should you think you made mistakes and
want to start over, click the Clear button and try this section again.
• Click Accept to commit the curves to the drill.
• Save your work.
47
Chapter 2 - The Tutorial
REVIEWING
SETS
Let’s see what we have so far.
• On the Count Track, drag the Yellow Anchor back to count 0..
• Make sure the Red Anchor is on count 72.
• In the Animation Controls, click on the Play button.
PRINTING
Since Page Tabs have already been inserted, it will be very simple to print desired pages.
• From File menu, choose Print Charts. A dialog box will appear allowing you to configure the way in
which your charts are to be printed.
• In the Print Selection options, click From Page Tabs.
• In the Overlay Set options, click Use Previous.
48
Chapter 2 - The Tutorial
• Click the Print/Preview button. A dialog box will appear allowing you to preview the printout and
configure Page Setup options. The Page Setup dialog box differ, depending on the printer you are
using.
• Click Print and your printer’s print dialog will appear. Clicking OK (or Print) will start your print job.
FINISH
You have completed your first drill.
We’ve tried to show you as many 3D features as possible in a short tutorial in order to create your first
drill. There’s still much more! Pyware 3D is the most used drill design software in the world. It is used
for a variety of design styles. We encourage you to review the manual to get the most out of your
design efforts.
49
Chapter 3 - The Menu Bar
This chapter references each menu item of the 3D menu bar.
NEW DRILL
(FILE MENU)
New Drill is
used to create
a new drill file
or continue
and exhisting
drill from
another file.
Selecting New
Drill from the
File menu will
display the
New Drill File
dialog.
• Drill Title is the title as it appears in in printouts and productions.
• Field/Stage Grid Layout is the type of grid that is used for the design and performance surface.
Clicking Browse will display the list of available fields. You can create your own grid layouts from
from the Grid Designer found in the Utilities menu. See Chapter 9 - Utilities for details.
• Maximum number of counts is the number of counts in the new drill file. Only enter one song per
drill. Try not to go over 400 counts. The higher you go the more work you make for 3D in calculating
transitions. On slower machines, you may notice an extra delay.
TIP - We recommend that you create separate files of major segments of the show or each musical
selection. This will make writing and teaching the drill much more manageable. 3D will allow you to
copy the last set of one drill in a file and paste it to a new file as the first set.
50
Chapter 3 - The Menu Bar
OPEN DRILL
(FILE MENU)
Open is used to open a file located on a storage device such as
your hard drive. Selecting Open
from the File menu will display
the Open a Drill File dialog.
“Drill files in” shows the directory
on the storage device that is displaying in the file list. Browse will change the directory shown in the
list.
The drill file list contains drill files, drill packages and folders. Clicking on any of them and clicking
Open will open the selection in the list.
The Get a Drill Online button will open the Online File Manager where you can select a file to download from a 3D online account. The Online File Manager is covered in detail in the Interactive menu.
See Chapter 11 - Interactive for details.
The Go To Drills Directory will show the list of drill files in the default drill files directory.
The Go To Backups Directory will show the list of drill files in the default backup drill files directory.
The location of the backup drill files directory can be changed from the Application Options
(Backups Tab) of the File menu.
The Go Up One Directory will move up one directory from any sub-folders found in the default drill
files directory.
51
Chapter 3 - The Menu Bar
PRODUCTION
FILES
Version 4 now has three types of 3D data files:
1) 3D Drill file (original data file in Pyware 3D)
2) 3D Drill Package file which is a combination of a 3D Drill file and its external files. External files
consist of the drill’s audio file, images for props, and the floor cover image.
3) 3D Production files which are a collection of 3D Drill Packages that when combined make a
complete production (or show).
Using 3D Production files has many advantages over a 3D Drill file or a 3D Drill Package file.
1) An entire production with all of its drills can be downloaded into a viewer or a 3D Performer’s
Practice Tools program at one time.
1) Printing reports such as drill books and coordinates of a 3D Production file will combine all of the
drills in the production into a single printed list.
2) 3D Production files are used by the 3D Performance Simulator of the 3D Performer’s Practice
Tools.
NEW
PRODUCTION
Since a production is essentially a collection of drills that when combined make a whole show, you
must have at least one saved drill available to put into your new production before you can create the
production. When a drill is added to a production it is moved from the “Drills” folder into the production
file. You will no longer find your drill in the “Drills” folder. You will, however, find your drill when you
open the production. That is very important to remember, so you don’t panic and think you have lost
your drill. A production will appear in the Open Drills dialog just like a drill (or a drill package). When
you open the production you will see the list of drills in the production in the Open Drill dialog. The
production is just like a sub-folder in the “Drills” folder.
• Select New
Production
from the File
menu and the
following dialog
will display.
Click Next to
continue to the
next step.
52
Chapter 3 - The Menu Bar
• Enter the title
of the production. The production title will
be used as the
file name of the
production’s
main title. After
entering the
production title,
click Create
and then click
Next to continue to the next
step. If there is
a production
with the same
title in your
Drills folder
you will be
asked to
choose another.
• Enter the
description of
the production
that will appear
on cover sheets.
Click Next to
continue.
53
Chapter 3 - The Menu Bar
• The 3D Production file is a very powerful file. 3D Productions can be sent online (using a 3D Online
Account) for performers (students) who can in turn download directly into their 3D Performer’s
Practice Tools program where they can use the Production file to do the following:
1) Productions can be opened in the 3D Performance Simulator where performers can practice
their drills for scores.
2) Production drill books can be printed that include all of the drills in a production in a single book.
3) Production coordinates can be printed that include all of the drills in a production in a single list.
Setting Enable Print Functions will control whether or not a production can be printed from within
the Performer’s Practice Tools program. Occasionally, if a designer has uploaded a production for
preview only, they do not want the performers to be able to print. Drills can also be individually
locked from printing and editing. If a drill has been locked it will not be able to print even if the
Enable Print Functions is selected.
Setting Enable Leader Board Functions will control whether or not a production will have Leader
Boards. Some designers (or directors) may choose to disable the Leader Boards functions.
54
Chapter 3 - The Menu Bar
• Choose which
drill files you
want included in
your production.
The drill files
must have been
saved as Drill
Packages and
they must have
any audio files
included. To
move a drill, into
the production
click on the drill,
and then click the
move (right) button. To move a
drill out of a production, click on
it in the production list, and then
click move (left).
You can also rearrange the order the drills will appear in the production by clicking on a drill in the
production list and clicking move up or down.
Remember, when you move a drill into a production you will no longer find it loose in the drills folder.
You will find it by opening the production then opening a drill within the production. The production is
like a sub-folder in the “Drills” folder.
• The summary will
display showing
the production
setup. Click
Build Production
and you are done.
Now if you want
performers to
download the production, you must
first upload it to
your 3D Account.
Use the Online
File Manager
from the
Interactive menu
to do that.
55
Chapter 3 - The Menu Bar
OPEN
PRODUCTION
Productions are collections of drills combined into one file to make a production. When you select
Open Production you will see the list of drills within the production to open.
• Select Open Production from the File
menu
• You will see in the Open dialog the list of
productions. Click on a production you
want to open and click Open.
• The list of drills found in the production
will display. Click on the drill within the
production you want to open and click
Open.
When a production is opened you can only
work with drills in that production. To work
with other drills not in the production you
will need to first close the production by
using Close Production from the File
menu.
CLOSE
PRODUCTION
PRODUCTION
OPTIONS
ADD/REMOVE
DRILLS IN
PRODUCTION
56
When productions are opened, you can only work with drills that are in that production. When you are
ready to work with a drill that is not in the production you will need to close the currently opened production first. To close a production, select Close Production from the File menu.
Production Options consist of the production description, Performer’s Practice Tools settings, and
the list of drills that are in the production. Production Options will be available only if you have a production currently opened. (See Open Production or New Production). The Production Options
are the same as the options that you set when you create a New Production (See New Production
for details).
When a production is opened you can change which files are in the production with this function. You
can also create a new drill or create a continuation drill of an existing drill in the production. This is
handy when you have finished one drill and want to move on to the next.
Chapter 3 - The Menu Bar
SAVE FILE &
SAVE AS FILE
(FILE MENU)
Selecting Save from the File menu will save your recent changes to the file. If a file has not been
saved before, a Save As dialog will display for you to name the file on the storage device (typically the
hard disk).
You can also choose Save As for a file that has already been saved. This will allow you to save
another copy of the drill file with a new name. This is a great way to keep copies of earlier versions of
a file should you choose to go back for some reason. To keep your file versions straight we recommend you rename the file by adding a number to the end of the name such as: opener01, opener02
opener03...
This is the dialog that appears for Save As:
“Drill files in” shows the directory on the storage device that is
displaying in the file list. Browse
will change the directory shown in
the list.
The drill file list contains drill files,
drill packages and folders.
Clicking on any of them and clicking Save will save the file to the
location in the list.
The Go To Drills Directory will
show the list of drill files in the
default drill files directory.
The Go Up One Directory will
move up one directory from any
sub-folders found in the default
drill files directory.
The Save Options contain
options available for the type of
file that is being saved.
3D Interactive Package is a
package that contains not
only the standard 3D Drill file
but also contains any audio
and picture files used within the drill file. The files that can be included are optional as well. They
are:
Include Audio File
Include Drill File
Include Props
Include Floor Cover
3D Drill File is a standard drill file that includes no picture files for props or floor covers. It also
does not include the audio file if an audio file was used within the drill.
Compatability (Interactive and Professional Only): Unless otherwise specified, drill files will save
with a version 5 compatibility. Any user with any edition of Version 5 will be able to open these files. To
share a file with a user that has an older version of 3D (3D Java versions 1-4), you would need to save
57
Chapter 3 - The Menu Bar
as “v.4 compatbility”. Newer features (any information input in the Production Sheet, preset camera
angles in Perspective View, performers marked with the Set Reference Tool) will not be saved with the
version 4 compatibility.
All Version 5 Basic Edition files are saved as Version 5 Compatibility.
BACKUP
(FILE MENU)
This function is used to backup the currently opened drill file. The backup is saved in the default backup files directory. Selecting Backup from the File menu will display:
Backup Options opens the Application Options dialog to the Backup tab where you can change the
default backup directory as well as other backup options. See Application Options for details.
With a computer, bad disks, damaged files, computer lock-ups and hard disk crashes are facts of life.
Although these occurrences are few and far between, they inevitably seem to happen to everyone at
least once. Take the precautions mentioned below and your drill designing days will be virtually trouble
free.
• To prevent losing large amounts of work, it is advisable to create a separate file for each drill segment (opener, production, closer). Smaller files will also speed up animation and at times, solve certain printing problems.
• Your time and effort is very valuable. We suggest saving every fifteen minutes when working on a
file. Nothing is more frustrating than losing drill because you did not save your work. It is easy and
takes very little time. Just select Save from the File menu.
• Work from the drill files that you have stored on your hard drive, however, also put your drill files on
disk (or CD) and store them. Keep copies on both hard disk and floppy disk (or CD). Hard drive
crashes can completely wipe out your entire drill design library as well as other important files stored
on the computer. Floppy disks and CDs can get damaged too. Never keep your files in only one
location.
• Make quick hard drive backups by choosing Save As from the File menu and changing the name of
the file. One common method of making backups is by ending a file name with a number such as 01
and then incrementing the number for each backup. For example: Name your opener “Opener01”.
Then after an hour of work, choose Save As and change the name to “Opener02” and so on. The
name with the largest number is the most current and all others are older at one hour increments.
This makes it easy to go back to earlier versions. After you have collected several copies, start deleting the oldest ones, and occasionally move copies to floppy or CD.
• Use the Backups section of the Application Options found in the File menu. Check “Always
backup after using Save”.
58
Chapter 3 - The Menu Bar
REVERT TO
SAVED
(FILE MENU)
PRINTING
(FILE MENU)
This function throws out all changes since the last time the file was saved and re-loads the previously
saved file.
There are four print functions found under the File menu. These function are covered in detail under
Chapter 8 - Printing. The functions are:
Print Charts
Print Coordinates
Print Cast Sheet
Print Cover Sheet
59
Chapter 3 - The Menu Bar
DOCUMENT
OPTIONS
(FILE MENU)
PROPERTIES
TAB
This function is used to change the properties and preferences of a particular file. For example,
through this function you can change a file’s symbol font, file locking properties, copyright information,
and file title. To display the Document Options, select Document Options from the File menu.
The Properties tab contains settings that are the file characteristics which define the use of a file
you are creating. There is a section for typing your author information and copyright. You can
set the file up to be an un-editable file for use as a demo. The properties can be changed and then
locked with a Master password. This is useful if you would like to distribute your drill file but make it
operate only as a demo. Its value is most seen on the Internet. You can create a drill file, put a company name and contact number in the file that displays when the file is opened, restrict its use for
only previewing, and post it on your web site for sale or upload the file to your Pyware account.
Anyone can download your file for preview. Should they want to purchase your drill, you can unlock
their copy of the file for use by giving the customer a key that only works one time.
The professional designer can implement this feature to market his services.
60
Chapter 3 - The Menu Bar
EXTERNAL
FILES TAB
PREFERENCES
TAB
61
The External
Files tab lists prop
image files and
audio files being
used by the drill.
Preferences tab
contains settings
that define the
characteristics of
the file you are
working in.
Chapter 3 - The Menu Bar
• Drill Title is the title that is used when printing. If this title is left blank then printouts will use the
name the file was saved as.
• Symbol Font is the font used to represent the performers on the field.
• Label Font is the font used to label (or number) the performers on the field.
• Default label position is the location of a label that appears next to a performer symbol on new
formations.
• Default Interval is the interval first entered into a drawing tool control panel to determine the
spacing between performers in a shape. This is just the initial value and can be changed while
using a drawing tool. Its default is 2 steps. You may want to change it if you find you consistently use an interval other than 2.
• Audio File is the music file that contains music you wish played during animation of the drill.
TIP - Entering music before writing the drill provides an excellent musical reference during the
“creating process”.
TIP - Add a “count off” to the music implementing either your notation, sequencing, or audio editing software.
A drill file can be synchronized to one of three types of sound files: (MID=MIDI, WAV=audio
wave file, OGG=audio file. To set up an audio file for use with a drill file, do the following:
1) With a drill file opened, select the Preferences section of Document Options of the File
menu.
2) Click Choose File for the audio file and select an audio file.
3) The next time you click ON the animate with music button, you will be instructed to synchronize the music to the drill.
• Animation Fixed Tempo is used to set the speed of the animation that is played with no music.
APPLICATION
OPTIONS
(FILE MENU)
EASE OF
ACCESS
This function is used to change the preferences of
the 3D application. Preferences such as: Secondary
and New Symbol display size and color, count track
settings, tool palette setup, installation encryption
information.
Ease of Access allows users to customize options
in 3D that would make the program more accessible
for various sizes of monitors and displays.
Toolbar - Select the checkbox to show the toolbar
in its own palette. If this is not selected, then the
toolbar will be a tab on the console.
Tool Button Size adjusts button size on the tool
palette. We recommend moving the slide bar to
“largest” for Whiteboard and touch screen monitor
use.
62
Chapter 3 - The Menu Bar
Orientation - Choosing the “horizontal” or “vertical” radio buttons will switch the direction that the
Toolbar is displayed. You may switch the number of rows the Toolbar has be adjusting the “rows”
number.
Count Track - changes the “count increments” of the count track. Typically showing a number every
8 counts is preferred.
Position Indicators allow you to adjust size and color of both new and secondary count positions. At
low screen resolutions the secondary dots will be larger on the screen, so you may want to draw the
smaller symbols than the default settings. If you are new to 3D, this setting can be changed anytime.
Its usefulness will become easier to understand after using the program.
Adjust the size of Edit Handles by moving the slide bar.
Select the color box to change the color of the Stride Zone, or adjust the slide bar to change transparency.
Reset Prompts & Helpers - Some prompts will appear during the use of the program for the purpose
of providing extra guidance. These prompts could pop up in tools, functions, and options throughout
the program. The prompts will only appear once if the user clicks "Don't display this again." Reset
Prompts & Helpers will reset the "Don't display this again" check box on all of these prompts.
DISPLAY TAB
The Display Tab contains options pertaining to
the appearance of items and windows.
Show Perspective Window in the
Display tab - shows or hides the perspective window. This is useful on slower computers or computers with low RAM.
Unchecking Show Perspective View will
make 3D run faster and with less memory
usage.
Use 3D Figurines (takes a lot of memory)
- shows actual figures with uniforms
defined through the Figurine Editor instead
of the standard pyramid images.
Flash Pace during mark time - when this
is enabled, performers that are “marking
time” will flash yellow during animation. To
disable this flash, remove the check from
the check box.
Show bridges (paths) during preview animation in the Display tab - switches on or off the
matching bridges to help provide a cleaner animation while drawing new forms.
Show Production Sheet - enables the Production Sheet to be displayed in 3D. This is only
available on 3D Interactive and Professional Editions.
Check for Pygraphics messages in the Display tab - checks online for messages from
Pygraphics concerning critical and optional updates and items of possible interest to 3D users.
Reset Window Locations in the Display tab - resets the location of windows and tool palettes to
their default location on the screen.
63
Chapter 3 - The Menu Bar
PLUG-INS TAB
The Plug-Ins tab lists all of the plug-ins that are installed on your installation of Pyware 3D.
3D Plug-in Instant Purchasing information -Selecting this button brings up a new window with pricing and accessibility for purchasing 3D Upgrades and Accessories. A valid Credit Card and internet
access is required to complete the purchase.
Reactivate Plug-Ins - Selecting this button brings up a new window that allows you to reactivate a 3D
Plug-In you have previously purchased. It will be necessary to reactivate your plug-Ins should you
need to reinstall your software.
BACKUPS TAB
64
The Backups tab contains options
for controlling the automatic backup
feature. The Backup Directory is
the location of your backup file folder. Number of backups maintained per drill option changes the
maximum number of copies created.
Always backup after using Save
option turns on or off the automatic
backup feature. When on (checked)
a new backup file is saved every
time you choose Save from the File
menu.
Chapter 3 - The Menu Bar
INSTALLATION
TAB
SYSTEM INFO
TAB
65
The Installation tab contains the encryption information. If you have not entered
your encryption information, the 3D program will function as a demo. The
encryption information is entered the first
time the program is run.
The System Info tab displays System
Information such as the computer’s operating system and versions of the
Java(tm) machine.
Chapter 3 - The Menu Bar
UNDO
(EDIT MENU)
DELETE
(EDIT MENU)
This function will undo the last function of any of the undoable functions. Some are not undoable and
some are. Most edit/maneuvering tools are undoable. Drawing tools are undoable except in one case.
Drawing tools are not undoable when a drawing tool creates performers for the first time, such as
when entering at count 0 of a new file. In order to remove a drawing of new performers, you need to
select the shape with a selection tool such as a Pointer tool, then select Delete from the Edit menu.
You can select the transition or performers to
be deleted by highlighting them with one of your
selection tools, and hitting your <delete> key. A
Delete Options will appear, and you will have
two choices:
Delete Transition resets the transition
between counts X and X (whichever page tabs
your red and yellow anchors are on at the
time) of the selected positions to a "HOLD" (or
Mark Time). After selecting the Delete Transition radio button and clicking the Delete Transition button, you will NOT be prompted to confirm.
Delete Performers permanently deletes the selected positions from the entire drill. Upon selecting the
Delete Performers radio button, then clicking the Delete Performers button, you will be prompted to
confirm the permanent deletion of the marked positions. For your safety, on this window, you cannot hit
<Enter> to confirm the deletion. You must click the Delete button.
COPY
(EDIT MENU)
PASTE
(EDIT MENU)
This function will copy the selected performers into a clipboard for pasting elsewhere. In order for Copy
to be available, you must first select performers to copy. Use one of the selection tools such as the
Pointer tool to select the performers. Then select Copy from the Edit menu.
This function pastes performers that have
been stored in the clipboard with the Copy
function. If nothing is stored in the clipboard the Paste function will be dim.
Select Paste from the Edit menu and the
following will display:
Paste with the same matching order - Pastes the performers into the current count of drill and maintains their same identity (matching order) as the performers they were copied from.
66
Paste with different matching order - This option will only be available if performers were selected
on the currently displayed count prior to choosing Paste. The selected performers will be the performers 3D will try to move (match) the pasted performers into. Matching Controls will display in the right
area of the Paste Control Panel. Matching Controls are used to match the positions of the pasted
shape to their respective performers in the drill. On the field display matching lines are drawn between
the positions of the pasted shape and the selected performers. Often the positions in the line are
matched correctly or simply need to be flipped over to be correct using the Flip button. If more match-
Chapter 3 - The Menu Bar
ing control is necessary, clicking the Clear button will clear all of the matching lines for you to replace
manually. See the end of Chapter 6 Manual Matching for details on manual matching.
Paste as new performers - This option will enter the performers as new performers. This is typically
done at count 0 of the drill. New performers are rarely entered at any other count. The only time you
might want to enter new performers at a count other than count 0 is when you are starting a new drill
by creating your first time performers at set #2 and plan to chart backwards to set #1.
Mirror ing / Less Options - Clicking this button expands the Paste Control Panel to show Mirroring
Options, which allow you to Invert paste shape vertically, horizontally, and across mid stage. This
inverts the copied shape prior to pasting it on the current count of drill.
SELECT RECENT
(EDIT MENU)
SELECT ALL
(EDIT MENU)
SNAP TO
(EDIT MENU)
ADJUST TO
(EDIT MENU)
TOOLS MENU
67
Choosing Select Recent from the Edit menu re-selects the last made selection of performers. If a new
shape is entered, then the performers of that shape will be selected. Double-clicking on the Pointer
tool does the same as Select Recent.
Choosing Select All from the Edit menu selects all performers displayed on the current count of drill.
This function snaps the selected performers to the nearest whole, half or quarter step. Choosing Snap
To from the Edit menu will display the Shape To dialog
where you can choose the snap to resolution.
The Adjuster editing tool is used for quickly moving and/or adjusting performer’s locations and transitions without having to first select the individual performers. See Chapter 7 Adjuster Tool for details.
The Tools menu contains many of the same tools as in the Tools Palette. The tools in this menu are
some of the most used tools. They are found in the Tools menu as another handy way to select tools,
especially through the menu tools shortcuts. Your preference of shortcuts used in the Tools menu can
be changed through the Shortcut Editor of the Utilities menu.
Chapter 3 - The Menu Bar
DISPLAY MENU
The Display menu contains functions which control the way the counts of drill appear on the field.
Many of which are also shown as buttons on the title bar of the Field Display Window and the Console.
These are some of the most used display related tools. They are found in the Display menu as another handy way to change display characteristics, especially through the menu tools shortcuts. Your
preference of shortcuts used in the Display menu can be changed through the Shortcut Editor of the
Utilities menu.
Whole Step option causes the cursor to jump to whole step intervals when entering locations on the
field.
Similarly Half Step, Quarter Step, Eighth Step, Sixteenth Step behave like Whole Step. These options
are also found as buttons in the upper right corner of the Console.
Show/Hide Props switch controls the display of props on the field. This switch is also found on the
right side of the title bar of the Field Display Window.
Show/Hide Labels switch controls the display of labels on the field. This switch is also found on the
right side of the title bar of the Field Display Window.
Show/Hide Text switch controls the display of text on the field. This switch is also found on the right
side of the title bar of the Field Display Window.
Zoom Grid function zooms the display on the field in or out. This function is also found on the right
side of the title bar of the Field Display Window.
Shift Grid function slides the display on the field in any direction. This function is also found on the
right side of the title bar of the Field Display Window.
Center Grid function centers the field back to the middle of the Field Display WIndow. This function is
also executed by clicking on the Shift Grid function while holding the <Alt> key.
Measure function measures the distance between any two points on the field. After selecting measure,
clicking on two points shows the distance in the Console. This continues until the Measure function is
de-selected or the mouse is double-clicked.
Animate function is the same as clicking Animate from the Animation Controls of the Count Track.
Next Page Tab jumps the Red and Yellow Anchors of the Count Track one page tab to the right.
Previous Page Tab jumps the Red and Yellow Anchors of the Count Track one page tab to the left.
First Count jumps the Red and Yellow Anchors of the Count Track to the first count on the track.
Last Count jumps the Red and Yellow Anchors of the Count Track to the last count on the track.
Hide Selection hides the selected performers throughout the drill. This is useful when performers that
you are not currently editing are in the way of performers that you are editing.
Show All sets any performers that you have currently hidden to be visible again.
DRILL
REWRITER
(UTILITIES MENU) The Drill Rewriter is found in the Utilities menu. The Drill Rewriter changes the number of performers in a drill by adjusting the spacing of the shapes within the drill. Performers can be removed or
added to a set and the adjustment is made throughout the drill. See Chapter 9 - Utilities for details.
68
Chapter 3 - The Menu Bar
COUNT EDITOR
(UTILITIES MENU) The Count Editor is found in the Utilities menu. The Count Editor adds or removes counts from a
drill. Counts can be inserted or removed at any place within the drill. This function is most useful to
extend the length of a drill when additional counts are needed at the end of the drill. See Chapter 9 Utilities for details.
CAST LIST
EDITOR
(UTILITIES MENU) The Cast List Editor is found in the Utilities menu. The Cast List Editor is an editor for creating a
customized cast list or importing the cast list from an exhisting drill file. See Chapter 9 - Utilities for
details.
GRID DESIGNER
(UTILITIES MENU) The Grid Designer is found in the Utilities menu. The Grid Designer is an editor for creating customized field grids. You can use this editor to design any type of grid such as winter guard floors, soccer fields and parades. See Chapter 9 - Utilities for details.
PAGE TAB
EDITOR
(UTILITIES MENU) The Page Tab Editor is found in the Utilities menu. The Page Tab Editor is useful for entering page
tab titles. Page tabs are considered sets when printing. If titles are entered, then the title is printed on
the chart. Use this when you want to title a set for clarification. For example, Set #1 could be titled
“Opening Formation” and Set #4 could be titled “Concert Formation”. The Page Tab Editor is also
another way to enter page tabs. Typically, page tabs are entered from the Page Tab Editor button on
the Count Track, however, they can be entered from this editor just as easy. See Chapter 11 - Utilities
for details.
Page tabs can also represent sub-sets. Often a page tab is useful to create a complex transition however you only want to print a chart at the beginning and end of the transition. You can create a subtab. This will prevent the set numbers from incrementing thru the sub-tabs because the sub tabs are
label A,B,C. For example, with two sub-tabs between set 2 and 3 the numbering sequence would be
1, 2, 2A, 2B, 3, 4, etc. You also can choose to print the sub-tabs or not from the Print Charts function.
PRODUCTION
SHEET
Interactive and Professional Editions Only: The Production Sheet allows you to map out you drill
from beginning to end with helpful instructions or notes that can be quickly added to a chart. You may
import any information on the Production Sheet into a Text Box by using the Text Box Tool.
SHORTCUT
EDITOR
(UTILITIES MENU) The Shortcut Editor is found in the Utilities menu. The Shortcut Editor is used to change the shortcuts
assigned to menu items. You can setup shortcut profiles so each user can establish their own preferences for shortcuts. See Chapter 9 - Utilities for details.
69
Chapter 3 - The Menu Bar
HELPER EDITOR
(UTILITIES
MENU)
The Helper Editor allows you to choose which helpers are displayed and which aren’t. If you would
like to turn all helpers off, or if you would like to set a helper to display again, this would be the editor
for you.
FIGURINE
EDITOR(UTILITIES
MENU)
The Figurine Editor is found in the Utilities menu. The Figurine Editor is used to change the uniform
colors and types for the perspective view icons. You can customize the look of the figurines to be the
same as your performers uniforms. See Chapter 9 - Utilities for Details.
INTERACTIVE
MENU
ONLINE FILE
MANAGER
UNLOCK THIS
DRILL
ONLINE USER
FILE ACCESS &
PASSWORDS
DRILL LOCK
DECODER
CHECK FOR
MESSAGES...
This menu contains all of the interactive functions that use the 3D Online Account service as well as
Pyware messages and web sites. See Chapter 11 - Interactive Utilities
This is a utility that uploads and manages files on the online account. See Chapter 12 - Interactive
Utilities.
This is a utility that will allow a user to unlock a locked drill using a key that has been given to them by
the creator of the drill. See Chapter 11 - Interactive Utilities
This is a utility that allows the administrator to create additional users and modify passwords that
access the online account. See Chapter 11 - Interactive Utilities
This is a utility that allows you to create keys to unlock files that have been locked by the creator so
that the master password does not have to be released. See Chapter 11 - Interactive Utilities
The Pyware Message Board is an automated information system that checks with Pygraphics
Headquarters for any important notices such as updates that are currently available for you to download.
3D will check Pygraphics Headquarters for any new updates or important notices that you me be interested in and display the list of messages in the Subject box. If you want to read a message, click on
the message listed in the Subject box and it will display.
PYWARE WEB
SITE
70
Launches your default browser to the Pyware web site.
Chapter 3 - The Menu Bar
FREQUENTLY
ASKED
QUESTIONS
DEAUTHORIZE
THIS COMPUTER
GET PLUG-INS
& ACCESSORIES
INSTANTLY
UPGRADE MY
3D NOW
CONTACT
PYGRAPHICS
ABOUT 3D...
(REFERENCE
MENU)
71
Launches your default browser to the page of Frequently Asked Questions on the Pyware web site.
This function allows the computer 3D is intalled on to be deauthorized so that another machine may be
authorized on the account.
This function allows you to instantly purchase plug-ins and program updates and upgrades online.
This function will allow you to instantly purchase and update or upgrade available for you installed version.
This will launch the Pyware website in your default web browser.
About Pyware 3D is found in the Reference menu. This shows the program version information and
the copyright information. Click on the Licensing Agreement button to view the Licensing Agreement.
Chapter 4 - Drawing Tools
“FIRST TIME”
OR
“TRANSITION”?
Drawing tools can either create shapes consisting of 'first time” performers typically at count 0 of a drill
file, or they can create a shape that is the destination of a “transition” for existing performers.
“First Time“
When the Red and Yellow Anchors of the Count Track are on the same count of drill, the drawing
tools will be accessible on the Tool Palette, and if no performers are selected on the field, the
places in the new shape created by the drawing tool will be filled with first time performers. That
means that the performers of the shape do not yet exist anywhere in the drill. To create a shape of
first time performers the Red and Yellow Anchors must both be set to the same count, and NO performers should be selected on the field at that count when choosing a drawing tool. Only in rare
cases are first time performers entered at any count other than count 0. One case is when it is more
convenient to design at the second set of a drill first, and then chart backwards to count 0.
“Transition”
Typically, on all counts of a drill other than count 0, drawing tools are used to create shapes that
define the end of a transition of existing performers. For example, let’s take a line moving into a circle. The Circle tool will be used to create the destination of the transition from the line. The Red
Anchor will be set to the count of drill where the circle will be drawn. The Yellow Anchor is set to
the beginning of the transition into the circle which is usually the previous page tab. To indicate
which performers on the field are moving into the circle THEY MUST BE SELECTED. In this example, you would select the line using a selection tool, and then choose the Circle drawing tool. After
the circle is created, Matching Lines will connect the new places in the circle with the existing performers of the selected line. These Matching Lines indicate which performers in the line are moving into which new place in the circle.
LINE TOOL
For first time performers, set the Red and Yellow Anchor of the Count Track to the count of drill
where the line is to be entered. For transitions of existing performers into a line, move the Red Anchor
to the count of drill where the line should be drawn. Move the Yellow Anchor to the beginning of the
transition into the new line. This is usually the previous set in the drill. Select the existing performers
that will be moving into the line using a selection tool. See “First Time or Transition?” at the beginning
of this chapter for more explanation.
Clicking on the Line tool will display the
Line Tool Control Panel.
The line is drawn by clicking two points on the field display. The first click will enter the first endpoint
and the second click will be the second endpoint.
While entering the endpoints, the cursor location is displayed in the Console. The resolution of the cursor can
be controlled by the whole, half and quarter, eighth,
sixteenth step switches in the upper right corner of the
Console.
72
Chapter 4 - Drawing Tools
Editing Handles
will appear at the
endpoints of the
line. These handles appear as
small red squares
and can be
dragged to reposition the line by
changing the location of the lines
endpoint.
A Reposition Handle also appears at the midpoint of the line.
This handle is useful for dragging the entire shape to a different location on the field. Drag the inner circle of the
Reposition Handle to move the entire shape. The extended
arm from the center of the Reposition Handle is called the
Rotator and can be dragged to rotate the line to a new location. The Point of Rotation is the center of the Reposition
Handle. To change the Point of Rotation, drag the outer circle of the Reposition Handle to a different place on the field.
In the Line Tool Control Panel, entering
the number of positions in the Positions
box will lock the positions and the line
will maintain the number entered while
you move its editing handles.
Similarly, entering the interval in the Interval box will lock the interval and the line will maintain the
interval while you move its editing handles.
Mixed Intervals are also entered in the Interval text box. This option will allow you to have different
intervals in one form. Sometimes you need to have positions at different intervals in the same shape.
The Mixed Intervals function allows you to easily create forms with multiple intervals. The Mixed
Interval function is built in to each of the drawing tools. The different intervals are entered in the
Interval text box. The Mixed Interval is entered with the interval value, followed by an ‘x’, followed by
the number of places at that interval. The Mixed Interval setting can be entered before or after you
create your shape, but have to be entered before
you Accept the form. For example a line with the
interval of 2 for 6 positions, followed by an interval
of 4 for 4 positions, ending with an interval of 2 for
6 positions will be entered the following way.
Example 2x6,4x4,2x6
73
Chapter 4 - Drawing Tools
This should be entered in the interval text
box as seen below. To enter the Mixed
Interval into a wider text box, hold the <alt>
key while clicking in the Interval box
(<option>-click for Macintosh).
Positions and Intervals can be locked or unlocked by clicking on the respective padlock. When
locked, the value cannot be recalculated by the computer if the size or shape of the form is modified.
Entering a number in the Clone box will clone the line across an axis for 1 clone, or across a point for
two or more clones. The Cloning Handle will be placed in the center of the field and can be moved or
rotated to reposition the cloned lines.
Omit Overlaps will watch for places where performers of a line are on top of other performers in the
drill. The overlapping places in the line will be omitted. Omit Overlaps can watch for either overlaps
involving only performers at the line’s endpoints or overlaps involving any performer anywhere in the
line.
Restrict Horizontal/Vertical forces the second endpoint to a location on the field that is in line horizontally, vertically or 45 degrees diagonally with the first endpoint.
When entering the line as “first time” performers, Symbol and Color is used to enter the symbol and
colors for the new performers entered. Symbol and Color options are only shown for first time performers. To enter a symbol sequence such as X O X O, type the sequence one time. For example XO
will enter symbols X O X O X O through out the line. Clicking on the Color Palette will display color
options for the first time performers. The performer’s symbol and color can be changed for existing
performers using the Labeling tool.
When entering the line as a “transition”, Matching Lines options are used to match the positions of
the line to their respective performers in the drill. Matching Lines options are only shown when a
shape is entered as the destination of a transition from a previous set. On the field display, matching
lines are drawn between the positions in the line and the selected performers of the drill. Often the
positions in the line are matched correctly, or simply need to be flipped over to be correct using the
Flip button. If more matching control is necessary, clicking the Clear button will clear all of the matching lines for you to replace manually. See the next section of this chapter called Matching Lines for
details on matching.
At any time the Animation Controls can be used to preview the line in the drill. Other useful options
that can be accessed during entry of the line are located in the upper right corner of the Field Display
Window. These functions control the field display appearance such as moving or zooming the field,
showing/hiding the text boxes, and showing/hiding the performer labels. Also accessible is the measuring tape.
The Accept button will commit the line into the drill page. Clicking on any tool without clicking Accept
will cancel the line. The line can also be cancelled by moving an anchor on the Count Track.
74
Chapter 4 - Drawing Tools
MATCHING
LINES
When drawing tools are used to create “transitions” of existing performers, you will need to identify (or
match) the new places made by the drawing tool with a selection of existing performers in the drill.
This process is automatically done by 3D and is shown by the matching lines extending from the new
places to the selected performers.
Often the matching order predicted by 3D is correct or may simply
need to be inverted with the Flip
button.
75
Chapter 4 - Drawing Tools
However, sometimes the matching order is not obvious enough for 3D to predict it correctly. 3D sometimes just needs a little help from you to get it started. Other times you may need to enter each of the
matching lines yourself. When 3D has not found the correct matching order, the first thing to do is to
try to give it some help.
• Click the Clear
button to clear
all of the matching lines and a
red bubble will
appear on top of
the first new
place. The red
bubble indicates
the new place
that you will
match to an
existing performer.
• With Predict
Next checked,
click on the
selected performer that you
want moved into
the new place
marked with the
red bubble. A
match line will
connect the performer with the
new place.
76
Chapter 4 - Drawing Tools
• The red bubble
will move to the
next new place.
Again, click on
the selected
performer that
you want moved
into this new
place.
Depending on
the location of
the selected
performer, this
may be enough
matches for 3D
to correctly predict all or some
of the matches.
Sometimes it
may take one or
two more manual matches for
3D to attempt a
prediction depending on the matching order you are entering.
• Sometimes 3D’s prediction starts off well but goes astray. When that happens you can use the Back
button to back up one match at a time. Once you get accustomed to 3D’s prediction logic, you may
find that combinations such as matching partly with Predict Next “on”, then partly with Predict Next
“off”, will accomplish matching with the fewest steps.
When the matching order follows no basic pattern that can be predicted by 3D, it is sometimes easier
to just do the matching manually from scratch.
• Turn off the Predict Next option.
• Click the Clear
button to clear
all of the matching lines and a
red bubble will
appear on top of
the first new
place.
77
Chapter 4 - Drawing Tools
• Click on the
selected performer that identifies the new
place marked
with the red
bubble. A match
line will connect
the performer
with the new
place.
• The red bubble
will move to the
next place in the
new shape.
Matched positions turn green
to indicate they
have been
matched. Click
on the selected
performer that
identifies this
new place.
Repeat this step
for each new
place.
• If you make a
mistake, click
the Back button
to back up one
matched place.
Another way to
correct a mistake is to click
on the matching
line drawn over
the incorrect
performer and
drag the line to
the correct performer.
78
Chapter 4 - Drawing Tools
• The <down arrow> key on the keyboard will advance the red bubble to the next new place.
Likewise, the <up arrow> key will advance the red bubble to the previous new place. After pressing
an arrow key, any matches done afterward will advance the red bubble in the same direction as the
last arrow keypress. Should the <up/down arrow> keys stop responding, click once in the
Positions text box.
At any time during the matching process the Animation Controls can be used to preview the transition in the drill. Other useful functions that can be accessed during matching are located in the upper
right corner of the field display window. They are functions for controlling the field display such as moving or zooming the field, showing/hiding the text boxes, show/hiding the performer labels. Also accessible is the measuring tape.
CIRCLE TOOL
For first time performers, set the Red and Yellow Anchor of the Count Track to the count of drill
where the circle is to be entered. For transitions of existing performers into a circle, move the Red
Anchor to the count of drill where the circle should be drawn. Move the Yellow Anchor to the beginning of the transition into the new circle. This is usually the previous set in the drill. Select the existing
performers that will be moving into the line using a selection tool. See “First Time or Transition?” at
the beginning of this chapter for more explanation.
Clicking on the Circle tool will display the
Circle Tool Control Panel.
The circle is
drawn by clicking two points
on the field display. The first
click on the field
will be the center point of the
circle. The second click will be
the first performer along the
edge of the circle. The remaining performers
will be drawn
counter-clockwise from the
first performer.
Many of the options in the Circle Tool Control Panel are exactly the same as options in the Line tool.
Refer to the Line tool at the beginning of this chapter for details on the Position, Interval, Clone,
Symbol, Color and Matching Line options, as well as Editing Handles and Reposition Handles.
Entering a number in the Data Points will change the number of points in the circle. This is useful to
create different shapes. For example 3 data points creates a triangle, 4 a rectangle, and 5 a pentagon.
The Offset Spacing option will offset the first performer of the circle by half the interval. For example,
this is useful when you want an equal number of performers on each side of a yard line. Place the circle edge handle on the yard line and the performers will be spaced equally on each side of the line.
79
Chapter 4 - Drawing Tools
The Lock to Circle option will create a circle. Turning off this option
will create an oval. When creating an oval there will be two Editing
Handles which are used to define the inner size and outer size of the
oval. Should you want to create the oval rotated, then use the
Rotation Arm of the Reposition Handle located at the center of the
oval.
The First Place at Top of Circle will make the matching order begin at the top of the circle. This is
sometimes useful to make matching of the circle easier.
POINT TOOL
For first time performers, set the Red and Yellow Anchor of the Count Track to the count of drill
where the point (or points) are to be entered. For transitions of existing performers into the point or
points, move the Red Anchor to the count of drill where the points should be drawn. Move the Yellow
Anchor to the beginning of the transition into the new point(s). This is usually the previous set in the
drill. Select the existing performers that will be moving into the point(s) using a selection tool. See
“First Time or Transition?” at the beginning of this chapter for more explanation.
Clicking on the Point tool will display the
Point Tool Control Panel.
Many of the options in the Point Tool
Control Panel are exactly the same as
options in the Line tool. Refer to the Line
tool at the beginning of this chapter for
details on the Clone, Symbol, Color and
Matching Lines options, as well as editing handles and Reposition Handles.
The first click on the field will enter the first point.
The second click on the field is another point and so on....
80
Chapter 4 - Drawing Tools
ARC TOOL
For first time performers, set the Red and Yellow Anchor of the Count Track to the count of drill
where the arc is to be entered. For transitions of existing performers into a arc, move the Red Anchor
to the count of drill where the arc should be drawn. Move the Yellow Anchor to the beginning of the
transition into the new arc. This is usually the previous set in the drill. Select the existing performers
that will be moving into the arc using a selection tool. See “First Time or Transition?” at the beginning
of this chapter for more explanation.
Clicking on the Arc tool will display the
Arc Tool Control Panel.
The arc is drawn by clicking three points on the field display. The first click on the field is the first endpoint of the arc. The second click on the field is the second endpoint of the arc. The third click on the
field is a point along the edge of the arc.
Entering a number in the Data Points will change the number of points in the arc. This is useful to create different shapes. For example 3 data points creates a wedge.
Many of the options in the Arc Tool Control Panel are exactly the same as options in the Line tool.
Refer to the Line tool at the beginning of this chapter for details on the Position, Interval, Clone,
Symbol, Color and Matching Line options, as well as editing handles and Reposition Handles.
81
Chapter 4 - Drawing Tools
CURVE TOOL
For first time performers, set the Red and Yellow Anchor of the Count Track to the count of drill
where the curve is to be entered. For transitions of existing performers into a curve, move the Red
Anchor to the count of drill where the curve should be drawn. Move the Yellow Anchor to the beginning of the transition into the new curve. This is usually the previous set in the drill. Select the existing performers that will be moving into the curve using a selection tool. See “First Time or Transition?”
at the beginning of this chapter for more explanation.
Clicking on the Curve tool will display the
Curve Tool Control Panel.
The curve is drawn by clicking three or more points on the field display. The first click on the field is the
first endpoint point of the curve. The second click on the field continues the curve. The third click on
the field continues the curve and so on with the fourth and fifth. The less points you have on the curve
the smoother it will be. There will be an editing handle at every point entered. You can use these handles to further modify the shape of the curve.
The Del Last button is used to remove the last entered point when creating the curve.
The Del Half button is used to reduce the number of points entered in half by deleting every other
point entered on the field. This is useful if you have too many points to form a smooth curve.
Many of the options in the Curve Tool Control Panel are exactly the same as options in the Line tool.
Refer to the Line tool at the beginning of this chapter for details on the Position, Interval, Clone,
Symbol, Color and Matching Lines options, as well as editing handles and Reposition Handles.
82
Chapter 4 - Drawing Tools
FREE FORM
TOOL
For first time performers, set the Red and Yellow Anchor of the Count Track to the count of drill
where the Free Form shape is to be entered. For transitions of existing performers into a free form
shape, move the Red Anchor to the count of drill where the free form shape should be drawn. Move
the Yellow Anchor to the beginning of the transition into the new shape. This is usually the previous
set in the drill. Select the existing performers that will be moving into the free form shape using a
selection tool. See “First Time or Transition?” at the beginning of this chapter for more explanation.
Clicking on the Free Form tool will display the Free Form Control Panel.
The free form is drawn by clicking points on the field display. The first click on the field is the first endpoint of the free form. The second click on the field places an editing handle at the second point of
the free form shape. By continuing to click on the field you add more editing handles that extend the
shape. You can draw continuously by holding the mouse button while moving the mouse across the
field.
This option allows you to adjust the frequency that new editing handles (red box) are added to a shape
while drawing. For example, if you input "2" in the Edit Handle Spacing box, while using the Free
Form (Pencil) Tool, an editing handle will appear every two yards on the shape you create.
The Del Last button is used to remove the last entered point when creating the free form.
The Del Half button is used to reduce the number of points entered in half by deleting every other
point entered on the field. This us useful if you have too many points to form a smooth shape.
The Smooth Shape button will smooth the form that has been created to a more fluid form.
Many of the options in the Free Form Tool Control Panel are exactly the same as options in the Line
tool. Refer to the Line tool at the beginning of this chapter for details on the Position, Interval, Clone,
Symbol, Color and Matching Lines options, as well as editing handles and Reposition Handles.
83
Chapter 4 - Drawing Tools
FILL TOOL
The Fill tool creates filled shapes. The shapes can have any number of sides. Typically, the Fill tool is
used to fill rectangles and triangles.
For first time performers, set the Red and Yellow Anchor of the Count Track to the count of drill
where the Filled shape is to be entered. For transitions of existing performers into a block, move the
Red Anchor to the count of drill where the block should be drawn. Move the Yellow Anchor to the
beginning of the transition into the new shape. This is usually the previous set in the drill. Select the
existing performers that will be moving into the free form shape using a selection tool. See “First Time
or Transition?” at the beginning of this chapter for more explanation.
Clicking on the Fill Tool will display the
Fill Tool Control Panel.
The fill is created by clicking three or more points on the field display. In this example, the first click on
the field is the first point of the first side of a multi-sided block. The second click on the field finishes
the first side and starts the next side and so on. A fill form can have as many sides as you prefer.
Entering a value in Positions will lock the positions box to the value entered. If both of the Horizontal
and Vertical boxes are locked, one will be unlocked automatically in order to adjust the intervals to
maintain the value entered for positions. If the shape of the block is such that the positions value can
not be maintained with reasonable intervals a message will appear above the Accept button in the
Control Panel.
Entering a value in both Horizontal and Vertical intervals will unlock (if locked) the positions value.
The value in the positions box will be calculated to maintain the intervals entered.
84
Chapter 4 - Drawing Tools
The Stagger option will stagger the spacing of each row in the
block.
Show Bridges shows the matching lines when a block is entered as a “transition”. Since blocks are
rows and columns of new places, the bridge lines can clutter the display.
Del Last will remove the last editing handle entered.
Many of the options in the Fill Tool Control Panel are exactly the same as options in the Line tool.
Refer to the Line tool at the beginning of this chapter for details on the Position, Interval, Clone,
Symbol, Color and Matching Lines options, as well as editing handles and Reposition Handles.
BLOCK TOOL
The Block Tool quickly creates block and rhombus shapes from user defined lines. To open the Block
Tool, select the tool from the Tool Palette. This will open the Block Tool Control Panel.
Using the Block Tool is quite simple. In the example above, let’s say we want a 64 performer block.
Enter the number of performers you would like for one side of the block (since we want 64 performers,
this would be 8) in the Control Panel in the P1 to P2 box. Do the same for the second side (once
again, this would be 8) in the P1 to P3 box. Click three positions (these will also be the Edit Handles
of your Block) on the grid. The first click would be P1, the second click P2, then finally P3. The Block
Tool will automatically create a block based off of the numbers you input for the sides, and where you
clicked on the field. You may adjust size by maneuvering one of the Edit Handles, or location by moving the Reposition Handle.
Many of the options in the Block Tool Control Panel are exactly the same as options in the Line tool.
Refer to the Line tool at the beginning of this chapter for details on the Interval, Clone, Symbol, and
Color options, as well as Editing Handles and Reposition Handles.
85
Chapter 4 - Drawing Tools
BEZIER CURVE
TOOL
For first time performers, set the Red and Yellow Anchor of the Count Track to the count of drill
where the bezier curve shape is to be entered. For transitions of existing performers into a block, move
the Red Anchor to the count of drill where the curve should be drawn. Move the Yellow Anchor to
the beginning of the transition into the new shape. This is usually the previous set in the drill. Select
the existing performers that will be moving into the free form shape using a selection tool. See “First
Time or Transition?” at the beginning of this chapter for more explanation.
Clicking on the Bezier Curve tool will display the Bezier Curve Control Panel
The curve is drawn by clicking two or more points on the field display.
The first click on the field is the first endpoint point of the curve. The
second click on the field develops the curve initially as a line. The
ends of the line have editing handles.
Dragging the red square in the editing handle will move the endpoints.
Dragging the red circle extending from the square handle will
shape the curve.
Many of the Bezier Curve tool options are exactly the same as options in the Line tool. Refer to the
Line tool for details on the Position, Interval, Clone, Symbol, Color and Matching Lines options, as
well as editing handles and Reposition handle.
86
Chapter 4 - Drawing Tools
POLYGON TOOL
The Polygon tool operates like the Circle tool to create outlined polygon shapes.
For first time performers, set the Red and Yellow Anchor of the Count Track to the count of drill
where the polygon shape is to be entered. For transitions of existing performers into a polygon, move
the Red Anchor to the count of drill where the polygon should be drawn. Move the Yellow Anchor to
the beginning of the transition into the new shape. This is usually the previous set in the drill. Select
the existing performers that will be moving into the free form shape using a selection tool. See “First
Time or Transition?” at the beginning of this chapter for more explanation.
Clicking on the Polygon tool will display
the Polygon Tool Control Panel
The Polygon tool operates similar to the Circle tool. Use the Sides text box to enter the number of
sides in the polygon. Many of the options in the Polygon Tool Control Panel are exactly the same as
options in the Line tool. Refer to the Line tool at the beginning of this chapter for details on the
Position, Interval, Clone, Symbol, Color and Matching Lines options, as well as editing handles
and Reposition Handles.
87
Chapter 4 - Drawing Tools
SPIRAL TOOL
The Spiral tool creates spirals of any number of loops.
This tool is purchased separately as an optional Plug-in.
For first time performers, set the Red and Yellow Anchor of the Count Track to the count of drill
where the spiral shape is to be entered. For transitions of existing performers into a spiral, move the
Red Anchor to the count of drill where the spiral should be drawn. Move the Yellow Anchor to the
beginning of the transition into the new shape. This is usually the previous set in the drill. Select the
existing performers that will be moving into the free form shape using a selection tool. See “First Time
or Transition?” at the beginning of this chapter for more explanation.
Clicking on the Spiral tool will display the
Spiral Tool Control Panel.
Loops sets the number of times the spiral will loop.
Reverse changes the direction of the spiral.
Many of the options in the Spiral Tool Control Panel are exactly the same as options in the Line tool.
Refer to the Line tool at the beginning of this chapter for details on the Position, Interval, Clone,
Symbol, Color and Matching Lines options, as well as editing handles and Reposition Handles.
88
Chapter 4 - Drawing Tools
THIS
89
PAGE IS INTENTIONALLY BLANK.
CHAPTER 5 - Selection, Adjustment & Regrouping Tools
Many tools used to design a drill work with existing shapes. For example, a Push tool is used to move
a formation across the field as well as create a transition from the previous location. In order to use
the Push tool, one must select the performers that will be pushed. That process is called “selection”
and is accomplished using Selection tools. Typically you would use the Pointer selection tool to click
on the shape that you want to push and the shape would become highlighted. Then, you would click
on the Push tool to perform the maneuver. This chapter covers using the Selection tools: Pointer
tool, Box Select tool, Lasso tool, Select By Profile tool.
Other tools in this chapter include the Pace tool, Spotlight tool, and Facing tool. With the Pace tool
you can change the pace of performers moving in a transition. For example, you can set the pace of
performers moving across the field to double time. You will also find a Spotlight tool which is used to
select a single performer, who will be highlighted with a spotlight throughout a drill. With the Facing
tool users are able to create a more realistic feel for your students by enabling you to show the direction that the performer is facing. With this tool it will now be easier to see a more realistic representation of the show in the perspective view while using the figurines.
Sometimes cutting a shape into smaller pieces or combining two or more shapes into one large shape
is useful. For example, imagine an arc splitting into thirds and each third floating into one of three
lines. To make the editing easier, we would first want to split the arc into three parts. That can be done
using the Knife tool. After cutting the arc, we can select one part of the arc independently of the others. We would then select the first part of the arc and morph it into a line, and repeat the process for
the remaining parts. The process of splitting and combining performers is called “regrouping” and is
done using the Regrouping tools. This chapter covers using the Regrouping tools: Knife tool and
Glue tool.
Adjustment tools are used to make quick adjustments in the transition and placement of formations.
You will find in this chapter the following Adjustment tools: Snap To, Adjust To.
90
CHAPTER 5 - Selection, Adjustment & Regrouping Tools
POINTER
SELECTION
TOOL
The Pointer Selection tool is the basic tool for selecting shapes. This tool is used to quickly select all
of the performers of a shape. The Pointer Selection tool only selects whole shapes. In other words,
when you use the Pointer Selection tool you will get ALL of the performers in a shape. If you only
want to select a portion of the performers in a shape other selection and regrouping tools will be used.
To select the Pointer Selection tool, click
on the Pointer tool on the Tool Palette or
click the right mouse button.
Clicking on a shape on the field will select all of the performers of the shape. When only one shape is
selected, the Console will display the Average Interval of the selected shape in steps.
To add another shape to the selection, hold the <Shift> key down and click on another shape.
Similarly, to remove a shape from the selection, hold the <Shift> key down and click on a selected
shape.
Following are several valuable time saving shortcuts using the Pointer tool:
1) Double-clicking on the Pointer tool on the Tool Palette is the same as choosing Select Recent
from the Edit menu.
2) Right clicking on the mouse is the same as clicking on the Pointer tool in the tool palette.
3) With the Pointer Selection tool activated, dragging across performers on the field selects all of the
shapes that have performers found within the drag region.
Even if you only catch one performer within the
drag region, the entire shape that the performer
is a member of is selected.
91
CHAPTER 5 - Selection, Adjustment & Regrouping Tools
4) If the Pointer tool is not selected on the Tool Palette, dragging with the right mouse across performers does the same as left click and drag.
5) Holding down the <Shift> key while dragging across performers will add the shapes of the performers falling inside the drag region to the selection.
6) Clicking on the field but not on a performer clears the selection.
BOX SELECTION
TOOL
The Box Selection tool is used to select a group of performers by dragging a selection box around the
performers. Unlike the Pointer Selection tool where whole shapes are selected, the Box Selection
tool is capable of selecting portions of a shape. When using the Box Selection tool all of performers
that are included in the boxed area (drag region) are selected.
To select the Box Selection tool, click on
the Box Selection tool on the Tool
Palette.
With the Box Selection tool selected, clicking and dragging a boxed region around the performers will
select the performers inside the drag region.
92
CHAPTER 5 - Selection, Adjustment & Regrouping Tools
Holding down the <Shift> key while dragging the the boxed region around unselected performers adds
the performers to the selection. Likewise, holding down the <Shift> key while dragging around selected performers removes them from the selection.
Clicking on the field but not on a performer clears the selection.
LASSO
SELECTION
TOOL
The Lasso Selection tool is used to select a group of performers by drawing a line around the performers. Unlike the Pointer Selection tool, the Lasso Selection tool is capable of selecting portions
of a shape. When using the Lasso Selection tool all of the performers found within the lasso region
are included in a selection.
To select the Lasso Selection tool, click
on the Lasso Selection tool on the Tool
Palette.
Clicking and dragging a line around the performers
will select them.
Holding down the <Shift> key while dragging the line around unselected performers adds the performers to the selection. Likewise, holding down the <Shift> key while dragging a line around selected
performers removes them from the selection.
Clicking on the field but not on a performer clears the selection.
93
CHAPTER 5 - Selection, Adjustment & Regrouping Tools
SPOTLIGHT
TOOL
The Spotlight Selection tool is used to select and highlight a position to help a performer watch their
movement while animating a drill.
To select the Spotlight tool, click on the
Spotlight tool on the Tool Palette and the
Spotlight Tool Control panel will display.
To spotlight a position, you can either type in the positions Name, Symbol, and/or Label.
There are options that allow you to see the bridges or paths that the positions will take to go to their
next location. The No bridges option will not display bridges or paths. Bridge spotlight will display
the spotlighted position’s bridge or path. Bridge All will show bridges or paths of all positions visible on
the design grid. Clear removes the spotlight from the display and resets the Spotlight Tool Control
Panel.
94
CHAPTER 5 - Selection, Adjustment & Regrouping Tools
PROFILE
SELECTION
TOOL
The Select by Profile tool is for selecting performers by Color, Label, Symbol, or Name. This tool is
used to quickly select groups of performers with similar characteristics.
To select the Profile Selection tool, click
on the Profile Selection tool on the Tool
Palette and the Profile Selection
Control Panel will appear.
To use the Profile Selection Control Panel:
• Click on the characteristic you want to use
when searching for performers you want to
select (or deselect). For example, if all of the
performers you want selected are drawn in
purple symbols, then you will click on the
Color characteristic to search by color.
Another example, if all of the Trumpets are
the symbol “T”, then click the Symbol characteristic to search by symbol.
• After selecting the characteristic, enter a
search value in the Search for... box. The
performers matching that characteristic value
will be highlighted with red boxes. As a
shortcut, you can also just click on a performer on the screen that has that search
value and it will be entered for you. For
example, if searching for a characteristic of
Color, if you click on a red performer all of
the red performers will be highlighted.
• If the highlighted performers (performers in red boxes) are performers that you want to include in the
selection, click Include. The selection will be modified. All performers in the selection will be
marked with a red dot.
• You can repeat the process of picking a characteristic, entering a characteristic value, then clicking
Include (or Exclude).
• The buttons Include, Exclude, All, Clear are used to modify the current selection with the highlighted performers.
95
Include
Exclude
All
Clear
will
will
will
will
include the highlighted performers in the current selection.
remove the highlighted performers from the current selection.
add all performers to the current selection.
remove all performers from the current selection.
CHAPTER 5 - Selection, Adjustment & Regrouping Tools
You can use combinations of these buttons to modify your selection.
For example, let’s say you want to select all Trumpet players. Let’s assume the Trumpet and
Trombone players are both labeled T1, T2, etc. Also, the Upper Brass are colored Red and the
Lower Brass are colored Blue. If we search by labels starting with T we will get the both Trumpets
and the Trombones. Likewise, if we search for Upper Brass we will get all the Upper Brass instruments including the Trumpets. Here is the solution:
1 Search for Labels starting with “T” to highlight both Trumpets and Trombones.
2 Click Include to include both Trumpets and Trombones in the selection.
3 Search for performers with Color of “Blue” to highlight the Trombones as well as the other Lower
Brass instruments.
4 Click Exclude to remove the Lower Brass instruments from the current selection, therefore leaving only the Trumpets selected.
GLUE TOOL
The Glue Regrouping tool is used for combining two or more shapes into single shapes. For example,
imagine three lines floating into a curve. To make the editing easier, we would first want to glue the
three lines into a single shape using the Glue tool. After gluing, we can select all three lines at one
time as a single shape. We would then simply morph the selection into a curve.
To select the Glue tool, click on the Glue
tool and the Glue Tool Control Panel will
display.
The Glue Tool Panel behaves differently from other tool panels. By default, there is no active Accept
button. Every glue with the glue tool is accepted without having to click the Accept button. This is usually preferred because the Glue tool is used quite frequently for single glues. Requiring the click of the
Accept button would simply add an unnecessary step. However, if you want to make the Glue Tool
Control Panel behave like typical 3D Control Panels, click off the “Accept each change and stick
around.....” option. When the option is off, the Accept button will be available and if not clicked when
you are finished gluing, then no changes will occur.
To perform a glue between two highlighted
shapes, click on the performers on each
end of the two shapes.
96
CHAPTER 5 - Selection, Adjustment & Regrouping Tools
The Glue tool can be switched to the Knife tool by clicking on the Knife option and vice-versa.
Regroup All button will break all of the performers in the highlighted shape(s) into individual points.
After the performers are broken up, you can reconnect the performers in a different order. Normally
this is not used when all of the shapes of a
page are highlighted. To highlight a smaller
group of performers, select the group prior
to clicking on the Glue tool. The Regroup
All option is commonly used to change the
grouping order of block shapes as shown.
Apply Pattern is available when only one shape is highlighted. To highlight a single shape, use the
Pointer tool to select the shape prior to clicking on the Glue tool. To use Apply Pattern, select a pattern from the pop up menu, and click Apply Pattern. The “AB” pattern will regroup a shape where
every other performer becomes a member of the first new shape and the remaining performers
become members of a second new shape. It is difficult to see any change on the field display. The first
new shape is almost directly over the second new shape.
Divide Into allows you to divide the selected shape into Halves, Thirds, Quarters, Pairs, Groups of
4, 6 or 8. Select the appropriate grouping you wish to apply from the drop down menu, then select
Divide Into. If the "Accept each change and stick around" checkbox is not checked, the new grouping will not take effect until you select the Accept button.
The Find Next button will find the next person in the direction the form has begun to be glued and
then glue it to the end of the section. This function allows you to continue gluing a continuous line or
form without requiring every position to be clicked on individually.
The Undo Last button will undo the last glue that was performed.
Revert button reverts the grouping order to its initial order.
KNIFE TOOL
The Knife Regrouping tool is used for cutting a shape into smaller pieces. For example, imagine an
arc splitting into thirds and each third floating into one of three separate lines. To make the editing easier, we would first want to split the arc into three parts using the Knife tool. After cutting, we can select
one part of the arc independently of the others. We would then select the first part of the arc and
morph it into a line, then repeat the process for the remaining parts.
To select the Knife tool, click on the Knife
tool and the Knife Tool Control Panel will
display.
97
The Knife Tool Panel behaves differently from other tool panels. By default, there is no active Accept
button. Every cut with the knife is accepted without having to click the Accept button. This is usually
preferred because the Knife tool is used quite frequently for single cuts. Requiring the click of the
Accept button would simply add an unnecessary step. However, if you want to make the Knife Tool
Control Panel behave like typical 3D Control Panels, click off the “Accept each change and stick
around.....” option. When the option is off, the Accept button will be available and if not clicked when
you are finished cutting, then no changes will occur.
CHAPTER 5 - Selection, Adjustment & Regrouping Tools
To perform a cut on a highlighted shape, click
on the performers on each side of the cut location.
Regroup All button will break all of the performers in the highlighted shape(s) into individual points.
After the performers are broken up, the tool will switch to a Glue tool for re-connecting the performers
in a different order. Normally this is not used when all of the shapes of a page are highlighted. To highlight a smaller group of performers, select the group prior to clicking on the Knife tool. The Regroup
All option is commonly used to change the grouping order of block shapes as shown.
Apply Pattern is available when only one shape is highlighted. To highlight a single shape, use the
Pointer tool to select the shape prior to clicking on the Knife tool. To use Apply Pattern, select a pattern
from the pop up menu, and click Apply Pattern. The AB pattern will regroup a shape where every
other performer becomes a member of the first new shape and the remaining performers become
members of a second new shape. It is difficult to see any change on the field display. The first new
shape is almost directly over the second new shape.
Divide Into allows you to divide the selected shape into Halves, Thirds, Quarters, Pairs, Groups of
4, 6 or 8. Select the appropriate grouping you wish to apply from the drop down menu, then select
Divide Into. If the "Accept each change and stick around" checkbox is checked, the new grouping
will not take effect until you select the Accept button.
The Undo Last button will undo the last knife that was done.
Revert button reverts the grouping order its initial order.
98
CHAPTER 5 - Selection, Adjustment & Regrouping Tools
SNAP TO
EDITING TOOL
This function snaps the selected performers to the nearest
whole, half or quarter step. Choosing Snap To from the
Edit menu will display the Snap To dialog where you can
choose the snap to resolution.
TIP - This is often used to firm up the positions of a block
formation where all performers are at some whole step
interval from each other.
ADJUST TO
EDITING TOOL
The Adjust To editing tool is used for quickly moving and/or adjusting
performers in shapes and transitions without having to first select the performers.
To use the Adjust To function:
• On the Count Track move the Red Anchor to the count of drill where the change of path adjustment will stop. Move the Yellow Anchor to the beginning of the transition where the path adjustment
will start (usually the previous set).
• If you want to limit the adjustment function to a number of performers, select them first using one of
the selection tools. This is optional, however, if you don’t select a group of performers, and have a
large drill with a slower computer the function can be sluggish.
• Click on the Adjuster editing tool or select
Adjust To from the Edit menu and the
Adjuster Control Panel will be displayed.
• If any performers were selected when starting the Adjuster tool,
red editing handles will appear over each performer. If you want
to move them all, click and drag on one of the editing handles and
they all will move.
If you want to move only one individual, click Deselect if any performers are selected to remove all of the editing handles, then click
and drag any single performer.
If you want to move a few performers at the same time, while holding <Shift> click on each performer until a red editing handle
appears over each performer you want to move, then drag one of
them. The others will move similarly.
99
CHAPTER 5 - Selection, Adjustment & Regrouping Tools
• To edit individual steps of a performer’s existing path, click Edit
Steps. Editing handles will appear at each step of the selected
performers. If you select more than one performer and edit a step
of one performer, the same step for the others will similarly move.
Since an editing handle appears at each step, it may be necessary
to Zoom in to the area of the performer to drag the handles easily.
Show Paths shows all of the paths of the selected performers or the performer you are adjusting.
This option is sluggish on some slower processors.
Show Symbols shows the symbols of the selected performers while you are adjusting.
Revert removes all changes made while adjusting and starts the Adjust tool over.
Stride and Distance boxes show the current stride and distance of the performer whose location you
are dragging.
PACE TOOL
The Pace tool is used during animation to show a performer moving in double time, half time, or regular time (one step per count). When a performer is marking time, the mark time pace is displayed by
flashing the performer twice per beat for double time, once every other count for half time, once per
beat for regular time, or no flashing at all for performers holding their position.
• Move the red editing anchor to the count of drill where the change of pace will stop. Move the yellow
editing anchor to the beginning of the transition where the change in pace will start (usually the previous set). Select the existing performers whose pace will be changing using a selection tool such as
the Pointer tool.
• Click on the Pace tool and the Pace Control Panel will be displayed.
• Enter the pace change information and click Accept. You can preview the change by clicking on the Play (animation) button prior to
clicking Accept.
100
CHAPTER 5 - Selection, Adjustment & Regrouping Tools
FACING TOOL
The Facing tool enables you to change the performer's facing (or orientation) on the field. This is helpful to see a more realistic approach to what your drill would look like in the Perspective view.
To change the facing of a performer, select the "Face" radio button and click on the compass to determine which angle you would like the performer to face.
To change the facing of a group of performers, select the "Face" radio button and click on the compass
to determine which angle you would like the group of performers to face.
The "Follow direction of movement" button automatically
adjusts the selected performers to face the direction they
are traveling for the entirety of the move.
To toggle facing on or off while designing, select the "Show/Hide facing" button above the console.
SET REFERENCE
TOOL
The Set Reference Tool is used to indicate which performer(s) will be used as a reference point for
adjusting or cleaning drill. To set a performer as a reference point, select the Set Reference Tool from
the Tool Palette.
Highlight a group of performers and select the Set Reference Tool. The Set Reference Tool control
panel will open, and you may click on a performer(s) in the drill to set them as reference points. You
may have as many reference points as you would like.
Reference points will be displayed on the chart with a diamond around them, and their coordinate will
be underlined on coordinate sheet print outs.
101
CHAPTER 6 - Editing & Maneuvering Tools
The tools in this chapter are called Editing/Maneuvering tools. These tools are used to reshape existing shapes displayed at the count indicated by the Red Anchor of the Count Track. However, the
power of these tools go much further than just editing a single count. These tools also create the transition to the count at the Red Anchor from the count at the Yellow Anchor. Typically the count at the
Yellow Anchor is the count of the previous set you have completed.
For example, imagine you are working on Set #2 of your drill. Set #1 of your drill is at count 0 and Set
#2 of your drill is at count 32. The Yellow Anchor is at count 0 and the Red Anchor is at count 32.
Editing/Maneuvering tools will make changes to shapes at count 32 as well as create the transition
between counts 0 to 32.
Editing/Maneuvering tools are always used on existing performers. Therefore, in order to make the
Editing/Maneuvering tools accessible, a group of performers must first be selected on the field.
Performers are selected with Selection tools such as the Pointer tool. See Chapter 5 - Selection &
Regrouping Tools for details.
PUSH TOOL
The Push tool is used to relocate a selected shape in a straight line path from one point of the field to
another without changing the form of the shape.
To establish the counts where the push transition is to begin and end in the drill, set the Red Anchor
on the Count Track to the count where the push transition is to end. This is typically the count of the
set you are currently working on. Set the Yellow Anchor to the count where the push transition is to
begin. This is typically the previous set. (See this chapter’s overview for more details)
After selecting the shape or shapes that
you want to push, clicking on the Push
tool will display the Push Tool Control
Panel.
Editing handles appear on each selected performer. These handles can be
dragged and thus dragging all performers to the final location of the push transition. While dragging the editing handles the location of the cursor is displayed in the Console as well as the
Largest Stride and Largest Distance.
The resolution of the cursor can be controlled by the whole, half and quarter
step switches in the upper right corner of
the Console. The Push Tool Control
Panel also displays the Stride and
Distance.
102
CHAPTER 6 - Editing & Maneuvering Tools
A Reposition Handle will appear in the center of the
selected performers. Dragging the center of the
Reposition Handle is the same as dragging one of the
performer handles. Dragging the Rotator Arm that
extends from the Reposition Handle will rotate the
shape. The point of rotation can be changed by dragging the outer ring of the Reposition Handle to a preferred location.
Use the Arrow Keys to shift and rotate forms easily without having to change tools or use the mouse.
Moving forms with the Arrow Keys (without the <shift> or <ctrl> keys) is disabled in drawing tools,
because this feature is primarily used for matching performers when regrouping. You can, however,
use Arrow Keys to move the form when you have any editing tool open. Simply select the form you
wish to move, select your editing tool, then move the form with your Arrow Keys.
<Shift><Arrow keys> move the center of the Relocation Handle and the selected form one step. This
causes the new positions to shift similarly to the new location.
<Control><Arrow keys> rotate the Relocation Rotation Handle 5 degrees. This causes the new positions to rotate around the Relocation Handle.
Entering a number in the Stride text box will move the editing handles the correct distance to reflect
the new stride.
Entering a distance in yards (or meters) in the Distance text box will move the editing handles to the
distance entered.
Clicking on one of the red dots on the Direction compass will move the editing handles to reflect the
new direction.
Snap to Horz/Vert padlock will snap the handles to the nearest horizontal, vertical, or 45 degree direction.
Mirroring options are available if two or
more shapes are selected. When mirroring, the direction of the shapes can
be set to opposing horizontally, opposing vertically, or opposing both vertically
and horizontally.
Show Symbols will display the position symbols instead of a plain dot.
Reset to Hold - resets the transition to a "Hold" from the secondary count.
Revert button resets the handles to their initial position.
At any time during the entry of the push, the Animation controls can be used to preview the push in
the drill. Other useful function that can be accessed during the entry of the push are located in the
upper right corner of the field display window. They are functions for controlling the field display such
as moving or zooming the field, showing/hiding the text boxes, showing/hiding the performer labels.
Also accessible is the measuring tape.
Clicking the Accept button will commit the push transition to the drill. Clicking on any tool without clicking Accept will cancel the push. The push can also be cancelled by moving an anchor on the Count
Track.
103
CHAPTER 6 - Editing & Maneuvering Tools
ROTATE TOOL
The Rotate tool is used to “gate” a selected shape around a point along curved paths.
To establish the counts where the rotate transition is to begin and end in the drill, set the Red Anchor
on the Count Track to the count where the rotation is to end. This is typically the count of the set you
are currently working on. Set the Yellow Anchor to the count where the rotation is to begin. This is
typically the previous set. (See this chapter’s overview for more details)
After selecting the shape or shapes that
you want to rotate, clicking on the Rotate
tool will display the Rotate Tool Control
Panel.
Editing handles appear on each selected performer. These handles can be dragged and
thus rotating all performers to the final location
of the rotation transition. While dragging the
editing handles the location of the cursor is
displayed in the Console as well as the
Largest Stride and Largest Distance. The
Rotation Control Panel also displays the
angle of rotation.
A Point of Rotation handle will appear in the
center of the selected performers. The point of
rotation can be changed by dragging this handle to a preferred location.
Entering an angle in the Rotation text box will
move the editing handles to reflect the angle
entered.
Mirroring Options are available if two or more shapes are selected. When mirroring, the rotation of
the shapes can be set to rotate on each shape’s individual point of rotation. The rotation can be in the
same or opposite directions.
Show Symbols will display the position symbols instead of a plain dot.
Reset to Hold - resets the transition to a "Hold" from the secondary count.
Revert button resets the handles to their initial position.
At any time during the entry of the rotation, the Animation controls can be used to preview the rotation
in the drill. Other useful functions that can be accessed during the entry of the rotation are located in
the upper right corner of the field display window. They are functions for controlling the field display
such as moving or zooming the field, showing/hiding the text boxes, showing/hiding the performer
labels. Also accessible is the measuring tape.
Accept button commits the rotation to the drill. Clicking on any tool without clicking Accept will cancel
the rotation. The rotation can also be cancelled by moving an anchor on the Count Track.
104
CHAPTER 6 - Editing & Maneuvering Tools
MORPH TOOL
The Morph tool is used to change the form of a selected shape. The transition creates a straight line
path from the original shape to the morphed shape. This is the most widely used tool because it is so
versatile.
To establish the counts where the morphing transition is to begin and end in the drill, set the Red
Anchor on the Count Track to the count where the morph is to end. This is typically the count of the
set you are currently working on. Set the Yellow Anchor to the count where the morph is to begin.
This is typically the previous set. (See this chapter’s overview for more details)
After selecting the shape or shapes that
you want to morph, clicking on the Morph
tool will display the Morph Tool Control
Panel.
Editing handles appear on each selected performer. These handles can be dragged creating
a new shape at the final location. While dragging the editing handles the location of the
cursor is displayed in the Console as well as
the Largest Stride and Largest Distance.
Bridge lines are drawn from the original shape
to the new morphed shape. These lines represent the paths taken by the performers. The
bridge line drawn in red is the performer taking
the largest stride and the Largest Stride is
shown on the Console along with the Largest
Distance.
Initially there is one editing handle per performer in the shape. This is often too many handles to work
with. Editing handles can be removed and added several ways.
Remove editing handles by clicking Fewer will remove half of the handles. Each time Fewer is
clicked the number of handles is cut in half.
Another way to remove editing handles is by
using the cursor to drag a box onto the field
around a group of handles you want removed.
For example, move the cursor just above and to
the left of the second handle in a shape and
drag down to the the location just below the third
handle will remove the two handles.
105
CHAPTER 6 - Editing & Maneuvering Tools
An editing handle can also be removed by clicking directly on the handle while holding down the
<Shift> key. Likewise, to add editing handles to the shape, click directly between two handles while
holding down the <Shift> key.
Curved Shape option will create curved shape between the handles. When the option is off the shape
consists of straight lines between the handles.
Show Bridges displays the bridge lines between the morphing shape and the initial location. The
bridge lines represent the paths of the performers. Turning this option off is useful when there are so
many performers that the bridge lines begin to clutter the screen.
Show Symbols will display the position symbols instead of a plain dot.
Reset to Hold - resets the transition to a "Hold" from the secondary count.
Revert button resets the handles to their initial position.
At any time during the entry of the morph, the Animation controls can be used to preview the morphing shape in the drill. Other useful functions that can be accessed during the entry of the morph are
located in the upper right corner of the field display window. They are functions for controlling the field
display such as moving or zooming the field, showing/hiding the text boxes, and showing/hiding the
performer labels. Also accessible is the measuring tape.
Accept button accepts the morph into the drill. Clicking on any tool without clicking Accept will cancel
the morph. The morph can also be cancelled by moving an anchor on the Count Track.
106
CHAPTER 6 - Editing & Maneuvering Tools
FOLLOW THE
LEADER TOOL
The Follow the Leader (FTL) tool is used to create a new shape resulting from the paths taken by all
positions of the selected shape. The path is determined by the leader of the shape.
To establish the counts where the FTL transition is to begin and end in the drill, set the Red Anchor on
the Count Track to the count where the FTL is to end. This is typically the count of the set you are
currently working on. Set the Yellow Anchor to the count where the FTL is to begin. This is typically
the previous set. (See this chapter’s overview for more details)
After selecting the shape or shapes that
you want to FTL, clicking on the Follow
the Leader tool will display the FTL Tool
Control Panel.
A red dot with a green center appears on one end of
the shape who is designated as the the “leader” of
the Follow the Leader movement. If the other end of
the shape is the preferred “leader”, clicking on the
leader indicator (red dot) and it will change.
If an existing path can be established for the
leader, editing handles will appear along the
path. These handles can be dragged creating
a new path to the final location. While dragging the editing handles the location of the
cursor is displayed in the Console as well as
the Largest Stride and Largest Distance.
If no existing path has been established there
will not be any editing handles visible.
Clicking anywhere on the field will create a
path to that location. An editing handle will
be placed at that location, the path will be
drawn and the performers will fill in place
behind the leader’s new final location.
Each click on the field will extend the path of the leader to the location of each click. A new editing
handle will be added at each location.
107
CHAPTER 6 - Editing & Maneuvering Tools
Clicking on an editing handle while holding down the <Shift> key will remove the handle from the
path. Similarly, clicking along the path between two handles while holding the <Shift> key will insert a
handle into the path.
The Delete Last button shortens the path by removing the last editing handle of the path. This is useful when you inadvertently add an editing handle to the end of the path.
The Fewer button cuts the number of handles in the path in half. Each time Fewer is clicked the number of handles is reduced.
The Curved Shape option will create a curved path between the handles. When the option is off the
path consists of straight lines between the handles.
Show Symbols will display the position symbols instead of a plain dot.
Reset to Hold - resets the transition to a "Hold" from the secondary count.
Revert button resets the handles to their initial position.
Mirroring Options are available if two or more shapes are selected. When mirroring, the path of the
shapes can be set to opposing horizontally, opposing vertically, or opposing both vertically and horizontally.
At any time during the entry of the FTL, the Animation controls can be used to preview the FTL in the
drill. Other useful functions that can be accessed during the entry of the FTL are located in the upper
right corner of the field display window. They are functions for controlling the field display such as moving or zooming the field, showing/hiding the text boxes, and showing/hiding the performer labels. Also
accessible is the measuring tape.
Accept button accepts the FTL into the drill. Clicking on any tool without clicking Accept will cancel
the FTL. The FTL can also be cancelled by moving an anchor on the Count Track.
RESIZE TOOL
The Resize tool is a multipurpose tool for changing the size of a selected group of performers. The
selection can be resized any of the following ways:
Scale - changes the size of the selection in equal amounts vertically and horizontally.
Stretch - changes the size of the selection in differing amounts vertically and horizontally
Slant - stretches the shape while also skewing the shape in horizontal or vertical directions.
Distort - changes the size of the selection in differing amounts in all four directions.
To establish the counts where the resizing transition is to begin and end in the drill, set the Red
Anchor on the Count Track to the count where the resizing is to end. This is typically the count of the
set you are currently working on. Set the Yellow Anchor to the count where the resizing is to begin.
This is typically the previous set. (See this chapter’s overview for more details)
After selecting the shape or shapes that
you want to resize, clicking on the Resize
tool will display the Resize Control Panel.
108
CHAPTER 6 - Editing & Maneuvering Tools
The selected performers are bordered on all
sides by a Resizing Box. The Resizing Box
has editing handles at all four corners that
can be moved.
Dragging the editing handles will manipulate the shape in a behavior based on the resize mode chosen: Scale, Stretch, Slant, Distort. While dragging the editing handles the location of the cursor is
displayed in the Console as well as the Largest Stride and Largest Distance. Bridge lines are drawn
from the original shape to the new resized shape. These lines represent the paths taken by the performers. The bridge line drawn in red is the performer taking the largest stride and the largest stride is
shown on the Console along with the largest distance.
Entering a value in the Scale To text box will uniformly scale the selection by the amount entered.
Show Symbols will display the position symbols instead of a plain dot.
Reset to Hold - resets the transition to a "Hold" from the secondary count.
Show Webbing displays graphically the resizing formula used on the selected group. This is rarely
used, however, can be useful with the Distort mode to understand how the handle movement is distorting the group.
Revert button resets the handles to their initial position.
At any time during the entry of the resizing, the Animation controls can be used to preview the resized
shape in the drill. Other useful functions that can be accessed during the entry of the resize are located in the upper right corner of the field display window. They are functions for controlling the field display such as moving or zooming the field, showing/hiding the text boxes, and showing/hiding the performer labels. Also accessible is the measuring tape.
Accept button accepts the resize into the drill. Clicking on any tool without clicking Accept will cancel
the resize. The resize can also be cancelled by moving an anchor on the Count Track.
109
CHAPTER 6 - Editing & Maneuvering Tools
TRACK TOOL
The Track tool moves a group of performers uniformly along a path. This is not like follow the leader.
The shape of the selection does not change. The entire shape follows the path at the same time as a
group. This is especially useful for pulling a single performer out of a group for solo’s and creating a
path for that performer to take.
To establish the counts where the track transition is to begin and end in the drill, set the Red Anchor
on the Count Track to the count where the track is to end. This is typically the count of the set you are
currently working on. Set the Yellow Anchor to the count where the track is to begin. This is typically
the previous set. (See this chapter’s overview for more details)
After selecting the shape or shapes that
you want to track, clicking on the Track
tool will display the Track Tool Control
Panel.
A red dot will appear on the one of the performers of the selection to highlight it. Clicking
anywhere on the field will start a path from the
highlighted performer to that location. An editing handle will be placed at the location of
the click.
Continuing to click on the field will extend the
path of the selected group to the location of
each click. A new editing handle will be
added at each location clicked.
Clicking on an editing handle while holding down the <Shift> key will remove the handle from the
path. Likewise, clicking along the path between two handles while holding the <Shift> key will insert a
handle into the path.
The Delete Last button shortens the path by removing the last editing handle of the path. This is useful when you inadvertently add an editing handle to the end of the path.
The Fewer button cuts the number of handles in the path in half. Each time Fewer is clicked the number of handles is reduced.
Show Symbols will display the position symbols instead of a plain dot.
Reset to Hold - resets the transition to a "Hold" from the secondary count.
110
Revert button resets the handles to their initial position.
CHAPTER 6 - Editing & Maneuvering Tools
At any time during the use of the Track tool, the Animation controls can be used to preview the
tracked shape in the drill. Other useful functions that can be accessed during the entry of the track tool
are located in the upper right corner of the field display window. They are functions for controlling the
field display such as moving or zooming the field, and showing/hiding the text boxes, showing/hiding
the performer labels. Also accessible is the measuring tape.
Accept button accepts the track into the drill. Clicking on any tool without clicking Accept will cancel
the track. The track can also be cancelled by moving an anchor on the Count Track.
111
CHAPTER 7 - Performer Labeling and Special Markings
This chapter covers Special Tools in the Tool Palette. These tools are:
Performer Labeling for entering the identifying attributes of performers such as their symbol, color,
label (usually a number), and label position.
Text Boxes for placing text directly on a chart (usually for instructions).
Arrow Indicators for clarifying movement in a drill.
Props for placing items (such as stages) on the field.
PERFORMER
LABELING
The Performer Labeling tool is used to change a performer’s identifying attributes. A performer’s
attributes consist of the performer label (usually a number), label placement at a count, symbol and
color used at a count, and performer name.
Some performer attributes do not change throughout the drill. Unchanging attributes consist of a performer’s label and name.
Other performer attributes can change at any count within a drill. Changing attributes are a performer’s label placement, performer’s color and symbol. A performer’s color and symbol are usually
not changed within a drill. However, a possible use for changing the symbol is to indicate a flag
change. Another possible use for changing the color is to indicate a costume change.
The display of a performer’s label can be turned on and off by the Hide/Show Labeling Switch located in the upper right corner of the Field Display window. When the Hide/Show Labeling Switch is
on (depressed), the labels on the count displayed will be shown. Until labels for a performer are
entered with the Performer Labeling tool the performer has no label. When the performer has no
label there is nothing to show and turning the Hide/Show Labeling Switch on or off appears to do
nothing. It is not necessary to turn the Hide/Show Labeling Switch on when using the Labeling tool.
Labels (if any) are always shown while the Labeling tool is active.
After selecting a group of performers
whose labeling attributes you want to
change, clicking the Performer Labeling
tool on the Tool Palette will display the
Performer Labeling Control Panel.
111
CHAPTER 7 - Performer Labeling and Special Markings
A red bubble will appear on top of one of the selected performers. Entering a value in the Label text
box changes the label of the performer marked with the red bubble. If the label value ends in a
numeric value, the [+] [-] Repeat button will be active. Clicking on the [+] button will change all of the
remaining selected performers with an increasing value starting with the number entered in the Label
text box. For example, T1 will generate T2, T3, T4... Likewise, clicking on the [-] button changes all of
the remaining selected performers with a decreasing value.
Entering text in the Name text box changes the name of the performer marked with the red bubble.
Clicking on a red dot in the Position compass will change the position of the labels relative to the location of the symbol assigned each performer.
Contour A will move the labels on each performer to
a position perpendicular to the contour of the shape.
Contour B does the same as Contour A except the
positions are on the other side of the shape.
Alternate follows the contour of the shape but alternates each label position to each side of the shape.
112
CHAPTER 7 - Performer Labeling and Special Markings
The default performer label position can be set. Select Document Options from the File menu. In
the Preferences tab find the option “Default label position.” Choose one of the positions in the list.
All new transitions will initially set the label position to the default label position.
Clicking the [Further] Space button will increase the distance of the label from the shape. Likewise,
the [Closer] Space button decreases the distance.
Entering a character such as X in the Symbol will change the symbol of the performer marked with the
red bubble to the character entered. The Repeat Symbol button will repeat the symbol entered
throughout the selection. Typing a sequence such as ABC will change the symbols in sequence. The
performer marked with a red bubble will be an A. The next performer a B, then C. The sequence will
repeat through the remaining performers.
Entering a color in the Color button will change the color of the performer marked with the red bubble.
The Repeat Color button will repeat the color throughout the selection.
The symbol and color changes can be applied to all counts of the drill or the changes can be applied
only to the counts set between the Yellow and Red Anchors on the Count Track. The option is set
with, “These changes apply to all counts” and “These changes apply to counts xx thru xx.”
Previous and Next will move the red bubble to the previous and next performer of the selected performers. The <up/down> arrows do the same.
Accept button accepts the labeling changes into the drill. Clicking on any tool without clicking Accept
will cancel the labeling changes. The changes can also be cancelled by moving an anchor on the
Count Track.
TEXT TOOL
The Text Tool is used to enter boxes of text directly onto a count of drill. Usually a text box contains
drill instructions for the performers.
Clicking on the Text tool will display the
Text Tool Control Panel.
All existing text boxes (if any) will appear on the screen
with editing handles in the upper left and lower right corner of each box.
113
CHAPTER 7 - Performer Labeling and Special Markings
Clicking on the field and not on any existing text box will create a NEW text box. The location of the
first click will become the upper left corner of the new text box. Move the mouse to a location for the
lower right corner of the new text box. In order to type text inside the box, click in the middle of the
box to place a cursor in the context area for typing.
Clicking and dragging on an editing handle located in the upper left corner of a text box will move the
text box. Similarly, clicking and dragging on an editing handle located in the lower right corner of a
text box will resize the text box.
Clicking in the middle of an existing text box will select the text box and place a cursor in the boxes
content area for typing. A text box is selected if the frame around the box is red. After a text box is
selected, changes made in the Text Box Control Panel will only affect the selected text box leaving
all other text boxes (if any) untouched. If no text box is selected, changes in the options of the Text
Box Control Panel will have no affect on any existing text box, however, any new text box created will
have to be created with the current control panel options.
Contents of a text box can be copied and pasted using <ctrl> c to copy and <ctrl> v to paste. This is
useful to know when the contents of a text box is repeated throughout a drill. For example, often an
instruction box is placed on each set of a drill. Each instruction box has formatted information that is
repeated on each set such as Section #____ Transition ______. This text can be copied and pasted
into a text box at each set.
Font Size [Bigger] and [Smaller] buttons will increase or decrease the size of the font used within the
selected text box.
Framed option will draw a frame around the selected text box.
Transparent option will make the text box transparent. When transparent, the field grid along with any
performers will show through the text box.
Serif option will change the font to a Serif styled font as opposed to the default setting of a SanSerif
style.
Delete button will delete the selected text box. If no text box is selected, the Delete button will do
nothing.
Lists of pre-designed text boxes with text can be created and used though the Templates combo box
located in the Text Tool Control Panel.
Interactive and Professional Editons: When a
Text Box is selected, you may choose to quickly
import a note from Production Sheet by choosing
one of the three Notes button. This will import the
note from your current set in the Production Sheet
to your Text Box.
To use a template, select the template from
the Templates combo box and click Use.
Initially there are no templates in the list, and
only the Edit List.... item will be found.
Adding a template to the list is accomplished
by first creating or selecting an existing text
box with the desired text typed into it. Select
Edit List... from the Templates list to display
the Text Template List Editor.
114
Within the Text Template List Editor, clicking
Add will add the selected (or just created)
text box to the list. Likewise, clicking
Replace will replace the selected template in
CHAPTER 7 - Performer Labeling and Special Markings
the list with the selected text box on the chart. Similarly, clicking Delete will delete the selected template from the list.
Interactive and Professional Editions: Selecting any of the Production Sheet Inserts will quickly
develop a Text Box Template that you may save and use throughout your design process.
Accept button accepts the text changes into the drill. Clicking on any tool without clicking Accept will
cancel the text changes. The changes can also be cancelled by moving an anchor on the Count
Track.
ARROW TOOL
The Arrow tool adds arrow indicators to a chart. Arrows are usually used to indicate direction of
movement within a transition. Arrows can also be used to identify distances between two points.
Typically distances between performers and key places on a field. There is also a center point arrow
which is useful for marking the center point for arcs and circles as well as indicating a distance for the
radius.
Selecting the Arrow Labeling tool in the Tool Palette and the Arrow Labeling Control Panel will display.
Any existing arrows will appear on the screen with editing
handles at each end. Curved arrows will have an additional
editing handle in the middle.
Clicking on an arrow’s editing handle will select the arrow. A
selected arrow is drawn in red. Dragging an editing handle
will reposition the selected arrow.
Clicking on a location on the field that is not on an existing arrow’s editing handle will start the creation of a NEW arrow. The type of the new arrow is defined by
the current settings in the Arrow Labeling Control Panel.
There are three types of arrows: Straight, Curved and Center
Point. Straight Arrow is an arrow formed by a straight line.
Likewise, Curved Arrow is an arrow formed by a curved line.
Center Point arrow is an arrow that represents the radius of a
circle or arc. For a Straight or Curved arrow, the location of the
first click will become one end of the new arrow. A second click
on the field will become the other end of the arrow. For a
Center Point arrow, the first click will be the center point and the
second click will be the circumference. After the arrow is
entered, the settings for the new arrow can be changed.
115
CHAPTER 7 - Performer Labeling and Special Markings
Arrow Heads can be added to either end of the arrow using the Arrow Head options. The length of
the arrow can be placed on the arrow using the Show Length option.
Delete Arrow button will delete the currently selected arrow. The currently selected arrow is the arrow
drawn in red. To select a different handle, click on one of its editing handles.
Accept button accepts the arrows into the drill. Clicking on any tool without clicking Accept will cancel
the arrow changes. The changes can also be cancelled by moving an anchor on the Count Track.
PROP TOOL
A prop is an image such as a stage, wall or pit area. Any jpg or gif image can be used as the prop. All
props are entered at count 0 of the drill. Props can be moved around the field by assigning a performer
to be the carrier of the prop. To control the movement of a prop, you can assign the prop to an existing
performer or create a new performer using the Point tool. To move the prop, use the editing functions
on the performer and the prop will follow the movement of the performer.
Before entering a prop, use to Count Track to move to count 0 of the drill and the Prop tool will be
enabled. Props are always added at count 0, and they exist throughout the drill.
Clicking on the Prop tool will display the Prop Tool Control Panel.
Clicking on top of an existing prop will select the prop for editing. A prop is selected when it is outlined
in red.
Clicking a location anywhere else on the field will start the
creation of a NEW prop. The first click will be the location of
the upper-left corner of the prop. Then move the cursor to
the location for the lower-right corner of the prop and click.
A red box will indicate the location entered.
Editing handles will appear on a selected or new prop.
Dragging the handle in the upper-left corner will move the
location of the prop. Dragging the handle in the lower-right
corner will change the size of the prop.
Clicking on Choose a Prop Image in the Prop Tool
Control Panel will display a file dialog for finding an existing (jpg or gif) image.
Clicking on Prop is carried by a performer in the Prop
Tool Control Panel will cause the prop to move with the
movement of a selected performer. To select the performer
to be the props carrier, drag the upper-left corner of the prop
directly on top of an existing performer. A red bulls eye will
appear on top of the performer to indicate the performer that
will carry the prop throughout the drill. The carrier can be
any performer in the drill, however, usually a new performer
is added to the drill whose only purpose is to carry a prop.
Use the Point tool to add a performer for this purpose.
116
CHAPTER 7 - Performer Labeling and Special Markings
Selecting the performer and editing its movement throughout the drill will cause the prop to move as
well.
The height of the prop can be entered by entering a number in the Height text box. The height is in
yards or meters. If you choose a height above about 2 yards, the performers will move under the prop.
If you choose a height of 0 yards the performers will move on top of the prop. You can create walls by
creating a narrow prop with a height such as 3 yards. Height is measured in meters if the 3D application is setup to work in meters.
Should you transfer the drill file to another computer, you will need to also transfer the prop images
used in your drill. You can save a 3D Drill File as a 3D Package that will include all props used with
the drill into one file. When saving, the package option Include Props must be set. To change the
format of an existing drill file to a 3D Package, choose Save As from the File menu and set the Save
Options.
3D Package files are compatible only with 3D version 2 or greater. Should you need the file to open
on 3D Java version 1, it is best to put the external files in the same folder as the drill. You can determine which images are used in the drill by selecting External Files from Document Options of the
File menu.
117
CHAPTER 7 - Performer Labeling and Special Markings
THIS PAGE IS INTENTIONALLY BLANK.
118
CHAPTER 8 - Printing
PRINTING
CHARTS
With 3D, any count of a drill can be printed. However, one usually only wants printouts at set points.
Charts can be printed by count number or by Set number. Sets are determined by the location of the
Page Tabs on the Count Track. Prior to printing you may want to add or remove certain Page Tabs
from the Count Track so the Sets will printout according to your preference.
Select Print Charts from the File menu and the following preview screen will display.
Print Selection options are used to determine which counts of a drill are printed.
From Page Tab option will print the selected page tabs showing in the Drill book.
Currently Displayed Count option will print the current count displayed. The displayed count is
determined by the location of the red anchor.
Thumbnails per page will print small grids to fill the page. Ideal settings for dotbooks are 8 thumbnails per page in portrait orientation, or 4 thumbnails per page in landscape orientation.
Print Preferences
119
Print all performers black is useful when it is important to make clear black and white reproductions of the printout. You may choose to check this option for color printers because the color symbols will not copy as clear when in color. You may also choose to check this option for black and
white printers because colored symbols will be printed as a shade of gray and also will not copy as
clearly as if they were black. Typically if you plan to reproduce the printouts you will want all of the
CHAPTER 8 - Printing
symbols to be printed black.
Print each performers label determines whether a label is printed (usually a number) beside each
performers symbol. Normally, if labels were entered with the Performer Labeling tool, this option is
checked. However, sometimes when a chart is very cluttered, it is preferred to remove the labels to
make the chart more clear.
Print text option determines whether the text created with the Text tool will be printed on the chart.
The Print text option also determines whether arrow indicators created with the Arrow Labeling
tool will be printed.
Magnify Symbols option will enlarge the symbols and labels printed on the charts.
Thicker grid lines option will print the field grid with thicker lines. This is sometimes useful on laser
printers low on toner. Also, on some printers the grid lines are too thin to reproduce well.
Performer viewpoint (reverse view) will print the charts from the performers perspective.
Mark center of performer locations will place a dot in the center of the positions where the performer will be standing.
Zoom chart for largest printout will print zoomed in charts. The printout will be zoomed in as
much as possible while still keeping the performers in the picture. When selecting this preference,
some options will display for determining which charted items are visible in the printout when
zoomed.
Overlay Set has two options Use Previous and Use Next. When checked, if a chart selection
includes an overlay, Use Previous will print the previous set as a background chart. Likewise, Use
Next will print the next set as a background chart.
Starting Set # will change the starting set number. For example if the first drill ends with page tab 23
the continuation file can begin with page 24.
Shortcuts pull-down menus change the settings in the drill book options in the print charts dialog. The
Print shortcut menu will remove or add
all of the checks from the selection
boxes in the print column. Similarly, the
Overlay shortcut menu will remove or
add all of the checks from the selection
boxes in the Include Overlay column
and the Paths shortcut menu will select
all, none, or mid-point options to print
paths.
Sets and SubSets are derived from the
Page Tabs of the Count Track.
Typically a chart should be printed at each page tab and therefore each page tab is a Set.
Sometimes, however, it is useful to create a page tab at a location where you don’t necessarily need
a printed chart. Such as in a complex transition where you only want to print a chart at the beginning
and end of the transition but you may need a few tabs placed within the transition to make it easier to
create. These “mid-transition” page tabs can be changed to a Sub-Set so the set numbering will be
correct. For example, with two sub-sets between set 2 and 3 the numbering sequence would be 1, 2,
2A, 2B, 3, 4, etc.
The Print column in the table enables/disables the printing of the set.
The Overlay column in the table enabled/disables the printing of a background chart for the set.
The Paths column in the table can be set to None for no paths printed, or All Paths for a dot per step
for every performer, or Path Midpoint for a single dot for each performer marking the midway point to
the next set.
120
CHAPTER 8 - Printing
The Title column in the table can be used to enter a title for the set to be printed along the top of the
printed chart.
Close button will exit the Print Charts window.
Save as Default will save settings of the options from Print Preferences as default values. Print
Selection option will not be saved.
Print/Preview button opens print preview and page setup dialog.
Print will send the job to the printer.
Previous Page will move to the previous preview page of the print job.
Next Page will move to the next preview page of the print job.
Page Setup button opens the printers page setup dialog.
Done button closes the print preview and returns to the print charts dialog.
121
CHAPTER 8 - Printing
PRINTING
COORDINATES
With 3D, coordinates for any count of a drill can be printed. However, one usually only wants coordinates for the set points in the drill. 3D uses the Page Tabs on the Count Track to determine the sets
in the drill. Prior to printing you may want to add or remove certain Page Tabs from the Count Track
so the Sets will printout according to your preference. It is useful to use Sub-Sets on the Count Track
to indicate sets that are used for design purposes but not to print.
Selecting Print Coordinates from the File menu will display the Print Coordinates dialog.
There
are two coordinate Report Type options:
1) Print Performer Coordinate Sheet is a list of coordinates for a performer. The coordinate list
contains a coordinate for each Page Tab location (set) in
the drill.
a)Combine coordinates of all drills in this production
into one list. This option is available when choosing
Print Coordinates while a Production file (or a drill in
a Production file) is currently opened.
b)List Size - This is the size of the printout. This is useful for performers who want lists to be printed in a convenient size for fitting on index cards or small pocket
size for a wallet.
2) Print Director Coordinate Sheet is a list of all performers. The list contains a coordinate for
each performer at a Page Tab (set). A Director Coordinate Sheet can be printed for each Page
Tab in the drill by selecting the Include coordinates for all sets option.
122
CHAPTER 8 - Printing
Performer
Coordinate
Sheet
Director
Coordinate
Sheet
123
CHAPTER 8 - Printing
Coordinates can be printed at four different resolutions: Whole Steps, Half Steps, Quarter Steps and
Eighth Steps.
Print only selected positions is useful for reprinting a single performer or a group of performers.
Select the performer(s) with a selection tool before selecting Print Coordinates from the File menu.
Then check the Print only selected positions option.
Sort performer list by: option sorts the coordinates by one of the following ways: Label and Symbol,
Symbol and Label, Name, Original entry order, or Shape and Rank.
Setting up the Grid Terminology to match the terms commonly used by your performing group will
make the coordinates easier to understand by the performers. For example, on a football field grid the
Left Side of the grid (the left endzone) may be referred to as the North Goal by your performers rather
than the default term Left.
Close button exits the Print Coordinates window.
Save as Default button saves the settings of the Grid Terminology and Preferences as default values.
Print/Preview will open the page setup display then render and display a preview of the coordinate
report according to the settings of the print coordinate report options.
Print will send the job to the printer.
Previous Page will move to the previous preview page of the print job.
Next Page will move to the next preview page of the print job.
Page Setup button opens the printers page setup dialog.
Done button closes the print preview and returns to the print coordinates dialog.
124
CHAPTER 8 - Printing
PRINTING A
CAST SHEET
Whether you have a large band or a small band the cast sheet is a very useful tool. The cast sheet will
display and print all symbols, labels, and names of the performers in the drill.
When you select Print Cast Sheet from the File menu the Cast Sheet Manager will display.
125
CHAPTER 8 - Printing
Print Sort order will sort the names in the cast sheet according to one of the following options: by
Symbol, Label, Name; by order entered; by Name, Symbol, Label; or by Label, Symbol, Name.
The name is entered using the Label Tool or can be entered directly from this dialog, the Cast Sheet
Manager.
The Notes column is just a space on the printout for taking notes on performers during rehearsals.
This feature was added in version 3. If this drill is opened with a version earlier than version 3, the
notes will not be found.
Print all symbols black will print all symbols in the cast sheet black instead of the color defined in the
label function.
Show unlabeled cast members shows all performers (even the performers with no label) on the Cast
Sheet Manager window and in the printout. Hiding unlabeled performers from a printout is useful if
you entered some performers as markers on the field and not actually performers.
Done button exits the Print Cast Manager window.
Save as Default button saves the settings of the Sort order.
Print/Preview will open the page setup display then render and display a preview of the Cast Sheet
report according to the settings of the print cast sheet manager.
126
CHAPTER 8 - Printing
Print will send the job to the printer.
Previous Page will move to the previous preview page of the print job.
Next Page will move to the next preview page of the print job.
Page Setup button opens the printer’s page setup dialog.
Done button closes the print preview and returns to the cast sheet manager.
IMPORT CAST
LIST INFO
Cast list names and labels can be imported from one drill to another. This is very handy when you add
cast list information such as cast member names or labels to a drill after you have finished it. This is
often done if you have purchased a custom or pre-written drill. Before Import you would have to make
the changes to all of the drills in a production (or show). Now you can make changes in the first drill of
a show and then import the changes to the other drills of the production (or show). Typically, you will
want to import into your drill the cast information of the previous drill of the show you are writing.
Usually the formation at the first count of the drill you are editing is the formation at last count of the
drill you are importing from. Import will find the counts with matching formations in both drills, lookup
the name (and/or label) of each performer and then set that name (and/or label) in the drill you are
editing.
• Select Print Cast List from the File menu or Cast List Editor from the Utilities menu and the Cast
List Editor will display.
• Click the Import Names & Labels button located in the lower left corner of the editor and the following dialog will display:
• Click Browse and find the drill whose cast list information you want to import into this drill.
• Select the Cast Member cross reference method.
127
Method 1: Order Entered. Once you have finished a drill file, if you start another drill file using the
“this drill is a continuation of the drill...” then both drills will have performers entered in the
same order. However, should you add new performers later, then the order may no longer be the
same (at least for the newly added performers) and the second cross reference method may give
you better results.
CHAPTER 8 - Printing
Method 2: Matching Set. This scans both drill files and looks for a set whose formations are
exactly the same in both. Then it copies the cast information from one to the other.
• Choose what information you want to import. The information can be cast list name and label. It is
important to remember that the name and/or labels of performers that are found in both drills will be
overwritten in the drill you have opened.
• Click Import to begin the search and copy the cast information into your drill.
• When you click Done from the Cast List Editor, you will be asked if you want to save the changes.
If you do not want the changes saved, you can click No here and nothing will be saved of the import.
PRINTING A
COVER SHEET
The Print Cover Sheet function will
print a cover sheet for the drill book.
When you choose Print Cover Sheet
from the File menu the Print Cover
Sheet dialog will display.
Edit Drill Title will open the Document Options to the Preferences tab so that the title may be
changed.
Edit Author Info will open the Document Options to the Properties tab so that the Author Info may
be changed.
Import 1st page of Notes and Import 2nd page of Notes will allow you to import a text file to have
as notes pages to follow the cover sheet for any additional instructions.
Close will close the Print Cover Manager dialog and return to the design grid.
Print/Preview will open the page setup display, render and display a preview of the Cover Sheet
report according to the settings of the Print Cover Sheet dialog. From the Print/Preview dialog you
can select Print.
128
CHAPTER 9 - Utilities
DRILL REWRITER
The Drill Rewriter is an editor which can add or remove performers from an entire drill file. When a
performer is added or removed, it is often preferred that the intervals of the shapes involved change to
accommodate the added or removed performer. Similarly, when performers are removed it is sometimes preferred that a hole be left in the shape the performer once occupied. This is especially useful
if the shape is a block or filled shape. The Drill Rewrite editor can either adjust intervals or leave
holes. However, the Drill Rewriter goes further than that. The Drill Rewriter can also adjust the transitions of the shapes.
When the Drill Rewriter adds or removes a performer, it looks at each shape where the performer is
involved throughout the drill. If intervals for those shapes need to be adjusted to accommodate the
removed (or additional) performer, only the shapes where the performer resides will be changed. This
section will cover how to ensure only the necessary shapes are changed when intervals change.
For example, you may find that combining two or more shapes into one larger shape may make more
sense when the Drill Rewriter starts adjusting the shape intervals. For example, imagine at Set #3,
two arcs drawn end to end to make an S shape, and a performer we plan on removing is a part of one
of the arcs. If we choose to adjust the intervals to accommodate the removed performer, the arc
where the performer resides will be adjusted, but the other arc intervals will remain unchanged. We
might have preferred that the intervals would adjust across the entire S shape. To make this happen,
we would need to glue the two arcs into a single S shape before using the Drill Rewriter. Now when
the Drill Rewriter looks to see which shape is involved at Set #3, it will find an S shape instead of two
independent arcs.
Sometimes you may find that cutting a shape into a smaller segment may make more sense when the
Drill Rewriter starts adjusting the shapes intervals. For example, imagine we plan on removing a performer who is a part of on outlined box at set #2. If we choose to adjust the intervals of the box, do we
really want the intervals for all four sides to adjust, or do we actually want the intervals for only one of
the sides of the box to adjust? Often, we would prefer only one side to change and the other 3 sides
to stay the same. To make this happen, we would need to cut the box using the Knife tool into 4 lines
before using the Drill Rewriter. Now, when Drill Rewrite looks to see the shape involved at Set #2, it
will find a line instead of a box.
To check out the shapes and see if a shape needs to be combined from another shape or cut out of a shape, do the following:
• Click on the first page tab and select Select All from the Edit
menu.
• Evaluate how shapes are grouped. Especially the shapes
that you expect to be involved in interval adjustments during
a drill rewrite. The shape will be involved when one or more
performers within the shape are to be removed or added.
For example if a performer of this square is to be removed,
then the intervals of the entire box will be adjusted because
the performer resides in the box shape.
• If regrouping appears to be needed, select which shape
needs regrouping. Select either Knife tool or Glue tool, and
make the necessary adjustments to the grouping of the
involved shape(s). In this example, we want the performer to
reside in only one side of the box and not the whole box.
This is done by cutting the box into four lines.
• Repeat these steps at each page tab in the drill.
129
CHAPTER 9 - Utilities
Removing a Performer
This Remove Performer option will delete a position from the entire drill and resize shape intervals or
leave a hole within a shape.
• Select Drill Rewriter from the Utilities
menu and the Drill Rewriter Wizard
will appear. The Drill Rewriter will only
edit a drill file that has first been saved.
You may be asked to save before continuing.
• Click on the performer (or performers)
that you want to remove from the drill.
The Drill Rewriter Wizard is displayed
in the upper right corner of the field display window. If it is covering your performers, it can be moved by dragging
the control panel’s title bar.
The Stop at each page tab... option will display each count that has a page tab (or sub-page tab)
and highlight the performer to be removed. At each page tab, you will decide how this shape is to
handle the removal of the selected performer. For example, if the shape is a part of a filled block of
horizontal and vertical lines, it may be preferred to leave a hole in the shape rather than to adjust its
intervals.
The Equalize Intervals option adjusts the intervals of each shape that the removed performer(s)
occupies.
The Leave a hole throughout the drill option inputs a hole in each shape that the removed performer(s) occupies.
• Click Continue and the Rewrite Control Panel will display. The control panel is typically displayed
in the upper left corner of the field. However, if it is covering your view, you can move it by dragging
its title bar.
A red X will appear on top of each performer that is about to be removed. The Rewrite Control
Panel will display the counts that are about to be involved. Depending on the options set one or
more of the following buttons are available:
Equalize equalizes the intervals of the shapes involved during the count range shown in the control panel.
130
CHAPTER 9 - Utilities
Leave a Hole cuts out a hole in the shapes involved during the count range shown in the control
panel.
Undo Last Set backs up to the previous count range rewritten.
Cancel reverts to saved version of the drill.
Adding a Performer
This function will add a performer to an entire drill and resize shape intervals.
• Select Drill Rewrite command under
the Tools menu. A dialog box will
appear. The Drill Rewrite will only edit
a drill file that has first been saved. You
may be asked to save before continuing.
• Click the Insert Performers tab in the
Drill Rewriter dialog.
• Click on the performer adjacent to the location where you want a performer added. The performer
you selected and the adjacent neighbor will be highlighted. Sometimes the adjacent performer is the
wrong one. Double check to see that the location where you want a performer added is between the
two selected performers. If not, try again by clicking on the other adjacent performer.
• Click Continue and the Rewrite Control Panel will display. The control panel is typically displayed
in the upper right corner of the field. However, if it is covering your view, you can move it by dragging
its title bar.
A blue dot will appear on top of each performer between which the new performer will be added.
Equalize will equalize the shapes within the drill.
Cancel will revert to the last saved version of the drill.
131
CHAPTER 9 - Utilities
COUNT EDITOR
The Count Editor is an editor which is used
to insert or remove counts from a drill. When
inserting counts into a drill, the transition in
the new counts will be mark time. The Apply
button will apply the settings in the editor to
the drill. The Page Tabs will be moved as
well.
When extending or shortening an existing transition by adding or removing counts to the drill, it is best
to add or remove the counts in the middle of the transition. For example, let’s take a 16 count transition from count 0 to count 16. You will want to insert (or remove) counts after count 1 (or before count
15). This will preserve your beginning and ending forms. After you have made the changes with the
Count Editor, you will notice a jump in the animation. This is because the continuity of the drill has
been disrupted. It is similar to removing frames from a movie, it will cause a jump in the picture. This
is easily remedied. You will need to re-build the transitions.
To re-build the transitions:
• Place the Yellow Anchor at the beginning of the transition. In this example, it is count 0.
• Place the Red Anchor at the end of the transition. In this example, it is count 16.
• Use a selection tool to select all performers except those performing any Follow the Leaders.
• Click the Morph editing tool and click Accept without making any changes. This will rebuild the
transitions of all forms with the exception of the Follow the Leaders.
• If there are any Follow the Leader transitions they will need to be corrected one shape at time by
selecting the shape, clicking Follow the Leader and clicking Accept.
132
CHAPTER 9 - Utilities
CAST LIST
EDITOR
Whether you have a large band or a small band the cast sheet is a very useful tool. The cast sheet will
display and print all symbols, labels, and names of the performers in the drill.
When you select Print Cast Sheet from the File menu the Cast Sheet Manager will display.
Print Sort order will sort the names in the cast sheet according to one of the following options: by
Symbol, Label, Name; by order entered; by Name, Symbol, Label; or by Label, Symbol, Name.
The name is entered using the Label Tool or can be entered directly from this dialog, the Cast Sheet
Manager.
The Figurine column allows for the assignment of figurines to each performer in the cast list. These
figurines are shown in the Perspective View.
The Notes column is just a space on the printout for taking notes on performers during rehearsals.
This feature was added in version 3. If this drill is opened with a version earlier than version 3, the
notes will not be found.
Print all symbols black will print all symbols in the cast sheet black instead of the color defined in the
label function.
133
Show unlabeled cast members shows all performers (even the performers with no label) on the Cast
CHAPTER 9 - Utilities
Sheet Manager window and in the printout. Hiding unlabeled performers from a printout is useful if
you entered some performers as markers on the field and not actually performers.
Import Names & Labels allows you to import cast information from an exhisting drill.
Print/Preview will open the page setup display then render and display a preview of the Cast Sheet
report according to the settings of the print cast sheet manager.
Save as Default button saves the settings of the Sort order.
Done button exits the Print Cast Manager window.
GRID DESIGNER
The Grid Designer is an editor which is used to create custom grid layouts. Any type of grid can be
designed such as soccer fields, winter guard, stages and streets. Custom grid layouts are stored in the
Layouts folder inside the 3D application folder. When a new drill file is created, a grid layout is chosen.
That layout is embedded into the drill file. Therefore, if a drill file is given to another 3D user, the user
does not have to have a copy of the layout in order for the drill file to be displayed correctly.
To load the Grid Designer, select Grid Designer from the Utilities menu. The current field grid will
display inside the editor.
Units - a pop up menu for setting the measurement configuration to Yards or Meters.
Left-Right [ ] steps per [ ] yards - sets up the underlying horizontal step grid. Also establishes the
way the Location Indicator of the Console and Student Coordinates measure locations on the field.
Top-Bottom [ ] steps per [ ] yards - sets up the underlying vertical step grid. Typically, these values
are the same as the Left-Right settings.
Resolution - a pop up menu for setting up the number of step division markings between the yard
lines.
Style - a pop up menu for setting the step division style to either lines or dots.
Measure - a pop up menu for setting up the way the Location Indicator, Field Markers, and
Coordinates Reports use the yard line markers. Typically Winter Guard designers measure from the
134
CHAPTER 9 - Utilities
center yard line marker outward. Whereas field designer follows the yardline markers on football field
and measure inward.
Measure vertically from stage front - sets the vertical measurement of the Location Indicator to
measure incrementally from the front side line (0 steps) to the back side line (typically 84 steps). If this
option is not checked and the Measure setting is inward, the Location Indicator measurement from
each side line will start with 0 (steps) and incrementally increase until the cursor reaches the center of
the field (typically 42 steps).
Marker Size - [ ^ ] [ v ] buttons will increase or decrease the size of the yard line division numbers.
Zoom buttons - Clicking on the ( + ) magnifying glass zooms into the center of the grid area.
Conversely, the ( - ) magnifying glass zooms out from the center of the grid area.
Field Relocation buttons - clicking on (slide up) button moves the grid area higher on the screen.
Conversely, the (slide down) moves the grid area lower on the screen.
Division Markers are the large numbers running from one end of the field grid to the other. The numbers are located at each major division line. They designate the number of yards across the grid.
Usually, these Division Markers are used as yard line markers on a football field, where the center
marker is the 50 yard line. The Division Markers are movable. For example, the markers displayed
horizontally can be dragged vertically to any location. Often, with football field grids, the markers are
placed in the exact location as they appear on the field, however, sometimes it is preferable to move
the markers just off of the field grid area so as not to clutter the display or the printout. Division
Markers can be hidden so that only certain yardline markers will be shown. To hide the Division
Marker double click on the large oval that corresponds the the yardline that you want the marker to be
removed. To have the yardline marker reappear double click on the large oval that corresponds the the
yardline that you want the marker to reappear.
Field Grid Border - is the red border surrounding the grid. On a football field the border represents the
side lines and the endzones. The middle of each of the four border lines is a number that represents
the location of the border. The four numbers can be drug to change the top, bottom, left, and right side
of the border.
Division Line, Sub-Division Line, Hash Mark editing handles located along the bottom and right
margins can be dragged to move the lines or hash marks up and down or across the grid area. The
editing handles associated with Division Lines are the longer ovals. Editing handles associated
with Sub-Division Lines are the smaller ovals. Editing handles associated with Hash Marks are rectangular in shape. All the editing handles are yellow until they are moved when their color changes to
green. To add a line or hash, drag a new handle out of the handle bin into the grid area. To remove a
line or hash, drag its editing handle back into the bin area. The small numbers located along the left
and top margins of the editor indicate in yards the location of the line or hash. When creating a grid
representing a football field, it may be interesting to note that you can add as many hash marks as you
would like.
Color Options are used to change the color of the grid elements. Clicking on Color Options will display Grid Color choices. Within the Grid Color dialog, clicking directly on a color swatch will display
a color palette for changing the color.
Save and Save As buttons will save the field grid layout to the 'Layout” folder. If you name your file
Default it will be the field grid layout that is use by default in the New (drill) file function of the File
menu.
Load button will load a grid field layout.
Clicking OK will copy the current field grid layout in the Grid Designer into the currently opened drill
file. Clicking Cancel will exit the Grid Designer without changing the grid layout currently embedded in
the opened drill file.
135
CHAPTER 9 - Utilities
PAGE TAB
EDITOR
The Page Tab Editor is an editor for changing the Page Tabs that appear on the Count Track. The
Page Tabs can be entered and moved visually using the Page Tab Editor button on the Count Track.
The visual editor is covered in Chapter 1 in the section discussing the Count Track. Selecting Page
Tab Editor from the Utilities menu and the editor will display.
Starting Set # will change the starting set number. For Example, if the first drill ends with page 23, the
continuation file can begin with page tab 24.
The Add Page Tab button adds a page tab at a count entered. The Delete Page Tab button removes
the page tab this is currently selected in the list of page tabs.
The Subset column is useful wen you are trying to create a complex transition however you only want
to print a chart at the beginning and end of the transition. In that case, you can establish a set as a
Subset. This will prevent the set numbers from incrementing thru the subsets (or sub-tabs) because
the sub-tabs are labeled A,B,C. For example, with two subsets between set 2 and 3 the numbering
sequence would be 1, 2, 2A, 2B, 3, 4, etc.
Click in the set Title column to enter a title for the page tab. When a title is entered, the title will be
used in printouts. Page Tab titles are useful to clarify reports. For example, imagine Page Tab #4 is a
concert formation. Titling Page Tab #4 Concert Set will print “Concert Set” on any printout where Page
Tab #4 is involved.
136
CHAPTER 9 - Utilities
PRODUCTION
SHEET
(Interactive and Professional Editions only)
The Production Sheet is a helpful tool that allows
you to develop your show ideas within 3D, before
any charting begins. Think of the Production Sheet
as a “map” to your drill. Within this tool, you are
able to notate which measures of a piece will be the
transition between Page Tabs, along with adding
any notes, such as “Big Hit” or “Winds face back
field.”
Set indicates the set (page tab) number you are
working on.
Placing a checkmark in the Sub column
would indicate that the current Set is a Sub-set.
The Count column displays which count a set is on.
Transition shows how many counts there are to get to a particular set.
Selecting a row under the Measures column would allow you to input which measures the set is referring to.
Title works much like the Measures column. If you click on a row under the Title column, you would
be able to input a title for that particular set.
Notes columns are there for any quick instructions or notes the ensemble (or you) might need. These
notes can be quickly imported into a Text Box and displayed on the field through the Text Box Tool.
Tip: Selecting a set on your Production Sheet is like selecting a page tab on the count track. This is
another quick way to preview a set.
To pull the Production Sheet away so you may view the field and Production Sheet at the same
time, press the “Detach” button in the upper right corner of the Production Sheet window. You will
now be able to drag the Production Sheet anywhere on your screen. To pin the window back to 3D,
press the “Pin” button.
137
CHAPTER 9 - Utilities
SHORTCUT
EDITOR
Many functions of the 3D menu bar can be accessed directly using keyboard shortcuts. To edit your
keyboard shortcuts: You can create more than one set of shortcuts. This is useful if more than one
person is using your installation of 3D. Each individual can setup the shortcuts according to their preferences. Initially there are two sets: Default and a Version 2. The Default set is a set of shortcuts
created at Pygraphics containing preferred shortcuts from the Pyware Tech Staff as well as some of
our users. The Version 2 set contains shortcuts to match the previous version of 3D. The Default set
cannot be changed. If you want to modify the Default set, you must create a copy of the Default set
and modify the copy.
• To create your own shortcut set, select a set that most closely matches the set you want to create for
yourself. Typically, one chooses Default as the set to copy. Select the set by choosing a set name
from the Shortcut Set combo box appearing at the top of the Shortcut Editor. Click New Set to
make a copy of the currently selected set with a new name. Likewise Delete removes the currently
selected Shortcut Set.
• To edit a shortcut, click on the shortcut description appearing in the list of shortcuts and click the Edit
button. Shortcuts from the Default set can not be edited. Click the key commands you want to represent its new shortcut.
• To remove a shortcut, click on the shortcut description appearing in the list, and click the Clear button. The shortcut will be removed.
• To reset a shortcut to its default value, click on the shortcut description appearing in the list, and click
Default.
• To save the changes click Save.
The currently selected Shortcut Set will be the set used in the application when the Shortcut Editor
is exited after saving.
138
CHAPTER 9 - Utilities
FIGURINE
EDITOR
The Figurine Editor is an editor for changing the Figure Uniforms that appear in the Perspective
View Window. When you open the figurine editor you can choose to edit the standard set which is
used with any file that does not have a custom figurine set assigned to it.
The Edit Standard Set button
brings up the figurine editor
window and allows you to
change the default figure uniforms.
The Add Custom Set copies the standard set and adds it to the current drill package, then allows you
to edit the uniform colors.
HELPER EDITOR
The Helper Editor allows you to turn on or off specific helpers and allows you to view all helpers at
one time.
Show in Context - This button turns the selected helper on to be seen when its tool or function
is activated.
Don’t Show in Context - This button turns the
selected helper off, and will not be shown when
its tool or function is activated.
Show all in Context - This button turns all
helpers on to be seen when its tool or function is
activated.
Don’t Show Any - This button turns off all
helpers, and will not show when its tool or function is activated.
139
CHAPTER 10 - Design Techniques
WRITING
DRILL
BACKWARDS
There will be times when you might wish to write backwards from a set later in the drill. For example,
imagine your second set of a drill is actually the opening formation, and the first set is a transition into
the opening formation. In this case, it is easier to create the opening formation at the later count first,
then chart backwards to the beginning of the drill.
• As with the above example, Set #2 is the opening formation. In this case we need to create performers for the first time in the drill at Set #2. These performers do not exist anywhere else in the drill file.
Place both editing anchors at Set #2. If you are charting backwards from a set of existing performers, skip this step. On the Count Track placing both anchors on top of each other is necessary for
creating “first time” performers. Holding <Alt> key (option on Mac) while clicking on a page tab will
force both Yellow and Red Anchors to move together to the tab. With the anchors setup, enter the
new formations into the drill.
• Using the above example, Set #2 is the start of the set we have just finished, and now we want to
move “backwards” to Set #1 to design the ending count and transition between the two sets.
Normally we would be thinking about the transition from the previous set (Set #1) to the current set
(Set #2). To setup the anchors for the “backwards” design, set the editing anchors on the Count
Track between Set #2 and the Set #1. Click on the small red right arrow on the Count Track
appearing between the Yellow and Red Anchors. The Red and Yellow Anchor will swap locations.
Editing of shapes and all transitions will now be written backwards.
Forward drill writing as indicated by the small red right arrow in the Count Track.
Backward drill writing as indicated by the small LEFT arrow in the Count Track and the red warning
bar in the Count Track’s page tab area.
NOTE: Do not forget to return the small red arrow back to its normal direction when wishing to continue writing forward.
140
CHAPTER 10 - Design Techniques
SYNC MUSIC
TO DRILL
A 3D drill file can be synchronized to one of three types of sound files:
MID = MIDI file
WAV = audio wave file
OGG = audio file
To setup an audio file for use with a drill file do the following:
• With a drill file opened, select the Preferences section of Document Options of the File menu.
• Click Choose File for the
audio file and select an
audio file.
• To indicate sound with animation, click on the Sound button under
the animation controls of the Count Track.
• After clicking on the Sound button, if there is no audio file selected, the following message will display.
141
CHAPTER 10 - Design Techniques
• If the selected audio file has not been synchronized to the drill file the following message will display.
• To synchronize an audio file to a drill file click on the <spacebar>
while the music is playing in tempo with the music. Each click of the
<spacebar> will advance the drill one count. When completed click
the Done button on the Synchronizing Window.
• To re-synchronize the drill, clear the current
synchronization by holding the <alt> key
(<option> on Macintosh) while clicking on
the Sound button. Another way to clear the
synchronization is by clicking on Clear
Synchronization To Drill in the
Preferences section of Document
Options of the File menu.
• After the audio file is synchronized, each time you click on the Play button when the Sound button is
depressed the music will be played.
Should you transfer the drill file
to another computer, you will
also need to transfer the drills
audio file. The location of the
audio file is found in the
External Files section of
Document Options of the File
menu.
External files can be saved in a
drill file package called 3D
Package. This option is available in the Save As dialog. This
package is compatible only with
the 3D version2 or greater.
Should you need the file to open
on 3D Version 1, it is best to put
the external files in the same
folder as the drill.
142
CHAPTER 10 - Design Techniques
THIS PAGE IS INTENTIONALLY BLANK.
143
CHAPTER 11 - Interactive Features (Interactive and Pro Version only)
ONLINE FILE
MANAGER
The Online File Manager is a utility that manages the transfer of files to and from your Online
Account. Depending on the access privileges you (the account administrator) setup, other users can
sign on to your account and read (download) drills. Users can sign on to your account through other
3D applications or through 3D Viewers anywhere in the world.
• To start the Online File Manager utility, select Online File Manager from the Interactive menu.
The Online File Manager will attempt to go online and find the list of accounts that you can access.
If the Online File Manager successfully connects to the Pyware Online Accounts a list of accounts
will display.
Add Account will add an account to the list of accounts. If an account is selected in the list, Delete
Account will remove it from the list.
Show My Personal Account List shows the list of accounts that you have entered either through Add
Account as well as the account to you were given during the initial setup of the program.
Show Commercial Accounts displays the list of commercial accounts currently accessible on the
Pyware Online Account system.
• Clicking on an account in the list and clicking Open will open and display the Sign On to Account dialog. Cancel will close the list of Online Accounts dialog where you can choose to Log On again.
144
CHAPTER 11 - Interactive Features (Interactive and Pro Version only)
When signing on as a Anonymous Guest, you will be able to see the files on the account that have
been given public access by the account administrator. Anonymous Guests are typically students
of school accounts, or shoppers on commercial accounts. Anonymous Guests require no sign-on
name or password.
When signing on as a Registered User, a user has unique privileges to see files that may (or may
not) be seen by Anonymous Guests. These access privileges are set by you, the account administrator. Often Registered Users consist of clients of drill designers. These users need private
access to the drill or drills that they have commissioned. No one else should be able to access
those drills. In order to sign-on as a Registered User, you must first be registered in the account by
the account administrator. Once registered, the administrator will give you a Sign-on Name and
Password.
Each account has an Account Administrator. The administrators sign on Name and Password is
given to the application’s registered user when the online account is setup by Pygraphics. To sign
on as an Account Administrator, select Registered User and enter the administrators sign on Name
and Password.
Save Settings is useful if you usually sign on into the same account repetitively because it will save
the values you have typed in to make it faster next time you want to sign on.
Cancel will disconnect from the online account system and return to the Online File Manager. To reconnect, click Log On to another account.
Sign On will sign on to the account and display the list of accessible files.
145
CHAPTER 11 - Interactive Features (Interactive and Pro Version only)
• Once a visitor has signed on to the account the Online File Manager will display with the list of
accessible files.
The Online File Manager will display all files the signed on user has privileges to see. All files will
be displayed, both files local to the host computer, as well as the files located in the online account.
The File Name is the actual name of the drill file (.3dj) or drill package (.3dz) as it is saved to your
hard drive. The File Description is a description entered by the account administrator of the files
located in the online account. The file versions are useful when determining which copy of a file
(local or online) is the most current.
Guests and Registered Users signing on to an account will see a GET THIS FILE column, because
the only action they can perform is to read (download) files from the online account. Account
Administrators will see a TO DO column so they can perform a variety of tasks that upload, download and delete files from the online account.
146
CHAPTER 11 - Interactive Features (Interactive and Pro Version only)
In the figure on the previous page notice that only five of the eight files listed are actually in the
online account and the rest of the file are located on the local computer only. Notice the online file
versions for the files that are online are shown in the Internet Copy column. If there are local
copies that have been downloaded from the online account the Local Copy will display the local version. You can use the versions to determine whether the drill file on your computer, or in the online
account, is the most current.
When logged in as the account administrator, there are four tasks that can be chosen to do to the
files in the list. Beside each of the drill files is a TO DO pull down menu listing the applicable tasks.
• Do Nothing will not make any changes to the file.
• Get the online internet copy of the file will download the online version of the file to the local
computer.
• Send a file copy to the internet account will upload the local version of the file to the online
account. This option is only available to the administrator.
• Remove the file from the internet account will remove the file entirely from the online
account. This option is only available to the administrator.
Other control buttons in the Online File Manager window are:
Save Changes will perform the tasks selected for each file.
Cancel will log off the online account and close the Online Account Manager.
Show File Information will show the file information dialog of the selected file in the list.
Log on to another account will log off the current account and re-display the list of accounts.
The Online Connection Monitor monitors the connection to the online account and displays the
user and account information.
User Name is the current user logged in.
User Level is the privilege level of the currently logged in user.
Account is the account in which the user is currently logged on to.
Status is the current status of the file manager.
147
CHAPTER 11 - Interactive Features (Interactive and Pro Version only)
UNLOCK THIS
DRILL
This function is used to unlock drills that have been locked from full access by a drill provider.
To unlock a drill:
• Contact the drill provider for a key.
• The drill provider will want to know the Drill ID and Lock ID displayed in this window.
VERY IMPORTANT: Do not click Exit or close this window after you give the provider the information, because the Lock ID will change each time you use this function. Therefore, the key the drill
provider gives you will not work!
• The drill provider will give you a key.
• Enter the key and click Unlock.
• Follow the screen prompts.
148
CHAPTER 11 - Interactive Features (Interactive and Pro Version only)
ONLINE USER
FILE ACCESS &
PASSWORDS
The Online Users File Access & Passwords utility is to be used by the account’s administrator to
setup the access privileges for visitors to their account. Visitors who have signed on to your account
are called “users”. Users can access your account from their 3D applications and from downloadable
3D Viewers. There are three types of users.
1 Anonymous Guest - This is a user who can access your account without having to sign on with a
User Name and Password. These users can only read (download) files from your online account.
They do not have the authority to write (upload) files to your online account. With this utility you
can setup Anonymous Guests to see only selected files in the account. Allowing Anonymous
Guests to sign on to your account is useful when you want a large group of users to have access
the same list of files, such as all performers in a marching band. Since a User Name and
Password are not required to be an Anonymous Guest, it is also useful for Commercial Online
Accounts for potential customers to be able to sign on.
2 Registered Guest - This is a user who can access your account with a sign on User Name and
Password. These users can read (download) files from your online account, but do not have the
authority to write (upload) files to your online account. With this utility you can setup Registered
Guests to see only selected files in the account. Setting up Registered Guests is useful to give
unique file access to a single user such as a customer picking up commissioned drill from a
designer.
3 Account Administrator - This is a user who can access your account after signing on to the
account as a Registered User using the account administrators User Name and Password. This
user can read and write files from your online account. All files in the account are visible to this
user. The administrator can use this utility to add or edit users and change their access privileges.
You can setup different users to have differing access to files in the account. This utility can only
be run by the account administrator.
• To start the Online Users File Access & Passwords, select Online Users File Access &
Passwords from the Interactive menu. The Online Users File Access & Passwords will attempt
to go online and find your online account.
• Once connected, a Sign On
dialog will display for you to
enter the account administrator’s Name and Password.
Clicking Sign On will display the list of all files in the online account.
149
CHAPTER 11 - Interactive Features (Interactive and Pro Version only)
In the table, the User column displays the Name you have designated for each for the users or user
groups you have established.
The Level column displays the type of level given to each user you have established. The levels
are:
Administrator - has full access to the online account to add, update and remove files.
Guest - has read only access for downloading files from the online account.
No Access - can sign on, but will not see any files in the online account.
The remaining columns in the table designate each file in the online account and the type of access
privilege this user is given to the file. The column title is the name of the file. The privileges are:
Read/Write - the user can upload, download, and update this file from the online account
READ - the user can only download this file from the online account
hide - the user will not see this file in the online account
The Allow anonymous guest for public access is used when you want to allow users access to your
account without a unique User Name and User Password. This option is typically useful for school
band programs who want student performers access to certain files on the account without assigning
user names and passwords to each student. This option is also used for Commercial Accounts that
anyone to see a selection of files visible to anonymous guests on their account.
150
CHAPTER 11 - Interactive Features (Interactive and Pro Version only)
• To add a new user or user group to you list of users, click New Registered User will display the Edit
User Privileges dialog.
User Name and Password are text boxes where you enter a user name and password that you as
the account administrator will determine.
Level is the level for the users file access. NO ACCESS will prevent all files from being displayed
on the users file list. GUEST allows users to see selected files in their users file list to read (download). The only user that can write (upload) files to the list is the Account Administrator.
Online Files is the list of all files current on the Online Account.
When the Level is GUEST, the Read Only column determines whether this registered user has
access to this file.
Set all files readable is used as a shortcut to set all current and any future files in the online account
to Read Only. Remember, this option will set any future files added to the online account to be Read
Only for this user. Conversely, if you do not use this option in a users privileges, you will need to
edit the users privileges after new files have been uploaded into the account when you want the user
to have access to the new files.
151
CHAPTER 11 - Interactive Features (Interactive and Pro Version only)
The Read Only column sets the access to the a file for the user. If it is not checked, the user will
not see the file when they sign on to the account.
Okay will accept the changes to the new user.
The Edit User button will display the same Edit User Privileges dialog as did the New Registered
User button.
The one exception is
that when editing the
Account
Administrator’s privileges the log in and
contact information will
display. This contact
information will be displayed to users that
appear to be having
trouble signing on to
your account.
The Delete User button will delete the selected user.
Save writes access changes to the online account. Likewise, Cancel exits the utility.
PERFORMER’S
TOOLS MENU
This menu has access to all of the Performer’s Practice Tools and utilities to manage them.
1 |3D Performer’s Practice Tools - Launches the same program that the performers (students) and
download and run on their home computers.
2 Leader Board Manager - This utility manages the online Leader Boards lists that are generated by
the performers as they use the 3D Performance Simulator. (explained in more detail next)
3 Print Performer’s Setup Instructions. This prints a sheet that the director (drill designer) can pass out
to the performers detailing steps to download and setup the Performer’s Practice Tools.
4 Setup - This wizard sets up 3D program to communicate directly with a installation of Performer’s
Practice Tools on this computer. It also activates all of the “Enhanced” features that can be purchased by the performer, and setups up the paths necessary for 3D to launch the Performer’s
Practice Tools directly.
152
CHAPTER 11 - Interactive Features (Interactive and Pro Version only)
LEADER BOARD
MANAGER
Leader Boards are generated by performers using the 3D Performance Simulator. As a performer
practices their drills they attempt to reach a perfect score of 1000. As their scores improve, their score
is uploaded to the drill’s Leader Board so performers can compete for the top of the leader board. The
Leader Board Manager displays the Leader Board lists of all of the drills you have online.
Clear - erases the list of the currently displayed Leader Board.
Clear All - erases the list of all Leader Boards.
Purge.. older than ? days - will remove performers on all Leader Board lists that have been on a list of
a determined number of days.
DRILL LOCK
DECODER
The Drill Lock Decoder utility is used primarily for designers selling drills online. Drills can be locked
with a password so they can be viewed but not edited or printed. After a customer downloads and previews a drill, the customer can then contact the drill designer to purchase and unlock it. This decoder
creates unique keys for unlocking a drill, so a key used by one customer cannot be used by another.
To create a locked drill file that can't be edited or printed:
• Open the drill, and select Document Options from the File menu.
• In the Author Information box, type your contact and/or sales information.
• Under the Properties tab, pick your restriction options such as "Cannot be printed" and "Cannot
be edited."
• Click Lock the properties with a Master Password, enter a Master password. The Master password
is the password that only you know. When your customer contacts you to unlock the drill, don't give
them your Master Password. Instead, use this decoder to create a unique key that will only work for
this customer and no one else. Remember the Master Password because you will need it to create
the unique key for your customer.
To unlock a locked drill with a
password that will work only
for one customer:
• Tell the customer to open
the drill they want to unlock
using their 3D program.
• Tell the customer to select
Unlock this Drill from the
Interactive menu and a
Drill Unlock Utility will display.
153
CHAPTER 11 - Interactive Features (Interactive and Pro Version only)
• Ask the customer to read to you the Drill ID, and Lock ID that is displayed. For your information,
the Drill ID is going to be the first 8 characters of the file that the customer has opened. You should
use the Drill ID given to make sure you are about to unlock the correct file.
• Using this decoder Utility, enter the Master Password that you originally used to lock the drill. Also
enter the Drill ID, and the Lock ID that the customer gave you.
• Click Calculate Key.
• Tell the customer to enter the key that you have calculated and click Unlock.
CHECK FOR
UPDATES
CHECK FOR
MESSAGES...
This functions checks and downloads updates from the the automated update system at Pyware
Headquarters.
This utility opens the Pyware Message Board. The Pyware Message Board is an automated information system that checks with Pyware Headquarters for any important notices such as updates that
are currently available for you to download. To check messages:
• Select Check for Messages from Pyware Headquarters from the Interactive menu and the utility
will attempt to connect with Pyware Headquarters.
3D will check Pyware Headquarters for any new update information or important notices that you
may be interested in and display the list of messages in the Subject box. If you want to read a message, click the message listed in the Subject box and it will display.
154
CHAPTER 11 - Interactive Features
Clicking on www.pyware.com launches a browser to the Pyware web site.
Clicking on Send a Message sends a message from you to the Pyware Headquarters.
Selecting a message and clicking Remind me later will re-display the message in 20 days.
Selecting a message and clicking Delete this message will remove the message from the list.
Clicking Delete all messages will remove all messages from the list.
Close will exit the Pyware Message Board.
PYWARE WEB
SITE
FREQUENTLY
ASKED
QUESTIONS
DEAUTHORIZE
THIS COMPUTER
155
This utility will open the local computer’s web browser to the Pyware website.
This utility will open the local computer’s web browser to the Frequently Asked Questions webpage
on the Pyware website.
This function was employed for users who need to switch 3D installations between more machines
than their license allows, all with the convience of not having to contact Pygraphics to do so. Once you
select the deauthorize button, the program on your machine will convert into a demonstration version
that does not save or print and is restricted to viewing only 80 counts. You would then be able to install
and activate on a different computer.
CHAPTER 11 - Interactive Features
GET PLUG-INS
AND
ACCESSORIES
INSTANTLY
UPGRADE
MY 3D NOW
This utility opens the 3D Upgrades and Accessories window for information and pricing regarding available updates and Plug-Ins. These may be purchased instantly online via Credit Card.
This utility opens a window with prompts:
How do I instantly upgrade my 3D Edition opens the window similar to Get Plug-Ins and
Accessories. This window has information and pricing regarding available updates and Plug-Ins.
I want to apply an existing upgrade or Plug-In purchase prompts you to revalidate your program. If
you have purchased an update (and have internet access at the time you are attempting to revalidate),
your new purchase will take effect after completing the online validation.
156
CHAPTER 12 - Traditional Tools Plug-in
The Traditional Tools Plug-In includes tools that are used in military corps style marching. These
tools include: the Sequential Push tool which is used to create step offs and drop offs; the Counter
March tool for counter marches; Parade Gate tool for wide sweeping turns, and the Traditional tool
that allows you to create a custom transitions.
Traditional Tools Plug-In is an optional purchase. To see if Traditional Tools Plug-in is installed on
your program, select Application Options from the File menu and click on the Plug-Ins tab.
157
CHAPTER 12 - Traditional Tools Plug-in
INSTALLATION
The Traditional Tools Plug-In will not operate on any version of 3D that is less than version 1.1.1. 3D
can be updated from our site at www.pyware.com.
To activate your Traditional Tools Plug-In, go to your File Menu and choose Application Options.
From Application Options, select your Plug-ins tab. Click "Reactivate Plug-ins."
You should then see blanks to enter information for each plug-in currently available. Reference your
Traditional Tool Plug-in Activation Code that came with your program, and type in the missing fragment
of the activation code in the appropriate field.
Select "Reactivate," and if keyed in correctly, your plug-in will be unlocked. Restart 3D and you will
see the Traditional Tools on your Tool Palette.
158
CHAPTER 12 - Traditional Tools Plug-in
SEQUENTIAL
PUSH TOOL
The Sequential Push tool allows you to create step offs and drop offs.
To access the tool, set the Count Track up for a “transition” with the Red Anchor at the end count of
the transition and the Yellow Anchor at the beginning. The performers you want doing this transition
must also be selected.
• Click on the Sequential Push tool button you will then see the Sequential
Push Control Panel.
Editing handles appear on each performer.
Dragging the editing handle of a position to
a final location will cause all other performers to follow behind in a sequential movement. The position that is dragged will
always be the performer that will travel the
furthest in the maneuver.
If there are not enough counts in the transition for all performers to have time to step
off, then those performers will mark time.
Entering a value in the Stride text box moves the positions into the new location that reflect stride
length entered. Likewise, entering a number into the Distance text box moves the positions into the
new location that reflects distance entered. Clicking on the directional compass will move the
positions to reflect the new direction.
Snap to Horz/Vert padlock will snap the positions to nearest horizontal, vertical, or 45 degree direction.
Multi-Segment allows you to select more
than one shape (segment) and have the
step off be uniform in all of the selected
shapes as shown here.
The value in Step Off designates the counts between each step off. For example if you entered 2,
then the positions will step off every 2 counts until the end of the shape is reached or the number of
counts in the maneuver is reached.
159
CHAPTER 12 - Traditional Tools Plug-in
The value in Drop Off designates the counts between each drop off. Typically you will enter a value
for either the Step Off or the Drop Off and leave the other at 0. For example if you enter a 0 as the
step off and 2 as the drop off, all positions stepped off together then the positions will drop off at the
rate of 2 every count until the end of the maneuver. If there are not enough counts in the maneuver
then some positions may just mark time.
The Animation Controls are always accessible while using this tool for previewing the maneuver.
Reset to Hold - resets the transition to a "Hold" from the secondary count.
Revert button resets the handles to their initial position.
Accept button accepts the shape into the drill.
COUNTER
MARCH TOOL
To access the tool, set the Count Track up for a “transition” with the Red Anchor at the end count
of the transition and the Yellow Anchor at the beginning. The performers you want doing this transition must also be selected.
• Click on the Counter March tool button
you will then see the Counter March
Control Panel.
• Editing handles appear on each of the selected performers. Drag any editing handle in the direction of
the counter march to the location on the field where
the counter march is to begin. A blue line will designate the location where the counter march maneuver
will begin.
In the Counter March Control Panel, the value in the Stride text box determines the stride length
the performers will be using during this maneuver.
The Flank button designates which way the performers will first turn in the counter march. You have
two options flanking to the left or to the right.
The value in Take [ ] steps and flank designates the number of steps after the first flank that the
performers travel before flanking again.
The value in Pause [ ] counts and go designates the number of counts the performers will hold (or
mark time) before the second flank.
The Animation Controls are always accessible while using this tool for previewing the maneuver.
Revert button resets the handles to their initial position.
Accept button accepts the shape into the drill.
160
CHAPTER 12 - Traditional Tools Plug-in
PARADE GATE
TOOL
The Parade Gate tool allows you to create wide gate turn easily. This is an essential tool for parades
when rounding corners. To access the tool, set the Count Track up for a “transition” with the Red
Anchor at the end count of the transition and the Yellow Anchor at the beginning. The performers
you want doing this transition must also be selected.
• To access the Parade Gate tool you must select a range of counts as seen below and a group of
performers must be selected.
• Click on the Parade Gate tool button
and the Parade Gate Control Panel will
appear.
• Editing handles will appear on each of the selected performers. Drag any performer to determine
the initial marching direction and the point at which the rotation of the gate maneuver should begin.
The center point of the rotation will occur at the final location of the editing handle you drag. You
can change the center point of rotation by dragging the center point indicator.
161
CHAPTER 12 - Traditional Tools Plug-in
In the Control Panel, the value in the Stride text box designates the stride length the performers will
be using during this maneuver, except during the actual gate. During the gate all performers will be
taking different strides.
Gate [left] [right] at the blue line designates which way the positions will turn when performing the
gate. The gate will not begin until the performers cross the blue line.
The value in Steps during gate designates the number of steps taken in the gate. The default is 16.
This means the performers take a total of 16 steps during the execution of the gate maneuver.
Revert button resets the handles to their initial position.
Accept button accepts the shape into the drill.
162
CHAPTER 12 - Traditional Tools Plug-in
TRADITIONAL
TOOL
The Traditional tool allows you to create custom transitions. They are created by entering a Route
consisting of any combination flanking and sequential setup moves. To access the tool, set the Count
Track up for a “transition” with the Red Anchor at the end count of the transition and the Yellow
Anchor at the beginning. The performers you want doing this transition must also be selected.
• Click on the Traditional tool button and
the Traditional Control Panel will
appear.
• Editing handles will appear on each of the selected performers. Drag any performer to determine the initial marching
direction for all of the performers.
As you drag an editing handle an action line will appear on
the field that designates starting line for the Route to begin. As
each performer crosses this line, the performer will begin following the Route.
In this example. The performers are initially moving in the
same direction as the leader (Left). As they cross the action
line, they begin performing the route. In this case the route is
simple LF (Left Flank).
163
CHAPTER 12 - Traditional Tools Plug-in
• The Traditional tool allows you to create custom transitions. They are created by entering a Route
consisting of any combination moves. You have 8 different moves available:
Code
LF
RF
MT
FM
TR
ST
SD
H
Movement
Left Flank
Right Flank
Mark Time
Forward March
To the Rear
Step Off (such as Step 2)
Drop off (such as Drop 2)
Half Stride allows to take a half distance step
The route is entered in the Route box by typing the code for the move followed by a number of
steps. Each move is separated with a comma.
For example: LF2,LF
The above example is a Left Flank (LF) then take 2 steps and make another left flank (LF), then continue marching to the end of the length of the transition. This is a standard left counter march. Type
in the route in the Route text box and as you type, the description will appear in the Description
area. This will help you confirm that you are entering a correct route.
Action Line Slope changes the slope of the starting line of the route. Typically the slope will be 0.
However you can set the line to a 45 degree slope which allows you to create column left and right
formations. You have 7 different settings: no slope, 22.5, 45, 67.5, -67.5, -45 and -22.5 degrees,
depending on what direction you want the column to turn.
New button creates a new traditional maneuver.
Save button will save your Route as a traditional maneuver to be used again later.
Copy button will open and display a saved Route (traditional maneuver).
Delete button will delete a saved Route.
Revert button resets the handles to their initial position.
Accept button accepts the shape into the drill.
164
CHAPTER 13 - Floor Covers Plug-In
In Pyware 3D, a performing surface is most always made up of a grid created by the Grid Designer of
the Utilities menu. Grids are the lines on the field display such as yard lines on a football field. Most
performing surfaces can be defined using simply these horizontal and vertical grid lines. However, in
some cases there are other characteristics of a performing surface that would be handy to show on the
screen. For example, the markings on a standard basketball court would be nice for Winter Guard performances. These special markings or background can be displayed using Floor Covers. When creating a grid using the Grid Designer, you can add a Floor Cover that is placed under the grid. The floor
cover usually represents the markings of a basketball court, soccer field or other standard field, however, it could also be the logo that is painted in the center of a football field, or the design on a canvas
that lays over the performing surface in an indoor performance. There are many uses for Floor Covers.
Floor Covers Plug-In is an optional purchase. To see if Floor Covers Plug-In is installed on your
program, select Application Options from the File menu and click on the Plug-Ins tab.
165
CHAPTER 13 - Floor Covers Plug-In
INSTALLATION
Installing the Floor Cover Plug-In: The Floor Cover Plug will not operate on any version of 3D that is
less than version 1.1.1. 3D can be updated from our site at www.pyware.com.
To activate your Floor Covers Plug-In, go to your File Menu and choose Application Options. From
Application Options, select your Plug-ins tab. Click "Reactivate Plug-ins."
You should then see blanks to enter information for each plug-in currently available. Reference your
Floor Covers Plug-in Activation Code that came with your program, and type in the missing fragment of
the activation code in the appropriate field.
Select "Reactivate," and if keyed in correctly, your plug-in will be unlocked. Restart 3D and you will
see the Floor Covers option in your Grid Designer under the Utlities Menu.
166
CHAPTER 13 - Floor Covers Plug-In
DESIGNING A
FLOOR COVER
IN A GRID
LAYOUT
A floor cover is actually a “.jpg” or “.gif” picture file that is created with the width and the height of the
picture in the same proportion as the performing surface. For example on a football field, the height is
52.5% of the length. Included with the floor covers is a Football field template that is already created to
these proportions. Within this picture file is a drawing representing the surface design of the performance. All floor cover files are located in the Floor Covers folder of the 3D application folder.
To create a grid that includes a floor cover you will use the Grid Designer found in the Utilities menu
of 3D.
• Select Grid Designer from the Utilities menu.
• If the grid that you want placed over the floor cover is already created but not currently displayed,
click Load and select the grid you want to be placed over the floor cover.
• Click Floor Cover and
select from the list of floor
covers (located in the Floor
Covers folder). If you want
to create a different floor
cover, you will need to use
a paint program to design
the floor cover with the
width and height of the picture in the same proportion
as the performing surface.
Save it in the Floor Covers
folder as a “.jpg” or “.gif”
file.
• After the floor cover and
grid layout are setup as you
would like, save the layout using the Save or Save As button so you can use the new grid design on
new drill files.
• Click Ok if you want change the grid of the currently opened drill file to the new grid.
167
CHAPTER 13 - Floor Covers Plug-In
ADDING A
SCHOOL LOGO
TO A
GRID LAYOUT
Included in the Floor Covers folder is a Football_Template.jpg file. This file is created with the correct
proportions (height and width) of a standard football field. The file also has a tick mark at each yard
line location.
• To add a logo to the file, open the file “Football_Template.jpg” with a drawing (paint) program. The
paint program can be something like “Microsoft Photo Editor.” The file is located in the Floor Covers
folder found in the 3D application folder.
• Paste your logo into the template. Scale and locate the logo so that it fits correctly in the template
using the yard line tick marks as a guide.
• Delete the outer border and tick marks leaving only the logo in the file.
• Save As the file under a new name. Make sure the location of the file is in the Floor Covers folder.
• Use the steps in the section above for adding a floor cover to an existing grid.
TRANSFERRING
FLOOR COVERS
Should you transfer the drill file to another computer, you will need to also transfer the floor cover
image used in your drill. You can save a 3D Drill File as a 3D Package that will include the floor cover
picture used with the drill into one file. When saving, the package option Include Floor Cover must
be set. To change the format of an existing drill file to a 3D Package, choose Save As from the File
menu and set the Save Options.
3D Package files are compatible only with 3D version 2 or greater. Should you need the file to open
on 3D Java version 1, it is best to put the external files in the same folder as the drill. You can determine which images are used in the drill by selecting External Files from Document Options of the
File menu.
168
CHAPTER 14 - Personal Drill Book Printer Plug-in
In Pyware 3D, the Personal Drill Book Printer is a plug-in that harnesses one of the most powerful
features of the Performer's Practice Tools and puts it in your hands as a Director/Designer. This plug-in
allows you to print customized drill books for each performer with set by set pathways and coordinate
sheets.
The Personal Drill Book Printer plug-in is an optional purchase. To see if the Personal Drill Book
Printer plug-in is installed on your program, select Application Options from the File menu and click
on the Plug-Ins tab.
169
CHAPTER 14 - Personal Drill Book Printer Plug-In
INSTALLATION
Installing the Personal Drill Book Printer Plug-In: This Plug-in will not operate on any version of 3D that
is less than version 4.2.6. 3D can be updated from our site at www.pyware.com.
• Open the 3D software.
• Go to the File Menu
• Open Application Options.
• Click on the Plug-ins Tab:
• Click the Re-activate Plug-ins button
• Enter the Plug-In Key Code in the text box at the bottom of the screen. The Plug-In Key Code is
sent to you by email from Pygraphics. You can also call Pygraphics 800-222-7536 for the key code.
Please have your 3D program Serial Number ready when you call.
•
Click the Re-activate button to activate the plug-in. Restart 3D and you will see the Personal Drill
Book Printer option under the File Menu.
170
CHAPTER 14 - Personal Drill Book Printer Plug-In
PRINTING A
DRILL BOOK
Before printing Drill Books it is suggested that you
label and name all performer’s for this tool to be most
effective. To print a Personalized Drill Book select
Print Personalized Drill Books from the file menu.
This will open the Print options for the Personalized Drill Books.
Preferences are options used to customize the drill book printouts.
Print only selected positions - only prints drill books for performers that you currently have
selected on the drill page.
Include Drill Book Cover - includes a cover for the drill book pages to be inserted into.
Print all drills of this production - includes all drills, that are part of the current production that is
currently open.
Print all performers black - prints all performers black instead of the color set in the label editor.
Print each performer’s label - prints each performer’s label that is set in the label editor tool.
Print Text - prints all the text boxes that have been entered on each page.
Print facing - prints the facing direction for each performer.
Overlay set: (Previous) (Next) - prints the secondary positions as dots from either the previous or
the next drill set.
Sort Performers allows you to sort the drill books in order of Original Entry, Name, Symbol & Label, or
Label & Symbol.
Save as Default - saves the preferences that you select as the default settings for Drill Book printouts.
Print/Preview - opens the Print Preview screen that is seen on the next page.
Close - closes the Print Drill Book Dialog.
171
CHAPTER 14 - Personal Drill Book Printer Plug-In
PRINT PREVIEW
The print preview screen is accessed by clicking the Print/Preview button in the Print Drill Book Dialog.
All drill charts printed on the drill book are in the student perspective.
Print will send the job to the printer.
Previous Page will move to the previous preview page of the print job.
Next Page will move to the next preview page of the print job.
Page Setup button opens the printer’s page setup dialog.
Done button closes the print preview and returns to the print charts dialog.
172
CHAPTER 15 - Spiral Drawing Tool Plug-in
In Pyware 3D, the Spiral Drawing Tool is a plug-in that allows a Designer to easily create a fluid spiral
shape.
The Spiral Drawing Tool plug-in is an optional purchase. To see if the Spiral Drawing Tool plug-in
is installed on your program, select Application Options from the File menu and click on the Plug-Ins
tab.
173
CHAPTER 15 - Spiral Drawing Tool Plug-In
INSTALLATION
Installing the Spiral Drawing Tool Plug-In: This Plug-in will not operate on any version of 3D that is less
than version 1.1.1. 3D can be updated from our site at www.pyware.com.
• Open the 3D software.
• Go to the File Menu
• Open Application Options.
• Click on the Plug-ins Tab:
• Click the Re-activate Plug-ins button
• Enter the Plug-In Key Code in the text box at the bottom of the screen. The Plug-In Key Code is
sent to you by email from Pygraphics. You can also call Pygraphics 800-222-7536 for the key code.
Please have your 3D program Serial Number ready when you call.
• Click the Re-activate button to activate the plug-in. Restart 3D and you will see the Spiral Drawing
Tool option on the tool palette.
SPIRAL DRAWING
TOOL
See Chapter 4 Drawing Tools Page 87.
174