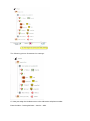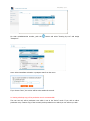
1
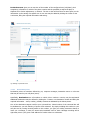
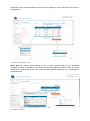
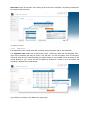
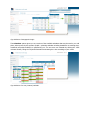
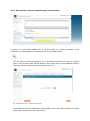
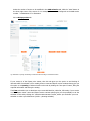
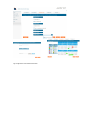
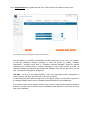
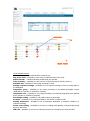
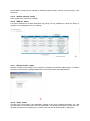
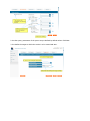
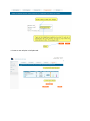
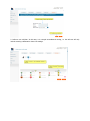
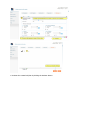
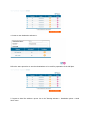
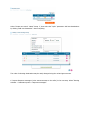
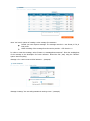
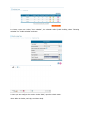
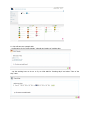
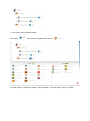
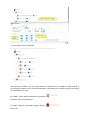
Administrator’s Guide to Routing Activator application for administration of GTS Colour numbers+ services Table of content 1 2 3 4 Service overview .................................................................................................................... 3 1.1 GTS Colour numbers+ ................................................................................................... 3 1.2 Geographic numbers ..................................................................................................... 3 “Routing Activation – CWI” web portal .................................................................................... 3 2.1 General information ....................................................................................................... 3 2.2 Login ............................................................................................................................ 4 2.3 Login problems ............................................................................................................. 5 2.4 Change of parameters ................................................................................................... 6 Description of CWI application screens .................................................................................... 7 3.1 Basic screen of the application ....................................................................................... 7 3.2 Main menu and captions ................................................................................................ 8 3.2.1 “Home” menu ........................................................................................................... 8 3.2.2 “Routing Activator” menu (i.e. advanced administration environment) .......................... 8 3.2.2.1 Service ............................................................................................................. 8 3.2.2.2 Destination points ............................................................................................. 9 3.2.2.3 Adjustment ......................................................................................................12 3.2.3 Wizard menu (wizard administration environment) .....................................................15 3.2.4 “Backup recovery” menu ...........................................................................................20 3.2.5 “Active reports” menu ...............................................................................................21 3.2.6 “Admin” menu ..........................................................................................................21 3.2.7 “Direct access” menu ................................................................................................21 3.2.8 “Help” menu ............................................................................................................21 3.2.9 Restrictions of the application ...................................................................................22 Service configuration wizard ..................................................................................................22 4.1 Example 1 “Simple routing” ..........................................................................................22 4.2 Example 2 “Call plan (structured tree)” .........................................................................28 5 Service deconfiguration wizard ...............................................................................................41 6 Abbreviations and concepts ...................................................................................................41 Introduction This document includes the instruction manual for application for administration of GTS Colour numbers+ (GTS Green number+, GTS Blue number+, GTS White number+, GTS Rainbow number+) services as well as any other services provisioned on the IN platform. Note: Customer names and service numbers used in the text for the purpose of this manual are purely fictional. 1 Service overview 1.1 GTS Colour numbers+ The group of GTS Colour numbers+ is a voice service of the so-called value added service category. The service enable automatic establishment of connection from any telephone station operated by the provider, or from telephone stations of other providers of telephone service to a telephone station(s) (i.e. assigned stations) selected by the subscriber in advance, using the service access code 8xy or 90x followed by a six-digit numeric combination. With a configuration of a certain service, all connections may be routed to a single assigned telephone station (unconditional routing) using the subscriber number, or routed to other telephone stations or response messages according to the applied conditions (conditional routing). GTS Colour numbers+ services are provisioned on the IN platform by Alcatel-Lucent in the environment of GTS Czech. From the user’s point of view, they add the possibility of configuration by the user/administrator via web interface in the CWI control application (access to application from cwi.gts.cz) to the common functionalities of value added services. Services of the GTS Colour numbers+ group include the following: GTS Green number+, GTS Blue number+, GTS White number+, GTS Rainbow number+. The services GTS Green number from abroad+ and GTS Blue number from abroad+ will be added in the next stage. 1.2 Geographic numbers This will be added in the next stage 2 “Routing Activation – CWI” web portal 2.1 General information “Routing Activation – CWI” (hereinafter as “CWI”) is a web portal (access to application from cwi.gts.cz) for administration of configuration of Colour numbers+ service (and other services), which the users may access via the web interface based on their access rights assigned to the user within the service provisioning process. All information required for login into CWI is provided to the customer within the process of service provisioning, in the service acceptance protocol. Overview of required information: - URL link to CWI web portal (https://cwi.gts.cz/frcgen/login) User name (9-digit mobile telephone number) to be specified by the user in the application for service provisioning (technical specification) - List of services for which the user was granted access to CWI under the respective user name Reference to user manual “Administrator’s Guide to Routing Activator Application” for administration of GTS Colour numbers+ services The customer bears full responsibility for all service changes and modifications via CWI executed by the customer (or an authorised user of the application, respectively), particularly traffic routing to a destination number, and the related fees. The customer is also responsible for prevention of abuse of access rights due to disclosure of access information to a third party by the customer or a customer’s employee. 2.2 Login Access to CWI application requires user name (Login) and password. For the purpose of enhancing security of access and mitigating the risk of abuse, login to the application is extended with an authorisation SMS, i.e. verification of user’s access authorisation against the user database administered by the operator. Fig.1 Initial login screen of the CWI web portal To login, enter your mobile number in the 9-digit format (i.e. without the international prefix and spaces) confirmed to you as the registered user name for access to the application in the service acceptance protocol. We will use the number 602123456 in our example. Click the “Novy mobilni klic / New mobile key” button. The information windows “Odesilam / Sending” and “SMS byla odeslana na číslo xxx xxx* / SMS has been sent to number xxx xxx*” will appear on the screen. (* The number entered in the LOGIN field a moment ago). Your mobile telephone should receive the SMS “Vas mobilni klic je / Your mobile key is: xxxxxx” with a six-digit mobile key (password) for login. Enter the mobile key in the field “Password” in the login window of the application and click “Login”. After a successful login, you should be re-directed to the following screen: Fig. 2 CWI application screen after successful login 2.3 Login problems In case of problems with login, check: - whether you entered the telephone number specified in the service acceptance protocol, i.e. the number confirmed by the operator as the registered login for access to the application. If excessive number of characters is entered in the LOGIN item, the following information window will appear on the page: “Enter valid login” - whether you entered the telephone number in the required format, i.e. without the international prefix and spaces. At the same time, the telephone number is active. A hint may be given by the status report “SMS has been sent to number xxxxxx” repeating the numeric combination entered by you in the LOGIN field a moment ago. - whether you entered the mobile key from the SMS delivered to your telephone as the last - validity of the mobile key is restricted to 30 minutes. If the limit expires, request a new mobile key by clicking the button “Nový mobilní klíč/New mobile key”. Repeat the login process. - the maximum number of attempts for sending a mobile key is restricted to 10 per hour due to security and operational reasons. If the limit is exceeded, access will be blocked. - if problems with login persist, please contact the customer service of GTS Czech s.r.o. at 800 990 990. - if you receive the status report “SMS cannot be delivered” upon entering the telephone number in the LOGIN field and sending the request for the mobile key, please contact the customer service of GTS Czech s.r.o. at 800 990 990. 2.4 Change of parameters The below parameters of the application were set according to your requirements specified in the technical specification of the service. If necessary, you may change the language option (Czech and English versions of the application are available) directly on the application site using the “Change language” button in the upper right corner of the screen as indicated by the below picture. Fig. Change of parameters The language of the application is the only parameter that may be changed on-line. If you wish to change other parameters like the login or the e-mail contact, please call the customer service of GTS Czech s.r.o. at 800 990 990. The password (mobile key) is generated automatically based on the request for sending a mobile key from the login page of the application; therefore, it may not be modified/changed here. Language change procedure: - Click the “Change settings” button Select the required language from the roll-down menu Confirm by clicking the floppy disc icon, see the picture above Restart the application, i.e. log out and then log in again. Otherwise the language change will not be executed. 3 Description of CWI application screens 3.1 Basic screen of the application The below picture describes the basic menu of the application and the content of the individual items displayed upon login to the application: Fig. 3 Basic screen of the application with the description of the individual items Site map – CWI structure: 3.2 Main menu and captions 3.2.1 “Home” menu By clicking “Home” in the left section of the screen, you can always return to the main/default screen of CWI (i.e. the home page) 3.2.2 “Routing Activator” menu (i.e. advanced administration environment) Routing Activator is an environment enabling you to set and modify your service provisioned for use in the environment. It is designated by the icon in the list of SAN numbers. Fig.4 Application menu – advanced environment 3.2.2.1 Service The Service item is divided to SAN, i.e. service access number (e.g. 800 000 001) and the Production Trees tab. SAN tab offers you an overview of services and the possibility to configure the individual SAN numbers as well as the information on the environment in which the service may be modified (Guide or Configuration of the routing schedule in the advanced environment). Production trees gives you an overview of the number of the configured trees (call plans), their completion, information on which of the plans is active and the possibility to adjust the plan, to duplicate it for further adjustments, or delete it. The icon to the left from the tree name gives you the information on the setting of a specific tree. A new tree may be added by clicking the Create a new tree button, filling the required information and saving. Fig. Settings of production trees 3.2.2.2 Destination points Destination points are numbers defined by you, response messages, interactive menus or sub-trees that may be used in your call plans (trees). Specifically, Destinations are all numbers on which Colour numbers+ service may be terminated. Additional destinations may be defined by clicking the “Create a new destination” button and filling the required information – name, number, possibly comment as indicated by the below picture. One of the destination targets could be your Voicemail box. Virtual number of the voicemail box will be dedicated to you with ordering of service GTS voicemail. By simply including this number to your call plan and by routing incoming traffic to this number, you give your calling customers chance to leave you a message, in case you cannot take immideate care for them. Message recording will be right away sent to your given email address for further actions or archivation. Information on the specific destination may be found by clicking the icon to the left from the name of the destination. Fig. Setting of destination points Serial lines are number groups defined by you, to which inbound traffic may be distributed sequentially, serially or cyclically. A new number group may be added by clicking “Create new series” and filling the required data (name, lit of numbers, traffic distribution algorithm, etc.) as indicated by the below picture: Fig. Setting of a serial line Response messages contain a list of available audio messages that may be used in your call plans. The menu shows you the messages preset by the operator as well as your own messages recorded by you. Messages may be configured, removed or new ones added by clicking “Create a new message”, filling the required data and recording your own file. The customer may create their message or ask the provider to do so. If the customer creates a message, it must be in a compatible format – message files must be in the .wav (windows sound family, audio code G.711, frequency 8000Hz) format. Fig. Response messages IVR or Interactive Voice Response, also called conditional forwarding according to DTMF) is a combination of messages, user interactions and subsequent routing of inbound traffic. Here you can set the destinations and response messages for the individual IVR options. This menu is also used for setting the routing logic in case of complicated (multilevel) IVR structures. Select the output of the sub-routing strategy (first IVR menu, previous IVR menu, next IVR menu, sub-tree, final response message) in the dialogue window for your choice. Fig. IVR setting Sub-trees provide an overview of the setting of the next level of call plans. The setting is identical to the setting of the main trees. Fig. Setting of sub-trees 3.2.2.3 Adjustment The Adjustment menu contains the tabs: Customer lists, Geographic origins, and Calendars. The Customer lists enables you to add Primary Lists - black lists, white lists and Exception Lists green lists of numbers that may be used in your call plan. You can also define a list of PIN codes, numerical codes and CLI codes granting your callers access to the provided service according to the criteria defined by you. A new list may be added by clicking the “Create a new list” button and uploading numerical files created earlier. Fig. Definition of Primary Lists (Black Lists, White Lists) Fig. Definition of Exceptions Lists (so-called Green list) Fig. Definition of Numerical Lists (PIN codes, numerical codes, CLI) Geographic origins enable you to define the breakdown of the areas by which you will want to route inbound traffic in the call plan to the individual destination numbers or response messages. You can choose from pre-defined areas specified by the operator (breakdown to 14 regions or to lands – Bohemia, Moravia, Silesia), or create your own structure by clicking Create geographic structure . Fig. Definition of Geographic Origin The Calendars options gives you an overview of the available calendars that may be used in your call plans, either preset by the operator (Public – planning calendar including breakdown to working days, weekends and public holidays) or specified by you. You can set a new calendar by clicking the “New calendar” button, filling the required information and setting the rules according to your needs. Fig. Definition of a new (custom) calendar 3.2.3 Wizard menu (wizard administration environment) A wizard is an environment enabling you to set and modify your service provisioned for this environment. It is designated by the following icon in the list of SAN numbers The user with all services provisioned for use in the Wizard environment sees only the “Wizard” menu in the left menu under Routing Activator, while he/she does not see additional functions. Therefore, the above description does not apply to such user. Fig. 5 Application menu – Wizard Environment The Wizard environment is defined by five tabs enabling you to easily define and set our call plan (tree) and its components, see the figure above. Select the number of service to be modified in the SAN selection tab. Click the “Next” button in the lower right corner of the screen. In our example, the service is configured on the SAN service number “+420800000001” for illustration Go to SAN properties tab. Fig. Definition of queuing and blocking of inbound traffic according to the defined criteria If your service is of the Expert price variant, then this tab gives you the option to set blocking of inbound traffic from abroad or from mobile phones. Smart and Expert service variants always give you the option to set queuing of inbound traffic on this tab by clicking the “Set queue” button, filling the required information and saving the setting. The Lists tab enables you to administer a pre-recorded black list, white list, PIN codes, if your service is of the Expert variant. Smart and Expert service variants always give you the possibility to set the calendar on this tab by clicking the “Calendar administration” button, where you can define your own calendar or select a pre-defined one (Public – planning calendar). Fig. Configuration in the Wizard environment Go to Target points tab by clicking the tab or the “Next” button at the bottom of the screen: Fig. Definition of response messages, serial links and destinations This tab enables you to define the destination numbers selected by you for use in your call plan, to add and administer response messages or serial line groups by clicking “Configure destinations”, “Configure serial lines” or “Configure response messages”, filling the required information and recording lists or response messages in wav or MP3 format. A number of response messages pre-defined by the operator are available, which you can also use in your call plan. The response messages are charged for. Call plan – As soon as the “SAN properties”, “Lists” and “Destination points” configuration is ready, go to the “Call plan” tab where the service logic is defined. For an existing call plan, click the orange icon in the “Adjust” column. This will show a preview of the existing call plan and the menu of available criteria and lists for future modification. If you want to create a new call plan, click the “New call plan” button, fill the required information and save. The same preview with the menu of available criteria and lists for your future tree (call plan) will be displayed. List of available criteria: Your calendar – the personal calendar created by you Day of the week – possibility to enter rules for individual days of the week Public calendar – a PUBLIC calendar predefined by the operator Time of the day – possibility to enter rules for a certain time during the day (from-to) Standard IVR – possibility to set routing according to DTMF Routing response message – possibility to set a response message in front of routing traffic to the destination Geographic group – possibility to set routing according to pre-defined geographic groups (defined by the operator or created by customer) Geographic area – possibility to set routing according to pre-defined geographic areas (defined by the operator or created by customer) Percentage routing – possibility to set traffic routing by percentage N-callers – possibility to set routing according to the number of inbound calls Routing destination – possibility to set a pre-defined destination (a telephone number or a response message) Access code reading – possibility to set rules for reading codes granting a selected caller group access to the service PIN code – possibility to set rules of restricting access to a selected group using PIN codes Routing selection code – possibility to set rules of restricting access to a selected group using a numeric code CLI group – possibility to set rules of restricting access for a selected group using CLI. CLIP_CLIR Registration counter – possibility to set on-line monitoring of the number of inbound calls on a specific destination. Overview of available lists: Response message – a pre-recorded response message as a destination of inbound traffic Destination – a pre-defined telephone number as a destination of inbound traffic Serial line – a pre-defined group of telephone numbers with a preset algorithm of traffic breakdown as a destination of inbound traffic Call hang up – call termination Advanced IVR A criterion and a list are added by clicking the icon, opening the criteria menu and selecting the respective criterion or a destination list. Save the created tree, select the activation time from the menu. Your call plan (tree) is now ready for use within the service = activation. 3.2.4 “Backup recovery” menu CWI supports definition of a tree to be used as a backup in case of disaster (i.e. as disaster recovery). The backup routing may be activated directly in the CWI application by clicking Backup recovery in the left Main menu and selecting a specific emergency tree and the “Backup recovery” button. This activates your backup (emergency) call plan. The plan may also be activated by telephone using a PIN defined in the technical specification and selecting from the IVR menu. Normal traffic routing may be restored by clicking the green button “Restore normal routing” in the CWI menu. 3.2.5 “Active reports” menu Active reports are currently not available. 3.2.6 “Admin” menu This menu contains the so-called Instruction logs giving you the possibility to search the history of changes to the configurations of your settings. 3.2.7 “Direct access” menu Selection of Direct access enables you to directly go through the customer’s SAN numbers or different customers. This function is intended particularly for service providers and administrators. 3.2.8 “Help” menu This gives you on-line help for the application, settings of the service, adding parameters, etc. Help includes window screenshots and icons of the application. The appearance and the content of the online help are suited to the settings of your service. Help can also be downloaded in .pdf format. 3.2.9 Restrictions of the application - The language variant of the login window (CZ, EN) depends on the language variant of your Internet browser. When entering descriptions of response messages, destination descriptions, and creating areas, it is not possible to use the following characters highlighted in red: 4 Service configuration wizard We prepared two examples of service settings and creation of a call plan for better understanding of working with CWI. 4.1 Example 1 “Simple routing” Assignment: A user is calling the 800 000 001 service. The call is automatically routed to a fixed destination (a telephone number or a termination response message). In our example, the call is routed to the geographic number 225252525 defined as “Destination1”. A queue is set as default for routing to Destination1 in our example so that other simultaneous callers can wait for connection with Destination1. The procedure of setting the service in the “Routing Activator” web portal: 1. Click the modify icon next to the respective call plan. Setup parameters for the call waiting feature 2. Set the queue; parameters of the queue are pre-defined by default values. Click Next. 3. Pre-define the target to which the service is to be routed and save. 4. Create a new call plan in Call plans tab. 5. Define a new call plan. In this case, it is a simple unconditional routing, i.e. the call tree will only include entering a destination. Save the settings. 6. Activate the created call plan by clicking the Activate button. 7. The status of the service is “active” now. The setting will be come effective on the platform in approximately 60 seconds since saving the Complete setting. 8. To check the setting of the service, click the plan. 4.2 icon in front of the name of the respective call Example 2 “Call plan (structured tree)” Assignment: A user is calling the 800 000 004 service. On working days in the working hours, calls are automatically routed to the IVR system providing for routing to 2 possible branches based on the DTMF selection (the caller is asked by the response message to select option 1 or option 2). If the caller selects option 1, the call is automatically routed to a serial line representing 3 defined destination numbers. Routing to the destination number within this serial line is set to cyclic selection. The serial line contains 3 numbers (Group1) – Destination1= 225252526, Destination 2= 225252527, Destination 3= 225252528 without any queue settings. If the caller enters option 2, the call is automatically routed to one of the two destinations Destination 4= 225252529, Destination 5= 225252530. The traffic is divided 50-50 between the two destinations. Outside working days (Saturdays, Sundays, public holidays), the call is automatically routed to the response message “Hello, you are calling outside the working hours. Please call our customer service line on working days from 9 a.m. to 5 p.m.“. The procedure of setting the service in the “Routing Activator” web portal“ (Service is configured in the advanced environment) 1. Log in 2. Select the number of the respective service that you wish to modify. In our case, select +420800000004. 3. Configure the Destination, the Serial line and Response messages, which is required for preparation of the Call plan. In order to set the destinations, select the “Routing activator > Destination points > Destinations“. 4. Create a new destination and save it. Follow the same procedure to set other destinations to be used for preparation of the Call plan. 5. Prepare a Serial line without a queue. Go to the “Routing activator > Destination points > Serial lines” menu. Select “Create new series”. Name “Group 1”, then select the “Cyclic” parameter. Add new destinations by clicking “Add new destination”. Save everything. The order of selecting destinations may be easily changed using the red and green arrows. 6. Prepare Response messages (voice announcements to the caller) in the next step. Select “Routing activator > Destination points > Response messages”. Note. You have 2 options of creating a voice message for customers: Record your own response message. The message must be in .wav format, G.711, 8 kHz, mono. Order recording of the message from the service provider – GTS Czech s.r.o. In order to create the message, select “Create a ne message/announcement”. Enter the wording/text of the message to the description for future reference. Record the file (.wav) using the “Browse” option. Save everything. Message 1 for a call to enter a DTMF selection ….(example) Message 2 stating “You are calling outside the working hours”. (example) This is the result of the settings 7. The setting of the Destination, the Serial line and the Response message is ready. Now you can configure the “Production tree”. Select “Routing activator > Service > Production trees”. 8. Create a new tree. Select “Your calendar”, the calendar called “public holiday; select “Planning calendar” for “Public calendar” and save. 9. Now you can configure the service. Select “Add”, open the criteria menu. Note. When in doubts, use help, see Menu>Help. 10. We will start our example with: - configuration of the “Public holiday” calendar and setting of working days. - set the working hours to 9 a.m. to 5 p.m. Click Add for “Working days” and select “Time of the day”. Save. 11. Set routing using a DTMF selection. Click “Add” and select the “Standard IVR” criterion. In DTMF settings, “Response message”, select “Message 1” and tick options 1 and 2 in “Digits”. 12. The result will be the following: After selection of DTMF 1, the call will be routed to a serial line in our example. In case of DTMF 2, the call will be routed to one of the two destinations. If the caller does not make a choice, the call will be terminated in our case. For DTMF 1, select “Add” and add the list “Serial line” Select the name of the Serial line. For DTMF, select the “Percentage routing” criterion Enter 50%. In case of no selection or an incorrect selection, add “Call hang up” 13. Destinations must be set for % based routing. These include Destination 4 and Destination 5. No additional conditions in this example. 14. Now add Message 2 to criteria “Rest of the day” and “Other day type”. Do not forget to save the settings. The following picture illustrates the settings. 15. Now just assign the Production tree to the SAN service telephone number. Enter the Menu – Routing Activator > Service > SAN. For SAN +420800000004 number, push the “Example 2”. button and select “Routing by tree” and assign Save. Select immediate activation or postpone start from the menu. If you choose “Now”, the service will be active within 60 seconds. 16. Saving a backup copy of the production tree is recommended! The user can only edit a production tree which is not in the “active” mode. If you wish to edit a production tree, create a copy of the currently active production tree which you can edit as you wish. 5 Service deconfiguration wizard If you wish to remove a configuration, proceed in the opposite direction. Select the removal button for the respective item and confirm Example: removal of a Production tree. 6 Abbreviations and concepts Retail, RT – retail division of GTS Czech Wholesale, WS – wholesale division of GTS Czech WO – Weborder – electronic order . WC – Webcare – electronic portal for service administration by customer/user CWI – customer web interface CWI Wizard – a simpler, instructive version of CWI application CWI Advanced – a more complex version of CWI application for advanced services SAN – service access number (colour number)