1
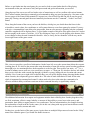
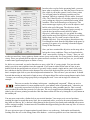
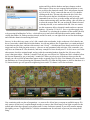
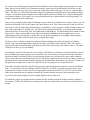
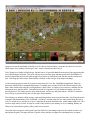
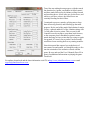
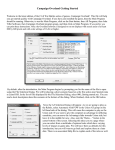
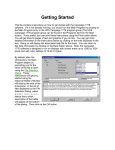
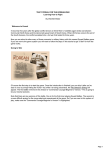
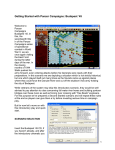
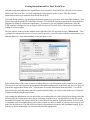
Getting Started tutorial for First World War
Welcome to the latest edition to the Squad Battles series of games, First World War. This title covers various
battles from The Great War. You will command the Allied powers in this scenario. This file contains
instructions on how to get started in First World War (FWW).
If it is not already running, you should run the Main Program (fww.exe) entry in the John Tiller Software \ First
World War program group (The John Tiller Software \ First World War program group can be found under the
Programs list found by clicking the Start button). If you prefer, you can print these instructions. Note: the
FWW software is designed to run on displays with screen areas of at least 800 by 600 pixels and with color
settings of 16-bit or higher.
The first scenario in the list in the window on the right side of the file selection screen is “#Started.scn.” This
is going to be your tutorial scenario. If you are new to the series, you will want to read these instructions as you
fight this battle for a basic understanding of how this game works.
In the bottom center of this same screen is a window that gives you information on the scenarios in the game.
The text gives you some historical or hypothetical background information on the battle and may even give you
some hints, suggestions or house rules. Take the time to read this information about this battle. You will be
better prepared to enter this battle and win it. In this particular battle you will see notes on the use of Chemical
weapons and the Rolling Barrage feature.
After reading the information you now know that you are taking the role of the Allied powers trying to breach a
defensive line the Central powers have dug in to near the Argonne Forest. You should aim to clear the trench
line and hold it against any counter attacks the Central Powers may launch. A tall order indeed. You will need
to coordinate your assets and make the most of the weapons you have available, if your men are to survive and
make it to the objectives. This title will focus heavily on preparation for attack, and coordinated assault. If you
launch your forces haphazardly you will assuredly loose the engagement.
Once you click on “OK” or hit the enter key you’ll see another
menu of choices. This is the A/I Selection Dialog. In this menu
you will pick which side you will be controlling. So choose
“Manual” for the Allied Powers A/I which means you will be
controlling the Allied side. Next, click either on “Automatic” or
“Automatic with FOW” for the Central Powers side. Now the
computer will control the opposition. “FOW” stands for fog of
war. If you choose it, you won’t be able to see any enemy units
unless they come within the line of sight (LOS) of one or more of
your units. Playing with FOW turned on makes the battle much
more realistic and exciting as surprise and LOS are key elements
of small unit actions. If you are, however, a first time player, it will be easier to play without FOW.
Notice the word “Rules…” at the bottom of the dialog box. Clicking on it will allow you turn on and or off the
optional rules in the game. We’ll leave that alone for this time, but when starting future battles you can go in
and select the optional rules that you desire. For more details on each rule, check the “Help” button on that
screen. After you have picked the method of play in the A/I Selection Dialog Menu, click on “OK.”
Since you are playing the Allies you will go first. That may not always be
the case, as sometimes the A/I will go first. A box will appear telling the
player which Army’s turn it is to move as well as turn number and the total
number of turns in the scenario. This box will appear at the beginning of
each turn throughout the game. You can either left-click on it to make it go
away and then repeat that each turn, or you can right-click on it and it will
display briefly then automatically go away each turn for the remainder of
your session.
Notice a small dialog box that appears once your turn starts stating
that you have support in this scenario as well as Smoke & Chemical
limits. Support refers to airstrikes, off-map artillery or in this situation
Rolling Barrages. Remember this and we will come back to it in a
couple of minutes. For now, just click the OK button.
Now you see the battlefield and your troops. If you wish to easily
scroll around the map, click on the menu list at the top called
“Settings.” Then left-click on “Auto Scroll” unless there is already a
check mark next to it. Now you can simply run your mouse pointer to
any edge of the map and the screen will scroll in that direction until the edge of the map is reached.
As you scroll around the map you will see your line along the bottom of the map and the extensive trench lines
of the Central powers stretching upwards. There are barbed wire obstacles before their lines as well as multiple
bunkers at key points giving the enemy overlapping fields of fire, enough to make any man tremble in his boots.
It will be imperative for you to neutralize, or at least significantly damped those bunkers if you plan on making
any progress at all. As mentioned in the opening notes, and evidenced buy the abundant craters along the line,
the first volley of the rolling barrage has already fallen on the Central lines. The barrage will continue at the
beginning of subsequent turns.
Take note of the 7 hexes along the lines with grey boxes with numbers in them, for example hex 18,13 – these
are objective hexes and are points you need to aim to take. Capturing these along with casualty counts are what
determine who wins and looses a battle. The color of the boxes represent the controlling nation and the number
inside is the point value they are worth.
Before we get further into the actual game play we need to look at some further details of the playing
environment so that you can learn to easily navigate around and get the information you are after.
Along the top of the screen you will see both a series of menu items as well as a toolbar with various buttons.
The Toolbar contains shortcuts to commonly used commands to help you speed up game play. Also note on the
last two pages of the General Help manual (F1 in game) are a list of Hot Keys that can also be used to speed
game play. During a normal game the most commonly used menus are the “Command”, “Leader” and “Info”
menus.
Then, along the bottom of the screen you have the Info bar, which gives you details about the forces in the
selected hex, terrain values, hex coordinates as well as notes that may occur from game play actions. If you try
to do give a command that is not allowed or not possible, then an error message explaining why the command
cannot be completed will be displayed here. To give further example of this area of the game screen let’s look at
the hex roughly at the center of your line, 14,16. By clicking on it once we’ll see the display at the bottom of the
screen change to show the units contained in that hex. Also, to clarify, the hex identifier is all the way on the
lowest right corner of the game screen.
This view now provides a good bit of information. On the lower left we see the current time & date the scenario
is taking place in. We also see the current sides turn, the number of turns left and any special weather conditions
that might exist. As mentioned before, the hex number is to the far right. Then we have our units – a 2nd Lt., a
section of infantry men as well as a crew served heavy weapon – a 37mm gun. We also have the hex info which
shows us in a clear hex with a trench dug through it (which we occupy) along with our elevation and current
visibility. Now I want you to right-click on the Info Bar, you will see the display change showing further details
about our units, the weapons they posses and the hex. The order of battle information is listed for the units
which is important for command and control. Leaders need to be close to the units they command to be
effective and their ability to influence units not in their command hierarchy is significantly reduced.
The additional information for weapons and equipment includes their reliability, how fast they degrade as they
are fired; maximum, effective range; lethality, a measure of their ability to cause loses to the enemy; and
penetration, their ability to negate protective cover and armor. The hex information box also changes showing
the total number of men in the hex in the center (16x in this case) along with any special terrain features on the
hex sides, such as trails, streams and walls.
So that gives you the basics of the game screen. Again, there are multiple Help resources located on the “Help”
menu from within the game if you would like further resources.
In order to have a plan for the upcoming battle, you must
know what is required to win. Only the player who moves
first, which is you in this scenario, scores victory points.
You will gain points for inflicting casualties on your
opponent. Objectives captured will also add to your total
score. The Central Powers A/I can take points away from
you by taking any objectives you hold and causing Allied
casualties. There are different types of objectives. The
most common type requires you to seize the objective and
hold it at the end of the game. The objectives in this
scenario are of this type. Others may require you only to
seize the hex, but not necessarily hold it (Capture
Objective), while others may give you points for exiting
units from the map (Exit Objective). Objectives can also be
hidden from your view until you move into the hex
(Hidden Objective). You can read more about them in the
User Manual accessed from the Help Menu in the game, by
pressing F9 in game, or by selecting it from the Program
Group off the Start menu.
Once you have examined the objectives on the map, take a
look at the victory conditions. These are found under the
“Info” menu item by clicking on “Victory.” Here you will
see that you need sixty victory points to obtain a minor victory and seventy five victory points to obtain a major
victory. Since you currently hold no objective points and have not taken or caused any loses yet, you will need
to make some significant progress to obtain a victory.
So, before we can assault, we need to know how to move, right? Ok, it’s pretty simple. You just select the
unit(s) you wish to move and then issue the command. If you want to control all the units in a hex at once
double-click the hex and all units are selected. If you only wish to control a single unit in a stack click on the
hex, and then in the Hex Info area at the bottom of the screen click the desired unit you wish to control. Once
that is complete right-click on your desired adjacent destination hex. This will move your unit into it. It should
be noted that moving an entire stack of units at once will negate things like road movement bonuses and so forth
– because you are moving a large group likely overlapping the road – not a unit in single file column, for
example.
There are two modes for infantry in this game – standing and “on ground”. When you are in a
combat situation it is most prudent to move your infantry in the on ground mode – otherwise you
are greatly exposed and very likely to be cut down by enemy machine gun fire. This is a much
slower method, but much more protective of your men. The way to toggle between standing and on ground is
either by the red arrow pointing towards the white line button on the tool bar or by hitting the 0 (zero) button on
the number pad.
You may now want to take a further look at your tactical situation. Your troops are in covered positions
awaiting the signal to assault the enemy lines, but as mentioned earlier, we need to do some preparation before
they head over the top. We’ve had one rolling barrage hit the objective line already and command tells us more
will be coming in roughly 5 minute intervals. Remember that Support dialog box that came up? Now it’s time to
put some of that to use.
We were given two types of support options beyond what we see on the map – both smoke and chemicals.
Looking at the line we see the strong points of the bunkers…so the best possible use of our chemicals at this
point would be to hit the bunkers and put a damper on their
effectiveness. There are two weapons on the map that we can
use to deliver the chemical rounds. The 4 inch mortars located
at 2,18 & 30,18. So let’s start with the one at 2,18 by doubleclicking on the hex. This not only selects the hex, but it also
selects the unit in the hex which makes it ready to accept
commands from us. Now, go to the toolbar and select the shell
in between the turning arrow and the red flag - this will allow us
to select the weapon load. We can see that the Chemical round
is already selected, so we can then click OK. Now we want to
use this weapon to deliver chemical rounds on the two nearest
bunkers – located at 2,11 & 9,13. So we can either toggle into
“Fire Mode” by selecting the crosshairs off the toolbar (far left)
or by pressing & holding the Ctrl key – which allows us to move back and forth between the modes without
visiting the toolbar. So with our mortar selected, and in fire mode, we can right-click on our first desired target
and watch the chemical round being delivered.
Success! A direct hit in my game, so let’s lob a round at the next bunker. Argh, on that one it feel short by one
hex so I must take a third round to hit this bunker. As with any indirect fire weapon there is a certain amount of
scatter that can take place, and since this mortar is not “Set up” – which means it has already worked out all its
ranges and can fire with pin-point accuracy – then we are not guaranteed a hit each time. Now remember, you
only have an allotment of 8 for chemicals, and in my example we have already used 3. So let’s move over to the
other mortar, check its assigned round, and try to hit the remaining bunkers along the line. My next vollies
weren’t that great either – with the 3 rounds I fired only one was a direct hit. That means I have a bunker left on
the line not impacted by gas yet and only 2 rounds left. When you select one of the hexes where gas has hit
though you can see it has an immediate impact on the occupants. Page 50 of the User Manual gives more details
on what those are. From referencing the Parameter Data File (F2) from the Help menu we also see that there is a
3% chance that the gas will spread to neighboring hexes and a 2% chance it will clear each turn.
Now continuing with our plan of preparation – we want to fire all our heavy weapons at available targets. We
only want to use the heavy weapons though in order to conserve the effectiveness of our light weapons for the
assault and to limit the exposure to our troops until it’s time for them to assault. If you really want to manage
this tightly you can “Toggle Hold Fire” from the command menu for each stack to prevent your troops from
firing.
So we have some machine guns along the line that should be used to soften things up, but we also have some
tanks. Since we know artillery fire in incoming we don’t want to move forward into the field of fire, so take
ranged fire shots with your guns. If you select one of the tanks with a 37mm gun you will see 3 options under
loads – SH, AP & CA. SH would be good for ranged fire against any non-hard target such as infantry or heavy
weapons. AP would be for hard targets such as other tanks or bunkers and finally CA is canister and should be
used against infantry at 1 hex range. You can get further details on weapons and their loads by pressing F3 or
going to weapon data in the Help menu.
Once you have completed this round of softening its time to allow the Central Powers to take a crack at you. We
do this by clicking the “Next Turn” button, but a note before you do. This will activate the AI and you will see
each and every fire it makes along with the target it is shooting at. Once you gain a comfort with the system you
may want to speed the AI’s turn up a bit. You can do this by pressing the F8 key, or by going to the AI menu
and selecting Fast AI Processing. This will significantly speed things up. Go ahead and proceed with the Central
Powers turn – when it is done and it’s time for your next turn do nothing after advancing the turn, as your
rolling barrage will come into play. Let this fully execute before attempting to do anything within the game.
There will be 12 vollies of three rounds each to complete the barrage.
Ok, now we have 2 chemical rounds left and some further softening to do before kicking off our infantry
assault. Target any remaining bunkers along the line and try to hit them with chemicals. Then you can start
moving your tanks forward focusing on the nearest points of the line and any close objective hexes. The tanks
will help clear the way for your infantry.
Be looking for your kick off points for your assault as well. Ideally you will move troops forward into cratered
hexes in order to give them as much cover as possible. You also want to avoid any hexes that have chemicals
deployed in them! And finally, before you start moving forward you will want to fire some smoke rounds to
create a screen between you and the enemy forces. The smoke rounds can only be fired by the heavy mortars, so
depending on how many chemical rounds you shot will determine how much smoke you can let fly. Smoke also
dissipates after a single turn, so only fire it right before you are going to move troops in that area.
It should be noted that trenches only offer full protection when being attacked from hexes forward and behind
them – so you need to aim to get infantry inside the trench line as swiftly as possible in order to attack with
maximum effectiveness. In my scenario I am targeting the trench line between 18,13 & 22,12 as I have three
tanks in the immediate area to support the assault, my chemical attacks on the two adjacent bunkers were
successful, and initial intelligence shows a slightly lighter defense in this area.
So with that, I toggle my left most mortar to smoke and fire off three rounds of smoke to mask my infantry’s
movements. I let fly with all the heavy machine guns in the area and then blow the whistle to send my boys over
the top.
I put pressure on the remainder of the line as well with my tanks and heavy weapons, but until I see how the
initial stages of my infantry advance go I don’t want to commit any other forces.
Turn 3 brings us a further rolling barrage, but this time it is focused behind the main enemy line suppressing the
rear echelon support elements. I let loose with my heavy machine guns and then put down a final blanket of
smoke in hopes that my men will gain enough cover from it to make their break into the trenches on the next
turn. I also doge the hexes where chemicals have drifted, as that will put a big damper on things.
As the assault progresses some of my men become pinned, so I use the “Highlight Organization” button to
determine which leaders command which troops. I can then move a leader over to the effected units to rally
them, either on this turn using the red flag button to “Rally Units” or simply to be in the hex with them for the
subsequent turn’s morale checks. Command and control is imperative if you intend on keeping your forces
moving forward. The leaders need to move with the men, but also try and protect them – because a leaderless
force will go to ground and stay there in this type of environment.
Turn 4 brings yet another rolling barrage, again marching further away from the front lines. My first tank makes
it into the trench and infantry isn’t far behind…and there’s assaults setup for two other points along the line as
well. To assault all you need to do is move a unit into the desired destination hex with a normal right-click. This
can be a single unit or a stack. Always be careful of the position your infantry are in, as standing infantry are
likely to be mowed down quickly if they waltz into an assault.
Given the relative progress at this point I pour the bulk of my remaining troops into the assault in order to try
and exploit the gains, leaving a thin line of guards in my trenches to support the remaining heavy weapons.
Turn 6 has me making decent progress, with the trench
line breached at 4 points, one bunker in Allied control
and three tanks followed up by infantry rolling forward
and wreaking havoc. It has come at a cost however, and
while we now have a draw, the Allied forces are
certainly bleeding for their efforts.
I continued to press my attacks, rallying men to keep
them all moving forward, and following up the tanks
progress. By the end of the match I had obtained a major
victory, captured and held 2 of the 4 bunkers along with
3 of the other objective points. This was not for the
Central Powers not trying to wrest them back from me,
as the computer player marshaled a spirited counter
attack throwing its reserves into the fray trying to regain
lost ground. If it wasn’t for my tanks I most assuredly
would have been crawling back to my starting trenches.
Since this tutorial has exposed you to the basics of
movement, fire and assault, you should be ready to dive
into the remainder of the scenarios offered with the
game. Be sure and read the User’s Manual (Press F9 in
game) for additional information on playing the game.
Good luck!
For updates, downloads and the latest information visit JTS at http://www.johntillersoftware.com or email
[email protected] .