1
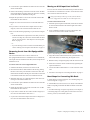
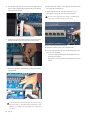
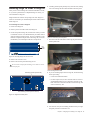
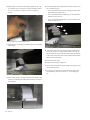
8 Loosen the two captive thumbscrews that secure the card to the chassis of Mix Rack. 9 Remove the mounting screws that secure the card to the back panel of Mix Rack, and gently slide it out of the slot. Carefully set the card aside for installation in Stage 48. 10 Repeat the procedure to remove the card from slot B of Mix Rack. Mark the cable end “B.” 11 Repeat to remove the card from slot C. Mark the cable end “C.” 12 If you want to relocate the AO16 Output card in slot D to Stage 48, remove the card and mark the cable end “D.” 13 Do one of the following depending on your desired configuration: Moving an AI16 Input Card to Slot D To move an AI16 card to slot D of Mix Rack, you must first move two internal I/O card brackets in slot D to secure the back of the AI16 card to the chassis of the rack. Only perform this procedure if you want your Mix Rack remote configuration to include one local AI16 input card. To move an AI16 Card to slot D: 1 Inside the open front panel of Mix Rack, locate the two interior IO card brackets attached to the left and right sides of Mix Rack in slot D. 2 Use a #1 Phillips screwdriver to remove the brackets. The screws are accessed on the outside of the rack. • If the Mix Rack has an output card in slot E that you want to relocate to a Stage 48, remove the card and mark the cable end “E,” then proceed to “Next Steps for Converting Mix Rack” on page 13. – or – • If you are moving an AI16 card to slot D of Mix Rack, proceed to “Moving an AI16 Input Card to Slot D” on page 13. Removing Cards from IOx-Equipped Mix Racks This section describes how to remove cards from an IOx-equipped Mix Rack. IOx is installed in slot A of Mix Rack, AI16 Input cards are installed in slots B–D, and an output card is installed in slot E. Figure 7. Repositioning one of the two IO card bracket 3 Align the brackets with the bracket holes just behind the original bracket holes, and attach using the original screws. 4 Hold the card by its edges and gently slide the card into slot D. 5 Secure the card to the chassis of Mix Rack by tightening the captive thumbscrews. To remove cards from an IOx-equipped Mix Rack: 1 Inside the Mix Rack, locate the AI16 card in slot B. 6 2 Disconnect the ribbon cable attached to the card by pushing the tabs on the card’s port outwards to release the cable. The ribbon cables attached to the Stage I/O cards will be connected to the Ethernet Snake card when it is installed in the rack. Connect the ribbon cable marked “C” to the connector on the card. 7 Proceed to “Next Steps for Converting Mix Rack” on page 13. 3 Mark this cable end “A” to help identify the cable when connecting it to the Ethernet Snake card. 4 Loosen the two captive thumbscrews that secure the card to the chassis of Mix Rack. 5 Repeat the procedure to remove the card from slot C of Mix Rack. Mark the cable end “B.” 6 If you want to relocate the AI16 card in slot D to Stage 48, remove the card and mark the cable end “C.” 7 If you want to relocate the output card in slot E to Stage 48, remove the card and mark the cable end “D.” Next Steps for Converting Mix Rack Install Stage I/O cards in Stage 48. See “Installing Stage I/O Cards in Stage 48” on page 17. Find the Mix Rack Remote Conversion Guide in the Ethernet Snake card package and install the Ethernet Snake card in Mix Rack. Use the include Stage 48 Quick Setup Guide (or see Chapter 3, “Connecting Stage 48” in this guide) for instructions on how to connect, power on, and confirm system I/O. Chapter 4: Configuring and Installing I/O in Stage 48 13


![Stage 48 - akmedia.[bleep]digidesign.](http://vs1.manualzilla.com/store/data/007247961_1-0fc36f720a3108317a47260e3de3799a-150x150.png)