Transcript
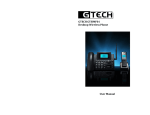
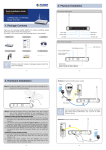
BOX CONTENTS
A
For legal notices, compliance and other information about G-CONNECT,
or to download the full product user manual, please visit our online
support at: http://www.g-technology.com/support/g-connect
G-Technology™ by Hitachii
B
Quick Setup Guide
C
D
1
A
G-CONNECT
C
Power Adapter
B
USB Y-Cable
D
Power Cable
2
POWER ON YOUR DEVICE
©2011 G-Technology by Hitachi Global Storage Technologies. All rights
reserved. Designed by G-Technology in California. G-CONNECT and
G-Technology are trademarks of Hitachi GST. Apple, iPad, iPhone, iPod
touch, Mac OS, and the Mac logo are trademarks of Apple, Inc., registered
in the U.S. and other countries. Windows 7, Windows Vista, and Windows
XP are trademarks of the Microsoft group of companies. All other
trademarks are the property of their respective owners.
CONNECT TO THE WIRELESS NETWORK
Go to the Wireless Network Connection icon on your personal computer and view your available
Wireless Networks. Find the network named ‘G-CONNECT-XXXX’ and connect to it.
After connecting the power adapter, turn on the
G-CONNECT by pressing the Power button.
The Status and PWR/HDD status indicator lights
will illuminate. The Status light will continue to
flash for a few moments indicating that your
device is powering on. You are now ready to
connect to the Wireless Network.
B
D
C
Note: The last four characters after the name G-CONNECT are the last four digits of your device’s
internal product key, which is a unique number assigned to each device.
Macintosh
Windows
E
A
A Power Button:
(On/Off) Press the power button and
wait for the LED’s to begin flashing. Do
not disconnect the decvice from the
power adapter unless the LED’s have
turned off.
B
3
C
Power Port:
Connect the device to the power adapter
to enable wireless access.
D USB Port:
E
Ethernet Port:
Connect an Ethernet cable (sold separately)
to your home network to enable
Internet access.
Once you are connected to the G-CONNECT-XXXX wireless network, open a new browser window and
type in http://www.gtech-connect.com to go to the G-CONNECT Welcome page. Click on the link that
says ‘Click here to begin’ to start the setup process.
Used for quickly moving files to and from
the device using a personal computer.
WiFi Button:
Used to enable and disable the wireless
network. Also used to reset the device.
SETUP YOUR G-CONNECT
1
CONNECTING TO THE INTERNET
Wireless Network (SSID) name
Just like connecting to the Internet through a wireless home router, the Wireless Network (SSID)
name is used to identify your G-CONNECT device when connecting over Wi-Fi. You can leave this
as the default name ‘G-CONNECT’, but it is recommended that you enter a name that is more
meaningful to you.
The Wi-Fi password is used as both the password to the Wireless Network and the password to
the ‘Guest’ account. Guest users are only allowed access to content found in the public folders on
the device.
2
You can also use your G-CONNECT device as a
Wi-Fi hotspot to browse the Internet. Just plug
an Ethernet cable from your home router into
the G-CONNECT device and open a browser to
begin surfing the web.
Admin Account
The Admin is typically the owner of the G-CONNECT and can manage all of the content found on
the device. This password is different from the Wi-Fi password because it allows access to both
the private and public content on the device
Finishing the setup
Once you’ve entered your information click on the ‘Submit’ button to complete setup. You can now
begin using G-CONNECT by entering http://www.gtech-connect.com into your preferred web
browser and logging in using either the Guest or Admin account credentials.
4
WELCOME TO G-CONNECT
Now that the G-CONNECT has been successfully setup, you can add content in a variety of ways.
The recommended way to quickly add content to the device is by using the included USB Y-Cable.
For alternate ways to add content, visit http://www.g-technology.com/support/g-connect
Using the G-CONNECT
Getting the free iPad/iPhone app
The G-CONNECT features a built-in application that functions like a typical website.
To access this application from your Personal Computer, open your desired web
browser and go to: http://www.gtech-connect.com and log in using either the
Admin or Guest account password.
Transferring files using the USB Y-Cable
A
Power off the G-CONNECT by pressing the power button found on the device until the LED’s
begin flashing. When the LED’s turn off, it is safe to disconnect the power adapter. Using the
USB Y-Cable provided to you with the box contents, plug the two identical ends of the Y-Cable into
your personal computer and the third into your G-CONNECT.
B
D
E
F
Download the free app from the Apple
App store onto your mobile device.
Use the G-CONNECT app to wirelessly
connect and stream content.
Please visit our online technical support for more
information about using the iPad/iPhone app.
http://www.g-technology.com/support/g-connect
C
Your G-CONNECT should now appear as a drive on the desktop if using a Mac and in ‘My Computer’
if using Windows.
Open Finder on your Mac or Windows Explorer on PC and find the G-CONNECT icon. Drag and drop
files from your personal computer into the default folder types on the G-CONNECT. It is recommended,
but not required that you use these folders to organize your files.
Files added into the top level folders are private and only visible by
users who log in using the Admin account. Files added under the Public
folder are accessible by all users that log into the G-CONNECT using the
Guest password.
Once you have added your content to the device, you can safely
remove the G-CONNECT from your Personal Computer and reconnect it
to the power supply for Wi-Fi access.
After transferring large amounts of content it is recommended to leave
your G-CONNECT on overnight to properly categorize your content.
A
Available Capacity
D
B
Display and manage content by folder
E
Show Thumbnail or List view
C
Display content by type
F
Perform actions on selected items
(Play/Slideshow, Delete, Upload, Download)
Sort content by date created
R1 - 02/12