1
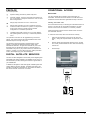
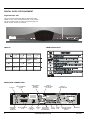
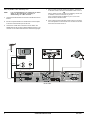
Contents
Programme Blocking
Menu Navigation Route
About This Manual .............................................................
2
Safety
2
.................................................................................
Preface
................................................................................
Digital Satellite Services
Conditional Access
....................................................
...........................................................
3
3
3
.......................................................... 14
......................................................
15
.......................................................................
16
Language Selection ..............................................................
Language Options in Guide and Menu ..................................
Soundtrack Options ..............................................................
16
16
16
Program Blocking Options........................................................
Blocking Options .................................................................
17
17
Using Menus
Change PIN code for Blocking ............................................
17
Smart Card ..........................................................................
Inserting the Smart Card ................................................
3
3
Information Display Period ......................................................
18
Digital Satellite Equipment
4
Local Time................................................................................
18
Digital Satellite STU ...........................................................
4
Mailbox
18
Display .................................................................................
Front Panel Keys ..................................................................
Rear Panel Connections .......................................................
4
4
4
Over The Air Software Download............................................... 18
Remote Control Unit
5
................................................
...........................................................
Replacing Batteries in the RCU .............................................
5
Getting Started
6
....................................................................
Setting-up the System ..........................................................
Switching on the STU at the Mains .......................................
Tuning your TV .....................................................................
Standby and Normal Modes ..................................................
6
6
6
6
Installation Options
7
............................................................
Introduction ...........................................................................
Hints to Quality TV System Configurations ...........................
STU, TV (using SCART or RF Interface) ...............................
STU, TV (SCART or RF Interfaces), Hi-Fi .............................
STU, VCR, TV, Hi-Fi .............................................................
STU, VCR, TV, Hi-Fi (using RCA Connectors) .....................
7
7
7
8
9
10
Bouquet Selection
..............................................................
11
Selecting Specific Services ...................................................
Selecting Services Directly ...................................................
Stepping through Services ....................................................
Stepping using the Remote Control ......................................
Stepping using the STU Front Panel Keys ............................
Selecting Specific Services from the EPG ............................
Selecting Services from the Information Bar .........................
11
11
11
11
12
12
12
Controlling the Show
Electronic Programme Guide
..................................................................
18
.....................................................................
22
...............................................................................
23
...................................................................................
23
Specifications
Hotlines
Notes
Macrovision.........................................................................
23
OpenTV Information Bar
12
12
12
12
12
12
13
13
13
............................................. 13
Using the EPG .....................................................................
STU 720if
Troubleshooting
.......................................................... 12
Adjusting the Volume using the RCU Keys ...........................
Adjusting the Volume using the STU Keys ............................
Mute .....................................................................................
Displaying Subtitles or Teletext .............................................
Subtitles ...............................................................................
Teletext ................................................................................
Clock ....................................................................................
Selecting Soundtracks ..........................................................
Power Reset .........................................................................
Reminders
...................................................................................
13
..................................................... 14
...........................................................................
14
OPERATING INSTRUCTIONS
1
ABOUT THIS MANUAL
SAFETY
This manual is a guide on how to use the UEC STU (Set Top Unit)
720 satellite receiver/decoder supplied by FOXTEL.
This STU exceeds International Safety Standards but you must
exercise care when using it. Please read the following
recommended safety precautions carefully, and exercise care at
all times when connecting or disconnecting any of FOXTEL’S
equipment from a power source.
The Digital Satellite STU
Equipment
This section provides an overview of the FOXTEL Set Top Unit
(STU) Equipment. It contains diagrams and tables of the STU and
Remote Control Unit.
MAINS SUPPLY: 192-288 V (220/240 V) AC 50 Hz.
Getting Started
LIQUIDS: Keep liquids away from the STU.
This section explains the basic operation of the STU, from
switching it on to tuning your TV to receive the satellite
programmes.
CLEANING: Before cleaning, disconnect the STU from the wall
socket. Use a cloth lightly dampened with water (no solvents) to
clean the exterior.
STU Connections
VENTILATION: Do not block the STU ventilation holes. Ensure that
free airflow is maintained around the STU. NEVER stand the STU
on soft furnishings or carpets. Do not use or store the STU
where it is exposed to direct sunlight, or near a heater. Never
stack other electronic equipment on top of the STU.
This section deals with the various domestic installation
configurations available and illustrates optional connections for
your TV, VCR and Hi-Fi.
Controlling the Show
This section shows you how to use the various controls to
provide you with the optimum viewing and listening experience.
Using the On-screen Menus
The menu system enables you to set functions in the STU so that
you can customise its features to suit your viewing needs.
Troubleshooting
This section contains a troubleshooting guide and explains how
FOXTEL can provide you with technical assistance.
2
ATTACHMENTS: Do not use any attachment that is not
recommended by the manufacturer, as it may cause a hazard or
damage the equipment.
CONNECTION TO THE SATELLITE DISH LOW NOISE BLOCK
(LNB): The LNB connector cable has a voltage on its centre core.
It is therefore recommended that the STU is disconnected from the
mains power before connecting or disconnecting this cable.
FAILURE TO DO SO COULD DAMAGE THE LNB AND/OR GIVE A
MILD SHOCK.
SERVICING: Do not attempt to service this product yourself. Any
attempt to do so will be against your terms and agreements.
Refer all servicing needs to FOXTEL 131 999.
OPERATING INSTRUCTIONS
STU 720if
PREFACE
CONDITIONAL ACCESS
The manual provides:
Smart Card
Important safety precautions; please study them.
Overview material; read only those parts that interest you.
It is not necessary to study the manual from cover to cover
before using the STU.
You were supplied with a FOXTEL Smart Card when you
subscribed. The Smart Card looks similar to a credit card and is
inserted into the slot behind the right-hand front flap of the STU.
Inserting the Smart Card
Step-by-step instructions on how to use the STU.
Step-by-step instructions on how to install the STU and
connect it to basic sound and TV systems. It is beyond the
scope of this manual to include all of the possible
configurations or installation procedures.
Troubleshooting guide to assist you if you have difficulty
with operating the STU correctly, or if technical problems
occur.
The operation of the STU can be upgraded using over-the-air
signals. This manual and the menus downloaded in the STU are
therefore subject to change at any time.
This document and the information contained herein are the
subject of copyright and intellectual property rights under
international convention. All rights are reserved. No part of this
document may be reproduced, stored in a retrieval system or
transmitted in any form by any means, electronic, mechanical or
optical, in a whole or in part, without the prior written permission
of UEC Technologies (Pty) Ltd, the Manufacturer.
The Smart Card is the key to unlocking the subscribed services in
the STU. The STU will not unscramble scrambled TV or audio
services if the card is not inserted or is incorrectly inserted.
Inserting the Smart Card into the STU allows instant access to
the subscribed services.
To insert the Smart Card, follow the instructions carefully.
1
Open the right hand flap on the front of the STU (see
figure). Swing the flap downwards to expose the card
slot.
2
Hold the Smart Card horizontally with the logo on top and
the arrows pointed towards the slot. Insert the Card fully
into the slot.
3
Close the flap.
DIGITAL SATELLITE SERVICES
The STU has been designed to receive and process digital signals
transmitted from orbiting satellites. The satellites act as mirrors in
the transmission process, beaming the FOXTEL’s signals back to
your satellite dish.
In addition to the digital TV and audio signals, satellite signals also
contain data that the STU extracts, processes and stores. This
provides up-to-date text information on the content and status of
the various services at the touch of a button.
I R D E T O
fluids on it
3 Never submerge card in liquid or use cleaning
1 Do not bend viewing card
2 Do not remove and re-nisert unnecessarily
OPERATING INSTRUCTIONS
I M P O R T A N T
STU 720if
3
DIGITAL SATELLITE EQUIPMENT
Digital Satellite STU
The STU combines a high quality MPEG-2 and DVB compliant
satellite receiver, with a sophisticated decoder in one package.
The STU provides all that you need to exploit the exciting new
satellite services that are now available.
/
P/ V
FRONT PANEL KEYS
DISPLAY
Y
G
R
Y
G
R
Y
G
R
Y
G
Y
R
Green dot:DSD in Standby
mode
Service number 17
selected
Green light:Audio service
selected
Three flashing bars
and red light:Service not found
or signal poor
quality
Y
Y
Y
Y
G
R
Download in
progress,
Steady yellow light
G
R
Green dot flashes
when RCU keys are
pressed
G
R
Yellow light:Mail message
waiting
G
Y
R
Menu selected
G
R
Rotating bar:Searching for
service
information
G
R
Red light:Error Indication
REAR PANEL CONNECTIONS
TO TV/VCR
SCART CONNECTOR
(TO VCR)
AUDIO TO MONO
AMPLIFIER
(TV OR VCR)
VIDEO TO
NON-SCART INPUT
(TV OR VCR)
SATELLITE
DISH CONNECTOR
WARNING! High Voltage
DANGER! Do not open
Unauthorised opening
renders warranty invalid
Protect against moisture
N4078
Republic of South Africa
TERRESTRIAL
ANTENNA
CONNECTOR
4
SCART CONNECTOR
(TO TV)
S-VIDEO
CONNECTOR
(TO TV)
AUDIO TO
HI-FI
FIXED STEREO
AUDIO OUTPUT
(FOR RECORDING)
OPERATING INSTRUCTIONS
TO EXT.
MODEM
COMMS
PORT
TO SECOND DECODER
IF CONNECTED TO
SAME TV
MAINS INPUT
STU 720if
REMOTE CONTROL UNIT (RCU)
When pressed and held
displays the UHF tuning
channel on decoder and
TV (page 6)
When pressed, displays
the last viewed FOXTEL
programme
Displays the Main Menu, or,
If a menu is already displayed,
returns to the last viewed
Foxtel programme (page 16)
and
arrow keys
Move the highlights up or down
the screen when a menu or
FOXTEL TV/Radio guide is
displayed (pages 13, 14 & 16)
and
arrow keys
Switches options in menus
(page 16)
Removes the TV/Radio guide
STU 720if
or information
from the screen
and redisplays the last
FOXTEL programme you
were watching (page 13)
Puts the decoder into
standby or takes it out
of standby (page 6)
Inserting/changing the batteries
- Never leave flat batteries in the remote control
- Only Insert AAA size batteries
- Make sure batteries are correctly positioned, or
remote will not work
Displays the local time
and date on the TV
(page 12)
Displays a programme
information bar on the
screen for 5 seconds.
When pressed again,
displays extended event
information (page 14)
Selects the electronic
programme guide (EPG)
which displays all the
available FOXTEL TV and
Radio programmes
(page 13)
Selects a programme
when in the EPG and selects
highlighted Options or values
OPERATING INSTRUCTIONS
in menus.
Saves any changed settings
in menus (pages 13 and 16)
5
GETTING STARTED
A Channel number (initially 38) will be displayed on the STU front
panel display. Press UHF on the RCU to remove the test signal.
Setting-up the System
Check that any noise from the STU does not interfere with signals
received on the VCR. Check all tuned channels on the TV for
interference.
Switching on the STU at the Mains
When you first switch on the STU at the mains, it goes through a
power-up sequence, during which various indications are
displayed on the STU display and TV screen, then displays
service number 1 on the front panel display.
NOTE:
4
If any interference is noticed, change the UHF channel
number as follows:
Press and hold the UHF button on the RCU to display UHF on
the STU display and the UHF test screen on the TV.
If the TV is not tuned to the channel
chosen to view the satellite services, the
sequence is still the same, but the TV will
not display the scanning screen or the TV
programme. To tune the TV to the STU
services, re-tune the TV as per Tuning
Your TV.
Change the channel number to 2 more or 2 less than the
existing number (36 or 40) by pressing
or
twice on the
RCU. Press OK to save. The following will happen as soon as
or
is pressed:
a. The TV display is lost because the TV is not tuned to the
new channel.
If your TV has been tuned to accept the
STU services, but your smart card has not
been inserted into the STU, an error
message will appear on your TV screen on
completion of the sequence.
b.
The new channel number is displayed on the front panel
of the STU.
On the TV, retune the channel allocated to the STU until the
STU test pattern is clearly visible.
If your STU was in standby mode with the mains power switch
off, it will display a 24 hour clock when mains power is restored.
Press
to restore the signal.
Repeat step 4 until interference on all channels is eliminated.
NOTE:
It is strongly recommended that the STU is not switched
off at the mains as this will prevent proper operation of
the STU, INCLUDING OVER-THE-AIR SOFTWARE UPGRADES.
If interference is still present, it is
recommended that good quality screened
cables (preferably double screened) are used
for interconnecting all other equipment to the
STU.
Tuning your TV
If your TV is not tuned to the STU viewing channel, you will not be
able to view the satellite services. Your VCR, STU and TV can
also interfere with each other unless they are tuned in correctly.
The output of the STU can be tuned over the whole UHF band
using the following recommended method:
1
2
3
Standby and Normal Modes
The STU does not have a mains power on/off switch and it is
recommended that, for normal viewing, it remains connected to
the mains after installation.
Connect the satellite dish and terrestrial antenna.
On the TV, select any unused channel on which you wish to
view your satellite programmes. Once selected, all your
satellite services will be viewed on this channel, selection of
the service being made using the RCU.
Press and hold UHF on the RCU until UHF is displayed on the
STU display. Tune your TV set to receive the STU test signal
display (see following figure).
When the STU is not in use, it should be switched to the standby
mode using the symbol on the front panel or on the RCU.
The standby mode is indicated by a 24 hour clock display on the
STU display panel. To use the STU after the initial installation:
1
Switch on the TV and any other equipment included in the
system.
2
Select the channel on the TV that you have allocated for
viewing the satellite services.
3
If the STU is in the standby mode, press
on either the
RCU or STU front panel, to return to the normal viewing mode.
A service number will be displayed on the front panel
indicator.
4
You will be returned to your last selected TV or Music &
Radio channel.
5
If you wish to select TV programming, press TV on the RCU.
6
If you wish to select the Music & Radio Services, press the
key on the RCU, or TV/ on the STU front panel. If
subscribed to, an audio service will be heard, and the audio
programme information box will be displayed on the TV. A
green indicator on the front panel display is lluminated while
UHF Channel
38
UHF Frequency
597.25
Press OK to save
Press EXIT to cancel
6
After changes have been made, the STU must
not be switched off for at least 3 minutes to
allow for the new setting to be saved.
OPERATING INSTRUCTIONS
STU 720if
the STU is in the Music & Radio mode.
STU, TV (using SCART or RF Interface)
TV Services are restored by pressing TV on the RCU, or TV on
the STU front panel.
NOTE:
NOTE:
When switching from normal to standby then
back to normal, the STU automatically returns
to the previously selected service.
1
7
The STU is set up to the local default settings by the
manufacturer. If it becomes necessary to change the installation
parameters call FOXTEL on 131 999.
As the LNB connection cable carries a small
voltage on its centre connector, it is
recommended that the mains supply to the
STU is switched off before connecting or
disconnecting the LNB cable.
Connect the terrestrial antenna connector to the RF IN socket
on the STU.
The following instruction applies if your TV has a SCART
connector.
The STU is now ready for normal use.
2
If using a SCART-to-SCART cable (not supplied), connect
theTV SCART socket on the STU to the SCART socket on the
TV.
OR
Using a SCART to RCA connector (not supplied), connect the
TV SCART to the A V connectors on your TV. If only one audio
socket is available on your TV, the mono audio connector
should be used.
3
If required, use an RF signal flylead to connect the RF OUT
socket on the STU to the RF IN socket on the TV.
4
Connect the coaxial cable connector from the LNB on the
satellite dish into the socket marked LNB IN on the STU. The
connector on the coaxial cable should be turned until it is finger
tight.
5
If your TV has a S Video connector, connect to S VHS
connector on the decoder. Also, connect Mono Audio on
decoder to Audio In on the TV, or variable audio if you have a
stereo TV.
INSTALLATION OPTIONS
Introduction
There are several ways of connecting the STU to an existing
entertainment system.
The following more common examples enable you to view satellite
services and terrestrial channels, record and playback from a
VCR and listen to CD quality stereo sound on a Hi-Fi.
Consult FOXTEL for assistance in setting up an audio/video
configuration best suited to your requirements.
Hints to Quality TV System Configurations
•
Where possible, connect cables via audio/video outputs/
inputs (SCART or AV) instead of RF connectors.
•
Use an appropriate, correctly installed satellite dish system.
•
Use high quality stereo TV and Hi-Fi equipment.
•
Use high quality screened cables.
NOTE:
When Video and Audio connectors (AV) are used,
it may be necessary to select a Video mode (AV)
on the VCR and TV in place of a TV mode.
RF IN
SCART TO SCART
S VIDEO
NOTE: CONNECT EITHER RF IN TO RF OUT
OR RCA TO RCA
VIDEO IN
AV CONNECTIONS
AUDIO IN
WARNING! High Voltage
DANGER! Do not open
Unauthorised opening
renders warranty invalid
Protect against moisture
N4078
Republic of South Africa
REAR PANEL
STU 720if
OPERATING INSTRUCTIONS
7
STU, TV (SCART or RF Interfaces), Hi-Fi
NOTE:
4
Using a SCART-to-SCART cable (not supplied), connect the
TV SCART socket on the STU to the SCART socket on the TV.
OR
Using a SCART to RCA connector (not supplied), connect the
TV SCART to the AV connectors on your TV.
If only one audio socket is available on your TV, the mono
audio connector should be used.
5
If the TV does not have a SCART socket or RCA AV connector,
use an RF flylead to connect the RF OUT connector on the STU
to the RF IN connector on the TV.
It is recommended that you switch off the mains
supply to the STU before connecting or
disconnecting the LNB connector.
1
Connect the terrestrial antenna connector to the RF IN socket on
the STU.
2
Connect a flylead between the variable stereo sound outputs
on the STU and the audio inputs on the Hi-Fi.
3
Connect the coaxial cable connector from the LNB on the
satellite dish into the connector marked LNB IN on the STU. The
connector on the coaxial cable to the STU should be finger tight.
HI-FI
R
L
SCART TO SCART
AUDIO
INPUTS
RF IN
A
SCART TO RCA
V
WARNING! High Voltage
DANGER! Do not open
Unauthorised opening
renders warranty invalid
Protect against moisture
N4078
Republic of South Africa
REAR PANEL
8
OPERATING INSTRUCTIONS
STU 720if
STU, VCR , TV, Hi-Fi
Follow Steps 5 and 6 if you are using SCART connectors.
NOTE:
5
Using a SCART-to-SCART cable (not supplied), connect the
TV SCART connector on the STU to the SCART socket on the
TV.
OR
Using a SCART to RCA connector (not supplied), connect the
TV SCART to the AV connectors on your TV. If only one
audio socket is available on your TV, the mono audio
connector should be used.
1
It is recommended that you switch off the mains
supply to the STU before connecting or
disconnecting the LNB connector.
Connect the terrestrial antenna connector to the RF IN socket on
the STU.
Follow Steps 2 to 4 if you are not using SCART connectors
2
Using a flylead, connect the RF OUT connector on the STU to the
RF IN connector on the VCR.
6
Using another SCART cable, connect the VCR SCART on the
STU to the SCART on the VCR.
3
If required, use an RF flylead to connect the RF OUT on the VCR
to the RF IN on the TV
7
Connect the VARIABLE LEFT and RIGHT STEREO AUDIO OUT
connectors on the STU to the LEFT and RIGHT AUDIO INPUT
connectors on the stereo.
8
Switch power on to the STU.
.
4
Connect the coaxial cable from the satellite dish to the LNB IN
connector on the STU. Tighten the connector finger tight.
TV
TV SCART
SCART TO SCART
VCR
RF IN
RF OUT
VCR SCART
RF IN
A
SCART TO RCA
V
WARNING! High Voltage
DANGER! Do not open
Unauthorised opening
renders warranty invalid
Protect against moisture
N4078
Republic of South Africa
REAR PANEL
STU 720if
OPERATING INSTRUCTIONS
9
STU, VCR, TV, Hi-Fi (using RCA Connectors)
5
If the TV and VCR have AV connectors, connect as shown in
the diagram.
It is recommended that you switch off the mains
supply to the STU before connecting or
disconnecting the LNB.
6
Connect the VIDEO OUT connector on the STU to the VIDEO IN
connector on the VCR.
1
Connect the terrestrial antenna to the RF IN socket on the STU.
7
Connect the MONO AUDIO socket on the STU to the AUDIO IN
socket on the VCR.
2
If required, using an RF flylead , connect the RF OUT on the STU
to the RF IN on the VCR.
8
Switch power on to the STU.
NOTE:
3
Using another flylead, connect the RF OUT on the VCR to the
RF IN on the TV.
4
Connect the coaxial cable connector from the LNB on the
satellite dish into the socket marked LNB IN on the STU. Tighten
the connector finger tight.
NOTE:
1. If your VCR has a stereo audio input, connect
the FIXED stereo audio outputs from the STU to
the VCR stereo audio connector.
2. Any taping of programmes from your Foxtel
service is subject to copyright laws.
3. Please note that when using the system with
fixed stereo connection, the volume control
cannot be controlled by the Foxtel remote
control unit. This will ensure appropiate sound
levels are recorded when taping programmes.
4. If you wish to use the Foxtel remote control
unit as the master volume control unit, connect
the variable stereo outputs. In this mode care
must be taken that there is sufficient audio level
when recording.
5. Your Foxtel installer will configure your
installation according to current Foxtel guidelines
and your particular TV and VCR.
TV
VCR
RF IN
L
R
VIDEO
RF OUT
RF IN
L
R
VIDEO
WARNING! High Voltage
DANGER! Do not open
Unauthorised opening
renders warranty invalid
Protect against moisture
N4078
Republic of South Africa
REAR PANEL
10
OPERATING INSTRUCTIONS
STU 720if
Bouquet Selection
Stepping through Services
TV services are transmitted in a subscribed package called a
BOUQUET, which contains a number of services. The services
transmitted by Foxtel are contained in a bouquet labelled FOXTEL.
Stepping through services is possible using either the RCU or STU
front panel keys.
Stepping using the Remote Control
When the bouquet is selected, the services in that bouquet will be
listed numerically in the Electronic Programme Guide (see page 13).
Pressing TV on the remote control displays a list of the available
bouquets.
Only one bouquet is available labelled FOXTEL. If the STU is not in
the Foxtel Bouquet, no services will be available. To select the
FOXTEL Bouquet, press the TV button on the remote control (The
FOXTEL Bouquet should appear), then select OK.
To step through services using the remote control, do the
following:
1
Select the type of service required, TV or Music & Radio (
2
Press P+ to step to the next service or P - to step to the
previous service in the list of available services.
).
After pressing P+ or P -, an information box is displayed at the
bottom of the TV screen with details of the service. After a
few seconds, the relevant service is displayed/heard.
3
If required, continue stepping by pressing P+ or P - until you
find the service you prefer. It is not necessary to wait for
services to be displayed/heard before stepping to the next or
previous service.
If you decide to watch or listen to a service you have stepped
to, wait for the service to be displayed/heard. The information
box will disappear after a short while or can be removed
immediately by pressing EXIT.
NOTE:
When you reach the last available service in the
list and press P+ you are returned to the first
service in the list.
The STU is capable of managing multiple Bouquets. FOXTEL may
choose to add further Bouquets post installation of your STU.
Please use the TV button to select the required Bouquet.
Stepping using the STU Front Panel Keys
Selecting Specific Services
To step and select a specific service using the STU front panel
keys, do the following:
Specific TV or Music & Radio services can be selected, either:
1
Select the type of service required, by pressing TV/
to
switch between TV services and audio services. Selection of
the audio service is indicated by a green indicator on the front
panel display.
2
Press
(up) to step to the next service or (down) to step
to the previous service in the list of available services.
•
Directly
•
By stepping through services
•
By using the Electronic Programme Guide (EPG),
or
By using the Information Bar.
•
After pressing
or , an information box is displayed at the
bottom of the TV screen with details of the service. After a
few seconds the relevant service is displayed/heard.
Selecting Services Directly
Services can only be selected directly using the RCU. To select a
specific service, do the following:
1
2
To select an audio service, press
restore TV services.
on the RCU. Press TV to
Press the number of the required service on the RCU’s
numerical keypad.
The specific service will be heard/displayed after a few
moments accompanied by an information box at the bottom of
the TV screen with details of the selected service.
NOTE:
TIP:
3
Continue stepping, by pressing
or
until you find the
service you prefer. It is not necessary to wait for services to
be displayed/heard before stepping to the next or previous
service.
To view/listen to any service you have stepped to, wait for
the service to be displayed/heard. The information box will
disappear after a short while.
NOTE:
To select services requiring two-digit
numbers, i.e.,10-99, press the first digit, then
the second digit without pausing.
When you reach the last service in the list,
pressing
returns you to the first service in
the list.
The
and
symbols have dual functions and
cannot be used for stepping while the volume
control box is displayed on the screen. This
box is displayed when setting the volume, see
this page.
When the key for the first digit is pressed on the RCU, the
corresponding number is displayed on the left of the front
panel numerical display on the STU. After a few moments,
the number moves to the right. The second digit of two
digit number must be keyed in before this move takes
place
STU 720if
OPERATING INSTRUCTIONS
11
To remove a subtitle do the following:
Selecting Specific Services from the EPG
NOTE:
For a description of the Electronic Programme
Guide (EPG) refer to page 13.
1
Press
symbol on the RCU. A box is displayed on
the TV screen as follows:
1 of 2
Selecting Services from the Information Bar
NOTE:
A description of the Information Bar is on page
14.
Press OK to select
NOTE:
Controlling the Show
2
Adjusting the Volume using the RCU Keys
NOTE:
The volume level is depicted by the length of the highlight bar on
the on-screen display.
NOTE:
The Fixed Stereo Sound Outputs (Left and
Right) cannot be controlled with the volume
control keys on the RCU or on the front panel
and the Mute function will not operate.
If subtitles are not available, a “No subtitle”
window is displayed for 5 seconds. Press EXIT
if required.
To restore the subtitles, press
is displayed:
It is recommended that you first select a
terrestrial channel, then set the volume on the
TV to a comfortable listening level.
To adjust the volume level on the STU, select your satellite
service, then press V+ to increase the volume level or V- to
reduce the volume level.
Stop subtitle
2 of 2
again. The following box
(Language)
Press OK to select
Teletext
Some services may have a teletext service. This can be selected
as follows:
1
With the service selected, press
symbol twice on the
RCU. The following box is displayed:
Adjusting the Volume using the STU Keys
To change the volume level, press P/V on the STU. An on-screen
volume display is displayed for a brief time.
Note that the symbol changes to three bars to indicate teletext
selected.
While the volume control display is displayed, press and release
or
to respectively increase or reduce the volume level in
separate steps. The change in volume level is depicted by the
changing length of the highlight bar.
NOTE:
The Variable Stereo Sound Outputs (Left and
Right) can be controlled using the volume
control keys on the RCU or on the front panel.
Mute
If teletext is not available, a “No teletext” window is displayed
for 5 seconds. If other languages are available keep pressing
the symbol until the language is selected.
2
To make the teletext transparent press the
3
To page up or down, press P+ or P- on the RCU. To change to
a distant page, select the page number on the RCU keypad,
then press OK
4
To clear the teletext, press EXIT on the RCU.
To mute the audio do the following:
1
Press
on the RCU. The following window is displayed
for 3 seconds and the audio muted:
2
To restore the audio, press the symbol again. The audio is
restored at the previous level and the volume control window
displayed for 3 seconds.
Clock
To view the time do the following:
1
3
Adjust the volume level using V+ and V-.
NOTE:
The mute function is disabled when the FIXED
STEREO audio outputs (Left and Right) on the
STU are used. This ensures a fixed volume
level for recording purposes. The VARIABLE
STEREO audio outputs (Left and Right) of the
STU can, however, be muted.
symbol again.
Press
on the RCU. The date and time are displayed for a
few seconds. If required press EXIT to clear.
Selecting Soundtracks
Available language soundtracks, included with programmes, can
be heard and selected at any time while watching a programme.
NOTE:
Displaying Subtitles or Teletext
Preferred soundtrack languages for automatic
selection can be set using the menu system.
Refer to Soundtrack Options (page 16).
Subtitles
If subtitles are available, they can be displayed on the screen as
part of the programme.
12
OPERATING INSTRUCTIONS
STU 720if
To listen to and select available soundtracks, do the following:
1
NOTES:
Press
? on the RCU. The current soundtrack language is
displayed as follows:
?
1 of 2
TV programmes are not displayed and audio
not heard while the EPG screen is displayed.
English
2
Press OK to select
Pressing OK selects the option listed.
2
3
When pressing any of the arrow controls on
the RCU, the colour of the displayed arrow in
the EPG screens darkens to indicate activity.
Press the symbol again. If additional soundtracks are
available, the next soundtrack option is listed in the window.
Continue pressing to cycle through all the available
soundtracks.
Use the cursor keys
or
to scroll up or down the list, as
only five events are shown on the screen. When the last
event is highlighted and you press , six new events are
displayed and the highlight is put at the top of the list. This
also works for scrolling up.
The list is continuous, so after the last service the Guide
starts displaying service 1 again.
The current programmes are listed when NOW is selected
and the programmes to follow are listed when NEXT is
selected.
Press OK to select a soundtrack language. The soundtrack
window is displayed and the new soundtrack is heard.
Power Reset
Should your TV picture freeze, it is possible to reset the STU
without unplugging it from the power supply.
Simultaneously press then release the
the STU front panel.
and TV/
3
To move between the NOW or NEXT programmes, press
on the RCU.
4
Select the highlighted programme to view/hear by pressing
OK. NEXT programmes cannot be viewed before their start
time.
buttons on
Pressing OK with NEXT selected sets a programme reminder
and a clock symbol appears under the programme time,
indicating a reminder. To remove the reminder press OK
again; the clock symbol disappears.
ELECTRONIC PROGRAMME
GUIDE
The STU stores up-to-date information, received over the air, of all
the currently subscribed to TV Services and on-air Audio
services, as well as the next and extended programmes
scheduled for each TV and Audio service. The information for
each programme includes, where appropriate:
•
The service number and name
•
Title of the programme
•
Censorship classification of the programme
•
Brief information on the programme
•
Start and finish times of the current programme
•
Reminders
•
Impulse Pay Per View symbol (when available)
i
5
Additional information on the programme is displayed when
on the RCU is pressed with a service on the EPG selected.
Press EXIT to return to the EPG.
6
Press on the RCU to enter the Music & Radio guide. The
Music and Radio guide behaves exactly the same as the TV
guide. Pressing TV on the RCU takes you back to the TV
guide.
7
Press OK to return to normal viewing/listening on highlighted
programme, or EXIT to return to programme you were
previously viewing.
Using the EPG
1
On the RCU, press TV GUIDE. An on-screen menu is
displayed as follows:
NOTE: The BOUQUET name may be inserted in the TV/
RADIO and MUSIC Guide if multiple BOUQUETS are
available.
STU 720if
OPERATING INSTRUCTIONS
13
OPENTV INFORMATION BAR
PROGRAMME BLOCKING
At any time whilst watching TV services or listening to radio
services, the viewer can obtain information about the current
programme and select available programmes via the Information
Bar.
When the user has selected a service where there is a blocked
programme, a “key” symbol is displayed in the bottom right of the
Information Bar. The message above the Information Bar indicates
that the user should press OK to unblock the programme.
i on the RCU. The following window is displayed:
1
Press
2
Use the cursor keys
or
to scroll up or down through
titles on other services, whilst simultaneously watching the
current service. The current programmes are listed when
NOW is selected and the programmes to follow are listed
when NEXT is highlighted.
Pressing i with the Information Bar displayed, provides
additional information on the programme.
The local time will also be displayed on the TV when the
Information Bar is displayed.
3
Move between the NOW or NEXT programmes by pressing
or
on the RCU.
4
With NEXT selected, an Information Bar appears that displays
the next programme. Pressing OK sets the reminder and a
clock symbol appears in the Information Box. Pressing OK
again removes the reminder.
1
Press OK. A screen requiring the Parental PIN code to be
entered is displayed.
2
Enter your Parental PIN code using the keypad. Refer to
Program Blocking Options on page 17. The programme is then
unblocked.
NEXT programmes cannot be viewed before their start time.
To exit the Information Box, press EXIT or i.
5
When viewing a programme, to tune to another programme
press the numbered keys on the RCU. The Information Bar will
be displayed for 5 seconds (see Information Display Period,
page 18).
REMINDERS
The procedure for setting and removing a reminder has already
been detailed.
Refer to the Electronic Programme Guide page 13 or the
Information Bar, this page. At the right time a reminder message
pops up. If you intend to watch the booked programme, press OK
on the RCU which tunes the STU to the new service. Otherwise
press EXIT to remove the message, while remaining tuned to the
original service.
NOTE:
14
OPERATING INSTRUCTIONS
The default Parental PIN code is 1234.
STU 720if
MENU NAVIGATION ROUTE
NOTE:
STU 720if
OPERATING INSTRUCTIONS
1.The menu structure can be upgraded over
the airby the Service Provider and could
differ slightly from that shown in these
instructions.
2.Decoder Upgrade menu option is only visible
when an Upgrade is being played out.
15
USING MENUS
Language Selection
To use the Menu system:
1
2
Language Options in Guide & Menu
Ensure that the STU is not in standby mode by pressing the
standby button
, if necessary.
Soundtrack Options
Press MENU on the RCU. The following Main Menu is
displayed, which provides access to all other sub-menus as
shown in the following figure:
Press and
to select option
Press OK to confirm selection
Main Menu
Language Option in Guide and Menu
Language Selection
Program Blocking Options
1
On selection the Language Options in Guide and Menu option
is highlighted.
2
Press OK.
The Language Menu containing a selection of languages is
displayed, as follows:
Information Display Period
Mailbox
Advanced Options
Language Options in Guide & Menu
Press an d to select option
Pre ss OK to confirm selection
English
All the menus are navigated as follows:
1
Use
or
buttons to scroll the highlighted bar up or down in
a (sub)menu or a vertical list box.
2
Select a highlighted menu option and go one level lower within
the menu hierarchy by pressing OK on the RCU. This applies
to the Main Menu screen and all submenu screens.
3
Press and
to select preferred language
Press OK to confirm this language
In screens where parameters can be set, OK is used to save
the settings.
3
Use
or
language.
Use EXIT to return to the preceding menu (go one level higher
within the menu hierarchy).
4
Press OK to select the desired language.
5
Press EXIT to return to the Main Menu or MENU to return to
the service.
In screens where the parameters can be set, EXIT is used to
cancel any settings that may have been entered without
saving.
4
Use
and
buttons to change the value of an input field
having preprogrammed values.
5
Use MENU to exit all menus and return to the TV or audio
programme.
6
Use numbered buttons to enter numerical values.
arrows to highlight any other preferred
The menu should now be presented in the language selected
Soundtrack Options
The Soundtrack Options allows users to set the soundtrack
language preference of the STU, if an option is available, and is
achieved by moving the available languages into a list of choice.
To select the soundtrack language of your choice do the
following:
Language Selection
1
The Language Selection screen allows users to set the text
language of the STU, if options are available. The text language is
set for the menus, EPG and Information Bar.
Press MENU on the RCU.
The Main Menu options list is displayed.
NOTE:
On initial selection of the Main Menu, the
default setting is for Language Selection.
To select the text language of your choice, do the following:
2
1
Press MENU on the RCU.
The Main Menu screen is displayed with Language Selection
highlighted.
2
Press OK. The following option list is displayed:
16
Press OK to select Language Selection. Select Soundtrack
Options. The following option list is displayed:
OPERATING INSTRUCTIONS
STU 720if
3
On the RCU, press
or
arrows to highlight the preferred
language that you wish to relocate from the list.
4
Press
to move the highlighted language option into the
relocation window.
NOTE:
5
2
Press OK.
A Security Check screen is displayed, in which the PIN code
for blocking must be entered using the RCU.
3
On entering the correct PIN, a submenu is displayed, which is
organised as follows:
NOTE:
If the incorrect PIN is entered, the previous
menu Security Check) is again displayed.
NOTE:
The default setting is for “No Block”
Although several languages can be available,
only two can be relocated into positions 1 and
2.
Press OK to confirm your selection.
NOTE:
Pressing
? on the RCU displays the
following window at the top of the TV screen:
?
Selected
English
4
Press
or
to highlight the preferred control option.
5
Select your choice by pressing OK on the RCU.
6
Press EXIT to return to the Main Menu or MENU to return to
the service.
Press OK to select
Changing the PIN code
Program Blocking Options
The STU includes a parental guidance facility to control viewing of
age restricted programmes, please utilise this facility. Access to
this facility is controlled via the Parental PIN code.
TIP:
The PIN is set at the factory to 1 2 3 4. If you intend to use
the parental guidance facility, please change the PIN as
soon as possible. Remember to keep a note of your new
PIN in a secure place. If the Parental Lock PIN number has
been changed from the default and is lost or forgotten, it
can be reset by calling Foxtel on 131 999. The PIN will
only be reset for the account holder and ID may be
requested.
To change the existing PIN to a new number, carry out the
following:
1
Press MENU on the RCU.
The Main Menu options list is displayed.
2
Press
OK.
3
On the displayed menu, press to highlight Change PIN code
for Blocking, then press OK. The Change PIN screen is
displayed.
4
Key in your old PIN code.This automatically highlights the new
PIN code to be entered.
5
Change the PIN to its new value. Instead of digits, crosses are
displayed for the PIN codes. When the new PIN code is
entered, a second box is highlighted requesting you to reenter the new code. This is a safeguard against an initial
incorrect entry.
6
The Program Blocking Options menu is automatically
displayed.
7
Press EXIT to return to the Main Menu or MENU to return to
the service.
Parental guidance can only be applied to scrambled programmes.
NOTE:
To use or change the Parental PIN code your
smart card must be in the STU.
Once a viewing channel is unblocked, it will only be blocked again
when the information bar changes the programme and rating
information.
Blocking Options
1
Press MENU on the RCU. The Main Menu options list is
displayed with Blocking Options highlighted.
to select the Program Blocking Options, then press
Program Blocking Options
Blocking Options
Change PIN code for Blocking
Press and
to select option
Press OK to confirm selection
STU 720if
OPERATING INSTRUCTIONS
17
Information Display Period
Mailbox
If the period of time that the Information box is displayed is either
too long or too short, change the Information box display time as
follows:
1
Press MENU on the RCU.
The Main Menu options list is displayed.
The Service Provider can send global or individual messages over
the air. When a message has been received, the yellow front
panel indicator will be illuminated and the
symbol will be
displayed on the TV screen.
To read the message do the following:
2
On the RCU, press
1
Press MENU on the RCU. The Mains Menu options list is
displayed.
3
Press OK.
The Information Display Period screen is displayed.
2
On the RCU, press
4
Press
or
seconds).
3
Press OK. The Mail Messages screen is displayed.
4
Press OK to return to the Main Menu.
to highlight Information Display Period.
to change the information display period (in
5
Press OK to confirm the new time or EXIT to cancel the
screen. The Main Menu is displayed.
6
Press EXIT or MENU to return to the service.
to highlight Mailbox.
The front panel yellow indicator will be OFF and the mail
symbol will no longer be displayed.
Over The Air Software Download
Local Time
The STU acquires the time ‘over the air’ from the Broadcaster.
There is therefore no need for the usere to adjust the time,
however the correct time zone is required for the STU to display
the correct time for that region. The STU is able to automatically
select these values.
The Local Time is controlled from the Local Time menu which is
located under ‘ADVANCED OPTIONS’. The STU operates in two
main modes being AUTOMATIC or MANUAL. In Automatic mode
the region region is selected by FOXTEL over the air according to
your street address, it is recommended that the STU is operated in
the Automatic Mode. In the Manual mode the user can select the
region according to the instructions below.
1. Press the Menu button on the Foxtel remote.
2. Press the
or
arrow and select Advanced Options.
3. Press OK.
4. Press the
or
arrow and select Local Time.
5. Press OK.
6. Use
or
arrow to change Mode.
7. Press OK when finished.
8. Press the
or
arrow and select Region.
9. Use
or
arrow to change Region.
10. Press OK when finished.
11. Press the
or
arrow and select Local Time.
12. Use
or
arrow to set the Local Time. The
arrow allows
you decrease the minutes by 30 minute intervals, while the
arrow allows you to increase the minutes by 30 minute
intervals.
13.Press OK when finished, then Press Menu button to exit to
normal viewing. To view the time, Press the yellow button on
you Foxtel remote.
Upgrades involve replacing the software (programs) in the STU with
improved software, adding more features and improving the existing
operation of the STU. This ensures that the STU does not have to be
replaced each time advances in technology occur. By replacing the
software, you virtually get a new STU.
Software upgrades normally take place automatically over-the-air. The
STU can be upgraded when it is in standby or while it is switched to a
service. The STU software cannot be upgraded if it is switched off at
the mains. It is strongly recommended that your STU is left in the
standby mode when you are not using it.
A message on the TVscreen will warn you that a software upgrade
will take place. Software upgrades usually take place in the early
morning and last approximately 9 minutes, during which time normal
satellite viewing is not possible. After the download is completed, the
STU will automatically return to the current service.
NOTE:
1. Whilst the STU is performing the Upgrade, never
remove power from the STU as this will stop the
upgrade process and will cause your STU to stop
functioning normally.
2. During the upgrade an Amber light will be
displayed on the front of the STU with numbers
and a rotating cursor.
UPGRADE
Checking for Upgrade.
Upgrade is active and will take approximately XXminutes
Advanced Options
Change Dish Installation
Signal Detection
Information
TV Installation
Change Modem Settings
Local Time
Decoder Upgrade
Press and to select option
Press OK to c onfirm selection
Local Time
Mode:
MANUAL
Region:
CUSTOM
Local Time:
14:36
29-09-2000
Use lef t an d righ t arrows to sele ct mad e
Press O K to exit.
18
OPERATING INSTRUCTIONS
STU 720if
Troubleshooting
If any problems are encountered when operating the STU, make
use of the following guidelines to assist in solving the problem.
The STU will automatically detect and diagnose many STU and
transmission related problems. Where possible, the errors will be
communicated via messages on the TV screen and/or the STU
display panel.
Locate either the corresponding error number and message or the
description of your problem in the troubleshooting table and follow
the advice provided.
If you have tried the appropriate remedy and still have difficulty in
operating your STU, please call the hot line.
TROUBLESHOOTING
D ecoder
Front Panel
Message/Display on
TV Screen or Sym ptom
Possible Cause
Rem edies
Any menu is displayed
Normal operation. The decoder Press the MENU button on the
is in menu mode
remote to return to normal viewing
Blank display
Blank screen (TV switched
on)
No mains power to the decoder
Ensure that the mains lead to the
decoder and mains power point is
securely plugged into the mains
outlet, and that the mains is
switched on
Small green dot
Blank screen (TV switched
on)
Normal operation. The decoder
is in standby mode
Press
on the rem ote to return
to return to normal viewing
Remote control does not work
Check that rem ote batteries are
correctly inserted.
Replace batteries and re-try
No small flashing
green dot when
any button on the
remote is pressed
Any programme
num ber
Any display
1.Raise volume using Foxtel RCU
2.Restore correct TV type for
country of operation
On the TV, select the channel
allocated to view the decoder
programmes
No Audio/Noisy Audio
1. Volume control set to low
2. PAL setting incorrect
Terrestrial programme
displayed
Incorrect TV channel selected
to view the satellite decoder
Incom plete video recording
- a portion of the recorded
satellite program me has not
recorded
The decoder has been switched
to standby or to a different
service during the recording
Do not make any adjustments
or selections with the rem ote
during recordings
Interrupted video recording.
Menus or other text appear
on the recorded satellite
programm e, or the sound
level fluctuates
A button has been pressed on
the remote
Do not make any adjustments
or selections with the remote
during recordings
N OTE: The recording o f a ny
chan nel is su bject to cop yright
law s
Blank display
Security check screen
followed by programme
blocking menu
Incorrect PIN num ber entered
3 flashing dashes TV picture breaks up and
and error dot (red) eventually NO SIGNAL
banner displayed
Refer to Programm e Blocking
in this manual. If you have
forgotten your PIN code
consult your service provider
Heavy thunderstorm in progress Wait until storm subsides
either locally or at transmission
point
Any programme
number
SCART functionality incorrectly
set
Press UHF button on remote to
obtain IRD on front panel display
Fa ulty installation
Sign al pro blem
H eavy rain (n ormal op eration will
re su me a s soo n as th e ra in
subside s
C heck, repa ir or rep lace ca bles
C heck d ecod er installation se tting s
R ealig n th e dish
C all th e se rvice pro vid er
TV Gu ide time s are TV Gu ide Start, Sto p D ates n ot
ma tch in g ma ga zine o r curren t
ou t b y 1 ho ur
pla yo ut.
Lo ca l time offset w ro ng
C han ge local time o ffse t. Re fe r to
pa ge 1 8 in th is m anu al
Error d ot (re d)
Th e CAM is m alfun ction ing
C all th e se rvice pro vid er
3 flashin g dash es
an d error dot (red )
STU 720if
No audio or video
N O SIG NAL
or
SEARC HIN G FO R SIGN AL
AT XXXX MH Z
E03 C A mod ule failu re
OPERATING INSTRUCTIONS
19
TROUBLESHOOTING
Decoder
Front Panel
20
Message/Display on
TV Screen or Symptom
Possible Cause
Remedies
Reinsert the Smart Card
Call the service provider
Error dot (red)
E04 Please insert Smart Card
The Smart Card is not inserted
Error dot (red)
E05 Unknown card
The Smart Card is not applicable Reinsert the Smart Card
to this system
Call the service provider
Error dot (red)
E06 Smart Card failure
The Smart Card is damaged
Call the service provider
Error dot (red)
E07 Checking Smart Card
The decoder is briefly checking
the Smart Card
If, after 30 seconds, the
message is still displayed,
reinsert the Smart Card.
Call the service provider
Error dot (red)
E08 CA Module failure
The CAM is malfunctioning
Call the service provider
Error dot (red)
E09 CAD EEPROM error
Error dot (red)
The Smart Card is malfunctioning
Reinsert the Smart Card
Call the service provider
E11 Updating CAD EEPROM
The decoder is briefly checking
the Smart Card
If, after 60 seconds, the
message is still displayed,
reinsert the Smart Card.
Call the service provider
Error dot (red)
E12 CAM failure
The CAM is malfunctioning
Call the service provider
Error dot (red)
E13 CAM failure
The CAM is malfunctioning
Call the service provider
Error dot (red)
E14 Service is currently
scrambled
There is a problem with the
transmission
Wait for the resumption of
transmission
Error dot (red)
E15 Smart Card error
Smart Card damaged
Call the service provider
Error dot (red)
E16 Service is currently
scrambled
Access to service denied
Not subscribed to, call to
arrange subscription.
Error dot (red)
E17 Service is currently
scrambled
Access to service denied
Call the service provider
Error dot (red)
E18 Unknown Card
The Smard Card is not applicable Insert the correct Smart Card
to this system
Call the service provider
Error dot (red)
E19 Service is currently
scrambled
Access to service denied
Error dot (red)
E20 Service is currently
scrambled
Access to service denied
Call the service provider
Error dot (red)
E21 Service is currently
scrambled
Access to service denied
Call the service provider
Call the service provider
Error dot (red)
Event Purchased
Error dot (red)
Preview period
Error dot (red)
E24 Service is currently
scrambled
Access to service denied
Error dot (red)
E25 Event already purchased
Attempt to re-purchase an event
Error dot (red)
E26 Event for sale - cheap
Special of the day
Error dot (red)
E27 No further purchases
possible
Event limit reached
OPERATING INSTRUCTIONS
Call the service provider
Call the service provider
STU 720if
TROUBLESHOOTING
Decoder
Front Panel
Message/Display on
TV Screen or Symptom
Possible Cause
Remedies
E28 Credit limit reached
Entitlements Credit in Smart
Card exhausted
Call the service provider
Error dot (red)
E30 Service is currently
scrambled
Access to service denied
Call the service provider
Error dot (red)
E31 Service is currently
scrambled
E32 Service is currently
scrambled
Access to service denied
Call the service provider
Access to service denied
Call the service provider
E34 Service is currently
scrambled
E35 Service is currently
scrambled
Access to service denied
Call the service provider
Access to service denied
Call the service provider
1. Wrong Bouquet has been
Selected.
2. System error
3. Not a Broadcast channel
1. Press TV button, select
FOXTEL Bouquet, press
OK.
2. Call the service provider
Error dot (red)
Error dot (red)
Error dot (red)
Error dot (red)
Error dot (red)
E37 Service unknown
Error dot (red)
E38 Service is not currently
running
The service is being used for a
special event
Consult the EPG
Error dot (red)
E39 Locating service
The decoder is busy locating
a service
Wait briefly while service is
located
Error dot (red)
E40 IRD memory full
System error
Call the service provider
Error dot (red)
E41 Service is not currently
available
The programme has been
blocked by means of Program
Blocking
Re-assign blocking level
Error dot (red)
E42 Parental control lock
The service has been blocked
Reset blocking level if required
Error dot (red)
E45 Service not allowed
The satellite dish is not receiving
a signal
Check that the satellite
frequency has been correctly
set
Check the installation
Call the service provider
Error Dot (red)
No parental rating in stream
Error dot (red)
E44 Event information not
available
E47 No soundtrack available
An unavailable language has
been selected
Select an available soundtrack
Error dot (red)
E49 LNB overload detected
Installation faulty
Check installation for short
circuits
Consult installer
Error dot (red)
E50 No service available
Error dot (red)
E 53 Incorrect PIN
Error dot (red)
E54 IPPV OK
Error dot (red)
E55 No event information found
Error dot (red)
E56 CAM not compatible
Error dot (red)
E64 Invalid tuning parameters
STU 720if
OPERATING INSTRUCTIONS
Remove Parental blocking on
STU
21
SPECIFICATIONS
Due to continued product improvement, this specification is subject
to change without prior notice.
GENERAL
Front Panel Control Buttons
On/Standby, TV/Audio,
Programme/
Volume up/down
Reset
On/Standby and TV/Audio
simultaneously
RCU
Multi-button, infrared, battery
operated RCU.
Range 7 m, ± 45° in
DiSEqC
Modulated onto 22 kHz
DEMODULATOR
Type
Input Data Rate
Error Correction
QPSK
2 to 45 Mb/s/
DVB specified FEC code rates
STU VIDEO
MPEG-2
STU AUDIO
Decompression
Channels
Sampling Frequencies
horizontal
plane,
± 20° in the vertical plane.
Batteries Type AAA
User Interface
Full On-screen Display with
point and select menus for
setup. TV viewing, audio
listening, teletext and future
interactivity
Subscription service facilities
Smart Card, on-board CA
software and over-the-air
upgradable software
Built-in modem (optional)
Data port
UHF Modulator
PAL BG, Ch 21 to 69, preset to
Ch 38
Mains Voltage
Power Consumption
210 - 250 V AC 50 Hz
30 W Maximum
Dimensions
357 x 70 x 240 mm (W x H x D)
Weight
Approx. 2.5 kg (unpacked)
Operating Conditions:
Relative Humidity
Temperature 5 °C to 45 °C
5% to 80% <38 °C wet bulb
temperature
0 to 2000 m
Altitude
CONNECTORS
LNB input
LNB output
Terrestrial antenna input
TV RF output
TV SCART
VCR SCART
S-VHS
Variable left channel audio
output to TV/VCR
Variable right channel audio
output to TV/VCR
Fixed left and right audio
channels to Hi-Fi
Mono audio to TV/VCR
Internal modem (where fitted)
External modem port
Data service port
SATELLITE RECEIVER TUNER
Receiver Frequency Range
Input Signal Level
Polarisation Switching
22
F-connector
F-connector
IEC 169 female
IEC 169 male
SCART
SCART
MiniDIN
MPEG-1, MPEG-2 Layer
Musicam
Single channel, joint stereo,
stereo
32.0 kHz, 44.1 kHz and
48.0 kHz
REMODULATOR RF SIGNAL
Depth of Modulation
Output Channel Range
Vision-to-sound ratio
Vision-to-sound frequency
variance
Vision carrier frequency drift
RF output level
Output spurii
RF stray radiation
Intermodulation
RF bypass bandwidth
RF bypass insertion gain
RF bypass channel tilt
± 20 kHz from nominal
± 10 kHz
73 dBµ V
<-60 dB
<20 dBµ V at antenna input
-60 dBc
47 MHz to 860 MHz
2 dB
1 dB
MEMORY
RAM
Flash - EEPROM
NVRAM
4 Mbyte
2 Mbyte
16 kbyte
VIDEO SIGNAL
Output
Format
Bandwidth
1 V peak-to-peak, 75
PAL
5 MHz
AUDIO SIGNALS
Output
Frequency range
88% PAL B/G
21 to 69 (preset to channel 38)
14 dB
Dynamic range
Distortion
Noise
L-R level difference
Crosstalk
1 V r.m.s. into 10 k
20 Hz to 20 kHz at 44.1 kHz
sampling rate
80 dB
± 0.2% @ 1 kHz
-80 dBµ
0.5 dB
-60 dB
EXTERNAL MODEM
Maximum data rate
19200 bits/s
RCA
RCA
RCA
RCA
RJ11
9 pin D-type male
9 pin D-type female
950 to 2150 MHz
-20 dBm to -65 dBm
13.5 - 18 V DC 350 mA
maximum, short circuit
protection
OPERATING INSTRUCTIONS
STU 720if
MACROVISION
HOTLINES
Foxtel Hotline Number:
NOTES
STU 720if
131 999
This product incorporates copyright protection technology that is
protected by U.S patents and other intellectual property rights. Use
of this copyright protection technology must be authorised by
Macrovision, and is intended for home and other limited pay-perview uses only unless otherwise authorised by Macrovision.
Reverse engineering or disassembly is prohibited.
NOTE:
This technology is permanently DISABLED in this
product.
OPERATING INSTRUCTIONS
23