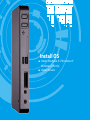
1
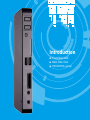
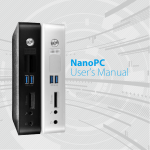
NanoPC
User s Manual
Trademark:
All trademarks are the property of their respective owners.
Version:
User’s Manual V1.1 for NanoPC.
Symbol description:
Note: Refers to important information that can help you to use NanoPC better, and tells you how to avoid problems.
CA
UT
IO
N
Caution: Indicating a potential risk of hardware damage or physical injury may exist.
WEEE: The use of this symbol indicates that this product may not be treated as household waste. By ensuring this product is disposed of correctly, you will help prevent potential negative consequences for the environment and human health, which could otherwise be caused by inappropriate waste handling of this product. For more detailed informa-
WLRQDERXWUHF\FOLQJRIWKLVSURGXFWSOHDVHFRQWDFW\RXUORFDOFLW\RI¿FH\RXUKRXVH-
hold waste disposal service or the shop where you purchased this product.
© All rights reserved.
All trade names are registered trademarks of respective manufacturers listed.
$OOLPDJHVDUHIRUUHIHUHQFHRQO\SOHDVHUHIHUWRWKHSK\VLFDOSURGXFWIRUVSHFL¿FIHDWXUHV
CA
UT
IO
N
Safety Notice:
Before using this product, please read the below safety notice carefully, this will help to
extend the product’s lifecycle, and work normally.
Ŷ
Ŷ
Ŷ
Ŷ
Ŷ
Ŷ
Ŷ
Ŷ
Ŷ
:KHQ1DQR3&LVZRUNLQJSOHDVHPDNHVXUHLWVYHQWLODWLRQV\VWHPLVZRUNLQJ
The power adapter is dissipating heat during normal use, please be sure not to cover it and keep it away from your body to prevent discomfort or injury by heat exposure.
3OHDVHXVHWKHSRZHUDGDSWHUWKDWFRPHVZLWKWKHSURGXFW¶VSDFNDJHZURQJSRZHU
adapter may damage your device.
0DNHVXUHDOOWKHSHULSKHUDOVDUHSURSHUO\FRQQHFWHGEHIRUHXVLQJ1DQR3&
7KLVSURGXFWVKRXOGRQO\EHXVHGLQDQHQYLURQPHQWZLWKDPELHQWWHPSHUDWXUHV
between 0°C and 40°C.
$OZD\VVKXWGRZQWKHFRPSXWHUEHIRUHLQVWDOOLQJRUXQLQVWDOOLQJWKHSHULSKHUDOZKLFK
does not support hot plug. 'LVFRQQHFWDOOSHULSKHUDOVEHIRUHVHUYLFLQJRUGLVDVVHPEOLQJWKLVHTXLSPHQW
3OHDVHGRQRWGLVDVVHPEOHWKLVSURGXFWE\\RXUVHOIDQ\GLVDVVHPEO\QRWDSSURYHG
by the original manufacturer may result in malfunction, and void warranty.
5LVNRIH[SORVLRQLIEDWWHU\LVUHSODFHGE\DQLQFRUUHFWW\SHSOHDVHGLVSRVHRIXVHG
batteries according to the instructions.
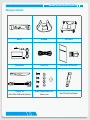
Package Contents
NanoPC
Seat Base
VESA Mount
Power Adapter
Power Cord
(DV\*XLGH86%)ODVK'LVN
Opening Tool
Screws, Magnet Rubber Foot, Mini COM to COM cable (Optional)
Screws cover
Mini PCIe Half Card Support
TABLE OF CONTENTS
Introduction
1-1 Front Side View ...................................................................................................... 2
1-2 Back Side View ....................................................................................................... 4
''5''5/MXPSHU ............................................................................................. 6
Placement and connecting
2-1 Placement of NanoPC ........................................................................................... 8
In Seat Base ............................................................................................................. 8
On the desk .............................................................................................................. 8
,QVWDOOLQJWR'LVSOD\................................................................................................... 9
2-2 Connection of NanoPC ........................................................................................ 10
Connect display ...................................................................................................... 10
Connect USB devices............................................................................................. 11
Connect network cable ........................................................................................... 11
Connect power cord ............................................................................................... 12
Connect Point Of Sales .......................................................................................... 13
BIOS Setup
Enter BIOS Setup ....................................................................................................... 15
Main ............................................................................................................................ 17
F-center ...................................................................................................................... 18
Smart BIOS ............................................................................................................ 19
Fox Intelligent Stepping .......................................................................................... 20
&38&RQ¿JXUDWLRQ.................................................................................................. 21
Advanced .................................................................................................................... 23
Trusted Computing ................................................................................................. 24
North Bridge ........................................................................................................... 25
TXE Subsystem ...................................................................................................... 26
2QERDUG'HYLFH&RQ¿JXUDWLRQ ............................................................................... 27
6$7$&RQ¿JXUDWLRQ ................................................................................................ 28
6XSHU,2&RQ¿JXUDWLRQ ........................................................................................... 29
1HWZRUN6WDFN&RQ¿JXUDWLRQ .................................................................................. 30
Boot ............................................................................................................................ 31
CSM parameters ................................................................................................... 32
Power .......................................................................................................................... 33
Health ......................................................................................................................... 34
Security ....................................................................................................................... 35
Save & Exit ................................................................................................................. 36
Install OS
,QVWDOO:LQGRZV:LQGRZV:LQGRZVELW .............................................. 39
,QVWDOO'ULYHUV ........................................................................................................ 43
Utility
)R[:,1)/$6+ .......................................................................................................... 45
/RFDO8SGDWH ...................................................................................................... 45
2. About & Help....................................................................................................... 47
Introduction
Ŷ)URQW6LGH9LHZ
Ŷ%DFN6LGH9LHZ
Ŷ''5''5/MXPSHU
,1752'8&7,21
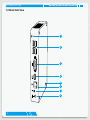
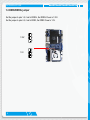
1-1 Front Side View
1
2
3
4
5
6
2
,1752'8&7,21
1
3RZHUEXWWRQZLWK3RZHULQGLFDWRU/('
3UHVVWRWXUQ\RXU1DQR3&RQRURIIWKH/('FDQLQGLFDWH\RXUV\VWHP
states.
2
Suspend Button
Enter suspend mode in operating system.
Clear CMOS : Press Suspend Button 10s in S5.
3
USB 3.0 port
7KLV86%SRUWVXSSRUWVWKH86%VSHFL¿FDWLRQ8VHWKLVSRUWIRU
86%GHYLFHVVXFKDVNH\ERDUGPRXVH86%SULQWHU86%ÀDVKGULYHVDQG
hard disk drives, etc. 4
Multi-Function card reader
7KLVPHPRU\FDUGUHDGHUVXSSRUWV06063UR6'6'+&6';&00&
memory cards used in devices like digital cameras, mobile phones, Media players and so on.
5
Microphone
Connects to a microphone or playback devices with optical connectors (3.5mm jack).
6
Headphone
Connects to a headphone. 3
,1752'8&7,21
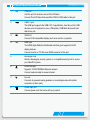
1-2 Back Side View
1
2
3
4
5
6
7
8
4
,1752'8&7,21
1
COM
COM port Use this port for devices such as Point Of Sales.
Connect Point Of Sales that uses Mini COM to COM cable to this port.
USB 2.0 port
7KLV86%SRUWVXSSRUWVWKH86%VSHFL¿FDWLRQ8VHWKLVSRUWIRU86%
GHYLFHVVXFKDVNH\ERDUGPRXVH86%SULQWHU86%ÀDVKGULYHVDQGKDUG
disk drives, etc. 2
3
VGA
VGA Port Connect VGA-compatible displays such as a monitor or projector. 4
HDMI
+'0,SRUW
7KH+'0,+LJK'H¿QLWLRQ0XOWLPHGLD,QWHUIDFHSRUWVXSSRUWV)XOO+'
display devices.
&RQQHFWPRQLWRURU79WKDWXVHV+'0,FRQQHFWRUWRWKLVSRUW
5
Kensington lock Attach a Kensington security system or a compatible security lock to secure your NanoPC in place.
6
5-/$1SRUW
6XSSRUWV0EV(WKHUQHWQHWZRUN
Connect network cable to access Internet.
7
/LQHRXW
Connects to powered analog speakers or recording devices with optical connectors (3.5mm jack).
8
Power input port
Connect power cord that come with your product.
5
,1752'8&7,21
1-3 DDR3/DDR3L jumper
6HWWKHMXPSHUWRSLQVLWVHWWR''5/WKH''5/3RZHULV9 6HWWKHMXPSHUWRSLQVLWVHWWR''5WKH''53RZHULV9
1.35V
1
2
3
1.5V
1
2
3
6
Placement
and
connecting
Ŷ3ODFHPHQWRI1DQR3&
Ŷ&RQQHFWLRQRI1DQR3&
3/$&(0(17$1'&211(&7,1*
2-1 Placement of NanoPC
In Seat Base
1. Place your NanoPC into the groove of the Seat Base.
On the desk
1. Fit your NanoPC with Magnet Rubber Foot, and put it on the tabletop directly.
8
3/$&(0(17$1'&211(&7,1*
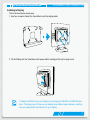
Installing to Display
This is the best space-saving way. 1. Use four screws to fasten the Vesa Mount onto the display back.
2. Fit the Nettop into the Vesa Mount with power button locating at the top for easy touch.
2
1
To fasten the VESA mount, your display must comply with VESA75 or VESA100 stan-
dard. The two groups of holes on your display have different space between, and they help you easily fasten the bracket onto your display. 9
3/$&(0(17$1'&211(&7,1*
2-2 Connection of NanoPC
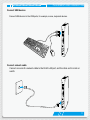
Connect display
&RQQHFWDGLVSOD\RU79WKDWKDV+'0,SRUWRU9*$SRUWWR\RXU1DQR3& 10
3/$&(0(17$1'&211(&7,1*
Connect USB devices
Connect USB devices to the USB ports, for example, mouse, keyboard devices.
Connect network cable
&RQQHFWRQHHQGRIDQHWZRUNFDEOHWRWKH5-/$1SRUWDQGWKHRWKHUHQGWRDKXERU
switch.
11
3/$&(0(17$1'&211(&7,1*
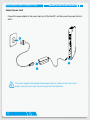
Connect power cord
Connect the power adapter to the power input port of the NanoPC, and then press the power button to start it.
2
3
UT
IO
N
1
CA
12
The power adapter is dissipating heat during normal use, please do not cover it and keep it away from your body to prevent injury from heat exposure.
3/$&(0(17$1'&211(&7,1*
Connect Point Of Sales
Connect one end of cable to the COM port, and the other end to a Point Of Sales. 13
BIOS Setup
Ŷ(QWHU%,266HWXS
Ŷ0DLQ
Ŷ)FHQWUH
Ŷ$GYDQFHG
Ŷ%RRW
Ŷ3RZHU
Ŷ+HDOWK
Ŷ6HFXULW\
Ŷ6DYH([LW
BIOS SETUP
Enter BIOS Setup
The BIOS is the communication bridge between hardware and software, correctly setting up the BIOS pa-
rameters is critical to maintain optimal system performance. Power on the computer, when the message ³3UHVV'HO!WRHQWHUVHWXS3UHVV)!WRHQWHUERRWPHQX´
DSSHDUVDWWKHERWWRPRIWKHVFUHHQ\RXFDQSUHVV'HO!NH\WRHQWHU6HWXS
We do not suggest that you change the default values in the BIOS Setup, and we shall not be responsible for any damage which resulted from the change you made.
8VHWKHDUURZULJKWOHIWNH\VWRVHOHFWDVSHFL¿FIXQFWLRQDQGJRWRWKHVXEPHQX(DFKIXQFWLRQLVH[-
plained below:
Main ,WGLVSOD\VWKHEDVLFV\VWHPFRQ¿JXUDWLRQVXFKDV&381DPHPHPRU\VL]HV\VWHPGDWHWLPHDQG
so on. They all can be viewed or set up through this menu.
F-Center
The advanced system features can be set up through this menu.
Advanced
The advanced system features can be set up through this menu.
Boot
Boot features can be set up through this menu. You can set the boot device priority and enable “Quiet %RRW´IHDWXUHKHUH
Power
All the items related with Green function features can be setup through this menu.
Health
7KLVVHWXSHQDEOHV\RXWRUHDGFKDQJHIDQVSHHGVDQGGLVSOD\VWHPSHUDWXUHVDQGYROWDJHVRI\RXU&386\VWHP
Security
7KH$GPLQLVWUDWRU8VHUSDVVZRUGFDQEHVHWXSWKURXJKWKLVPHQXWRSUHYHQWXQDXWKRUL]HGXVHRI
your computer. If you set a password, the system will ask you to key in correct password before boot or access to Setup.
Save&Exit
The optimal performance settings can be loaded through this menu. However, it may offer better SHUIRUPDQFHLQVRPHZD\VVXFKDVOHVV,2FDUGVOHVVPHPRU\HWFVWLOOLWPD\FDXVHSUREOHP
15
BIOS SETUP
LI\RXKDYHPRUHPHPRU\RU,2FDUGVLQVWDOOHG,WPHDQVLI\RXUV\VWHPORDGLQJLVKHDY\VHWWR optimal default may sometimes come out an unstable system. What you need now is to adjust BIOS VHWWLQJRQHE\RQHWULDODQGHUURUWR¿QGRXWWKHEHVWVHWWLQJIRU\RXUFXUUHQWV\VWHP<RXDOVRFDQ
save or discard the changes and exit BIOS setup here.
16
BIOS SETUP
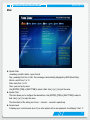
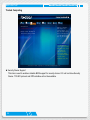
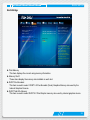
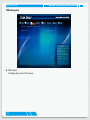
Main
Main
F-center
Advanced
Boot
Power
Health
System Date
System Time
[Sun 01/06/2013]
[09:37:57]
Access Level
Model Name
TXE Version
EC Version
BIOS Version
Build Date and Time
Administrator
nT-iBT18/-iBT19/-iBT29
01.00.02.1060
D72F1116
D72F1D14 x64
12/02/2013 17:12:34
Halt On
[All, but keyboard]
Security
CPU Brand Name:
Intel(R) Celeron(R) CPU J1900 @ 1.99GHz
Total Memory
MAC Address
4096 MB (DDR3/DDR3L 1333)
00-00-00-00-00-03
Save&Exit
Set the Date. Use Tab
to switch between
Date elements.
→ ←: Select Screen
↑ ↓/Click: Select Item
Enter/Dbl Click: Select
+/-: Change Opt.
F1: General Help
F2: Previous Values
F3: Optimized Defaults
F4: Save & Exit
ESC/Right Click: Exit
Version 2.16.1242. Copyright (C) 2013 American Megatrends, Inc.
Ź6\VWHP'DWH
ZHHNGD\!PRQWK!GDWH!\HDU!IRUPDW
'D\²ZHHNGD\IURP6XQWR6DWWKLVPHVVDJHLVDXWRPDWLFDOO\GLVSOD\HGE\%,265HDG2QO\
0RQWK²PRQWKIURPWR
'DWH²GDWHIURPWR
<HDU²\HDUVHWXSE\XVHUV
8VH>(17(5@>7$%@RU>6+,)77$%@WRVHOHFWD¿HOG8VH>@RU>@WRLQSXWWKHYDOXH
Ź6\VWHP7LPH
7KLVLWHPDOORZV\RXWRFRQ¿JXUHWKHGHVLUHGWLPH8VH>(17(5@>7$%@RU>6+,)77$%@WRVHOHFWD
¿HOG8VH>@RU>@WRLQSXWWKHYDOXH
7KHWKUHH¿HOGVRIWKHVHWWLQJDUHKRXU!PLQXWH!VHFRQG!UHVSHFWLYHO\
Ź$FFHVV/HYHO
,WGLVSOD\V\RXUFXUUHQWDFFHVVOHYHO,I\RXHQWHUV\VWHPZLWKDXVHUSDVVZRUGLWZLOOGLVSOD\³8VHU´,I
17
BIOS SETUP
no password is set or you enter system with administrator password, this item will display ³$GPLQLVWUDWRU´
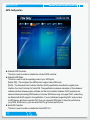
F-center
Main
F-center
Advanced
Super BIOS Protect
Boot
Power
Health
[Disabled]
Security
Save&Exit
Super BIOS Protection
Settings.
▶ Smart BIOS
▶ Fox Intelligent Stepping
▶ CPU Configuration
→ ←: Select Screen
↑ ↓/Click: Select Item
Enter/Dbl Click: Select
+/-: Change Opt.
F1: General Help
F2: Previous Values
F3: Optimized Defaults
F4: Save & Exit
ESC/Right Click: Exit
Version 2.16.1242. Copyright (C) 2013 American Megatrends, Inc.
Ź Super BIOS Protect To protect the system BIOS, there is a BIOS write-protection mechanism provided to prevent BIOS )/$6+WRROEHLQJLPSURSHUO\XVHGWRXSGDWH%,26RUWKHYLFLRXVYLUXVVXFKDV&+,HWFUHZULWLQJ%,26
setup.
Ź6PDUW%,26)R[,QWHOOLJHQW6WHSSLQJ&38&RQ¿JXUDWLRQ
3UHVV(QWHU!WRJRWRUHODWLYHVXEPHQX
18
BIOS SETUP
Smart BIOS
Main
F-center
Advanced
Smart Power LED
Smart Boot Menu
Boot
Power
Health
[Disabled]
[Enabled]
Security
Save&Exit
Smart Power LED
Settings
→ ←: Select Screen
↑ ↓/Click: Select Item
Enter/Dbl Click: Select
+/-: Change Opt.
F1: General Help
F2: Previous Values
F3: Optimized Defaults
F4: Save & Exit
ESC/Right Click: Exit
Version 2.16.1242. Copyright (C) 2013 American Megatrends, Inc.
Ź6PDUW3RZHU/(' 6PDUW3RZHU/('LVDIHDWXUHEXLOWRQ\RXUPRWKHUERDUGWRLQGLFDWHGLIIHUHQWVWDWHVGXULQJ3RZHU2Q
6HOI7HVW32677KH/('LVORFDWHGDWWKHIURQWSDQHODQGLWGLVSOD\V3267VWDWHE\GLIIHUHQWORQJ
short blinking intervals. You can always leave this state enabled.
System Status
3RZHU/('6WDWXV
Stop Blinking Condition
Normal
Always On
Always On
No Memory
Continue blinking On (1sec.), Off (1sec.)
Reboot & Memory OK
1R'LVSOD\
Continue blinking On (2sec.), Off (2sec.)
5HERRW'LVSOD\2.
Post Error Message
4XLFNEOLQNLQJWZLFHVHF2QVHF2II
one long On (1sec.), continuously.
Enter Setup or Skip
19
BIOS SETUP
Ź6PDUW%RRW0HQX :KHQ3&VWDUWVLWZLOODVN\RXWRSUHVV>'HO@NH\WRHQWHUVHWXSRUSUHVV>)@NH\WRHQWHUVPDUWERRW
PHQX,I>'LVDEOHG@LVVHOHFWHGWKHQSUHVVLQJ>)@KDVQRIXQFWLRQ7KLVDOVRSUHYHQWVXVHUZLWKRXW
password trying to get into your computer through smart boot menu.
Fox Intelligent Stepping
Main
F-center
Spread Spectrum
Advanced
Boot
Power
Health
[Disable]
Security
Save&Exit
Enable/Disabled Spread
Spectrum
→ ←: Select Screen
↑ ↓/Click: Select Item
Enter/Dbl Click: Select
+/-: Change Opt.
F1: General Help
F2: Previous Values
F3: Optimized Defaults
F4: Save & Exit
ESC/Right Click: Exit
Version 2.16.1242. Copyright (C) 2013 American Megatrends, Inc.
Ź6SUHDG6SHFWUXP ,I\RXHQDEOHGWKLVIXQFWLRQLWFDQVLJQL¿FDQWO\UHGXFHWKH(0,(OHFWURPDJQHWLF,QWHUIHUHQFH generated by the system, so to comply with FCC regulation. But if overclocking is activated, you had better disable it.
20
BIOS SETUP
&38&RQ¿JXUDWLRQ
Main
F-center
Advanced
Boot
Power
Health
Security
CPU Configuration
CPU Brand Name:
Intel(R) Celeron(R) CPU J1900 @ 1.99GHz
L1 Data Cache
L1 Code Cache
L2 Cache
L3 Cache
CPU Signature
Max CPU Speed
Min CPU Speed
Processor Cores
Intel HT Technology
Intel VT-x Technology
Intel SMX Technology
24 KB X 4
32 KB X 4
1024 KB X2
Not Present
30673
1990 MHZ
1333 MHz
4
Not Supported
Supported
Not Supported
Execute Disabled Bit
Limit CPUID Maximum
Intel Virtualization Technology
Power Technology
EIST
CPU C3 Report
CPU C6 report
Package C State limit
[Enabled]
[Disabled]
[Enabled]
[Energy Efficient]
[Enabled]
[Disabled]
[Enabled]
[No Limit]
Save&Exit
XD can prevent certain
classes of malicious
buffer overflow attacks
when combined with a
supporting OS (Windows
Server 2003 SP1, Windows XP SP2, SuSE Linux
9.2, RedHat Enterprise
3 Update 3.)
→ ←: Select Screen
↑ ↓/Click: Select Item
Enter/Dbl Click: Select
+/-: Change Opt.
F1: General Help
F2: Previous Values
F3: Optimized Defaults
F4: Save & Exit
ESC/Right Click: Exit
Version 2.16.1242. Copyright (C) 2013 American Megatrends, Inc.
Ź,QWHO;'%LW 7KLVLWHPLVXVHGWRHQDEOHGLVDEOHWKH([HFXWH'LVDEOH%LWIHDWXUH ,QWHO¶V([HFXWH'LVDEOH%LWIXQFWLRQDOLW\FDQKHOSSUHYHQWFHUWDLQFODVVHVRIPDOLFLRXVEXIIHURYHUÀRZ
attacks when combined with a supporting operating system .
Ź/LPLW&38,'0D[LPXP 7KLVLWHPLVXVHGWRHQDEOHRUGLVDEOH&38,'PD[LPXPYDOXHOLPLWFRQ¿JXUDWLRQ6HW/LPLW&38,'
0D[LPXPWR6KRXOGEH>'LVDEOHG@IRU:LQ;3
Ź,QWHO9LUWXDOL]DWLRQ7HFKQRORJ\$SSHDUVRQO\ZKHQ&38VXSSRUWV 9LUWXDOL]DWLRQLH,QWHO9DQGHUSRRO7HFKQRORJ\DOORZVDSODWIRUPWRUXQPXOWLSOHRSHUDWLQJV\VWHPV
DQGDSSOLFDWLRQVLQLQGHSHQGHQWSDUWLWLRQVRU³FRQWDLQHUV´2QHSK\VLFDOFRPSXWHV\VWHPFDQIXQFWLRQ
DVPXOWLSOH³YLUWXDO´V\VWHPV9DQGHUSRRO7HFKQRORJ\FDQKHOSLPSURYHIXWXUHYLUWXDOL]DWLRQVROXWLRQV
This item will be displayed only when the CPU is supporting this feature and the setting is used to HQDEOHGLVDEOHLW
21
BIOS SETUP
CA
UT
IO
N
Ź3RZHU7HFKQRORJ\
7KLVLWHPLVXVHGWRHQDEOHRUGLVDEOHWKHSRZHUPDQDJHPHQWIHDWXUHV'HIDXOWYDOXHLV>(QHUJ\(I-
¿FLHQW@
Ź(,67
You can select the EIST (Processor Power Management, PPM) through this item.
(QKDQFHG,QWHO6SHHG6WHSWHFKQRORJ\(,67DOORZVWKHV\VWHPWRG\QDPLFDOO\
adjust processor voltage and core frequency, which can result in decreased average
power consumption and decreased average heat production. There are some
system requirements must be met, including CPU, chipset, motherboard, BIOS and
operation system. Please refer to Intel Website for more information.
Ź&38&5HSRUW
This item is used to enable or disable CPU C3 (ACPI C2) report to OS.
Ź&38&UHSRUW This item is used to enable or disable CPU C6 (ACPI C3) report to OS.
Ź3DFNDJH&6WDWHOLPLW
It is used to select the C-State mode.
22
BIOS SETUP
Advanced
Main
▶
▶
▶
▶
▶
▶
▶
F-center
Advanced
Boot
Trusted Computing
North Bridge
TXE Subsystem
Onboard Device Configuration
SATA Configuration
Super IO Configuration
Network Stack
Power
Health
Security
Save&Exit
Trusted Computing
Settings
▶Realtek PCIe GBE Family Controller
(MAC:00:00:00:00:00:03)
→ ←: Select Screen
↑ ↓/Click: Select Item
Enter/Dbl Click: Select
+/-: Change Opt.
F1: General Help
F2: Previous Values
F3: Optimized Defaults
F4: Save & Exit
ESC/Right Click: Exit
Version 2.16.1242. Copyright (C) 2013 American Megatrends, Inc.
Ź7UXVWHG&RPSXWLQJ1RUWK%ULGJH7;(6XEV\VWHP2QERDUG'HYLFH&RQ¿JXUDWLRQ6$7$&RQ¿JXUDWLRQ
6XSHU,2&RQ¿JXUDWLRQ1HWZRUN6WDFN&RQ¿JXUDWLRQ 3UHVV(QWHU!WRJRWRLWVVXEPHQX
Ź5HDOWHN3&,H*%()DPLO\&RQWUROOHU
3UHVV(QWHU!WRJRWRJHWGULYHULQIRUPDWLRQDQGFRQ¿JXUH5HDOWHNHWKHUQHWFRQWUROOHUSDWDPHWHU
23
BIOS SETUP
Trusted Computing
Main
F-center
Advanced
Configuration
Security Device Support
Current Status Information
NO Security Device Found
Boot
Power
Health
[Disabled]
Security
Save&Exit
Enables or Disables
BIOS support for
security device. O.S.
will not show Security
Device. TCG EFI protocol and INTA interface
will not be available.
→ ←: Select Screen
↑ ↓/Click: Select Item
Enter/Dbl Click: Select
+/-: Change Opt.
F1: General Help
F2: Previous Values
F3: Optimized Defaults
F4: Save & Exit
ESC/Right Click: Exit
Version 2.16.1242. Copyright (C) 2013 American Megatrends, Inc.
Ź6HFXULW\'HYLFH6XSSRUW This item is used to enable or disable BIOS support for security device. O.S. will not show Security 'HYLFH7&*(),SURWRFRODQG,17$LQWHUIDFHZLOOQRWEHDYDLODEOH
24
BIOS SETUP
North Bridge
Main
F-center
Advanced
Boot
Power
Health
Security
North Bridge Configuration
Memory Information
Total Memory
Memory Slot0
2048 MB (DDR3/DDR3L 1333)
2048 MB (DDR3/DDR3L 1333)
Save&Exit
Select DVMT 5.0 PreAllocated (Fixed)
Graphics Memory size
used by the Internal
Graphics Devices.
Memory Configuration
Integrated Graphics Device
DVMT Pre-Allocated
DVMT Total Gfx Memory
[Enabled]
[64M]
[256MB]
→ ←: Select Screen
↑ ↓/Click: Select Item
Enter/Dbl Click: Select
+/-: Change Opt.
F1: General Help
F2: Previous Values
F3: Optimized Defaults
F4: Save & Exit
ESC/Right Click: Exit
Version 2.16.1242. Copyright (C) 2013 American Megatrends, Inc.
Ź7RWDO0HPRU\
This item displays the current using memory information. Ź0HPRU\6ORW
7KHVHLWHPVGLVSOD\WKHPHPRU\VL]HLQVWDOOHGRQHDFKVORW
Ź'9073UH$OORFDWHG
7KLVLWHPLVXVHGWRVHOHFW'9073UH$OORFDWHG)L[HG*UDSKLFV0HPRU\VL]HXVHGE\WKH
,QWHUQDO*UDSKLFV'HYLFHV
Ź'9077RWDO*I[0HPRU\ 7KLVLWHPLVXVHGWRVHOHFW'9077RWDO*UDSKLFPHPRU\VL]HXVHGE\LQWHUQDOJUDSKLFVGHYLFH
25
BIOS SETUP
TXE Subsystem
Main
F-center
Advanced
Boot
Power
Health
Security
Save&Exit
Intel TXE Subsystem Configuration
TXE Version
01.00.02.1060
→ ←: Select Screen
↑ ↓/Click: Select Item
Enter/Dbl Click: Select
+/-: Change Opt.
F1: General Help
F2: Previous Values
F3: Optimized Defaults
F4: Save & Exit
ESC/Right Click: Exit
Version 2.16.1242. Copyright (C) 2013 American Megatrends, Inc.
Ź7;(9HUVLRQ
It displays the current TXE version. 26
BIOS SETUP
2QERDUG'HYLFH&RQ¿JXUDWLRQ
Main
F-center
Advanced
Boot
Power
Health
Security
Onboard Device Configuration
Onboard LAN Controller
Onboard USB Controller
Legacy USB Support
USB3.0 Support
Azalia HD Audio controller
Save&Exit
Enabled/Disabled On-
[Enabled]
[Enabled]
[Enabled]
[Enabled]
[Enabled]
board LAN Controller
→ ←: Select Screen
↑ ↓/Click: Select Item
Enter/Dbl Click: Select
+/-: Change Opt.
F1: General Help
F2: Previous Values
F3: Optimized Defaults
F4: Save & Exit
ESC/Right Click: Exit
Version 2.16.1242. Copyright (C) 2013 American Megatrends, Inc.
Ź2QERDUG/$1&RQWUROOHU 7KLVLWHPLVXVHGWRHQDEOHRUGLVDEOHWKHRQERDUG/$1FRQWUROOHU
Ź2QERDUG86%&RQWUROOHU This item is used to enable or disable the onboard USB controller.
Ź/HJDF\86%6XSSRUW This item is used to enable the support for USB devices on legacy OS. If you have a USB keyboard or mouse, set to enabled. [Enabled]: This option will enable the legacy USB support. >'LVDEOHG@7KLVRSWLRQZLOONHHS86%GHYLFHVDYDLODEOHRQO\IRU(),DSSOLFDWLRQV
Ź86%6XSSRUW
This item is used to enable or disable USB3.0(XHCI) Controller Support.
Ź$]DOLD+'$XGLRFRQWUROOHU 7KLVLWHPLVXVHGWRHQDEOHRUGLVDEOHWKH$]DOLD+'$XGLR&RQWUROOHU
27
BIOS SETUP
6$7$&RQ¿JXUDWLRQ
Main
F-center
Advanced
Boot
Power
Health
SATA Configuration
Onboard SATA Controller
Onboard SATA Mode
Serial-ATA Controller
Security
Save&Exit
Enabled/Disabled Se-
[Enabled]
[Native IDE]
[Enabled]
rial ATA
SATA Port1
Not Present
→ ←: Select Screen
↑ ↓/Click: Select Item
Enter/Dbl Click: Select
+/-: Change Opt.
F1: General Help
F2: Previous Values
F3: Optimized Defaults
F4: Save & Exit
ESC/Right Click: Exit
Version 2.16.1242. Copyright (C) 2013 American Megatrends, Inc.
Ź2QERDUG6$7$&RQWUROOHU
This item is used to enable or disable the onboard SATA controller.
Ź2QERDUG6$7$0RGH This item is used to set the operating mode of your SATA ports. >1DWLYH,'(@7KLVFRQ¿JXUHVWKH6$7$SRUWVWRVXSSRUWQDWLYH,'(PRGH >$+&,@7KH$GYDQFHG+RVW&RQWUROOHU,QWHUIDFH$+&,VSHFL¿FDWLRQGHVFULEHVWKHUHJLVWHUOHYHO
LQWHUIDFHIRUD+RVW&RQWUROOHUIRU6HULDO$7$7KHVSHFL¿FDWLRQLQFOXGHVDGHVFULSWLRQRIWKHKDUGZDUH
software interface between system software and the host controller hardware. AHCI provides more advanced features including SATA features, but some SATA drives may not support AHCI, unless they DUHODEHOHGZLWK$+&,VXSSRUWLQLWVVSHFL¿FDWLRQ,I\RXUPRWKHUERDUGVXSSRUWLQJ$+&,DQG\RXKDYH
D6$7$GHYLFHZKLFKDOVRVXSSRUWV$+&,WKHQ\RXFDQVHOHFW,'(RSWLRQWRKDYHIDLUSHUIRUPDQFH
(only PATA, SATA level), or you can select AHCI to get its best performance.
Ź6HULDO$7$&RQWUROOHU
This item is used to enable or disable the Serial ATA Port 1.
28
BIOS SETUP
6XSHU,2&RQ¿JXUDWLRQ
Main
F-center
Advanced
Boot
Power
Health
Security
Super IO Configuration
Super IO Chip
▶ Serial Port 1 Configuration
IT8518E/IT8519E
Save&Exit
Set Parameters of
Serial Port 1
(COMA)
→ ←: Select Screen
↑ ↓/Click: Select Item
Enter/Dbl Click: Select
+/-: Change Opt.
F1: General Help
F2: Previous Values
F3: Optimized Defaults
F4: Save & Exit
ESC/Right Click: Exit
Version 2.16.1242. Copyright (C) 2013 American Megatrends, Inc.
6HULDO3RUW&RQ¿JXUDWLRQ
Ź6HULDO3RUW
This item is used to enable or disable the serial port (COM).
Ź'HYLFH6HWWLQJV This item shows the resource assigned to the serial port. Ź&KDQJH6HWWLQJV This item is used to select an optimal settings for Super IO device. 29
BIOS SETUP
1HWZRUN6WDFN&RQ¿JXUDWLRQ
Main
F-center
Network stack
Advanced
Boot
Power
Health
[Disabled]
Security
Save&Exit
Enable/Disables UEFI
network stack
→ ←: Select Screen
↑ ↓/Click: Select Item
Enter/Dbl Click: Select
+/-: Change Opt.
F1: General Help
F2: Previous Values
F3: Optimized Defaults
F4: Save & Exit
ESC/Right Click: Exit
Version 2.16.1242. Copyright (C) 2013 American Megatrends, Inc.
Ź1HWZRUNVWDFN
7KLVLWHPLVXVHGWRHQDEOHGLVDEOH8(),QHWZRUNVWDFN
7KH8(),8QL¿HG([WHQVLEOH)LUPZDUH,QWHUIDFH1HWZRUN6WDFNLPSOHPHQWVWKH7&3,3QHWZRUN
LQWHUIDFHVVXFKDV613013$53,38'3'+&307)73DQG7&3
30
BIOS SETUP
Boot
Main
F-center
Advanced
Boot
Power
Health
Boot Configuration
Bootup Numlock State
[On]
Quiet Boot
Fast Boot
[Enabled]
[Disabled]
Security
Save&Exit
Select the keyboard
NumLock state
▶ CSM Configuration
FIXED BOOT ORDER Priorities
Boot Option #1
Boot Option #2
Boot Option #3
Boot Option #4
Boot Option #5
Boot Option #6
Boot Option #7
▶ USB HardDisk Drive BBS Priorities
▶ USB KEY Drive BBS Priorities
▶ UEFI Boot Drive BBS Prioriies
[UEFI
[UEFI
[UEFI
[UEFI
[UEFI
[UEFI
[UEFI
Hard Disk]
CD/DVD]
USB Hard Disk]
USB CD/DVD]
USB Key]
USB Floppy]
Network]
→ ←: Select Screen
↑ ↓/Click: Select Item
Enter/Dbl Click: Select
+/-: Change Opt.
F1: General Help
F2: Previous Values
F3: Optimized Defaults
F4: Save & Exit
ESC/Right Click: Exit
Version 2.16.1242. Copyright (C) 2013 American Megatrends, Inc.
Ź Bootup Numlock State
7KLVLWHPGH¿QHVLIWKHNH\ERDUG1XP/RFNNH\LVDFWLYHZKHQ\RXUV\VWHPLVVWDUWHG7KHDYDLODEOH
settings are: On (default) and Off.
ŹQuiet Boot
7KLVLWHPLVXVHGWRHQDEOHGLVDEOHWKHTXLHWERRW
>'LVDEOHG@'LVSOD\VWKHQRUPDO3267PHVVDJHV
>(QDEOHG@'LVSOD\V2(0FXVWRPHUORJRLQVWHDGRI3267PHVVDJHV
Ź Fast Boot
7KLVLWHPLVXVHGWRHQDEOHRUGLVDEOHERRWZLWKLQLWLDOL]DWLRQRIDPLQLPDOVHWRIGHYLFHVUHTXLUHGWR
launch active boot option. This is no effect for BBS boot options.
Ź),;('%22725'(53ULRULWLHV
These items are used to set the system boot order.
31
BIOS SETUP
Ź+DUG'LVN'ULYH%%63ULRULWLHV&''9'520'ULYH%%63ULRULWLHV86%)ORSS\'ULYH%%63ULRULWLHV
86%&''9'520'ULYH%%63ULRULWLHV86%+DUG'LVN'ULYH%%63ULRULWLHV86%.(<'ULYH%%6
3ULRULWLHV1(7:25.'HYLFH%%63ULRULWLHV8(),%RRW'ULYH%%63ULRULWLHV
This items appear only when the devices are available. Use this items to specify the boot device priority sequence of the detected devices.
CSM parameters
Main
F-center
Advanced
Boot
Power
Health
Compatibility Support Module Configuration
CSM Support
[Disabled]
Security
Save&Exit
Enable/Disable CSM
Support.
→ ←: Select Screen
↑ ↓/Click: Select Item
Enter/Dbl Click: Select
+/-: Change Opt.
F1: General Help
F2: Previous Values
F3: Optimized Defaults
F4: Save & Exit
ESC/Right Click: Exit
Version 2.16.1242. Copyright (C) 2013 American Megatrends, Inc.
Ź&606XSSRUW
This item is used to enable or disable CSM Support.
32
BIOS SETUP
Power
Main
F-center
Advanced
Resume By USB Device(s)
Resume By Onboard LAN
Resume By RTC
Energy-using product
Restore AC Power Loss
Boot
Power
Health
[Enabled]
[Disabled]
[Disabled]
[Enabled]
[Power Off]
Security
Save&Exit
Resume By USB
Device(s)
→ ←: Select Screen
↑ ↓/Click: Select Item
Enter/Dbl Click: Select
+/-: Change Opt.
F1: General Help
F2: Previous Values
F3: Optimized Defaults
F4: Save & Exit
ESC/Right Click: Exit
Version 2.16.1242. Copyright (C) 2013 American Megatrends, Inc.
Ź5HVXPH%\86%'HYLFHV This item is used to enable or disable the USB device(s) to generate a wake up.
Ź5HVXPH%\2QERDUG/$1 7KLVLWHPLVXVHGWRHQDEOHRUGLVDEOHWKHRQERDUG/$1WRJHQHUDWHDZDNHXS
Ź5HVXPH%\57& This item is used to enable or disable RTC alarm event to generate a wake up. RTC is system real time clock.
Ź57&$ODUP'DWH'D\V :KHQ5HVXPHE\57&LVHQDEOHGVHOHFWDVSHFL¿FGDWHWRJHQHUDWHDZDNHXS
Ź57&$ODUP7LPH++0066 :KHQ5HVXPHE\57&LVHQDEOHGVHOHFWDVSHFL¿FWLPHWRJHQHUDWHDZDNHXS
Ź(QHUJ\XVLQJSURGXFW
7KLVLWHPLVXVHGWRFRQ¿JXUHWKH'HHS6[0RGHFRQ¿JXUDWLRQ
33
BIOS SETUP
Ź5HVWRUH$&3RZHU/RVV This item is used to set which state the PC will take with when it resumes after an AC power loss.
Health
Main
F-center
Advanced
Boot
Power
Health
CPU Temperature
CPU Fan Speed
+3.3V
+5V SYS
CPU VCore
VDDR
:
:
:
:
:
:
+40 ˚C
3326 RPM
3.307V
+4.985 V
+1.117 V
+1.340 V
CPU Shutdowm Temperature
CPU Smart Fan Control
[Enabled]
[Enabled]
Security
Save&Exit
CPU Shutdowm
Temperature
→ ←: Select Screen
↑ ↓/Click: Select Item
Enter/Dbl Click: Select
+/-: Change Opt.
F1: General Help
F2: Previous Values
F3: Optimized Defaults
F4: Save & Exit
ESC/Right Click: Exit
Version 2.16.1242. Copyright (C) 2013 American Megatrends, Inc.
Ź&386KXWGRZQ7HPSHUDWXUH
This item is used to set the system temperature upper limit. When the temperature exceedsthe set value, the system will shut down automatically.This function works only when your operating system is supporting ACPI.
Ź&386PDUW)DQ&RQWURO
This option is used to enable or disable CPU smart fan function. 34
BIOS SETUP
Security
Main
F-center
Advanced
Boot
Power
Health
Save&Exit
Set Administrator
Password
Security configuration
Administrator Password
User Password
Security
Not Installed
Not Installed
Administator Password
▶ Secure Boot menu
→ ←: Select Screen
↑ ↓/Click: Select Item
Enter/Dbl Click: Select
+/-: Change Opt.
F1: General Help
F2: Previous Values
F3: Optimized Defaults
F4: Save & Exit
ESC/Right Click: Exit
Version 2.16.1242. Copyright (C) 2013 American Megatrends, Inc.
Ź$GPLQLVWUDWRU3DVVZRUG
This item is used to install or change administrator password.
$IWHU\RXLQSXWDGPLQLVWUDWRUSDVVZRUGLWWKHQZLOODVN\RXWRFRQ¿UPWKHSDVVZRUG
Ź8VHU3DVVZRUG
This item is used to install or change user password.
Only when there exists a Administrator password, then this setting can be activated.
Ź6HFXUH%RRWPHQX
3UHVV(QWHU!WRJRWRLWVVXEPHQX
35
BIOS SETUP
Save & Exit
Main
F-center
Advanced
Boot
Power
Save Changes and Reset
Discard Changes and Reset
Restore Defaults
Health
Security
Save&Exit
Reset the
system after
saving the changes.
Boot Override
Windows Boot Manager (P1: WDC WD2500BEVT-22A23T0)
UEFI:
UEFI:
UEFI:
▶ Reset
General USB Flash Disk 1.0
SMI USB DISK 1100
Built-in EFI Shell
System with ME disabled Mode
→ ←: Select Screen
↑ ↓/Click: Select Item
Enter/Dbl Click: Select
+/-: Change Opt.
F1: General Help
F2: Previous Values
F3: Optimized Defaults
F4: Save & Exit
ESC/Right Click: Exit
Version 2.16.1242. Copyright (C) 2013 American Megatrends, Inc.
Ź6DYH&KDQJHVDQG5HVHW
,I\RXVHOHFWWKLVRSWLRQDQGSUHVV(QWHU!DPHVVDJHZLOOEHGLVSOD\HGLQWKHVFUHHQ
6HOHFW><HV@WRVDYH\RXUFKDQJHVDQGUHVHWFRPSXWHUVHOHFW>1R@RU(6&!WRUHWXUQWRWKHPDLQ
menu.
Ź'LVFDUG&KDQJHVDQG5HVHW
,I\RXVHOHFWWKLVRSWLRQDQGSUHVV(QWHU!DPHVVDJHZLOOEHGLVSOD\HGLQWKHVFUHHQ
6HOHFW><HV@WRH[LWVHWXSXWLOLW\DQGUHVHWFRPSXWHUZLWKRXWVDYLQJ\RXUPRGL¿FDWLRQVVHOHFW>1R@RU
(6&!WRUHWXUQWRWKHPDLQPHQX
Ź5HVWRUH'HIDXOWV
Optimal defaults are the best settings of this motherboard. Always load the Optimal defaults after updating the BIOS or after clearing the CMOS values.
Select this option and press Enter, it will pop out a dialogue box to let you load the defaults. Select <HV!DQGWKHQSUHVV(QWHU!WRORDGWKHGHIDXOWV6HOHFW1R!DQGSUHVV(QWHU!LWZLOOQRWORDG
36
BIOS SETUP
By this default, BIOS have set the optimal performance parameters of system to improve the performances of system components. But if the optimal performance parameters to be set cannot be supported by your hardware devices (for example, too many expansion cards were installed), the system might fail to work.
Ź%RRW2YHUULGH
BIOS auto detect the presence of connected devices, select the device you want to boot from and SUHVV(QWHU!WKHQWKHV\VWHPZLOOGLUHFWO\ERRWIURPWKHVHOHFWHGGHYLFHV Select [Yes] to discard \RXUPRGL¿FDWLRQVVHOHFW>1R@RU(6&!WRUHWXUQWRWKHPHQX
Ź Reset System with ME disabled Mode
3UHVV(QWHU!WRJRWRLWVVXEPHQX
37
Install OS
Ŷ,QVWDOO:LQGRZV:LQGRZV Windows 7(64 bit)
Ŷ,QVWDOO'ULYHUV
,167$//26
What kinds of hardware and software you need here:
:LQGRZV:LQGRZV:LQGRZVELW,QVWDOO86%'LVNRU86%'9'520GULYHDQGQGRZV
:LQGRZV:LQGRZVELW,QVWDOO&'2WKHUSXUFKDVH
1DQR3&86%)ODVK'LVN,QWKLVSDFNDJH
4-1 Install Windows 8.1/Windows 8/Windows 7(64 bit)
1. Connect the Windows :LQGRZV:LQGRZVELW,QVWDOO86%'LVNRU86%'9'520GULYHWR
one USB port of NanoPC.
2. Press power on button to turn on your computer.
3XWWKH:LQGRZV:LQGRZV:LQGRZVELW,QVWDOO&'LQWRWKH86%'9'520GULYHLI\RX
XVHWKH86%'9'520GULYH
&RPSXWHUZLOOFKRRVHWKHERRWGHYLFHE\%,26GHIDXOWDQGVWDUWORDGLQJWKH¿OHVIRULQVWDOOLQJWKH26
3OHDVHSUHVV'HO!NH\WRHQWHU%,266HWXSLI\RXZDQWWRFKDQJHWKH¿UVWERRWGHYLFH
for installing the OS.
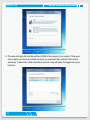
:KHQWKHLQVWDOODWLRQZLQGRZVSRSXSVHWWKHUHODWHGLWHPVDQGFOLFN³1H[W´WRFRQWLQXHWKHQFOLFN
³,QVWDOOQRZ´EXWWRQWRVWDUWWKHVHWXS
:KHQWKHOLFHQVHWHUPVDSSHDUFKRRVHDFFHSWDQGFOLFN³1H[W´WRFRQWLQXH
,WZLOOWKHQDVN\RXWRVHOHFWWKHLQVWDOODWLRQW\SH&OLFN³&XVWRPDGYDQFHG´WRLQVWDOODQHZFRS\RI
Windows.
39
,167$//26
8. The setup will display the hard disk partitions (20GB, in this example) of your system. If there were RWKHUV\VWHPVVXFKDV/LQX[LQVWDOOHGSUHYLRXVO\\RXQHHGVHOHFWWKHPDQGFOLFN³'ULYHRSWLRQV
DGYDQFHG´WRGHOHWHWKHP:KHQDOOSDUWLWLRQVDUHFOHDQVHWXSZLOOGLVSOD\WKHELJJHVWVL]HRI\RXU
hard drive.
40
,167$//26
,QWKHKDUGGLVNVL]HVFUHHQ\RXFDQFOLFNWKH³QHZ´EXWWRQWRFUHDWHSDUWLWLRQVDV\RXQHHG
,QWKLVH[DPSOHZHDUHFUHDWLQJD*%SDUWLWLRQWRLQVWDOO:LQGRZV0DNH\RXUPRGL¿FDWLRQVDQG
FOLFN³$SSO\´
To ensure that all Windows features work correctly, Windows might create additional partitions for V\VWHP¿OHV6R\RXZLOOVHHD0%SDUWLWLRQUHVHUYHGE\V\VWHPDIWHU\RXFUHDWHDSDUWLWLRQ6HOHFW
WKH*%SDUWLWLRQDQGFOLFN³1H[W´WRFRQWLQXH
41
,167$//26
7KHVHWXSSURJUDPZLOOWKHQVWDUWWRLQVWDOO:LQGRZV:LQGRZV:LQGRZVELWRQ\RXUKDUG
GLVN'XULQJWKHLQVWDOODWLRQ\RXUFRPSXWHUZLOOUHVWDUWVHYHUDOWLPHV
42
,167$//26
:KHQWKHLQVWDOODWLRQLVFRPSOHWHVHWXSZLOOSUHSDUH\RXUFRPSXWHUIRULW¶V¿UVWXVH<RXFDQWKHQ follow the steps to select system settings, create an account, set a password...etc, until the whole process is completed.
4-2 Install Drivers
:KHQWKH:LQGRZV:LQGRZV:LQGRZVELWLVFRPSOHWHO\LQVWDOOHG\RXKDYHWRLQVWDOOWKH
QHFHVVDU\GULYHUVEHIRUHXVLQJWKH1DQR3&&RQQHFWWKH1DQR3&86%)ODVK'LVNWR\RXUV\VWHP
2. Waiting for a few seconds, the main menu will be displayed on the screen. 8VHWKHVHRSWLRQVWRLQVWDOODOOWKHGULYHUVIRU\RXUV\VWHP<RXPXVWFOLFN,QWHO&KLSVHW'ULYHUWR
LQVWDOOLW¿UVW$IWHUWKDW\RXFDQFOLFN´2QH&OLFN6HWXS´DQGWKHQFKRRVHWKHLWHPV\RXZDQWWRLQVWDOO
or you can click on each individual driver to install it manually. When you install the driver of Windows ELW26\RXQHHGWRLQVWDOOLWPDQXDOO\XQGHUWKHSDWK'ULYHU?,QWHO?7;(SDWFK7;(SDWFK
4. After installing all the drivers, you need to restart your NanoPC, then you can start using it.
43
Utility
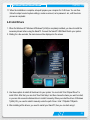
Ŷ)R[:,1)/$6+
87,/,7<
Fox WINFLASH
)R[:,1)/$6+LVDXVHIXOXWLOLW\WREDFNXSDQGXSGDWH\RXUV\VWHP%,26
Supporting Operating Systems:
Ŷ :LQGRZV
Ŷ :LQGRZV
Ŷ :LQGRZVELW
3OHDVHVHWWKH%,26VHWWLQJ³%,26:ULWH3URWHFW´RU³6XSHU%,263URWHFW´WR
>'LVDEOHG@ZKHQUXQQLQJWKLVDSSOLFDWLRQ
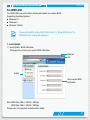
1. Local Update
/RFDO8SGDWH%,26,QIRUPDWLRQ
This page lets you know your system BIOS information.
Minimum
Exit Toolbar
Show current BIOS information
1RWH%,266L]H0E 0ELW 0%\WH
%,266L]H0E 0ELW 0%\WH
Please refer to the physical motherboard for details. 45
87,/,7<
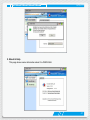
/RFDO8SGDWH%DFNXS%,26
7KLVSDJHFDQEDFNXS\RXUV\VWHP%,26<RXFDQFOLFN³%DFNXS%,26´DQGNH\LQD¿OHQDPHWKHQ
FOLFN³6DYH´WR¿QLVKWKHEDFNXSRSHUDWLRQ7KHH[WHQVLRQRIWKLVEDFNXS¿OHLV³520´IRU$0,%,26
0DNHVXUH\RXFDQUHPHPEHUWKH¿OHQDPHWRJHWKHUZLWKWKHGLUHFWRU\ZKLFKLWLVVWRUHGSUHYHQWHG
that you may need them to recover your BIOS later.
Key in a BIOS name
Click to Save
/RFDO8SGDWH8SGDWH%,26
7KLVSDJHKHOSV\RXWRXSGDWH\RXU%,26IURPDORFDO¿OH$IWHUFOLFN³8SGDWH%,26´$QDOHUW PHVVDJHZLOOEHGLVSOD\HGWRHQVXUHLI\RXUHDOO\ZDQWWRFRQWLQXHFOLFN³<HV´WRFRQ¿UP$VHWXS
ZL]DUGZLOOJXLGH\RXWRORDGDORFDO%,26¿OHWR¿QLVKWKHRSHUDWLRQ<RXPXVWUHPHPEHUIURPZKLFK
GLUHFWRU\WRORDG\RXUQHZ%,26¿OHZLWKDQH[WHQVLRQRI³520´IRU$0,%,26EHIRUHWKHVHWXS
ZL]DUGVWDUWV
46
87,/,7<
2. About & Help
7KLVSDJHVKRZVVRPHLQIRUPDWLRQDERXW)R[:,1)/$6+
47
Statement:
This device complies with part 15 of the FCC Rules. Operation is subject to the following two conditions: (1) This device may not cause harmful interference, and (2) this device must accept any interference received, including interference that may cause undesired operation.
Warning:
FEDERAL COMMUNICATIONS COMMISSION INTERFERENCE STATEMENT
This equipment has been tested and found to comply with the limits for a Class B digital device, pursuant to part 15 of the FCC Rules. These limits are designed to provide reasonable protection against harmful interference in a residential installation. This equipment generates, uses and can radiate radio frequency energy and, if not installed and used in accordance with the instructions, may cause harmful interference to radio communications. However, there is no guarantee that interference will not occur in a particular installation. If this equipment does cause harmful interference to radio or television reception, which can be determined by turning the equipment off and on, the user is encouraged to try to correct the interference by one or more of the following measures:
ƒ5HRULHQWRUUHORFDWHWKHUHFHLYLQJDQWHQQD
ƒ,QFUHDVHWKHVHSDUDWLRQEHWZHHQWKHHTXLSPHQWDQGUHFHLYHU
ƒ&RQQHFWWKHHTXLSPHQWLQWRDQRXWOHWRQDFLUFXLWGLIIHUHQWIURPWKDWWRZKLFKWKHUHFHLYHULV connected.
ƒ&RQVXOWWKHGHDOHURUDQH[SHULHQFHGUDGLR79WHFKQLFLDQIRUKHOS
Caution:
$Q\FKDQJHVRUPRGL¿FDWLRQVQRWH[SUHVVO\DSSURYHGE\WKHJUDQWHHRIWKLVGHYLFHFRXOGYRLGWKH
user’s authority to operate the equipment.
RF exposure warning:
This equipment must be installed and operated in accordance with provided instructions and the antenna(s) used for this transmitter must be installed to provide a separation distance of at least 20cm from all persons and must not be co-located or operating in conjunction with any other antenna or transmitter. End-users and installers must be provide with antenna installation instructions and transmitter operating conditions for satisfying RF exposure compliance.
Warning statement for Europe:
$OVRSXWLQWKHPDQXDOZKLFKGLUHFWLYHWRIXO¿ODQGDOVRZKLFKFRXQWULHVWRVHOOWKHSURGXFW
([DPSOHRIDWH[WWRWHOOZKLFKGLUHFWLYHKDVEHHQIXO¿OOHG
Hereby, Foxconn, declares that this nT-iBT Series is in compliance with the essential requirements DQGRWKHUUHOHYDQWSURYLVLRQVRI'LUHFWLYH(&´