1
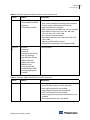
3.2 Multimedia Player User’s Guide 6.3 March 2013 3 Contents Preface 7 Copyrights and Trademark Notices 7 Telestream Contact Information 11 Overview 13 Introduction 13 What’s New 13 Windows Media® Components for QuickTime Licensing Levels 14 Player 14 Player Pro 15 Studio 15 Studio Pro HD 16 Feature Comparison 16 System Requirements 18 13 Installing and Upgrading 19 Introduction 19 Installing Flip Player 19 Uninstalling Flip Player 21 Upgrading Flip Player 21 Purchase Online at the Telestream Store Checking for Updates to Flip Player 21 Manually Entering a Serial Number 22 Deactivating a Serial Number 23 Activating a Serial Number 24 Basic Features 27 Introduction 27 Opening Media with Flip Player 27 Opening a video file 28 21 4 Contents Opening a Movie Stream 28 Opening Recent Media Files 28 Simultaneously Playing Multiple Movies 28 Editing Media Files 29 Cropping the Movie Frame 29 Rotating the Video 31 Trimming the Video 32 Scaling Picture Resolution 34 Movie Playback and Editing Controls 35 Play Bar 36 Play Controls 37 Setting Audio Volume and Muting 38 Viewing Controls 38 Full Screen Display 39 Highlighting the Flip Player Window 40 Screen Sizing 40 Aperture Control 40 Advanced Features 41 Introduction 41 Exporting Media 41 Exporting to Applications 42 Exporting to Devices 43 Exporting to a Format 43 Export Settings 45 Video Encoder Settings 46 Advanced Video Settings 48 Audio Encoder Settings 50 Advanced Audio Settings 51 Metadata Settings 52 Silverlight Settings 52 Creating Custom Encoder Profiles 53 User Interface 55 Flip Player Menu 55 File Menu 56 Edit Menu 56 Control Menu 57 Audio Menu 58 View Menu 58 Export Menu 58 Window Menu 58 Help Menu 58 Flip Player User’s Guide | 102190 Contents Reference 61 Supported Codecs, Formats, & Protocols Network Stream Protocols 64 Flip Player User’s Guide | 102190 61 5 6 Contents Flip Player User’s Guide | 102190 7 Preface Copyrights and Trademark Notices Copyright © 2013 Telestream, Inc. All rights reserved. No part of this publication may be reproduced, transmitted, transcribed, altered, or translated into any languages without the written permission of Telestream. Information and specifications in this document are subject to change without notice and do not represent a commitment on the part of Telestream. Telestream, Flip4Mac, FlipFactory, Episode, Telestream MAP, MetaFlip, GraphicsFactory, MotionResolve, ScreenFlow, and Split-and-Stitch are registered trademarks and Flip Player, Pipeline, Launch, Wirecast, Videocue, Drive-in, and Vantage are trademarks of Telestream, Inc. QuickTime, Mac OS X, and Safari are trademarks of Apple, Inc. Bonjour, the Bonjour logo, and the Bonjour symbol are trademarks of Apple, Inc. MainConcept is a registered trademark of MainConcept LLC and MainConcept AG. Copyright 2004 MainConcept Multimedia Technologies. Microsoft, Windows NT|2000|XP|XP Professional|Server 2003, Vista, Media Player, Media Encoder, .Net, Internet Explorer, SQL Server 2005 Express Edition, and Windows Media Technologies are trademarks of Microsoft Corporation. Dolby and the double-D symbol are registered trademarks of Dolby Laboratories. Redistributions of source code must retain the above copyright notice, this list of conditions and the following disclaimer. Redistributions in binary form must reproduce the above copyright notice, this list of conditions and the following disclaimer in the documentation and/or other materials provided with the distribution. Neither the name of Diversified Sales and Service, Inc. nor the names of its contributors may be used to endorse or promote products derived from this software without specific prior written permission. THIS SOFTWARE IS PROVIDED BY THE COPYRIGHT HOLDERS AND CONTRIBUTORS “AS IS” AND ANY EXPRESS OR IMPLIED WARRANTIES, INCLUDING, BUT NOT LIMITED TO, THE IMPLIED WARRANTIES OF MERCHANTABILITY AND FITNESS FOR A PARTICULAR PURPOSE ARE DISCLAIMED. IN NO EVENT SHALL THE COPYRIGHT OWNER OR CONTRIBUTORS BE LIABLE FOR ANY DIRECT, INDIRECT, INCIDENTAL, SPECIAL, 8 Preface Copyrights and Trademark Notices EXEMPLARY, OR CONSEQUENTIAL DAMAGES (INCLUDING, BUT NOT LIMITED TO, PROCUREMENT OF SUBSTITUTE GOODS OR SERVICES; LOSS OF USE, DATA, OR PROFITS; OR BUSINESS INTERRUPTION) HOWEVER CAUSED AND ON ANY THEORY OF LIABILITY, WHETHER IN CONTRACT, STRICT LIABILITY, OR TORT (INCLUDING NEGLIGENCE OR OTHERWISE) ARISING IN ANY WAY OUT OF THE USE OF THIS SOFTWARE, EVEN IF ADVISED OF THE POSSIBILITY OF SUCH DAMAGE. Other brands, product names, and company names are trademarks of their respective holders, and are used for identification purpose only. MPEG Disclaimers MPEGLA MPEG2 Patent ANY USE OF THIS PRODUCT IN ANY MANNER OTHER THAN PERSONAL USE THAT COMPLIES WITH THE MPEG-2 STANDARD FOR ENCODING VIDEO INFORMATION FOR PACKAGED MEDIA IS EXPRESSLY PROHIBITED WITHOUT A LICENSE UNDER APPLICABLE PATENTS IN THE MPEG-2 PATENT PORTFOLIO, WHICH LICENSE IS AVAILABLE FROM MPEG LA, LLC, 6312 S. Fiddlers Green circle, Suite 400E, Greenwood Village, Colorado 80111 U.S.A. MPEGLA MPEG4 VISUAL THIS PRODUCT IS LICENSED UNDER THE MPEG-4 VISUAL PATENT PORTFOLIO LICENSE FOR THE PERSONAL AND NON-COMMERCIAL USE OF A CONSUMER FOR (i) ENCODING VIDEO IN COMPLIANCE WITH THE MPEG-4 VISUAL STANDARD (“MPEG-4 VIDEO”) AND/ OR (ii) DECODING MPEG-4 VIDEO THAT WAS ENCODED BY A CONSUMER ENGAGED IN A PERSONAL AND NON-COMMERCIAL ACTIVITY AND/OR WAS OBTAINED FROM A VIDEO PROVIDER LICENSE IS GRANTED OR SHALL BE IMPLIED FOR ANY OTHER USE. ADDITIONAL INFORMATION INCLUDING THAT RELATING TO PROMOTIONAL, INTERNAL AND COMMERCIAL USES AND LICENSING MAY BE OBTAINED FROM MPEG LA, LLC. SEE HTTP://WWW.MPEGLA.COM. MPEGLA AVC THIS PRODUCT IS LICENSED UNDER THE AVC PATENT PORTFOLIO LICENSE FOR THE PERSONAL AND NON-COMMERCIAL USE OF A CONSUMER TO (i) ENCODE VIDEO IN COMPLIANCE WITH THE AVC STANDARD (“AVC VIDEO”) AND/OR (ii) DECODE AVC VIDEO THAT WAS ENCODED BY A CONSUMER ENGAGED IN A PERSONAL AND NONCOMMERCIAL ACTIVITY AND/OR WAS OBTAINED FROM A VIDEO PROVIDER LICENSED TO PROVIDE AVC VIDEO. NO LICENSE IS GRANTED OR SHALL BE IMPLIED FOR ANY OTHER USE. ADDITIONAL INFORMATION MAY BE OBTAINED FROM MPEG LA, L.L.C. SEE HTTP://WWW.MPEGLA.COM. Flip Player User’s Guide | 102190 Preface Copyrights and Trademark Notices MPEG4 SYSTEMS THIS PRODUCT IS LICENSED UNDER THE MPEG-4 SYSTEMS PATENT PORTFOLIO LICENSE FOR ENCODING IN COMPLIANCE WITH THE MPEG-4 SYSTEMS STANDARD, EXCEPT THAT AN ADDITIONAL LICENSE AND PAYMENT OF ROYALTIES ARE NECESSARY FOR ENCODING IN CONNECTION WITH (i) DATA STORED OR REPLICATED IN PHYSICAL MEDIA WHICH IS PAID FOR ON A TITLE BY TITLE BASIS AND/OR (ii) DATA WHICH IS PAID FOR ON A TITLE BY TITLE BASIS AND IS TRANSMITTED TO AN END USER FOR PERMANENT STORAGE AND/OR USE. SUCH ADDITIONAL LICENSE MAY BE OBTAINED FROM MPEG LA, LLC. SEE HTTP://WWW.MPEGLA.COM FOR ADDITIONAL DETAILS. Limited Warranty and Disclaimers Telestream, Inc. (the Company) warrants to the original registered end user that the product will perform as stated below for a period of one (1) year from the date of shipment from factory: Hardware and Media—The Product hardware components, if any, including equipment supplied but not manufactured by the Company but NOT including any third party equipment that has been substituted by the Distributor for such equipment (the “Hardware”), is free from defects in materials and workmanship under normal operating conditions and use. Software—If software is supplied as part of the product, the software will operate in substantial conformance with specifications set forth in its product user's guide. The Company does not warrant that the software will operate uninterrupted or error-free, will meet your requirements, or that software errors will be corrected. Warranty Remedies Your sole remedies under this limited warranty are as follows: Hardware and Media—The Company will either repair or replace (at its option) any defective Hardware component or part, or Software Media, with new or like new Hardware components or Software Media. Components may not be necessarily the same, but will be of equivalent operation and quality. Software—If software is supplied as part of the product and it fails to substantially confirm to its specifications as stated in the product user's guide, the Company shall, at its own expense, use its best efforts to correct (with due allowance made for the nature and complexity of the problem) such defect, error or nonconformity. Software Updates—If software is supplied as part of the product, the Company will supply the registered purchaser/licensee with maintenance releases of the Company’s proprietary Software Version Release in manufacture at the time of license for a period of one year from the date of license or until such time as the Company issues a new Version Release of the Software, whichever first occurs. To clarify the difference between a Software Version Release and a maintenance release, a maintenance release generally corrects minor operational deficiencies Flip Player User’s Guide | 102190 9 10 Preface Copyrights and Trademark Notices (previously non-implemented features and software errors) contained in the Software, whereas a Software Version Release adds new features and functionality. The Company shall have no obligation to supply you with any new Software Version Release of Telestream software or third party software during the warranty period, other than maintenance releases. Restrictions and Conditions of Limited Warranty This Limited Warranty will be void and of no force and effect if (i) Product Hardware or Software Media, or any part thereof, is damaged due to abuse, misuse, alteration, neglect, or shipping, or as a result of service or modification by a party other than the Company, or (ii) Software is modified without the written consent of the Company. Limitations of Warranties THE EXPRESS WARRANTIES SET FORTH IN THIS AGREEMENT ARE IN LIEU OF ALL OTHER WARRANTIES, EXPRESS OR IMPLIED, INCLUDING, WITHOUT LIMITATION, ANY WARRANTIES OF MERCHANTABILITY OR FITNESS FOR A PARTICULAR PURPOSE. No oral or written information or advice given by the Company, its distributors, dealers or agents, shall increase the scope of this Limited Warranty or create any new warranties. Geographical Limitation of Warranty—This limited warranty is valid only within the country in which the Product is purchased/licensed. Limitations on Remedies—YOUR EXCLUSIVE REMEDIES, AND THE ENTIRE LIABILITY OF TELESTREAM, INC. WITH RESPECT TO THE PRODUCT, SHALL BE AS STATED IN THIS LIMITED WARRANTY. Your sole and exclusive remedy for any and all breaches of any Limited Warranty by the Company shall be the recovery of reasonable damages which, in the aggregate, shall not exceed the total amount of the combined license fee and purchase price paid by you for the Product. Damages TELESTREAM, INC. SHALL NOT BE LIABLE TO YOU FOR ANY DAMAGES, INCLUDING ANY LOST PROFITS, LOST SAVINGS, OR OTHER INCIDENTAL OR CONSEQUENTIAL DAMAGES ARISING OUT OF YOUR USE OR INABILITY TO USE THE PRODUCT, OR THE BREACH OF ANY EXPRESS OR IMPLIED WARRANTY, EVEN IF THE COMPANY HAS BEEN ADVISED OF THE POSSIBILITY OF THOSE DAMAGES, OR ANY REMEDY PROVIDED FAILS OF ITS ESSENTIAL PURPOSE. Flip Player User’s Guide | 102190 Preface Telestream Contact Information Further information regarding this limited warranty may be obtained by writing: Telestream, Inc. 848 Gold Flat Road Nevada City, CA 95959 You can call Telestream, Inc. via telephone at (530) 470-1300. Telestream Contact Information To obtain product information, technical support, or provide comments on this guide, contact us using our web site, email, or phone number. Table 1. Telestream Contact Information Resource Contact Information Telestream Technical Support Web site: www.telestream.net/telestream-support Flip4Mac Technical Support Web site: www.telestream.net/telestream-support/ flip4mac-wmv/support.htm Telestream, Inc. Web site: www.telestream.net Support Email: [email protected] Sales and Marketing Email: [email protected] Telestream, Inc. 848 Gold Flat Road Nevada City, CA. USA 95959 International Distributor Support Web site: www.telestream.net Telestream Technical Writers Email: [email protected] Flip Player User’s Guide | 102190 See the Telestream Web site for your regional authorized Telestream distributor. If you have comments or suggestions about improving this document, or other Telestream documents—or if you've discovered an error or omission, please email us. 11 12 Preface Telestream Contact Information Flip Player User’s Guide | 102190 13 Overview Introduction Flip Player is a very versatile multimedia player. You can use it to view many kinds of files, including most video and audio files. Flip Player supports the most popular formats on the Internet for news, sports, education, movie trailers, and other entertainment. Flip Player plays everything QuickTime supports by default such as MOV and MP4/ H.264/AAC. Additional format support can be added through QuickTime components. Flip4Macmust be installed to play, convert and create Windows Media. For details see Windows Media® Components for QuickTime. Topics What’s New Windows Media® Components for QuickTime Feature Comparison System Requirements What’s New • Performance improvements when loading Windows Media files • Aspera is the new e-commerce provider for in-app purchases Flip Player is a newly introduced multi-format video player for playing, editing, and transcoding that replaces the WMV Player application. Windows Media® Components for QuickTime Flip4Mac is the official Windows Media player on Mac OS X—supported and hosted by Microsoft. This collection of QuickTime™ components allow you to easily play, import, and export Windows Media® files. Flip4Mac can be used with Flip Player and most of your other favorite QuickTime-compatible applications such as Apple Compressor, 14 Overview Licensing Levels iMovie, Keynote, PowerPoint as well as Web browsers such as Safari, Firefox and Chrome. Flip Player works with Flip4Mac components providing an easy to use tool for viewing and exporting media; exact Flip Player features vary depending on which version of Flip4Mac you have. For information on Flip4Mac, please read the Flip4Mac User Guide found in the Flip4Mac folder (within your Applications folder), installed as part of the Flip4Mac installation. The Flip4Mac manual discusses the components, use with 3rd-party applications, and integration with Web browsers. By upgrading Flip4Mac to Player Pro, Studio, or Studio Pro HD, you can also import Windows Media files for editing, and create Windows Media files in SD or HD for distribution. These features are available in demo mode until you are ready to purchase an upgrade to another Flip4Mac edition. Whichever version of Flip4Mac you have installed determines the feature set of Flip Player, with more advanced features available in the Pro versions. Note: Demo mode is the default mode of operation when using unlicensed software. This results in truncated exports. From Flip Player, you can purchase an upgrade to Flip4Mac by going to Preferences > License, clicking the lock icon at the bottom of the screen to unlock, and then clicking the “Purchase License” button on the screen. Alternately you may also upgrade in Flip4Mac—see Manually Entering a Serial Number in the Flip4Mac User Guide. Finally, you can also purchase an upgrade online at the Telestream Store. Licensing Levels Flip Player has four licensing levels: Player, Player Pro, Studio, and Studio Pro HD. Player Flip Player enables you to play everything QuickTime supports by default such as MOV, MP4, H.264, and AAC files. Additional format support can be added through QuickTime components. Flip4Mac is the official Windows Media player on the Mac and adds support for WMV and WMA to Flip Player. Telestream is committed to extending format support in future releases of Flip Player to provide official and legal multi-format support. Flip Player dynamically fades-in navigation controls, but only when you need them and never on top of your video. With a simple, uncluttered design, Flip Player makes it easy to navigate through your video. You can scrub, fast-forward, rewind, skip, jump or step, without ever obscuring your video content. For brilliant and distraction-free video playback, use the Dim Lights feature to dim the background of your screen. Full pixel-to-pixel fidelity without any scaling or interpolation is also provided. Flip Player User’s Guide | 102190 Overview Licensing Levels You can convert your media with easy-to-use export templates optimized for import into applications such as: • • • • • • iMovie iPhoto Mail iPhone iPod Apple TV Player Pro Player Pro includes all Player features, plus it enables you to import Windows Media video and audio for editing or for conversion to other QuickTime formats. Player Pro enables you to convert Windows Media files to other formats for iPod, iPhone, iPad, Apple TV, iMovie, iPhoto, iTunes or Final Cut Pro. The Flip4Mac Player Pro license level is also required for performing these actions in Flip Player, regardless of whether the source or output is Windows Media: • • • • • • • • • • • Scale Trim Crop Rotate Save As Revert Export to Final Cut Pro ProRes Export to iPhone Ringtone Slow Motion Playback JKL Controls Comma/period frame stepping Studio Studio includes all Player Pro features, plus it enables you to create Windows Media files by exporting video and audio from a QuickTime application. You can export Windows Media directly from QuickTime applications including Flip Player, QuickTime Player 7 Pro, Final Cut Pro 7, and Final Cut Pro X (using Compressor). You can also export Window Media from Telestream’s ScreenFlow. The export process is simplified by using a variety of preset encoding profiles to meet most needs, which cannot be modified. Flip Player User’s Guide | 102190 15 16 Overview Feature Comparison Note: To export WMV from Final Cut Pro X, you must do so via Final Cut Compressor. Studio Pro HD Studio Pro HD includes all Studio features, plus it adds the ability to create highdefinition video and two-pass HD encoding profiles. The WMV 9 Advanced Video codec, WMA 9 Professional codec, and WMA 9 Lossless audio codec are also available. Note: License badges are used in this User’s Guide when a feature requires a license level above the free player: PRO STUDIO STUDIO PRO HD Feature Comparison Use these tables to determine which features are provided at each license level (basic and upgrades). One-pass standard definition encoding presets are provided on all license levels. However, Studio Pro HD also enables you to create custom two-pass high definition presets. Table 2. Flip Player Import and Export Features at each License Level License Features Restrictions Player • Playback • Video and audio watermarks on Windows Media file conversions to MOV files. • Windows media exports truncated to thirty seconds. If the source file is less than thirty seconds, it is truncated to half the duration. Player Pro • Playback • Importing (Transcoding from WMV) • Windows Media exports truncated to thirty seconds. If the source file is less than thirty seconds, it is truncated to half the duration. • Only one-pass encoding presets available. • Only standard-definition encoding presets available. Flip Player User’s Guide | 102190 Overview Feature Comparison Table 2. Flip Player Import and Export Features at each License Level License Features Restrictions Studio • Playback Importing • Only one-pass encoding presets available. • Only standard-definition encoding presets available. • Custom settings disabled. Must use a preset. • WMV 9 Advanced not available. • WMA 9 Professional and WMA 9 Lossless not available. • Unavailable 4:3 frame sizes: 384 x 288, 480 x 360, (Transcoding from WMV) • Exporting • (Transcoding to WMV) 768 x 576, 960 x 720, 1280 x 1080 • 4:3 CCIR frame sizes unavailable. • Unavailable 16:9 frame sizes: 960 x 540, 1280 x 720, 1920 x 1080 • Maximum 48 kHz audio in exports. • Variable bit rate encoding is not supported (VBR). Studio Pro HD • Playback • Importing • Exporting • Creating Custom Presets • Two-Pass Encoding • High Definition Exports • WMV 9 Advanced • WMA 9 Professional • WMA 9 Lossless • Up to 96 kHz audio • Variable Bit Rate (VBR) • No restrictions. encoding methods are available. Table 3. Flip Player Application Features at each License Level License Features Restrictions Player • Playback • Editing (crop, rotate, trim, and scale) can be performed in the Flip Player, but not saved or exported. • Slow motion playback is not available. • iPhone Ringtone exports are not available. • Final Cut Pro exports are not available. • Frame stepping using comma and period keys is not available. • JKL keyboard controls are not available. Flip Player User’s Guide | 102190 17 18 Overview System Requirements Table 3. Flip Player Application Features at each License Level License Features Restrictions Player Pro • Playback • Editing • Slow Motion Playback • iPhone Ringtone Exports • Final Cut Pro Exports • Command/Period Frame • Windows media exporting requires Flip4Mac Studio or Studio Pro HD Stepping • JKL keyboard controls are available. System Requirements The operating system requirement is: OS X (on Intel) Version 10.7 Lion and later. Flip Player User’s Guide | 102190 19 Installing and Upgrading Introduction This section will demonstrate how to install, remove, update, and customize Flip Player. Note: Installers are available on Telestream.net for installing Flip Player by itself or installing Flip4Mac and Flip Player together. Topics Installing Flip Player Uninstalling Flip Player Upgrading Flip Player Checking for Updates to Flip Player Manually Entering a Serial Number Deactivating a Serial Number Activating a Serial Number Installing Flip Player To install Flip Player, you must be logged on as a user with administrator rights, and you must provide your administrator name and password during installation. Quit all QuickTime applications (Safari, Firefox, Google Chrome, Flip Player, QuickTime Player, etc.) and follow these steps: 1. Download the DMG file from the Web site or obtain it on media. 2. Locate the DMG file (in your Downloads folder, if you obtained it from the Web). 3. Double-click the disk image file to mount the disk image. 20 Installing and Upgrading Installing Flip Player 4. Click and drag Flip Player icon into the Applications folder. Click and drag icon 5. If you are installing Flip4Mac, double-click Flip4Mac.pkg icon, and follow the steps to install both Flip4Mac and Flip Player software. Double-click icon. 6. Relaunch your Web browser and QuickTime applications. If both Flip Player and Flip4Mac are installed, there will be a Flip Player application and Flip4Mac folder in your Mac Applications folder, otherwise only the Flip Player Flip Player User’s Guide | 102190 Installing and Upgrading Uninstalling Flip Player application will be present. You can run Flip Player at any time by double-clicking the application icon. You can drag the icon to your dock for easy access in the future. Uninstalling Flip Player To remove Flip4Mac and Flip Player from your computer when both are installed, follow these steps: 1. In the Finder, open the Applications > Flip4Mac folder. 2. Double-click Flip4Mac Uninstaller.pkg and follow the instructions. 3. Relaunch your Web browser and QuickTime applications. Note: The uninstaller does not remove the Flip Player preferences or serial numbers you have purchased. To remove only Flip Player, drag the Flip Player icon to the trash. Upgrading Flip Player Upgrading Flip Player unlocks certain features which enable you to import Windows Media files for editing and create Windows Media files for distribution. You do not need to download a new version. To enable these features, visiting the Telestream Store to purchase and activate Flip Player. Purchase Online at the Telestream Store If you installed Flip Player on a computer without Internet access, you can purchase an upgrade by visiting the Telestream Store on another computer. When the purchase is complete you’ll receive an email containing your serial number. Review the Manual Activation Guide (www.telestream.net/pdfs/user-guides/ Manual_Activation_Guide.pdf ) on the Telestream Web site for step-by-step instructions on manually activating your serial number. Checking for Updates to Flip Player To use Flip Player Preferences to check for software updates manually (or at scheduled intervals), follow these steps: Flip Player User’s Guide | 102190 21 22 Installing and Upgrading Manually Entering a Serial Number 1. Select Flip Player > Preferences, then click the Update icon. 2. To change the interval at which Flip Player checks for updates, choose Daily, Weekly, Monthly or Never from the Check For Updates menu. 3. To check for updates manually, click Check Now. Click Update Select interval Click Check Now 4. If an update is available, you’ll be notified. If a notification displays, click Update Now. Click Update Now Manually Entering a Serial Number If your computer is connected to the Internet and you purchased an upgrade via the Telestream Store online, you may use the email receipt (which contains your serial number) to manually activate Flip Player. Manual activation is also used for activating a serial number in Flip Player on another Mac. To enable the upgraded features when you purchase a serial number in this manner (or if you are entering the same serial number in additional copies of Flip Player), you must have access to the Internet, and you must manually enter the serial number to activate the features you purchased. Note: If your Mac does not have Internet access, do not use this process. Instead, use a separate computer with Internet access to open the Manual Activation Guide on the Telestream Web site (www.telestream.net/pdfs/user-guides/Manual_Activation_Guide.pdf) for a step-by-step guide to manually activate the component after purchasing an upgrade. 1. Select Flip Player > Preferences, then click the License icon. Flip Player User’s Guide | 102190 Installing and Upgrading Deactivating a Serial Number 2. Click the lock icon, enter your administrator name and password, and then click OK to enable the Serial Number button. Click Enter Serial Number to enter your serial number. Click License. Click lock icon Click Enter Serial Number. 3. When the Serial Number dialog displays, enter the registration serial number exactly as it exists in your receipt email. (It is best to copy and paste the serial number to avoid typing mistakes.) When typing it in, be sure to enter only zeroes (no letter O's), capitalize all letters, and include all hyphens. The Name field is optional except for users with very old serial numbers. Enter serial number Note: If you experience problems activating, contact Telestream Customer Support at: [email protected] or 877-681-2088. 4. When the serial number is entered correctly, the Activate button is enabled, and you can click Activate. The Telestream Store is contacted and activates the serial number for your computer. Deactivating a Serial Number A Flip Player serial number can only be active on one computer at a time. But, you can enter it on multiple computers (see Manually Entering a Serial Number), making it available on many. Before activating Flip Player on a different computer, you must deactivate where ever it is currently activated. In other words, you can deactivate it and Flip Player User’s Guide | 102190 23 24 Installing and Upgrading Activating a Serial Number then activate it elsewhere as needed. (See Activating a Serial Number.) This makes the use of the serial number more flexible, and avoids unnecessarily purchasing extra licenses. To deactivate a Flip Player serial number on a particular computer follow these steps: 1. Select Flip Player > Preferences, then click the License icon. 2. Click the lock icon and enter your administrator name and password and click OK to enable the buttons. Click Deactivate Serial Number. Click License Click lock icon Click Deactivate Serial Number 3. When the dialog box displays, click Deactivate to deactivate your serial number on your computer (which must have Internet access). This enables you to activate this same serial number on another computer. Activating a Serial Number If you previously deactivated a serial number to make it available on another computer, you can activate it by following these steps: 1. Select Flip Player > Preferences, then click the License icon. Flip Player User’s Guide | 102190 Installing and Upgrading Activating a Serial Number 2. Click the lock icon and enter your administrator name and password, then click OK to enable the buttons. Click Activate Serial Number. Click License Click lock icon Click Activate Serial Number 3. When the Serial Number window displays, click Activate. The Telestream Store is contacted and your serial number is activated on your computer. Click Activate Flip Player User’s Guide | 102190 25 26 Installing and Upgrading Activating a Serial Number Flip Player User’s Guide | 102190 27 Basic Features Introduction This section presents the basic features of Flip Player. Topics Opening Media with Flip Player Editing Media Files Movie Playback and Editing Controls Setting Audio Volume and Muting Viewing Controls Opening Media with Flip Player When Flip Player is installed, Windows Media files become automatically associated with Flip Player. When you open a Windows Media file, Flip Player is automatically launched and plays that file. To manually associate a Windows Media file with Flip Player hold down the control key and click the file icon in Finder (or right-click) to display the shortcut menu, then select Open With > Flip Player. Finder changes the file association and opens the file. To permanently change the file association, select a file in Finder, right-click and select Get Info, click Open With, choose Flip Player, then click Change All. Other media file types, in addition to Windows Media, can also be opened and played similarly. (See the list of Supported Codecs, Formats, & Protocols.) 28 Basic Features Opening Media with Flip Player For convenience, you can add the Flip Player application to your dock by dragging it from the Applications folder. To open other Windows Media files, drag and drop them onto the Flip Player icon. Drag and drop Windows Media files onto the Flip Player icon Opening a video file Select File > Open File, or press the command + O keys, to open a media file in Flip Player. When the Open dialog box displays, navigate to the file you want to open and click Open. Click Cancel if you decide to not open any media files. The file navigation window provides a variety of display and sorting options, accessed by clicking the icons at the top of the window. Opening a Movie Stream To open a movie stream in Flip Player, select File > Open Stream, enter a valid URL for the movie source then click Open. Opening Recent Media Files You can re-open previously opened media files by selecting File > Open Recent. This displays your most recently accessed media files. Every time a file is opened or saved it is entered into the list. Note: The number of recent items is dependent on the user's settings in the General pane of the System Preferences. Simultaneously Playing Multiple Movies You can have more than one Flip Player window open at a time. To open more than one Flip Player window, do one of the following: • Double-click another video file. • Control-click (or right-click) a movie file and then select Open With Flip Player. Flip Player User’s Guide | 102190 Basic Features Editing Media Files When you have more than one Flip Player window open, the audio plays only on the active (top) window. Editing Media Files The Edit Menu offers selections for editing of video and audio content. Cut, Copy, Paste, Delete, and Select All can be used when in Trim mode for basic video clip editing. You can also cut, copy, and paste between multiple video clip files. Crop, Trim, Rotate, and Scale are editing functions to edit the movie clip itself; these functions are described in the topics that follow. Cropping the Movie Frame PRO The crop tool enables you to use just a portion of the visible picture. You might use this to make the picture frame smaller for fitting in a Web window application, or for fitting Flip Player User’s Guide | 102190 29 30 Basic Features Editing Media Files a 4:3 or 16:9 aspect ratio that is sized smaller than the existing frame geometry. You can access the crop tool by selecting Edit > Crop, or by pressing the command + K keys. Crop settings The crop tool enables you to set the crop size, crop offset, and constraints (full screen, wide screen, or none). The settings selected in the crop settings window above are manifested in the video screen shown below. Each of the four settings represents one of the cropping edges. Crop Size Height Crop Offset Width Crop Size Width Crop Offset Height Crop Offset Width is the amount of pixels that the selection is offset from the left side of the frame. Crop Size Width is how wide the crop selection is in pixels. Crop Offset Height is the amount of pixels that the selection is offset from the bottom of the frame. Crop Size Height is how tall the crop selection is in pixels. Flip Player User’s Guide | 102190 Basic Features Editing Media Files When you enter a new value, the screen will adjust its cropping frame when you enter another setting field. You can also click and drag on any of the handles of the crop selection to resize it, or in the center to move it. Note: Do not click Apply or press the Enter key until you have made all your cropping settings. Once you are satisfied with the crop area selected, click Apply to implement your settings. Or, you can click Cancel to discard your changes. Once applied, you can reenter the crop settings window and make cropping changes. Clicking Revert undoes all edits and restores the video to its original size. Revert cannot be undone. Rotating the Video PRO You can change the orientation of a video by rotating it 90, 180, or 270 degrees. To rotate a video, open the rotation settings window by clicking Edit > Rotate or by pressing the command + R keys. Flip Player User’s Guide | 102190 31 32 Basic Features Editing Media Files The rotate window enables you to rotate the video either clockwise or counterclockwise by 90 degrees. Shown below is the result of a counter-clockwise rotation. Rotated video Normal video Multiple clicks of either rotation button causes additional rotations of the video. After rotating, click Apply, or press the Enter key, to implement your settings. Click Cancel to discard your changes. Once applied, you can re-enter the rotation settings window and make changes. Clicking Revert undoes all edits and restores the video to the way it exists in the file when it was first opened. Revert cannot be undone. Trimming the Video PRO You can choose where a video clip begins and ends by setting trim points. Select Edit > Trim, or press the command + T keys, to open the trim settings window. The time format is: days, hours, minutes, seconds, fractional seconds, and scale (d:mm:hh:ss.ss/ scale). You can also enter partial values and have the rest filled in automatically, such as entering 30 for thirty seconds. However, you should make sure the scale is the same for all three fields, otherwise the calculations might not be what you expect (10.00/50 Flip Player User’s Guide | 102190 Basic Features Editing Media Files would be the same as 20.00/100). Scale is not the frame rate, even though it looks similar. Enter a start time for the In marker and click Go to set the marker. Then enter an end time for the Out marker and click Go to set that marker. You can also set in and out markers by sliding them in the edit bar below the video. To select a portion of a movie, move the In and Out selection markers or use the “I” and “O” keys on your keyboard. The lighter colored area between the two markers indicates the selected portion. To fine-tune the selection, select a marker and move it with the arrow keys. Edit bar In marker Flip Player User’s Guide | 102190 Out marker 33 34 Basic Features Editing Media Files Cut, Copy, Paste, Delete, and Select All can be used when trimming video clips. Select the portion of the clip you want to Cut, Copy, or Delete, then select the Paste to place it in your target location. You can also cut, copy, and paste between multiple movies. After trimming, click Apply, or press the Enter key, to implement your settings. Click Cancel to discard your changes. Once applied, you can re-enter the trim settings window and make changes. Clicking Revert undoes all edits and restores the video to its original length. Revert cannot be undone. Scaling Picture Resolution PRO You can scale the picture (and optionally change the aspect ratio) for different devices or applications. Select Edit > Scale, or press the command + G keys, to display the scale settings window. In this window you can set the video resolution by entering the pixel size for the video height and width. You can also choose if the aspect ratio will be maintained or not in the Dimensions menu. Set resolution Select Dimension Select preset The Scale settings window displays the Natural Size (original size) and Current Size in pixels. If Maintain aspect ratio is selected, re-sizing will keep the aspect ratio intact as you change the size of the video. You ca not scale less than 240 x 240. Flip Player User’s Guide | 102190 Basic Features Movie Playback and Editing Controls A variety of screen presets are available from the Preset menu. When a selection is made, the video re-sizes accordingly. Here are the available presets: After scaling, click Apply, or press the Enter key, to implement your settings. Click Cancel to discard your changes. Once applied, you can re-enter the scale settings window and make changes. Clicking Revert undoes all edits and restores the video to its original size. Revert cannot be undone. Movie Playback and Editing Controls Flip Player provides a variety of Control menu options and a play bar to allow you to move around within the movie for viewing or editing. Flip Player User’s Guide | 102190 35 36 Basic Features Movie Playback and Editing Controls Play Bar The features of the play bar are shown below. play Bar Scrubber Elapsed Time Progress Bar Volume Control Time Remaining Play/Pause Play/Pause Click to play the video; click again to pause it. Note: In addition to clicking Play/Pause on the play bar, you can also play and pause by pressing the spacebar. It acts as a toggle between play and pause modes. Elapsed Time Displays time the video has been playing. Scrubber Click and slide to change the location in the video you are viewing. You can also click on any position in the scrubber to jump the play head to that location. Progress Bar The progress bar indicates how much of the media has been downloaded. Elapsed Time Displays time remaining for the video to play. Volume Control Click to display a volume control slider. Flip Player User’s Guide | 102190 Basic Features Movie Playback and Editing Controls Play Controls To access Control selections, select the Control menu. Control features include: Play, Fast Forward/Reverse, Slow Motion (Flip Player Pro only), Step, Jump, Skip, Instant Replay, Chapter selection, and Loop. Play Click Play to begin playing your video. The word Play changes to Pause while playing media. Fast Forward/Reverse Fast Forward speeds up playback and Fast Reverse plays backward rapidly. This enables you to move quickly to other locations in the video. Repeated clicks cause increased speeds (2x, 4x, etc.) of forward and reverse. Speed Speed enables you to set the playback speed in increments of 1x, 2x, 4x, 8x, 16x, 32x, and 64x. When playing, the playhead displays the speed selected. Speed display PRO Slow Motion Enables you to playback video at one fourth of normal playback speed. This feature is only available in the Pro (or above) version of Flip Player. Slow motion also available when pressing L and K keys together (forward slow motion) or J and K keys together (reverse slow motion). Step Forward/Backward Step Forward moves the video one frame forward; Step Backward moves it one frame backward. You can also press the right and left arrow keys, or the comma and period keys to step forward and backward. Flip Player User’s Guide | 102190 37 38 Basic Features Setting Audio Volume and Muting Jump Forward/Backward Selecting Jump forward or backward results in moving 10 seconds ahead or behind in the video. Jump To End/Start Jump To End moves the video to the last frame; Jump To Start moves it to the first frame. If the video is paused, it will remain paused after the jump is executed. Skip Skip enables you to jump forward 30 seconds into the video. Instant Replay Instant Replay enables you to jump backward 8 seconds in the video. If video is playing, it will jump back and continue playing; if paused, it will jump back and stay paused. Previous/Next Chapter Moves from the current location in the video to the previous or next chapter. Chapters Moves to the chapter selected in the chapter list. Chapter list Note: The Chapter menu items (Next Chapter, Previous Chapter, and Chapter) are only enabled if the video has chapter markers embedded in it. If no chapter markers are present, the menu items are greyed out. Chapter markers are sometimes embedded in longer movie clips to divide sections of the media topically or by edit points. Loop Enables you to play a video repeatedly. If Loop is selected, the movie will play again from the beginning whenever it reaches the end. Setting Audio Volume and Muting Flip Player enables you to change playback volume. From the Audio menu select Increase Volume to increase the volume of the video, select Decrease Volume to decrease it, and select Mute to silence it entirely. Viewing Controls Flip Player provides a number of viewing controls: full screen display, Flip Player window highlighting, screen sizing, and aperture control. Flip Player User’s Guide | 102190 Basic Features Viewing Controls Full Screen Display You can set the screen so that only the movie is visible. This presentation setting is called Full Screen mode. (You can also size the movie player so it will play at whatever screen size you need.) To play a movie at full screen, do one of the following: • Select View > Enter Full Screen. • Press the command + F keys. • In the Flip Player screen, click on the Full Screen arrows icon in the top right hand corner To quit full-screen mode, press the esc key, or press the command + F keys. To adjust the picture to fit your screen, move the pointer to any corner of the active picture area, click to select the corner, and then drag the corner to the needed size. Note: You must click on the corner of the viewing area of the screen—not on the title bar or play bar—to resize the movie player. Full Screen arrows icon Title bar Viewing area Play bar Scrubber Progress Bar Note: As long as Full Screen is selected, you can make hidden controls appear by moving the cursor over the video. However, the play bar can be made visible by moving the cursor over the video at any time, whether in full screen or not. The title bar will not appear in full-screen or edit modes. Flip Player User’s Guide | 102190 39 40 Basic Features Viewing Controls Highlighting the Flip Player Window To make viewing the Flip Player player window easier when you have lots of windows open, select View > Dim Lights. This isolates the Flip Player player window visually from all others on the desktop by fading everything else to a dark gray. Select Dim Lights again to disable this feature. Screen Sizing Flip Player lets you adjust the size of the video display by providing four sizes: Half Size, Actual Size, Double Size, and Fit To Screen. Actual Size is a combination of the dimensions of the video essence in the file, the aperture mode, any scale edits, any crop edits, and any rotation edits. Half Size adjusts the display to half of the actual size. Double Size makes the display twice the size of actual. Fit To Screen causes the display to expand to the limits of the display. Aperture Control The Aperture setting enables you to control the dimensions of the video, which may change the aspect ratio. Flip Player provides five aperture settings: Classic Content appears as it did in previous versions of QuickTime. Clean The recommended setting for most video. Crops the video to the area of frame free from digitization artifacts and applies pixel aspect ratio correction. A 4:3 DV NTSC track appears as 640 x 480; a 16:9 DV NTSC track appears as 853 x 480. Production Used for video production. Shows all pixels in the video including the edges and corrects for pixel aspect ratio. A 4:3 DV NTSC track appears as 654 x 480; a 16:9 DV NTSC track appears as 873 x 480. Encoded Pixels Neither crops nor scales the video. A DV NTSC (4:3 or 16:9) track appears as 720 x 480. None No aperture control is used. For more detailed information on Aperture settings, see QuickTime Pro: About the "Conform aperture to" setting and About QuickTime Aperture Display Modes. Flip Player User’s Guide | 102190 41 Advanced Features Introduction This section presents the advanced features of Flip Player, including how to export Windows Media files, how to edit video and audio settings, and how to create custom encoder profiles. Topics Exporting Media Exporting to Applications Exporting to Devices Exporting to a Format Export Settings Video Encoder Settings Advanced Video Settings Audio Encoder Settings Advanced Audio Settings Metadata Settings Silverlight Settings Creating Custom Encoder Profiles Exporting Media A powerful feature of Flip Player Pro is the ability to re-encode video and export a new movie clip for use by other applications and many popular devices (iPhone, iPod etc.). While not having the powerful features of Telestream Episode or Vantage, Flip Player is 42 Advanced Features Exporting to Applications handy for doing quick conversions of all container formats, audio codecs, and video codecs that are available in QuickTime. Note: You can export from all QuickTime supported formats, but you cannot export to all QuickTime supported formats. Exporting to Applications You can export Flip Player files to a variety of popular applications including: iMovie, iPhoto, Final Cut Pro X (Player Pro only), Episode, ScreenFlow, and Wirecast. This may or may not require transcoding, depending on the source format and which application you have selected. To export a video to an application, follow these steps: 1. Load a media file into Flip Player. 2. Select Export > Application and select an application from the list. Note: Episode, ScreenFlow, Wirecast, iPhoto, and Mail are all H.264 format. (H.264 is a video format in which the audio format and container format varies.) iMovie is AIC format. Final Cut Pro is ProRes format. 3. Once you have made a selection, Flip Player presents a Save dialog box asking you for a filename and a location then creates a new media file that works with the selected application. When you click Save, Flip Player displays a progress window that tracks progress. When completed, the newly exported file is ready for use with your application. Flip Player User’s Guide | 102190 Advanced Features Exporting to Devices Note: To automatically launch export-receiving applications such as Episode, ScreenFlow, Wirecast, iMovie, etc., they must reside in the Applications folder and they must not be renamed. Exporting to Devices Since so many devices play video (iPod, iPhone, iPhone-Ringtone (Player Pro only), iPad, AppleTV, Mac, and PC computers), Flip Player acts as a simple and fast tool for exporting video to them. Based on the selected device and the source format, Flip Player picks the appropriate file container, codec, and encode settings. This makes Flip Player very fast and easy to use. (See Supported Codecs, Formats, & Protocols for a table of applications and file formats supported for export.) To export a video to a specific device, follow these steps: 1. Load a media file into Flip Player. 2. Select Export > Device and select a device from the list (iPhone, iPad, iPod, etc.) Note: iPhone, iPad, iPod, Apple TV, and Mac are all H.264 format. iPhone (Ringtone) is AAC format. H.264 is a video codec and AAC is an audio codec, but they are not mutually exclusive. Many of the devices export using both H.264 and AAC. 3. Once you have made a selection, Flip Player creates a new media file that works with the selected device then presents a Save dialog box asking you for a filename and a location. Click Save and Flip Player displays a progress window that tracks progress and completion. When it’s done, the newly exported file is ready for use with your device. Exporting to a Format STUDIO You can also export a Windows Media file from Flip Player. Which media formats you can export from Flip Player depends on the upgrade you have licensed. To export a Windows Media file, follow these steps: 1. Load a media file into Flip Player. Flip Player User’s Guide | 102190 43 44 Advanced Features Exporting to a Format 2. Export > Format > Windows Media, or press the command + J keys. 3. Select a preset from the list of presets, then click the down-arrow to edit/view the preset’s values. Select preset Click to see preset’s values Note: You can create and edit these presets if you have the Studio Pro HD license. Flip Player User’s Guide | 102190 Advanced Features Export Settings To select a preset, click the Preset pull-down menu to display all the presets available (for your license level). You can also select New Preset to create a new preset (if you have a Studio Pro HD license). Export Settings To edit the preset’s values, click the down-arrow to display the Media Export Settings window which contains four tabs: • • • • Video Displays video encoder settings Audio Displays audio encoder settings Metadata Displays metadata values stored into the output file Silverlight Displays Silverlight settings How you can export media in Flip4Mac depends on which F4M license you have: • Player—You can export complete WMV files to MOV files (or any other format), but the file is watermarked. You can also export MOV files to WMV files, but the exports are limited to 30 seconds (or half the source media duration) and the files are not watermarked. • Player Pro—You can export WMV files to MOV files. You can export MOV files to WMV files, but the exports are limited to 30 seconds (or half the source media duration) – the files are not watermarked. • Studio—You can export WMV files to MOV (and other format) files, and you can export MOV files to WMV files. You can select from a wide variety of preset encoder profile choices, which can not be customized. Export resolution is limited to 960x540 pixels. • Studio Pro HD—When exporting MOV files to WMV format, you can change individual WMV encoder settings and save those changes in a new preset (note the Preset Flip Player User’s Guide | 102190 45 46 Advanced Features Video Encoder Settings drop-down list at the top of the Flip Player Export Settings dialog). You can also select New Preset from the popup menu (near the bottom of the drop-down list), to create a new, custom interlaced or progressive encoder profile with custom settings. See Creating Custom Encoder Presets later in this manual for more information. You can also export WMV files to MOV files. Video Encoder Settings The Video settings tab enables you to specify how the video track is encoded when exporting. Note: The video settings tab is disabled if your source media does not contain a video track. Video settings Click for advanced settings Flip Player User’s Guide | 102190 Advanced Features Video Encoder Settings Use the controls on this dialog to change your basic video settings. For more options, you can click Advanced to display additional controls. (Settings displayed vary with the selected preset). • Export using When checked, the video track is encoded using the selected video codec. If unchecked, the Windows Media file will not contain a video stream. • Method For constant bit rate (CBR) encoding, enter the desired bit rate–the encoder dynamically adjusts quality to maintain that bit rate, by adjusting the quality of each frame or by dropping frames completely. • Quality The quality setting emphasizes which method the encoder should use. For variable bit rate (VBR), set the desired quality to emphasize smoother or sharper output. Smoother quality produces better motion, but may reduce the quality of each frame. Sharper quality produces better images. During encoding, the bit rate varies (based on frame size, rate, and complexity). In two-pass VBR, you can specify the target bit rate, but in one-pass VBR you cannot edit the bit rate. • Bit Rate Select data rate from the drop-down list. • Peak Bit Rate Select the peak data rate from the drop-down list. • Frame Size and Rate Determines the width, height and frame rate of the encoded video track. • Advanced Click to display the Advanced panel to make special adjustments for encoding. Flip Player User’s Guide | 102190 47 48 Advanced Features Advanced Video Settings Advanced Video Settings When you click Advanced, additional settings are displayed: Advanced settings Advanced settings • Complexity This setting controls the effort used to identify areas of similarity in consecutive frames. Live modes apply less effort and may sacrifice image quality for encoding speed. Offline modes apply more effort and take more time, but produce the best image quality. Flip Player User’s Guide | 102190 Advanced Features Advanced Video Settings • Profile Specify Simple or Main (WMA 9 Standard), or Advanced (WMV 9 Advanced). – Simple—This profile targets low-rate Internet streaming and low-complexity applications (mobile communications, or playback of media in personal digital assistants). – Main—This profile targets high-rate Internet applications (streaming, movie delivery via IP, or TV/VOD over IP). – Advanced—This profile targets broadcast applications. It is the only profile available for WMV 9 Advanced. • Key frames Select the maximum interval allowed between successive key (I) frames. • Buffer Delay Select the duration of the delay buffer used for bit rate control. Longer delays produce better overall quality (at the expense of larger fluctuations in the bit rate). • B Frames The Windows Media video codec employs intra (I), predictive (P) and bidirectional (B) coded frames. Select the number of B frames to insert between successive I or P frames. • Input Type/Output Type Select the format of the source (input) video track and the desired format of the encoded (output) video stream. The encoder uses this information to optimize the conversion between interlaced and progressive formats. Flip Player User’s Guide | 102190 49 50 Advanced Features Audio Encoder Settings Audio Encoder Settings Use the Audio settings tab to control how the audio track is encoded. Note: The audio settings tab is disabled if your source media does not contain an audio track. Audio settings Click for advanced settings Use these controls to change your audio settings: • Export using When checked, the audio track is encoded using the selected audio codec. If unchecked, the Windows Media file will not contain an audio track. • Method For constant bit rate (CBR) encoding, you can select the audio format (sample rate and number of channels) and the desired bit rate. The encoder converts the track to that format and dynamically adjusts the quality to maintain the selected bit rate. For variable bit rate (VBR) encoding you select the audio format and desired quality. During encoding the bit rate will vary based on the complexity of the audio content. • Quality The quality setting emphasizes which method the encoder should use. Smoother quality produces better sound flow, but potentially reduces the quality Flip Player User’s Guide | 102190 Advanced Features Advanced Audio Settings of each sample. Crisper quality produces better sound, but potentially drops more samples. • • • • • • Bit Rate Select data rate from the drop-down list. Peak Bit Rate Select the peak data rate from the drop-down list. Channels Select the number of audio channels. Frequency Select the sampling frequency. Depth Select an audio sample bit depth from the radio buttons presented. Advanced Click to display the Advanced panel to make special adjustments for encoding. Advanced Audio Settings When you click Advanced, additional settings are displayed: Advanced setting • Buffer Delay Specifies the duration of the delay buffer used for bit rate control. Longer delays can produce better overall quality at the expense of larger fluctuations in the bit rate. Flip Player User’s Guide | 102190 51 52 Advanced Features Metadata Settings Metadata Settings The Metadata tab provides optional metadata information stored inside the exported file: This information is stored in the Windows Media file and displayed by most Windows Media players. Silverlight Settings When encoding media for use with Silverlight, click the Silverlight settings tab. Check Embed video in Silverlight package to embed video into Silverlight. Select a Silverlight Flip Player User’s Guide | 102190 Advanced Features Creating Custom Encoder Profiles template. Templates specify a particular skin that will encase your video, which can be one of any number of stylized designs that include playback elements. Due to the way QuickTime works, you cannot name the exported media the same as another file that exists. Check Copy presentation to unique subfolder to create a new folder for the presentation (in a new directory) named with a date and time stamp. Note: If QuickTime prompts you to overwrite an existing file, click No and change the filename. Attempting to overwrite an existing file when exporting a Silverlight presentation will cause the export to fail at the end of the encoding process. Creating Custom Encoder Profiles STUDIO PRO HD Flip Player Studio provides a number of preset audio and video encoder profiles. These presets are designed to meet a wide variety of media distribution needs, including Web streaming, Web download, and desktop presentation. When you upgrade to Flip Player Flip Player User’s Guide | 102190 53 54 Advanced Features Creating Custom Encoder Profiles Studio Pro HD, you can create your own encoder profiles (a specific set of encoder settings). To create a new profile, follow these steps: 1. Select Export > Format > Windows Media, pull down the Presets menu, then go to the bottom of the drop-down list and select New Preset. Pull down Presets menu Click to see settings Select New Preset 2. When the dialog window displays, enter a name for the new profile and click Done. Your new custom profile displays at the top of the Presets list. 3. Click the expand settings button to edit/view individual video and audio encoder settings as described in the preceding sections. Once edited, click OK to save your changes to the new profile. Flip Player User’s Guide | 102190 55 User Interface Introduction These topics describe the menus and menu items in Flip Player. Topics Flip Player Menu File Menu Edit Menu Control Menu Audio Menu View Menu Export Menu Window Menu Help Menu Flip Player Menu About Flip Player Displays the version of Flip Player you are running. Check for Updates Provides a short-cut to Preferences > Check Now. Preferences Opens the Preferences window. If the Preferences window is already open, it becomes the active window. Services Presents the Macintosh Services available. Hide Flip Player Hides the Flip Player application window. Hide Others Hides all application windows other than Flip Player. Show All Shows all application windows. Quit Flip Player Closes all files and exits. If a file has been modified but not saved, you are notified and you must save the file (or discard changes) before exiting Flip Player. 56 User Interface File Menu File Menu Open File Displays the Open dialog window for opening a media file. Open Stream Displays the Open Stream dialog window for opening a stream from a location determined by the URL provided. Open Recent Displays the most recently accessed media files. Every time a file is opened or saved it is entered into the this list. Close Closes the currently active media file window. If the file has not been saved, you are asked to save the document before closing. PRO Save As Displays the Save As... dialog window enabling you to save the file using a new file name. PRO Revert Enables you to discard all changes you have made to a file and revert it to its last saved state. Edit Menu Undo Reverses your last change in Flip Player. Flip Player offers an unlimited number of undo actions (within computer memory limitations). Undo information is stored on a per-window basis. Also, if you close window then reopen it, your undo information is lost. Undo does not undo edit actions. Redo Reverses your last undo action. Flip Player offers an unlimited number of redo actions (within computer memory limitations). Redo information is stored on a perwindow basis. Also, if you close window then reopen it, your redo information is lost. Redo does not re-do edit actions. Cut Copies (and removes) the selected media and stores it on the clipboard allowing you to paste it into a selected target. Copy Copies (but does not remove) the selected media and stores it on the clipboard allowing you to paste it into a selected target. Paste Duplicates the content in the clipboard into the currently selected location. Media is placed in the clipboard using Cut and Copy. Paste and Match Style Duplicates the content in the clipboard into the currently selected location, maintaining the style resident in the target location. Delete Deletes the currently selected media. Select All Selects all items in the currently active window. Select None Deselects all items in the currently active window. PRO Crop Displays the Crop window, enabling you to crop the selected media. PRO Rotate Displays the Rotate window, enabling you to rotate the selected media. Flip Player User’s Guide | 102190 User Interface Control Menu PRO Trim Displays the Trim window, enabling you to trim the selected media. PRO Scale Displays the Scale window, enabling you to scale the selected media. Special Characters Displays the Special Characters window, enabling you to create a list of favorite special characters. This is useful for entering characters into text fields that are difficult or impossible to type using the keyboard. Control Menu Play/Pause Plays the selected media file. When playing, the word Pause is displayed and when selected causes the media to stop playing. When paused, the word Play is displayed. Fast Forward Causes the selected media to enter the Fast Forward mode. Rewind Causes the selected media to enter the rewind mode. Speed Enables you to select the speed at which the selected media is played. • Increase Increases the speed of the selected media • Decrease Decreases the speed of the selected media • 1x - 64x Enables you to select one of seven pre-set speeds of the selected media Note: The unlicensed version of Flip Player allows you to pick 1x, 2x, 4x, 8x, 16x, 32x, and 64x playback speeds, Player Pro users can use the JKL keyboard controls to achieve 1x, 2x, 3x, 4x, 5x, 6x, …, up to 64x speeds. PRO Slow Motion Places the currently playing media into slow motion mode. Slow motion can also be started while paused. Step Forward Moves selected media forward one frame. Step Backward Moves selected media backward one frame. Jump Forward Moves selected media forward ten seconds. Jump Backward Moves selected media backward ten seconds. Skip Enables you to jump forward 30 seconds into the video. Instant Replay Enables you to jump backward 8 seconds in the video. Next Chapter Moves media to the next chapter. Previous Chapter Moves media to the previous chapter. Chapters Displays list of chapters. Moves media to selected chapter. Jump To End Moves current location in media to first frame. If the media is playing, it will continue playing. If it is paused, it will continue to be paused. Jump To Start Moves current location in media to last frame. If the media is playing, it will continue playing. If it is paused, it will continue to be paused. Flip Player User’s Guide | 102190 57 58 User Interface Audio Menu Loop When checked (selected), media loops back to start when end is reached. Audio Menu Increase Volume Turns the media volume up. Decrease Volume Turns the media volume down. Mute Mutes the media audio. View Menu Enter Full Screen Expands the selected media to full screen. Press Escape to return to normal mode. This differs from the Fit To Screen option in that it hides the menu bar, and the desktop. Dim Lights When checked (selected) dims the brightness of all windows other than the currently selected Flip Player window. Half Size Changes the size of the selected media to half of its actual size. Actual Size Changes the size of the selected media to its actual size. Double Size Changes the size of the selected media to twice its actual size. Fit to Screen Changes the size of the selected media to the max size of the screen. Aperture Enables you to specify how the outside edges of the video are cropped during playback. Export Menu Application Exports selected media to other applications (Wirecast, iMovie, etc.). Device Exports selected media to a device (iPhone, iPad, PC, etc.). Format Exports selected media into a format (Windows Media, etc.). Show Progress Displays the Progress window. Window Menu Minimize Minimizes the front-most window. Zoom Maximizes the front-most window (zooms to the full size of the screen). Bring All to Front Brings all Flip Player windows to the front (above any other open application windows). Available Windows All open windows are listed at the bottom of this menu. Selecting a listed window makes it the active window. Help Menu Search Enables you to search the help system for any topic or key word. Flip Player Help Opens the online help version of the Flip Player User Guide. Flip Player User’s Guide | 102190 User Interface Help Menu Flip Player User Guide Opens the PDF version of the Flip Player User Guide. Flip Player Forum Opens the Telestream Flip Player Community Forum Web page. Flip4Mac Help Opens the online help version of the Flip4Mac User Guide. Flip4Mac User Guide Opens the PDF version of the Flip4Mac User Guide. Flip4Mac FAQ Opens the Flip4Mac FAQ Web page. Flip4Mac Forum Opens the Telestream Flip4Mac Community Forum Web page. Gather Support Information Gathers support information and enables you to save a file with this information to your Mac desktop. A unique filename is generated. Sending this file to Telestream enables the support team to diagnose any problems you have reported. Flip Player User’s Guide | 102190 59 60 User Interface Help Menu Flip Player User’s Guide | 102190 61 Reference Introduction This section provides important reference information including supported codecs and formats, and network protocols. Topics Supported Codecs, Formats, & Protocols Network Stream Protocols Supported Codecs, Formats, & Protocols The following audio and video codecs and general file formats can be processed in Flip Player and Flip4Mac. Note: Flip Player can play all codecs, formats, and protocols provided by QuickTime. Windows Media Audio Voice, Windows Media Video Screen (and variants), and Windows Media Video Image (and variants) formats are not yet supported in Flip4Mac or Flip Player. Table 4. Supported Audio Codecs Audio Codec Windows Media Audio 9 Professional Windows Media Audio 9 Lossless Windows Media Audio 9 Standard Windows Media Audio 7/8 Play/ Import Export 62 Reference Supported Codecs, Formats, & Protocols Table 4. Supported Audio Codecs Audio Codec Play/ Import Export Play/ Import Export Play/ Import Export Microsoft G.726 Microsoft IMA ADPCM Microsoft ADPCM Table 5. Supported Video Codecs Video Codec Windows Media Video 9 Advanced (WMVA)—Broadcast Profile Windows VC1 Windows Media Video 9 Standard (WMV3) Windows Media Video 8 (WMV2) Windows Media Video 7 (WMV1) ISO MPEG-4 V1.1 (M4S2) ISO MPEG-4 V1.0 (MP4S) Microsoft MPEG-4 V3 (MP43) Microsoft MPEG-4 V2 (MP42) Microsoft Motion JPEG (MJPG) Table 6. Supported File Formats File Format Advanced Systems Format (ASF) Advanced Stream Redirector (ASX) (ASX Support PDF) Audio/Video Interleaved (AVI)—WMV media wrapped in AVI file format. WVX and WAX files Note: 1ASF files are the same as .wmv and .wma files, and also .wm amd .wmp files. Flip Player User’s Guide |102190 Reference Supported Codecs, Formats, & Protocols Table 7. Supported Export to Applications and Related File Formats Application Versions Video Audio Container Extension iMovie 9.0.4 and later. Apple Intermediate AAC-LC 128 Kbps, QuickTime MOV Codec (AIC) 16-bit, 44.1kHz, QuickTime MOV QuickTime MOV Stereo Final Cut Pro 10.0.3 and later. ProRes 422 HQ AAC-LC 128 Kbps, 16-bit, 44.1kHz, Stereo iPhoto 9.2.1 and later. H.264 AAC-LC 128 Kbps, 16-bit, 44.1kHz, Stereo iPhone Ringtone n/a n/a AAC-LC 128 Kbps MP4 M4R Mail 5.2 and later H.264 AAC-LC 128 Kbps, QuickTime MOV 16-bit, 44.1kHz, Stereo Episode 6.2.2 and later. AIC PCM QuickTime MOV ScreenFlow 3.0.3 and later. H.264 (GOP Size 6) AAC-LC 128 QuickTime Kbps, 16-bit, 44.1kHz, Stereo MOV Wirecast 4.1.3 and later. H.264 (GOP Size 6) AAC-LC 128 QuickTime Kbps, 16-bit, 44.1kHz, Stereo MOV Flip Player User’s Guide |102190 63 64 Reference Network Stream Protocols Network Stream Protocols You can use MMS-RTSP, MMS-HTTP, HTTP, with Flip Player and/or Flip4Mac. Table 8. Supported Stream Protocols Stream Type Name Protocols MMS Microsoft Media Server MMS, HTTP, RTSP, and TCP HLS HTTP Live Streaming HTTP and TCP Flip Player User’s Guide |102190 65 Index C Copyright notice 7 E Encoder Profiles Creating Custom 53 Exporting Media 41 To a Format 43 To Applications 42 To Devices 43 Exporting Media 41 F Feature Comparison Table 16 Features Player 14 Player Pro 15 Studio 15 Studio Pro HD 16 File Menu 56 Flip4Mac Editions Studio Pro 16 H Help Menu 58 I Installation 19 66 Index M Menu Edit 56 Flip Player 55 MPEG disclaimers 8 P Protocol Network Stream 64 Purchase Online 21 S Serial Number Activating 24 Deactivating 23 Manually Entering 22 Settings Advanced Audio 51 Advanced Video 48 Audio Encoder 50 Export 45 Metadata 52 Silverlight 52 Video Encoder 46 Supported Codecs, Formats, & Protocols 61 System Requirements 18 T Telestream contacting 11 International 11 Telestream, contacting 11 Trademark notices 7 U Uninstalling 21 Updates Checking for 21 Upgrading 21 W Warranty and Disclaimers 9 Window Menu 58 Flip Player User’s Guide | 102190