1
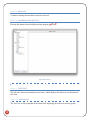
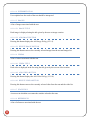
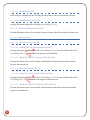
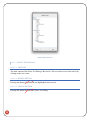
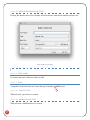
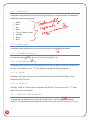
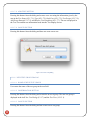
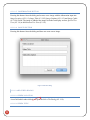
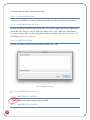
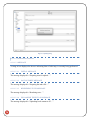
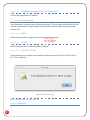
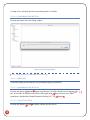
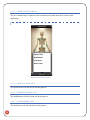
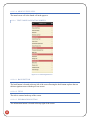
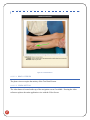
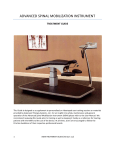
Requirements Specification by Advisor: Santiago Ontañón Stake holder: Dawn Gulick Group members: Matt Hinkle (Computer Science) Steven Hershey (Computer Science) Dylan Kenny (Computer Science) Steven Hansen (Computer Science) Austin Blakeslee (Computer Science) Alexy Thomas (Computer Science) TABLE OF CONTENTS 1 DOCUMENT HISTORY .................................................................................................................................. 3 1.1 DOCUMENT INFORMATION .......................................................................................................................................... 3 1.2 REVISION HISTORY ........................................................................................................................................................ 3 2 INTRODUCTION .......................................................................................................................................... 4 2.1 PURPOSE .......................................................................................................................................................................... 4 2.2 OVERVIEW ....................................................................................................................................................................... 4 2.3 SCOPE ............................................................................................................................................................................... 5 2.4 DEFINITIONS ................................................................................................................................................................... 5 3 USE CASES ..................................................................................................................................................... 7 3.1 USE CASES FOR MOBILE APPS ..................................................................................................................................... 7 3.1.1 Launching the App ................................................................................................................................................ 7 3.1.2 Downloading App Data ....................................................................................................................................... 7 3.1.3 Purchasing Access to Tests ................................................................................................................................ 8 3.1.4 Navigating Test Index .......................................................................................................................................... 9 3.1.5 Viewing a Special Test or Mobilizations ................................................................................................... 10 3.1.6 Scrolling through the Image Carousel ....................................................................................................... 11 3.1.7 Viewing Statistics and refernces .................................................................................................................. 12 3.1.8 Viewing a Video ................................................................................................................................................... 12 3.1.9 Viewing and Adjusting Settings .................................................................................................................... 12 3.2 USE CASES FOR ADMIN CLIENT ...................................................................................................................... 13 3.2.1 Logging into Admin Client .............................................................................................................................. 13 3.2.2 Navigating Tree ................................................................................................................................................... 13 3.2.3 Expanding and Collapsing Tree Branch ................................................................................................... 13 3.2.4 Clicking on a Test in the tree ......................................................................................................................... 14 3.2.5 Editing a Test ........................................................................................................................................................ 14 3.2.6 Adding Test ............................................................................................................................................................ 14 3.2.7 Entering Text For Test ...................................................................................................................................... 14 3.2.8 Deleting Test ......................................................................................................................................................... 15 3.2.9 View Test Preview ............................................................................................................................................... 16 3.2.10 Reset all tests ..................................................................................................................................................... 16 3.2.11 Upload to Staging ............................................................................................................................................ 16 3.2.12 Upload Staging To Production ................................................................................................................... 16 4 FUNCTIONAL REQUIREMENTS ......................................................................................................... 16 4.1 OVERALL FUNCTIONALITY ........................................................................................................................................ 16 4.1.1 Administrative – Mobile App Interoperability ....................................................................................... 16 4.2 USER INTERFACE ........................................................................................................................................................ 17 4.2.1 Administrative Client ........................................................................................................................................ 17 4.2.2 Mobile Application ............................................................................................................................................. 41 5 NON-FUNCTIONAL REQUIREMENTS .............................................................................................. 53 1 5.1 DOCUMENTATION ....................................................................................................................................................... 53 5.1.1 User Manual .......................................................................................................................................................... 53 5.1.2 Administrative Manual .................................................................................................................................... 53 5.1.3 Design Document ................................................................................................................................................ 53 5.1.4 API Documentation ............................................................................................................................................ 53 5.1.5 System Requirement .......................................................................................................................................... 53 5.1.6 Run-‐time Speed .................................................................................................................................................... 54 5.1.7 Reliability ............................................................................................................................................................... 54 5.1.8 Availability ............................................................................................................................................................. 54 5.1.9 Security ................................................................................................................................................................... 55 5.1.10 Maintainability ................................................................................................................................................. 55 5.1.11 Portability ........................................................................................................................................................... 55 5.1.12 Testability ............................................................................................................................................................ 55 5.1.13 System Administration Requirements .................................................................................................... 55 5.2 FUTURE EVOLUTION ................................................................................................................................................... 56 5.2.1 Test schemas ......................................................................................................................................................... 56 2 1 DOCUMENT HISTORY 1.1 Title: iOrtho+ Project: Software Requirements Specification Authors: Austin Blakeslee, Matthew Hinkle, Steven Hansen, Dylan Kenny, Alexy Thomas Reviewers: Austin Blakeslee 1.2 3 DOCUMENT INFORMATION REVISION HISTORY Version: Date: Editors: Description: 1.0 1/3/13 Austin Blakeslee, Matthew Hinkle, Steven Hansen, Dylan Kenny Initial draft 1.1 1/7/13 Austin Blakeslee Edited for Formatting 1.2 1/8/13 Matthew Hinkle Updated some sections 1.3 1/9/13 Austin Blakeslee Revised tenses 1.4 1/15/13 Dylan Kenny Incorporated some changes Dawn wanted 1.5 1/18/13 Steven Hansen Updated some screens 1.6 1/27/13 Dylan Kenny Added in definitions 1.7 2/1/13 Steven Hansen General additions 1.8 2/2/13 Austin Blakeslee, Matthew Hinkle, Steven Hansen, Dylan Kenny Big meeting to finalize the document for submission 2 INTRODUCTION 2.1 PURPOSE This document is intended to detail the specifics of the iOrtho+ Project. It specifies the visual elements necessary for the final applications, both client and administrator. Furthermore, this document serves as a living artifact to declare both the functional and nonfunctional requirements of the product. 2.2 OVERVIEW iOrtho+ is an educational mobile application for reviewing and assessing physical therapy test strategies. The application, available on both iOS and Android platforms, is primarily used in the academic realm to help facilitate learning amongst physical therapy students. 4 Currently, the iOrtho+ application is difficult for the administrator to maintain content and issue new tests or updates quickly and cost-effectively. Releasing new information requires an administrator to not only generate the initial content, but also send it to the developer, who then resubmits it to the Apple and Play (Andoid) stores. The latter part of this process can take over two weeks to complete. This procedure severely limits the administrator's ability to upload information to the application and further degrades the reliability and versatility of the product to the user. The new iOrtho+ system includes an administrative client, which circumvents the majority of the publication process, updated mobile applications, as well as a reliable back-end framework to support the new implementation. The administrative client is responsible for enabling an iOrtho+ official to create, format, and publish new or edited content directly from their personal computer, without having to contact any third parties. The back-end framework stores, maintains, and catalogues the updated content for acquisition from the mobile client applications. The mobile applications are the users' gateway to the content hosted on the framework. The mobile software queries the remote content manager for the test it seeks, and verifies if the device should be updated with the latest version. This process removes any developer-intervention as well as any interaction with the mobile marketplaces, while still allowing for dynamic content to be accessed by the end-user. 2.3 SCOPE The goal of the project is to manipulate the existing mobile applications to be compliant with a dynamic content management system, thereby requiring a regular loading of the index of tests. Furthermore, this project standardizes code-trees between the different mobile platforms to enable easier modifications for future developers. The user-interface of the mobile software better suits the needs of the client. It uses basic principles of human-computer interaction. The administrative client is completely stand-alone and operating system-independent, while using minimal resources. The software allows the administrator to perform basic text editing within the application. Furthermore, the application provides the ability for the user to generate, edit, preview, and publish test information to the remote storage. The test format is crafted to mirror typical user-interfaces the user is likely familiar with. Rather than having hard-coded test designs, the new system allows for a predefined template to be used within the applications, enabling easy redesign of existing and future tests alike. 2.4 5 DEFINITIONS Apple – Apple Inc., formerly Apple Computer, Inc., is an American multinational corporation headquartered in Cupertino, California that designs, develops, and sells consumer electronics, computer software, and personal computers Play Store – Google Play is a digital entertainment hub, similar to Apple's iTunes Store, where you can purchase a whole range of different media products Administrator – A person responsible for managing the content available to the application Administrative client – The application for the administrator the edit the content available to the mobile application Mobile application – The applications available on mobile platforms such as iOS and Android phones and tablets S3 – a scalable, high-speed, low-cost Web-based service designed for online backup and archiving of data and application programs The Internet – The Internet (or internet) is a global system of interconnected computer networks that use the standard Internet protocol suite (TCP/IP) to serve billions of users worldwide Tests – may refer generically to mobilizations or special tests which all have references, pictures and videos Mobilizations – a test which contains the following fields: contacts, indication, technique Special Tests – a test which contains the following fields: purpose, technique, and interpretation S3 Access Key Id – an alphanumeric text string that uniquely identifies user who owns account. No two accounts can have same AWS Access Key S3 Secret Access Key – plays role of password . It's called secret because it is assumed to be known to owner only, that's why when you type it in given box, its displayed as asterisk or dots. A Password with Access Key forms a secure information set that confirms user's identity Test Tree – A collection of tests kept in tree form for organizational clarity HTML – HyperText Markup Language (HTML) is the main markup language for creating web pages and other information that can be displayed in a web browser Android – an open mobile phone platform that was developed by Google and, later, by the Open Handset Alliance. Google defines Android as a "software stack" for mobile phones. 6 iOS – a mobile operating system developed and distributed by Apple Inc. Originally released in 2007 for the iPhone and iPod Touch, it has been extended to support other Apple devices such as the iPad and Apple TV Staging Area/Bucket – a location for storing test content in order to provide an intermediary area to view tests without allowing them to be publicly available Production Area/Bucket – a location for storing test content to be publicly available for the mobile applications iPhone – a line of smartphones designed and marketed by Apple Inc. It runs Apple's iOS mobile operating system, known as the "iPhone OS" until mid-2010, shortly after the release of the iPad iPad – a line of tablet computers designed and marketed by Apple Inc., which runs on Apple's iOS operating system Java – a general–purpose, concurrent, class–based, object–oriented computer programming language that is specifically designed to have as few implementation dependencies as possible API – a protocol intended to be used as an interface by software components to communicate with each other. An API may include specifications for routines, data structures, object classes, and variables 3 USE CASES 3.1 3.1.1 USE CASES FOR MOBILE APPS LAUNCHING THE APP The user touches the icon on the screen of the Mobile Device they are using to view the iOrtho+ app. The app launches, showing first the iOrtho+ Splash Screen, and then the iOrtho+ Main Page. 3.1.2 7 DOWNLOADING APP DATA Figure 1 Flowchart for Downloading of Data If the user is connected to the Internet, the iOrtho+ app checks the current available data, and checks the data available in S3, and, if the data contained within the app is out of date, the user will be prompted to choose between two options. • • Download all available data to app. Download all data except videos. These options are presented with a file size for the overall download, as well as an approximate download time based on the user’s connection. When the user selects one of these options, the app downloads the data, prompting the user when it is complete. If the user is not connected to the Internet, the app launches using the data that is currently available to it. 3.1.3 8 PURCHASING ACCESS TO TESTS Figure 2 Flowchart for Purchasing App Access After data is checked and downloaded, then the user is presented with a picture of the Human Skeleton, as well as the two given categories, Mobilizations and Special Tests. If the body part chosen is not available in the free version, and the user has not paid, a separate window launches prompting the user to purchase access. There is only one option now available, for the user to purchase, which is the option to pay for access to both Mobilizations and Special Tests. Once a user pays for access, they will be able to navigate the available tests by choosing a body part. 3.1.4 9 NAVIGATING TEST INDEX Figure 3 Flowchart for Navigating Test Index When a body part is chosen, a list of all of the possible tests/mobilizations for that body part will be presented to the user. When the user picks one of these tests on the list, the app either repopulates the list with all the tests contained under that subcategory, or the app loads the info for that specific test or mobilization. 3.1.5 10 VIEWING A SPECIAL TEST OR MOBILIZATIONS Figure 4 Flowchart for Loading and Viewing Tests The page is downloaded if the newest version is not available in memory. If the Internet is not available, the app uses the information packaged with the app. The page for a Special Test or Mobilization loads with the following information: • • • • • • • A carousel of images pertaining to the test A purpose for the test The technique for performing the test The Interpretation of the outcome of the test Collapsible fields containing the references for the information above Statistics for what the outcome of the test could mean A carousel of videos showing the test being performed The information on this page can be viewed, and the following tasks can be performed: • • • • 3.1.6 11 Scrolling through the images on the carousel Expanding and viewing statistics and references Scrolling through the carousel of videos available Viewing a video SCROLLING THROUGH THE IMAGE CAROUSEL The images and videos in the app are shown one at a time. Swiping your finger across the image scrolls to the next image or video in the carousel, if more than one is available. 3.1.7 VIEWING STATISTICS AND REFERNCES On the right side of the title bar is one button labeled “Statistics/References”. Touching this button will expand a separate window, which shows the user the statistics for the particular test they are viewing, as well as references for any information that was taken from outside sources. 3.1.8 VIEWING A VIDEO At the top of the screen, the user sees buttons on the left side title bar, one for each video. These buttons will be labeled as “Video 1”, “Video 2”, and “Video 3”, with a maximum of three videos. When a user touches one of these buttons, the device’s native video player launches full screen, and shows the user the corresponding video. The video either streams from S3, or plays from the video from the apps data if it is available there. Clicking back on this screen takes you back to the tests information page. 3.1.9 VIEWING AND ADJUSTING SETTINGS Navigating to the device’s settings app shows an additional screen for the settings of iOrtho+. Here the user can adjust their choice to download all videos, which will take effect next time the app is launched with Internet. There is also be a switch here which allows the admin of the app to switch their app from staging to production mode. 12 3.2 3.2.1 USE CASES FOR ADMIN CLIENT LOGGING INTO ADMIN CLIENT Figure 5 Flowchart for Logging into Admin Client When starting the admin client, the user is prompted to enter in Amazon S3 credentials. The user enters in their credentials, chooses whether or not to save these for later, and then clicks “OK”. After “OK” is clicked, the credentials are sent to S3 and verified. If correct, the app is launched. If the credentials are incorrect, an error message is shown telling the user about the incorrect credentials, and the user is brought back to the login screen. 3.2.2 NAVIGATING TREE On the left hand side of the screen, all of the tests currently in the staging area of S3 are shown in a tree. The tree is organized into the different groups, Special Tests and Mobilizations. Under each category, the different body parts are shown. Expanding a body part will show all of the tests available for that body part. If a test group is included, then that group can further be expanded to show all of the tests contained within that group. 3.2.3 13 EXPANDING AND COLLAPSING TREE BRANCH For each group of tests, the tree can be further expanded. By clicking on the arrow to the left of the group name. If the expanded tree is in the way, clicking on the arrow again can collapse it. 3.2.4 CLICKING ON A TEST IN THE TREE When a test is clicked in the tree structure, the text fields on the right are populated with the information contained within that test. This allows for any of this information to be edited. 3.2.5 EDITING A TEST Once the information for a test is loaded, the information for the test can be edited. Once text has been edited, the client will save the data when a field has been clicked off, and then that saved information will be uploaded to that tests data on S3. 3.2.6 ADDING TEST Under the tree view, there is a button named “Add Test”. Clicking this will pop up a new window to allow the user to create a test. In this window, the user enters in a name for the test, and picks the type of test, body part, and test group it is contained in. Then the user will pick where the test will be placed in the index, and click “Add Test”, which will create the test and allow users to then edit the data for that new test. Clicking cancel will close this window without saving any information or creating any tests. 3.2.6.1 ADDING A TEST GROUP There is a button contained within the add test pop up named “Add Group”. Clicking this button will produce another pop up to create a new test group. The user enters the name of the new test group and clicks “OK” to create the new group. Clicking cancel will go back to the Add Test window without creating a group. 3.2.7 ENTERING TEXT FOR TEST After a test is created or loaded, the text fields are available for edit. When text is entered into any if the text fields, the information will be saved and uploaded to S3. 3.2.7.1 ADDING IN AN IMAGE For the “Images” field, the user clicks the “Add Image” button. A pop up then appears prompting the user for the Image name, location, caption, and credit. The user can enter in text for the name, caption, and credit fields. When the user clicks the location field, the user is then prompted with a file selection dialog. The user navigates to the place where the file is located, 14 and then clicks add. The user then clicks “OK”, which adds a line of text related to the image in the “Images” box, and uploads the image to S3. 3.2.7.2 DELETING AN IMAGE When a text line associated with an image is selected in the “Images” box, the delete button becomes enabled. Clicking this will prompt the user, and if “OK” is clicked, the associated image is removed from the “Images” box and from S3. 3.2.7.3 ADDING IN A VIDEO For the “Videos” field, the user clicks the “Add Video” button. A pop up then appears prompting the user for the Video name, location, and Description. The user can enter in text for the name, and description fields. When the user clicks the location field, the user is then prompted with a file selection dialog. The user navigates to the place where the file is located, and then clicks add. The user then clicks “OK”, which adds a line of text related to the video in the “Videos” box, and uploads the video to S3. Clicking Cancel closes the pop up without adding any videos. 3.2.7.4 DELETING A VIDEO When a text line associated with a video is selected in the “Videos” box, the delete button becomes enabled. Clicking this will prompt the user, and if “OK” is clicked, the associated video is removed from the “Videos” box and from S3. 3.2.7.5 ADDING IN A REFERENCE For the “References” field, the user clicks the “Add Reference” button. A pop up then appears prompting the user for the reference contents and locations. The user can enter in text for the contents, and location fields. The user then clicks “OK”, which adds a line of text related to the reference in the “References” box, and uploads the text to S3. Clicking Cancel closes the pop up without adding any reference. 3.2.7.6 DELETING A REFERENCE When a text line associated with a reference is selected in the “References” box, the delete button becomes enabled. Clicking this will prompt the user, and if “OK” is clicked, the associated reference text is removed from the “References” box and from S3. 3.2.8 15 DELETING TEST When a test or test group is selected in the tree, clicking the “Delete Test” will delete what ever is selected from the tree, and delete the related data from S3. 3.2.9 VIEW TEST PREVIEW When a test is selected, clicking the Preview tab will show you what the test will look like in the app. 3.2.10 RESET ALL TESTS Clicking this prompts the user to make sure they are sure. Once they are sure, all of the tests on S3 will be deleted, and the tree on the side will be restarted using a new index. 3.2.11 UPLOAD TO STAGING Clicking this prompt the user. When they click “OK” all information on S3, will be added to the staging area, which will allow the mobile apps to view the information in beta mode. 3.2.12 UPLOAD STAGING TO PRODUCTION Clicking this prompt the user. When they click “OK” all information in the staging area will be moved into the production area, which will allow all users of the app to see the information. 4 FUNCTIONAL REQUIREMENTS 4.1 4.1.1 OVERALL FUNCTIONALITY ADMINISTRATIVE – MOBILE APP INTEROPERABILITY 4.1.1.1 UPDATES TO TESTS DO NOT REQUIRE 3 RD PARTY APPROVAL Updating test data (whether Staging or Production) do not require a resubmission of the mobile applications and the associated 3rd party approvals. 4.1.1.2 STAGING TESTS APPEAR IN MOBILE APP BETA When the Upload to Staging process is complete all tests data contained within the Admin Client is present in S3 in serialized form in the Staging Area. Mobile apps with the Beta setting enabled 16 will load the newly uploaded test data and present them in Mobile Application (4.2.2) user interface. 4.1.1.3 PRODUCTION TESTS APPEAR IN MOBILE APP When the Promote to Production process is complete all test data contained within the old Staging Area is the new production data. Production data is shown by default on all mobile applications with the exception of those with Beta setting enabled. 4.2 4.2.1 USER INTERFACE ADMINISTRATIVE CLIENT Figure 6 Credentials Dialog 4.2.1.1 CREDENTIALS DIALOG 17 The credentials dialog is the dialog that is displayed upon running the administrative client. 4.2.1.1.1 ACCESS KEY ID A text field in which the user enters their S3 Access Key Id. 4.2.1.1.2 SECRET ACCESS KEY A text field in which the user enters their S3 Secret Access Key. 4.2.1.1.3 SAVE CREDENTIALS A checkbox which enables the user to save their S3 credentials for future use. 4.2.1.1.3.1 CHECKED When checked the credentials will be saved 4.2.1.1.3.2 UNCHECKED When unchecked the credentials will not be saved to local storage. 4.2.1.1.4 CONFIRMATION BUTTON Pressing this button loads the tests from S3 using the given credentials and brings the user to the Start Screen (4.2.1.3). If the tests cannot be loaded the Read Error Dialog (4.2.1.2) will be displayed. Figure 7. S3 Read Error Dialog 4.2.1.2 READ ERROR DIALOG 18 4.2.1.2.1 MESSAGE A sentence alerting the user that an error has occurred. 4.2.1.2.2 CONFIRMATION BUTTON Pressing this button closes the dialog and the program will exit. Figure 8. Start Screen 4.2.1.3 START SCREEN 4.2.1.3.1 TEST TREE The left side of the screen contains tree structure, which displays all of the tests in a hierarchical tree form. 4.2.1.3.1.1 EXPANSION The Test Tree is fully expanded on the initial load, displaying all of the tests and test groups. 19 4.2.1.3.1.2 INDENTATION The root of the tree has no indentation while subsequent levels of the tree have increased indentation relative to their parent. 4.2.1.3.1.3 BODY PART A body part is represented by its name using all capital letters with a document icon when empty and a folder icon when not empty. 4.2.1.3.1.4 TEST GROUP A test group is represented with the test name and a folder icon. 4.2.1.3.1.5 TEST A test is represented using the test name and a document icon. 4.2.1.3.1.6 SELECTING ATEST When the user selects a test, the information related to the test is loaded into the Test Screen. If the test is a mobilization test the information is displayed using the Mobilization Test View (4.2.1.6), if the test is a Special Test the information is displayed using the Special Test View (4.2.1.4). 4.2.1.3.1.7 ADD TEST BUTTON Pressing this button will open the Add New Test Dialog (4.2.1.7). 4.2.1.3.1.8 DELETE TEST BUTTON Pressing this button will delete the currently selected test or test group. 4.2.1.3.1.8.1 DELETING ATEST GROUP Deleting a test group will delete all of the child tests and test groups of the selected test group. The test group and all of its children will be removed from the Test Tree. 4.2.1.3.1.8.2 DELETING A TEST Deleting a test will remove the test from the Test Tree. 4.2.1.3.2 CONTENT PANE 20 The right side of the start screen is the content pane. The content pane shows the test information of the currently selected test. On initial load, the content pane displays no test information. 4.2.1.3.2.1 SAVING TESTS After every action is taken in the content pane, including typing or adding an image/video/reference the test is saved. Figure 9.Special Test View 4.2.1.4 SPECIAL TEST VIEW 4.2.1.4.1 TITLE The title of the test given by the user on test creation. 4.2.1.4.2 PURPOSE User enters the purpose of the test. 4.2.1.4.3 TECHNIQUE User enters the technique used when administering the test. 21 4.2.1.4.4 INTERPRETATION User explains how the result of the test should be interpreted. 4.2.1.4.5 IMAGES A list of images associated with the test. 4.2.1.4.5.1 IMAGE TITLE Each image is displayed using the title given by the user on image creation. 4.2.1.4.5.2 ADD IMAGE BUTTON Pressing this button displays the Add Image Dialog (4.2.1.9). 4.2.1.4.5.3 DELETE IMAGE BUTTON Pressing this button removes the currently selected image from the test and images list. 4.2.1.4.6 VIDEOS A list of videos associated with the test. 4.2.1.4.6.1 VIDEO TITLE Each video is displayed in the list using the title given by the user on video creation. 4.2.1.4.6.2 ADD VIDEO BUTTON Pressing this button displays the Add Video Dialog (4.2.1.10). 4.2.1.4.6.3 DELETE VIDEO BUTTON Pressing this button removes the currently selected video from the test and the video list. 4.2.1.4.7 STATISTICS A text area in which the user enters the statistics related to the tests. 4.2.1.4.8 REFERENCES A list of references associated with the test. 22 4.2.1.4.8.1 REFERENCE TITLE Each reference is displayed in the list using the title given by the user on reference creation. 4.2.1.4.8.2 ADD REFERENCE BUTTON Pressing this button displays the Add Reference Dialog (4.2.1.11). 4.2.1.4.8.3 DELETE REFERENCE BUTTON Pressing this button removes the currently selected reference from the test and the reference list. 4.2.1.4.9 ASSOCIATIONS 4.2.1.4.9.1 POSTIVE ASSOCIATIONS 4.2.1.4.9.1.1 ADD POSITIVE ASSOCIATION BUTTON Pressing this button will display the Select Test Dialog (4.2.1.5). The test selected in the Select Test Dialog (4.2.1.5) will be added to the positive associations list. 4.2.1.4.9.1.2 REMOVE POSITIVE ASSOCIATION BUTTON Pressing this button removes the currently selected positive association from the test and the positive associations list. 4.2.1.4.9.2 NEGATIVE ASSOCIATIONS 4.2.1.4.9.2.1 ADD NEGATIVE ASSOCIATION BUTTON Pressing this button will display the Select Test Dialog (4.2.1.5). The test selected in the Select Test Dialog (4.2.1.5) will be added to the negative associations list. 4.2.1.4.9.2.2 REMOVE NEGATIVE ASSOCIATION BUTTON Pressing this button removes the currently selected negative association from the test and the negative associations list. 23 Figure 10. Select Test Screen 4.2.1.5 SELECT TEST DIALOG 4.2.1.5.1 TEST LIST The main content of the Select Test Dialog is the test list. The user selects a test in the test list by clicking on the test’s name. 4.2.1.5.2 SELECT BUTTON Pressing this button will select the test highlighted in the test list. 4.2.1.5.3 CANCEL BUTTON Pressing this button will close the Select Test Dialog. 24 Figure 11. Mobilization Test View 4.2.1.6 MOBILIZATION TEST VIEW 4.2.1.6.1 TITLE The title of the test given by the user on test creation. 4.2.1.6.2 INDICATION A text area in which the user enters the indication related to the test. 4.2.1.6.3 TECHNIQUE User enters the technique used when administering the test. 4.2.1.6.4 CONTACTS User enters the contacts related to the test. 4.2.1.6.5 IMAGES A list of images associated with the test. 25 4.2.1.6.5.1 IMAGE TITLE Each image is displayed using the title given by the user on image creation. 4.2.1.6.5.2 ADD IMAGE BUTTON Pressing this button displays the Add Image Dialog (4.2.1.9). 4.2.1.6.5.3 DELETE IMAGE BUTTON Pressing this button removes the currently selected image from the test and images list. 4.2.1.6.6 VIDEOS A list of videos associated with the test. 4.2.1.6.6.1 VIDEO TITLE Each video is displayed in the list using the title given by the user on video creation. 4.2.1.6.6.2 ADD VIDEO BUTTON Pressing this button displays the Add Video Dialog (4.2.1.10). 4.2.1.6.6.3 DELETE VIDEO BUTTON Pressing this button removes the currently selected video from the test and the video list. 4.2.1.6.7 STATISTICS A text area in which the user enters the statistics related to the tests. 4.2.1.6.8 REFERENCES A list of references associated with the test. 4.2.1.6.8.1 REFERENCE TITLE Each reference is displayed in the list using the title given by the user on reference creation. 4.2.1.6.8.2 ADD REFERENCE BUTTON Pressing this button displays the Add Reference Dialog (4.2.1.11). 26 4.2.1.6.8.3 DELETE REFERENCE BUTTON Pressing this button removes the currently selected reference from the test and the reference list. Figure 12.Add New Test Dialog 4.2.1.7 ADD NEW TEST DIALOG 4.2.1.7.1 TEST NAME User enters the name of the test in the text field. 4.2.1.7.2 TYPE A dropdown, from where the user selects the type of test that will be created. 4.2.1.7.2.1 SPECIAL TEST When selected, a special test is created. 4.2.1.7.2.2 MOBILIZATION TEST When selected, a mobilization test is created. 27 4.2.1.7.3 BODY PART A dropdown with which the user selects the body part the test is associated with. The dropdown contains the following body parts. • • • • • • • • Ankle Knee Hip Spine Cervico-Thoracic Spine Shoulder Elbow Wrist 4.2.1.7.4 TEST GROUP A dropdown with which the user selects the test group the test will be inserted under. 4.2.1.7.5 ADD GROUP BUTTON Pressing this button will open the New Test Group Dialog(4.2.1.8). 4.2.1.7.6 POSITION DROPDOWN A dropdown with which the user selects the position of the test relative to the test selected in the Relative Test Dropdown (4.2.1.7.7). The dropdown contains the following options. 4.2.1.7.6.1 AFTER Selecting “After” places the newly created test below the test selected in the Relative Test Dropdown in the Test Tree. 4.2.1.7.6.2 CHILD OF Selecting “Child of” converts the test selected in the Relative Test Dropdown (4.2.1.7.7) into a Super Test on new test creation. 4.2.1.7.7 RELATIVE TEST DROPDOWN A dropdown with which the user selects the test the newly created test will be positioned relative to. The dropdown is populated with all of the tests in the current Test Group (4.2.1.7.4). 28 4.2.1.7.8 ADD TEST BUTTON Pressing this button closes the dialog and creates a new test using the information given by the user in the Test Name (4.2.1.7.1), Type (4.2.1.7.2), Body Part (4.2.1.7.3), Test Group (4.2.1.7.4), Add Group Button(4.2.1.7.5), and Relative Test Dropdown (4.2.1.7.7). The test is displayed in the Test Tree and the test information loads into the Test Display Screen. 4.2.1.7.9 CANCEL BUTTON Pressing this button closes the dialog and does not create a new test. Figure 13.New Test Group Dialog 4.2.1.8 NEW TEST GROUP DIALOG 4.2.1.8.1 NAME OF NEW TEST GROUP User enters the name of the test group in the text field. 4.2.1.8.2 CONFIRMATION BUTTON Pressing this button closes the dialog and creates the new test group. The new test group is displayed in the Add New Test Dialog (4.2.1.7) and the Test Tree (4.2.1.3.1). 4.2.1.8.3 CANCEL BUTTON Pressing this button closes the dialog and not creates a new test group. 29 Figure 14.Add Image Dialog 4.2.1.9 ADD IMAGE DIALOG 4.2.1.9.1 IMAGE LOCATION A text field which when clicked will open the Select File Dialog (4.2.1.19). 4.2.1.9.2 IMAGE TITLE User inputs the title of the image in the text field. 4.2.1.9.3 IMAGE CAPTION User inputs a short description of the image in the text field, which is displayed to the user underneath the image (Figure 26). 4.2.1.9.4 IMAGE CREDIT User inputs who the image is credited to which is displayed with the image caption (Figure 26). 30 4.2.1.9.5 CONFIRMATION BUTTON Pressing this button closes the dialog and creates a new image with the information input into Image Location (4.2.1.9.1),Image Title (4.2.1.9.2),Image Caption (4.2.1.9.3),and Image Credit (4.2.1.9.4) fields. The image is added to the image list in the test display screens, Special Test View (4.2.1.4) or Mobilization Test View (4.2.1.6). 4.2.1.9.6 CANCEL BUTTON Pressing this button closes the dialog and does not create a new image. Figure 15.Add Video Dialog 4.2.1.10 ADD VIDEO DIALOG 4.2.1.10.1 VIDEO LOCATION A text field which when clicked will open the Select File Dialog (4.2.1.19). 4.2.1.10.2 VIDEO TITLE 31 User enters the title of the video in the text field. 4.2.1.10.3 VIDEO DESCRIPTION A text area in which the user enters a short description of the video, limited to 2048 characters. 4.2.1.10.4 CONFIRMATION BUTTON Pressing this button closes the dialog and creates a new video using the information input by the user in the Video Title (4.2.1.4.6.1), Add Video Button (4.2.1.4.6.2), and Delete Video Button (4.2.1.4.6.3) fields. The new video is displayed in the list of videos, Special Test View (4.2.1.4) or Mobilization Test View (4.2.1.6). 4.2.1.10.5 CANCEL BUTTON Pressing this button closes the dialog and does not add a new video. Figure 16.Add Reference Dialog 4.2.1.11 ADD REFERENCE DIALOG 4.2.1.11.1 REFERENCE CONTENTS Userenters details about the reference in the text field. 4.2.1.11.2 REFERENCE LOCATION 32 A text field in which the user will enter the location of the reference. 4.2.1.11.3 CANCEL BUTTON Pressing this button closes the dialog and does not create a new reference. 4.2.1.11.4 CONFIRMATION BUTTON Pressing this button closes the dialog creating a new reference with the information input by the user into the Reference Contents (4.2.1.11.1) and Reference Location (4.2.1.11.2) fields. The new reference is displayed in the list of references on the test display, Special Test View (4.2.1.4) or Mobilization Test View (4.2.1.6). 4.2.1.12 MENU BAR The following headings are options in the menu bar. 4.2.1.12.1 ADVANCED The following are options in the advanced heading of the menu bar. Figure 17.Advanced Dropdown Options 4.2.1.12.1.1 RESET ALL TESTS Selecting the “Reset all tests…” option displays the Reset All Tests Dialog (4.2.1.13). 4.2.1.12.2 UPLOAD The following are options in the Upload heading of the menu bar. Figure 18.Upload Dropdown Options 33 4.2.1.12.2.1 UPLOAD TO STAGING Selecting this option displays the Upload Confirmation Dialog (4.2.1.14). 4.2.1.12.2.2 PROMOTE STAGING TO PRODUCTION Selecting this option displays the Promotion Confirmation Dialog (4.2.1.17). Figure 19.Reset All Tests Dialog 4.2.1.13 RESET ALL TESTS DIALOG 4.2.1.13.1 MESSAGE A string of text informing the user that all of the tests currently in S3 will be deleted and a new index containing no tests will be created. 4.2.1.13.2 CONFIRMATION BUTTON Pressing this button closes the dialog, removes all of the test files from S3, and creates a new index with new tests. This is an unrecoverable operation. 4.2.1.13.3 CANCEL BUTTON Pressing this button closes the dialog. 34 Figure 20.Upload Confirmation Dialog 4.2.1.14 UPLOAD CONFIRMATION DIALOG 4.2.1.14.1 MESSAGE A message informing the user that they are about to upload all of the tests in the Test Tree (4.2.1.3.1) to remote storage. 4.2.1.14.2 CONFIRMATION BUTTON Pressing this button closes the dialog, displays the Uploading Dialog (4.2.1.15), and starts the upload of all tests to remote storage. 4.2.1.14.3 CANCEL BUTTON Pressing this button closes the dialog. 35 Figure 21.Uploading Dialog 4.2.1.15 UPLOADING DIALOG 4.2.1.15.1 MESSAGE A string of text displayed to the user informing them of what step is currently being performed. 4.2.1.15.1.1 INITIAL MESSAGE The message displayed is “Preparing tests for upload…”. 4.2.1.15.1.2 SAVING INDEX MESSAGE The message displayed is “Preparing the index file…”. 4.2.1.15.1.3 RENDERING TESTS MESSAGE The message displayed is “Rendering tests…”. 4.2.1.15.1.4 UPLOADING TESTS TO S3 MESSAGE The message displayed is “Uploading local content to S3…”. 36 4.2.1.15.1.5 FINISHED UPLOADING TEST TO S3 MESSAGE The messaged displayed is “Finished!”. 4.2.1.15.2 2.2 PROGRESS BAR A bar showing the current progress of the current upload. The percentage of the bar that is filled is based on the number of steps completed divided by the number of steps total to upload the content to S3. 4.2.1.15.2.1 EMPTY When the progress bar is empty the upload step has not been started. 4.2.1.15.2.2 FILLED When the progress bar is filled the upload is complete. 4.2.1.15.2.3 UPLOAD FAILURE If the upload does not complete successfully the dialog closes and the Upload Failure Dialog (4.2.1.16) is displayed. Figure 22.S3 Upload Failure Dialog 4.2.1.16 UPLOAD FAILURE DIALOG 4.2.1.16.1 MESSAGE 37 A string of text is displayed to the user notifying them of a failure. 4.2.1.16.2 CONFIRMATION BUTTON Pressing the button closes the dialog window. Figure 23. Promote Confirmation Dialog 4.2.1.17 PROMOTION CONFIRMATION DIALOG 4.2.1.17.1 MESSAGE A message telling the user that they are promoting staging to production. 4.2.1.17.2 CONFIRMATION BUTTON Pressing this button will promote staging to production. All of the data that was in staging will now be available in production and users of the application will have the new data. When promotion is finished the Finished Promotion Dialog (4.2.1.18) will appear. 4.2.1.17.3 CANCEL BUTTON Pressing this button will close the dialog without any side effects. 38 Figure 24. Finished Promotion Dialog 4.2.1.18 FINISHED PROMOTION DIALOG 4.2.1.18.1 MESSAGE A message showing informing the user that staging has finished promoting to production. 4.2.1.18.2 CONFIRMATION BUTTON Pressing this button will close the dialog. 39 Figure 25.Select File Dialog 4.2.1.19 SELECT FILE DIALOG This is the operating system’s select file dialog. 40 4.2.2 MOBILE APPLICATION 4.2.2.1 ROOT SCREEN Figure 26. Root Screen 4.2.2.1.1 NAVIGATION SCREEN Primary navigation area sits on the left. (4.2.2.2) 4.2.2.1.2 DETAIL SCREEN Primary content area sits on the right. (4.2.2.5) 41 4.2.2.2 NAVIGATION SCREEN Figure 27. Navigation Screen 4.2.2.2.1 TITLE The title is centered at the top of the screen. 4.2.2.2.2 INFORMATION BUTTON The information button is located at the top-right of the screen. Pressing the Information Button displays the Information Screen as a modal dialog. (4.2.2.7) 4.2.2.2.3 SKELETON The skeleton background image occupies the center of the screen. 4.2.2.2.3.1 BODY PART BUTTONS 42 Body part buttons overlay portions of the skeleton image.Pressing a Body Part Button with restricted content displays the Purchase Application Screen as a modal dialog.Pressing a Body Part Button with available content displays the Test Table Navigation Screen associated with that button. 4.2.2.2.3.1.1 WRIST AND HAND BUTTON The wrist and hand body part button overlays the upper-left hand of the skeleton. 4.2.2.2.3.1.2 SHOULDER BUTTON The shoulder button overlays the left shoulder of the skeleton. 4.2.2.2.3.1.3 CERVICO-THORACIC SPINE BUTTON The Cervico-Thoracic spine button overlays the center of the skeleton’s upper torso. 4.2.2.2.3.1.4 LUMBO PELVIC SPINE BUTTON The Lumbo pelvic spine button overlays the center of the skeleton’s waist. 4.2.2.2.3.1.5 HIP BUTTON The hip button overlays the right portion of the skeleton’s hip. 4.2.2.2.3.1.6 KNEE AND LOWER LEG BUTTON The knee and lower leg button overlays the left knee of the skeleton. 4.2.2.2.3.1.7 ANKLE AND FOOT BUTTON The ankle and foot button overlays the right ankle of the skeleton. 4.2.2.2.3.1.8 ELBOW AND FOREARM BUTTON The elbow and forearm button overlays the right elbows of the skeleton. 4.2.2.2.4 TEST CATEGORY BUTTON The category button is located on the bottom portion of the screen. Clicking the test category button displays the test category popover. 43 4.2.2.2.5 FREE CONTENT IMAGE The free content image is adjacent to the test buttons accessible in the trial version of the application. 4.2.2.3 SELECT TEST CATEGORY POPOVER Figure 28. Select test category popover 4.2.2.3.1 SPECIAL TESTS CELL The special tests cell is the first cell in the popover. 4.2.2.3.2 MOBILIZATIONS CELL The mobilizations cell the second cell in the popover. 4.2.2.3.3 GONIOMETRY CELL The goniometry cell is the third cell in the popover. 44 4.2.2.3.4 MUSCLE TESTS CELL The muscle tests cell is the fourth cell in the popover. 4.2.2.4 TEST TABLE NAVIGATION SCREEN Figure 29. Test Table Navigation Screen 4.2.2.4.1 BACK BUTTON The back button is located at the top-left of the screen.Pressing the back button replaces the test table navigation screen with the previous screen. 4.2.2.4.2 TITLE The title is centered at the top of the screen. 4.2.2.4.3 INFORMATION BUTTON The information button is located at the top-right of the screen. 45 4.2.2.4.4 TEST SECTIONS HEADER CELLS Each test section begins with a non-interactive header cell. 4.2.2.4.5 TEST CELLS Each test is marked by a test table cell. 4.2.2.4.5.1 TEST CELL Pressing a test cell replaces the Detail Screen with the Test Detail Screen associated with the test cell. 4.2.2.4.5.2 SUPER TEST CELL Pressing a super test cell replaces the Detail Screen with a Test Table Navigation Screen containing the subtests for the super test. 46 4.2.2.5 TEST DETAIL SCREEN Figure 30. Test Detail Screen 4.2.2.5.1 PHOTO VIEWER The photo viewer occupies the entirety of the Test Detail Screen. 4.2.2.5.2 VIDEO BUTTON The video button is located at the top of the navigation screen if available. Pressing the video reference replaces the entire application view with the Video Screen. 47 4.2.2.6 VIDEO SCREEN Figure 31. Video Screen 4.2.2.6.1 MEDIA PLAYER The media player occupies the entirety of the screen. 4.2.2.6.2 DONE BUTTON The done button is located at the top-left of the screen. Pressing the Done Button replaces the screen with the previous screen. 48 4.2.2.7 INFORMATION SCREEN Figure 32. Information Screen 4.2.2.7.1 TAB NAVIGATION A tab navigation is centered at the top of the screen. 4.2.2.7.1.1 APP INFORMATION TAB The App Information Tab is the first tab from the left.Pressing the App Information Tab replaces the HTML contents with the app information HTML contents. 4.2.2.7.1.2 COMPANY INFORMATION TAB The Company Information Tab is the second tab from the left. Pressing the Company Information Tab replaces the HTML contents with the company information HTML contents. 49 4.2.2.7.1.3 RESOURCES INFORMATION TAB The Resources Information Tab is the third tab from the left.Pressing the Resources Information Tab replaces the HTML contents with the resource information HTML contents. 4.2.2.7.2 CLOSE BUTTON The Close Button is located at the top-right portion of the screen. Pressing the Close Button removes the screen from view. 4.2.2.7.3 HTML VIEWER The HTML Viewer occupies the area of the screen under the Tab Navigation area. 50 4.2.2.8 PURCHASE APPLICATION SCREEN Figure 33. Purchase Application Screen 4.2.2.8.1 TITLE The title is centered at the top of the screen. 4.2.2.8.2 DONE BUTTON The Done Button is located at the top-left of the screen.Pressing the Done Button removes the screen from view. 4.2.2.8.3 CONTENT AREA The content area is located under the title area of the screen. 4.2.2.8.3.1 PURCHASE BUTTON 51 The purchase button is displayed in the content area. Pressing the Purchase Button begins a transaction procedure. 4.2.2.8.3.2 REDEEM PREVIOUS PURCHASE BUTTON The Redeem Previous Purchase Button is located after the Purchase Buttons in the content area. Pressing the Redeem Previous Purchase Button begins a transaction procedure where the user can redeem a previous purchase. 52 5 NON-FUNCTIONAL REQUIREMENTS 5.1 DOCUMENTATION 5.1.1 USER MANUAL iOrtho+ will produce a document that specifies the actions and abilities of the end-user. 5.1.2 ADMINISTRATIVE MANUAL iOrtho+ will produce a document that specifies the actions and abilities of the administrator. 5.1.3 DESIGN DOCUMENT iOrtho+ will produce a document detailing how iOrtho+ achieved the requirements previously specified. 5.1.4 API DOCUMENTATION iOrtho+ will produce a document detailing all methods, functions, and procedures implemented within the tool to enable easy maintainability of code for other developers. 5.1.5 5.1.5.1 53 SYSTEM REQUIREMENT ANDROID SYSTEM REQUIRMENTS Specification Minimum Recommended Operating System Android 2.2 Android 3.0 Processing Power 500 MHz 1 GHz RAM 16 MB 64 MB External Storage 4 MB 1+ GB Additional Internet Connection Broadband Internet Connection 5.1.5.2 IOS SYSTEM REQUIREMENTS Specification Minimum Recommended Operating System iOS 5.0 iOS 5.0+ Processing Power 833 MHz 1 GHz RAM 256 MB 512 MB External Storage 4 MB 1+ GB Additional Internet Connection Broadband Internet Connection 5.1.6 RUN-TIME SPEED 5.1.6.1 NETWORK TASKS 5.1.6.1.1 ADMINISTRATIVE CLIENT The system must publish test information within five seconds of a user's request to publish. 5.1.6.1.2 MOBILE The system must download and parse a test index from remote storage within ten seconds of startup.The system must download and render a test within three seconds of selection.The system must open a video within three seconds of selection. 5.1.7 RELIABILITY The use of remote storage for content ensures that information is constantly available to be reliably transported to the both applications. 5.1.8 AVAILABILITY The iOrtho+ mobile applications are acceptably robust such that they can work with limited or no network connectivity. If a network is available, the application stores an up-to-date test index locally on the machine for retrieval in the event of a network-outage. If a network is unavailable, and no locally cached test index exists, the application defaults to an index that is pre-packaged with the application. The remote storage unit ensures that the information is available at nearly all times, from nearly 54 all locations. 5.1.9 SECURITY The iOrtho+ administrative application passes all authentication credentials over a secure SSL connection. If the administrator chooses to save their credentials to the machine, the credentials are securely encrypted to avoid fraud. 5.1.10 MAINTAINABILITY The iOrtho+ administrative application's primary purpose is to increase maintainability. The software enables an administrator to quickly and cost-effectively create, modify, and maintain content for the iOrtho+ mobile application. The iOrtho+ mobile applications' code-trees are synchronized to be similar to increase codemaintainability. This synchronization enables a developer to quickly modify or update both mobile applications quickly and efficiently. Furthermore, the free and premium iOrtho+ Android applications are consolidated into a single application, effectively halfing the Android projectsize and maintenance time. 5.1.11 PORTABILITY The iOrtho+ administrative application is written in Java, which boasts a user-base of 1.1 billion desktops, thereby ensuring portability onto most machines. 5.1.12 TESTABILITY The iOrtho+ applications are broken into functional modules which are tested individually and collectively. The results of these tests are analyzed against the API documentation. 5.1.13 SYSTEM ADMINISTRATION REQUIREMENTS 5.1.13.1 AUTHENTICATION The system must accept verifiable credentials in order to properly authenticate the administrator to remote storage. Optionally, these credentials may be saved onto the machine, in order to streamline future logins. 5.1.13.2 ADDING TESTS The system must accept new test information from the administrator, then append it to an appropriate style template and update the index. The result of this operation must be verifiable. 5.1.13.3 EDITING TESTS 55 The system must allow the administrator to efficiently edit the information of a pre-existing test, then save the changes to the original. The result of this operation must be verifiable. 5.1.13.4 DELETING TESTS The system must allow the administrator to efficiently delete a pre-existing test, then save the changes to the index. The result of this operation must be verifiable. 5.1.13.5 PREVIEW TESTS The system must contain a staging area for tests to enable the administrator to properly preview tests prior to uploading them to remote storage and updating the mobile application index. 5.1.13.6 PUBLISH TESTS The system must allow for the administrator to publish tests to remote storage and update the mobile application index. 5.2 5.2.1 FUTURE EVOLUTION TEST SCHEMAS The system must allow for the administrator to create tests with custom text fields and save them for future use. For example, if the administrator wanted a test to contain a text field for “fun facts,” the application would enable them to create a new schema for future tests to have this additional text field. 56