1
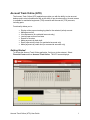
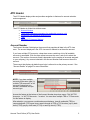
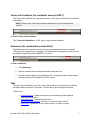
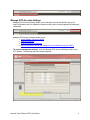
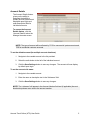
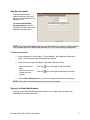
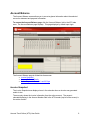
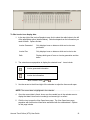
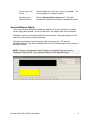
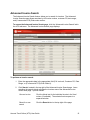
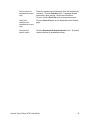
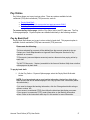
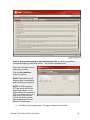
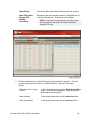
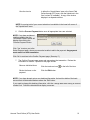
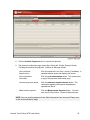
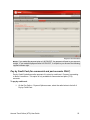
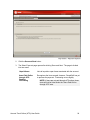
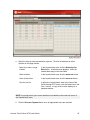
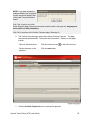
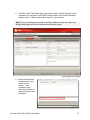
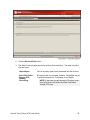
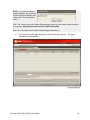
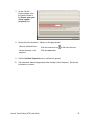
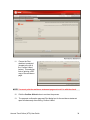
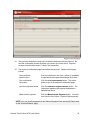
Account Track Online (ATO) User Guide Last Update: August 17, 2011 Preface This Account Track Online (ATO) User’s Manual contains confidential information of Ingersoll Rand, and is intended solely for the use and support of persons who are registered users of the Trane ComfortSite™ System or American Standard Air DealerNet System. If you are not a registered user, please call the Site Support at 800-430-5284, or email [email protected] to apply for registration. Refrain from using the manual until you have been authorized to do so. The use of this manual by registered users is subject to the terms and conditions of the System Access and Use Agreement between the registered user or its employer, and Ingersoll Rand, which among other things: Expressly prohibits users from using, disclosing, displaying, copying, downloading, storing, reproducing, transmitting, distributing, reselling or otherwise commercially exploiting the Manual, or any of the other Resources and Functionality relating to or otherwise available on or through the ComfortSite™ or ASDealerNet System; and Obligates such parties to use their best efforts and all diligence to safeguard and protect the Manual, and all other Confidential Information of Ingersoll Rand, as such term is defined therein. If you have any technical support issues or concerns that this manual does not address, you may wish to contact the Site Support by phone at 1-800-430-5284 or by email at [email protected]. INGERSOLL RAND, IN PROVIDING THIS SYSTEM, ACCEPTS NO RESPONSIBILITY OR LIABILITY FOR THE SUITABILITY OF THE SYSTEM IN PROVIDING SPECIFIC RESULTS. TRANE SHALL NOT BE LIABLE FOR ANY CLAIMS, CAUSES OF ACTION, OR DAMAGES ARISING OUT OF OR ALLEGED TO ARISE OUT OF THE USE OR INABILITY TO USE THE COMFORTSITE™ OR ASDEALERNET SYSTEM. UNDER NO CIRCUMSTANCES WILL INGERSOLL RAND BE LIABLE FOR ANY INCIDENTAL, CONSEQUENTIAL, OR SPECIAL DAMAGES, REGARDLESS OF THE LEGAL THEORY ADVANCED. Table of Contents Account Track Online (ATO) ................................................................................................... 1 Getting Started ....................................................................................................................... 1 ATO Header .............................................................................................................................. 2 Account Number..................................................................................................................... 2 Terms and Conditions (for residential accounts ONLY) .......................................................... 3 Statements (for residential accounts ONLY) ........................................................................... 3 Tabs ....................................................................................................................................... 3 Manage ATO Account Settings .............................................................................................. 4 Account Details ................................................................................................................... 5 Add New Accounts.............................................................................................................. 6 Sign up for Email Notifications ............................................................................................ 6 Opt-Out of Paper (for residential accounts ONLY) .............................................................. 8 Account Balance...................................................................................................................... 9 Invoice Snapshot.................................................................................................................... 9 Account Balance Details........................................................................................................11 Online Payments From the Last 90 Days ..............................................................................12 View Open Items .....................................................................................................................13 Advanced Invoice Search.......................................................................................................15 Pay Online ...............................................................................................................................17 Pay by Bank Draft .................................................................................................................17 Pay by Credit Card (for commercial and part accounts ONLY) ..............................................23 Remit by Check (for residential accounts ONLY)...................................................................29 FAQs ........................................................................................................................................37 Account Track Online (ATO) The Account Track Online (ATO) application provides you with the ability to view account balance and invoice information as well as the ability to pay invoices online. Account access is available for residential equipment (TRS) accounts and commercial (TCS) accounts, including parts. Functionality allows you to: Display online payment and aging data for the selected (active) account Manage accounts View statements (for residential accounts only) Load all open account line items Search for invoices Make payments by bank draft Remit payments by check (for residential accounts only) Make payments by credit card (for commercial accounts only) Getting Started To access the Account Track Online application, first log on to the extranet. Select Financial Center and then Account Track Online. The ATO screen displays. Account Track Online (ATO) User Guide 1 ATO Header The ATO Header displays tabs and provides navigation to features for account selection and management. The ATO Header is divided into distinct areas: Account Number Terms and Conditions Information (for residential accounts only) Statements (for residential accounts only) Tabs Manage ATO Account Settings Account Number The Account Number field displays the account that populates all data in the ATO view area. The account displayed in the ATO view area is referred to as the active account. If you have multiple ATO accounts, a drop-down menu containing a list of all available accounts is accessible. Click the down arrow to access the menu, and click to select the account. (The number of accounts listed is dependent on the number of accounts assigned to your company.) Any account selected in the Account Number field becomes the active account. The account that displays by default upon login is referred to as the primary account. See "Account Details" on page 5 for more information. NOTE: If you have multiple accounts of the same type (i.e. multiple TRS accounts), an 'all accounts' feature lets you access a combined view per account type. Access the feature at the bottom of the Account Number drop-down menu. Click 'All TRS Accounts...' or 'All TCS Accounts...' to select. You must have multiple TRS or TCS accounts for this feature to display. After selection, you can see a combined account balance, view all residential (TRS) or commercial/parts (TCS) open items, search through all TRS or TCS invoices, pay by bank draft (if TRS), pay by credit card (if TCS) or remit by check (if TRS). Account Track Online (ATO) User Guide 2 Terms and Conditions (for residential accounts ONLY) The Terms and Conditions menu provides access to a PDF copy of the terms and conditions of purchase. NOTE: These are the Terms and Conditions referenced on your invoices for this account. To access Terms and Conditions: Click Terms And Conditions. A PDF copy of the information displays. Statements (for residential accounts ONLY) The Statements menu provides access to the most recent statements for all residential (TRS) accounts assigned to your company. The statements are grouped by account and are accessible through links listed in MM/DD/YYYY format. To view a statement: 1. Click Statements. 2. Select the needed account from the statement drop-down list. 3. Select the needed date from the predefined list. A separate browser window opens and displays the selected statement in PDF format. Tabs The tabs (Account Balance, View Open Items, Advanced Invoice Search and Pay Online) dictate the data seen the ATO view area. Click the tab to open the page for that tab. Tabs include: Account Balance - Displays at-a-glance current and aging data regarding invoices and payments View Open Items - Displays all open items Advanced Invoice Search - Allows you to search through invoices Pay Online - Allows you to pay invoices online in a number of ways Account Track Online (ATO) User Guide 3 Manage ATO Account Settings Manage ATO Account Settings allows you to manage accounts and details, sign up for email notifications and (for residential customers only) receive online paperless invoices and statements. Manage ATO Account Settings allows you to: Select display of account details Add new accounts Sign up for email notifications Opt-out of paper invoices and statements (for residential accounts ONLY) To access management features, click the ‘Manage ATO Account Settings’ button in the ATO header. The Manage Accounts screen displays. Account Track Online (ATO) User Guide 4 Account Details The Account Details feature gives you the ability to designate the default or primary account (the account displayed upon login) and enter descriptive titles for individual accounts. To access the Account Details feature, click the ‘Account Details’ tab on the Manage Accounts screen. NOTE: The type of account will be reflected by TCS for commercial / parts accounts and TRS for residential customer accounts. To set the default account (for multiple account situations): 1. Navigate to the needed account in the list provided. 2. Select the radio button to the left of the individual account. 3. Click the Save Settings button to save any changes. The account will now display by default upon login. To set the account nick name: 1. Navigate to the needed account. 2. Enter the name or descriptive text in the ‘Nickname’ field. 3. Click the Save Settings button to save any changes. NOTE: The “nickname” will appear in the Account Number field and (if applicable) Account Number drop-down menu next to the account number. Account Track Online (ATO) User Guide 5 Add New Accounts The Add New Accounts feature accesses a form that allows you to add accounts for display in ATO. To access the Add New Accounts feature, click the ‘Add New Accounts’ tab on the Manage Accounts screen. NOTE: This request does not add accounts into the extranet for ordering or other purposes. The ‘Add New Accounts’ feature adds accounts to ATO for online viewing and payment. To add a new account: 1. Enter information in to the ‘Name,’ ‘E-mail Address,’ and ‘Additional Information’ fields. All fields marked with an asterisk are required. 2. Enter account number information in the table. Options include: Add more fields for entry Click the icon to the right of the lowest field. Remove an account number from the request Click the icon to the right of that account number 3. Click the Save Settings button to save any changes and submit the request(s). NOTE: Please allow 3 business days for the account to be added. Sign up for Email Notifications The Sign up for Email Notifications feature allows you to assign who receives email notifications for selected accounts. Account Track Online (ATO) User Guide 6 This feature is a great way to ensure you do not miss your electronic invoices (which are generated in one (1) business day after the order) and to always pay your invoices on time. To access the Sign up for Email Notifications feature, click the ‘Sign up for Email Notifications’ tab on the Manage Accounts screen. NOTE: You may sign up for notifications for invoice generation and/or due date notification (issued five (5) days prior). To assign email notifications: 1. Click to select the notification checkbox(es) in the ‘Invoice’ (for invoice generation notification) and/or ‘Due Date’ (for notification five (5) days before an item’s due date). Selection depends on your needs for the specific account. 2. Enter the email address where you want the account notifications sent in the textboxes in the ‘E-mail Address’ column. NOTE: You may enter multiple email addresses, separated by a semi-colon (no spaces). 3. Click the Save Settings button to save any changes. Account Track Online (ATO) User Guide 7 Opt-Out of Paper (for residential accounts ONLY) The Opt-Out of Paper feature allows residential (TRS) accounts to save paper and view invoices and statements online. This option replaces receiving paper invoices and statements through the mail. Selections are made per account in multiple account situations. To access the Opt-Out of Paper feature, click the ‘Opt-Out of Paper: Go Green!’ tab on the Manage Accounts screen. To opt-out of paper: 1. Select the needed 'Invoice' and/or 'Statements' checkbox and discontinue receiving paper copies of invoices and/or statements for that account. 2. Click on the Save Settings button to save the changes made. Confirm any changes. Account Track Online (ATO) User Guide 8 Account Balance The Account Balance screen allows you to see at-a-glance information about the selected account’s statement and payment information. To access the Account Balance page, click the ‘Account Balance’ tab in the ATO tabs area. The Account Balance page displays. This page displays by default upon login. The Account Balance page is divided into three areas: Invoice Snapshot Account Balance Details Online Payments From the Last 90 Days Invoice Snapshot The Invoice Snapshot area displays icons in the calendar when an invoice was generated and/or is due. The area only shows the invoice information from the active account. The account selected/displaying in the Account Number field in the ATO header (top left of the screen) is the active account. Account Track Online (ATO) User Guide 9 To filter invoice icon display data: 1. In the top right of the Invoice Snapshot area, click to select the radio button to the left of the appropriate option (detailed below). Selection depends on the information you need to obtain. Options include: Invoice Generated Only displays icons on dates on which an invoice was generated Invoice Due Only displays icons on dates on which an invoice is due Both Displays both types of icons on invoice generation and due dates 2. The calendar area repopulates to display the selected icons*. Icons include: Invoice generated information Invoice due information *‘Both’ results in both and 3. Use the arrows to the left and right of the calendar to adjust the three-month span. NOTE: The current date is highlighted in the calendar. 4. Once the correct date is found, hover over the needed icon in the calendar area to display that date’s item/invoice number(s) and amount(s) in a callout. 5. Click the icon to open the View Open Items page. The View Open Items page populates with item/invoice information associated with the selected date. Options on this page include: Account Track Online (ATO) User Guide 10 View a copy of the invoice Click the linked text in the ‘Item’ column (if available). The invoice displays in a separate window. Download open items information Click the Download Open Items button. The date’s item/invoice information downloads in spreadsheet format. Account Balance Details The Account Balance Details area displays a snapshot of account information, including current, aging and total data. Hover over the bars in the graph to view exact information. The data is current as of last processing and is not real-time. Items paid today will not be reflected on this screen until after processing. The graph only shows account information for the active account. The account selected/displaying in the Account Number field in the ATO header (top left of the screen) is the active account. NOTE: There are no designated Credits, Disputed, or Unapplied Payment involving residential (TRS) accounts. Any credits are factored into the aging data totals. Account Track Online (ATO) User Guide 11 Online Payments From the Last 90 Days The Online Payments From the Last 90 Days feature lists recent online payments made through ATO. The table only shows the payments made from the active account. The account selected/displaying in the Account Number field in the ATO header (top left of the screen) is the active account. To view payment details: 1. Click the linked text in the ‘Confirmation Number’ column. 2. The Online Payment Details screen opens. Details regarding the payment of the item/invoice are listed on the screen. Options on this page include: View an invoice Click the linked text in the ‘Item’ column (if available). The invoice displays in a separate window. Download payment details Click the Download Payment Details button. The date’s item/invoice information downloads in spreadsheet format. Account Track Online (ATO) User Guide 12 View Open Items The View Open Items screen allows you to view all open items related to the active account. The account selected/displaying in the ‘Account Number field in the ATO header (top left of the screen) is the active account. To access the View Open Items page, click the ‘View Open Items’ tab in the ATO tabs area. The View Open Items page displays. The items are grouped by date, PO number, item number, due date, amount, discount and other information. NOTE: If Items remain unpaid (debits) or unapplied, the items stay on the open items list. NOTE: For residential (TRS) accounts, a credit card icon credit card online at the time of purchases. displays for items paid by To view an open invoice: Click the linked text in the ‘Item’ column (if available). The invoice displays in a separate window. Account Track Online (ATO) User Guide 13 To download open items: Click the Download Open Items button. All open item information downloads in spreadsheet format. To print a list of open invoices (for residential accounts ONLY): 1. Click the individual item's checkbox in the 'Select' column to select. Other selection options include the following: Select all open items Select open items by date Click the Select All button in the top right of the screen. Clear all selections Click the Clear All button in the top right of the screen. Click the Select By Date button in the top right of the screen. 2. Click the Print All button in the top right of the screen. A separate window opens with a print preview. Review the information. 3. To print, click the Print This button on the preview screen. Account Track Online (ATO) User Guide 14 Advanced Invoice Search The Advanced Invoice Search feature allows you to search for invoices. The Advanced Invoice Search screen allows searches by full invoice number, customer PO, date range, and (if commercial/TCS) Pride order number. To access the Advanced Invoice Search page, click the ‘Advanced Invoice Search’ tab in the ATO tabs area. The Advanced Invoice Search page displays. To perform an invoice search: 1. Enter the appropriate data in the appropriate field (Full Invoice #, Customer PO, Date Range, or (if commercial/TCS) Pride Order #). 2. Click Search, located in the top right of the Advanced Invoice Search page. Items matching the search criteria populate the Invoices area of the Advanced Invoice Search view page. Options include: View an invoice Click the linked text for the individual invoice in the 'Item' column (if available). The selected invoice opens in a separate window. Reset for a new search Click the Reset button in the top right of the page. Account Track Online (ATO) User Guide 15 Print invoices (for residential accounts only) Select the needed items individually (click the checkbox(es) to select). Click the Print All button. A separate window opens with a print preview. Review the information. To print, click the Print This icon on the preview screen. Clear print selections (for residential accounts only) Click the Clear All button on the Advanced Invoice Search page. Download all search results Click the Download All Search Results button. All search results download in spreadsheet format. Account Track Online (ATO) User Guide 16 Pay Online Pay Online allows you to pay invoices online. There are options available for both residential (TRS) and commercial (TCS) accounts, such as: Pay by Bank Draft Pay by Credit Card (for commercial and parts accounts ONLY) Remit by Check (for residential accounts ONLY) To access the Pay Online page, click the ‘Pay Online’ tab in the ATO tabs area. The Pay Online page displays. Payment options are detailed individually in the following sections. Pay by Bank Draft Pay by Bank Draft allows you to pay invoices online by bank draft. This payment option is available for both residential (TRS) and commercial (TCS) accounts. Please note the following: The items selected for payment will be debited from the account entered at sign-up. Contact your Credit Representative at Ingersoll Rand Enterprise Services for any questions or concerns. TCS accounts (commercial/parts accounts) receive a discount when paying online by bank draft. The 'All TCS Accounts...' feature (accessible in the Account Number field) does not allow online payment by bank draft. To pay by bank draft: 1. On the Pay Online – Payment Options page, select the Pay by Bank Draft radio button. NOTE: If you have already set up your banking information, the last four digits of the bank account that will be drafted displays in the ‘Pay by Bank Draft’ information (below the radio button). If you need to change this banking information, click the ‘Change bank draft routing or account number’ link. If your account is residential (TRS), then follow the directions that display on screen. If your account is commercial (TCS), enter information on the Banking Information screen. Refer to the instructions after step 3 in this section for more information. Account Track Online (ATO) User Guide 17 2. Click the Save and Next button. 3. The Legal Agreement section displays. Read through the information provided. Click the I Accept Terms button to continue with the transaction. NOTE: Clicking the ‘I Do Not Accept Terms’ button returns you to the previous screen. Account Track Online (ATO) User Guide 18 If this is your first time paying by bank draft through ATO, you will be prompted to complete the Banking Information section. This process is detailed below. Enter and verify bank account and routing numbers. Click the Save and Next button to continue. NOTE: Please allow two (2) business days for processing before making your payment. NOTE: All TRS accounts in ATO are set up to bill to the same bank account. If you have multiple TCS accounts in ATO, you will have to set up a bank account for each one. You do not have to use the same bank account for your different TCS accounts. 4. The Select Payment page opens. The page is divided into two areas: Account Track Online (ATO) User Guide 19 Unpaid Items Lists all unpaid or open items associated with the account. Items Paid Online through ATO Pending Processing Recognizes the items as paid; however, PeopleSoft has yet to process the payment. Processing occurs nightly. NOTE: If items are not paid through ATO online, those items will not be listed under the Items Paid Online through ATO area. 5. Click the checkbox(es) to select the item(s) to be processed for payment. The item must be pending and must result in a debit transaction. Options on this page include: Select by a date or range of dates In the Unpaid Items area, click the Select by Due Date button. A selection area displays. Enter the needed date range in the date fields. Select all items In the Unpaid Items area, click the Select All button. Clear all selections In the Unpaid Items area, click the Clear All button. Account Track Online (ATO) User Guide 20 View the invoice In either the ‘Unpaid Items’ area or the ‘Items Paid Online through ATO’ area, click the linked text in the 'Item' column (if available). A copy of the invoice displays in a separate window. NOTE: A running total of your current selections is available in the lower left corner of the 'Unpaid Items' area. 6. Click the Process Payment button once all appropriate items are selected. NOTE: If you have unclaimed credits available, then the 'Unclaimed Credits' screen will display after clicking the 'Process Payment' button. Click 'Yes' to return you to the Select Payment page, where you can select credits to add to the payment. Any payment must result in a debit transaction. Click 'No' to continue to the Confirm Payment page. (See step 7.) 7. The Confirm Payment page opens and summarizes the transaction. Review the information on screen. Options on this page include: Remove individual items Click the trash can icon Revise the items on the payment Click the Edit button. to the left of the item. NOTE: If you have already set up your banking information, the last four digits of the bank account that will be drafted displays above the ‘Edit’ button. If you need to change this banking information, click the ‘Change bank draft routing or account number’ link. Follow the directions that display on screen. Account Track Online (ATO) User Guide 21 8. Click the Confirm Payment button to continue the process. 9. The payment confirmation page opens after clicking the ‘Confirm Payment’ button. This page summarizes the payment. Options on this page include: View confirmed items/invoices Click the linked text in the 'Item ' column (if available). A separate window opens and displays the invoice. Print confirmation information Click the Print Confirmation button. This action prints a copy of the payment confirmation page. Download payment details Click the Download Payment Details button. The information regarding the payment downloads in spreadsheet format. Make another payment Click the Make Another Payment button. You start over from the Pay Online - Payment Options screen. NOTE: You can view this payment in the ‘Online Payments From the Last 90 Days’ area on the ‘Account Balance’ page. Account Track Online (ATO) User Guide 22 NOTE: If you made this payment prior to 6:00 PM CST, the payment will post to your account tonight. If you made this payment after 6:00 PM CST, it will post to your account the following regular business night. Pay by Credit Card (for commercial and part accounts ONLY) Pay by Credit Card allows online payment of invoices by credit card. Payment is according to terms & conditions. This option is only available for commercial and parts (TCS) accounts. To pay by credit card: 1. On the Pay Online – Payment Options screen, select the radio button to the left of Pay by Credit Card. Account Track Online (ATO) User Guide 23 2. Click the Save and Next button. 3. The Select Payment page opens after clicking ‘Save and Next.’ The page is divided into two areas: Unpaid Items Lists all unpaid or open items associated with the account. Items Paid Online through ATO Pending Processing Recognizes the items as paid; however, PeopleSoft has yet to process the payment. Processing occurs nightly. Account Track Online (ATO) User Guide NOTE: If items are not paid through ATO online, those items will not be listed under the 'Items Paid Online through ATO' area. 24 4. Select the item(s) to be processed for payment. Click the checkboxes to select. Options on this page include: Select by a date or range of dates In the Unpaid Items area, click the Select by Due Date button. A selection area displays. Enter the needed date range in the date fields. Select all items In the Unpaid Items area, click the Select All button. Clear all selections In the Unpaid Items area, click the Clear All button. View the invoice In either the ‘Unpaid Items’ area or the ‘Items Paid Online through ATO’ areas, click the linked text in the 'Item ' column. A copy of the invoice displays in a separate window. NOTE: A running total of your current selections is available in the lower left corner of the 'Unpaid Items' area. 5. Click the Process Payment button once all appropriate items are selected. Account Track Online (ATO) User Guide 25 NOTE: If you have unclaimed credits available, the 'Unclaimed Credits' screen will display after clicking the 'Process Payment' button. Click 'Yes' to return you to the Select Payment page, where you can select credits to add to the payment. Any payment must result in a debit transaction. Click 'No' to continue to the Confirm Payment page. (See step 6.) 6. The Confirm Payment page opens after clicking ‘Process Payment.’ The page summarizes the transaction. Review the item information. Options on this page include: Remove individual items Click the trash can icon Revise the items on the payment Click the Edit button. to the left of the item. 7. Click the Confirm Payment button to continue the process. Account Track Online (ATO) User Guide 26 8. The Enter Credit Card Details page opens after clicking ‘Confirm Payment’. Enter information into the fields in the ‘Credit Card Information’ and ‘Credit Card Billing Address’ areas. Fields marked with an asterisk (*) are required. NOTE: The email address(es) entered in the 'Email Address' field in the Credit Card Billing Address area will receive transaction confirmation emails. 9. Review the terms and conditions (link in the lower left of the screen). Once reviewed, click to select the checkbox to agree to the terms and conditions. Account Track Online (ATO) User Guide 27 10. Click the Pay Now button. NOTE: Click the ‘Back’ button to return to the Confirm Payment screen. 11. The Payment Confirmation page opens after clicking ‘Pay Now’. An email confirmation of the transaction is sent to the email address entered on the previous screen. This page summarizes the payment, including the confirmation number and item(s) paid. Options on this page include: View confirmed items/invoices Click the linked text in the 'Item ' column (if available). A separate window opens and displays the invoice. Print confirmation information Click the Print Confirmation button. This action prints a copy of the payment confirmation page. Download payment details Click the Download Payment Details button. The information regarding the payment downloads in spreadsheet format. Make another payment Click the Make Another Payment button. You start over from the Pay Online - Payment Options screen. NOTE: You can view this payment in the ‘Online Payments From the Last 90 Days’ area on the ‘Account Balance’ page. Account Track Online (ATO) User Guide 28 NOTE: If you made this payment prior to 6:00 AM Central time, the payment will post to your account tonight. If you made this payment after 6:00 AM Central time, it will post to your account the following night. Please allow up to two business days to complete the processing (i.e., for Paid Items to be shown in your ATO Account Balance Summary). Payments made on the last day of the month after 6:00 AM Central time may not be reflected in your monthly statement. Remit by Check (for residential accounts ONLY) Remit by Check creates a remittance statement that requires a check to be mailed-in. This payment option is only available for residential (TRS) accounts. To remit by check: 1. On the Pay Online – Payment Options page, select the Remit by Check radio button. Account Track Online (ATO) User Guide 29 2. Click the Save and Next button. 3. The Select Payment page opens after clicking ‘Save and Next.’ The page is divided into two areas: Unpaid Items Lists all unpaid or open items associated with the account. Items Paid Online through ATO Pending Processing Recognizes the items as paid; however, PeopleSoft has yet to process the payment. Processing occurs nightly. Account Track Online (ATO) User Guide NOTE: If items are not paid through ATO online, those items will not be listed under the Items Paid Online through ATO area. 30 4. Select the item(s) from the ‘Unpaid Items’ area to be processed for payment. Click the checkbox(es) to select. Options include: Select by a date or range of dates In the Unpaid Items area, click the Select by Due Date button. A selection area displays. Enter the needed date range in the date fields. Select all items In the Unpaid Items area, click the Select All button. Clear all selections In the Unpaid Items area, click the Clear All button. View the invoice In either the ‘Unpaid Items’ area or the ‘Items Paid Online through ATO’ areas, click the linked text in the 'Item ' column. A copy of the invoice displays in a separate window. NOTE: A running total of your current selections is available in the lower left corner of the 'Unpaid Items' area. 5. Click the Process Payment button once all needed items are selected. Account Track Online (ATO) User Guide 31 NOTE: If you have unclaimed credits available, the 'Unclaimed Credits' screen will display after clicking the 'Process Payment' button. Click 'Yes' to return you to the Select Payment page, where you can select credits to add to the payment. Any payment must result in a debit transaction. Click 'No' to continue to the Confirm Payment page. (See step 6.) 6. The Confirm Payment page opens after clicking ‘Process Payment.’ The page summarizes the transaction. Account Track Online (ATO) User Guide 32 7. On the Confirm Payment page, enter the check number in the Please enter your Check number (required) field. 8. Review the item information. Options on this page include: Remove individual items Click the trash can icon Revise the items on the payment Click the Edit button. to the left of the item. 9. Click the Confirm Payment button to continue the process. 10. The remittance statement page opens after clicking ‘Confirm Payment’. Review the information on screen. Account Track Online (ATO) User Guide 33 11. Ensure the Print checkbox is selected (located to the left of the ‘Confirm & Next’ button). This selection links to printing a PDF copy of the remittance page. NOTE: You must print the remittance statement page and sent it in with the check. 12. Click the Confirm & Next button to continue the process. 13. The payment confirmation page and Print dialog box for the remittance statement open simultaneously after clicking ‘Confirm & Next.’ Account Track Online (ATO) User Guide 34 14. Once printed, remember to mail in the remittance statement with the payment. Be sure the confirmation number is written in the memo line of the check. Payment must be received within seven (7) days f this transaction. 15. The payment confirmation page summarizes the payment. Options on this page include: View confirmed items/invoices Click the linked text in the 'Item ' column (if available). A separate window opens and displays the invoice. Print confirmation information Click the Print Confirmation button. This action prints a copy of the payment confirmation page. Download payment details Click the Download Payment Details button. The information regarding the payment downloads in spreadsheet format. Make another payment Click the Make Another Payment button. You start over from the Pay Online - Payment Options screen. NOTE: You can view this payment in the ‘Online Payments From the Last 90 Days’ area on the ‘Account Balance’ page. Account Track Online (ATO) User Guide 35 NOTE: If you made this remittance payment before 4:00 AM CST, the payment will post to your account tonight. If you made this payment after 4:00 AM CST, it will post tomorrow night. Please allow up to two (2) business days to complete the transaction. Payment must be received within seven (7) days of this transaction. Account Track Online (ATO) User Guide 36 FAQs GENERAL INFO What are TCS and TRS accounts? TCS and TRS are account types. TCS stands for commercial / parts accounts, and TRS stands for residential customer accounts. I have multiple accounts in ATO. How do I access my different accounts? If you have multiple ATO accounts, a dropdown menu containing a list of all available accounts is accessible. Click the down arrow to access the menu, and click on the appropriate account number to select the account. (The number of accounts listed is dependent on the number of accounts assigned to your company.) Any account selected in the Account Number field becomes the active account. How do I access a combined view of all my residential (TRS) and commercial or parts (TCS) accounts? Access the 'all accounts...' feature at the bottom of the Account Number dropdown menu in the ATO header. Click 'All TRS Accounts...' or 'All TCS Accounts...' to select. You must have multiple TRS or TCS accounts for this feature to display. After selection, you can see a combined account balance, view all residential (TRS) or commercial/parts (TCS) open items, search through all TRS or TCS invoices, pay by bank draft (if TRS), pay by credit card (if TCS) or remit by check (if TRS). What is a default or primary account? The default or primary account is the account that displays upon login to ATO. This feature is helpful in multiple account situations. See "Account Details" on page 5 for more information. How can I be notified when invoices are generated for an account and/or when an item is due? You can sign up for email notifications under Manage ATO Account Settings. See "Sign up for Email Notifications" on page 6 for more information. How do I access my statements online? See "Statements (for residential accounts ONLY)" on page 3 for more information. Please note that this feature is only available for residential (TRS) accounts. How do I print a list of open invoices/items? See "View Open Items" on page 13 for more information. Please note that this feature is only available for residential (TRS) accounts. PAY ONLINE - GENERAL How do I pay online? If you have residential (TRS) accounts, you can pay online by bank draft or remit by check. If you have commercial/parts (TCS) accounts, you can pay online by bank draft or pay by credit card. See "Pay Online" on page 17 for more information. Account Track Online (ATO) User Guide 37 Can I apply credits to my payment? Yes. Select any credits on the ‘Select Payment’ page in the pay online process. However, take note that the overall payment must result in a debit transaction. Why am I seeing a pop-up referring to ‘Unclaimed Credits’? If you have any unapplied/unclaimed credits on the account for which you are currently processing a payment, then an ‘Unclaimed Credits’ pop-up will display after the ‘Select Payment’ page. Click ‘Yes’ to return to the Select Payment page. There you can apply credits to the payment. The overall payment must result in a debit transaction. Click ‘No’ to ignore the credits and continue with the payment process. I am remitting by check. How do I print the remittance statement? When going through the online remit by check process, ensure the ‘Print’ checkbox is selected on the remittance statement page. After clicking the ‘Confirm & Next’ button, the print dialog box will display and allow you to print your remittance statement. How can I see my payment after completing the payment process? Navigate to the Account Balance page (by clicking the Account Balance tab) and view payment information in the Online Payments From the Last 90 Days area. PAY ONLINE - PAY BY BANK DRAFT This is my first time paying online. What information do I need to pay by bank draft? If this is your first time paying by bank draft through ATO with a residential (TRS) account or any commercial (TCS) account, you will be prompted to complete the banking information screen. There is a two (2) business day processing time to complete this setup. After setup, you can make your payment. Why can’t I pay by bank draft? If this is your first time paying by bank draft through ATO with a residential (TRS) account or any commercial (TCS) account, you will be prompted to complete the banking information screen. There is a two (2) business day processing time to complete this setup. After setup, you can make your payment. Also, the ‘All TCS Accounts...’ feature does not function with bank draft payment. See "Account Number" on page 2 for more information. I have multiple commercial/parts (TCS) accounts. How are the bank accounts set up for paying online by bank draft? If you have multiple TCS accounts, you will have to set up a bank account for each one. You do not have to use the same bank account for your different TCS accounts. I have multiple residential/equipment (TRS) accounts. How are the bank accounts set up for paying online by bank draft? All residential (TRS) accounts are set up to bill to the same bank account. I’ve noticed the bank account being drafted is incorrect when I’m paying online by bank draft. How do I change this? If you have already set up your banking information, the last four (4) digits of the bank account being drafted displays in the ‘Pay by Bank Draft’ information on the Pay Online page. If you need to change this information, click the ‘Change bank draft routing or account Account Track Online (ATO) User Guide 38 number’ link. If the account is residential (TRS), follow the directions the display on screen. If the account is commercial (TCS), then fill out the Banking Information screen. PAY ONLINE - PROCESSING TIME What is the processing time for online payments made by bank draft? If you made your payment prior to 6:00 AM CST, the payment will post to your account tonight. If you made your payment after 6:00 AM CST, the payment will post to your account the following regular business night. What is the processing time for online payments made by credit card? If you made your payment prior to 6:00 AM CST, the payment will post to your account tonight. If you made your payment after 6:00 AM CST, the payment will post to your account tonight. Payments made on the last day of the month after 6:00 AM CST may not be reflected on that month’s monthly statement. Please allow up to two (2) business days for processing. Online payment by credit card is only available to commercial (TCS) accounts. What is the processing time for online remittance by check? If you made your payment before 4:00 AM CST, the payment will post to your account tonight. If you made your payment after 4:00 AM CST, the payment will post to your account the following night. Please allow up to two (2) business days to complete the transaction. Payment must be received seven (7) days to this transaction. Online remittance by check is only available to residential (TRS) accounts. Account Track Online (ATO) User Guide 39