1
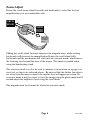
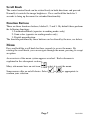
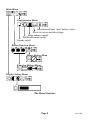
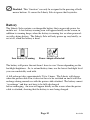
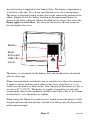
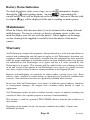
Liberty Solo
User Manual
Table of Contents
Installation.......................................................................................................... 2
Mouse Camera ................................................................................................... 3
Zoom Adjust..................................................................................................... 4
Writing with the Liberty Solo .......................................................................... 5
Main Unit Controls............................................................................................ 6
Power Button.................................................................................................... 6
Mode Select Button.......................................................................................... 6
Scroll Knob ...................................................................................................... 7
Function Buttons .............................................................................................. 7
Menu.................................................................................................................... 7
Main Menu ....................................................................................................... 9
Display Settings Menu ..................................................................................... 9
Button Functions Menu.................................................................................... 9
Configuration Menu ....................................................................................... 10
Function descriptions ...................................................................................... 10
Battery............................................................................................................... 12
Battery Status Indication................................................................................ 14
Maintenance ..................................................................................................... 14
Warranty .......................................................................................................... 14
Specifications.................................................................................................... 15
Important Instructions for Use ...................................................................... 16
Before using this product, refer to page 16 for the
Important Instructions for Use.
Page 1
Rev D EN
Installation
The Liberty solo is supplied the following components:
o Main Unit
o Liberty Solo Mouse Camera
o Handwriting stand
o Power supply adapter
o Mains cable
o Carry case
o Additional battery
When setting up, it is important to choose your workplace carefully to avoid an
uncomfortable or awkward position. You should not have to raise your arm to
use the mouse; your wrist should be on the resting on the surface. The monitor
should be below eye level to avoid strain.
• Remove the Liberty Solo main unit from its case and place on the work
surface.
• Depress both handle release buttons and rotate the handle to allow you to
look onto or slightly down on the display.
• Plug the mouse camera into either socket at the right hand side of the
main unit.
! The mouse camera must be plugged in before powering on. If it is
plugged in when the power is on, it may not operate properly.
• An additional external camera or other video source (not supplied) can be
plugged into the second camera connector on the right hand side of the
unit. A suitable adapter is available from your distributor.
• As it is supplied with the battery partially charged, we recommend that
you initially operate the Liberty Solo from the power supply. Plug the
power supply into a wall socket and insert the connector into the right
hand side of the unit above the mouse cable.
• Power up the Liberty Solo by pressing the red power button (the rightmost button on the front panel).
• When you place the mouse camera on some text you should see the
magnified image on the screen.
Page 2
Rev D EN
Handle Release
Button
Handle
Power Supply
Connector
Scroll Knob
Camera 1
Connector
Power
On/Off
Button
Camera 2
Connector
Mouse Camera
Scroll Zoom
Right
Left
The left button will switch digital magnification on and off.
The right button will change modes just like the mode button on the main unit.
Pressing both buttons will have no effect by default, but can be programmed to
alternately display mouse and external camera. See the section on the Menu
for details.
Page 3
Rev D EN
Zoom Adjust
Rotate the scroll-zoom wheel forwards and backwards to select the level of
magnification you are comfortable with.
ABCD
EFGH
ABCDEFGHI
JKLMNOPQ
RSTUVWXY
ZABCDEFG
HIJKLMNOP
ABCDEFGHIJK
LMNOPQRSTU
VWXYZABCDE
FGHIJKLMNO
PQRSTU
Sliding the scroll wheel forwards increases the magnification, while rotating
backwards will decrease the magnification. Rotate the scroll wheel fully
backwards and the mechanism will click into an overview mode, which moves
the focusing area beyond the base of the mouse. This mode is needed when
using the handwriting stand.
The overview mode can also be used to orientate your position on a page or to
view text or objects in awkward places. Be advised that the further the objects
are away from the mouse camera, the smaller they will appear on screen. In
overview mode it may be easier to view the image using the photo mode and if
needed adjust the brightness level using the scroll knob.
The magnification level cannot be altered in overview mode.
Page 4
Rev D EN
Writing with the Liberty Solo
The mouse has handwriting stands
that can be pulled out that allow
you to write with the aid of the
camera. Flip out one of the stands:
use the left-hand-side stand if you
are right handed and vice versa.
Rotate the scroll-zoom wheel on the
mouse fully backwards i.e. into
overview mode.
When using the handwriting stand, it is best to use the full color mode, press
the Mode button on the Liberty Solo to change.
Page 5
Rev D EN
Main Unit Controls
The Liberty Solo has the following controls. Refer to the diagram for the
position of the controls.
11
2
Function
Buttons
3
Scroll Knob
Mode
Select
Power
Power Button
Press to power up the unit. Press again to power off. The Liberty Solo will not
operate without the mouse camera attached; this is to prevent accidental
discharge of the battery. The unit will power off if the camera is unplugged.
The
icon indicates that no camera was found and the unit will now
power-off.
The last-used settings are stored at power off and are restored when the unit is
switched on again. Removing the power cord or the battery with the unit
powered on may corrupt the saved settings.
Mode Select Button
There are three modes of operation:
• Full-color mode for viewing photographs, images, etc.
• Positive mode, an enhanced reading mode where the foreground “ink” is
darker than the background “paper”.
• Negative mode, an enhanced reading mode where the foreground “ink”
is brighter than the background “paper”.
The Mode button will toggle between the last reading mode and full-color
mode if a few seconds elapse between presses. Repeated pressing of the Mode
button will cycle through all three modes.
Page 6
Rev D EN
Scroll Knob
The central control knob can be rotated freely in both directions and pressed.
Normally it controls the image brightness. Press and hold the knob for 3
seconds to bring up the menu for extended functionality.
Function Buttons
There are three functions buttons, labeled 1, 2 and 3. By default these perform
the following functions:
1: Linemarker/Blinds (operates in reading modes only)
2: Semi-color (operates in reading modes only)
3: Digital magnification.
The function performed by these buttons can be altered by the user, see below.
Menu
Press and hold the scroll knob for three seconds to access the menu. By
rotating the scroll knob, you can navigate through the menu, pressing to accept
an option.
An overview of the menu system appears overleaf. Each sub-menu is
explained in the subsequent sections.
Many sub-menus have an exit icon,
, select it to exit the menu.
Some menus offer an on/off choice. Select
confirm your selection.
Page 7
or
as appropriate to
Rev D EN
Main Menu
Configuration Menu
Information Panel (incl. battery status)
Reset to factory default settings
Edge enhance on/off
TextStretch mode on/off
Sounds on/off
Button Function Menu
Mouse Button Menu
Function Button Menus
Display Setting Menu
The Menu Structure
Page 8
Rev D EN
Main Menu
Opens Display Settings menu, to alter the brightness, contrast, etc., of
the image.
Opens the Button Function menu to select the function assigned to the
three function buttons and both mouse buttons.
Opens the Configuration menu to set various options.
Exits the menu.
Display Settings Menu
All options below bring up a scale on the bottom of the screen to allow
adjustment of the particular attribute. Each setting is unique to the mode and
camera currently being displayed and will be used when that mode and camera
are displayed again. The exception to this rule is the backlight level, which is
common to all modes.
Adjusts the image brightness.
Adjusts the contrast level of the image.
Adjusts the color saturation. This is only available when displaying a
full-color image.
Sets the backlight level. Note that lower levels of backlight significantly
improve battery life when operating with battery power.
Exit the menu.
Button Functions Menu
The details of the functions available for each button are described below in the
next section Function Descriptions.
Page 9
Rev D EN
Allows the function of Function Button 1 to be chosen.
Allows the function of Function Button 2 to be chosen.
Allows the function of Function Button 3 to be chosen.
Allows the function of Both-Mouse-Buttons 1 to be chosen.
Exits the menu.
Configuration Menu
Turn the sounds on or off.
TM
Turn TextStretch mode on or off. Selecting this option stretches the
text horizontally, increasing the space between the letters. Many people
find it a lot easier to read with this option.
Turn edge enhancement on or off. With enhancement on, the image is
sharper and has greater contrast, but the edges of the letters can
shimmer.
Reset to Factory Defaults. If you choose settings that render the unit
unusable, you can restore the settings to a known set of values that
produce an image. All previous settings are replaced with the factory
default values.
Information display. This screen displays the current battery charge (if
operating on batteries) or a symbol indicating that the unit is operating
on mains power. It also displays which camera socket is in use and the
type of signal received.
Exit the menu.
Function descriptions
Swap cameras. This function will change the display to alternate
between the two cameras (if connected). There will be a brief blank
Page 10
Rev D EN
while the image is swapped. If a second video source is not detected,
the unit will beep and swap back to the original camera. The second
video source can be either PAL or NTSC format, and can be taken from
any suitable source, e.g. camcorder, video/DVD player, etc.
You can choose this function to be assigned to both-mouse-buttons for
ease of swapping while reading.
Line marker/Blinds. This function will display an underline or
dimming blinds over the image. It functions in both reading modes but
not in full color mode.
To change the gap between the blinds, hold the function button in for
three seconds until the sound is heard and use the scroll knob to adjust.
Press any button to exit the adjustment mode.
Color select. This function will change the “ink” and “paper” colors
on the display. There are a number of pre-defined color combinations
that can be cycled through by pressing the function key.
If you want a color combination that is not built-in, then press and hold
the function key for three seconds until the sound is heard. Use the
scroll knob to adjust the paper and ink colors and press any key when
the displayed colors are correct.
Digital magnification. Press the function button to turn digital
magnification on or off. It always returns to the last level of
magnification used.
To adjust the level of digital magnification, press and hold the function
button and a scale will appear at the bottom of the display. Use the
scroll knob to adjust to the desired level and press any key to accept.
The left mouse button performs the same task, but holding it will not
enter the adjustment mode.
Page 11
Rev D EN
Disabled. This “function” can only be assigned to the pressing of both
mouse buttons. It causes the Liberty Solo to ignore that keystroke.
Battery
The Liberty Solo contains a rechargeable battery that can provide power for
mobile use. A low battery warning icon will appear briefly on the screen, in
addition to warning beeps, when the battery is running low or when poweredon with a dying battery. The Liberty Solo will only power up very briefly, or
not at all, when the battery is dead.
Low Battery Warning
Power Adapter Detected
The battery will power the unit from 1 hour to over 3 hours depending on the
backlight brightness. So, to extend battery time, use the lowest backlight level
you can comfortably read with.
A full recharge takes approximately 2½ to 3 hours. The Liberty will charge
when the power cable is in; it does not have to be switched on and it will also
recharge during normal use with the power cable attached. The battery cannot
“overcharge” and does not have to be fully discharged
before recharging. An icon will appear briefly on the screen when the power
cable is attached, showing that the battery is now being charged.
Page 12
Rev D EN
An extra battery is supplied for the Liberty Solo. The battery compartment is
at the back of the unit. Press down and slide the cover off as shown below.
The battery is held quite firmly in place but can be removed by pulling on the
ribbon. Simply lift out the battery and plug in the replacement battery as
shown on the battery diagram. Ensure that both arrows align to the same side.
Do not apply excessive force. Re-insert the battery into the unit connectorfirst and replace the cover.
Battery
Push
down and
slide off
Cover
The battery is customized for the Liberty Solo and should not be substituted
with any other type.
When carrying batteries outside the unit, be careful not to allow the connector
to come in contact with any metal object (coins, keys, metal foil, etc.) as it
could cause the battery to short circuit. Don’t dispose of the battery in a fire or
use above 40°C (100°F). The battery is capable of supplying considerable
current under short circuit conditions and this could cause a fire or, in extreme
circumstances, cause the battery to explode.
When storing the Liberty for a period over 1 month, ensure the battery is fully
charged and removed from the unit; otherwise the battery may discharge fully
and become damaged.
Page 13
Rev D EN
Battery Status Indication
information display
To check the battery status at any stage, access the
through the
control settings menu. An icon
, representing the
current battery level will be displayed on the first line. An icon of the unit with
will be displayed if the unit is working on mains power.
its adapter
Maintenance
When the Liberty Solo becomes dirty it can be cleaned with a damp cloth and
mild detergent. Do not use solvents or abrasive cleaning agents as they can
mark the display area. Do not wash the mirror! If dust appears on the image
use the cleaning cloth supplied to carefully clean the mirror of the mouse
camera.
Warranty
Ash Technologies warrants the equipment, when purchased new, to be free from defects in
material and workmanship and will repair or replace at Ash Technologies' discretion, any
equipment which exhibits such defects, provided that the equipment has been operated
under the proper conditions of installation and has not been tampered with by any persons
not authorized by Ash Technologies or its agents and that it is solely serviced by Ash
Technologies or its agents. This warranty shall be voided in the event of damage or abuse
to the unit caused, in the opinion of Ash Technologies or its agents, by general wear and
tear, abuse, neglect, failure to observe stated precautions or by dropping the unit.
Batteries and backlighting are warranted for failure within a period of one year. Pixel
failures, cracks, scratches or similar damage to the display are specifically excluded from
warranty. Non-electrical accessories are specifically excluded from warranty.
In no event shall Ash Technologies, or its agents, be liable for special, indirect, incidental
or consequential damages; the original user's remedies being limited to repair or
replacement.
Ash Technologies makes no other or further warranty, express or implied, including and
warranty of fitness for a specific purpose or warranty of merchantability.
This warranty is valid for a period of TWO YEARS effective from the date of delivery to
the customer.
Depending on the country of sale, the warranty conditions may differ. Contact your
distributor for details.
Page 14
Rev D EN
Specifications
Display unit:
302 x 252 x 62mm, 2.1 kg (11.9”x 9.9”x2.5”, 4 lb 11 oz)
Camera:
110 x 50 x 56mm, 85g (4.3”x2”x2.2”, 3oz)
Power consumption: 15W operating, 35W recharging and operating.
Voltage: 100-240V AC, 50/60Hz.
Input to Liberty: 12V dc center positive 3.5A
Battery:
Custom Ni-MH rechargeable battery
Typical battery life is 1.2 hours but will vary depending
on the backlight brightness.
Screen:
High brightness 12” (30cm) diagonal TFT display. Free
from flicker associated with standard CRT monitors.
Magnification
10x - 18x continuous zoom; (10x - 36x with digital
on internal display: magnification). TextStretch™ mode: 16-26x. Overview
mode: 1x - 10x
Temperature:
Storage: -10°C to +40°C. (15°F to 100°F)
Operating: +5°C to +35°C (40°F to 90°F)
As we strive to constantly improve our products, this information is subject to change without notice.
DECLARATION OF CONFORMITY
We, Ash Technologies Ltd., declare under our sole responsibility that this product, Liberty Solo,
of the brand Ash Technologies to which this declaration relates, is in conformity with the
following standards or other normative documents:
EN 50081-1:1992 CENELEC Generic Emission Standard
Part 1:Residential, commercial and light industry
EN 50082-1:1997 Generic Immunity Standard
Part 1: Residential, commercial and light industry.
EN1441: 1997 Risk analysis Medical devices
following the provisions of EMC directive 89/336/EEC and Low Voltage directive 73/23/EEC.
Signed, for and on behalf of Ash Technologies Ltd,
Alan Johnston,
Engineering Director
Naas, Ireland. November 19, 2002
Page 15
Rev D EN
Important Instructions for Use
The following instructions and warnings must be observed:
• Remove the Liberty Solo and its power supply adapter from the carry case
during use.
• Use only the power supply adapter provided.
• If the Liberty Solo is not going to be used for a period exceeding 1 month,
the battery must be removed.
• Do not use the Liberty Solo in a bathroom, near water or other damp
conditions.
• Do not open the Liberty Solo - there are no user serviceable parts inside and
opening it will invalidate your warranty.
• Do not allow the battery connector to come in contact with metal objects or
serious injury may occur.
• The mouse-camera must be plugged in prior to powering the unit on or the
unit may fail to operate correctly. The Liberty Solo is not designed for use
with two mouse-cameras.
For warranty claims or service during or after warranty period please
contact your distributor.
In the USA, for repair service contact:
Freedom Vision. Tel: 800-961-1334
© Ash Technologies Limited 2002
Ash Technologies Ltd.
B5, M7 Business Park,
Naas, Ireland.
Made in Ireland
+353-45-88 22 12
+353-45-88 22 14
email: [email protected]
web: www.ashtech.ie
Page 16
Rev D EN