1
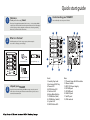
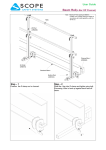
Toll Free: 1-888-865-6888
Tel: 510-226-8368 Fax: 510-226-8968
Email: [email protected]
TAU401
TAU401
L
Linux
www.RackmountMart.com
Quick start guide
© Copyright. Synergy global Technology, Inc. Proudly Assembled in the U.S.A.
Quick start guide
1
Welcome
4
Thank you for choosing TAU401
Understanding your TAU401
Learn and identify each component of TAU401
!
Thank you for buying!RackmountMart TAU401 series , A 4-bay desktop RAID-5
solution for professionals who demand exceptional data protection. Featuring up
to 8TB of capacity, cable-less backplane and universal connectivity, including
FW400/800, eSATA and USB for PC and Mac.
2
2
1
11
What is in the box?
18
3
Carefully unpack your TAU401 storage system, and inventory the
accessories according to your model type.
17
4
16
15
TAU401
14
9
5
Quick Install Guide - Qty 1
10
Hot-swap Disk Trays - Qty 4
6
7
HDD Mounting Hardware - Qty 32
3
Unpack your TAU401
Unpack all components including the HDD mounting screws, key sets and
cables. If you are missing any of the items mentioned above, please contact
at www.rackmountmart.com
8
Front:
1. Security Key Lock
2. Hot-swap HDDs Tray
3. Power LED
4. HDD Active LED
5. Fan Error LED
6. Alarm Mute Button
7. LCM Button (Next)
8. LCM Button (Select)
9. System LED
10. RAID Active LED
12
13
Rear:
11. Thumb Screw for FAN module
12. Power Switch
13. ATX PS2 Power Supply
14. FW 400 port
15. FW 800 port
16. USB 2.0 port
17. eSATA port
18. FAN module
Quick start guide
Disk Installation
5
If your system was purchased with capacity, please skip this section and
immediately go to next section. If your system was purchased without disks,
install each disk into the provided disk trays and fasten using the supplied
hdd screws. Do not use
!! any other mounting screws other than the ones provided
with your system. System or disk damage may occur if using non-approved
mounting hardware.
!
7
Connecting Your TAU401
Your TAU401 can be connected to a Mac or Windows-based workstations through
a choice of small computer interface connections such as FW400, FW800, High!
speed USB2.0 and eSATA.
Hard Disk
Figure 8.
Disk Tray
Figure 1.
Figure 2.
Disk tray - Bottom view
Insert Disk Module
6
After fastening each disk, insert the disk trays in the open disk bay on your
system. For added security your system is equipped with locking
disk bays to prevent !accidental or malicious disk removal.
Gently “press” tray handle to insert HDD
Figure 7.
Do not connect two ports at the same time. Doing so may
cause your TAU401 to function incorrectly. Always select
one interface port at atime.
Quick start guide
Power On
8
After connecting Data (FW400/800, USB, eSATA) cable to your system and host
TAU401
!
On
10
WARNING;!To minimize the chance of
electrical shock, always follow proper
safety rules when working with
electrical materials.
Off
!
Figure 11.
9
TAU401
TAU401
The LCM will have following messages show up.
!
Powering Up
Waiting...
Detecting Disk
Waiting...
Active
-Menu
11
Quick start guide
12
your dealer or visit us online at www.rackmountmart.com
ensureing the connector is inserted securely in your TAU401
3. Check your TAU401 drive presence LEDs, located on the front
panel of your array, if the LEDs are not lit, power down your TAU401
the disk, power-on your TAU401
If the problem persists, please contact www/.RackmountMart.com
13
your dealer or visit us online at www.rackmountmart.com
Your TAU401 features a next generation Oxford FireWire chipset. This chipset offers support
for hard disk capacities up to 2.0TB per disk. However, due to the OS 2TB limitation, Mac OS 10.4
and Windows XP 32-bit do not support capacity over 2.0TB.
The company reserves the right to modify product specifications without prior notice and assumes no responsibility for any error which
may appear in this publication.
All brand names, logo and registered trademarks are properties of their respective owners.
Copyright 2008 Synergy Global Technology Inc. All rights reserved.