1
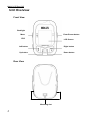
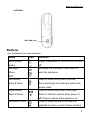
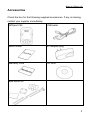
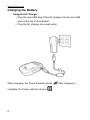
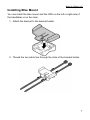
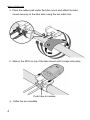
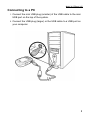
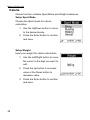
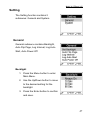
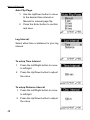
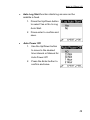
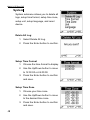
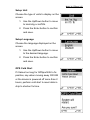
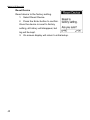
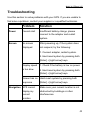
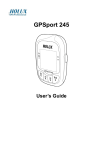
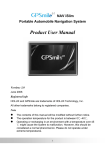
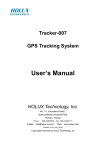
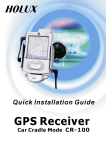
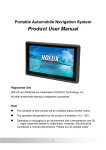
GPSport 245
User’s Guide
Safety Precautions
•
Use the power adapter included with the package, using power adapters
other than the one provided will result in malfunction and could prove
dangerous.
•
Do not use the power adapter in a wet environment. When hands and feet
are wet, do not touch the power adapter.
•
While using the power adaptor ensure that the area is well ventilated. Do
not let paper or other material cover the power adaptor, as this will interfere
with cooling. Do not use the power adaptor whilst it is in a bag.
•
Do not attempt to repair the device. If device is damaged or is in a wet
environment, replace the device immediately.
•
This device is waterproof (meets IPX-6 standard) but not protected against water
immersion.
Warranty Information
The GPSport 245 is warranted to be free from defects in material and functions
for a period of one year from the date of purchase. If there is a product failure of
within this period (under normal conditions), a replacement will be provided at
no charge to the customer.
Copyright Information
No part of this manual, including the products and software described in it, may
be reproduced, transmitted, transcribed, stored in a retrieval system, or
translated into any language in any form or by any mean, without the express
written permission of Holux Technology, Inc.
Copyright© 2008 Holux Technology, Inc. All Rights Reserved.
Federal Communications Commission (FCC)
Statement
This equipment has been tested and found to comply with the limits for a Class
B digital device, pursuant to Part 15 of the FCC Rules. These limits are
designed to provide reasonable protection against harmful interference in a
residential installation. This equipment generates, uses and can radiate radio
frequency energy and, if not installed and used in accordance with the
instructions, may cause harmful interference to radio communications.
However, there is no guarantee that interference will not occur in a particular
installation. If this equipment does cause harmful interference to radio or
television reception, which can be determined by turning the equipment off and
on, the user is encouraged to try to correct the interference by one or more of
the following measures:
•
Reorient or relocate the receiving antenna.
•
Increase the separation between the equipment and receiver.
•
Connect the equipment into an outlet on a circuit different from that to
which the receiver is connected.
•
Consult the dealer or an experienced radio/TV technician for help.
CAUTION
Any changes or modifications not expressly approved by the grantee of this
device could void the user's authority to operate this equipment.
This device complies with Part 15 of the FCC Rules. Operation is subject to the
following two conditions: (1) This device may not cause harmful interference,
and (2) this device must accept any interference received, including interference
that may cause undesired operation.
RF Exposure Warning
This equipment must be installed and operated in accordance with provided
instructions and the antenna(s) used for this transmitter must be installed to
provide a separation distance of at least 20 cm from all persons and must not be
co-located or operated in conjunction with any other antenna or transmitter.
End-users and installers must be provided with antenna installation instructions
and transmitter operating conditions for satisfying RF exposure compliance.
Table of Contents
GETTING STARTED .............................................................................1
FEATURES ............................................................................................1
BUTTONS..............................................................................................3
ACCESSORIES ......................................................................................5
CHARGING THE BATTERY ......................................................................6
Using the AC Charger ......................................................................6
INSTALLING BIKE MOUNT .......................................................................7
CONNECTING TO A PC...........................................................................9
DRIVER INSTALLATION .........................................................................10
USING THE GPS.................................................................................13
TURNING ON THE SYSTEM ...................................................................13
TURNING OFF THE SYSTEM .................................................................13
MENU .................................................................................................13
ON SCREEN DISPLAY ...........................................................................13
STATUS ICONS ....................................................................................16
FUNCTIONS AND OPERATIONS....................................................... 18
INITIAL SETUP .....................................................................................18
QUICK SETUP .....................................................................................21
HISTORY.............................................................................................22
ALERT ................................................................................................24
CALORIE.............................................................................................26
SETTING .............................................................................................27
General ..........................................................................................27
System ...........................................................................................29
TROUBLESHOOTING ........................................................................33
SPECIFICATIONS ...............................................................................36
HOLUX GPSport 245
Getting Started
Congratulations on purchasing the GPSport 245. The GPSport 245 is a
compact, lightweight device with GPS finder and calorie calculation
designed for sporting use.
Features
•
GPS positioning
•
Auto flip page
•
Auto power off
•
Support Finder
•
Speed meter that simulates an analog meter
•
3 Sport modes for calorie calculation
•
Auto Log function starts log as soon as the satellite signal is fixed
•
One touch POI recording
•
Multi-language support
•
Support both metric and imperial unit
•
Support time zone setting
•
Support both 12:00 and 24:00 time format
1
HOLUX GPSport 245
Unit Overview
Front View
Backlight
Enter/Power button
Menu
ESC
LCD Screen
Left button
Right button
Up button
Down button
Rear View
Mounting slot
2
HOLUX GPSport 245
Left View
Mini USB Port
Buttons
Use the Buttons for basic functions.
Name
Icon
Function
Enter/Power
Inputs commands or turns the unit on and
button
off.
Backlight
Activates the backlight, main menu or
Menu
exits the submenu.
ESC
Left button/
Press to move the cursor to the left.
Save & Clear
Save track logs into history & clear main
screen data.
Right button/
Press to move the cursor to the right.
Start & Pause
Press to start the device when power is
off; Press to pause when power is on.
Up button/Finder
Press to move up within the menu to
highlight an item or enter Finder function.
3
HOLUX GPSport 245
Down
Press to move down within the menu to
button/page
highlight an item or flip pages to display
navigation information.
4
HOLUX GPSport 245
Accessories
Check the box for the following supplied accessories. If any is missing,
contact your supplier immediately.
GPSport 245
USB cable
Quick Guide
AC adapter plug
Warranty Card
CD Rom
Bike mount kit
5
HOLUX GPSport 245
Charging the Battery
Using the AC Charger
1.
Plug the mini USB plug of the AC charger into the mini USB
port on the top of the handset.
2.
Plug the AC charger into a wall outlet.
When charging, the Power indicator shows
complete, the Power indicator shows
6
.
. After charging is
HOLUX GPSport 245
Installing Bike Mount
You can install the bike mount and the GPS on the left or right side of
the handlebar or on the stem.
1. Attach the bracket to the bracket holder.
2. Thread the two cable ties through the slots of the bracket holder.
7
HOLUX GPSport 245
3. Place the rubber pad under the bike mount and attach the bike
mount securely to the bike stem using the two cable ties.
4. Slide in the GPS on top of the bike mount until it snaps into place.
Push here to release
※ Cable ties are reusable
8
HOLUX GPSport 245
Connecting to a PC
1.
Connect the mini USB plug (smaller) of the USB cable to the mini
USB port on the top of the system.
2.
Connect the USB plug (larger) or the USB cable to a USB port on
your computer.
9
HOLUX GPSport 245
Driver installation
1. Insert the provided installation CD into the computer’s CD drive.
The introductory screen appears automatically. If the screen does
not appear, open the Autorun.exe file on the CD.
2. Click Next to begin the installation. The License Agreement screen
opens.
3. Read the agreement, click I accept the terms of the license
agreement, then click Next. The Destination Folder screen opens.
10
HOLUX GPSport 245
4. To install the driver in the default location, click Next. The Ready to
Install the Program screen opens. Or, to change the location, click
Change, type the location, then click Next. The Ready to Install the
Program screen opens.
5. Click Install to continue installation. The Driver Installer screen
opens.
11
HOLUX GPSport 245
6.
Click Install to start driver installation or click Change Install
Location to change installation folder.
7. Installation is done. Click OK to continue.
8.
12
Click Finish to exit the wizard.
HOLUX GPSport 245
Using the GPS
Turning on the System
Press and hold the Power button until the opening screen appears on
the LCD screen.
Turning off the System
Press the Power button until the LCD screen turns off.
Menu
This section explains how to open and
navigate the menu. Press the Menu
button to open or exit the menu.
Main Menu: the Main Menu consists of 5
options. Use the Up/Down button to
move to the option and press Enter to
enter the submenu.
Submenu: press the arrow button to move
up, right, down, or left within the menu to
select an item or adjust an item and press
Enter to accept the selected item.
On screen display
The on-screen display changes to show
different navigation information when you
flip the pages by pressing the page
button or by enabling the automatic flip
function.
13
HOLUX GPSport 245
Meter: displays speed meter that simulates an analog meter that
are commonly seen in most vehicles.
Speed: displays your maximum and
average speed.
Distance and time: displays your lap
distance and time.
Altitude: displays altitude variation.
14
HOLUX GPSport 245
Calorie information: displays lap calorie
and today calorie consumed.
Finder Function: press the Finder button
to display the direction and the distance
of your start point.
Users can use the Finder function as a
Geocaching tool.
1. Enter the Finder function by press the
up button.
2. Enter the coordinates and hit enter to set the point.
3. The Finder shows you the distance and direction of the
hidden geocache.
Press the
want to find.
to enter a location you
15
HOLUX GPSport 245
Press
to set up a new point.
Status icons
Status icons show sport mode, auto flip page, POI, backlight,
satellite status, memory mode, and battery information.
•
Sport mode for calorie calculation. It also indicates that Log is started.
When sport mode icon disappeared, the Log is stopped or paused.
Sport mode icons:
indicates Biking mode
indicates Running mode
indicates Walking mode
Vehicle mode
POI icon:
indicates that POI has been recorded; it will be on for five seconds
and then disappear
Backlight icon:
indicates backlight switch is on
Satellite mode icons:
16
HOLUX GPSport 245
indicates satellites is fixed
indicates the device is trying to fix the satellites
Memory status icons:
Memory mode: indicates the memory is in overwrite mode.
Battery status icons:
indicates battery is in full status
indicates battery is in charging status
. Indicates battery is done charging
Battery low message appears every 5 minutes. Press any key to
disable the alert.
17
HOLUX GPSport 245
Functions and Operations
Read this section to learn how to set up and use the GPS.
Initial setup
After you reset the device or turn it on for the first time, the initial
setup menu will appear on the screen. Follow the step-by-step
procedures to setup the common settings in the device:
Language, Unit, Time format, Time zone, Auto flip page, Weight,
and Sport mode.
Setup Language
Choose the language displayed on the
screen.
1. Use the Up/Down button to move
to the desired language.
2. Press the Enter button to confirm
and save.
Setup Unit
Choose the type of units to display on the
screen.
1. Use the Up/Down button to move
to km/m/kg or mi/ft/lb.
2. Press the Enter button to confirm
and save.
18
HOLUX GPSport 245
Setup Time Format
Choose the time format to display.
1. Use the Up/Down button to move
to 12:00:00 or 24:00:00.
2. Press the Enter button to confirm
and save.
Setup Time Zone
Choose your time zone.
1. Use the Up/Down button to move
to the desired time zone.
2. Press the Enter button to confirm
and save.
Setup Auto Flip Page
Choose the specified time to change the
display among meter, speed, distance,
time, altitude, and calorie information.
1. Use the Up/Down button to move
to the desired time interval or
Manual for manual page flip.
2. Press the Enter button to confirm
and save.
19
HOLUX GPSport 245
Setup Weight
Input your weight for calorie calculation.
1. Use the Left/Right button to move
the cursor to the digit you want to
edit.
2. Press the Up button to increase
value or the Down button to
decrease value.
3. Press the Enter button to confirm and save.
Setup Sport Mode
Choose the Sport mode for calorie
calculation.
1. Use the Up/Down button to move
to the desired mode.
2. Press the Enter button to confirm
and save.
Sport mode also indicates that Log is started. When sport mode
icon disappeared, the Log is paused or stopped.
Biking mode: calculate calories burned when bike riding.
Running mode: calculate calories burned when running.
Walking mode: calculate calories burned when walking.
20
HOLUX GPSport 245
Vehicle mode: calorie calculation is disabled in Vehicle
mode.
Quick Setup
User-friendly Quick setup function allows you to quickly setup
most common settings. Press the Menu button to enter Main
Menu and choose Quick Setup to begin setup. Q1. Sport Mode
setup appears when you begin.
Sport Mode:
1. Use the Up/Down button to move
to the desired mode.
2. Press the Enter button to confirm
and save.
3. Q2. Backlight setup appears.
Backlight:
1. Use the Up/Down button to move
to the desired setting for the
backlight.
2. Press the Enter button to confirm
and save.
3. Q3. Weight setup appears.
21
HOLUX GPSport 245
Weight:
1. Use the Left/Right button to move
the cursor to the digit you want to
edit.
2. Press the Up button to increase
value or the Down button to
decrease value.
3. Press the Enter button to confirm
and save.
4. Quick setup is now completed.
Press Enter to start.
History
History function allows you to review log status for distance, time,
maximum speed, average speed, calorie burned, and altitude
variation. Maximum 10 records can be saved in device memory.
To review history:
1. Press the Menu button to enter
Main Menu.
2. Use the Up/Down (c/d) button to
view the log change by day.
3. Press the Enter (f) button to view
next record.
22
HOLUX GPSport 245
indicates which record the user is
currently viewing.
Maximum 10 records can be saved in
device memory.
23
HOLUX GPSport 245
Alert
The Alert function can be set for time,
speed, and distance. The asterisk on the
right side indicates this option has been
set.
To set alerts:
1. Press the Menu button to enter
Main Menu.
2. Use the Up/Down button to move to Alert.
3. Press the Enter button to enter Alert submenu.
4. Select Time, Speed, or Distance to open submenu.
To setup Time Alert:
i.
Press the Left/Right button to
move to left/right.
ii. Press the Up/Down button to
adjust the value.
To setup Speed Alert:
i.
Press the Left/Right button to
move to left/right.
ii. Press the Up/Down button to
adjust the value.
24
HOLUX GPSport 245
To setup Distance Alert:
i.
Press the Left/Right button to
move to left/right.
ii. Press the Up/Down button to
adjust the value.
5. Press the Enter button to confirm setting and return to
the Alert submenu.
The following indicators will appear on the message bar:
•
(appears only when the pre-determined time is due)
•
(appears only when the pre-determined distance is due)
•
(appears only when the pre-determined speed is due)
You can press any key to disable the message.
You may also reset alert by selecting Reset Alert from the Alert
submenu:
1. Select Reset Alert.
2. Press the Enter button to confirm.
25
HOLUX GPSport 245
Calorie
Calorie function contains Sport Mode and Weight submenus.
Setup Sport Mode
Choose the Sport mode for calorie
calculation.
1. Use the Up/Down button to move
to the desired mode.
2. Press the Enter button to confirm
and save.
Setup Weight
Input your weight for calorie calculation.
1. Use the Left/Right button to move
the cursor to the digit you want to
edit.
2. Press the Up button to increase
value or the Down button to
decrease value.
3. Press the Enter button to confirm
and save.
26
HOLUX GPSport 245
Setting
The Setting function contains 2
submenus: General and System.
General
General submenu contains Backlight,
Auto Flip Page, Log Interval, Log Auto
Start, Auto Power Off.
Backlight:
1. Press the Menu button to enter
Main Menu.
2. Use the Up/Down button to move
to the desired setting for the
backlight.
3. Press the Enter button to confirm
and save.
27
HOLUX GPSport 245
Auto Flip Page:
1. Use the Up/Down button to move
to the desired time interval or
Manual for manual page flip.
2. Press the Enter button to confirm
and save.
Log Interval:
Select either time or distance for your log
interval.
To setup Time Interval:
1. Press the Left/Right button to move
to left/right.
2. Press the Up/Down button to adjust
the value.
To setup Distance Interval:
1. Press the Left/Right button to move
to left/right.
2. Press the Up/Down button to adjust
the value.
28
HOLUX GPSport 245
•
Auto Log Start function starts log as soon as the
satellite is fixed.
1. Press the Up/Down button
to select Yes or No to Log
Auto Start.
2. Press enter to confirm and
save.
•
Auto Power Off
1. Use the Up/Down button
to move to the desired
time interval or Manual for
Auto Power Off.
2. Press the Enter button to
confirm and save.
29
HOLUX GPSport 245
System
System submenu allows you to delete all
logs, setup time format, setup time zone,
setup unit, setup language, and reset
device.
Delete All Log:
1. Select Delete All Log.
2. Press the Enter button to confirm.
Setup Time Format
1. Choose the time format to display.
2. Use the Up/Down button to move
to 12:00:00 or 24:00:00.
3. Press the Enter button to confirm
and save.
Setup Time Zone
1. Choose your time zone.
2. Use the Up/Down button to move
to the desired time zone.
3. Press the Enter button to confirm
and save.
30
HOLUX GPSport 245
Setup Unit
Choose the type of units to display on the
screen.
1. Use the Up/Down button to move
to km/m/kg or mi/ft/lb.
2. Press the Enter button to confirm
and save.
Setup Language
Choose the language displayed on the
screen.
1. Use the Up/Down button to move
to the desired language.
2. Press the Enter button to confirm
and save.
GPS Cold Start
If it takes too long for GPSport245 to fix
position, say when moving away 300 KM
or the device is powered off more than 2
hours; perform cold start to reset data in
chip to shorten fix time.
31
HOLUX GPSport 245
Reset Device
Reset device to the factory setting.
1. Select Reset Device.
2. Press the Enter button to confirm.
Once the device is reset to factory
setting, all history will disappear, but
log will be kept.
3. On screen display will return to initial setup.
32
HOLUX GPSport 245
Troubleshooting
Use this section to solve problems with your GPS. If you are unable to
find solve a problem, contact your supplier or a qualified technician.
Power
Problem
Solution
Cannot start
Insufficient battery charge, please
connect to the adapter and restart
system.
Screen
No screen
After powering up, if the system does
displayed
not respond, try the following:
1. Connect adapter, restart system.
2. Hard reset system by pressing both
[Enter] + [right arrow] keys.
Display speed
is too slow
1. Check if the battery is low on power.
2. Hard reset system by pressing both
[Enter] + [right arrow] keys.
Screen has no Hard reset system by pressing both
response
Navigation GPS cannot
[Enter] + [right arrow] keys.
Make sure your current location is not
display my
obstructed by buildings or other
current
interferences.
location
33
HOLUX GPSport 245
Normal Care and Maintenance
To ensure the unit’s normal operation and extended life span, please
note the following while using and storing:
Keep dry
This product is not waterproof. If it comes into contact with water
spray or is submerged it will seriously damage the components,
resulting in irreversible damage.
Do not drop the unit
If violently impacted or shocked, serious damage may be caused.
Avoid sudden temperature changes
Condensation may occur when entering a warm room on a cold day.
To prevent condensation from damaging the unit, please place into
an airtight plastic bag before sudden temperature changes.
Keep away from strong magnetic fields
When using or storing, please keep away from strong
electromagnetic/radioactive or magnetic field equipment.
Operating temperature
The products operating temperature is between 0°C ~ 40°C; please
do not operate under extreme temperatures.
Avoid exposure to sunlight
Please avoid long periods of sunlight or high temperature exposure.
Using the stylus
The LCD screen is easily scratched; please use only the stylus for
operation. Do not use any other sharp objects on the screen to avoid
34
HOLUX GPSport 245
damaging the LCD screen.
Cleaning the screen
Using a soft clean cloth to wipe the screen is recommended; do not
use ordinary tissue to wipe the screen.
Do not disassemble
Please do not disassemble the product, this may void the warranty
and damage the unit.
Storage
When the product is not being used for a long period, store the
device in a cool and dry place. For long-term storage, keeping the
unit in a dry box is recommended.
Please do not keep the product in the following environments:
1. Unventilated and humid locations.
2. In a car window that is exposed to excessive amounts of sunlight.
3. In an environment where humidity is over 90%.
35
HOLUX GPSport 245
Specifications
Chipset: MTK 3318
Cold start: 36 sec
GPS chip
Warm start: 33 sec
Hot start: 1 sec
Update Rate: <1 second continuously
Dimension
81.7x 54x 22 mm
Weight
<72g
Battery
Rechargeable 1050 mAh Li-lon Battery
Key
Six buttons: Menu/ESC, Left, Up, Down,
Right, Enter/Power
Antenna
Built-in patch antenna
IO interface
Mini-USB
Display
High-contrast electro luminescent back light
display 4 level gray scale LCD.
Size : 33.5 × 33.5 mm, 1.8"
Resolution : 128 ×128 pixels
Environment
Operating Temp: -10℃ to 60℃
Temperature
Storage Temp: -20℃ to 70℃
Language
Support
Waterproof
36
Multi-Language (English/French/ German/
Spain/Italian/Dutch/Portuguese/Traditional
Chinese/ Simplified Chinese/Japanese)
IPX-6