1
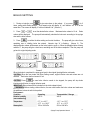
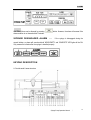
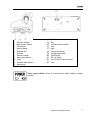
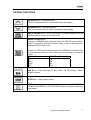
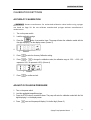
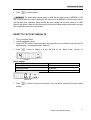
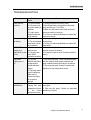
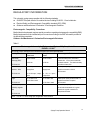
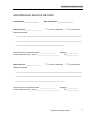
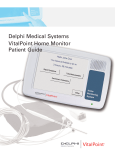
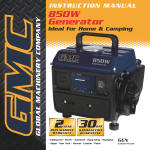
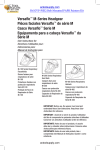
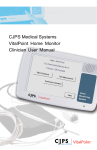
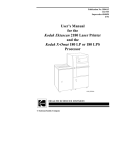
Versaflo™ 300
Micro-Infusion Syringe Pump
User’s Manual
For Veterinary Use Only
Midmark Corporation
60 Vista Drive, Box 286
Versailles, OH 45380-0286
Customer Service and Technical Service
TEL: 1-800-MIDMARK (1-800-643-6275)
www.midmark.com
GENERAL INFORMATION
Versaflo™ 300 Micro-Infusion Syringe Pump Features
9 Capability to Load 100ml Syringe
With 100ml syringe, you can treat larger animal with larger volumes continuously without changing
syringes
9 Broad Infusion Applications
General medication, Analgesics, PCA therapy, parenteral and eternal nutrition
9 Micro to Macro Infusion
Delivers precise infusion at rates from 0.1 to 1500 ml/hr
9 Excellent Linearity Performance
Continuously linear infusion at both low and high infusion rate for the best even medication
treatment
9 Alarms/Alert Light
6 alarms using both light and sound
Syringe Pump Operation Manual
∣
2
GENERAL INFORMATION
TABLE OF CONTENTS
GENERAL INFORMATION ........................................................................................................................... 4
SIGNS AND SYMBOLS......................................................................................................................... 4
PRODUCT FEATURES......................................................................................................................... 5
FIGURES AND SIGNS .......................................................................................................................... 6
PRECAUTIONS & NOTES ................................................................................................................... 6
SPECIFICATIONS........................................................................................................................................ 11
PREPARING FOR THE INFUSION........................................................................................................... 12
STARTING AN INFUSION .......................................................................................................................... 13
PURGE FUNCTION..................................................................................................................................... 17
BOLUS SETTING......................................................................................................................................... 18
ALARMS ........................................................................................................................................................ 19
OCCLUSION......................................................................................................................................... 19
COMPLETE........................................................................................................................................... 19
LOW BATTERY .................................................................................................................................... 19
NEAR EMPTY....................................................................................................................................... 19
MALFUNCTION.................................................................................................................................... 19
SYRINGE DISENGAGED ALARM .................................................................................................... 20
KEYPAD DESCRIPTION .................................................................................................................... 20
KEYPAD FUNCTIONS ........................................................................................................................ 22
CALIBRATION SETTINGS ......................................................................................................................... 23
ACCURACY CALIBRATION ............................................................................................................... 23
ADJUST OCCLUSION PRESSURE ................................................................................................. 23
ADJUST ALARM VOLUME................................................................................................................. 24
RESET TO FACTORY DEFAULTS.................................................................................................... 25
TROUBLESHOOTING ................................................................................................................................ 26
INFUSION ACCURACY OF THE SYSTEM ............................................................................................. 27
REGULATORY INFORMATION................................................................................................................. 28
ACCESSORIES............................................................................................................................................ 29
PACKAGE, TRANSPORTATION AND STORAGE.................................................................................. 30
MAINTENANCE............................................................................................................................................ 31
MAINTENANCE SERVICE RECORD....................................................................................................... 32
LIMITED WARRANTY ................................................................................................................................. 34
Syringe Pump Operation Manual
∣
3
GENERAL INFORMATION
GENERAL INFORMATION
This Syringe Pump is a conventional device for specialty practices, universities, and general practices. A
wide variety of clinical departments, such as internal medicine, cardiology, and oncology require being
equipped with this type of syringe pump. This pump is mainly used for intravenous/arterial infusion,
anesthetic injection, IV antibiotics, cancer therapy, etc.
This Micro-Infusion Syringe Pump offers a reliable alternative for fluid control, especially suitable for
long-term, micro fluid and precise injections.
SIGNS AND SYMBOLS
HEADINGS USED IN THIS MANUAL
THIS GUIDE CONTAINS WARNINGS, CAUTIONS, AND IMPORTANT INFORMATION TO HELP CALL
YOUR ATTENTION TO THE MOST IMPORTANT SAFETY AND OPERATIONAL ASPECTS OF THE
PUMP. TO HELP IDENTIFY THESE ITEMS WHEN THEY OCCUR IN THE TEXT, THEY ARE SHOWN
USING THE FOLLOWING HEADINGS:
WARNING
STATEMENTS THAT DESCRIBE SERIOUS ADVERSE REACTIONS AND POTENTIAL SAFETY
HAZARDS.
CAUTION
STATEMENTS THAT CALL ATTENTION TO INFORMATION REGARDING
ANY SPECIAL CARE TO BE EXERCISED BY THE PRACTITIONER
FOR THE SAFE AND EFFECTIVE USE OF THE DEVICE.
IMPORTANT
STATEMENTS THAT CALL ATTENTION TO ADDITIONAL SIGNIFICANT INFORMATION ABOUT THE
DEVICE OR A PROCEDURE.
Syringe Pump Operation Manual
∣
4
GENERAL INFORMATION
PRODUCT FEATURES
Category:
Type of Protection Against Electric Shock:
Type I Internal Power Supplied
Type CF
Degree of Protection Against Ingress of
Fluids
Drip-Proof IPX1
Mode of Operation:
Continuous operation
Power Supply:
AC100-240V or DC12V or
Internal rechargeable battery
Application:
Single use syringe size 10 ml, 20/30 ml.
50/60 ml, 100 ml
Power Consumption:
Rated Power 25VA ±25%
(1) This product controls the flow rate of an injection. The rate is not affected by intravenous/artery
pressure or by thickness of the fluid.
(2) This product performs a self-diagnose when turn on the power.
(3) This pump automatically recognizes & calibrate for B-D, MONOJECT, Terumo® BRAND SYRINGES,
For complete list of authorized syringes see Page 29
(4) Wide range of injection rate: with 100 ml syringe, maximum flow rate setting is 1500 ml/hr.
(5) Settings of last injection are memorized even after pump is power-off.
(6) When unitary error happens, pump stops immediately. No siphon happens. The volume infused at the
responding interval between error happening and pump stopping is less than 15 ml.
(7) The product is DC/AC power supplied with rechargeable internal batteries. Product is able to charge
the batteries and to operate at the same time. Power sources are:
a. AC input: 100-240AC,50/60Hz,25VA;
b. DC input: 12VDC,1.6A;
c. Battery power: 12VDC,1200mA
In event of losing AC power, product will switch to battery power automatically.
Syringe Pump Operation Manual
∣
5
GENERAL INFORMATION
FIGURES AND SIGNS
WARNINGS: Must operate this pump with Pump-Use syringes. Fail to comply will cause
inaccurate infusion result and may harm the patient.
Signs/Symbols
Definitions
Meet MDD 93/42/EEC Requirement and
certified by the notified body 0197
Protection Against Electric Shock: Type CF,
defibrillator proof
IPX1
Protection Against vertically falling water drips
Attention, consult user’s manual
Manufacturer’s information
Product Serial Number
Manufacturing Date
EU Representative
AC Power
DC Power
FUSE:(T 1AL 250V)
Fuse & Fuse Type
I
ON
O
OFF
PRECAUTIONS & NOTES
SAVE THIS MANUAL FOR YOUR FUTURE REFRENCE!
Syringe Pump Operation Manual
∣
6
GENERAL INFORMATION
IMPORTANT: USER SHOULD READ THIS ENTIRE MANUAL BEFORE OPERATING THIS SYRINGE
PUMP. THIS DEVICE SHALL BE OPERATED BY AUTHORIZED PERSONNEL. THE RUNNING
OF THE DEVICE SHALL BE CONSTANTLY SUPERVISED BY AUTHORIZED PERSONNEL.
WARNINGS: CRITICAL EXPLOSION HAZARD! DO NOT USE IN THE PRESENCE OF Inflammable
and explosive materials!
(1) ONLY USE THE 3-CORE AC (MAINS) POWER CORD INCLUDED WITH THIS PUMP. USE OF
ANY OTHER CORD PRESENTS SHOCK OR DEATH HAZARD TO PATIENTS. THE AC MAINS
OUTLET MUST BE PROPERLY GROUNDED (EARTHED) TO PREVENT SHOCK HAZARDS TO
PATIENT. THE MAINS OUTLET AND THE GROUND (EARTH) SHOULD BE TESTED ON A
REGULAR BASIS TO ENSURE PATIENT SAFETY. OPERATE AWAY FROM STRONG MAGNETIC
FIELDS (LARGE EQUIPMENT OR BIG MOTORS).
(2) DO NOT OPERATE THIS DEVICE IN THE PRESENCE OF FLAMMABLE ANESTHETISCS (A
MIXURE OF Air, oxygen, nitrogen oxides.
(3) DO NOT USE A PUMP, SYRINGE, OR ACCESSORY THAT SHOWS ANY SIGN OF DAMAGE.
(4) This pump is not a portable device. To use this pump in a mobile environment, attach the pump
onto an I.V pole with a pole clamp which is included in the accessories.
(5) DO NOT CONNECT THE DEVICE TO THE PATIENT, WHILE PURGE THE TUBING.
(6) BEFORE CONNECTING THE TUBING TO THE PATIENT, THE USER MUST PRIME THE TUBING
TO PREVENT AIR FROM MOVING INTO THE PATIENT.
(7) TO CLEAN THE PUMP, USE A DAMP (NOT WET) CLOTH OR SPONGE. DO NOT IMMERSE
PUMP OR POWER CABLE INTO WATER OR OTHER CLEANING SOLUTIONS.
(8) BEFORE START AN INJECTION, CHECK THE EXTENSION TUBING TO MAKE SURE IT IS
NEATLY PLACED. MAKE SURE THERE IS NO AIR IN THE
SYRINGE AND EXTENSION TUBING. CHECK ALL SETTINGS
ON THE SYRINGE PUMP.
(9) TO AVOID ELECTRIC SHOCK, UNPLUG THE POWER CORD
FROM THE PUMP AND THEN CLEAN THE DEVICE. MUST
NOT SPRAY THE CLEANSER ON THE EXTENSION TUBING OR
THE POWER CORD. DO NOT IMMERSE THE PUMP INTO ANY SOLUTION.
(10) IF THE PACKAGE OF SINGLE USE SYRINGE IS DAMAGED, MUST NOT USE THIS SYRINGE.
(11) USE ONLY AUTHORIZED SYRINGES, SEE PAGE 29. CONTACT MANUFACTURER FOR THE
AUTHORIZED CALIBRATION VALUE BEFORE USING SYRINGES NOT LISTED ON PAGE 29. DO
NOT CALIBRATE UNAUTHORIZED SYRINGES WITHOUT MANUFACTURERS AUTHORIZATION
PRECAUTIONS:
(1) TO AVOID A MALFUNCTION CAUSED BY ELECTROMAGNETISM DISTURBANCE, PUMP SHALL
OPERATE AWAY FROM DEVICES SUCH AS ELECTROCOAGULATOR AND DEFIBRILLATOR
Syringe Pump Operation Manual
∣
7
GENERAL INFORMATION
WHICH MAY CREATE A STRONG ELECTROMAGNETIC FIELD. DURING OPERATION,
PLEASE NOTICE THAT THE PUMP:
a. MUST KEEP ENOUGH DISTANCE FROM ELECTROCOAGULATOR AND/OR
DEFIBRILLATOR;
b. DO NOT SHARE SAME POWER OUTLET WITH ELECTROCOAGULATOR AND/OR
DEFIBRILLATOR;
c. MUST OPERATE UNDER CONTINUOUS SUPERVISION;
d. DO NOT USE THE PUMP IN THE MRI ROOM OR HIGH PRESSURE ROOM THAT CREATES
A STRONG ELECTROMAGNETIC FIELD;
e. DO NOT USE CELLULAR PHONES, RADIOS, AND DEVICES WHICH MAY EMIT
HIGH-FREQUENCY SIGNAL.
KEEP THE SYRINGE
PUMP AWAY FROM THE MENTIONED DEVICES;
(2) USE ONLY AUTHORIZED SYRINGES, SEE PAGE
29. CONTACT MANUFACTURER FOR THE AUTHORIZED
CALIBRATION VALUE BEFORE USING SYRINGES NOT
LISTED ON PAGE 29. DO NOT CALIBRATE UNAUTHORIZED
SYRINGES WITHOUT MANUFACTURERS AUTHORIZATION
(3) TO STORE THE PUMP, MAKE SURE THE BATTERIES ARE FULLY CHARGED BEFORE
STORAGE. BATTERIES MAY BE DAMAGED IF LEAVE UNCHARGED FOR A LONG PERIOD
OF TIME;
(4) USE THE PUMP AFTER MIN. 3 MONTHS OF STORAGE, THIS PUMP MUST BE TESTED AND
CALIBRATED FOR ACCURACY, BATTERY POWER AND ALL ALARM FUNCTIONS. ENSURE
THE BATTERIES ARE FULLY CHARGED BEFORE USE;
(5) AVOID CONNECT TUBING OF PUMP-CONTROLLED SYRINGE WITH TUBING OF
MANUAL-CONTROLLED SYRINGE. IT MAY AFFECT THE INFUSION ACCURACY AND
ACTIVATE FALSE ALARMS. THE SYRINGE PUMP WILL GENERATE A PRESSURE DRIVING
MEDICATION INTO THE PATIENT, BUT THE PUMP CAN NOT DETECT THE DAMAGE OF
SYRINGE CAUSED BY OVERPRESSURE, E.G. LEAKING IN THE TUBING, DISENGAGEMENT
OF SYRINGE AND EXTENSION TUBING. DURING THE OPERATION, CONSTANTLY CHECK
FOR THE DAMAGE OF TUBING SYSTEM;
(6) WHILE PUMP IS USING AC POWER, PLEASE ENSURE THE POWER OUTLET IS PROPERLY
GROUNDED;
(7) ALWAYS OPERATE THE PUMP WITH AC POWER CONNECTED, UNLESS AC POWER IS NOT
AVAILABLE. WHENEVER AC POWER IS AVAILABLE, CONNECT THE PUMP TO AN AC
POWER SOURCE AND CHARGE THE BATTERY. IN THIS WAY, BATTERY POWER CAN BE
WELL PRESERVED FOR EMERGENCY USE;
(8) DISPOSABLE SYRINGE USED IN THE PUMP SHOULD COMPLY WITH THE GOVERNMENT
REGULATIONS AND HAS TO BE DESIGNED FOR PUMP-USE;
(9) USE AND CHANGE SYRINGES AND EXTENSION TUBING ACCORDING TO HOSPITAL
REGULATIONS.
SINGLE USE SYRINGE AND TUBING SHALL BE STORED IN A
CENTRALIZED STORAGE AFTER USE, AND BE DISPOSED ACCORDING TO REGULATIONS
OF DISPOSAL OF MEDICAL WASTE;
(10) THE CIRCUIT DIAGRAM AND PARTS LIST WILL ONLY BE PROVIDED TO MANUFACTURER
ASSIGNED TECHNICIANS;
Syringe Pump Operation Manual
∣
8
GENERAL INFORMATION
(11) THE PUMP CAN BE USED ON A HORIZONTAL PLATFORM OR ON THE IV STAND WITH THE IV
POLE CLAMP. BEFORE SECURING THE PUMP ON THE IV POLE, PLEASE MAKE SURE THAT
THE IV STAND IS SOLID VERTICALLY AND WON’T FALL WITH THE WEIGHT OF THE PUMP;
(12) TO CHANGE THE FUSE, MUST DISCONNECT THE PUMP
WITH AC POWER;
(13) DURING THE OPERATION, THIS SYRINGE PUMP SHALL
BE CONSTANTLY MONITORED BY MEDICAL PERSONNEL;
(14) THE PUMP WILL GO THROUGH A SELF DIAGNOSTIC
PROGRAM WHEN THE POWER SWITCH IS TURNED ON. IF
AN “ERR” IS SHOWN IN THE DISPLAY, REBOOT THE PUMP.
IF THE ERROR CONDITION STILL EXISTS, DO NOT
CONTINUE OPERATION AND CONTACT DISTRIBUTOR OR MANUFACTURER FOR TECHNICAL
SERVICE IMMEDIATELY;
(15) READ MANUAL OF SYRINGES CAREFULLY BEFORE OPERATING THE SYRINGE. STRICTLY
FOLLOW THE MEDICAL RULES AND REGULATIONS DURING OPERATION;
(16) ONLY AUTHORIZED PERSONNEL SHALL OPERATE THIS SYRINGE PUMP;
(17) LUER LOCK SYRINGES SHOULD ALWAYS BE USED TO ENSURE SECURE CONNECTION OF
THE EXTENSION TUBING;
(18) DO NOT CLEAN, DISINFECT OR STERILIZE ANY PART OF THE PUMP WITH ETHYLENE OXIDE
GAS OR BY AUTOCLAVING. THIS MAY DAMAGE THE PUMP AND WILL VOID THE WARRANTY;
DISINFECT THE PUMP’S EXTERNAL PARTS ONLY, USING APPROVED CLEANSERS OR
DISINFECTANTS;
(19) THESE CHEMICALS MAY DAMAGE THE PUMP’S FRONT PANEL: ACETALDEHYDE, ACETONE,
AMMONIA, BENZENE, HYDROXYTOLUENE, METHYLENE CHLORIDE, OR OZONE. DO NOT
USE
THOSE
CHEMICALS
OR
CLEANSERS
CONTAINING
N-ALKYLDIMETHYLBENZYLAMMONIUM CHLORIDE;
(20) THE USE OF NON-RECOMMENDED ACCESSORIES MAY RESULT IN INCREASED EMC
EMISSIONS OR DECREASED EMC IMMUNITY OF THIS SYRINGE PUMP.
(21) USE THIS PUMP FOR INJECTION OF LIFE-SUSTAINING MEDICATION, MAKE SURE THERE IS
AN EXTRA PUMP STANDBY AND THERE ARE ENOUGH SYRINGES STANDBY;
IMPORTANT:
(1) TO PREVENT ELECTRIC HAZARDS, BEFORE CLEANING, TURN OFF THE PUMP AND THEN
UNPLUG THE POWER CORD FROM THE PUMP. USE 70% ALCOHOL ON A SOFT CLOTH TO
WIPE OUT ANY FLUID ON THE PUMP. KEEP THE PUMP CLEAN AND DO NOT IMMERSE THE
PUMP INTO ANY LIQUID FOR CLEANSING PURPOSE;
(2) BATTERIES USED IN THIS PUMP ARE HYNB-762(AA×10/1200MAH). TO ENSURE THE
PERFORMANCE OF THE SYRINGE PUMP, MAKE SURE THE BATTERIES ARE FULLY
CHARGED BEFORE OPERATE THE PUMP ON BATTERY POWER. ALWAYS CHECK THE
BATTERY PERFORMANCE BEFORE OPERATE ON BATTERY POWER. AFTER A FULL
BATTERY-CHARGING CYCLE, IF THE BATTERIES ARE STILL DEPLETED, CHANGE THE
BATTERY PACK IMMEDIATELY; THE BATTERIES MUST BE CHARGED FOR ONCE AT EVERY 3
MONTHS OF STORAGE. WHILE CONNECT THE PUMP TO AC POWER, MAKE SURE THE
POWER IS PROPERLY GROUNDED. IF AC POWER IS NOT RELIABLE, USE INTERNAL
Syringe Pump Operation Manual
∣
9
GENERAL INFORMATION
BATTERIES TO OPERATE THE PUMP;
(3) TO CHANGE THE FUSE OF THE PUMP, DISCONNECT THE AC POWER;
(4) ONLY AUTHORIZED SERVICE PERSONNEL SHOULD REPAIR THIS PUMP. THE
MANUFACTURER ASSUMES NO RESPONSIBILITY FOR INCIDENTS THAT OCCUR IF THE
PUMP IS NOT REPAIRED ACCORDING TO MANUFACTURER-AUTHORIZED PROCEDURES;
(5) IF THE PUMP FALLS OFF ON THE GROUND, OR HAS IMPACT, IT MAY BE DAMAGED
INTERNALLY WITH NO SIGN OF BROKEN EXTERNALLY. IN SUCH SITUATION, THE PUMP
PERFORMANCE MAY BE AFFECTED.
DO NOT USE THE PUMP, AND CONTACT
AUTHORIZED DISTRIBUTORS FOR SERVICE;
(6) THIS PUMP HAS BUILT-IN BATTERIES. WHEN AC POWER IS DISCONNECTED, THE PUMP
SWITCHES TO BATTERY POWER AUTOMATICALLY. BEFORE INITIALLY POWERING ON THE
PUMP, CHARGE THE BATTERY FOR AT LEAST 8 UNINTERRUPTED HOURS.
Syringe Pump Operation Manual
∣
10
SPECIFICATIONS
SPECIFICATIONS
1. Environmental Temperatures of Operation:
2. Relative Humidity:
3. Atmospheric Pressure:
4. Power Source:
5. Power Consumption:
6. Volume To Be Infused:
7. Compatible Syringe Size:
8. Flow Rate Range:
9. Accuracy:
10. Alarms:
11. Maximum Infusion Pressure:
12. Occlusion Alarm Pressure:
13. Bolus Respond Time and Bolus Rate:
Infusion Rate
Occlusion Alarm Pressure
Low(0.03±0.02 MPa)
Min. 1 ml/h
Mid(0.05±0.02 Mpa)
High(0.07±0.02 Mpa)
Low(0.03±0.02 MPa)
Mid. 5 ml/h
Mid(0.05±0.02 Mpa)
High(0.07±0.02 Mpa)
14. Net Weight:
15. Dimension:
5℃ ~ 40℃ / 41 F – 104 F
Less than 90%
700hPa–1060hPa
(1) AC Input: 100-240AC,50/60Hz,25VA
(2) DC Input: 12VDC,1.6A
No More Than 25 VA
1–999 ml
10ml, 20/30ml, 50/60ml, 100ml
10ml syringe
0.1ml/h-300ml/h;
20/30ml syringe
0.1ml/h-500ml/h;
50/60ml syringe
0.1ml/h-1200ml/h;
100ml syringe
0.1ml/h-1500ml/h
± 5% with syringe
Audible alarms with visual indicators of
"NEAR EMPTY", "COMPLETE", "OCCLUSION",
and "LOW BATT"
Less Than 0.07 Mpa with 50ml syringe
0.03 Mpa – 0.07 Mpa wit 50ml syringe
With 50ml syringe
Respond Time
Bolus Rate
1:45’
0.77ml
3:05’
0.62ml
4:10’
0.50ml
18’
0.70ml
31’
0.61ml
41’
0.63ml
2.5 Kg / 5.5 lbs
335(L)x142(B)x120(H) mm
13” x 5 1/2” x 4 3/4”
Syringe Pump Operation Manual
∣
11
PREPARING FOR THE INFUSION
PREPARING FOR THE INFUSION
1. Keep the pump horizontally before use. The pump can be used either on
horizontal table or on the IV pole with the designated pole clamp
packaged with the pump.
2. Prepare the disposable syringe and extension tube according to its
accompanying instructions. ONLY use syringes and extension tube with a
luer-lock connection. This connection guarantees that the drain will not
slip off due to a rise in pressure during the infusion.
WARNINGS: THIS SYRINGE PUMP HAS BEEN PROGRAMMED TO USE BD PLASTIPAK
SYRINGE BY DEFAULT. ALWAYS CHECK THE ACCURACY CALIBRATION SETTING EVERY TIME
BEFORE USING A NEW/DIFFERENT SIZE/BRAND SYRINGE. USING A NEW/DIFFERENT
SIZE/BRAND SYRINGE WITHOUT CORRECT CALIBRATION SETTING WILL CAUSE INACCURATE
INFUSION RESULT!
。For use in USA, B-D, Monoject, TERUMO brand syringe can be used without calibration.
Syringe Pump Operation Manual
∣
12
STARTING AN INFUSION
STARTING AN INFUSION
WARNINGS: The user must read this manual carefully before first-time use.
1. Plug the power cord into a wall outlet to charge the internal battery. The pump can be used normally
during the charging or use the DC 12V built-in battery power. Under battery operation, charge battery
at least 8 hours before use. A fully charged NEW battery can support continuous running up to 3
hours at a flow rate of 25 ml/hr. If the power cord is unplugged during the operation, the pump will
switch to the built-in battery automatically.
2. Load syringe with medication or desired fluid, then purge the syringe to expel the air. Lift up the
syringe securing bar and rotate 90 degrees counter-clockwise to make it hold the position. Place the
syringe on the top of the pump. Be sure to insert the syringe flange firmly into the flange slot on the
pump firmly so the syringe won’t be able to move during the infusion.
WARNINGS: A loose installation of the syringe will cause inaccurate
infusion result.
3. Press the release button on the plunger driver block and slide the
driver-block into position so that the end of the syringe plunger can be
placed into the slot in the driver block. Make sure the syringe plunger
is properly seated in the plunger driver block.
4. Turn the syringe securing bar 90° clockwise to secure the syringe barrel. Make sure the syringe
barrel is secured so the syringe won’t move during the infusion.
Syringe Pump Operation Manual
∣
13
STARTING AN INFUSION
5. Turn the power switch ON. ON/OFF switch is located on the right side of the pump. When it is
initialized, the pump will go through a Self Diagnostic program. After the pump passes the Self
Diagnostic tests, previous infusion rate setting will appear on the display. The pump is then ready to
be programmed for an infusion.
6. Press and hold the
button to purge air from the syringe and associated extension tube
before connecting to patient.
Syringe Pump Operation Manual
∣
14
STARTING AN INFUSION
IMPORTANT: If the syringe was not installed or not installed properly, the syringe size
indicators will keep flashing. After the syringe was installed, the corresponding LED light
will keep ON indicating the syringe size (e.g. 100ml as below sample)
7. Press
or
to set the desired flow rate. You can also hold the button
or
to accelerate the rate changing.
Flow rate range for different size of syringe:
Syringe Size (ml)
10
20/30
50/60
100
Infusion Rate Range (ml/h)
0.1-300
0.1-500
0.1-1200
0.1-1500
button to start infusion. The
8. Press
to left during infusion.
User can check the infused volume by pressing
led lights will keep rolling from right
button. The ‘ml/h’ LED light will switch to ‘ml’.
Syringe Pump Operation Manual
∣
15
STARTING AN INFUSION
9. To stop an infusion, press
button.
Reason for the failure of the Self Diagnostic program
If the pump fails the start-up/initial Self Diagnostic program, the LED screen will display ‘1111’ indicating
that the pump did not pass the Self Diagnostic program. Stop using the pump until the it is serviced by
authorized personnel.
WARNINGS: If the pump’s LOW BATT alarm is ON after the pump is turned on, the user must connect
the pump to/into an AC power outlet immediately. DO NOT use the pump if the LOW BATT alarm is ON.
The pump may stop during the infusion if the LOW BATT alarm is ON after the pump was turned on.
Syringe Pump Operation Manual
∣
16
PURGE FUNCTION
PURGE FUNCTION
WARNINGS:
The extension line must be disconnected or clamped before removing the syringe to prevent free flow to
the patient. The user must purge the syringe to expel the air completely from the syringe and the
associated tubing every time before connecting to the patient. Failure to do so may cause the patient‘s
blood to drain backward at a low rate.
WARNING: Do not remove a syringe from the pump while connected to a patient.
To purge the syringe, stop the pump first if the pump is running. Hold the
or fluid from the syringe.
button to expel the air
IMPORTANT: Depending on the syringe size, the pump will purge the syringe at different rates for
different size of syringe:
Syringe Size (ml)
10
20/30
50/60
100
BOLUS/Purge Rate (ml/h)
240
400
960
1200
Syringe Pump Operation Manual
∣
17
BOLUS SETTING
BOLUS SETTING
1. During an injection, use
to give extra dose to the patient. If you press
for 2
times, pump enters Bolus settings. First numeric sign will display “b”, unit indicator “ml” is on at the
same time./ The screen will display “b” with unit indicator “ml”. (Screen 1)
2. Press
or
to set the desired bolus volume.
Maximum bolus volume is 10 ml. Bolus
volume will be displayed. The pump will automatically calculate the bolus rate according to the syringe
size and the bolus volume.
3. Press
to confirm the bolus setting and to start the bolus. The pump will give a short buzz,
reminding user of initialing bolus has started. Numeric sign “b” is flashing. (Screen 2) The
displayed bolus volume will decrease as the bolus injection goes on. When the displayed bolus volume
reaches “0”, the pump will give a short buzz, reminding user of the bolus completion. Then the pump will
go back to original injecting mode.
Screen 1
Screen 2
When the bolus is completed, the pump goes back to the original injecting/infusion rate/mode.
CAUTION: When the user enters the Bolus Setting screen, original infusion rate and volume are not
affected. Each bolus shall not exceed 10 ml.
CAUTION: Press
in case bolus infusion needs to be stopped; the pump will stop bolus
injection and will return to original infusion mode.
IMPORTANT: Bolus volume will be included into the total volume infused.
WARNINGS: Before starting a bolus infusion, the user shall confirm the bolus volume and make sure
the additional volume is safe for the patient.
Environment :
Condition
Operating
Transportation / Storage
Relative humidity
≤90 %
≤93 %
(non-condensing)
Temperature
5℃ to + 40℃
-10℃ to + 55℃
41℉ to + 104℉
14℉ to + 131℉
Atmospheric
700 to 1060 hPa
500 to 1060 hPa
Syringe Pump Operation Manual
∣
18
ALARMS
ALARMS
OCCLUSION ——
When an occlusion occurs, the infusion stops. Press MUTE button to silence
the alarm buzzer. User can only resume the after the alarm condition is cleared.
COMPLETE ——
When an infusion is completed, the operation stops and audible and visual
alarms are activated. Press MUTE button to silence the alarm buzzer.
LOW BATTERY—— Audible and visual alarms are activated if the battery runs low. In such
situation, the pump should be connected to an AC or DC power supply immediately to charge the battery.
The pump will continue to operate while recharging the battery. The LOW BATT alarm will keep 30
minutes if pump wasn’t not plugged in the power supply/will remain activated during 30 minutes if the
pump is not plugged into a power outlet. Pump will stop if the battery will be depleted in 3 minutes.
NEAR EMPTY—— When there is approximately 5 ml of medication left, an audible and visual
alarm is activated. Press the MUTE button to silence the alarm buzzer.
MALFUNCTION —— If the pump’s LED screen displays ‘2222’ during the infusion, it’s indicating
that the pump has internal mechanism problem.
serviced by authorized personnel.
Stop using the pump immediately until the it is
Syringe Pump Operation Manual
∣
19
ALARMS
CAUTION: Alarm can be silenced by pressing
alarm condition is not cleared within 2 minutes.
button. However, the alarm will resume if the
SYRINGE DISENGAGED ALARM ——
If the syringe is disengaged during the
normal infusion, an alarm will sound and both ’NEAR EMPTY’ and ‘COMPLETE’ LED lights will be ON.
Only resume the infusion after the syringe is installed properly.
KEYPAD DESCRIPTION
A. Control panel & pump structure
Syringe Pump Operation Manual
∣
20
ALARMS
1
2
3
4
5
6
7
8
9
10
11
12
Syringe size indicator
AC power indicator
Battery power indicator
Increase rate
Numeric display
Decrease rate
Flow rate
Delivered volume
Near empty indicator
Check
Complete alarm indicator
Rapid purge
13
14
15
16
17
18
19
20
21
22
23
Occlusion alarm indicator
Run
Low battery alarm indicator
Stop
Mute
Syringe securing bar
Syringe plunger head
On/Off switch
DC 12V Socket
AC 100-240V Power cord socket
Fuse
Power supply indicator: Green for external power supply; Orange for battery
operation
Syringe Pump Operation Manual
∣
21
ALARMS
KEYPAD FUNCTIONS
INCREASE Button – Increases flow rate.
Press to increase the flow rate, hold to accelerate the rate changing
DECREASE Button – Decreases flow rate.
Press to decrease the flow rate, hold to accelerate the rate changing
CHECK VOLUME Button - Press or hold during RUN mode to display the volume
delivered. Release to return the current flow rate
BOLUS or PURGE Button –
If pump is in RUNNING mode, this button function as a BOLUS button. Hold this
button for 2 seconds to enter BOLUS infusion setting to infuse at preset flow rate,
maximum BOLUS volume is 10ml.
If pump is in STOP mode, this button function as a PURGE button. Hold this button
to run the pump at preset flow rate to expel air out of the syringe or to purge the
syringe:
Syringe Size (ml)
BOLUS/Purge Rate (ml/h)
10
240
20/30
400
50/60
960
100
1200
RUN Button – Press RUN button to start infusion; the LED indicator flashes
during the infusion.
STOP Button – Press to stop the pump.
MUTE Button – Press to silence the alarm buzzer when ‘NEAR EMPTY’,
‘COMPLETION/COMPLETE’ OR ‘OCCLUSION’ alarms are sounded. Audible and
visual alarms.
Syringe Pump Operation Manual
∣
22
CALIBRATION SETTINGS
CALIBRATION SETTINGS
ACCURACY CALIBRATION
WARNINGS: Contact manufacturer for authorized calibration value before using syringes not listed on Page 29. Do not calibrate unauthorized syringes without manufacturer’s authorization.
1.
2.
Turn on the power switch
Load the applicable syringe.
3.
Press the
button 4 consecutive times. The pump will enter the calibration model with the
first digit displaying 1 on the display screen. (Screen 3)
4.
i.
Screen 3
5.
Press
to enter the Accuracy Calibration setting.
6.
Press
or
to change the calibration value, the calibration range is -30% ~ + 30%. (-30
represents -30%; 30 represents +30%). (Screen 4)
1.
7.
Press
Screen 4
to confirm and exit.
ADJUST OCCLUSION PRESSURE
1. Turn on the power switch.
2. Load the applicable/compatible syringe.
3. Press the STOP button 4 consecutive times. The pump will enter the calibration model with the first
digit displaying 1 on the display screen.
4. Press
once and the pump will display 2 in the first digit. (Screen 5)
Syringe Pump Operation Manual
∣
23
CALIBRATION SETTINGS
Screen 5
5. Press
to enter the Accuracy Calibration setting.
6. Press
or
to change the occlusion pressure. (Screen 6)There are 3 levels of occlusion
pressure settings:
1 – LOW
0.04 MPa / 5.8 PSI
2 – MEDIUM
0.08 Mpa / 11.6 PSI
3 – HIGH
0.12 Mpa / 17.4 PSI
to confirm and exit.
7. Press
Screen 6
ADJUST ALARM VOLUME
1. Turn on the power switch
2. Load the applicable syringe
3. Press the STOP button 4 times continuously; the pump will enter the calibration settings with the first
digit displaying 1 on the display screen.
4. Press
button two times and the pump will display 3 in the first digit on the display screen.
(Screen 7)
Screen 7
5. Press
to enter the alarm volume setting.
6. Press
or
to select the alarm volume. (Screen 8) There are three levels of alarm volume
to select:
- LOW:
Lowest alarm volume
- MEDIUM: Medium alarm volume
- HIGH:
Maximum alarm volume
Screen 8
Syringe Pump Operation Manual
∣
24
CALIBRATION SETTINGS
7. Press
to confirm and exit.
WARNINGS: The default alarm volume setting is HIGH. Set the alarm volume to MEDIUM or LOW
may cause the alarm not heard in distance/ If the volume is set to MEDIUM or LOW, the user may not
hear the alarm from a distance. Always check if the alarm volume/ that the alarm volume is on HIGH
before a new infusion. Make sure the alarm sound at the current volume setting can be heard at any time
by the responsible personnel in any situation.
RESET TO FACTORY DEFAULTS
1. Turn on the power switch.
2. Load the applicable syringe.
3. Press the STOP button 4 times continuously; the pump will enter the calibration model with the first
digit displaying 1 on the display screen. (Screen 9)
4. Press
3 times to display 4 in the first digit on the display screen. (Screen 10)
Screen 9
Default settings:
Infusion Rate
Accuracy Calibration
Occlusion pressure
Alarm volume
0.1ml/h
0%
2 (Medium)
3 (High)
Screen 10
5. Press
to confirm the factory reset and exit. The pump will be restored to the factory default
settings.
Syringe Pump Operation Manual
∣
25
TROUBLESHOOTING
TROUBLESHOOTING
Description
Possible
Cause
Pump can’t be
1. Circuit overload.
turned on
2. The power cord
is loose or battery is
depleted.
3. Pump’s power
supply/transformer
is not working.
Pump won’t charge 1. Circuit overload.
the battery
2. The rechargeable
main battery needs
to be replaced.
OCCLUSION
1. Hidden occlusion
alarm but no
can’t be seen
visible block on the 2. The pump was
set at HIGH
IV line
occlusion sensitivity
Over/under
1. User uses
infusing over +/different brand/size
5%
syringe without
proper calibration
setting.
2. The pump wasn’t
sent for calibration
within last 24
months according
to the service
protocol.
Keypad
1. The pump is
locked/frozen
running and most
keypads are locked.
2. The control
buttons are broken.
Required Actions
1. Unplug the pump from the AC power,
Check/change fuses on the bottom of the pump
(only use fuse type T 1AL 250V).
2. Make sure the power cord is firmly connected
and power switch is turned on.
2. Contact our authorized distributor to replace the
main power supply.
1. Unplug the pump from the AC power, Check and
change fuses
2. Contact our authorized distributor to replace the
main battery
1. Check carefully the IV line and connection area,
and then resume the infusion.
2. Change the pump to lower Occlusion sensitivity
setting
1. Stop using the pump. Check the pump accuracy
with the currently used syringe brand/size and
pump calibration setting according to the manual.
2. Stop using the pump. Contact our authorized
distributor for the maintenance service.
1. Stop the pump to change the pump setting on
the keypad.
2. Stop using the pump. Contact our authorized
distributor for service.
Syringe Pump Operation Manual
∣
26
INFUSION ACCURACY OF THE SYSTEM
INFUSION ACCURACY OF THE SYSTEM
Infusion Accuracy
Trumpet Curve
Syringe Pump Operation Manual
∣
27
REGULATORY INFORMATION
REGULATORY INFORMATION
This volumetric syringe pump complies with the following standards:
z 93/42/EEC European directive for medical devices including EN 60601-1-2 and collaterals.
z Electrical Safety and Electromagnetic Compatibility standards (IEC) (CEM)
z Guidance and Manufacturer’s Declaration—Electromagnetic Emissions
Electromagnetic Compatibility Precautions
Medical electrical equipment requires special precautions regarding electromagnetic compatibility(EMC).
Medical equipment must be installed and put into service according to the EMC information provided in
the following documentation.
Guidance and Manufacturer’s Declaration Electromagnetic Emissions
Tablel-1
Electromagnetic Immunity for Equipment and Systems Fully Compliant with
EN 60601-1-2:2007
This syringe pump is intended for use in the electromagnetic environment specified below.
Immunity Test
IEC 60601
Test Level
Compliance
Level
Electromagnetic Environment- Guidance
Electrostatic
Discharge (ESD)
± 6kV contact
± 6kV contact
± 8kV air
± 8kV air
Floors should be wood, concrete or
ceramic tile.If floors are covered with
synthetic material.The relative humidity
should be at least 30%.
Electrical fast
transient/burst
± 2kV for power
supply lines
± 2kV for power
supply lines
IEC 61000-4-4
± 1kV for input/output
lines
± 1kV for input /
output lines
Surge
± 1kV line to line
± 2kV line to earth
± 1kV line to line
IEC 61000-4-2
IEC 61000-4-5
Power frequency
(50/60Hz) magnetic
field
± 2kV line to earth
3 A/m
3 A/m
Mains power quality should be that of a
typical commercial or clinical
environment.
Mains power quality should be that of a
typical commercial or hospital
environment.
Power frequency magnetic fields should
be at levels characteristic of a typical
location in a typical commercial or
hospital environment.
IEC 61000-4-8
NOTE:UT is the a. c. mains voltage prior to application of the test level.
Syringe Pump Operation Manual
∣
28
ACCESSORIES
ACCESSORIES
Every new pump’s package includes:
1 x Pole Clamp
1 x 3-core standard power cord
3 x Disposable extension tube (for testing)
2 x Fuse (T1AL 250V)
1 x User’s manual
Authorized syringe brands to use with this pump without additional calibration
10ml、20ml、50ml syringes: B-D, Monoject, Terumo® , NIPRO(Europe), JMS
100ml syringe: JMS, KDL
Syringe Pump Operation Manual
∣
29
PACKAGE, TRANSPORTATION AND STORAGE
PACKAGE, TRANSPORTATION AND STORAGE
1. Package: Please save the original package and Styrofoam, put the syringe pump in this original
package for storage, keep the manuals and all accessories.
2.Transportation: Avoid shake and impact during transportation, keep away from moistures (no
rain or snow).
3. Storage:
If the pump is to be stored for an extended period, it should be cleaned and the battery fully charged
(at least 8 hours). Store in a clean, dry atmosphere.
Environmental temperatures: -10℃~+55℃
Relative Humidity: Less than 93%
Atmosphere Pressure: 500hPa~1060hPa
There should be no erosive air or harmful dust. Leaving the battery in an uncharged state for a long
period of time may discharge completely and damage the battery permanently.
Perform operational and safety standard checkout to ensure the pump works properly and infuses
accurately before use if the pump is stored over 3 months.
Perform operational and safety standard checkout and fully charge the battery every three months.
Syringe Pump Operation Manual
∣
30
MAINTENANCE
MAINTENANCE
Service of this syringe pump must be done by manufacturer authorized technician.
Replacing the fuse:
If the pump can’t be turned on when it’s plugged in the electrical outlet, please make sure there that
the electrical outlet is working. Then unplug the power cord and check the fuses in the fuse box on
under the power socket. If the fuse is burned, please replace the fuse.
SUGGESTED CLEANING, STERILIZATION GUIDELINES :
Always keep the pump clean, use 70% alcohol soft cloths to wipe out any fluid on the pump.
Use EOG (Ethylene oxide gas) to sterilize the pump under following conditions:
Environmental temperatures: under 58℃
Relative Humidity: Less than 60%
After the sterilization, please keep the room ventilated for 24 hours or longer, or leave the pump in
the ventilation device for 8 hours or longer.
Important:
Avoid using Solvents and thinners to clean the pump
Before cleaning, turn off the power and disconnect power cord.
WARNING: The operational and safety standard checkout must be performed at least every 24
month by factory authorized service representative to ensure the pump works properly and infuse
accurately. (not covered by warranty, paid service)
WARNING: Perform functional tests and ensure that battery is fully charged at least once every
month.
The designed life time of this pump is 6-8 years. After designed life time, please replace all major
components by manufacturer authorized technician or stop use.
Pollution-Free Treatment And Recycling
1) Remove the Ni-MH before recycling or disposal.
2) Manufacturer will accept used pump for proper pollution-free treatment and recycling
Syringe Pump Operation Manual
∣
31
MAINTENANCE SERVICE RECORD
MAINTENANCE SERVICE RECORD
Serial Number: _______________
Date of Service:__________________
Date of Purchase: _________________
□
Accuracy Calibration
□
Functional tests
Maintenance Detail:
________________________________________________________
________________________________________________________
_________________________________________
Serviced by (Print Technician Name): _________________
Signature:____________
Service Company Name (Print):_________________________
Tel:______________
Date of Service:__________________
□
Accuracy Calibration
□
Functional tests
Maintenance Detail:
________________________________________________________
________________________________________________________
_________________________________________
Serviced by (Print Technician Name): _________________
Signature:____________
Service Company Name (Print):_________________________
Tel:______________
Syringe Pump Operation Manual
∣
32
MAINTENANCE SERVICE RECORD
Date of Service:__________________
□
Accuracy Calibration
□
Functional tests
Maintenance Detail:
________________________________________________________
________________________________________________________
_________________________________________
Serviced by (Print Technician Name): _________________
Signature:____________
Service Company Name (Print):_________________________
Tel:______________
Syringe Pump Operation Manual
∣
33
LIMITED WARRANTY
LIMITED WARRANTY
This syringe pump has been carefully manufactured from the highest quality components. The pump is
guaranteed against defects in material and workmanship for two (2) years from date of purchase by the
original purchaser, 6 months (6) for rechargeable battery. User should keep the service record according
to manufacturer’s instruction to keep the warranty valid.
Manufacturer’s obligation, or that of its designated representative under this Limited Warranty, shall be
limited, at our option, to repairing or replacing the pump, which upon examination, is found to be defective
in material or workmanship. The repair or replacement of any product under this Limited Warranty shall
not extend the above mentioned Warranty period.
All repairs under this Limited Warranty should be undertaken only by qualified, trained service personnel.
In the event that a pump is found to be defective during the warranty period, the purchaser shall notify
manufacturer or its designated representative within thirty (30) days after such defect is discovered. The
defective pump should be sent immediately to manufacturer or its designated representative for
inspection, repair or replacement.
Material returned should be properly packaged to avoid shipping damage.
This Limited Warranty shall not apply to defects or damage caused, wholly or in part, by negligence, spilt
fluids, dropping of the pump, misuse, abuse, improper installation or alteration by anyone other than
qualified, trained personnel; or to damage resulting from inadequate packaging in returning the pump.
This Limited Warranty is the sole and entire warranty pertaining to manufacturer’s products and is in lieu
of and excludes all other warranties of any nature whatsoever, whether stated, or implied or arising by
operation of law, trade, usage or course of dealing, including but not limited to, warranties of
merchantability and warranties of fitness for a particular purpose. Purchaser expressly agrees that the
remedies granted to it under this limited warranty are purchaser’s sole and exclusive remedies with
respect to any claim of purchaser arising under this Limited Warranty.
EXCLUSIONS (WHAT IS NOT COVERED)
1.
2.
3.
4.
5.
Accessories used with this pump such as pole clamp, power cord etc. are not covered under this
limited warranty policy.
This warranty becomes void if opened or serviced by un-authorized personnel.
This warranty does NOT cover freight cost, insurance and any other incidental charges.
Failure to service the pump periodically as scheduled will void this warranty policy.
This warranty becomes void if the pump shows evidence of having been dropped, impact, sand
and/or water damage, mishandling, tampering, battery or chemical corrosion, use contrary to this
instruction manual.
Syringe Pump Operation Manual
∣
34