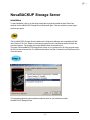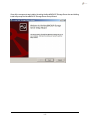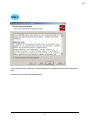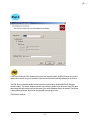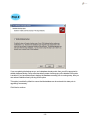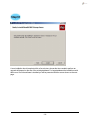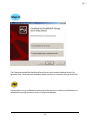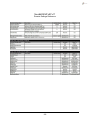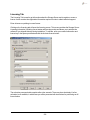
1
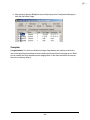
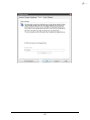
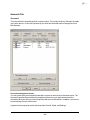
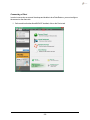
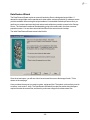
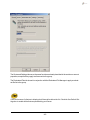
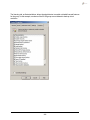
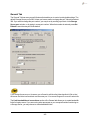
NovaBACKUP®
Storage Server
User Manual
NovaStor / April 2015
© 2015 NovaStor, all rights reserved. All trademarks are the property of their respective owners. Features and
specifications are subject to change without notice. The information provided herein is provided for informational
and planning purposes only.
Table of Contents
Table of Contents
NovaBACKUP Storage Server
Installation
xSP Local Restore
Remote Settings Reference
Creating a Staged Backup or Import
Staged Backup Creation
Import
Complete
Configuration Manager
Getting Started
Accounts Tab
Accounts
Connecting a Client
Properties
The General Tab
The Quota Tab
The Settings Tab
The Tools Tab
Data Restore Wizard
Group Policy Settings
General Tab
Security Tab
Directories Tab
Storage Tab
Logging
Notifications Tab
Licensing Tab
Active Users Tab
Command Line Reference
BackupServer.exe
BackupServerUtil.exe
BackupImportUtil.exe
Redundant File Manager.exe
Uninstall.exe
2
3
3
16
19
21
21
24
26
28
28
29
29
30
35
36
37
38
38
39
42
45
46
48
49
51
52
56
57
58
58
59
60
60
60
-2-
NovaBACKUP Storage Server
Installation
To start installation, click or run the Setup executable to begin the installer wizard. After a few
seconds, the NovaBACKUP Storage Server Wizard will open. Click next, and the License Agreement screen opens.
The NovaBACKUP Storage Server installer and Configuration Manager are compatible with Windows Server 2012 Core. Simple run the setup program from the command prompt and follow the
instructions below. The storage server and related utilities are installer in the
\Program Files\NovaBACKUP Storage Server folder on your system drive. All of the programs may
be run from the command line. For additional information, see the Command Line Reference section
of this document
This windows explains the prerequisites needed in order for you to be able to install
NovaBACKUP Storage Server.
-3-
Once all the components are installed, checking the NovaBACKUP Storage Server box and clicking
install will prompt the NovaBACKUP Storage Server Setup Wizard.
-4-
If you accept the terms of the license, click inside the box to I accept the terms in the License Agreement.
Click next to move to the next installation step.
-5-
The Custom Setup screen opens:
In this screen, the default location for the data files is shown. You can also select a different location
by clicking on Browse and selecting an alternate location. If you are unsure of the amount of space
available on your drives, clicking on Disk Usage will open the following screen:
-6-
Click OK to return to the Setup Screen
NovaStor recommends that you use the C: drive for the SQL databases associated with the
NovaBACKUP Storage Server. Once you have selected the target drive, or if you choose to go with
the defaults, press Next, and you will advance to the Service Account screen.
If you are performing an Upgrade, you do not need to re-install the database portion unless you want
to install a "dummy" database. If you do this, you must edit your backup server.ini to the correct database after install before the backup server connects to the original database.
Press Next to move to the next step in installation. The next screen asks you which type of SQL program will be used for the database services required by the xSP Storage Server. Because MySQL*
is an open source SQL database program, support for MySQL from NovaStor is very limited. We
find that Microsoft SQL Server is a better commercial product developed and supported by Microsoft
and a network of consultants, and has numerous online support forums. NovaStor encourages the
use of Microsoft SQL Server with NovaBACKUP Storage Server if at all possible.
-7-
Select the SQL Server Provider, and Click Next.
Coming to the next screen, you choose the correct instance of SQL, and use either Windows or
SQL authentication. If you are not familiar at all with SQL please use Windows authentication. When
you choose SQL server and it asks for the account, this is the sa account. Remember if you want to
use the sa account it must be enabled in SQL, and you must have a password activated. We find that
setting your SQL to use mixed mode authentication is helpful and will get you through any issues on
this screen. Still, we find the majority of customers who have no SQL knowledge getting stuck on this
particular screen. If you are not sure what to put in the SQL server field, or what an instance name is,
open SQL Server Management Studio. The very first screen in Management studio has the
SQL instance name you can copy and paste into the setup wizard.
-8-
If you are browsing for SQL instance and cannot see anything listed, the SQL Browser service will
need to be turned on for you to be able to have the instances automatically detected in the wizard.
The SQL Server names available on the network are retrieved by the NovaBACKUP Storage
Server installer. The server instances shown may not be the instance you choose to use. The database name field at the bottom will be the name given to the database when it is created. The default
is always BackupServer, but this can be changed to anything you like.
Click Next to continue.
-9-
This screen will ask for your Windows Administrator username for the machine with SQL isntalled on
it. Adding the domain name is optional.
Click Next.
- 10 -
If this is a new installation, as opposed to an upgrade, then you will be prompted for the name and
password for the backup administrator account. Enter the required information and click Next.
- 11 -
If you are updating the backup server, and a database already exists, then you will be prompted to
enable database backup. Setup will automatically create a backup copy of the databse if this option
is enabled. If you have taken steps to backup the database manually prior to running setup, then you
can reduce installation time by turning off this option.
This option is enabled by default to ensure that the database can be restored to its state prior to
upgrading if neccessary.
Click Next to continue.
- 12 -
Enter your contact information which will be needed in the event you require technical support. All
fields are required to activate the software. The license key is not needed if you are choosing to evaluate the software. Evaluation software may be activated later using the Configuration Manager, as
discuess in the Licensing section.
Click Next to continue. There may be a short delay as your information is registered.
At this point the installer has all the information required. Click the Install button to install the software.
- 13 -
A new installation should complete within a few minutes, wheras the time needed to perform an
upgrade will depend on the size of the existing database. For large databases the installation could
take hours. Once the software is installed you will be presented with the screen shown on the next
page.
- 14 -
The Final screen shows Start the Backup Server Service and Launch the Backup Server Configuration Utility. These items are checked by default, and will run, if checked, once you click Finish.
A good practice is to go to Windows services and set the service to run with your Administrator credentials before starting the service and the Configuration Manager.
- 15 -
xSP Local Restore
Use local restore if you wish to restore from Server Storage that has been copied to your computer
rather than connecting to the Backup Server online.
xSP Local Restore Setup
1. Install the xSP client on the machine you want to restore files.
NOTE: You may use the custom install and disable the Disaster Recovery and Agent Service
feature for a quick use.
2. Copy the user's data storage folder to the local machine or a location where the client can
access the files.
- 16 -
3. On the xSP client Device tab, click [Add] and select the xSP Account and click [OK].
4. Enter just the username and password. Don't click [OK] yet and go to the Restore tab.
NOTE: Leave the Server Name or IP Address field empty
- 17 -
5. Select the 'Restore from local server storage' checkbox and click the [Browse] button and locate the user data files folder you copied from [Step 2]. Click [OK] to continue adding the device
on the client.
6. Once the xSP device has been added, you may go to the Restore tab and restore any files to
an alternate location.
- 18 -
Remote Settings Reference
NovaBACKUP xSP v17
- 19 -
NovaBACKUP xSP v17
Remote Settings Reference
- 20 -
Creating a Staged Backup or Import
Staged Backup Creation
This document is going to show you how to perform a Staged Backup on the client for the RWF
device and how to import it to the Storage Server. This function is most useful for very large backups
that the initial backup you do not want to go over the wire.
PLEASE READ THIS ENTIRE GUIDE BEFORE BEGINNING ANY STAGED BACKUP
1. Setup the user on the Storage Server
2. [Install] and setup the RWF device on the client computer
3. In the RWF Configure device settings, enter the Server name, username, and password.
- 21 -
4. Before you click OK, go to the Staging tab and configure the staging folder (the folder must
exist first), and [Select] the checkbox to write the backup to the staging folder.
5. Click [Test Connection] to verify [OK] to accept the changes and continue to add the
RWF device.
6. Your first backup should now be going to your staging folder.
- 22 -
7. Make sure the .datasource file appears in the staged data and that it contains the computer
name where the Staged was performed.
8. NOTE: The user must NOT do a backup until the staged backup is imported to the backup
server, so disabled any schedules that may be setup for the user.
9. When the import is done on the Storage Server side (before running your second backup), go
back to Configure Device and [UNCHECK] the staging option below and click [OK]
- 23 -
Import
Get the user's staged data on the storage server or accessible to the storage server via UNC path or
USB drive.
BACKUP IMPORT UTILITY
1. From the Storage Server, launch the Backup Import Utility
2. Point the user's BASE folder and [Enter] the account username
- 24 -
3. Click [OK] to start importing the staged backup to the Storage Server.
NOTE: There is no real 'progress' indicator when the import is done. If you check the windows
task manager, you will see another copy of BackupServe.exe running. One of them will close
when the import is done.
- 25 -
4. After the import is done, [Close] the Import utility and go to the Configuration Manager to
verify the user's Disk Usage.
Complete
Congratulations! You have now finished running a Stage backup and Import process for the
user. At this point the client software can do backups and restores from the storage server. Make
sure to uncheck the 'Write the backup to the staging folder' on the client side before the user performs its next backup (Step 9).
- 26 -
- 27 -
Configuration Manager
Getting Started
The NovaBACKUP Storage Server Configuration Manager is your primary access point for managing NovaBACKUP Storage Server. The Storage Server Configuration Manager provides you
with access to all the main configuration menus required to manage your Storage Server.
The NovaBACKUP Storage Server Configuration Manager is launched from the Start Menu. When
the Start Menu is opened, move the mouse over All Programs until the additional program screen
opens, or click on All Programs to reveal the additional programs available. Then, click on
NovaBACKUP Storage Server and select Configuration Manager, as shown here:
Left-click on the Configuration Manager menu item to open the NovaBACKUP Storage Server
Configuration Manager.
The NovaBACKUP Storage Server Configuration Manager is compatible with Windows Server
2012 Core. Simply run the BackupServerUtil.exe program from the command prompt. It is installed
in the \Program Files\NovaBACKUP Storage Server folder on your system drive. For additional
information, see the Command Line Reference section of this document.
- 28 -
Accounts Tab
Accounts
This is the tab that is opened by default, as shown below. The primary function of this tab is to enable
you to add, remove, or view the Properties of your client accounts that use this Storage Server for
their backups.
Accounts management screen:
You can access the account properties and add or remove an account all on the same screen. The
Accounts Properties Screen shows the properties of the account you have selected, and the
Accounts Add Screen has not yet been populated with account information. In addition, you can create and manage Groups in this screen.
A typical account properties screen has three tabs: General, Quota, and Settings.
- 29 -
Connecting a Client
In order to see review an account's backups and be able to do a Data Restore, you must configure
the account on the client side.
1. On the machine that has NovaBACKUP Installed, click on the Device tab.
- 30 -
2. Click the Add button towards the bottom right corner of the screen and a new window should
pop up.
3. On the drop down menu, select xSP device
- 31 -
4. A new window pops up, here, type the IP address of the machine that has
NovaBACKUP Storage Server locally installed and Type the username and password for the
account you created on the NovaBACKUP Storage Server to create the link
- 32 -
Deleting an account:
In addition to adding and modifying accounts, you can remove an account from the system by selecting the account in the list, then pressing the Remove button. A confirmation dialog will prompt you or
additional instructions, as shown below.
The default action is to delete all file data associated with the account from disk storage
and remove all account information form the database. You can alter the action based on
your needs. For instance, you may choose to retain the account's file data and delete it
manually at a later time. Each of the available options is dicussed below.
Account Options
Check "Delete the account's data directory from all storage locations" to remove all the account's
backed up data from the file system. This does not remove information about the files from the database. CAUTION: Once the data directory is removed, the account will no longer be able to restore
any backed up files unless the database has been altered to find the files elsewhere.
Check "Delete the account's log files" to remove the account's log files from the file system. This is a
housekeeping option has no effect on the account.
- 33 -
Account Disposition Options
Select "Preserve account" to keep the account active in the database. Preserving the account, while
removing all the associated data, has the effect of resetting the account back to its initial state.
Select "Hide account" to keep the account in the database nut mark it as deleted. Hidden accounts
can be restored later if needed. They are automatically restored if an account with the same name is
added through the Accounts tab.
Select "Permanently delete account" to remove the account and all associated data from the database. CAUTION: Permanently deleted accounts cannot be recovered.
To view hidden accounts, check the "Show hidden accounts" checkbox on the Accounts tab. You
can then use the Remove button to permanently delete the account. You cannot add hidden
accounts, or change their properties.
Associated Data
Check "Delete account's file information to remove all data about the account's backed up files from
the database. CAUTION: The account will no longer have access to previously backed up files,
although it can back up new files. This option is not available if the account is being permanently
deleted.
Check "Delete accounts server requests" to delete the accounts request history from the database.
This is a housekeeping option that has no effect on the account. This option is not available if the
account is being permanently deleted.
- 34 -
Properties
Please be aware that you are only able to manage passwords in this screen is you have used
SQL authentication during the installation. If Active Directory is handling authentication, these fields
will not appear. If you want to change authentication methods after you've installed, please contact
support for details on this.
- 35 -
The General Tab
Pictured above is the General Tab, which is used to set the general settings for a new or existing
account. It specifies where the user's data will be stored, assigns the account to a group, and sets
the length of time that restorable data will be held. Group information is selected from the dropdown
menu. You can only select a pre-defined group to which this account can be assigned. When an
account name is entered, a password is not required. A password can be added after the account is
created.
Accounts tab allowed to backup files from zero or more computers. Each computer consumes one of
the available licenses. The default number of computers for an account in the Administrators group
is zero, which effectively prevents an Administrator account from backing up any files. The default for
accounts in other groups is one computer. The number of computers assigned to any account can
be set to any value from zero to the maximum number of licenses available.
Normally, an account can only have one simultaneous connection to the Storage Server, even if it is
allowed to backup more than one computer. The Allow separate computers to backup to this
account check box will enable multiple computers to simultanously acces the Storage Server using
the same account.
The primary storage location specifies where the backup server will cache certain account information. The storage location is selected from a list of locations specified on the Storage tab, which will
be discuessed more in a later section. In addition to account information, this is also where an
account data folder will be created, which serves as a repository for files that are backed up by the
client that holds the account. By default, the data folder name is the same as the account name. You
can change the data folder name to suit your own needs, but it must be unique across all accounts.
As the client backs up files they are stored in the data folder. If the disk that contains the folder fills up
then file data will automatically be directed to an alternate storage location if one is available. The
automatic redirection feature can be disabled for the account by chekcing Restrict backed up files to
primary storage location.
For new installations, setup creates the default storage location. C:\UserData. For upgrades from versions
prior to 12.0, setup creates storage locations based on account information found in the existing database.
Upgraded accounts will be restircted to the primary storage location for compatibility with the older software.
After an upgrade, review the account properties to make any desired adjustments to the default settings.
As of version 13.0 it is possible to change the primary storage location even after the account has been used
to back up files. The storage files will be moved from the old location to the new one, which may take a considerable amount of time for large accounts. Any unused files and directories are left in the old location and
may be manually deleted after insepction by the administrator.
- 36 -
The Quota Tab
You can set up quotas on individual accounts or set a quota on a group. By default when you create
an account, there are no quotas or limitations in place. Also note that your Storage Server can send
quota related warning reports, pop-up warning windows inside the client, or even disable a client's
backup. All this can be configured in this screen.
- 37 -
The Settings Tab
This screen enables you to add a new setting, edit the value of a setting, or delete a setting from this
account. To obtain the list of available settings, please visit http://www.novastor.com/en/documents
and download the "Remote Settings" document.
Returning to the Accounts tab will occur automatically after you press OK or Cancel in the Account
Properties or Account Creation screen.
There are two more features selectable from buttons on the Accounts Tab: Data Restore Wizard
and Group Policy Settings.
The Tools Tab
This tools tab provides account maintenance tools that may be required in some circumstances.
The Computer Editor gives the administer a way to change the name of one or more computers
associated with an account. This should only be necessary in situations where an old or damaged
computer is replaced with another having a different name. Generally, it is simpler to assign the
same name to the new computer when it is configured, but there may be times when this is not feasible. Changing the name using the Computer Editor makes it possible to associate exisiting, backed
up files with the new computer without consuming another computer license.
The Storage Size Updater scans the file system, tallies the storage space used by the account,
and updates the database. This is useful in situations where accurate usage is required for billing purposes. This is normally not required for accounts that were created using version 12.5 or later of the
software which maintains byte-level accuracy in the database. Older versions used a fractional
accounting system that had the potential to introduce rounding errors.
Returning to the Accounts tab will occur automatically after you press OK or Cancel in the Account
Properties or Account Creation screen.
- 38 -
Data Restore Wizard
The Data Restore Wizard copies an account's backed up files to a designated output folder. If
desired, the output folder can be transferred to other media, such as optical disk, by whatever means
you have available. After moving this output media so it is accessible to a backup/restore client, you
can then run a restore process using local restore mode without any need to connect to the Storage
Server. The local restore mode can be selected by going to the restore tab in the client;s account
properties screen. You can then restore individual files or the account's entire backup.
The initial Data Restore Wizard screen looks like this:
Once the wizard opens, you will see a list of accounts and the current disk usage of each. This is
shown on the next page.
Here you select the account you want to restore, and press Next. Then select a volume that you wish
to restore, such as the C: drive. The Data Restore Wizard will provide information about the space
required to make the restore files, and then let you choose a target for the data restore files.
- 39 -
Press Next, and you will be asked to select a Media root directory to which the restore files will be
written. The option to ask to delete all files and folders in the destination directory if any are
present appears as a check box. This should be checked if a single directory is used to create
restore files for multiple accounts. This way, you will be assured that the account receiving the
restore data does not receive data from other accounts.
- 40 -
You may browse for a target directoryor enter the name of a target directory. The default directory is
C:\Data Restore Wizard\<account name>.
The next screen provides information about the Data Restore process that you've configured. Press
Prepare account data now! - And the process of creating data restore media will begin.
You may, of course, cancel the setup by pressing Cancel. You may also press the Back button to
make changes to the data restore setup.
- 41 -
Group Policy Settings
Opens a list of groups, as shown below. This screen lists the Groups that are already defined, and
also enables you to add, remove, or edit the properties of a group.
Click the Add button to add a new group, or click Properties to modify an existing group. In either
case, you are presented with a screen similar to the one below.
- 42 -
The Quota and Settings tabs serve the same function as already described in the section on account
properties, except that they apply to all accounts in the group.
The Redundant Files tab is used in conjunction with the Redundant File Manager to apply a redundant file list to the group.
Click on the name of a feature to display a brief description below the list. Check the Use Default Settings box to enable all the features permitted by your license.
- 43 -
The licensing tab, as illustrated below, allows the administrator to enable or disable licensed features
for the group. In this example, members of the 20 GB group are not allowed to backup virtual
machines.
- 44 -
General Tab
The General Tab has some powerful features that enable you to control certain global settings. The
default Storage Server port is 308. Unless you have a reason to change the port, it should remain at
308. If you want to change the port number, you may do so by scrolling up or down in the Storage
Server port: window, or by typing in a new port number. When that number is entered, press Set
Default to save the new port as the default.
If you change the server port, be aware you will need to edit the client's backupclient.ini file so that
the server and client communicate over the same port. You can ask Support for more info about this.
The Limit bandwidth and connections section of the General tab allows you to create bandwidth
limits for backup users. If you are running other processes on your computer besides functioning as
a Storage Server, you may choose to create bandwidth limits.
- 45 -
Security Tab
The Security Tab defines the authentication method you have chosen during the install.
A word about the master decryption key:
The master decryption key is a key that can be used to decrypt user backups. This little feature is
often overlooked but it can be extremely valuable. In the event that a user loses or forgets his or her
decryption key, use of the master decryption key may be the only way to restore the user's data.
The user may choose to disable the master decryption key using an option in its client software.
Although this may be perceived as providing protection from inappropriate activities by the backup
service provider, it is also making recovery of data nearly impossible if user encryption keys are lost
or forgotten.
- 46 -
If the master decryption key feature is enabled, and the account has been configured to use the feature, then a small key appears to the left of the account name in the accounts list, as shown below for
the "adam" account. In addition, "Keys" tab will appear on the account's Properties screen. By clicking on the tab, and entering the master encryption key when prompted, the administrator can view
keys used by the account. The key, in turn, can be used to log into the account and restore files.
- 47 -
Directories Tab
The Directories Tab specifies the location for the work directory used to store temporary files during
the file rollup and restore processes. The amount of work space needed will depend on the number
of concurrent jobs and the size of the account's files. Since this number can vary greatly for different
environments it is recommended to specify a location that will always have a large reserve of disk
space.
- 48 -
Storage Tab
This tab provides a way to define multiple storage locations for backed up files. Each time the server
gets a request to store a file it looks at the accounts primary storage location (see Accounts tab) and
checks if the free space is greater than the reserve specified for the location. If free space is greater
than the reserve, then the file sent to that storage location, otherwise the test is repeated on all other
defined locations, in order of rank, until a usable location is found. If none is found, then the backup is
aborted.
The reserve is only a guideline, not a hard limit. Patches to a file (incremental changes) are always
stored in the same location as the original file. Also, the server cannot split a large file across multiple
locations. Therefore, ensure there is an adequate margin to allow existing files to grow as incremental patches are applied. Leave extra room if you anticipate your users will be storing very large
files. A red disk icon indicated the location does not exist. The server will attempt to create it the first
time a request is made to store a data there.
- 49 -
Use the Add button to define a new storage location. Use the Properties button to view or modify a
location's settings. Use the Remove button to delete a storage location. You cannot remove a storage location if any accounts are using it. Use the Move Up and Move Down buttons to adjust the
rank of the selected storage location. Changes are not saved until you press the Apply or
OK buttons.
- 50 -
Logging
The logging tab provides the administrator with control of storage server logging through the screen
shown below.
The master log contains information describing the overall operation of the storage server. The
name of the file is masterlog.txt. By default it is created in the same directory in which the storage
server was installed. The logging tab allows the administrator to specify an alternate location for the
file and limit its size.
The account log files contain information describing work requests made to the storage server from
a particular account. They are saved in a subdirectory having the same name as the account. The
logging tab allows the administrator to specify a location where the subdirectories are created. By
default, they are created in a directory named Logs, which in turn is in the same directory in which
the storage server was installed. In addition to the location, the administrator can limit the number of
log files saved per account.
Unless instructed to do otherwise, the storage server maintains a log of account requested in the
SQL database, in a table named Requests. The information in this table can be used for billing purposes and to monitor account activity. The administrator can disable this feature if the information is
not needed, and thus reduce some system overhead.
- 51 -
Notifications Tab
The Notifications tab is used for the following purposes:
l Enable or disable email notifications
l Enable or disable event logging in the Windows event viewer
l Set the thresholds that determine when license notifications are sent
l Specifying what e-mail attachments are included in error notifications
If you enable any mail notification, you will have to enter the specific mail settings.
In order to set the mail options, you must first click in the Send mail notifications box on this tab, and
then click the Mail Options button. This will open the E-Mail Configuration Menu
- 52 -
The E-Mail Configuration menu requires the SMTP Server Address, From: To: and also allows you
to send multiple copies. You may also use Secure Socket Layer (SSL) to send your messages. The
E-Mail Configuration screen looks like this:
Additionally you can select the Error Conditions that will trigger the sending of E-Mail, as shown on
the next page.
- 53 -
You may also send E-Mail to inform you when a user account reaches certain quota thresholds.
The three thresholds are:
l
l
l
Account reaches "Near quota % threshold"
Account reaches "At quota % threshold"
Account reaches "Over quota % threshold"
The mail system can be set to attach user log files to the mail message, so that you can quickly
identify which user accounts may be having problems or approaching quota limits.
If you choose to write event logs, you will be able to set event log options.
- 54 -
The errors that you select will be written to the Event Log when they occur. When you have put a
check mark in the box next to each system error you want added to the log, clicking the Set default
button will save these conditions. You can also set Quota issues that can be saved in the Event log.
- 55 -
Licensing Tab
The Licensing Tab is used to get information about the Storage Server and to register or renew a
license. It also contains the registration information required in order to obtain technical support.
Enter a license or updating to a new license:
Clicking on the Licensing tab will open the licensing screen. This screen provides the Storage Server
Licensing information (including current status and licensing mode) and allows you to activate the
software if you skipped this step during installation. To activate, enter your contact information and
license key in the spaces provided and click the Activate License button.
The activation process should complete after a few seconds. There may be a short delay if online
activation is not available, in which case you will be presented with instructions for performing an offline activation.
- 56 -
Active Users Tab
The Active Users tab is primarily an informational tab that provides information about backups and
current connections to the NovaBACKUP Storage Server.
Keep in mind that this screen will only display the accounts that were connected to the server when you started the configuration manager. If an account connects while this screen is open, it has to be refreshed or close
and re-open the configuration manager.
The purpose of this tab is to determine the cause of any system slowdowns or other performances
issues, and to get a quick look at the current server status. If, for example, a customer reports that a
backup is going very slowly, you will be able to open Storage Server Configuration Manager and
then open the Active Users tab, and you will be able to see what processes were running at the
time the user reported the issue.
In this screen, you can determine the Account Name and IP Address of the users who where using
the Storage Server before the Storage Server Configuration Manager was launched. You can also
see the type of request the user made (backup or restore, for example), how much time has elapsed
since the process started, and the percent of progress the user's request has made in completing the
request.
- 57 -
Command Line Reference
This section describes the command line options for the programs installed by NovaBACKUP Storage Server. Bold text represents an executable file name. Italic text in angle brackets represents values supplied by the user. Non-italic text in entered exactly as shown. Text in square brackets is
optional and may be omitted from the command. The vertical bar (|) indicates that either the text
before or after the bar may be entered as part of the command.
BackupServer.exe
This is the main backup server program. This program normally runs as a Windows service, but can
be run from the command line to perform certain utility functions. The general format for the command line is:
BackupServer [<command>,<options>]
where command is one of the commands described below. Each command has options that are specific to it.
apfmigration -u <user-account-name> [&endash;c <connection-string>] [-d <data-directory>] [-a
<account-profile-path>]
This command is used to populate the database from information stored in a user's data directories.
It is typically used to moving an account from one server to another, or repairing a damaged database. Use the &endash;c option to override the default database connection string. Use the &endash;d option to override the default user data directory name. Use the &endash;a option to override
the default path to the account's cached profile.
storagemigration [&endash;c <connection-string>] [-v] [-t]
This command is used to fix storage errors that were known to occur in some backup file storage
files prior to version 11.5 of NovaBACKUP Storage Server. The errors were a result of backing up
certain combinations of files within the same folder that had non-ASCII characters in their file
names.This command should only be used if recommended by NovaStor technical support. Use the
&endash;c option to override the default database connection string. The &endash;v option enables
verbose mode. The &endash;t option enables test mode. No changes are made to the file system
when test mode is enabled.
rollback [-v][-t]
This command is used to undo changes made by the storagemigration command. The &endash;v
option enables verbose mode. The &endash;t option enables test mode. No changes are made to
the file system when test mode is enabled.
stageddatamigration &endash;s <staged-data-directory> -u <user-account-name> [&endash;c
<connection-string>]
This command is used to import staged data that was created by a NovaBACKUP application on
another computer. Use the &endash;c option to override the default database connection string.
- 58 -
updatediskusage &endash;u <user-account-name>|*
Calculates the amount of server disk space used by a specified user account and updated the total
recorded in the SQL database. Updated the disk usage for all users if "r;*" is given as the account
name. Older versions of the software used a floating point number to represent disk usage. Rounding errors could affect the accuracy of this number over time and render it unsuitable for billing purposes. This command may be used to correct the stored value. As of version 13.0 the usage is
stored as a byte count and is no longer subject to rounding errors. However, the command may still
be useful for correcting totals in cases where the file system was modified outside of software control.
remove
Removes the program from the list of Windows Services. This command is used by the uninstaller
and should not be run manually.
uninstall
This command is the same as the remove command
add
Adds the program to the list of Windows services. The command is used by the installer and should
not be run manually.
install
This command is the same as the add command.
manual
This command runs the storage server as a normal program as opposed to a Windows service. It is
intended for debugging and should not be run manually.
Use the &endash;h or &endash;help options without a command to display a brief command summary.
BackupServerUtil.exe
This is the GUI Configuration Manager utility used to configure the storage server. The command
line format is:
BackupServerUtil [/debug] [/userinfo <user-account-name>|*] [/nolastbackup] [<alternate-configfile-name>]
The /debug option records diagnostic information in &ldots;
The /userinfo option creates a report describing the amount of disk space and computer licenses
used by a user account, along with the number of backup server requests made by the account. If
"r;*" is given as the user account name, then a report for all accounts is created.
The /nolastbackup option surpresses display of the last backup date and time on the user accounts
tab. Use this option to leave more room for displaying other account information.
- 59 -
An alternate configuration file may optionaly be specified. By default, the program uses the
backupserver.ini file residing in the same folder as itself.
BackupImportUtil.exe
This is the GUI backup import utility for importing staged backup data. It is a wrapper for the backup
server's stageddatamigration command and is provided for convenience. This program has no command line options.
Redundant File Manager.exe
This is the GUI Redundant File List Manager utility. This program has no command line options.
Uninstall.exe
This program is invoked when the software is removed through the Control Panel. It should not be
run manually. To remove NovaBACKUP Storage Server from the command line, start by opening
regedit and expanding the following key:
HKLM\SOFTWARE\Microsoft\Windows\CurrentVersion\Uninstall
Examine the subkeys to find one for NovaBACKUP Storage Server and copy the value for "r;UninstallString" to the command line. Execute the command to initate the uninstall sequence.
- 60 -