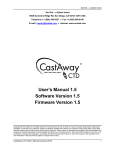
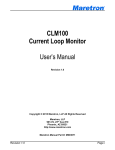
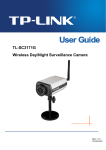
1
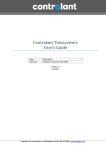
CellSniper for Blackberry CellSniper for BlackBerry User Manual Version 2.0 Version Information User manual for CellSniper for BlackBerry version 1.0. Copyright Information Copyright © 2007-2011 by NSS MSC SDN BHD. All Rights Reserved. No part of this document can be reproduced or transmitted in any form or by any means, electronic or mechanical, for any purpose, without the express written permission of NSS. Trademark Information CellSniper™ is a registered trademark, and the CellSniper™ logo and NSS logo are trademarks of NSS MSC SDN BHD in Malaysia and other countries. All other registered and unregistered trademarks in this document are the sole property of their respective owners. Licensing and Patent Information CellSniper™ is a software application licensed to users under the terms of the End User License Agreement provided. Its distribution may be controlled directly by NSS MSC SDN BHD or by a partner thus appointed. Acknowledgments Export Information Export of this software and documentation may be subject to compliance with the rules and regulations promulgated from time to time by the Bureau of Export Administration, United States Department of Commerce, which restrict the export and re-export of certain products and technical data. Limitations The software provided with this documentation is licensed to you for your individual use under the terms of the End User License Agreement provided with the software. The information in this document is subject to change without notice. NSS MSC SDN BHD does not warrant that the information meets your requirements or that the information is free of errors. The information may include technical inaccuracies or typographical errors. Changes may be made to the information and incorporated in new editions of this document, if and when made available by NSS MSC SDN BHD. About Network Security Solutions (NSS MSC SDN BHD) Network Security Solutions (NSS) is an information security company headquartered in Kuala Lumpur, Malaysia. A recognized leader in security consulting, products and services, NSS develops, markets and supports proprietary products that secure sensitive/confidential information and are in use by a broad base of enterprises, businesses, governments and individuals. Over the past five years, NSS recommended and developed solutions have been used by scores of corporate/government and individual users worldwide. These include some of the world‟s most security-sensitive enterprises, government departments/agencies, individuals, and cryptography experts. Visit NSS MSC SDN BHD at www.mynetsec.com for more information or contact [email protected]. CellSniper for BlackBerry – User Manual 2 Symbols Notes, Cautions, and Warnings are used in the following ways. A Note is extra, but important, information. A Note adds important information, but you could still use the product if you didn‟t have that information. Caution indicates the possibility of loss of data or minor damage to equipment. A Caution tells you about a situation where potential loss of data or minor damage to equipment could be possible. Special attention should be paid to Cautions. Warning indicates the possibility of significant damage to equipment or injury to human beings. A Warning means that your equipment may be damaged or someone could be injured. Please take Warnings seriously. CellSniper for BlackBerry – User Manual 3 Preface Who should read this document This document is for end-users using CellSniper for BlackBerry or others who intend to use this application. This document outlines the usage of CellSniper for BlackBerry. It may also be of relevance to partners to understand the product and its applications. CellSniper for BlackBerry – User Manual 4 Table of Contents Symbols ....................................................................................................... 3 Preface ......................................................................................................... 4 Table of Figures ........................................................................................... 6 1. Introduction ............................................................................................. 7 2. System Requirements .............................................................................. 7 3. Installation .............................................................................................. 8 3.1. Installing using BlackBerry Desktop Manager and USB cable............. 8 3.2. Pre-requisite on Application Setting .................................................. 8 4. Activation and Application Setup .............................................................. 9 5. Enable / Disable CellSniper .................................................................... 12 6. CellSniper Settings ................................................................................. 12 6.1. SIM Change Notification .................................................................. 12 6.2. Lock Setting ..................................................................................... 16 6.3. Wipe Setting .................................................................................... 16 6.4. Authorized SIMS .............................................................................. 17 6.5. Change Password ............................................................................. 18 6.6. Renew License ................................................................................. 19 7. Remote Control Using SMS Command .................................................... 19 7.1. Display of Custom Message .............................................................. 19 7.2. Trigger/Disable Alarm ..................................................................... 20 7.3. Lock/Unlock Phone .......................................................................... 20 7.4. Track Location of Lost Phone ........................................................... 21 7.5. Stealth Call ...................................................................................... 21 7.6. Wipe Data ........................................................................................ 21 8. About ..................................................................................................... 22 8.1. Show IMSI & IMEI ........................................................................... 22 8.2. License Info ..................................................................................... 23 8.3. About CellSniper .............................................................................. 24 9. Help........................................................................................................ 24 CellSniper for BlackBerry – User Manual 5 Table of Figures Figure Figure Figure Figure Figure Figure Figure Figure Figure Figure Figure Figure Figure Figure Figure Figure Figure Figure Figure Figure Figure Figure 1: 2: 3: 4: 5: 6: 7: 8: 9: 10 11 12 13 14 15 16 17 18 19 20 21 22 Welcome to CellSniper .................................................................. 9 Activate Application ..................................................................... 9 Set Application Password ........................................................... 10 Alert Setting ............................................................................... 10 Wipe Setting ............................................................................... 11 CellSniper Main Menu ................................................................. 12 SIM Change Notification ............................................................. 13 Edit Alert Message ...................................................................... 13 Add Contact ................................................................................ 14 : Add Contact from Native Address Book .................................... 14 : Add Contact by Manual Input ................................................... 15 : Verify Setting ........................................................................... 15 : Lock Setting ............................................................................. 16 : Wipe Setting ............................................................................. 17 : Authorized SIMS ....................................................................... 17 : Authorize SIM .......................................................................... 18 : Authorized SIMS ....................................................................... 18 : Renew License.......................................................................... 19 : Show IMSI & IMEI .................................................................... 23 : License Info.............................................................................. 23 : About CellSniper ....................................................................... 24 : Help Menu ................................................................................ 24 CellSniper for BlackBerry – User Manual 6 1. Introduction CellSniper for BlackBerry is a mobile phone application that can help trace the lost or stolen phone. Upon detecting an unauthorized SIM change, it will automatically block the phone, and send a SIM change notification to the pre-designated contacts. CellSniper for BlackBerry additionally facilitates a remote feature that allows user to lock, trigger alarm, make stealth call, track phone location, and wipe data remotely even if the SIM has been changed on device. All these can be done by sending in SMS commands to the device. 2. System Requirements To use CellSniper for BlackBerry, your BlackBerry device must meet the following requirements. Platform: Display: v4.2 and above Non-Touch screen/Touch screen To check your platform version, select Options >> About. CellSniper for BlackBerry – User Manual 7 3. Installation To transfer and install CellSniper for Blackberry onto your BlackBerry device, you will need BlackBerry Desktop Manager and a USB cable. If the application was previously installed on the device, then it should be uninstalled and the device should be rebooted for a fresh installation. After installation, the application permissions setting will also need to be set on the BlackBerry device. The following are instructions for the installation process. 3.1. Installing using USB cable Follow the steps mentioned below to install the CellSniper application into your BlackBerry mobile phone. Visit www.GetMoXecure.com Enter registration key and Click “Go”. Enter details, phone model and confirm. Click “Download app” (CellSniper*.Zip) and save . Click “Display Activation Key” and note the activation key. Unzip the “CellSniper .Zip” file into one folder, & transfer the folder to the phone using USB cable. (Note: CellSniper.zip contains 9 files) Click on the “CellSniper*.jad” out of 9 files in phone and don‟t forget to select/check “set application permission” and then click on Download button. (Note: If user is setting the permission he can skip the 3.2 section of this document) Make every application settings to ALLOW and save the settings. Click on the CellSniper icon in the download folder and key in the activation key. 3.2. Pre-requisite on Application Setting In order to use CellSniper for BlackBerry, the application permissions must be set to Allow. To change the CellSniper for BlackBerry application permissions setting, follow the instructions below. There are two ways to access the Application Permissions setting on BlackBerry device. You can either go to Options >> Security Options >> Application Permissions, or Options >> Advanced Options >> Applications. From the list of applications, highlight “CellSniper for BlackBerry” and click Menu >> Edit Permissions. CellSniper for BlackBerry – User Manual 8 In the Permissions setting screen, set Connections, Interactions, and User Data to Allow. Then click Menu >> Save. 4. Activation and Application Setup Following are the steps for activating and setup for CellSniper application. When you launch CellSniper for the first time, you will see the welcome screen (Figure 1). The application will guide you through the activation and application setup process. Figure 1 : Welcome to CellSniper Click on the “Proceed” button and you will come to the activation screen (Figure 2Figure 2). Enter the activation key and click “Activate Now”. Figure 2 : Activate Application CellSniper for BlackBerry – User Manual 9 Please note that on Pearl devices, all text input will be done differently. You need to click on the text area where you wanted to type or edit text, and a small popup will appear. This is where you can input your text, after finishing, click Menu >> OK to close the popup. After activation, you will need to create an application password (Figure 3Error! Reference source not found.). Please remember the password as it will be your login password to the application. The password can also be changed inside the application. Enter the password and confirm password, and click Menu >> Continue. Figure 3 : Set Application Password On the Alert Setting screen, you can customize your own Alert Message and add new Contact (Figure 4Figure 4). You can refer to Section 6.1 for more information. Once you are done editing, click Menu >> Continue. The data will be saved and you will be directed to the next setup step. You have the option to skip this step and update the data later in the application. CellSniper for BlackBerry – User Manual 10 Figure 4 : Alert Setting Please note that the application won’t function properly if your Contact list in the Alert Setting is empty. Wipe Setting comes after the Alert Setting. Here you can change the wipe keycode to something that you will remember. You can refer to Section 6.3 for more information. Once you are done editing, click Menu >> Continue, and the data will be saved. You also have the option to skip this step and update it later in the application. Figure 5 : Wipe Setting The wipe keycode is unique for every application. It is important that you create a wipe keycode that you can remember. Congratulations, you have now successfully completed the activation and application setup steps! You will now see the CellSniper Main Menu screen (Figure 6). CellSniper for BlackBerry – User Manual 11 Figure 6 : CellSniper Main Menu 5. Enable / Disable CellSniper You can enable and disable CellSniper application from the CellSniper Main Menu (Figure 6). When the application is disabled, all CellSniper functions will be disabled. Functions such as lock on startup, send SIM change notification upon detection of unauthorized SIM, and those remote commands via sms. To enable/disable the CellSniper application, you need to check or uncheck the checkbox field for “Enable CellSniper” in the CellSniper Main Menu. The result would be saved and reflected immediately when you check or uncheck the “Enable CellSniper”. 6. CellSniper Settings CellSniper Settings contain the options to change application settings, login password, authorize SIM, and renew license. The following sections illustrate these functions in detail. You can expand and collapse the Settings list by clicking on the Settings. 6.1. SIM Change Notification In order for the application send out SIM change notification message upon detection of unauthorized SIM (such as the thief‟s SIM), the setting in SIM Change Notification must be set up properly. The „Alert on Unauthorized SIM‟ checkbox must be selected, and the contact list must contain valid mobile number(s) of your friends or relatives. To change the SIM Change Notification, select Settings >> SIM Change Notification (Figure 7) from the CellSniper Main Menu. CellSniper for BlackBerry – User Manual 12 Figure 7 : SIM Change Notification To edit the Alert Message, click on the Alert Message text. A popup appear which will allow you to edit the text (Figure 8). After finish editing, click Menu >> OK. The popup is closed. To save the changes you made, click Menu >> Save. Figure 8 : Edit Alert Message To add more Contact, click on “New” button in the Contacts area (Figure 9). You have two options to add a contact. One is select existing contact from the native Address Book, and another is to enter the mobile number manually. CellSniper for BlackBerry – User Manual 13 Figure 9 : Add Contact To select contact from the native Address Book, click “New” and then “Select from Native”. You will be directed to the Address Book, highlight on the contact you wanted to add and click Menu >> Continue (Figure 10). You will be prompted to confirm the mobile number you wanted to add, click “Yes”. The mobile number will be added to the Contact list. To save the changes you made, click Menu >> Save. Figure 10 : Add Contact from Native Address Book For selection from the native Address Book, the contact’s Mobile field must contain the mobile number. The program will not retrieve number from the other fields. To add new contact by entering the mobile number manually, click on “New” and then “Add New” (Figure 11). CellSniper for BlackBerry – User Manual 14 A dialog will prompt you for the mobile number, enter the mobile number and click “Add” (Figure 11). The mobile number will be added to the Contact list. To save the changes you made, click Menu >> Save. Figure 11 : Add Contact by Manual Input To delete contact(s), checks the contact(s) that you wanted to delete in the Contact list and click “Delete”. To save the changes you made, click Menu >> Save. After you have completed the setup, you can use the Verify Setting feature to test your setting. This feature allows the user to send sms notification message to all the saved contacts to verify that the contact setting is correct. To verify your setting, click on Menu >> Verify Setting (Figure 12). Figure 12 : Verify Setting CellSniper for BlackBerry – User Manual 15 6.2. Lock Setting This setting determines whether the BlackBerry device will be locked on startup. When the device is locked, you can unlock it by entering the application access password. There are three types of lock setting: Off, Always, and Only on SIM change. 1. Off – The device will never be locked on startup. 2. Always – The device will always be locked on startup. 3. Only on SIM change – The device will be locked only when an unauthorized SIM is detected on startup. To authorize SIM, refer to Section 6.4. To change the lock setting, select Settings >> Lock Setting (Figure 13) from the CellSniper Main Menu. To save the changes you made, click Menu >> Save. Figure 13 : Lock Setting 6.3. Wipe Setting Wipe Setting allows the user to change the wipe keycode and the data type to be wiped. The wipe keycode is used in the SMS command to wipe the device remotely. Please refer to Section 7.6 for the SMS command to wipe. To change wipe setting, select Settings >> Wipe Setting (Figure 14) from the CellSniper Main Menu. Make sure you change the wipe keycode to something that you can remember. By default, all data to be wiped are selected. You can change the data you want to wipe by select/unselect the item. To save the changes you made, click Menu >> Save. CellSniper for BlackBerry – User Manual 16 Figure 14 : Wipe Setting 6.4. Authorized SIMS This feature allows the user to authorize more SIMs (different IMSI) so that it would not trigger the SIM change alert when phone reboot after an authorized SIM change. This is useful when the owner wanted to temporarily lend his phone to his spouse or friend and do not want the SIM change alert to trigger. Each new SIM must be separately registered in the application. To authorize a new SIM, select Settings >> Authorized SIMS (Figure 15) from the CellSniper Main Menu. Figure 15 : Authorized SIMS To add new SIM, click on “New”. A dialog will appear, read the instructions and click “OK” to disable the application. The application will be closed at this point. Change a new SIM (the one you wanted to authorize) and reboot the phone. CellSniper for BlackBerry – User Manual 17 Launch CellSpiner application, select Settings >> Authorized SIMS. You will see a different screen that prompts you to confirm and authorize the new SIM (Figure 16). Please note that you will see this screen if and only if the CellSniper application is disabled and your SIM is not already in the Authorized SIM list. Click “Authorize” and the SIM would be added to the authorized SIM list. Figure 16 : Authorize SIM 6.5. Change Password This function allows the user to change his/her current CellSniper access password. To change the current CellSniper access password, select Settings >> Change Password (Figure 17) from the CellSniper Main Menu. Figure 17 : Authorized SIMS You will be prompted for the current access password and the new password. The new password has to be entered twice for verification. Once everything is filled in, click Menu >> Save to change the password. CellSniper for BlackBerry – User Manual 18 Password will only be changed when the old password entered is authenticated and both the new password matches. 6.6. Renew License This function allows user to renew the CellSniper application. To renew license, select Settings >> Renew License (Figure 18) from the CellSniper Main Menu. Figure 18 : Renew License Enter the renewal key and click “Renew” to renew the CellSniper license. When renewal process is completed successfully, you will be shown the License Info screen that your application expiry date has updated. 7. Remote Control Using SMS Command In the case where your phone is lost or stolen, you can still control your phone remotely to do a few tasks. The following shows all the possible command you can tell you phone to do remotely. All commands will be sent by sms. 7.1. Display of Custom Message User can send a SMS command from any phone to show a custom message on the BlackBerry device‟s screen. This is useful in the case where a user lost his phone or his phone is stolen, he can remotely trigger the display of a custom message on the screen to convince the thief or someone who picked up the phone to return the phone to the owner. Type and send the following sms to the target phone. CSSHOW <password> <message> Parameters: <password> - CellSniper application password <message> - The custom message CellSniper for BlackBerry – User Manual 19 If the phone is in the locked mode (locked by CellSniper) when the CSSHOW SMS command is received, the custom message will be shown in a dialog on top of the lock screen. Dismissing the dialog would return to the CellSniper lock screen. If the phone is NOT in the locked mode when the CSSHOW SMS command is received, the custom message should be shown in a separate UI window and the user would be able to dismiss the window. 7.2. Trigger/Disable Alarm User can send a SMS command from any phone to trigger or disable the alarm/siren. This is useful in the case where a user misplaced or lost his phone, he can remotely trigger the alarm and locate the phone by the siren sound. It can also annoy the thief as the alarm cannot be turned off without a valid application access password. To trigger alarm, type and send the following sms to the target phone. CSALARMON <password> Parameters: <password> - CellSniper application password To disable alarm, type and send the following sms to the target phone. CSALARMOFF <password> Parameters: <password> - CellSniper application password Once the CSALARMON SMS command is received, the application will set off the alarm sound and lock the phone. The alarm will work even when the silent profile is set for the phone. To turn off the alarm: o Key in the valid CellSniper access password on the lock screen, or o Send in the CSALARMOFF SMS command. 7.3. Lock/Unlock Phone User can send a SMS command from any phone to remotely lock or unlock the phone. To lock the phone, type and send the following sms to the target phone. CSLOCK <password> Parameters: <password> - CellSniper application password To unlock the phone, type and send the following sms to the target phone. CSUNLOCK <password> Parameters: CellSniper for BlackBerry – User Manual 20 <password> - CellSniper application password Once the phone is locked, the lock screen cannot be dismissed until either of the following unlock procedures is performed. o Key in the valid CellSniper password on the lock screen, or o Send in the CSUNLOCK SMS command. 7.4. Track Location of Lost Phone User can send a SMS command from any phone to retrieve the location of the phone. The location can either be the GPS coordinates (lat/long) or the Cell Tower Id. To track the device, type and send the following sms to the target phone. CSWHERE <password> Parameters: <password> - CellSniper application password If the phone does not have a GPS, when the SMS command is received, the application will retrieve the Cell Tower Id of the network and send it back to the sender via SMS. If the phone is equipped with a GPS, when the SMS command is received, the application will retrieve the latitude and longitude of the device from the internal GPS and send it back to the sender via SMS. If the GPS failed to lock onto a location, then the application will fall back to send the Cell Tower Id. 7.5. Stealth Call User should be able to send a SMS command from any phone to have his phone make a stealth call to or pickup a call from any mobile number so that the user can listen to the surrounding in order to help him locate the phone. To have the phone automatically dial out to a phone number, type and send the following sms to the target phone. CSCALL <password> <phone_number> Parameters: <password> - CellSniper application password <phone_number> - The phone number to call 7.6. Wipe Data User can send a SMS command from any phone to remotely wipe his phone. The possible data types to wipe are: o Contacts (C) o Memos (M) o Tasks (T) o Events (V) o Call Logs (L) o Emails and PIN Messages (E) CellSniper for BlackBerry – User Manual 21 User can configure the default types of data to wipe in the application. Please refer to Section 6.3 for details. To wipe the device, type and send the following sms to the target phone. CSWIPE <wipe_code> <data_type> Parameters: <wipe_code> - The wipe code set up in the application <data_type> - Optional. The data type to wipe. A concatenated string of alphabets that represent each data type. It is case insensitive. If the SMS Command does not contain the data type parameter, it will wipe according to the default setting in the application. If the SMS Command contains the data type parameter, it will overwrite the default setting in the application. When the SMS command is received, the application will delete all the data as indicated in the command or the default setting in the application. The deleted data will not be recoverable. The password or keycode used in SMS command is case sensitive. Therefore it is important that you remember the exact password with upper or lower case characters that you used in the application. All the SMS command keywords, i.e. CSSHOW, is case insensitive. 8. About About contains information about IMSI and IMEI on device, License Info, and About CellSniper. 8.1. Show IMSI & IMEI This function allows you to check the current IMSI on the SIM and the IMEI of your BlackBerry device. To see IMSI and IMEI, select About >> Show IMSI & IMEI (Figure 19) from the CellSniper Main Menu. CellSniper for BlackBerry – User Manual 22 Figure 19 : Show IMSI & IMEI 8.2. License Info License info shows the details of the CellSniper license currently installed on the device. License info contains your CellSniper license id, activation date, and expiry date. To see License Info, select About >> License Info (Figure 20) from the CellSniper Main Menu. Figure 20 : License Info Once application license expired, CellSniper will no longer functional until further renewal of the license. CellSniper for BlackBerry – User Manual 23 8.3. About CellSniper This feature contains information about CellSniper version, and information on content provider. To see About CellSniper, select About >> About CellSniper (Figure 21) from the CellSniper Main Menu. Figure 21 : About CellSniper 9. Help This is a simple guide on how to use the application. To access the Help menu, select “Help” from the CellSniper Main Menu (Figure 222). Figure 22 : Help Menu CellSniper for BlackBerry – User Manual 24