1
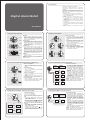
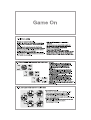
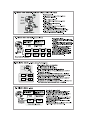
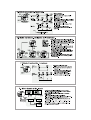
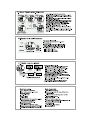
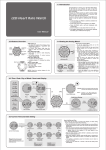
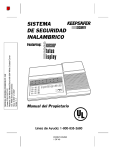
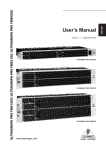
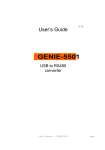
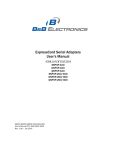
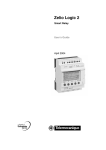
71 mm
78 mm
105 mm
77 mm
71 mm
297 mm
Project no: 06-022 Version: 1.0 File name: 06-022 manual 001.CDR Prepared by: C.K Lau Copyright: Latitude Ltd. Date: 20 Feb 2006
Digital Alarm Watch: Instruction Manual
210 mm
NOT ON SCALE
Remarks:
Size:210 x 297 mm (WxH)
Type: sheet type
Paper: 100 gms wood free paper
Color: 1 C + 1 C
Pages: cover - 0 pages
body - 2 pages
white- 0 pages
total - 2 pages
Language: English
Blinding: folding
Project:
Release for:
Prepared by:
Date:
Checked by:
Date:
Approved by:
Date:
1.0 Introducti on
Thank you for purchasing of this Watch.
Your Watch includes current time, daily alarm,
chronograph , countdown timer and dual time
functions.
Your Watch is carefully designed and produced for
you, in order to utilize the features of your watch, it is
advisable to use the Watch in conformity with the
instructions below:
! Read the instruction before you use the Watch.
! Avoid exposing your Watch to extreme conditions
for an unreasonable time.
! Avoid rough uses or severe impacts to your
Watch.
! It is recommended to complete the battery
replacement by a certified service agency
because your Watch contains precise electronic
components.
! Clean your Watch with a soft moistened cloth
occasionally.
! DO NOT expose the Watch to strong chemicals
such as gasoline, and alcohol, as they will damage
the Watch.
! Store your Watch in a dry place when it is not in
use.
Digital Alarm Watch
User Manual
3.0 Major Functi on Modes
2.0 Important Key Operat ions
Light
Start/Stop
Mode
Lap/Reset
Light
Start/Stop
Mode
Lap/Reset
Light
Start/Stop
Mode
Lap/Reset
There are variations in outlooks
from region to region for the Watch.
Mode [M]
! Press the button to select among five function
modes. Hold down the button to select setting
display. In setting display: Press the button to
select among setting items. Hold down the
button to exit setting display.
Start/Stop [S/S]
! In Current Time Mode: Press the button to
switch between Date and Month Display. In
Daily Alarm Mode: Press the button to turn ON
or OFF daily alarm. In Chronograph and
Countdown Timer Mode: Press the button to
start or stop counting.
Lap/Reset [L/R]
! In Current Time Mode: Press the button to
switch between Date and Month Display. In
Daily Alarm Mode: Press the button to turn ON
or OFF hourly chime. In Chronograph Mode
(counting): Press the button to display split
time. In Chronograph Mode (stop counting):
Hold down the button to reset the chronograph.
In Countdown Timer Mode (stop counting):
Press the button to reload the target time.
Light [EL]
! Press the button to turn ON the EL back light
for about 3 seconds.
NOTE: The important key operations is
summaried above, check the coming chapters for
detail descriptions.
4.0 Current Time Mode - Month Display and Day of Week Display
day
hour
minute
second
Month Display
month
[S/S] or
[L/R]
The Current Time Mode
! Current Time Mode includes two displays,
they are the Month Display and Day of week
display.
The Month Display
! The 1 st. row: Hour digits
! The 2 nd. row: Minute digits and calendar
(day and month).
! The 3 rd. row: Second digits.
The Day of week Display
! The 2 nd. row: Minute digits and calendar
(day and day of week).
! The 1 st and 3rd. row: Same as the Month
Display.
How to Select Between Month Display and
Day of Week Display
! Press the [S/S] or [L/R] button to switch
between the Month Display and Day of Week
Display following the adjacent diagram.
[M]
Major Operation Mode
! The Watch includes 5 major operation
modes. They are Current Time Mode, Daily
Alarm Mode, Chronograph Mode,
Countdown Timer Mode and Dual Time
Mode.
! Each operation mode may include one or
more than one operation displays. These
operation displays provide supplementary
features of the operation mode.
! Check the coming chapters for the detail of
these operation displays.
To Switch among Operation Modes
! Press the [M] button to select among the
Current Time Mode, Daily Alarm Mode,
Chronograph Mode, Countdown Timer
Mode and Dual Time Mode.
[M]
Current Time Mode
Daily Alarm Mode
Dual Time Mode
[M]
[M]
[M]
Chronograph Mode
Countdown Timer Mode
4.1 Current Time Mode - Setting the Current Time
How to Set Current Time
Increaseorthe
increase
decrease
number the
at
faster
asetting
highervalue
speed
increase
or
Increase
decrease
the
the number
setting
value
[S/S] or
[L/R]
hold [S/S] or
hold [L/R]
[M]
hold [M]
Second
Minute
Year
Hour
hold [M]
[M]
[M]
[M]
Day
Month
[M]
! In Current Time Mode, hold down the
[M] button for about 2 seconds will
change the display to setting display.
! The selected digits will be flashing in
the display. Pressing the [M] button
will select among the different
settings following the adjacent
diagram.
! When one of the settings is selected,
pressing the [S/S] or [L/R] button will
increase or decrease the setting
value; holding the [S/S] or [L/R] button
will increase or decrease the setting
value faster.
! When the above is set, hold down the
[M] button will exit the setting.
NOTE: The Watch will also exit the
setting display if NO key-stroke has
been activated for about one minute.
[M]
Day of Week Display
12/24
hour format
day of
week
Current Time Setting Sequence
5.0 Daily Alarm Time Mode - Daily Alarm and Date Alarm
hour
minute
Daily Alarm Mode
[S/S]
Daily Alarm OFF
Daily Alarm ON
[L/R]
Hourly Chime OFF
Hourly Chime ON
Key tone
ON/OFF
The Daily Alarm Display
! The 1 st. row: Hour digits
! The 2 nd. row: Minute digits
How to set the Daily Alarm between ON and
OFF
! In the Daily Alarm Display, pressing the
[S/S] button will change the function
between ON and OFF.
! When the alarm indicator '
' is exhibited
(the daily alarm is ON), the Watch will
sound at the preset alarm time every day.
How to set the Hourly Chime between ON
and OFF
! In the Daily Alarm Display, pressing the
[L/R] button will change the function
between ON and OFF.
! When the hourly chime indicator '
' is
exhibited (the hourly chime is ON), the
Watch will sound once at zero minute every
hour (i.e 1:00, 2:00, 3:00 and etc).
5.1 Daily Alarm Mode - Setting the Daily Alarm
How to Set Daily Alarm
increase
or
Increase
decrease
the
the number
setting
value
Increaseorthe
increase
decrease
number the
at
faster
asetting
highervalue
speed
[S/S] or
[L/R]
hold [S/S] or
hold [L/R]
[M]
hold [M]
Hour
Minute
hold [M]
Daily Alarm Setting Sequence
! In Daily Alarm Mode, hold down the
[M] button for about 2 seconds will
change the display to setting display.
! The selected digits will be flashing in
the display. Pressing the [M] button
will select among the different
settings following the adjacent
diagram.
! When one of the settings is selected,
pressing the [S/S] or [L/R] button will
increase or decrease the setting
value; holding the [S/S] or [L/R] button
will increase or decrease the setting
value faster.
! When the above is set, hold down the
[M] button will exit the setting.
NOTE: The Watch will also exit the
setting display if NO key-stroke has
been activated for about one minute.
6.0 Chronograph Mode - Functions Overviews
Chronograph Mode
! The Watch includes a stopwatch function
to measure:
! Elapsed time,
! Accumulative elapsed time, and
! Split time.
Chronograph Display
! The display shows the 'Reset' display, if
the Watch or the stopwatch has been
reset. It is then ready for a new
measurement.
! The 1 st. row: Hour digits
! The 2 nd. row: Minute digits and 1/100
second.
! The 3 rd. row: Second digits.
NOTE: The maximum measureing range of
the stopwatch is 23 hours 59 minutes and
59.99 seconds.
1/100
second
hour
minute
second
Chronograph Mode
Reset Display
1. Elapsed
time
hold [L/R]
[S/S]
[S/S]
0
10
2. Accumulative
elapsed time [S/S]
0
3. Split time
0
20
0
[S/S]
20
10
[S/S]
[S/S]
hold [L/R] hold [L/R]
0
10
split
split [L/R]
20
split
[L/R]
[S/S]
0
6.1 Chronograph Mode - Using the Chronograph
N O T E : T h i s
diagram illustrates
the key flow on
how to use the
chronograph only,
so
the number
showing on these
displays DOES
NOT conform to
fact.
[S/S]
split
time
Spli t Display
10
seconds
[L/R]
counting
[S/S]
Co unti ng Display
'Rese t' Display
stop
counting
[S/S]
hold [L/R]
10
30
20
time
Stop Co unti ng Display
Elapsed time, Accumulative
Elapsed time and Split time
7.0 Countdown Timer Mode - Functions Overviews
Countdown Timer Function
! The Watch includes a countdown
timer function which measures the
elapse of a fix period of time (target
time).
! The timer will downcount from target
time to zero, and beeps will sound at
zero.
! The target time can be set by the user.
Check the coming chapter for more
detail on how to set target time.
minute
hour
second
Countdown Timer Mode
0
20
Case 1
Target
time = 20
How to Measure Elapsed Time and
Accumulative Elapsed Time
! When the chronograph is not counting, press
the [S/S] button once to start counting. When
the chronograph is counting, press the [S/S]
button once to stop counting. The elapsed
time between these two keystrokes is
exhibited on the display.
! Repeat the above mentioned steps to get t h e
accumulative elapsed time of which the
chronograph is counting.
How to Measure Split Time
! When the chronograph is counting, press the
[L/R] button once to take the split time at any
designate moment. This key operation will not
affect the counting.
! The split time will appear on the display for
10 seconds, and it returns to counting display
automatically. Repeat the steps mentioned
above to get another split time.
How to Reset the Chronograph
! To reset the chronograph to get ready for a
new measurement, hold down the [L/R] button
for 2 seconds when the chronograph is not
counting.
7.1 Countdown Timer Mode - Setting the Target Time
increase
or
Increase
decrease
the
the number
setting
value
Increaseorthe
increase
decrease
number the
at
faster
asetting
highervalue
speed
[S/S] or
[L/R]
hold [S/S] or
hold [L/R]
[M]
hold [M]
Hour
Minute
hold [M]
[M]
[S/S]
20
[M]
Second
Daily Alarm Setting Sequence
20
Case 2
Target
time = 20
10
[S/S]
20
0
10
[S/S]
NOTE: The Watch will also exit the
setting display if NO key-stroke has
been activated for about one minute.
[S/S]
[L/R]
0
10
How to Set the Target Time
! In Countdown Timer Mode, hold down the
[M] button for about 2 seconds will
change the display to setting display.
NOTE: When the timer is counting, the
target time CAN NOT be set.
! The selected digits will be flashing in the
display. Pressing the [M] button will
change among the different settings
(hour, minute, second) following the
adjacent diagram.
! When one of the settings is selected,
pressing the [S/S] or [L/R] button will
increase or decrease the setting value;
holding the [S/S] or [L/R] button will
increase or decrease the setting value
faster.
! When the above is set, hold down the [M]
button will exit the setting.
30
20
time
Countdown Timer Case
7.2 Countdown Timer Mode - Using the Coutndown Timer
counting
[S/S]
Countdown Timer Mode
(Sets as 30 minutes)
Counting Display
stop
[S/S]
counting
[L/R]
Beep
Beep
Beep
Stop Counting Display
[S/S]
counting
29' 58''
Counting Display
How to Use the Timer
! When the target time is set (for example: 30
minutes), pressing the [S/S] button will start
the counting. When the timer is counting,
pressing the [S/S] button once will stop the
counting.
! When the Timer is counting, the remaining
time (to zero) will be exhibited on the display
continuously.
! When it counts to the last 5 seconds, it beeps
once for every second.
! When it counts to 0 seconds, it beeps for 30
seconds. Pressing any button (except the
[EL] button) in this period will terminate the
beeps prematurely.
! The target time will be loaded automatically
after the beeps.
How to Reload the Target Time
! In the Stop Counting Display, pressing the
[L/R] button will reload the target time.
NOTE: The adjacent diagram illustrates the key
flow on how to use the countdown timer only, so
the number showing on these displays DOES
NOT conform to fact.
8.0 Dual Time Mode - Functions Overviews
minute
hour
second
Dual Time Mode
Dual Time
Mode icon
The Dual Time Function
! The Watch includes a dual time function
which measures the current time of
another time zone.
! The second digits of Dual Time Mode will
be the same as the second digits of
Current Time Mode.
! The dual time (hour and minute) can be
set by the user. Check the coming
chapter for more detail on how to set dual
time.
The Dual Time Display
! The 1 st. row: Hour digits,
! The 2 nd. row: Minute digits,
! The 3 rd. row: Second digits.
Counting Display
8.1 Dual Time Mode - Setting the Dual Time
How to Set Dual Time
increase
or
Increase
decrease
the
the number
setting
value
Increaseorthe
increase
decrease
number the
at
faster
asetting
highervalue
speed
[S/S] or
[L/R]
hold [S/S] or
hold [L/R]
[M]
hold [M]
Hour
Minute*
hold [M]
Dual Time Setting Sequence
! In Dual Time Mode, hold down the [M]
button for about 2 seconds will
change the display to setting display.
! The selected digits will be flashing in
the display. Pressing the [M] button
will select among the different
settings following the adjacent
diagram.
! When one of the settings is selected,
pressing the [S/S] or [L/R] button will
increase or decrease the setting
value; holding the [S/S] or [L/R] button
will increase or decrease the setting
value faster.
NOTE: Minute setting value will be
increased or decreased 30 minutes per
step.
! When the above is set, hold down the
[M] button will exit the setting.
NOTE: The Watch will also exit the
setting display if NO key-stroke has
been activated for about one minute.
9.0 Specifications
Current Time Mode
! Hour, minute and second
! Month, day, and day of week
! 12 / 24 hour format (user selectable)
! Auto calendar
Alarm Mode
! Daily alarm
! Alarm beeps for about 30 seconds at
preset alarm time
! Hourly chime
Chronograph Mode
! 1/100 second resolution
! Measuring range 23 hours, 59 minutes,
59.99 seconds
! Split time display
Countdown Timer Mode
! 1 second resolution
! Programmable up to 23 hours, 59
minutes 59 seconds
! Alarm beeps for about 30 seconds when
the timer count to zero
Dual Time Mode
! Hour, minute and second for the second
time zone
! 12 / 24 hour format (according the setting
of Current Time Mode)
Back Light
! Electro-luminescent back light
Other
! Key tone ON/OFF user selectable.
SCLAE 1:2
a4 size
297mmX210mm
APN ref. no: A63206
Date: 12-01-07
Vendor ref:
no. of color: 1C+1C
Prepared by:
B&W artwork attached:
Presentation
Testing
Production/Shipment
*P.P.= PAD PRINTING S.P.= SILK SCREEN PRINTING
Verified by:
Approved by:
hora
minutos
Alarma diaria OFF
Campaneo OFF
Alarma diaria ON
Campaneo ON
9.0 Especificaciones