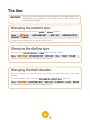
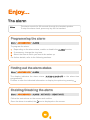
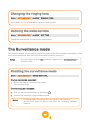
1
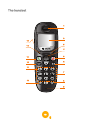
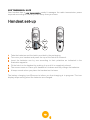
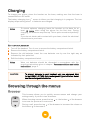
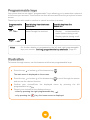
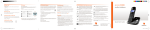
eircom 9000/9000A/9000A Twin Pack Cordless telephone User Guide Dear customer, You have just acquired a new generation telephone and thank you for placing your confidence in us. This device has been manufactured with the utmost care. If you should have difficulties in operating it, we recommend that you consult this user manual. For further information please refer the helpdesk: 1850 60 20 60. This product follows a strategy of continuous development. We reserve the right to make changes without notice, modifications and improvements to the products described in this user manual. To operate the device safely and easily, please read carefully the paragraph “Recommendations and safety instructions”, page 2. The CE label confirms that the product complies with the 1999/5/EC regulations of the European Union Parliament regarding wireless systems and telecommunications. The declaration of compliance may be looked up on the www.sagemcom.com website section «Support», or can be obtained from the following address : Sagemcom Broadband SAS 250, route de l'Empereur 92848 Rueil-Malmaison Cedex - France 1 Recommendations and safety instructions ! For safety reasons, never put the handset in the base station without the battery inserted or without the lid on the battery compartment as this could cause an electric shock. To avoid damaging your handset/base, only use certified rechargeable batteries NiMH 1.2 V 650 mAh, never use no rechargeable batteries. Insert the batteries in the handset/base battery compartment respecting polarity. Only use the power unit supplied and connect it to the electricity mains in accordance with the installation instructions in this user manual and the details on the sticker regarding voltage, electrical current and frequency. As a precaution if there is a risk of danger, the power plug can be pulled out to disconnect the 230 volt power supply. Therefore the sockets should be near the device and easily accessible. Do not install your DECT telephone in a damp environment, such as a bathroom, washroom, kitchen etc, and not within 1.50 metres of a source of water or outside. This device is designed for use in temperatures of between 5 °C and 45 °C. In regions greatly affected by electrical storms we recommend that you protect your telephone circuit with a special fixture for excess voltage. Do not attempt to remove screws or open the appliance. It does not contain any user-replaceable parts. This device is designed to be used for connecting to the public telephone network. If problems should arise, contact your nearest specialist dealer. Only use the telephone cable supplied. Your DECT telephone has a range of approx. 50 metres indoors and up to 300 metres outdoors. The range can be affected by the proximity of metal objects, such as a television and electrical devices. Zones without reception may appear owing to elements in the building. This can cause brief interruptions in the conversation, caused by faulty transmission. 2 Certain medical equipment and highly-sensitive machines or security systems may be affected by the transmission power of the telephone. In these cases we recommend adhering to the safety information. Your eircom 9000/9000A has anti-skid pads that should leave no traces on your furniture and ensure stability. However, given the the wide variety of finishes used by furniture manufacturers, traces may appear on surfaces in contact with the parts of your eircom 9000/9000A. eircom decline all responsibility in any such cases of damage. The used battery must be disposed of in line with the recycling regulations in this user manual. 3 Contents Recommendations and safety instructions ......... 2 Discover... ......................................................... 8 Your phone .......................................................................... 8 The base ................................................................................................................................................. 8 The handset ......................................................................................................................................... 10 The screen............................................................................................................................................ 12 Handset set-up .................................................................. 13 Charging............................................................................ 14 Browsing through the menus ............................................. 14 Browser ................................................................................................................................................. 14 Programmable keys........................................................................................................................... 15 Illustration ............................................................................................................................................. 15 Menu tree structure............................................................................................................................ 17 Procedures in your booklet ............................................................................................................. 19 Making and receiving calls... ............................ 20 Managing a call.................................................................. 20 Making a call........................................................................................................................................ 20 Receiving a call................................................................................................................................... 20 Managing several calls....................................................... 21 Receiving a second call ................................................................................................................... 21 Making a second call......................................................................................................................... 21 Switching from one call to the other ............................................................................................. 21 Ending one of the calls in progress .............................................................................................. 21 Talking with two contacts at the same time (3-party conference) ....................................... 22 Using additional handsets.................................................. 22 Calling another handset (intercom) .............................................................................................. 22 Transferring a call to another handset......................................................................................... 22 4 Use the phonebook ............................................................ 23 Create an entry ................................................................................................................................... 23 Call the contact from their entry..................................................................................................... 23 Search for an entry ............................................................................................................................ 23 Changing an entry.............................................................................................................................. 23 Deleting an entry ................................................................................................................................ 23 Associating a ring tone with an entry ........................................................................................... 24 Adding another number to an entry.............................................................................................. 24 Transferring entries from one handset to another.................................................................... 24 Options during a call .......................................................... 25 Enable/Disable loudspeaker (handsfree mode)........................................................................ 25 Adjusting the volume......................................................................................................................... 26 Enabling/Disabling the secret mode............................................................................................. 26 Locating your handset ....................................................... 27 Listening and Recording (model eircom 9000A) ...................................... 28 Enabling/disabling the answering machine ........................ 28 Answering machine announcements.................................. 29 Saving your personal announcement........................................................................................... 29 Listening to your announcement.................................................................................................... 29 Erasing your announcement ........................................................................................................... 29 Messages .......................................................................... 30 Listening to your messages............................................................................................................. 30 Managing your messages................................................................................................................ 31 Querying your answering machine remotely.............................................................................. 31 Delete all your messages ................................................................................................................. 32 Recording a conversation................................................................................................................ 32 Answering machine settings .............................................. 33 Enabling/Disabling call filtering...................................................................................................... 33 Changing the remote querying code............................................................................................ 33 Changing the recording quality ..................................................................................................... 33 Changing the number of rings........................................................................................................ 33 5 Setting up... ..................................................... 34 The phone.......................................................................... 34 Changing the ringing tone ............................................................................................................... 34 Enabling/Disabling audio alerts ..................................................................................................... 34 Enabling/Disabling the silent mode............................................................................................... 34 Defining programmable key shortcuts......................................................................................... 35 Setting the date and the time.......................................................................................................... 35 Picking up and hanging up calls automatically ......................................................................... 35 Changing your mailbox number..................................................................................................... 36 Checking your mailbox ..................................................................................................................... 36 Changing the display language ..................................................................................................... 36 Enabling/Disabling keyboard locking........................................................................................... 37 Defining banned calls (Parental Control) .................................................................................... 37 Changing the default code .............................................................................................................. 38 Allow/Prevent the sharing of a call with another handset ...................................................... 38 The handset ....................................................................... 38 Associating a new handset ............................................................................................................. 38 Define the priority base for a handset.......................................................................................... 39 Resetting the handset ....................................................................................................................... 39 Customizing the handset’s registration ....................................................................................... 40 Renaming the handset ...................................................................................................................... 40 Adjusting the contrast....................................................................................................................... 40 The base............................................................................ 41 Enabling the paging mode .............................................................................................................. 41 Adjusting the volume of the messages heard from the base ................................................ 41 Resetting the base ............................................................................................................................. 42 Removing a handset registered on the base ............................................................................. 42 Renaming the base ............................................................................................................................ 42 The line.............................................................................. 43 Changing the network type ............................................................................................................. 43 Changing the dialling type............................................................................................................... 43 Changing the flash duration............................................................................................................ 43 Defining the outside call prefix (PABX)........................................................................................ 44 6 Enjoy... ............................................................ 45 The alarm .......................................................................... 45 Programming the alarm .................................................................................................................... 45 Finding out the alarm status............................................................................................................ 45 Enabling/Disabling the alarm.......................................................................................................... 45 Changing the ringing tone ............................................................................................................... 46 Defining the wake-up time ............................................................................................................... 46 The Surveillance mode....................................................... 46 Enabling the surveillance mode..................................................................................................... 46 Disabling the surveillance mode.................................................................................................... 47 Tracing your calls... ......................................... 48 Call logs............................................................................. 48 Viewing the received and dialled call log ................................................................................... 48 Managing incoming or outgoing calls .......................................................................................... 48 The events log ................................................................... 49 Checking new events ........................................................................................................................ 49 Enabling/Disabling event notification ........................................................................................... 49 Environmental information ............................... 50 Environmental impact ........................................................ 50 Guarantee........................................................ 51 Lexicon ............................................................ 52 7 Discover... Your phone The base Model without answering machine (eircom 9000) 1 2 Caption Description 1 Handset location 2 button Paging/Pairing: • Short press: paging of handsets. • Long press: pairing of handsets 8 Model with answering machine (eircom 9000A) 1 2 3 4 5 Key Description 1 Handset location. 2 Short press: read / stop reading messages Key Description 4 Display: • Answering machine off: no display. • Answering machine enabled: - No new messages: a dash is displayed. - New messages have been received: the unread messages counter flashes and displays the number of messages received (up to 9). 3 Message deletion: • Long press in read mode: delete a message. • Long press when not in read mode: delete already read messages. 5 Paging button: • Short press: paging of handsets. • Long press: pairing of handsets 9 The handset 1 2 15 3 14 4 13 5 12 6 11 7 10 8 9 10 Key Description Key Description 1 Loudspeaker 9 Microphone 2 Graphic screen 10 Star key • Long press: unlock / lock the keyboard 3 Programmable / cancel shortcut key 11 Press and hold the key (refer to “Checking your mailbox”, page 36): • If the answering machine (eircom 9000A) is turned off: access to eircom messaging (*) • If the answering machine (eircom 9000A) is turned on: access to the answering machine (*) eircom messaging is eircom's answering machine on the network. The eircom messaging number is preconfigured for fast access to your mailbox (171). To modify the number please refer to “Changing your mailbox number”, page 36. 4 Browser • Brows up or down through the menu • During a call, press up or down to increas or decrease the volume 12 Speakerphone Hands-free key 5 Hang up key • Short press: return to main menu. • Long press: switch off the handset. 13 Pick-up / Hands-free • Long press: switch on the handset 6 Phonebook access key. 14 Programmable / confirm shortcut key. 7 Alphanumeric keyboard. 15 Speaker handsfree mode. 8 # key 11 key / The screen THE ICONS DISPLAYED In standby mode or during use, your phone screen informs you of your phone’s current state through icons, and in particular: 1 2 3 TAM Calls Caption Description 1 Status icons Indicates your phone’s current state. Battery charge condition Network Phone in conversation mode Alarm on Only for the eircom 9000A model Secret mode on Speakerphone on Answering machine enabled - steadily displayed: answering machine on - flashing: new message(s) on your answering machine or on your mailbox (*) - Answering machine off: no display (*) eircom messaging is eircom's answering machine on the network. The eircom messaging number is preconfigured for fast access to your mailbox (171). To modify the number please refer to “Changing your mailbox number”, page 36 Low transmission 2 Information field • handset placed on the base: the current time is displayed, • handset off-hook: the handset number, the date and the time are displayed. 3 Action icons • handset placed on the base: browser actions and the confirm key, • handset off-hook: menus associated with programmable keys. 12 LOW TRANSMISSION MODE Your handset has a Low transmission mode It manages the radio transmission power required according to how far you are away from your base. + - + + - - Handset set-up + + - + 1 Take the batteries and the hatch provided in the packaging. 2 Turn over your handset and press the top of the hatch to release it. 3 Insert the batteries one by one according to their polarities as indicated in the illustration opposite. 4 Fit the hatch to the handset by pushing it up until it is completely closed. 5 The screen turns on. Place your handset on its base and fully charge the batteries. 6 A beep sounds when you place the handset on the base. The battery charging icon moves to inform you that charging is in progress. The icon display stops moving when the batteries are charged. 13 Charging To charge your phone, place the handset on the base, making sure that the base is connected to an AC outlet. The battery charging icon moves to inform you that charging is in progress. The icon display stops moving when the batteries are charged. Notes To ensure optimum charging, leave the handset on the base for at least 15 hours when using the phone for the first time. During charging, the batteries may heat up. This is quite normal and perfectly safe. If you do not obtain radio contact with your base, check the electrical connections to your base. BATTERY REPLACEMENT 1 Turn off the handset. Turn it over to access the battery compartment hatch. 2 Remove the battery compartment hatch. 3 Remove the old batteries, insert the new batteries one by one the right way as indicated by their polarities. 4 Refit the battery compartment hatch. Notes CAUTION Worn out batteries should be discarded in accordance with the recycling instructions given in chapter “Recommendations and safety instructions”, page 2. To prevent damage to your handset, only use approved AAA format NiMH 1.2 V 650 mAh rechargeable type batteries. Never use No-rechargeable batteries. Browsing through the menus Browser This browser allows you to quickly access menus and change your settings easily. It points in two directions. When choosing menus, press the top to access the previous or next menu. During a call, press the top the bottom to decrease it. 14 or the bottom of the browser of the browser to increase the volume or Programmable keys Your phone has two so-called “programmable” keys allowing you to associate a shortcut to the menu you use most. This shortcut can then be accessed from the your phone’s home screen. These keys are also used to confirm or cancel an action in a menu. Programmable key... Use this key from the home screen to... Use this key from the menus to... Left Directly access the associated menu through the shortcut. • Confirm the current entry. • Display context-sensitive menu options during a call. • Display options during a call • Cancel the current entry. Right Notes For further details on programming the left and right programmable keys, see section “Defining programmable key shortcuts”, page 35. Illustration To browse through menus, use the browser and the two programmable keys: 1 Press the top or bottom of the browser key . The main menu is displayed on the screen. 2 Press the top or bottom of the browser key to scroll through the menus and access the desired function. 3 Confirm your choice/Enter the displayed menu by pressing the left programmable key . 4 Cancel your choice/Exit the displayed menu: - either by pressing the right programmable key - or by pressing the , key; the home screen is displayed. 15 DETAILED BROWSER EXAMPLE: ADJUST THE DATE AND TIME Notes It is recommended to set the date and time accurately to allow you to follow the chronological order of your calls and messages. Notes If you have the Display number option, the date and time will, depending on your operator, be set automatically when you receive a call. To access the date and time setting menu: 1 Press the top or bottom of the browser key . The main menu is displayed on the screen. 2 Scroll through the menus to the SETTINGS menu by pressing the top of the browser key . 3 Enter the SETTINGS menu by pressing the left programmable key The SETTINGS menu is displayed. 4 Scroll through the menus to the DATE/TIME menu by pressing the top of the browser key or bottom . or bottom . 5 Enter the DATE/TIME menu by pressing the left programmable key The DATE/TIME menu is displayed. . 6 Enter the DATE: using the numeric keypad (day, month and year) in the form DD/MM/YY. 7 Confirm your entry by pressing the left programmable key The home screen displays the message OK. 8 Enter the TIME: using the numeric keypad (hours then minutes). 9 Confirm your entry by pressing the left programmable key The home screen displays the message OK. . . You have just set your phone’s current date and time. Refer to the “Menu tree structure”, page 17 section to find out about your phone’s functions. 16 Menu tree structure Contextual menu In conversation mode PHONEBOOK Option FIRST CALL < New > HANDSFREE VIEW LOUDSPEAK BASE (*) CALL CALL TRANSFER (**) EDIT SECOND CALL SEARCH PHONEBOOK RING TONE CALLS ADD NUMBER SECRET NEW ENTRY RECORD DELETE TRANSMIT SECOND CALL CALLS SWITCH INCOMING CALLS 3-PARTY CONF OUTGOING CALLS HANDSFREE EVENTS LOUDSPEAK BASE (*) PHONEBOOK CALLS SECRET ACCESSORIES RECORD (*) ALARM HANGING UP ROOM MONITOR. RINGER TONE EXTERNAL CALL INTERNAL CALL BEEPS SILENT MODE (*) Only for the eircom 9000A model. (**) Only if two handsets are registered on the same base. 17 SETTINGS PROGRAM KEYS DATE/TIME CONTRAST AUTO HANG UP AUTO PICKUP VOICE BOX No LANGUAGE KEYPAD LOCK RESTRICTION ADVANCED SET. SET HANDSET REGISTRATION BASE PRIORITY RESET HANDSET PERSON.REGISTR HANDSET NAME SET BASE REGISTR.MODE RESET BASE DELETE HANDSET RENAME BASE INTRUSION SET LINE NETWORK TYPE DIAL FLASHING PABX PREFIX CHANGE CODE 18 ANS.MACH. (*) MESSAGES PLAY DELETE OLD ANSWERING MODE OUTGOING MSG. PLAY CHANGE DELETE SETTINGS CALL SCREENING REMOTE CODE MODE ENREG. NO OF RINGS SPK.BS LEVEL (*) Only for the eircom 9000A model. Procedures in your booklet The procedures in your booklet are presented in the form of sheets. To facilitate their implementation, each of them includes the following as appropriate: • the keys associated to directly access the function described, and/or • the path for accessing the function described in the menu. EXAMPLE: > HANDSFREE means that you access this function by displaying the menu and then the HANDSFREE function. > HANDSFREE means that you access this function by displaying the menu and then the HANDSFREE function. Contextual menu> HANDSFREE means that you access this function by displaying the menu and then the HANDSFREE function. 19 Making and receiving calls... Managing a call Making a call 1 2 METHOD 1 1 Dial your contact’s number. 2 Press the key . METHOD 2 1 Press the key 2 Dial the number. 1 . 2 A beep sounds. At the end of the call, press the handset base. Receiving a call key and replace the handset on its 1 1 Press the 2 At the end of the call, press the handset key and replace the handset on its base. 2 key to take the call. A beep sounds. Notes Your handset includes the AUTO PICKUP and AUTO HANG UP functions. For further details, refer to the “Picking up and hanging up calls automatically”, page 35 section. 20 Managing several calls Your phone allows you to take and manage several calls when you are already on the line. These calls can be managed with the Contextual menu. Receiving a second call During a call, a beep indicates the arrival of a second call. To take this call, press ACCEPT when the message is displayed on the screen. Your first call is put on hold and you can talk with the second caller. Making a second call Contextual menu > SECOND CALL Dial your contact’s number and confirm. The message SECOND CALL is displayed on the screen to indicate that the second call is in progress. Switching from one call to the other Contextual menu > SWITCH The call in progress is then put on hold and you can take back the previous call. Ending one of the calls in progress Contextual menu > HANGING UP The call in progress is interrupted and you take back the previous call. 21 Talking with two contacts at the same time (3-party conference) Contextual menu > 3-PARTY CONF You can then talk with your two contacts at the same time. To end the 3-party conference, press the key . Using additional handsets You can associate additional handsets with your phone: You can then make and receive outside calls or calls between these handsets. Notes You first have to pair the handsets with the base. For further details, refer to the “Associating a new handset”, page 38 section. Calling another handset (intercom) 1 Enter the handset’s number directly on the keyboard. 2 Press . The selected handset rings. 3 Take the call from the handset by pressing 4 End the call by pressing . . Transferring a call to another handset Notes You must have at least two handsets paired on the same base. Contextual menu > CALL TRANSFER 1 Select the handset and confirm. The handset called rings. 2 Pick up the other handset and then transfer the call by pressing 22 . Use the phonebook Create an entry Menu > PHONEBOOK > < New > Specify the required information by confirming at each step: • NEW NAME? : enter your contact’s name, • NEW NUMBER? : enter their number, • HOME, WORK, MOBILE or FAX : select the number type. Call the contact from their entry Menu > PHONEBOOK > Option > CALL Confirm or press the key or the speakerphone key directly. Search for an entry Menu > PHONEBOOK > Option > SEARCH Enter the first letter of the name and confirm. When your handset is in standby mode, hold down the key (long press) corresponding on the first letter of the name to be looked up. Changing an entry Menu > PHONEBOOK > Option > EDIT Change the name and/or number and/or number type and confirm. Deleting an entry Menu > PHONEBOOK > Option > DELETE Confirm the deletion of the entry. 23 Associating a ring tone with an entry Menu > PHONEBOOK > Option > RING TONE Scroll down the list of available ring tones and confirm. Adding another number to an entry Menu > PHONEBOOK > Option > ADD NUMBER Specify the required information by confirming at each step: • NEW NUMBER? : enter their number, • HOME, WORK, MOBILE or FAX : select the number type. Transferring entries from one handset to another Notes You must have at least two handsets paired on the same base. Menu > PHONEBOOK > Option > TRANSMIT Each handset has its own phonebook. To transfer one or more entries from a phonebook to another handset: 1 Confirm the message BY INTERCOM. 2 Choose the desired option to transfer: - ONE ENTRY : the current entry, - MANY ENTRIES : the selected entries, - ALL ENTRIES : all the phonebook entries. 3 Select the handset to which the data are to be transferred. The receiving handset rings. 4 Pick up the handset by pressing . A confirmation message is displayed. 5 The transfer takes place. 24 Options during a call You can use the following options during a call: Enable/Disable loudspeaker (handsfree mode) HANDSET LOUDSPEAKER or (during a call) Or Or Contextual menu > HANDSFREE > Activ. or Disable BASE LOUDSPEAKER (EIRCOM 9000A ONLY) Contextual menu > LOUDSPEAK BASE > Activ. or Disable A confirmation screen is displayed. Notes When your battery charging icon displays the minimum, the handsfree mode is unavailable until the next charging cycle. 25 Adjusting the volume • To increase the volume, press . • To decrease the volume, press . Enabling/Disabling the secret mode (during a call) Or Contextual menu > SECRET > Activ. The secret mode allows you to temporarily mute the line so that you are not heard by the caller. Once enabled, the SECRET MODE message flashes on the screen. To disable SECRET MODE press Exit. 26 Locating your handset If you have misplaced your handset, press the handset rings. 27 key on your phone’s base. The Listening and Recording... (model eircom 9000A) IMPORTANT When you answering machine’s memory is full, the answering machine turns off. You have to read your messages and delete some to free up memory space. Enabling/disabling the answering machine Menu > ANS.MACH. > ANSWERING MODE > ON or OFF When the answering machine is enabled, the icon is displayed on the screen. Notes For further details on the settings of your answering machine, see section “Setting up...”, page 34. 28 Answering machine announcements Notes If you have not saved a personal announcement, the answering machine will automatically use the pre-recorded announcement. Saving your personal announcement Menu > ANS.MACH. > OUTGOING MSG. > CHANGE Confirm the instructions on the screen. Listening to your announcement Menu > ANS.MACH. > OUTGOING MSG. > PLAY The current announcement used is played. Erasing your announcement Notes If you have erased your personal announcement, the answering machine will use the pre-recorded announcement. Menu > ANS.MACH. > OUTGOING MSG. > DELETE Confirm the instructions on the screen. 29 Messages Listening to your messages FROM THE BASE Notes For better listening comfort, see section “Adjusting the volume of the messages heard from the base”, page 41. FROM THE HANDSET Menu > ANS.MACH. > MESSAGES > PLAY The messages are read in chronological order (from oldest to newest). At the end of the last message, the answering machine will stop automatically. Notes Depending on your operator and your subscription, your contact’s name and number are displayed on the screen. 30 Managing your messages When playing back messages, press the following buttons: TO... FROM THE BASE 1 press Go on to the next message Return to message the start of FROM THE HANDSET 1 press the Return to the previous message 2 presses Pause/Resume reading 1 press Stop/Start message again 1 short press Delete the message being read 1 long press 1 press Querying your answering machine remotely This function allows you to check your messages from outside. When playing back messages, press the following buttons: TO... OTHER TELEPHONE Read messages 1 press 5 Enable / Disable the answering/recording machine 1 press 9 Go on to the next message 1 press # Return to the start of the message 1 press * Return to the previous message 2 presses * Delete the message being read 1 press 3 Pause/Continue playing back 1 press 0 1 Dial your phone number, the telephone rings (see “Changing the number of rings”, page 33.). 2 While listening to your announcement , press the querying code. key and enter your remote Notes If the answering machine is is disabled, wait for 12 rings before the bip is emitted. Press the code. key and enter your remote querying Notes The default code is 0000. You can change it. For further details, refer to paragraph “Changing the remote querying code”, page 33. 31 Delete all your messages FROM THE BASE (1 long press) only for messages already read. FROM THE HANDSET Menu > ANS.MACH. > MESSAGES > DELETE OLD Confirm the deletion. Recording a conversation CAUTION The Penal Code prohibits the recording of a conversation without your contact’s knowledge. You have to obtain your contact’s authorization before using this function. Contextual menu > RECORD > Begin then End. Confirm the messages on the screen. 32 Answering machine settings Enabling/Disabling call filtering Call filtering allows you to take only the calls you want. Other calls will be recorded on the answering machine. Menu > ANS.MACH. > SETTINGS > CALL SCREENING > ON or OFF Changing the remote querying code You can give this code to anyone who needs to check their messages outside. Menu > ANS.MACH. > SETTINGS > REMOTE CODE > MODIFY CODE? Follow the instructions on the screen to change the code. Notes The default code is 0000. Changing the recording quality Menu > ANS.MACH. > SETTINGS > MODE ENREG. > HIGH or STD Two quality modes are available: • HIGH for higher quality (12 minutes and 30 seconds of recording), • STD for standard quality (24 minutes). Changing the number of rings You can increase the number of rings before the answering machine cuts in to give yourself longer to take the call. Menu > ANS.MACH. > SETTINGS > NO OF RINGS > 2 to 7 Select the number of rings you want (up to 7 rings). 33 Setting up... The phone Changing the ringing tone Menu > RINGER TONE > EXTERNAL CALL and INTERNAL CALL You can change the ringing tone of: • outside calls, • calls between handsets (intercom). Scroll through the pre-recorded ring tones and confirm. Enabling/Disabling audio alerts Menu > RINGER TONE > BEEPS > KEYTONE and CHARGER and BATTERY LOW The audio alerts apply to: • low battery, • keyboard keys pressed, • placing the handset on the base. Follow the instructions on the screen and confirm. Enabling/Disabling the silent mode Menu > RINGER TONE > SILENT MODE Follow the instructions on the screen and confirm. A direct-access key can also be configured with this function. 34 Defining programmable key shortcuts You can define a shortcut for the function(s) you use most. Menu > SETTINGS > PROGRAM KEYS Select the menu to be displayed as a shortcut for the left programmable keys, confirming each step. and right Setting the date and the time Menu > SETTINGS > DATE/TIME 1 Enter the DATE: in as DD/MM/YY. 2 Enter the TIME: starting with the hours and then the minutes. 3 Confirm your entry. For further details, refer to the “Illustration”, page 15 section. Picking up and hanging up calls automatically This function allows you to take and end a call by simply taking the handset off its base or placing it back on its base. Menu > SETTINGS > AUTO HANG UP and AUTO PICKUP Follow the instructions on the screen and confirm. 35 Changing your mailbox number Notes The eircom messaging number is preconfigured for fast access to your mailbox (171). Menu > SETTINGS > VOICE BOX No Enter the mailbox number and confirm. There are two ways of recording messages: • Answering machine enabled: the messages are recorded on your eircom 9000A’s internal answering machine. • Answering machine disabled: messages are handled by your operator mailbox. Checking your mailbox If the answering machine is disabled, press and hold key. Follow the instructions issued by your operator’s online answering machine. Changing the display language Menu > SETTINGS > LANGUAGE Select the language to be used and confirm. 36 Enabling/Disabling keyboard locking This function allows you to lock the keyboard when you are not on line. (long press) FROM THE HANDSET Menu > SETTINGS > KEYPAD LOCK Follow the instructions on the screen and confirm. Notes To unlock the keyboard, make a long press on . Defining banned calls (Parental Control) You can inhibit calls to numbers with surcharged prefixes or international calls, for example, by defining up to 5 profiles. Menu > SETTINGS > RESTRICTION 1 Enter the base code and confirm. Notes The default code is 0000. 2 Select an entry (from 0 to 4) and confirm. 3 Enter the prefix to be inhibited and confirm. 37 Changing the default code Menu > SETTINGS > ADVANCED SET. > CHANGE CODE Enter the old and then the new code and confirm. Allow/Prevent the sharing of a call with another handset Notes If you disable the intrusion mode, you will not be able to share a call in process with another handset. Menu > SETTINGS > ADVANCED SET. > SET BASE > INTRUSION Follow the instructions on the screen and confirm. The handset Associating a new handset Your phone allows you to associate other handsets with the base. You then have to page/pair them so that they are recognized. Menu > SETTINGS > ADVANCED SET. > SET HANDSET > REGISTRATION FROM THE HANDSET: 1 Enable the function. FROM THE BASE: 2 Enabling the paging mode. Refer to section “Enabling the paging mode”, page 41. Once the handset is registered, the paging mode is automatically exited. 38 Define the priority base for a handset This function allows you to specify the priority base to be used for making calls. Notes Only if you have paged/paired the same handset on several bases. Menu > SETTINGS > ADVANCED SET. > SET HANDSET > BASE PRIORITY Select the base that the handset should use first. Notes The automatic mode avoids you having to specify a priority. Resetting the handset When you reset your handset, all the settings are returned to their initial values (factory settings), except for the phonebook. Menu > SETTINGS > ADVANCED SET. > SET HANDSET > RESET HANDSET Follow the instructions on the screen and confirm. 39 Customizing the handset’s registration You can customize the following information: • your base’s name, • the handset’s registration number. Menu > SETTINGS > ADVANCED SET. > SET HANDSET > PERSON.REGISTR FROM THE HANDSET: 1 Select the base number and confirm. 2 Enter the new base name and confirm (optional). 3 Enter the base code. Notes The default code is 0000. FROM THE BASE: 4 Enabling the paging mode. Refer to section “Enabling the paging mode”, page 41. Renaming the handset You can assign a meaningful name to your handset if you have several handsets Menu > SETTINGS > ADVANCED SET. > SET HANDSET > HANDSET NAME Follow the instructions on the screen and confirm. Adjusting the contrast Menu > SETTINGS > CONTRAST Select the LEVEL 1, the LEVEL 2 or LEVEL 3 and confirm. 40 The base Enabling the paging mode You enable the paging mode when you associate an additional handset, for example. Press the paging button for several seconds. Or Menu > SETTINGS > ADVANCED SET. > SET BASE > REGISTR.MODE • On the eircom 9000 base: the base is in paging mode. • On the eircom 9000A base: a dash flashes on the display, meaning that the base is in paging mode. Once the handset is registered, the paging mode is automatically exited. Notes Your base will remain in paging mode for about a minute. Adjusting the volume of the messages heard from the base For better listening comfort, you can adjust the volume when listening to answering machine messages from the base. Menu > ANS.MACH. >SETTINGS >SPK.BS LEVEL Select the desired level (LOW, MEDIUM or HIGH) and confirm. 41 Resetting the base When you reset your base, all the settings are returned to their initial values (factory settings), except for the phonebook. Menu > SETTINGS > ADVANCED SET. > SET BASE > RESET BASE Follow the instructions on the screen and confirm. Removing a handset registered on the base Menu > SETTINGS > ADVANCED SET. > SET BASE > DELETE HANDSET 1 Enter the base code and confirm. Notes 2 The default code is 0000. Select the handset number and confirm. Renaming the base You can assign a meaningful name to your base if you have several bases. Menu > SETTINGS > ADVANCED SET. > SET BASE > RENAME BASE Follow the instructions on the screen and confirm. 42 The line IMPORTANT We do not recommend that you change line settings without first contacting your operator, as this may result in your phone line being disconnected. Changing the network type You can connect your phone to a public or private network. Menu > SETTINGS > ADVANCED SET. > SET LINE > NETWORK TYPE > PRIVATE or PUBLIC Follow the instructions on the screen and confirm. Changing the dialling type You can use a voice frequency or pulse based dialling system. Menu > SETTINGS > ADVANCED SET. > SET LINE > DIAL > TONE or PULSE Follow the instructions on the screen and confirm. Changing the flash duration You can configure the flash duration if you use your phone abroad or on a private network. For further details, refer to section “Changing the network type”, page 43.. Menu > SETTINGS > ADVANCED SET. > SET LINE > FLASHING > 80 MS to 600 MS Follow the instructions on the screen and confirm. 43 Defining the outside call prefix (PABX) You can define the outside call prefix if you use your phone on a private automatic branch exchange. For further details, refer to the “Lexicon”, page 52 section . Menu > SETTINGS > ADVANCED SET. > SET LINE > PABX PREFIX > ACTIVATE / DEACTIVATE or PREFIX or EDIT LENGTH The following options are available: • ACTIVATE / DEACTIVATE : to define the prefix status. • PREFIX : to enter the number that allows you to access the outside line. • EDIT LENGTH : to specify the length of the number before automatic dialling of the prefix (from 01 to 99). 44 Enjoy... The alarm Notes The alarm sounds for 60 seconds through the handset speaker. To stop the alarm clock, press any key on the handset. Programming the alarm Menu > ACCESSORIES > ALARM To program the alarm: 1 Depending on the alarm status, enable or disable the ALARM function. 2 If necessary, change the ring tone. 3 Select the time at which you want to be woken up. For further details, refer to the following sections. Finding out the alarm status Menu > ACCESSORIES > ALARM The display indicates the alarm status (ALARM CLOCK OFF or the alarm time programmed). Confirm to save the indicated information or display the options by pressing Enabling/Disabling the alarm Menu > ACCESSORIES > ALARM > ACTIVATE or DEACTIVATE Follow the instructions on the screen and confirm. Once the alarm is enabled, the icon is displayed on the screen. 45 . Changing the ringing tone Menu > ACCESSORIES > ALARM > RINGER TONE Scroll down the list of available ring tones and confirm. Defining the wake-up time Menu > ACCESSORIES > ALARM > SET TIME Follow the instructions on the screen and confirm. The Surveillance mode This function allows you to monitor a room, by placing the first handset (transmitter) in the room to be monitored, and the second handset (receiver) near you. Notes You must have at least two handsets registered on the same base to use this mode. Enabling the surveillance mode Menu > ACCESSORIES > ROOM MONITOR. ON THE RECEIVING HANDSET: 1 Select the calling handset to be called. The handset rings. ON THE CALLING HANDSET: 2 Pick up the second handset by pressing 3 Confirm the transition to surveillance mode. Notes . In calling mode, the phone will not ring if a call comes in. You can still make or take a call from the receiving handset, however. 46 Disabling the surveillance mode Press Off on the receiving and calling handsets. 47 Tracing your calls... Call logs Logs are lists of numbers or events received by your phone. Depending on your operator, call logs contain the following information: • your contact’s name or number, • the call time or date. Viewing the received and dialled call log Menu > CALLS > INCOMING CALLS or OUTGOING CALLS Scroll through the list of stored numbers. You can use the options described in section “Managing incoming or outgoing calls”, page 48. A shortcut is set as default for the key to access the log directly. Managing incoming or outgoing calls Menu > CALLS > INCOMING CALLS or OUTGOING CALLS > Option Use the following options from the call list to: • • • • • VIEW : display the information about the selected call, CALL : call the displayed number, DELETE : delete the stored number, STORE NUMBER : save the number in your phonebook, DELETE ALL : delete all the numbers in the list. 48 The events log The NEW EVENT! message informs you that you missed a call or message. Checking new events NEW EVENT! + Or Menu > CALLS > EVENTS > VIEW NEW EVENT! Select the event and confirm. Enabling/Disabling event notification Menu > CALLS > EVENTS > ACTIVATE or DEACTIVATE Disable this function to delete the display of the NEW EVENT! message. 49 Environmental information Environmental impact Electrical and electronic appliances are an integral part of our daily lives, but sooner or later they end up as waste. WEEE disposed of to land ll, incinerated or recovered without any pre-treatment has the potential to cause serious consequences for the environment and human health. You will nd a crossed out wheeled bin symbol on the base of the telephone. The symbol means that the equipment should not be disposed of with general household waste. Play your part by - • Not disposing of this equipment with your general household waste. • Bringing this eircom phone or the product it replaced to your civil amenity site at end of life for recycling. • Post or deliver to: eircom Recovered Engineers, Central Warehouse, Clondalkin Industrial Est. Dublin 24. There is no disposal charge for end of life equipment returned to eircom or deposited at civic amenity sites for collection by “WEEE Ireland” on behalf of eircom. Reduce, Reuse, Recycle eircom working for the environment. 50 Guarantee a) The eircom 9000/A has a warranty of 12 months and is guaranteed to be free from defects in materials and workmanship during that period. b) Should your eircom 9000/A fail to function properly please call the helpdesk on 1850 60 20 60. c) The product must have been used for the intended purpose and must not have been subjected to wilful or accidental damage. d) In the case of new devices and their components exhibiting defects resulting from manufacturing and/ or material faults within 12 months of purchase, eircom shall, at its own option and free of charge, either replace the device with another device reflecting the current state of the art, or repair the said device. e) This warranty does not cover damage caused by excessive voltage, lightning, liquid or faults on the telephone line. If the product or serial number has been tampered with in any way, any repairs attempted or non-rechargeable batteries found to be used the warranty shall be considered null and void. f) This warranty does not affect your statutory rights. For operational queries please call the helpdesk on 1850 60 20 60. For queries relating to eircom services please call eircom on 1901. 51 Lexicon Term Definition Pairing The pairing mode allows you to associate devices that have to operate in pairs (for example, a phone base and its handset) in compliance with the GAP standard. Private automatic branch A PABX is primarily used to connect the telephones of a exchange private entity on to the public telephone network. (PABX, Private Automatic Branch eXchange) 3-way conference This service allows you to talk to two contacts simultaneously. GAP The GAP is a standard that allows the handsets of the various manufacturers to be operated with the same base and calls to be dialled on the line connected to the base. Likewise, a single handset can work with several bases. Intercommunication Intercommunication establishes free communication between several handsets from the same base. (Generic Access Profile) 52 253472870A - 12/2012 Irish Trade Mark Registration no. 213824 Registered of ce: eircom Limited, 1HSQ, St. John’s Road, Dublin 8 Registered in Ireland No. 98789