1
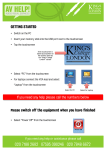
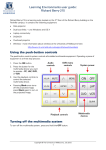
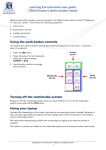
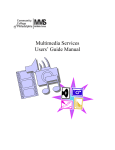
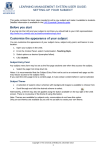
Learning Environments user guide:
Using laptops with Windows 7
The following is a guide to connecting a laptop using Windows 7 to the projection system in
shared teaching spaces and meeting rooms at the University of Melbourne.
Please be aware that not all laptop computers are created equal!
Laptops differ depending on the model, manufacturer and operating system installed. Because of
this, we cannot guarantee your laptop will work straight away when connecting it to a teaching
spaces’ projection system.
To avoid delays, we recommend you familiarise yourself with connecting your laptop to an
external monitor or projector.
Starting up the multimedia system
This generally involves touching the touch panel screen. Refer to the specific guide for the
teaching space for instructions on how to operate the projection system - see the Learning
Environments room database for details:
http://le.unimelb.edu.au/room/room-search.html
Connecting your laptop
Connect your laptop to the teaching space’s multimedia system before starting your laptop.
1. Connect to lectern power.
2. Connect the installed VGA or HDMI cable to the corresponding output on your laptop.
3. Connect to the network point (if internet required).
See “Connecting to the network” for step-by-step instructions on how to configure your
laptop’s network settings.
Turning on your laptop
1. Press the power button on your laptop.
If your laptop has been in standby mode, we recommended that you restart it.
2. Wait while the operating system starts up.
Starting the projector
See the relevant guide for instructions on using the multimedia system in a teaching space:
http://le.unimelb.edu.au/room/room-search.html
Copyright © The University of Melbourne, May 2013
1
Learning Environments user guide: Using laptops with Windows 7
Troubleshooting
Most laptops will automatically display via the projector - if your laptop does not automatically
display, check that the VGA or HDMI cable is securely connected to your laptop and the lectern
input.
If this does not help, you will need to mirror your laptop’s video output:
•
Hold down the Function (FN) key on your laptop’s keyboard.
•
At the same time press the relevant F key (located in the top row of keys on your laptop’s
keyboard - usually F3, F5 or F8). This key will be identified with either a suitable legend (for
example, LCD/CRT), or with a graphic of two overlapping screens.
NOTE: There is usually a slight delay between pressing these key combinations and the video
output mirroring.
Generally, pressing these keys:
•
Once will send the image to the data projector and cut it off from the laptop.
•
Twice will send the image to the laptop and cut it off from the data projector.
•
Three times will send the image to both the laptop and the projector.
Not all laptops follow this exact sequence; you may have to experiment with your laptop to find
the correct sequence.
If you cannot work out the correct key combination for your laptop, have a look at this on-line chart
that lists the video activation commands for common laptop manufacturers:
https://portal.infocus.com/support/Support Pages/LaptopActivation.aspx
If this does not help, refer to your laptop’s user manual about connecting it to an external
monitor or projector.
Connecting to the network
You can connect to the University of Melbourne network via wireless or a physical network port.
See here for information about connecting to the wireless network:
https://its.unimelb.edu.au/help/networks-access/networks-internet/connect-wireless
Laptop network ports in shared teaching spaces are connected to the Centrally Allocated Teaching
Spaces (CATS) network, served by DHCP.
•
Laptops do not need to be registered for DHCP to allocate an IP number on the CATS
network.
•
The IP number and host name allocated on the CATS network will differ from those allocated
in your normal work and home environment. This may limit access to network services which
are restricted by IP number.
•
Record all of your original settings before making any changes.
•
If you have any doubts, contact your LITE (Local IT Expert)!
Connecting the supplied blue Cat 5 cable to your laptop’s Ethernet
port should automatically connect your laptop to the university
network. The connection process takes approximately 20
seconds.
If, after connecting the Cat 5 cable, you still do not have network
connectivity, follow the instructions below to enable DHCP on
your laptop.
Cat 5 cable
Copyright © The University of Melbourne, May 2013
2
Learning Environments user guide: Using laptops with Windows 7
Changing network settings
There are a number of ways to change your laptop’s network settings. If you are unfamiliar with
the process, follow the instructions below.
1. On the taskbar, click Start.
2. Click Control Panel.
3. Under Network and Internet,
click View network status and
tasks.
Copyright © The University of Melbourne, May 2013
3
Learning Environments user guide: Using laptops with Windows 7
4. Right-click Local Area
Connection.
5. Click Properties.
6. Select Internet Protocol Version 4 (TCP/IPv4).
7. Click Properties.
8. Select Obtain an IP address automatically.
9. Select Obtain DNS server address
automatically.
10. Click OK.
11. Close all open Control Panel windows.
You will now be able to connect to the internet via
your internet browser.
Copyright © The University of Melbourne, May 2013
4